Blog

  • Google updates Earth Timelapse with petabytes of new data

    Google has updated its interactive Earth Timelapse feature with better imagery and several years of new data. The massive update added petabytes of new data and brings it up to the current year. 

    Detailing the update in a blog post, Google says updated images are sharper ‘with truer colors and fewer distracting artifacts.’ Earth Timelapse was introduced in 2013 and includes images recorded as early as 1984.

    Basically, Google’s Earth Timelapse presents users with 33 interactive images of the entire planet, but creating those images was a feat – Google says it sifted through 3 quadrillion pixels to maximize image quality. The final product represents 25,000,000 overlapping global image tiles that users can zoom in, zoom out, play and replay to their heart’s content.

    Check it out for yourself and see how the world has changed over the past three decades.

    Articles: Digital Photography Review (dpreview.com)

  • Fujifilm X-T2 tethered shooting firmware arrives, also adds button lock

    Fujifilm has released its much anticipated new firmware for the X-T2 that enables tethered shooting with the forthcoming Tethered Shooting Plug-in Pro application, but has added a number of other fixes and a new feature.

    Fujifilm X-T2 users will now be able to set up a function button to lock all the body buttons of the camera so that they don’t get pressed by accident during shooting. Users can determine which button they want to use for this purpose via the custom settings menu.

    As with previous updates for the X-T1 and X-Pro2 this new firmware fixes an AF reliability issue when using the longer end of the XF 18-135mm F3.5-5.6 R LM OIS WR and a problem that meant that Nissin’s i40 flash unit wouldn’t fire.

    Further fixes include issues around exposure in very specific conditions, connectivity and the high speed burst mode when used with flash.

    For more information see the Fujifilm website.

    Manufacturer’s release notes

    X-T2 Camera Body Firmware Update Ver.1.10

    Detail of the update

    The firmware update Ver.1.10 from Ver.1.00 incorporates the following issues:

    1.Tether shooting is available by USB connection.

    One of the application software below is required to use the tether shooting function.

    • Tether Shooting Plug-in PRO for Adobe® Photoshop® Lightroom® Ver.1.3 or newer *1
    • Tether Shooting Plug-in for Adobe® Photoshop® Lightroom® Ver.1.3 or newer *2
    • Tethered Shooting Software HS-V5 Ver.1.3 or newer *3

    [How to set the PC shooting]
    Before connecting your camera to a computer, set the PC SHOOT MODE of the CONNECTION SETTING in the SET UP menu to USB AUTO.
    *If the USB AUTO is selected, the camera mode will automatically change to tether shooting mode when the camera is connected to a computer via a USB cable.
    *If the USB FIXED is selected, the camera always work as tether shooting mode. Therefore, the camera doesn’t work as normal shooting mode when the USB cable is not connected.

    *1: “FUJIFILM Tether Shooting Plug-in PRO” will be available from Adobe Add-ons website.
    The launch of the Mac version is scheduled for release around the end of November 2016, and the Windows version is scheduled for release around the beginning of December 2016.
    *Separately, you need to purchase Adobe® Photoshop® Lightroom® 6 / CC.

    *2:”FUJIFILM Tether Shooting Plug-in” is available from Adobe Add-ons website. X-T2 will be supported with Ver.1.3 upgrade.
    For Mac
    For Windows
    *Separately, you need to purchase Adobe® Photoshop® Lightroom® 6 / CC.

    *3: You need to purchase the HS-V5 and download the latest version from the site below to upgrade it.

    • Tethered Shooting Software HS-V5 for Windows® Updater
    • Tether shooting function of X-T2 will be supported with HS-V5 Ver.1.3 or later.
    • Tethered Capture Plug-in for Adobe® Photoshop® Lightroom® Ver.1.3, which will enable the tether shooting function of X-T2, will be available for free download to those customers who purchased HS-V5.
    • Tethered Capture Plug-in for Adobe® Photoshop® Lightroom® Ver.1.3

    2. Lock function during shooting mode is added. The update will let users prevent from the unexpected dial/button operation.

    [How to set]
    First, select the function you wish to lock in BUTTON/DIAL SETTING>LOCK>FUNCTION SELECTION” in the Setup Menu. And then, select the function in BUTTON/DIAL SETTING>LOCK>LOCK SETTING>SELECTED FUNCTION” in the Setup Menu.

    *Select “ALL FUNCTION” to lock all the buttons and dials. This lock function can be allocated to a function button.

    3. The shutter speed will be displayed in a preview image with the setting of SHUTTER AE OFF, ISO AUTO and Aperture-Priority.

    4. The phenomenon is fixed that overexposure could happen with the setting of AF-C mode, AF-C PRIORITY SELECTION and FACE DETECTION ON.

    5. The phenomenon is fixed that AF function doesn’t work well in the tele-photo area with XF18-135mmF3.5-5.6 R LM OIS WR.

    6. The phenomenon is fixed that hung-up could happen when carrying out SELECT FROM NETWORK LIST of MANUAL SETUP in PC AUTO SAVE SETTING.

    7. The phenomena is fixed that CH HIGH SPEED BURST (continuous high speed) doesn’t work well with fixed exposure and fixed amount of flash luminescence (TTL-L or flash M mode) while used with FUJIFILM Shoe Mount Flash (excluding EF-X8)

    8. The phenomenon is fixed that Flash i40 made by Nissin for FUJIFILM doesn’t fire.

    Articles: Digital Photography Review (dpreview.com)

  • Grip Gear introduces Movie Maker, a tiny slider for smartphones and action cams

    Grip Gear, maker of the handheld smartphone stabilizer IndieSolo, has launched the Movie Maker: a portable, electronically driven slider built for smartphones, action cams and compact cameras.

    Powered by AAA batteries or a separate power bank via USB, the Movie Maker includes a rail, motorized head and a clamp to accommodate most smartphones. Eight speeds can be utilized, as slow as 6mm/min up to 300mm/min to create slow motion, time-lapse or real-time stabilized panning shots.

    Upon reaching the end of the track, the Movie Maker will automatically bounce back and move in the opposite direction. The motorized head can also be used separately from the rail to pan 360-degrees for panorama. It’s all designed to pack away into a compact kit that can fit into a camera bag or backpack.

    The Movie Maker is available now on Amazon for a list price of $ 130.

    Press release

    Hollywood production tools arrive for smartphones.
    Grip Gear launches The Movie Maker tool set

    <GripGear. 31 Oct. 2016. For immediate release. > Smartphone movie tool kit company, Grip Gear has upped the ante in video production with the launch of Movie Maker: a set of miniature production tools that puts all the equipment a movie company might use to make a major Hollywood production into a tiny package that will help turn a smartphone into a full-blown movie making resource.

    As smartphones become more and more capable, they are becoming one of the most important tools for creating video content for both brands and individuals. By 2019 video will account for almost 80 percent of all consumer Internet traffic. Even now, Facebook experiences 8 billion video views per day. But as video proliferates, standing out from the crowd becomes an increasing challenge.

    The Movie Maker helps video makers move up into a new realm of production quality and creativity with gadgets like an 8-speed electronic tracking slider, a 360º panoramic function and suction cups to hold your phone in impossible positions for the most amazing shots.

    Co-founder Rhys Bradley said: “As a former grip in the film industry, I’ve long had a vision of creating a film set experience in a smaller format for smartphones and other small cams. With the Movie Maker, smartphone users can now create beautiful movie quality footage that used to take massive pieces of expensive film making equipment with a set of highly portable tools that can fit in a camera bag!”

    Co-founder Dean Tzembelikos said: “After 3 years of development and meticulous attention to detail and quality we are proud to launch the Movie Maker. It will enhance the video making experience and bring out the creative juices in everyone. This is a genuine breakthrough in putting movie making into the everyone’s hands”

    The Movie Maker will shortly be available on Amazon as well as at www.gripgear.com and cost USD $ 129.

    Technical information:

    • Can use 99% of all smartphones, action camera’s and light compact camera’s
    • Folds small and is light weight and backpack friendly • Comes with 2 x 31cm tracks, additional tracks are available for extensions
    • Power Options: Plug into a power bank to extend operating times +36 hours (10400MA), or use 2 AAA batteries for 2 hours
    • Remote control for both speed and direction (8 speeds)
    • Bounce back for continuous motion: When the movie maker reaches the end of track it will not stop but move in opposite direction
    • Motor speeds vary from very slow, mostly used in time lapse 6mm/minute and to a 300mm/minute for real time.
    • Operates as a manual slider
    • Convenient ¼ inch threads allow you to attach The Movie Maker to a tripod, suction cup
    • Can climb 90 degrees
    • Weighs 900g and can hold up to 300g phone/camera
    • Can operate upside down
    • Use without tracks for pans or 360 Panorama shots
    • No vibration, even on full zoom videos are stable
    • Easy to use

    Articles: Digital Photography Review (dpreview.com)

  • New kid on the block: The YI M1 Mirrorless ILC

    Key Specifications

    • 20MP Four Thirds sensor
    • 3″ 1.04M-dot touchscreen LCD
    • 81 Point Contrast Detect AF system rated to -4EV
    • Touch to focus and one touch image capture
    • 5 fps continuous shooting
    • 4K/30P video recording capability
    • Built in Wi-Fi and Bluetooth LE

    YI is a China-based company that has already made its mark in the action cam market, earning a recommendation in our recent roundup. But it clearly has ambitions beyond this and has announced its entry into the consumer-level compact ILC market.

    We were lucky enough to get our hands on the YI M1, the company’s first ever mirrorless camera. YI has attempted to capitalize on an already well-established camera mount, but decided to put a new spin on it in the form of an almost entirely touchscreen-based user interface.

    YI tells us its name refers to ‘young innovators,’ so its no surprise its target demographic is a group that is looking to move on from their smart phone based camera, but perhaps isn’t ready or interested in, taking the plunge into the realm of a traditional DSLR or mirrorless platform.

     The YI M1 features an all-metal lens mount and a 20MP CMOS sensor.

    The YI M1 is built around a Sony-designed 20MP Four Thirds CMOS sensor that boasts Raw capability in the form of DNG output files and the ability to shoot 4K/30P video. As with its action cameras, YI publicly lists where its key components come from and the Sony IMX269 instantly suggests good things about the camera’s potential.

    The big news is the all-touchscreen interface (the body only has two physical buttons), which aims to give a simple, more smartphone-like user experience. However, the company doesn’t treat these users as undemanding, just because they don’t want a conventional camera.

    The camera comes with either the 12-40mm zoom, the 42.5mm prime or a kit that features both the prime and the zoom, a camera strap, USB charging brick and a Micro-USB cable. While the camera sports a hot shoe for an external flash, the current kit doesn’t have a flash included.

    Lenses

    The two lens choices that come in the kit were a bit of surprise for us, and in a very good way. It’s not too often that a camera company decides to include a prime lens and a zoom in an ILC starter kit, but that’s just what YI has done. There’s a macro-capable 42.5mm F1.8 prime as well as a more conventional 12-40mm F3.5-5.6 zoom in the box, both equipped with image stabilization, since the body itself does not offer any.

    The 42.5mm F1.8 prime lens can be seen on the left and the 12-40mm F3.5-5.6 can be seen on the right. The focus ring on the 42.5mm prime doesn’t actually move – it’s just for show although the camera does allow for ‘manual focus’ via the touchscreen.

    The lenses are constructed of a mostly plastic body and are extremely lightweight. I definitely wouldn’t suggest getting them wet, as they don’t appear to have any sort of weather-sealing. The lens mounts are made of a plastic composite material.

    Oddly, the 42.5mm prime doesn’t offer true manual focus – the ‘focus ring’ is purely cosmetic. You are able to adjust the focus with an up and down arrow via the touchscreen interface. In any case offering a prime lens, particularly a portrait-friendly 85mm equivalent one, is a really nice touch and is sure to please folks moving from a fixed-lens smartphone to an ILC platform. 

    Being that this camera is on the MFT platform, YI claims that it will be compatible with more than 50 other lens options. We’ve tried several Panasonic and Olympus MFT lenses and they all seem to work great, so that’s very promising. 

    The YI M1 offers five JPEG shooting modes: a high contrast black and white mode, a standard black and white mode, portrait, vivid, and lastly a standard shooting mode. Unfortunately you currently aren’t able to shoot Raw + JPEG, so you will have to decide which format you would like to shoot in before heading out with the camera.

    Autofocus

    In terms of autofocus the YI M1 has an 81-point contrast detect AF system with touch to focus and touch shutter. It also offers face detection and both AF-S and AF-C shooting modes. It’s also important to note that the AF also lacks any sort of subject tracking outside of face detection. 

    Autofocus is possible during video capture; AF-C is automatically enabled while shooting video. Unfortunately, the YI lacks a dedicated AF control switch, which makes switching AF shooting modes a bit difficult. Novices coming to the YI may find they’ll need to pay more attention to their autofocus point placement than they did with their smartphone. 

    Video

    The M1 has several video shooting modes- the highlight of which is its ability to shoot in 4K/30P. It also offers 2K/30P, Full HD 1080 and 720 at 60, 30 and 24P. Autofocus is available while shooting video in the form of single point AF-C, but if you’re using the 12-40mm F3.5-5.6 zoom lens you will also have the ability to use manual focus with focus peaking, which can definitely come in handy because the autofocus is fairly slow to lock focus while in video mode. 

    Pricing and Availability

    The YI M1 is available in three different kits. It will cost $ 499 USD for the kit with the standard zoom lens (12-40mm F3.5-5.6) and $ 599 USD for the kit that comes with the 42.5mm F1.8 prime. If you wish to purchase the camera and both the zoom and the prime lens it will set you back $ 699 USD. It will be offered in two colors; Ice Silver and Storm Black.

    Articles: Digital Photography Review (dpreview.com)

  • How to Turn Your Images into Kaleidoscope Patterns

    This tutorial is a lot of fun, transforming photographs into kaleidoscopic wonders, often with surprising results. The resulting kaleidoscope patterns make fantastic desktop backgrounds and wallpapers too.

    Remember kaleidoscopes? Those curious tubes with an array of mirrors and colorful beads inside? As a kid, I would while away sunny weekends straining my eye against the viewing aperture, hypnotized by the endless combination of shapes, patterns, and colors. Although I now spend most of my time looking through the viewfinder of a camera, the magic of the kaleidoscope remains in my mind as an early foray into image making.

    Step 1 – Setting up the canvas

    kaleidoscope-01

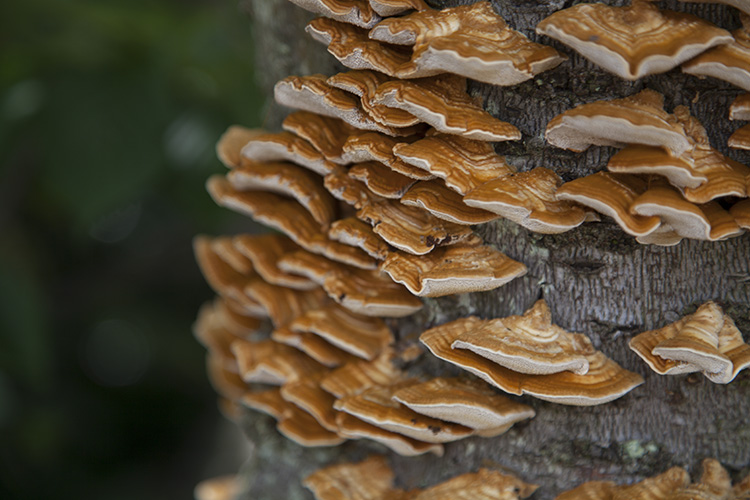
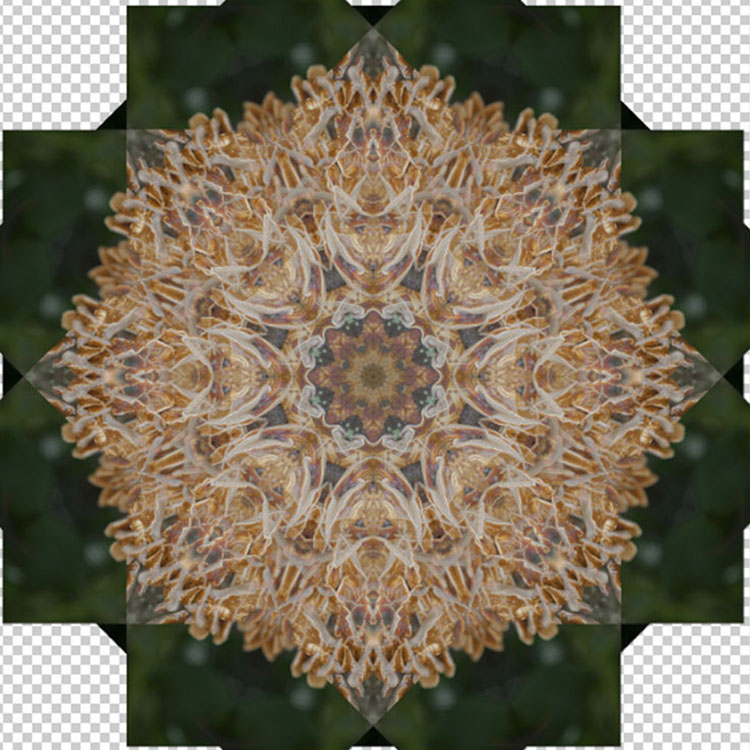
    First, select a photograph. I’ve chosen this photograph of some fungi growing on an old tree stump. From my own experimentation I’ve found images with bold, contrasting colors and negative space result in the best kaleidoscopic images.

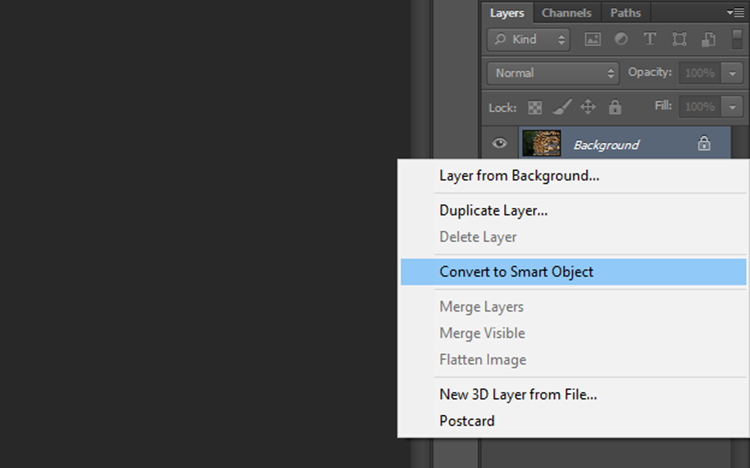
    Once you have selected an image and opened it in Photoshop, right click on the image in the layers panel and select Convert to Smart Object. This will enable you to move the image around the canvas.

    kaleidoscope-02

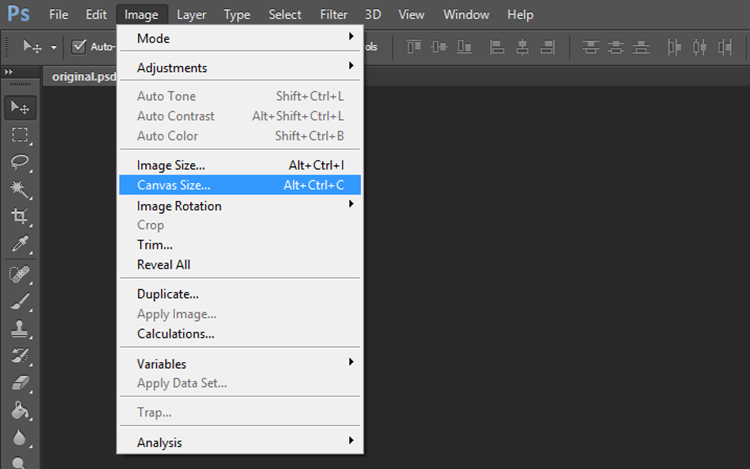
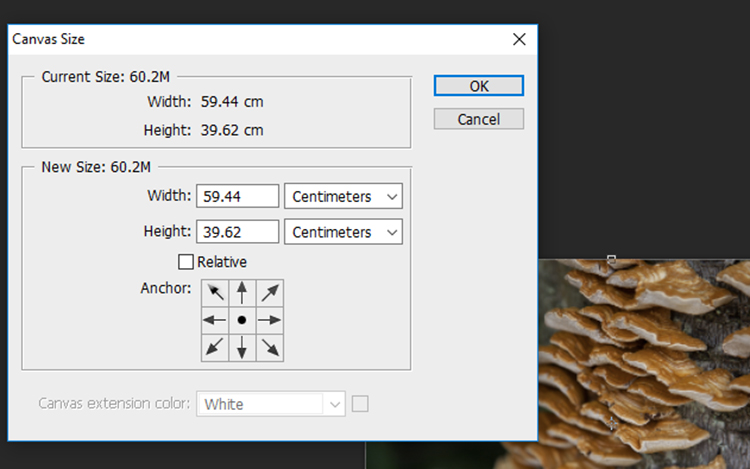
    Now we need to add some space around the image. Go to Image > Canvas Size and a window will pop up with the dimensions of your current image.

    kaleidoscope-03

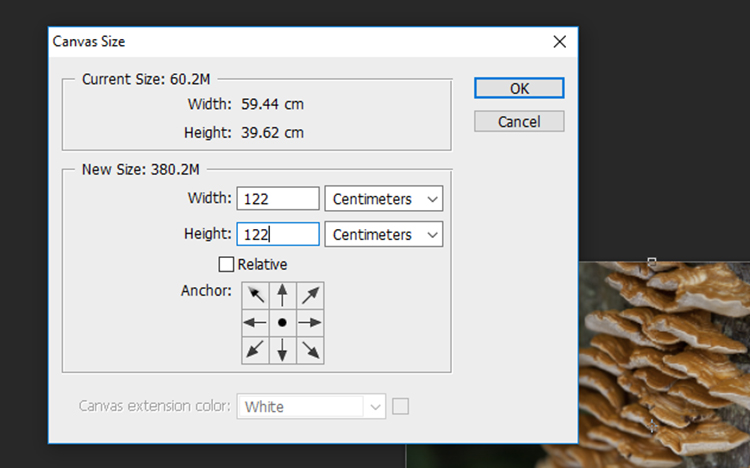
    To calculate the dimensions of the canvas, look at the largest side of the image, double that figure and add four. For example, the image I selected was originally 59.44 x 39.62cm so I multiplied 59 by 2 to get 118m then added 4 to get 122. Add the same value to the smaller side of the image so that the canvas will be square. Click OK.

    kaleidoscope-04

    kaleidoscope-05

    Step 2- Creating the template

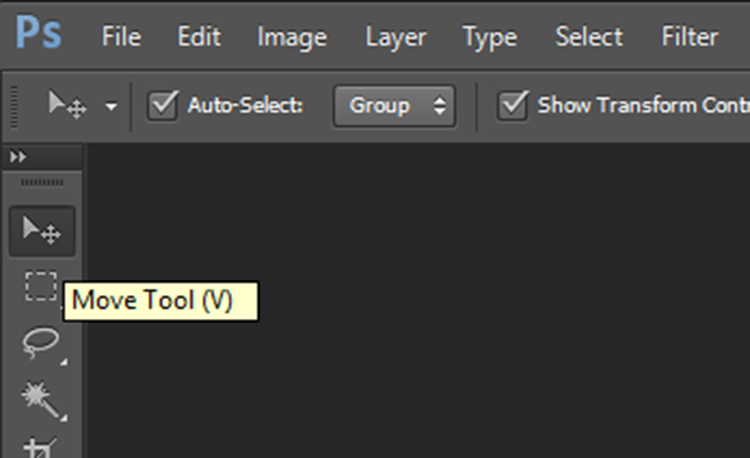
    Zoom out so you can view see the entire canvas and select the Move Tool located at the top of the left toolbar.

    kaleidoscope-06

    kaleidoscope-07

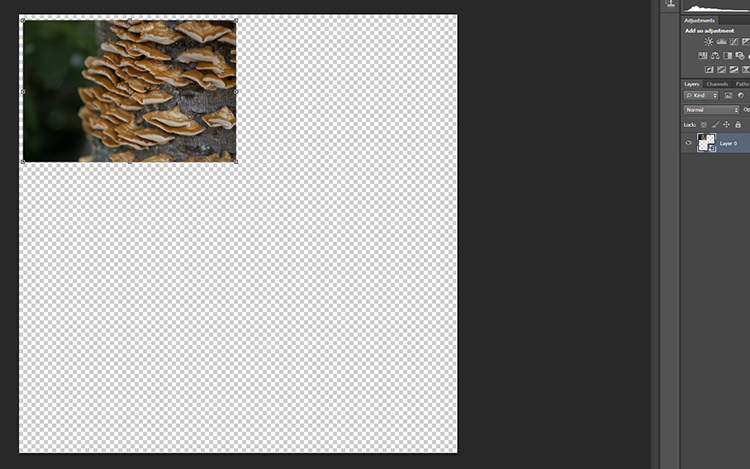
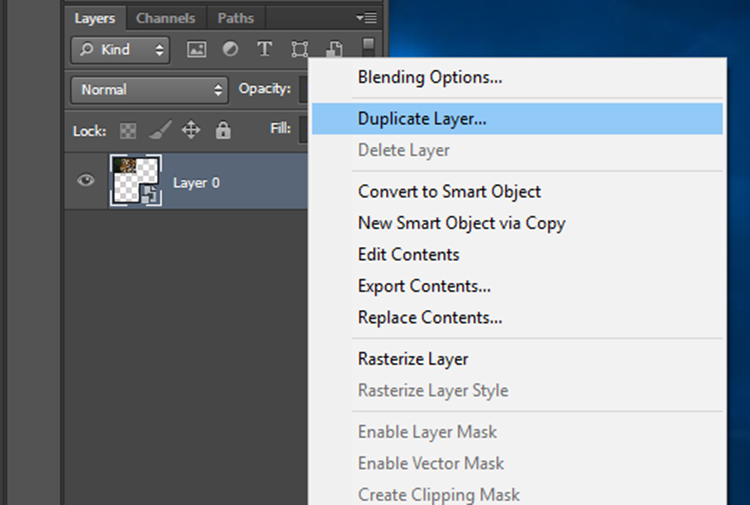
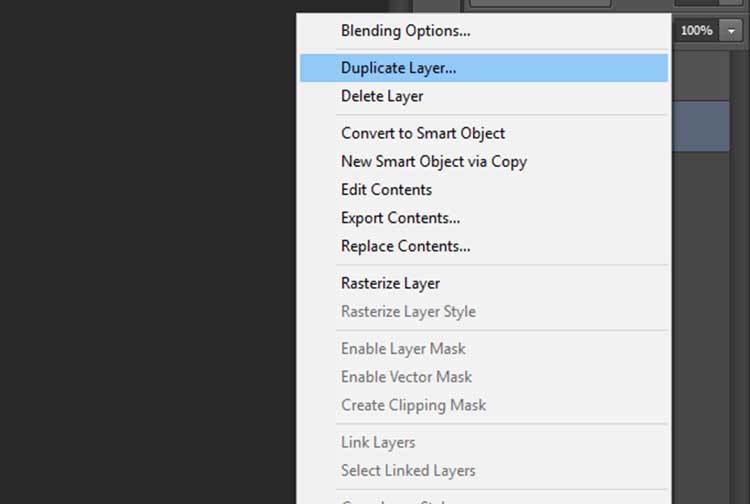
    Click on your photograph on the canvas, and with the left mouse button depressed, drag the image to a corner of the canvas. Leave a few centimeters between the image and the edge of the canvas. Don’t worry about making this too exact as we will crop it to more exact proportions later. Now, duplicate this layer by right clicking it in the layers panel and selecting Duplicate Layer (or use the keyboard shortcut Cmd/Ctrl+J).

    kaleidoscope-08

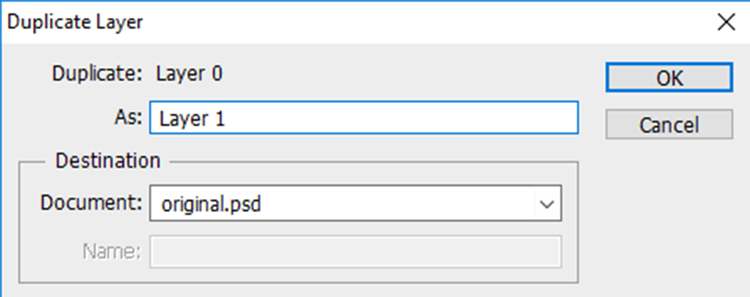
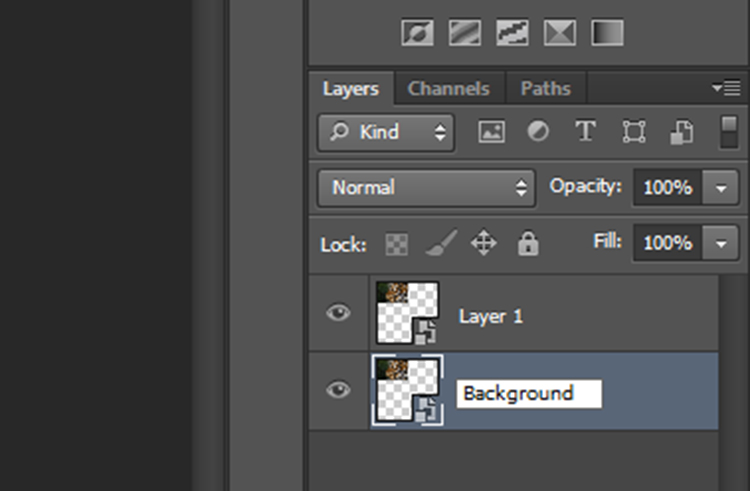
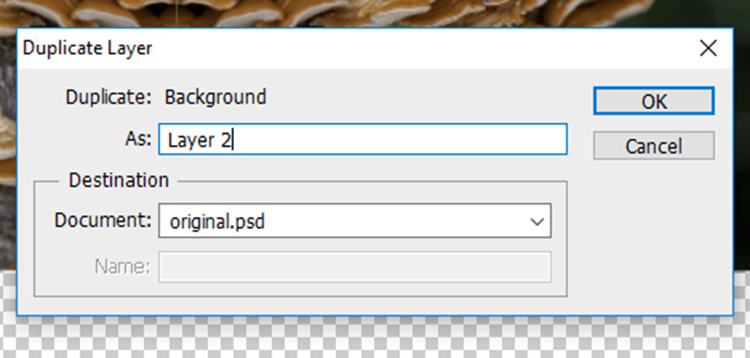
    In the Duplicate Layer prompt, rename this layer as “Layer 1” as we will be duplicating a number of layers over the next few steps. Click OK and a new layer will appear in the layers panel.

    kaleidoscope-09

    Rename the original image layer as “Background” by double clicking on the name “Layer 0” in the layers panel. This will help avoid confusion later.

    kaleidoscope-10

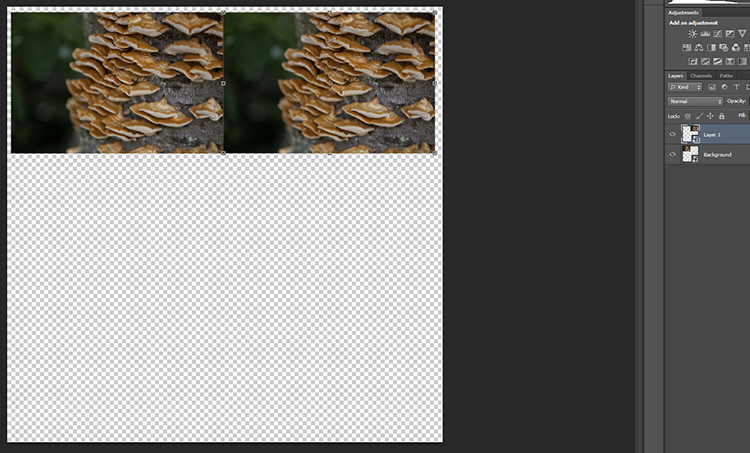
    At the moment, both layers will be in the same spot on the canvas, with Layer 1 sitting on top of Background. With the Move Tool selected, click on the top layer, and with the left mouse button depressed, drag Layer 1 next to the Background image.

    kaleidoscope-11

    kaleidoscope-12

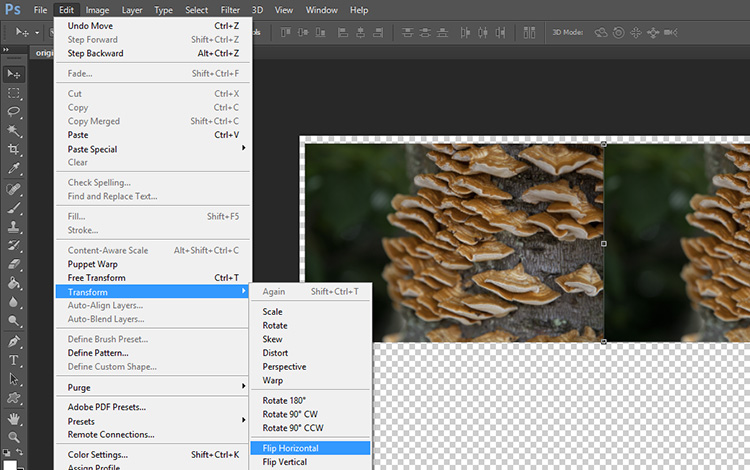
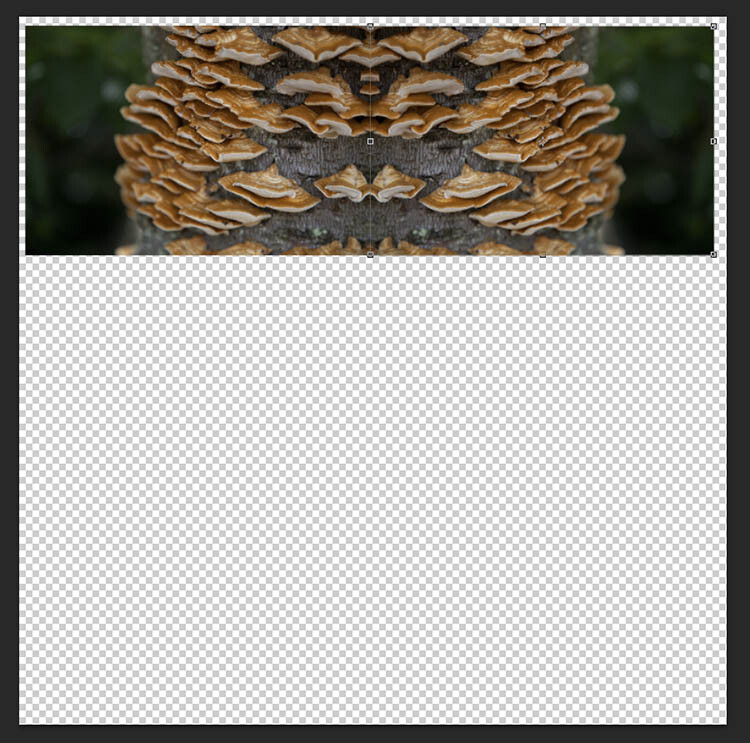
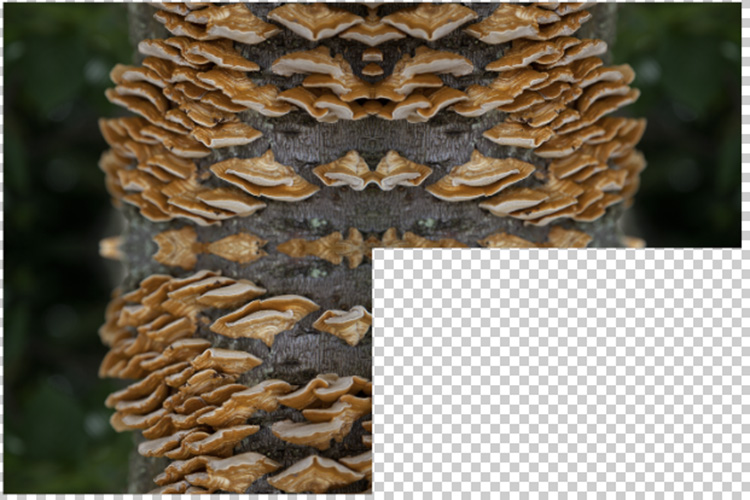
    Keeping Layer 1 selected, click Edit on the main toolbar and then Transform > Flip Horizontal. Layer 1 will flip to create a mirrored image of the Background.

    kaleidoscope-13

    Your image should look something like this now.

    Just two more to go!

    Duplicate the Background layer again, and when the prompt window appears, rename it “Layer 2”.

    kaleidoscope-14

    kaleidoscope-16

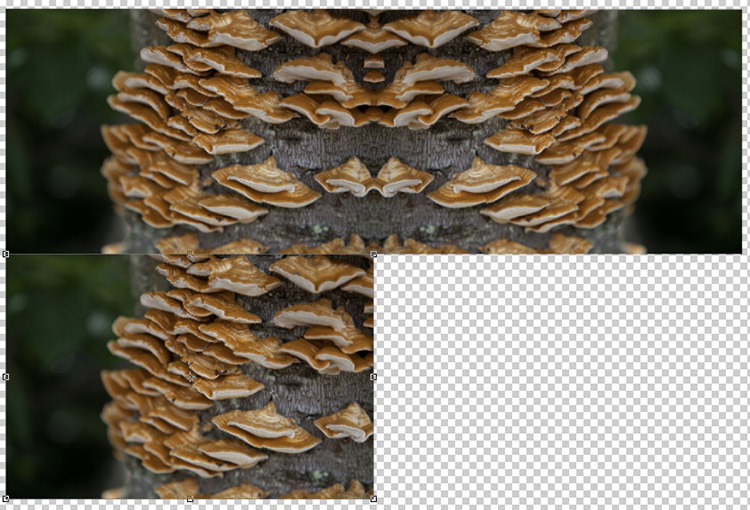
    With the Move Tool selected, click on the newly created Layer 2 (which will be over Background). Keep the left mouse button depressed, and drag Layer 2 underneath Background.

    kaleidoscope-17

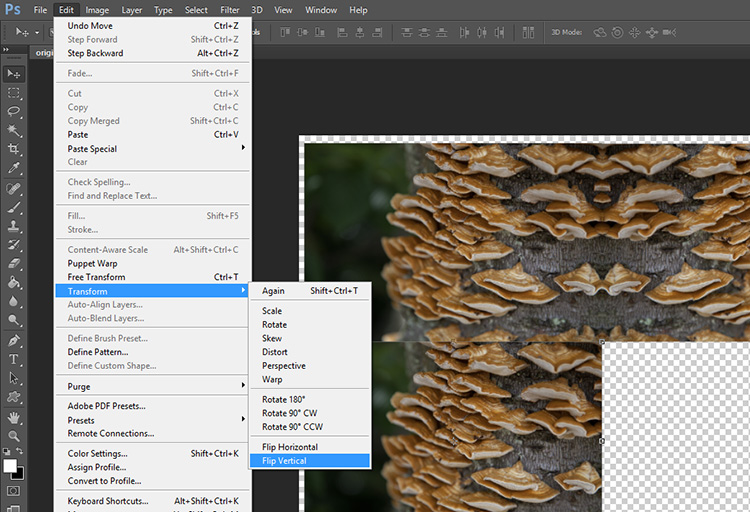
    With Layer 2 selected, click Edit on the main toolbar and then Transform > Flip Vertical. Layer 2 will flip vertically to create a mirrored image of Background from below.

    kaleidoscope-18

    kaleidoscope-19

    Duplicate Background one more time, this time naming the layer “Layer 3”. With the Move Tool selected, click on the newly created Layer 3 (which will be over Background) and with the left mouse button depressed, drag Layer 3 into the remaining slot to complete the rectangle.

    With Layer 3 selected, click Edit on the main toolbar and then Transform > Flip Horizontal. To complete the pattern, keep Layer 3 selected click Edit on the main toolbar and then Transform > Flip Vertical.

    kaleidoscope-20

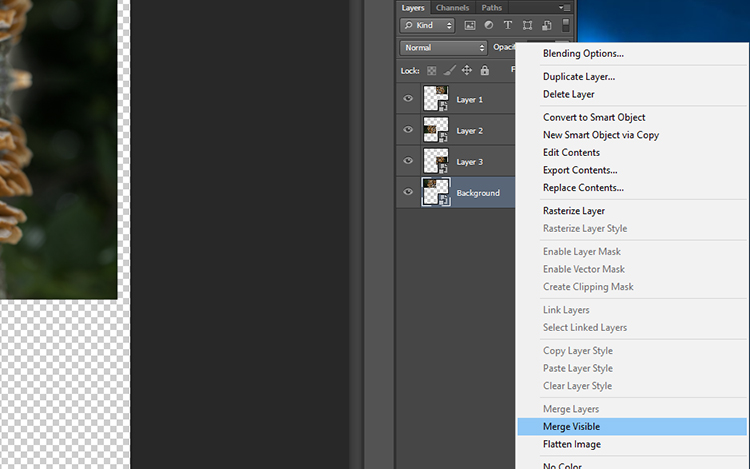
    The next step is to merge the layers of the rectangle you have made so that it can be moved around as one layer. To do this, right-click on the layer titled Background in the layers panel and select Merge Visible.

    kaleidoscope-21

    If it hasn’t done so automatically, it is a good idea to rename this merged layer as “Background” so it will be easier to keep track of which layers are where. You now have the template for your kaleidoscopic image!

    Step 3 – Creating the kaleidoscope

    Select the Background layer, and with the Move tool selected, drag the layer into the center of the canvas. Right-click on Background in the layers panel and select Duplicate Layer. Rename this layer as “Layer 1”.

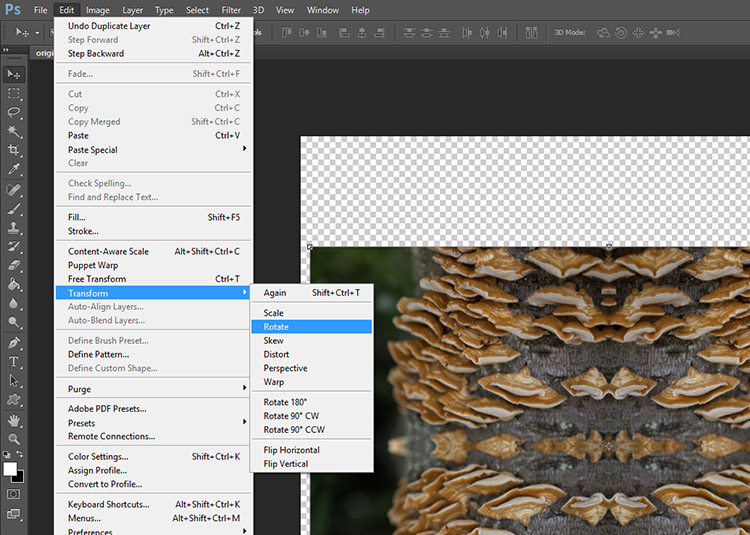
    With Layer 1 selected, click Edit > Transform > Rotate.

    kaleidoscope-22

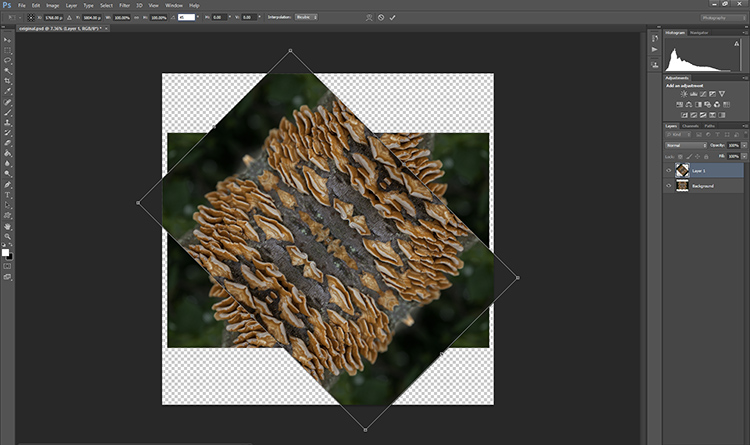
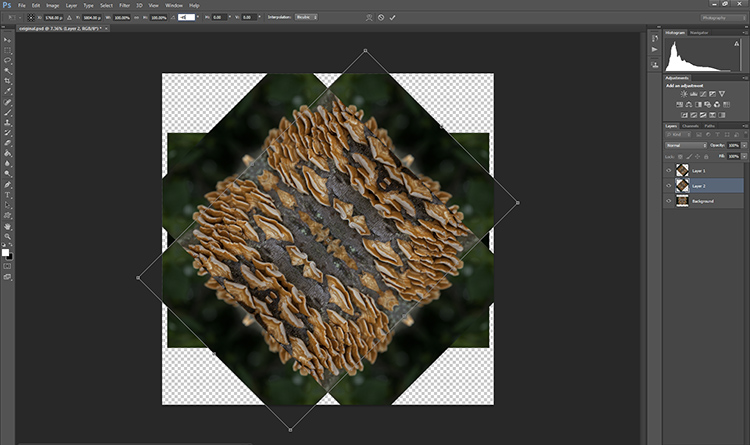
    In the Transform settings panel, there is a text box next to the symbol of an angle. In this text box, type 45 and press enter. Layer 1 will be rotated to a 45-degree angle.

    kaleidoscope-23

    kaleidoscope-24

    Duplicate Background again, this time renaming the layer “Layer 2”. With Layer 2 selected in the layers panel, click Edit > Transform > Rotate. In the Transform settings panel, in the text box next to the angle symbol, enter -45 and press enter.

    kaleidoscope-25

    kaleidoscope-26

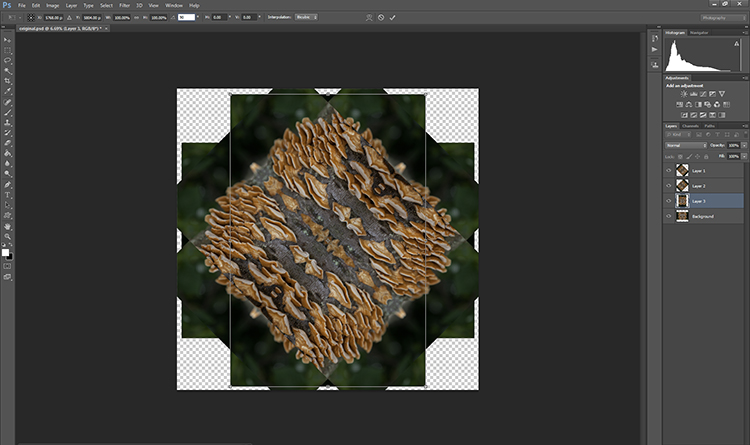
    Duplicate the Background layer one last time, renaming the layer “Layer 3”. With Layer 3 selected in the layers panel, click Edit > Transform > Rotate. In the Transform settings panel, in the text box next to the angle symbol, enter 90 and press enter. The layer will be rotated 90 degrees.

    kaleidoscope-27 kaleidoscope-28

    Step 4 – Blending Modes

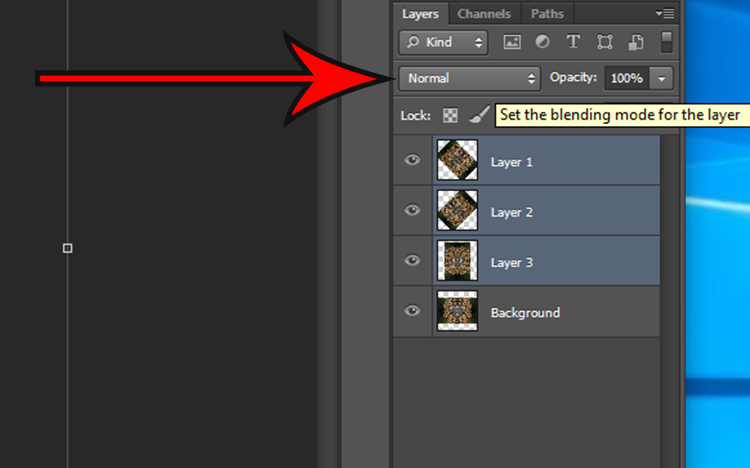
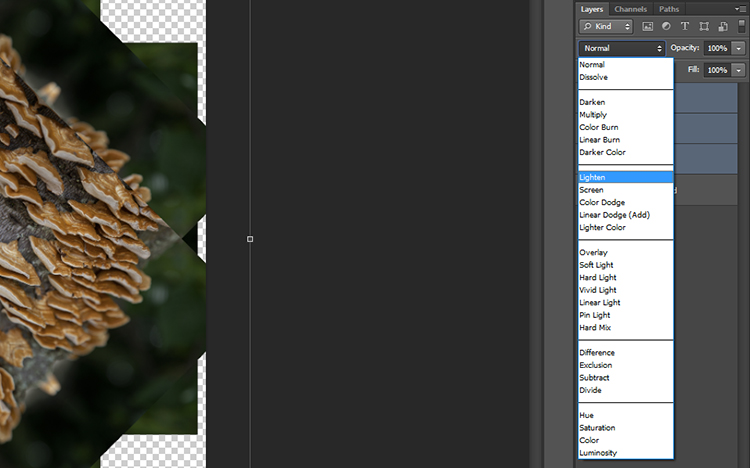
    Select the top three layers in the layers panel by holding down the shift key and clicking on Layers 1, 2, and 3. With the layers selected, click on the Blending Mode drop down menu (red arrow below) and select the Lighten option. The selected layers will blend to form a kaleidoscope pattern.

    kaleidoscope-29

    kaleidoscope-30

    kaleidoscope-31

    Crop it

    To neaten up the image you can crop the edges of the kaleidoscope down to a square or rectangle. With the Crop Tool selected, hold the shift key on your keyboard and drag the corners of the Crop Tool over the image to create a square or rectangle. When you are happy, press enter and save the image via File > Save As.

    kaleidoscope-32

    Step 5 – Making a desktop background

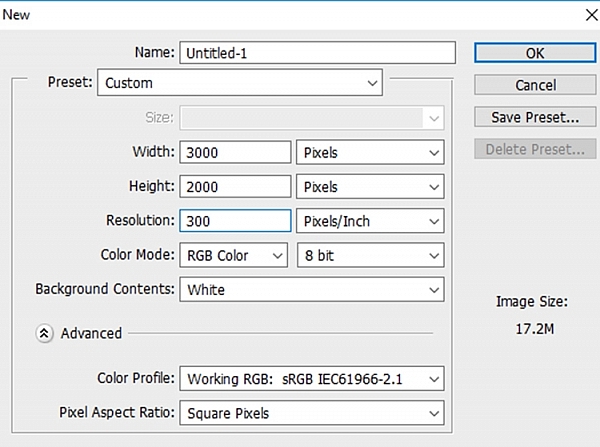
    To make a wallpaper effect, open a new Photoshop document by selecting File > New and entering the dimensions 3000 pixels by 2000 pixels in the text boxes. Make sure the resolution set to at least 300 pixels/inch, so it will look nice on a large monitor screen.

    kaleidoscope-33

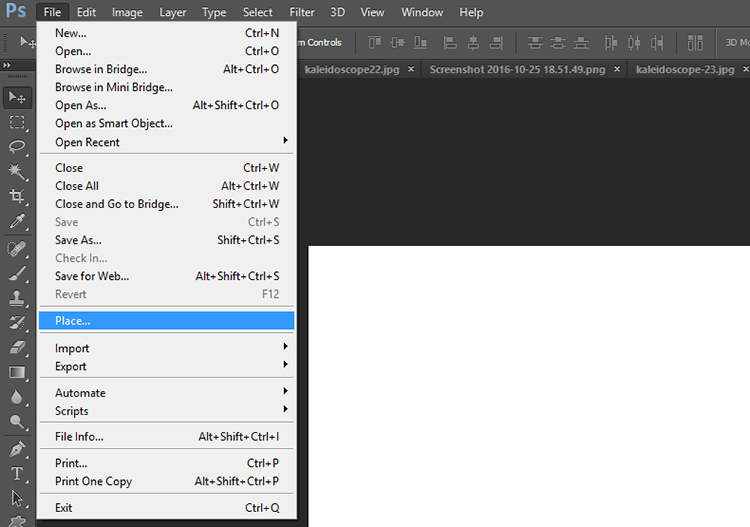
    Select File > Place… and select your new kaleidoscope file.

    kaleidoscope-34

    Once placed in the Photoshop canvas, you can choose to duplicate the image any number of times to create an interesting pattern, or add layers on top of one another and have fun experimenting with more Blending Modes. The possibilities are endless! Here are a few ideas.

    Have you done this technique before to make a kaleidoscope pattern? Please share your results in the comments section below.

    desktop

    desktop-01

    desktop-02

    googletag.cmd.push(function() {
    tablet_slots.push( googletag.defineSlot( “/1005424/_dPSv4_tab-all-article-bottom_(300×250)”, [300, 250], “pb-ad-78623” ).addService( googletag.pubads() ) ); } );

    googletag.cmd.push(function() {
    mobile_slots.push( googletag.defineSlot( “/1005424/_dPSv4_mob-all-article-bottom_(300×250)”, [300, 250], “pb-ad-78158” ).addService( googletag.pubads() ) ); } );

    The post How to Turn Your Images into Kaleidoscope Patterns by Megan Kennedy appeared first on Digital Photography School.


    Digital Photography School

  • 6 Tips for Capturing Action in Your Wildlife Photos

    Even with the fastest lenses and top-end DSLR cameras, catching fast movement in your wildlife photos can be tricky. The physical speed of your autofocus may not be able to keep up with and track a moving subject. Away from the limitations of your equipment, you may find that you miss a flutter of wings or fight between two animals.

    action-wildlife-photos-6

    Luckily, there are some things you can do to overcome both problems. Here are my top tips for successfully capturing action in your wildlife photos.

    #1 Pay Attention to Behavioural Cues

    Animals are great at giving away information about what they are going to do next. If you pay real attention to the subjects you a photographing, then chances are you’ll be able to predict the future and have a better chance at capturing something awesome on camera. You can often apply a general rule to a class of animals, rather than having to learn hundreds of different cues from all sorts of different species. For example, when a bird is about to fly off, most will first lean forwards and appear “twitchy” before taking flight.

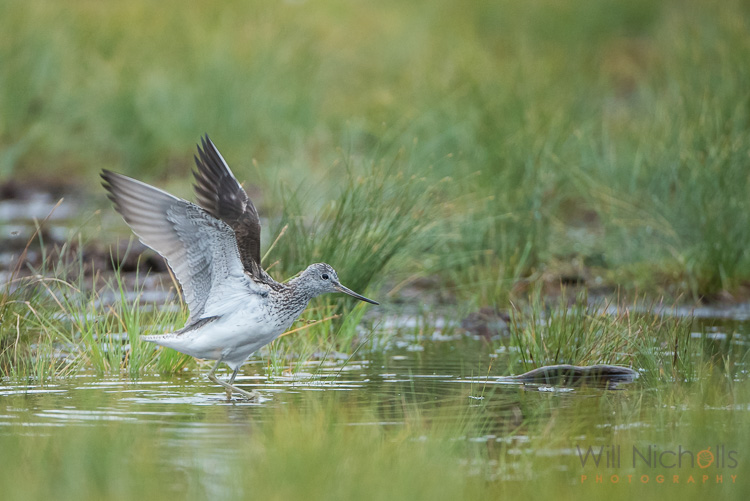
    When photographing this greenshank, I saw it bathing in a puddle in a field. From my experience, I know that birds will fluff their  feathers or shake off water after bathing and preening. I composed the image properly then sat in wait with the subject in focus and my finger on the trigger. Eventually, probably after about 20 minutes of waiting, the bird stretched out its wings and I clicked the shutter.

    wildlife photos

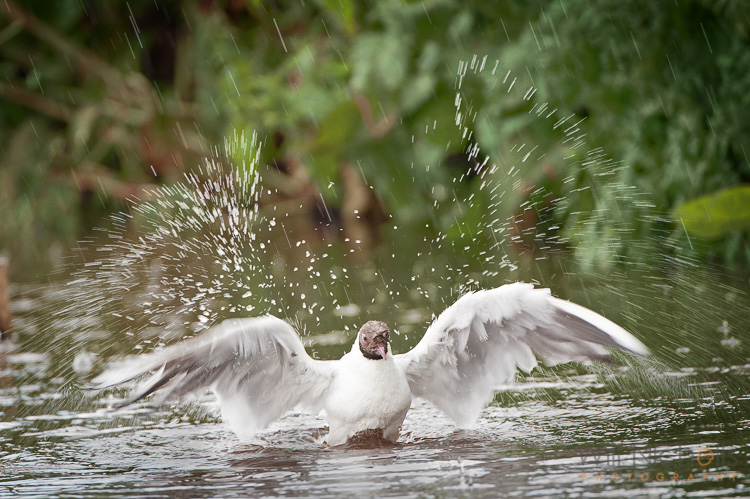
    Being able to anticipate this behaviour made catching this moment possible. If I had tried to jump into action having seen the stretch, the action would have been over before I could even focus the camera. The same principle applied to the following image. I saw a black-headed gull dipping its head underwater washing itself. Soon after it finished, it threw droplets up into the air. Waiting in position made it possible.

    action-wildlife-photos-7

    #2 Don’t Use Live View

    The live view mode on your DSLR camera shouldn’t be touched with wildlife photos. It makes tracking very difficult, and whenever you engage autofocus the live view goes off as the mirror flips down. Because of the way you end up holding the camera, things become unstable too. Instead, stick to using your viewfinder. It is so much easier to react quickly and track your subject that way.

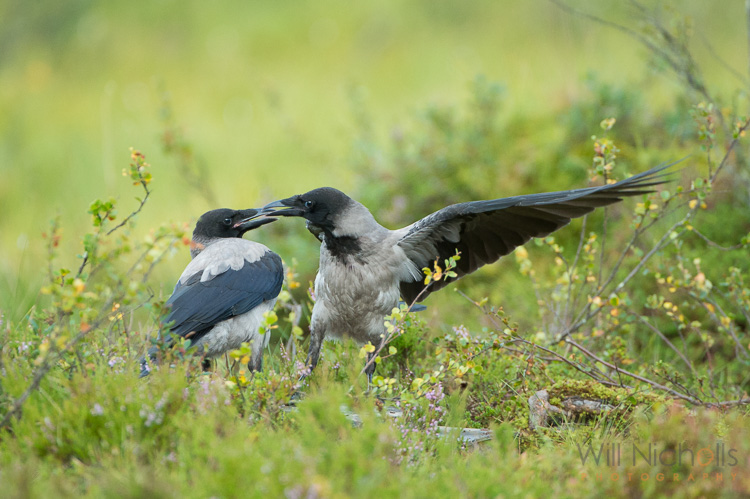
    Two hooded crows engaged in a scrap.

    Two hooded crows engaged in a scrap.

    #3 Use a Sufficient Shutter Speed

    It goes without saying that if you have enough available light, then you should use a fast shutter speed to freeze movement. A general rule to avoid camera shake is 1 over the focal length of your camera. For example, a 400mm lens should have a shutter speed of at least 1/400th second to avoid camera blur.

    However, this rule may not give you a shutter speed fast enough to freeze the subject. Animals often move quickly, so adjust it as required. 1/1000th second or more is a good bet for fast running or flying creatures. It’ll depend on what you are photographing, and how exactly you are shooting it, as to what shutter speed you should go for.

    action-wildlife-photos-5

    1/2000th, f/4, ISO 320

    A good tip is to review your images, when possible, to check that your shutter speed is fast enough. Zoom in on the LCD and look for motion blur. If you spot any, then just increase your shutter speed.

    #4 Don’t Stick to Your Tripod

    If you are comfortable with handholding, then maybe you can ditch your tripod. Some tripod heads, like ball heads, can make things restrictive when you’re trying to follow a moving subject that stops and starts. Having to undo knobs to be able to move the camera slows you down.

    Releasing your camera from the grips of your tripod will allow you to move freely. If you have it, then engage vibration reduction on your lens. This will help to get rid of camera shake, but you should be using a fast shutter speed so that shouldn’t prove a problem at all.

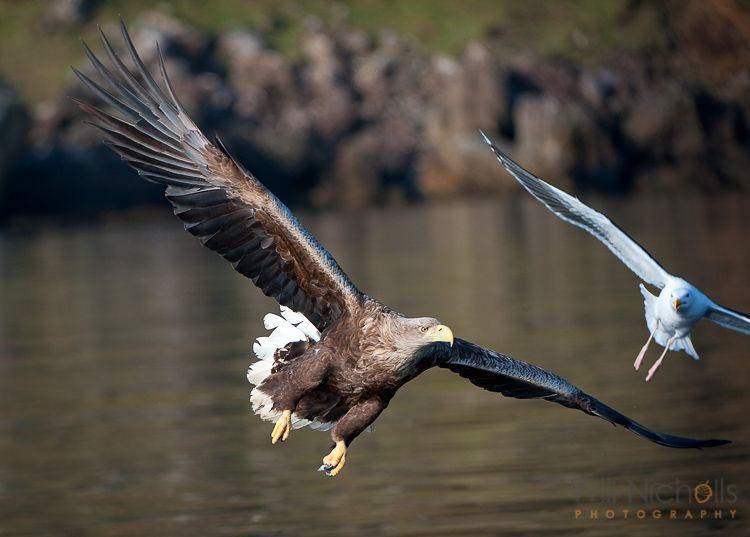
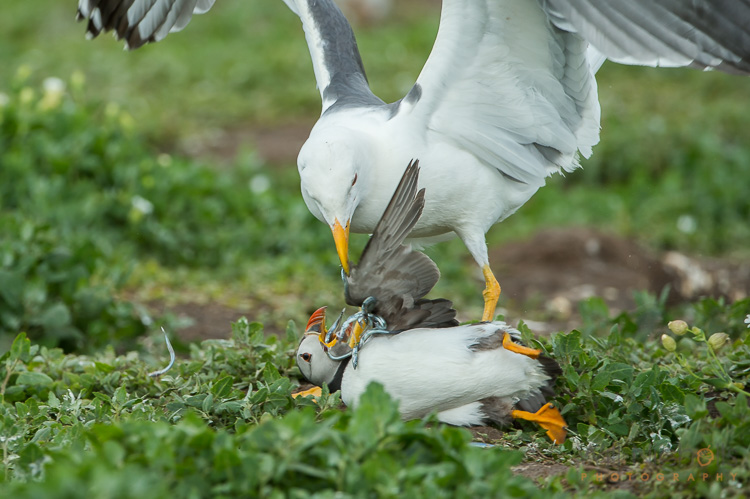
    A lesser black-backed gull pins down an Atlantic puffin and steals its catch of sandeels.

    A lesser black-backed gull pins down an Atlantic puffin and steals its catch of sand eels.

    #5 Use Continuous Focus

    Switch your camera to continuous focus mode so that you can track focus with a moving subject. If you continually have to refocus manually because your camera locks onto a spot once it achieves focus, then you’ll probably find you’re always one step behind the animal. Continuous focus mode will keep the plane of focus shifting.

    Be sure to dive into your camera’s menu and find the setting which chooses whether achieving focus or pressing the shutter gets priority. Set it to the shutter, and then you can ensure you are able to fire off frames at the opportune moments.

    #6 Lay in Wait

    If you find that your equipment’s focusing motors are too slow and you can’t keep up with a moving animal, then you should change your approach. Look for patterns of behaviour, such as a route an animal may take regularly. Chances are there will be places where they pause. Focus there, and point your camera straight at it. Lay in wait, and once the animal moves into view, fire the shutter.

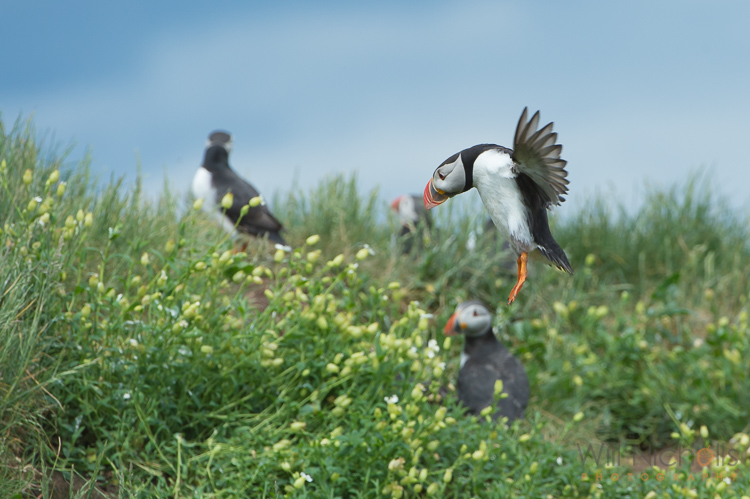
    An Atlantic puffin (Fratercula arctica) coming into land at its burrow on the Farne Islands, Northumberland.

    An Atlantic puffin (Fratercula arctica) coming in to land at its burrow on the Farne Islands, Northumberland.

    If you’re following a bird in flight, try setting your focus to a plane the bird will pass through. Pan along with the animal (you’ll need to be in manual focus by this point), and hold down the shutter to utilise burst mode as it passes you. Hopefully, one of the shots will be in focus if you’ve timed it right. You’ll need to do this a number of times to adjust the focal plane to the optimum distance, and then have a bit of luck on your side!

    googletag.cmd.push(function() {
    tablet_slots.push( googletag.defineSlot( “/1005424/_dPSv4_tab-all-article-bottom_(300×250)”, [300, 250], “pb-ad-78623” ).addService( googletag.pubads() ) ); } );

    googletag.cmd.push(function() {
    mobile_slots.push( googletag.defineSlot( “/1005424/_dPSv4_mob-all-article-bottom_(300×250)”, [300, 250], “pb-ad-78158” ).addService( googletag.pubads() ) ); } );

    The post 6 Tips for Capturing Action in Your Wildlife Photos by Will Nicholls appeared first on Digital Photography School.


    Digital Photography School

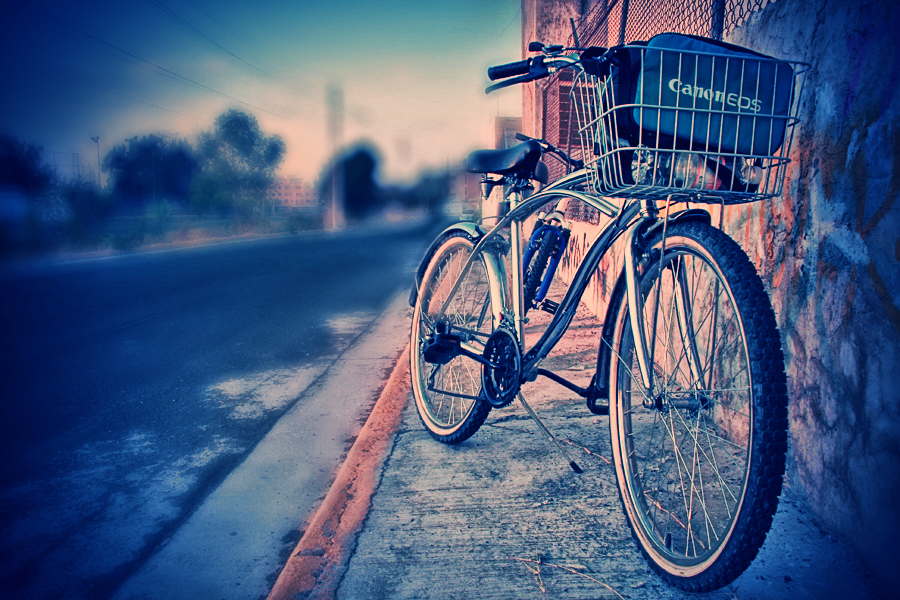
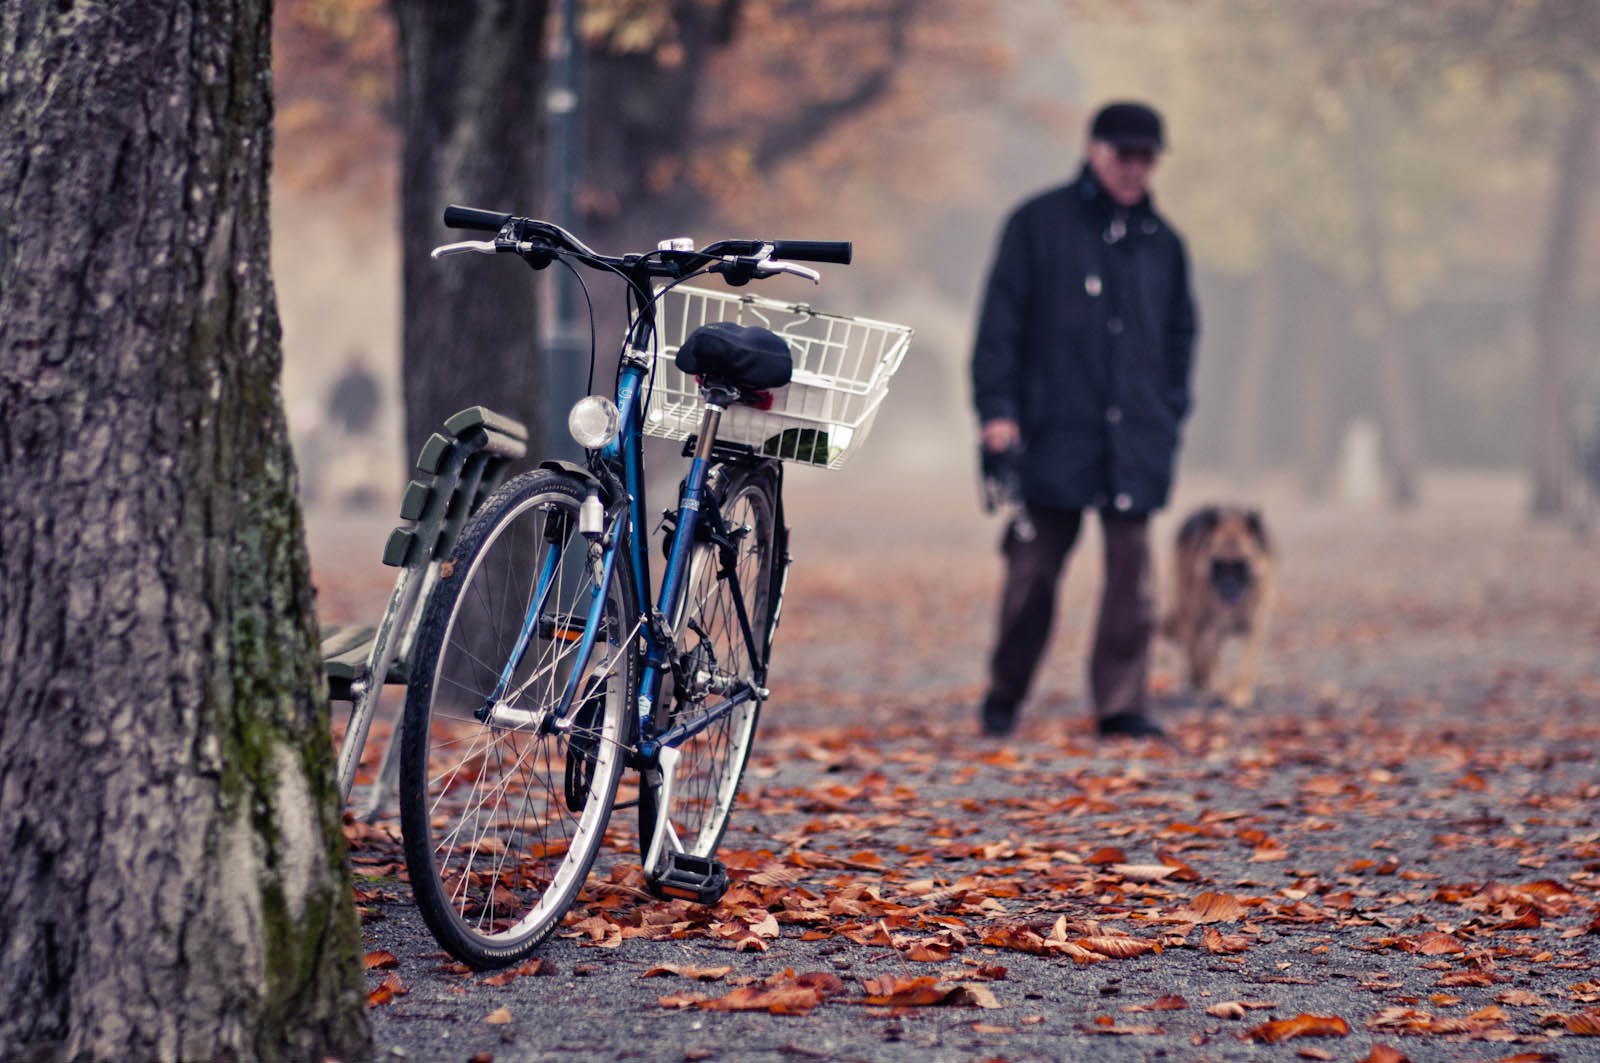
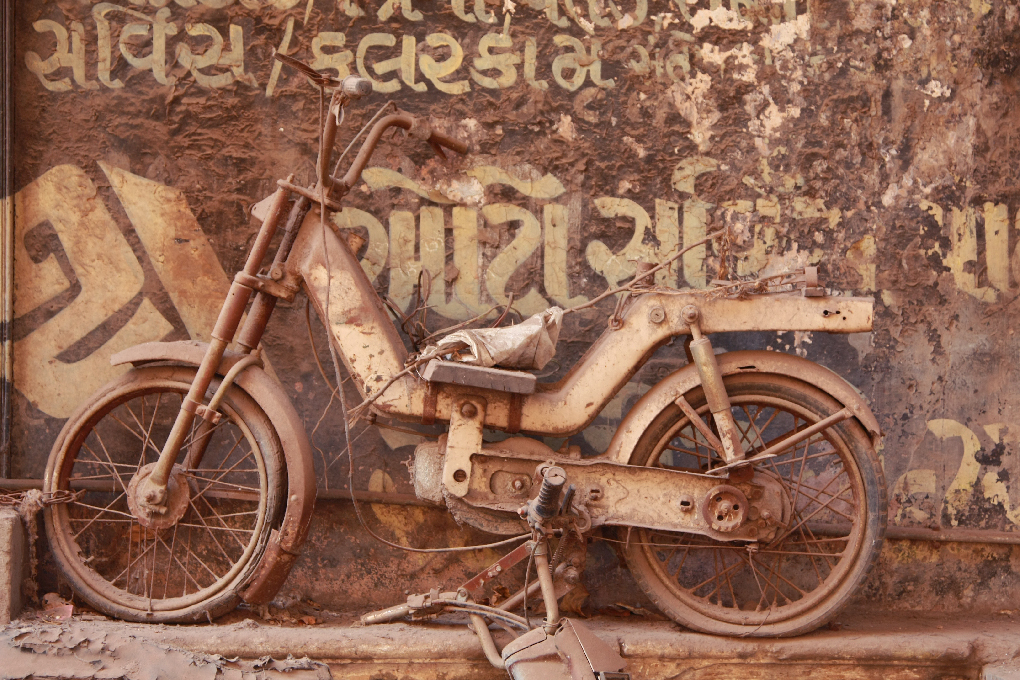
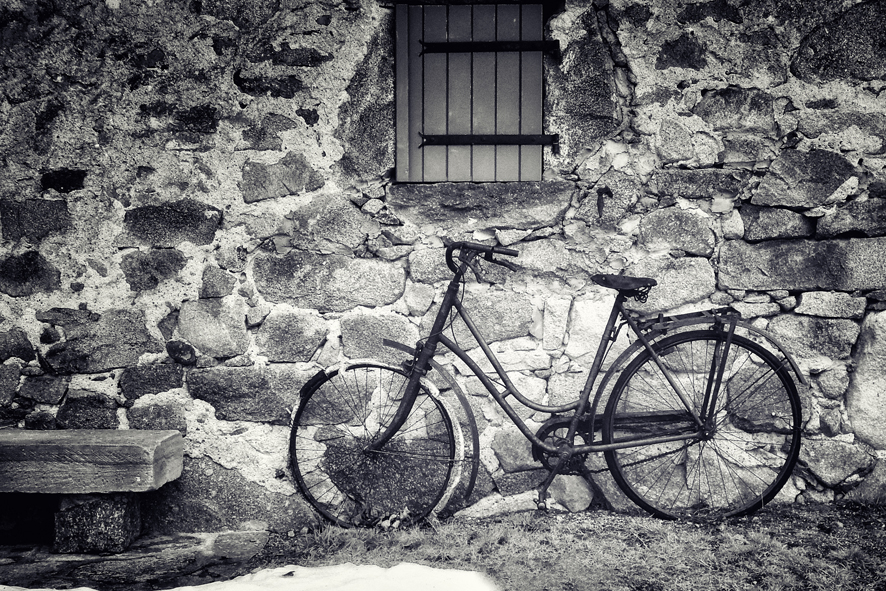
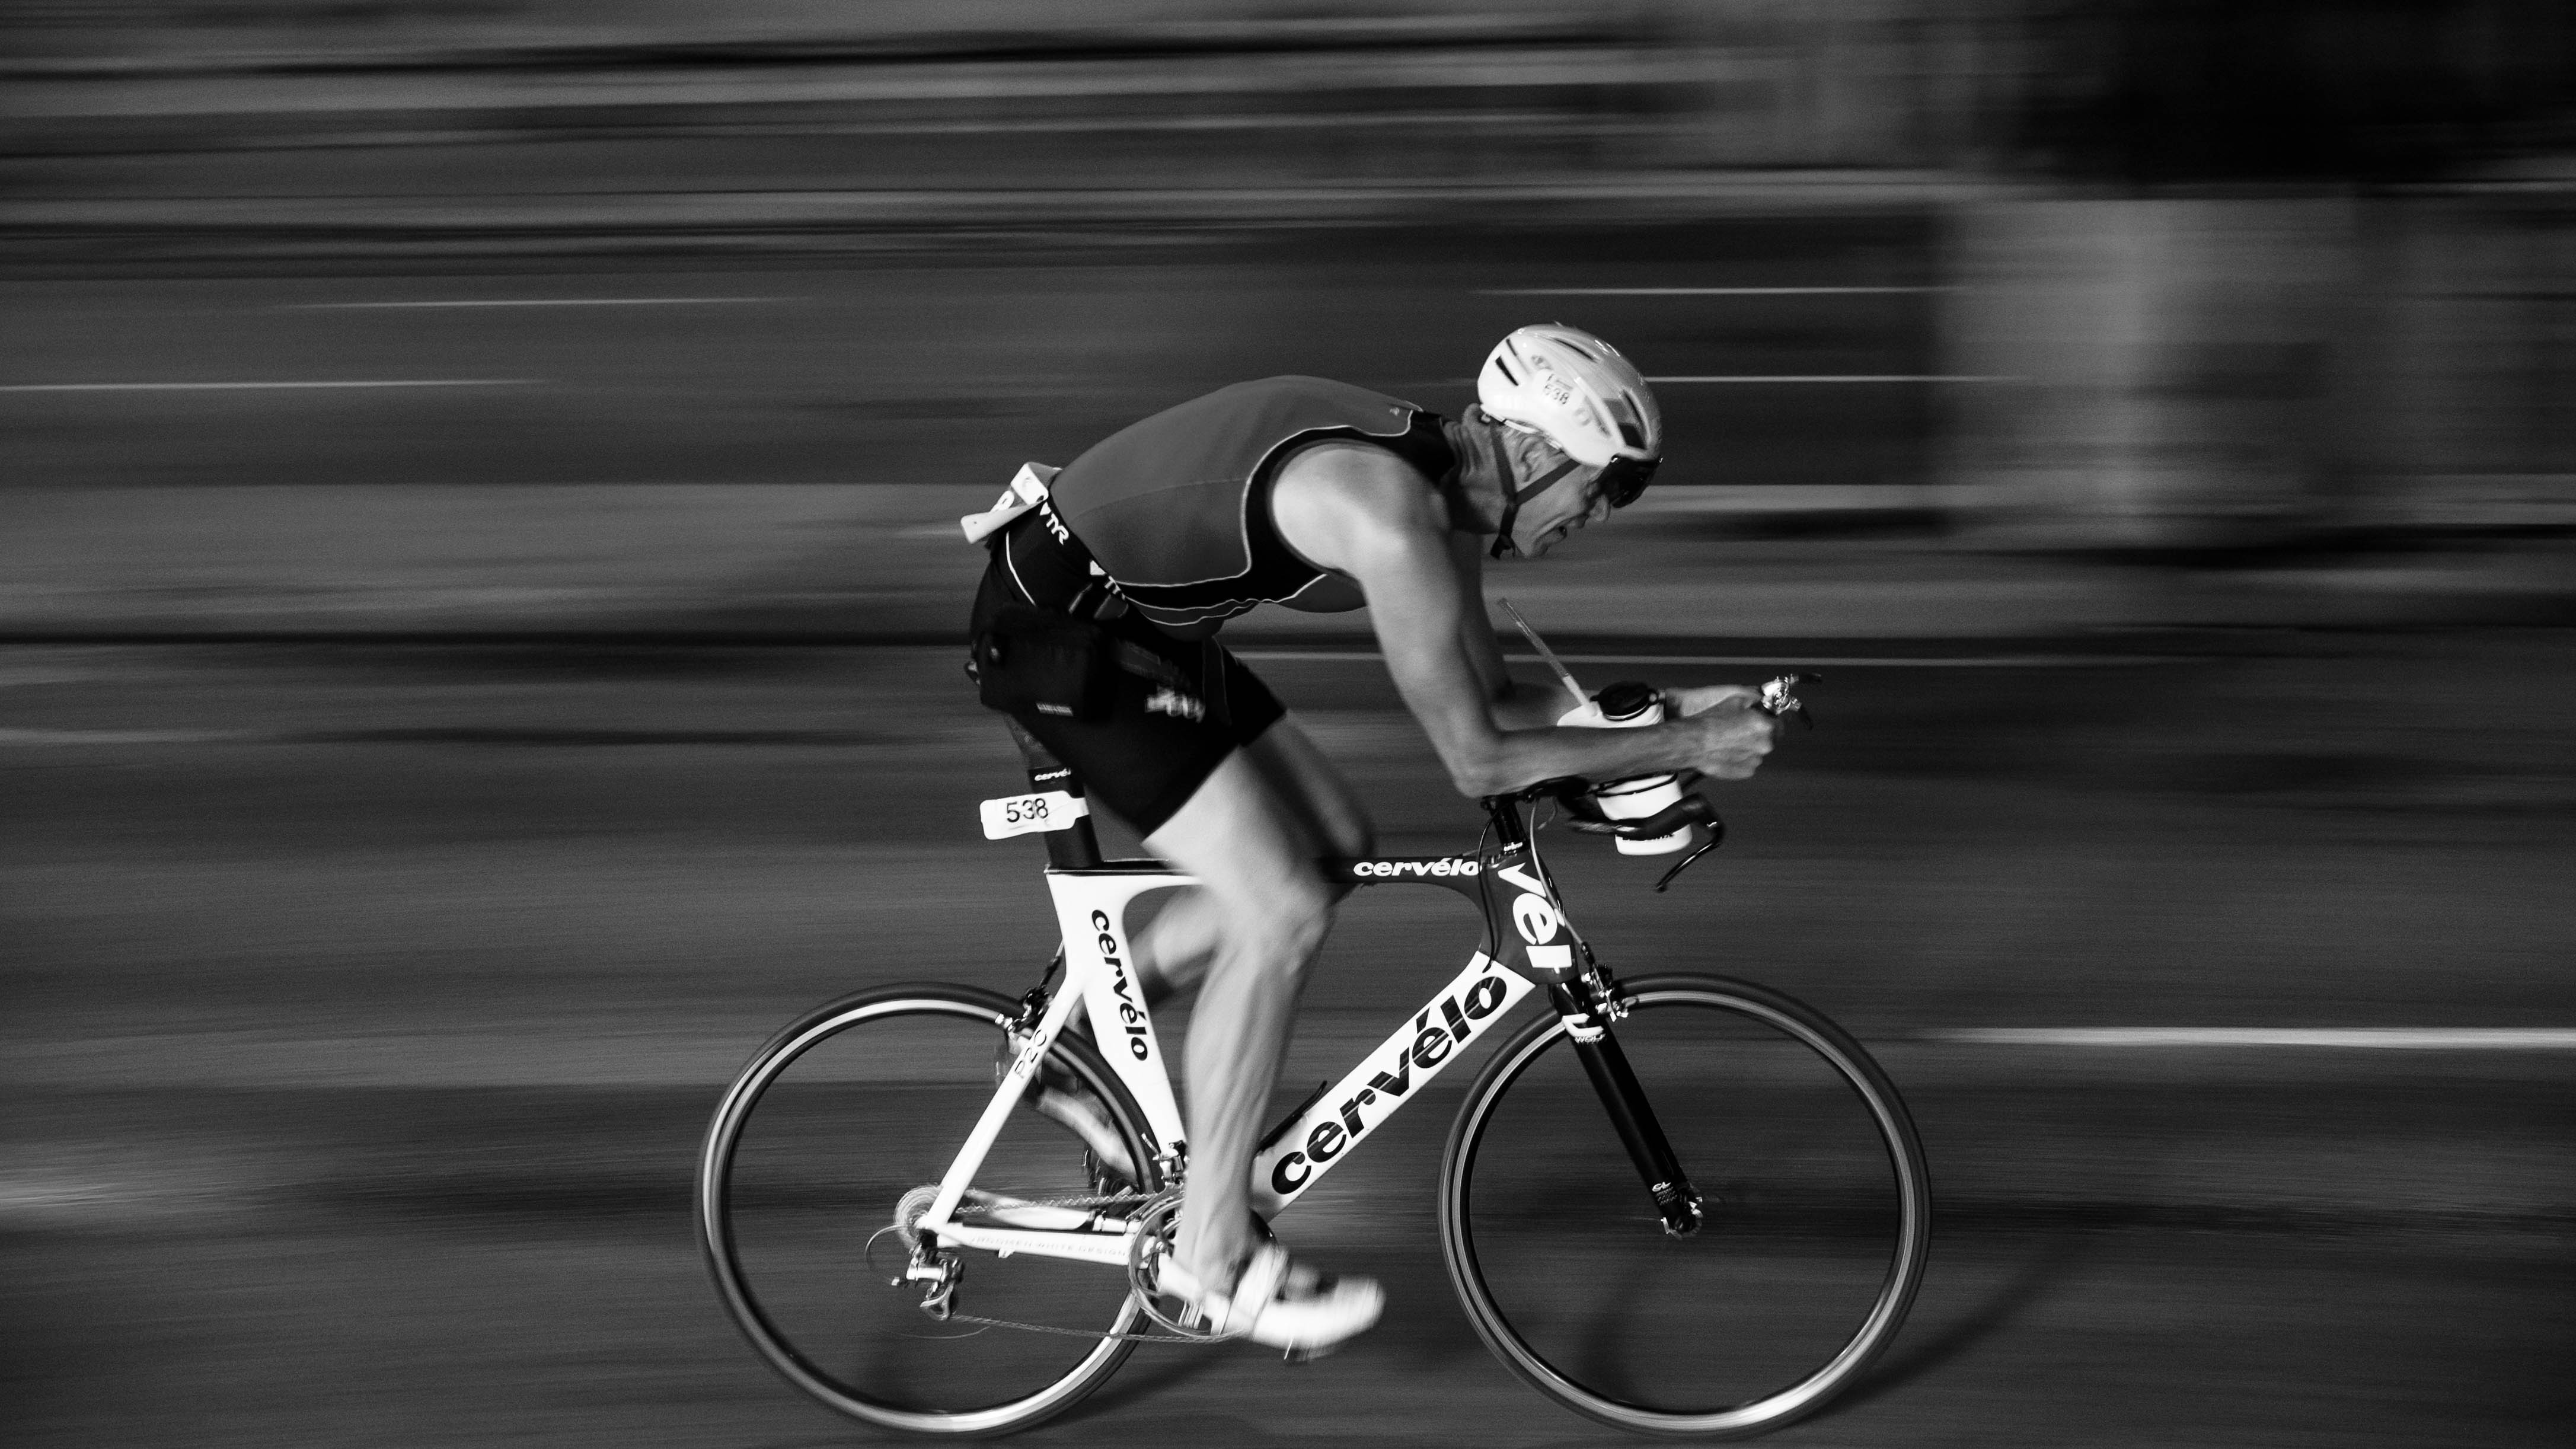
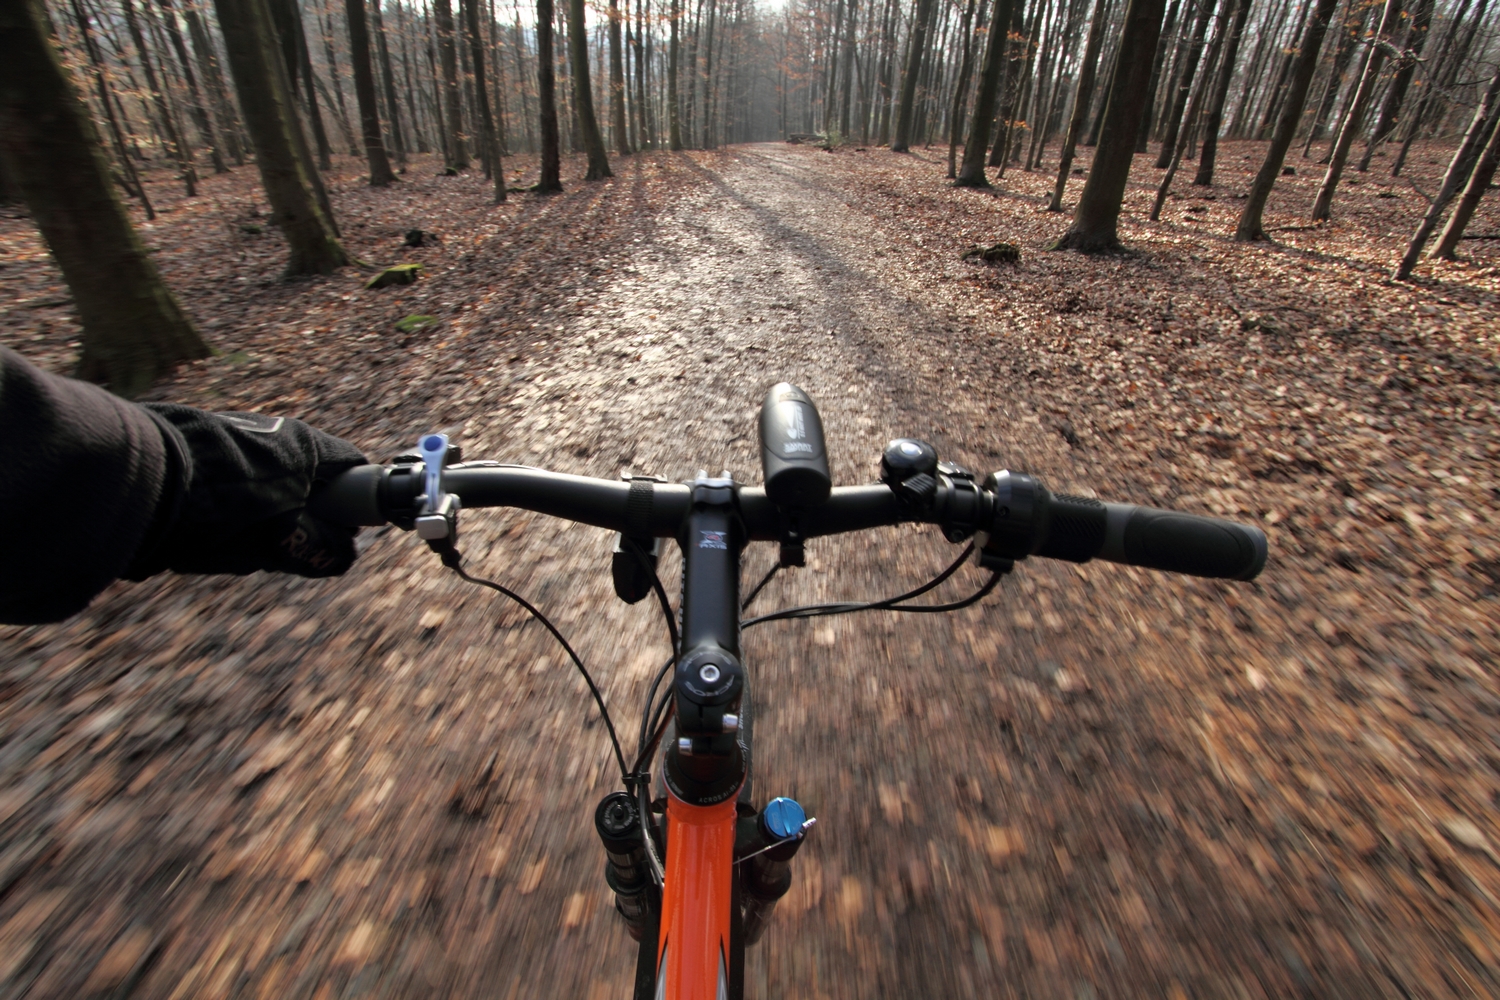
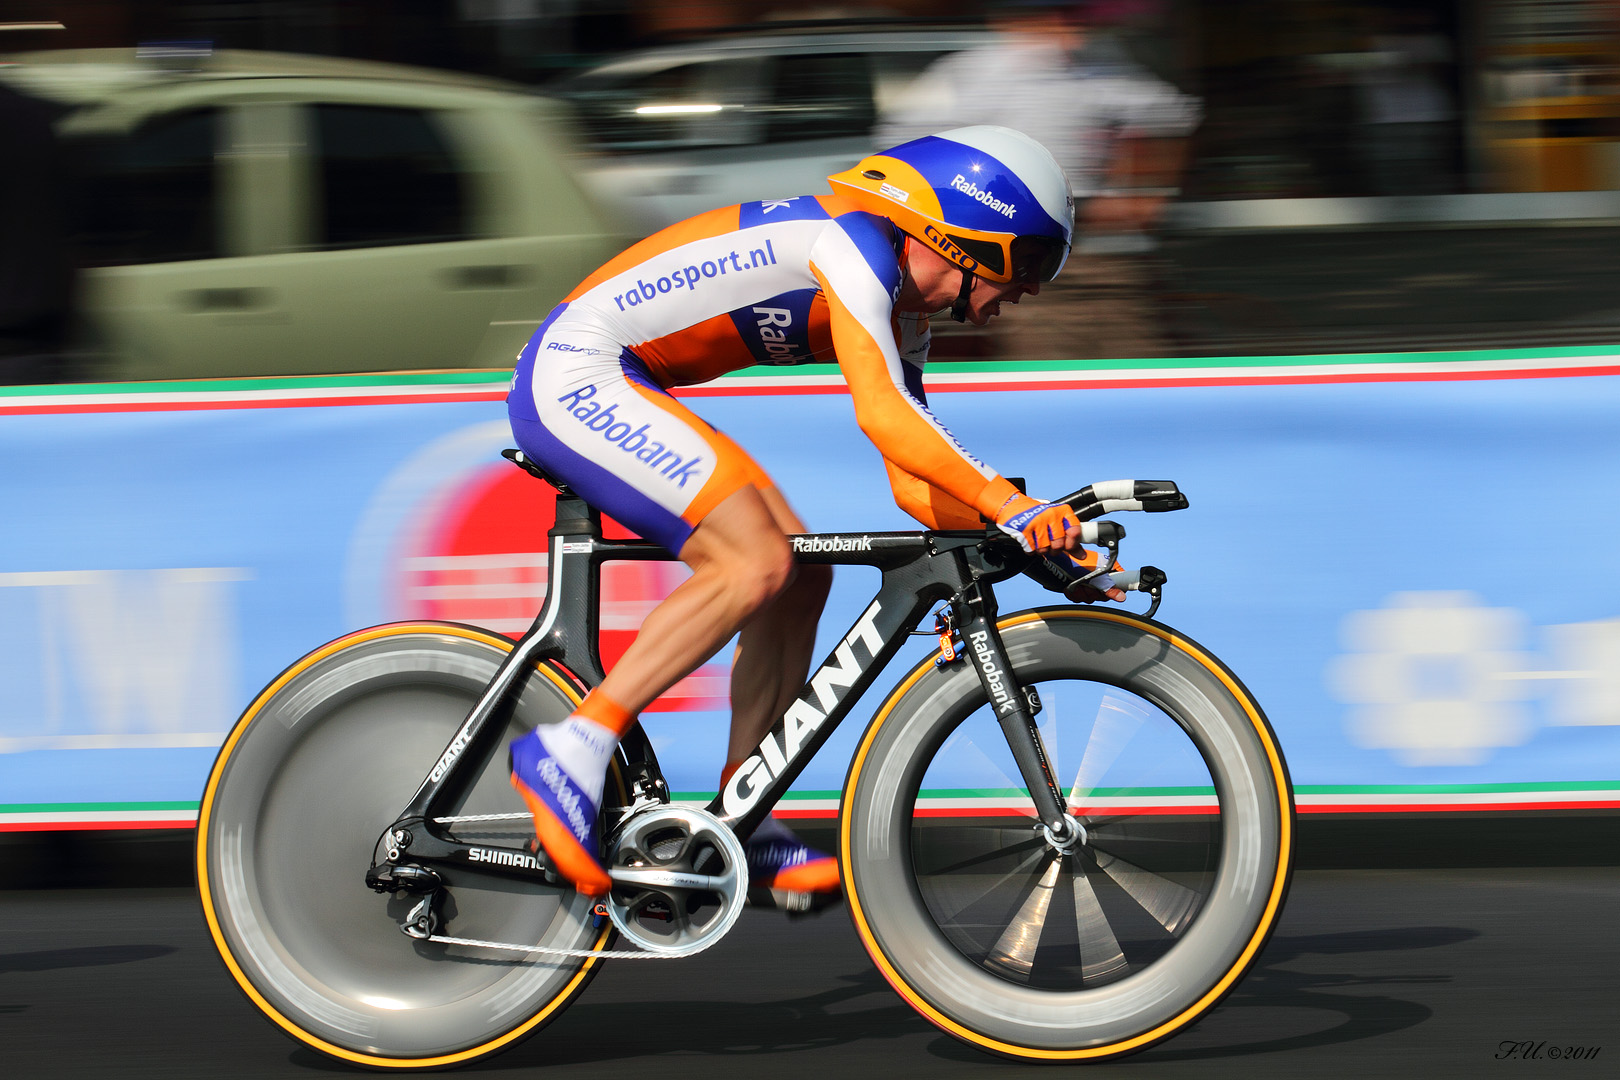
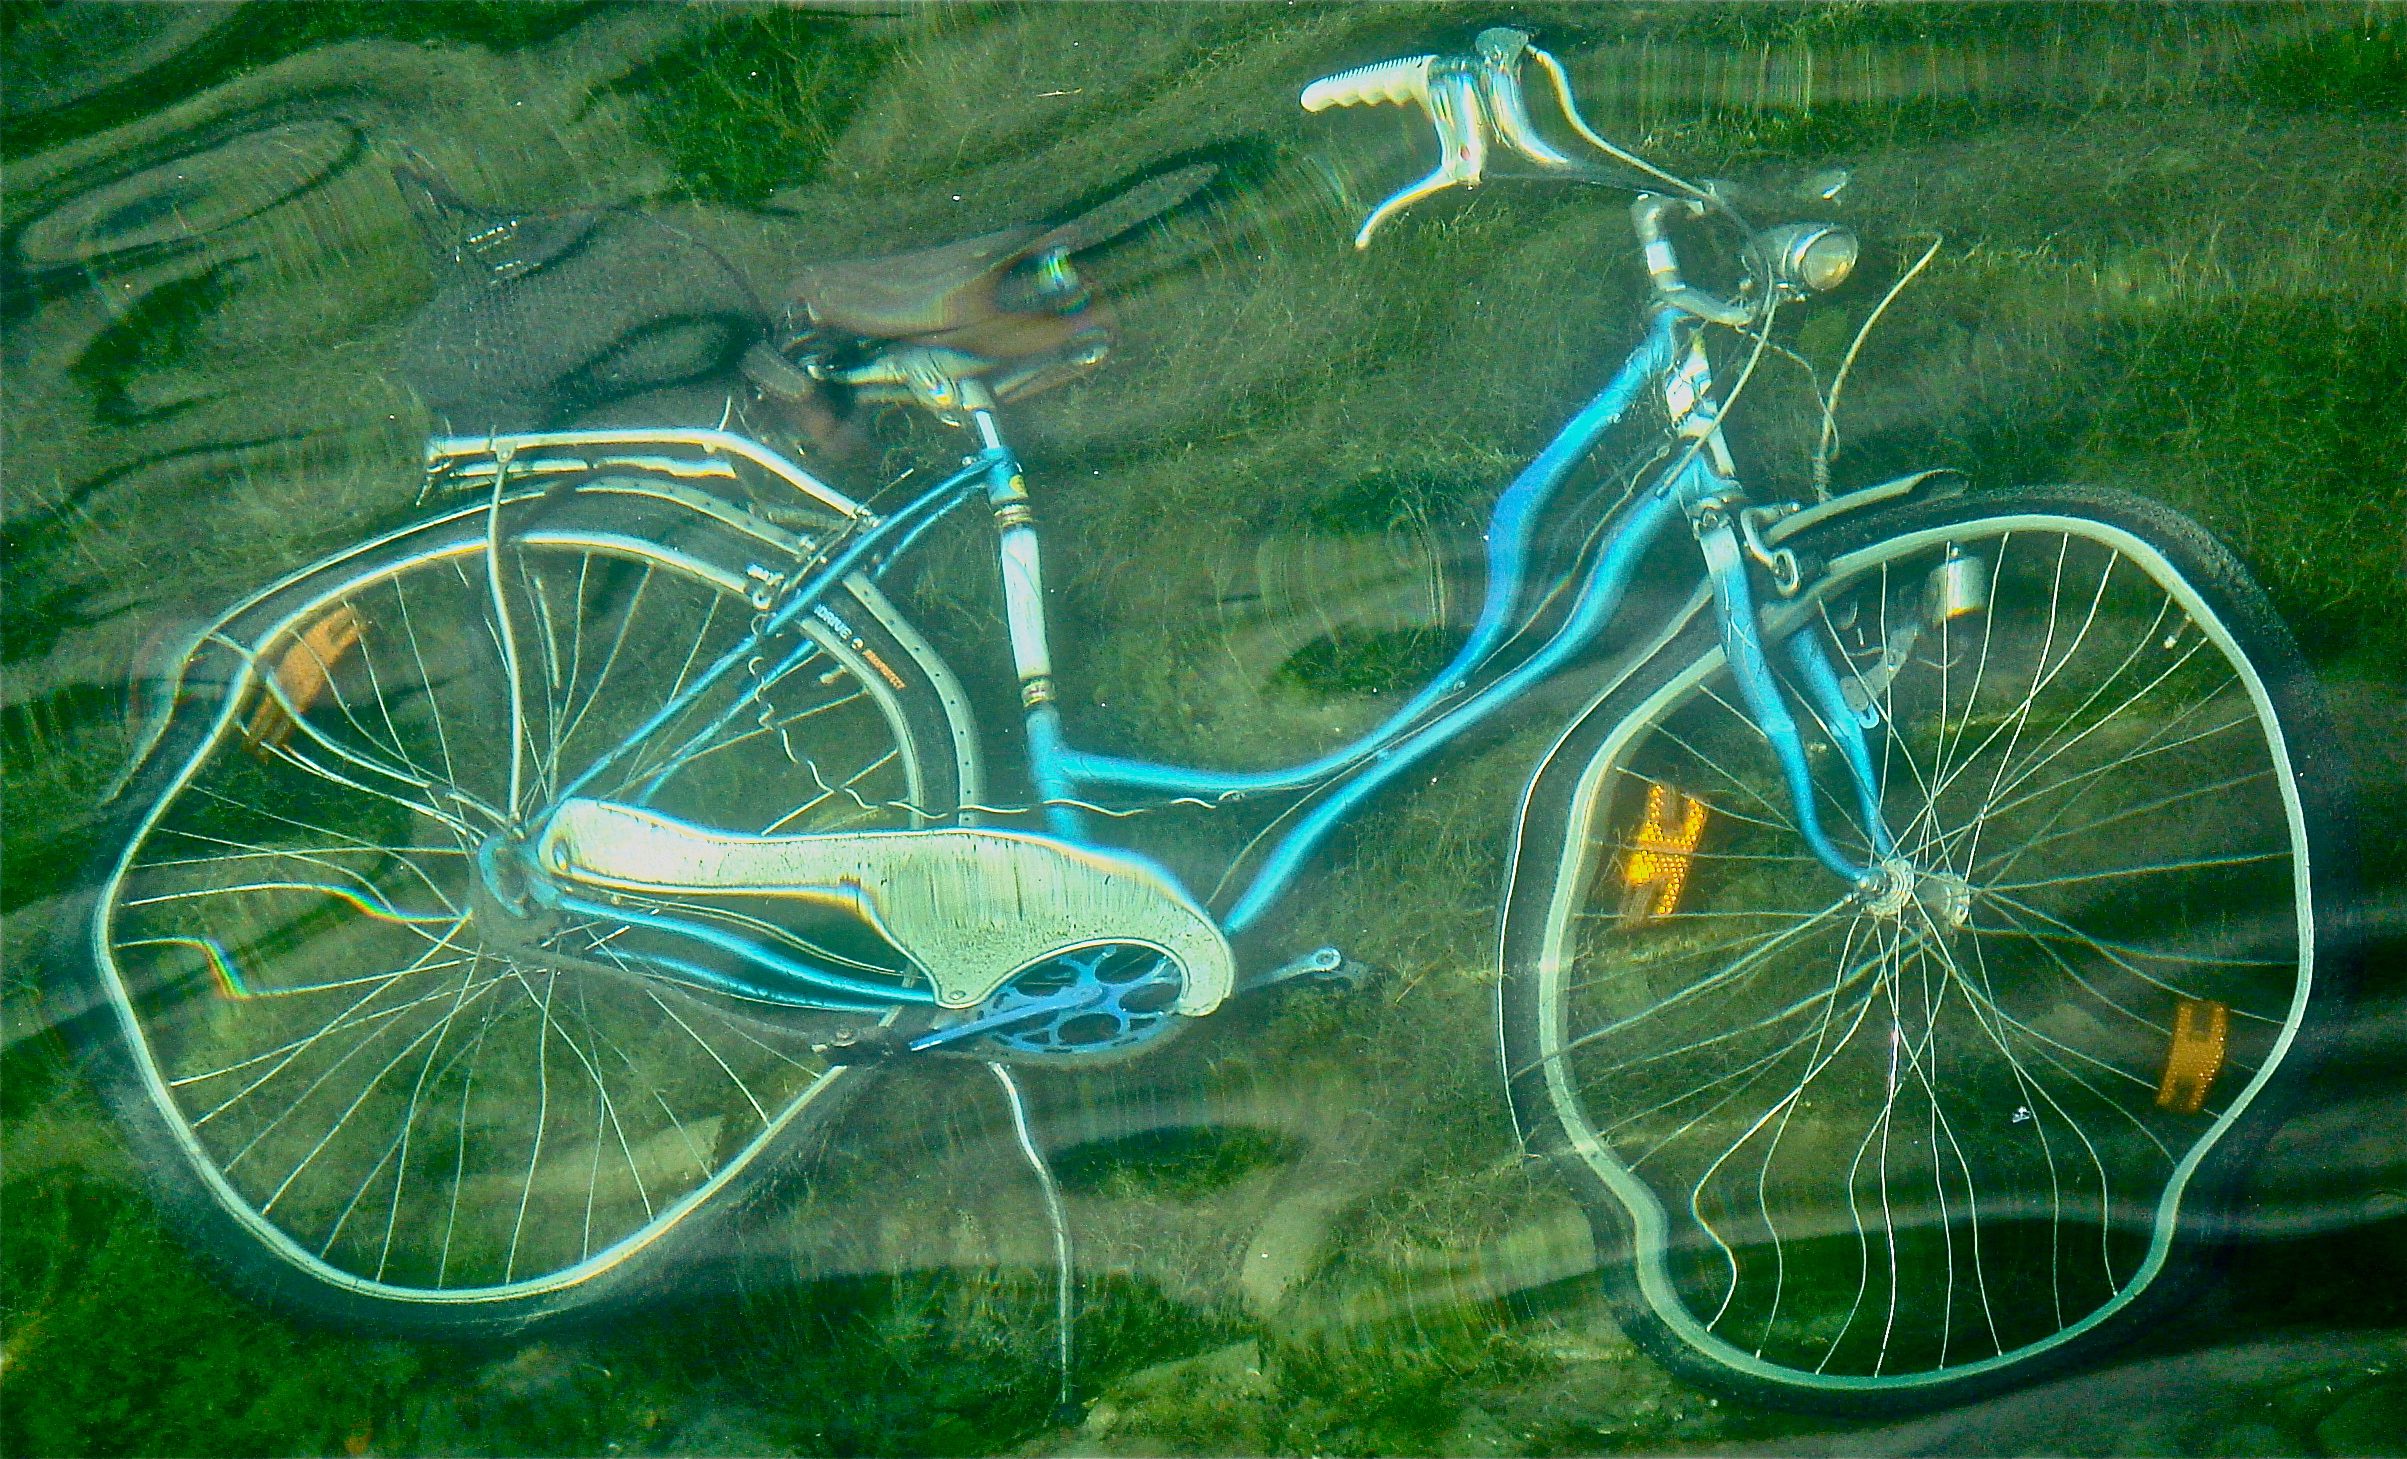
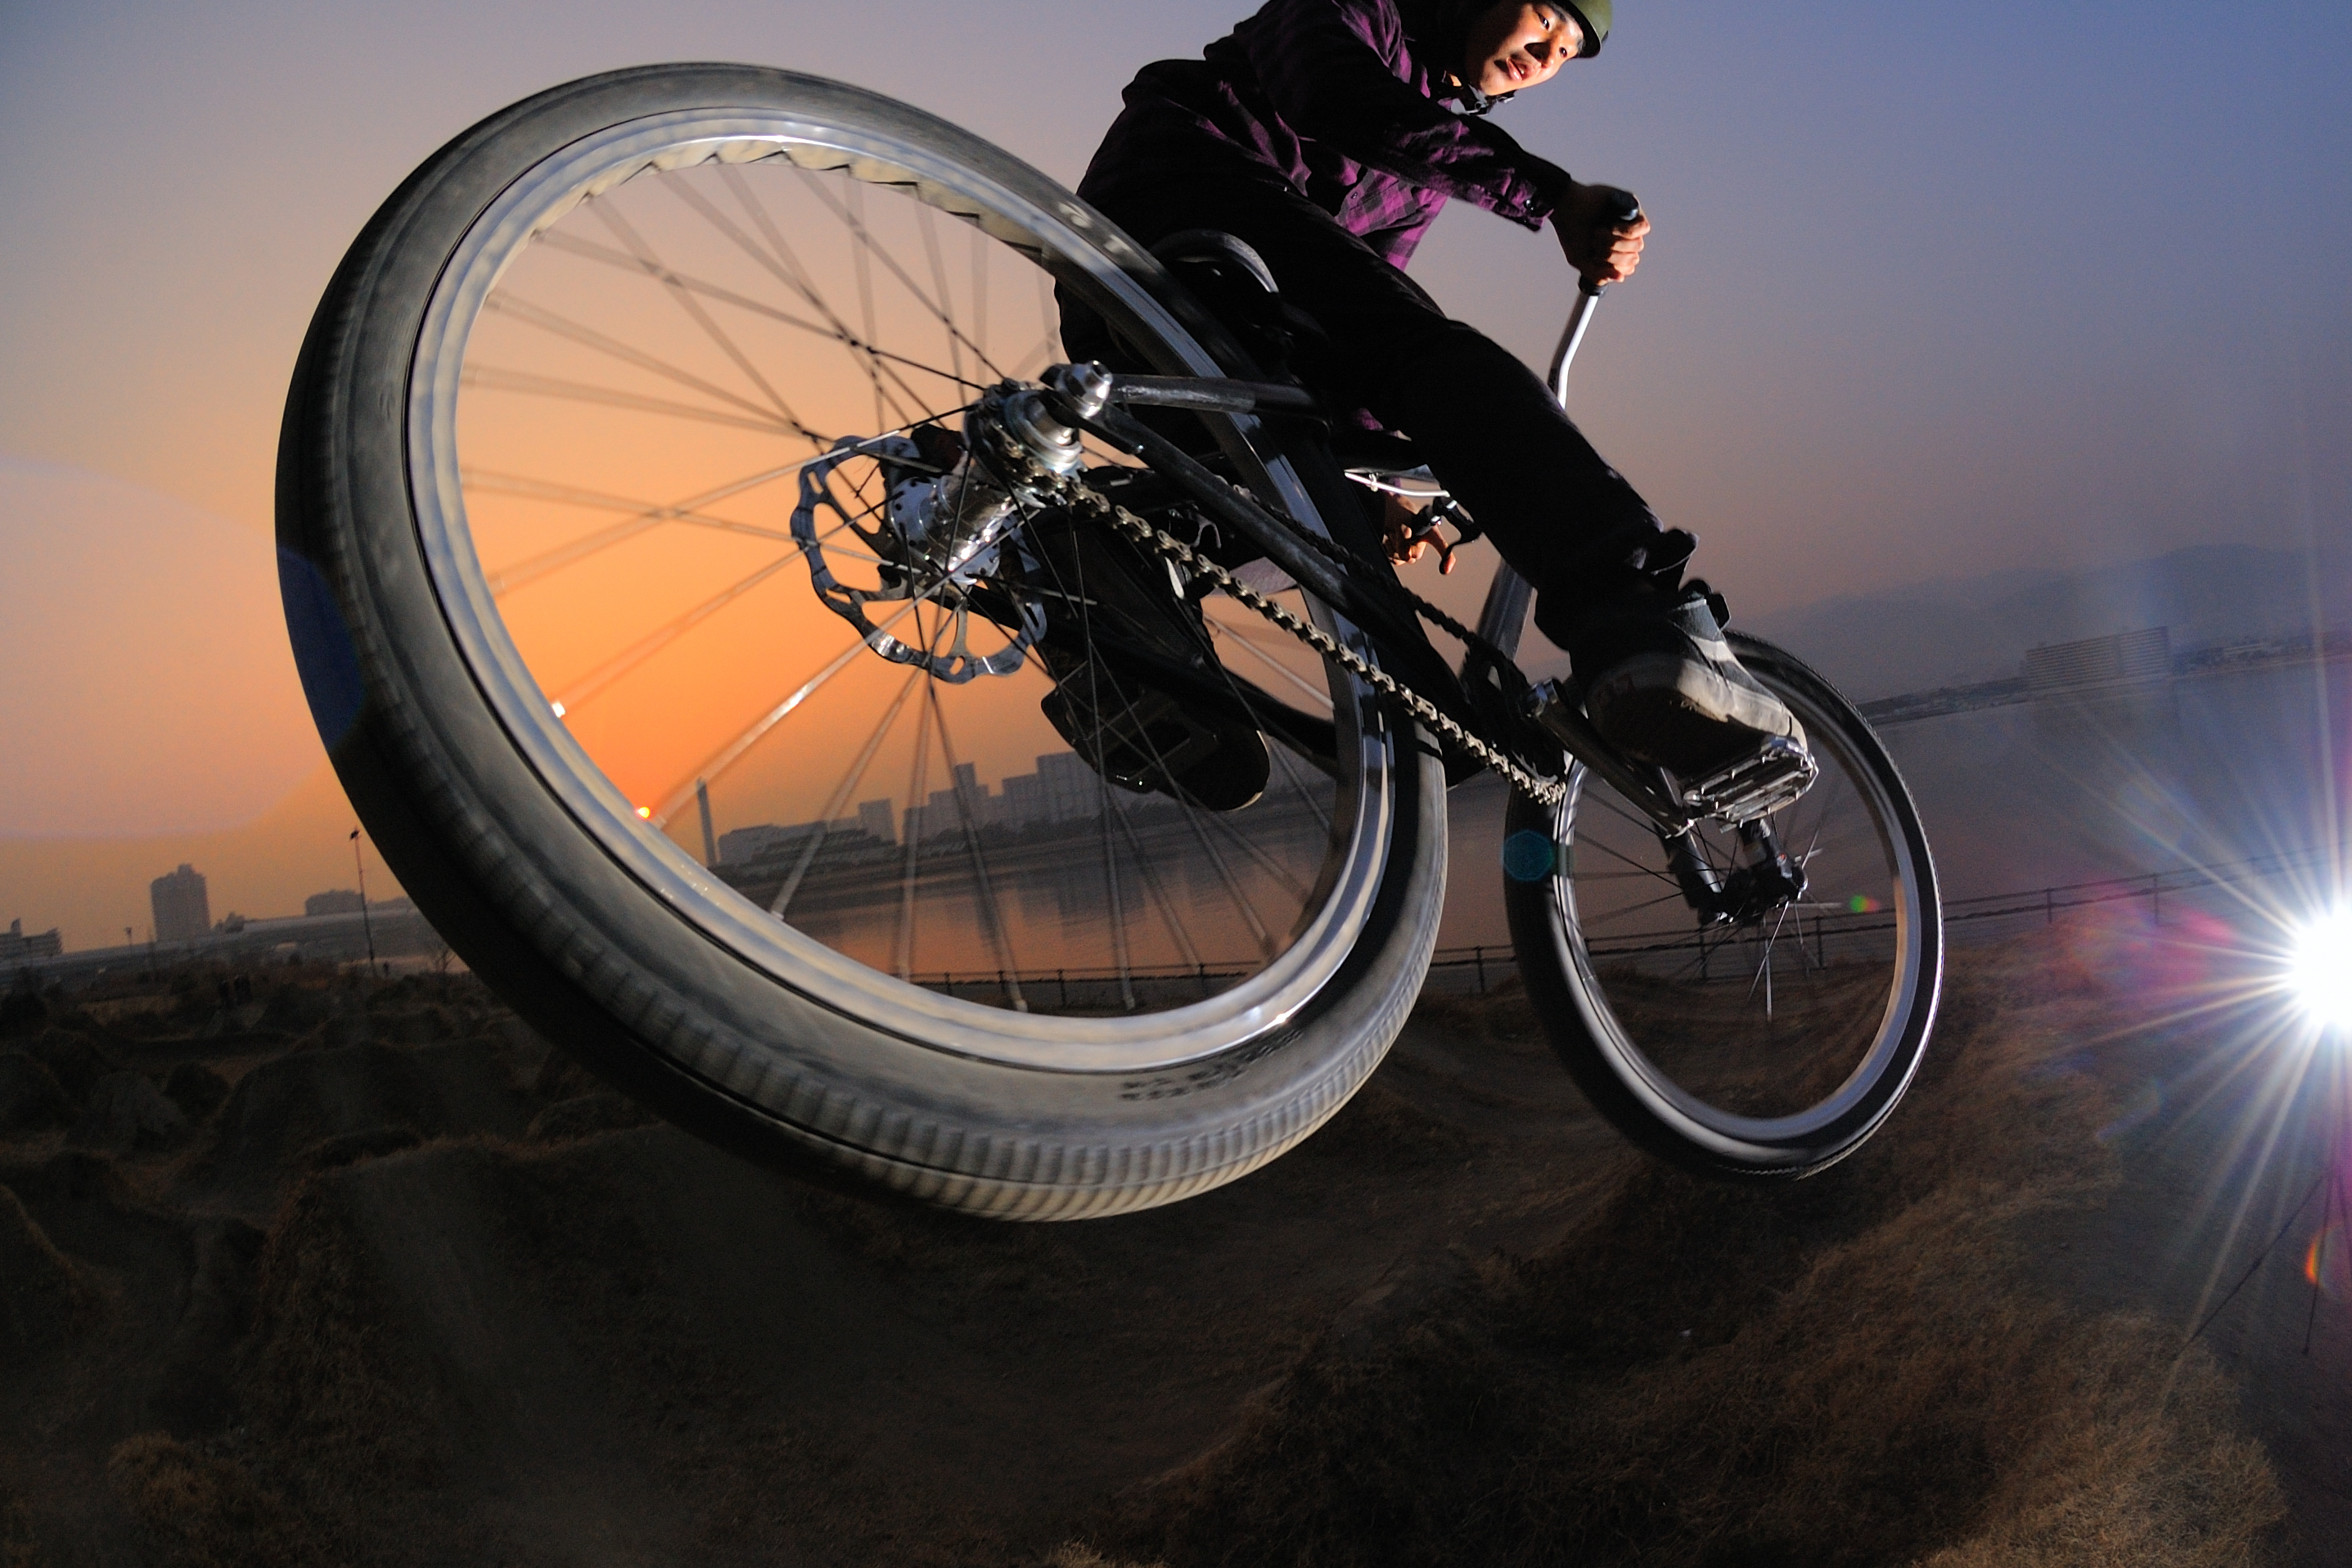
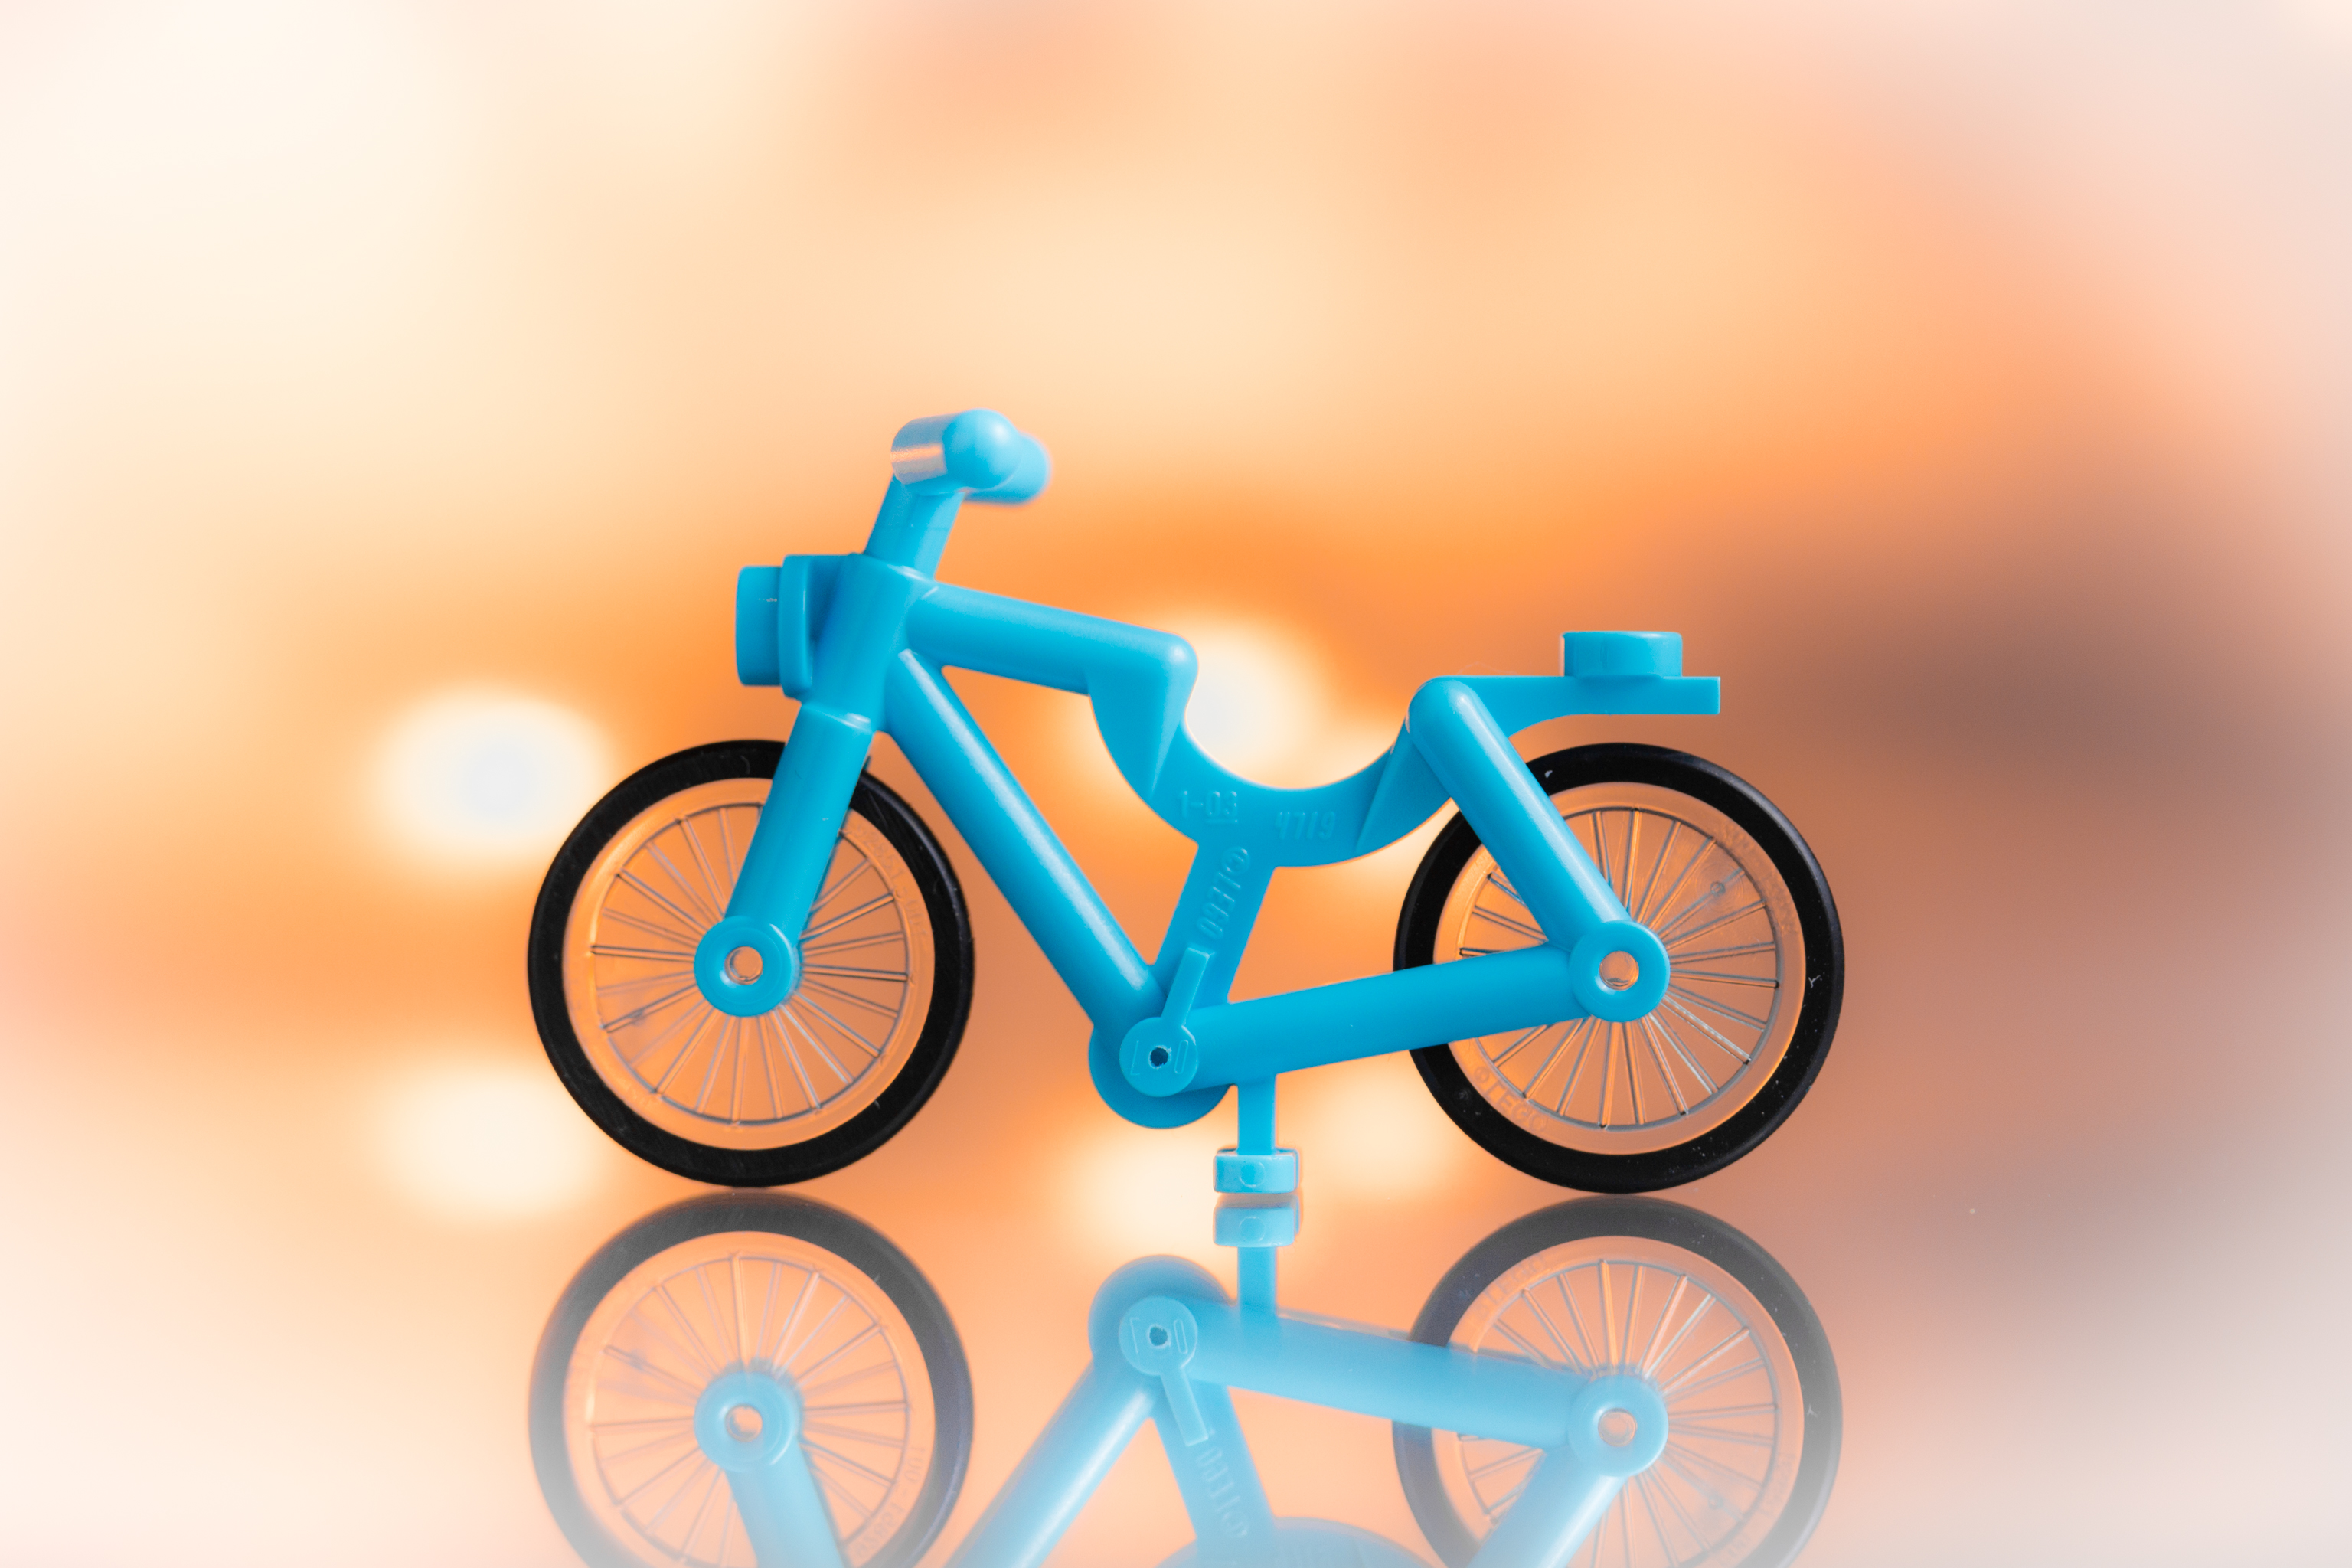
  • Handlebars to Spokes – 20 Impressive Images of Bikes

    One of my favorite things to look for and to photograph is bicycles. They have a great shape, make interesting shadows and you can shoot them standing still or moving.

    I think it’s a common subject of many photographers including these:

    Maryl Gonzalez

    By Maryl Gonzalez

    Thomas Meier

    By Thomas Meier

    Darlene Hildebrandt

    By Darlene Hildebrandt

    Vaidotas Mišeikis

    By Vaidotas Mišeikis

    Meena Kadri

    By Meena Kadri

    Carlo Scherer

    By Carlo Scherer

    Riccardo Cuppini

    By Riccardo Cuppini

    Mike Boening Photography

    By Mike Boening Photography

    Markus Spiering

    By Markus Spiering

    PhilHendley

    By philHendley

    Bernat Casero

    By Bernat Casero

    Julian Schüngel

    By Julian Schüngel

    Francesco

    By Francesco

    Petur?

    By Petur?

    Shinobu Sugiyama

    By shinobu sugiyama

    Clement127

    By clement127

    Todd F Niemand

    By Todd F Niemand

    Photographer

    By Photographer

    Hopeless128

    By hopeless128

    Owen's

    By Owen’s

    googletag.cmd.push(function() {
    tablet_slots.push( googletag.defineSlot( “/1005424/_dPSv4_tab-all-article-bottom_(300×250)”, [300, 250], “pb-ad-78623” ).addService( googletag.pubads() ) ); } );

    googletag.cmd.push(function() {
    mobile_slots.push( googletag.defineSlot( “/1005424/_dPSv4_mob-all-article-bottom_(300×250)”, [300, 250], “pb-ad-78158” ).addService( googletag.pubads() ) ); } );

    The post Handlebars to Spokes – 20 Impressive Images of Bikes by Darlene Hildebrandt appeared first on Digital Photography School.


    Digital Photography School

  • Weekly Photography Challenge – Bicycles

    We already saw some other photographers’ images of bikes here.

    Martin Fisch

    By Martin Fisch

    ·júbilo·haku·

    By ·júbilo·haku·

    Weekly Photography Challenge – Bicycles

    Now it’s your turn. There are bikes everywhere in all different shapes, sizes, and colors. Go find some interesting ones and photograph them. Think outside the box of the usual shots, go macro, shoot a shadow, process it in black and white.

    Thomas Hawk

    By Thomas Hawk

    Robert Couse-Baker

    By Robert Couse-Baker

    R. Nial Bradshaw

    By r. nial bradshaw

    Share your images below:

    Simply upload your shot into the comment field (look for the little camera icon in the Disqus comments section) and they’ll get embedded for us all to see or if you’d prefer, upload them to your favorite photo-sharing site and leave the link to them. Show me your best images in this week’s challenge. Sometimes it takes a while for an image to appear so be patient and try not to post the same image twice.

    Share in the dPS Facebook Group

    You can also share your images on the dPS Facebook group as the challenge is posted there each week as well.

    googletag.cmd.push(function() {
    tablet_slots.push( googletag.defineSlot( “/1005424/_dPSv4_tab-all-article-bottom_(300×250)”, [300, 250], “pb-ad-78623” ).addService( googletag.pubads() ) ); } );

    googletag.cmd.push(function() {
    mobile_slots.push( googletag.defineSlot( “/1005424/_dPSv4_mob-all-article-bottom_(300×250)”, [300, 250], “pb-ad-78158” ).addService( googletag.pubads() ) ); } );

    The post Weekly Photography Challenge – Bicycles by Darlene Hildebrandt appeared first on Digital Photography School.


    Digital Photography School

  • 4 Tips to Leverage Natural Light Using Just your Camera and One Lens

    In photography light is everything. Without light, whether that be artificial or natural, there is no photography. The problem is that sometimes there is just too much or too little, and in both cases, artificial light may need to be added. But what if you don’t have any artificial light available to you? And what if all you have is literally a camera with a lens and nothing else? This article focuses on how you can leverage natural light using just one lens and working without a reflector or a speedlight.

    #1 Position your subject in relation to the light

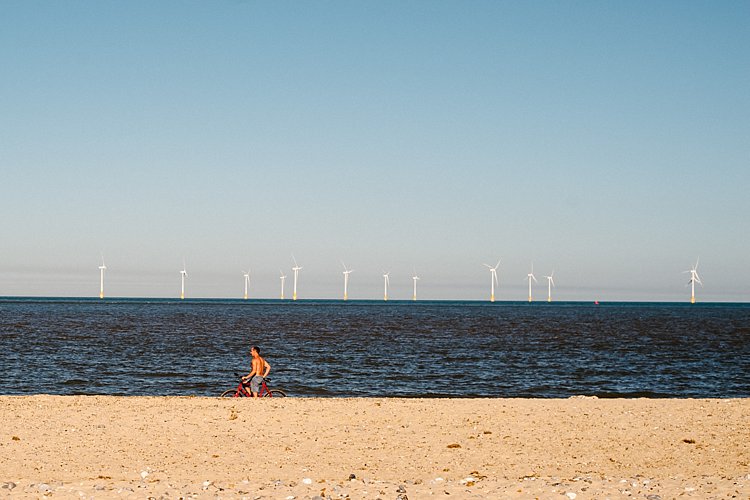
    Let’s take a look at these photos below. It was a very sunny day and I wanted to capture the blueness of the sky and the sea as well as the people in the shots. I had a D700 which has a base ISO of 200 and the 50mm 1.4 lens. I have provided the settings below for each photo.
    creative-ways-available-light-with-the-50mm_0000

    f/5.6 ISO 200, 1/2000th

    creative-ways-available-light-with-the-50mm_0000

    f/5.6 ISO 200, 1/1250th

    creative-ways-available-light-with-the-50mm_0000

    f/6.3 ISO 200, 1/2000th

    These settings are okay on a very sunny day if you shoot with the sun positioned behind you shining towards your subject. In this case the sea and sky, which also illuminated the people that I wanted to be in the photo.

    Lighting position

    While these photos are fine, there are a few issues. First, put simply, when this is the lighting position, anyone, and any camera can take these types of photos. You can shoot in automatic mode and the photos would look the same. Mobile phones nowadays can take even more amazing photos in this situation where there is a huge amount of light hitting the subject and the background directly.

    I love these types of photos for travel photography, high contrast shots and snapshots that would make me remember such scenes. But if I am after portraits, would I hire a professional photographer who would give me photos that anyone can take? Definitely not! Sure, the occasional lifestyle snapshot in this lighting is acceptable such as this one directly below shot at f/2.5 ISO 200, 1/2500th. But I would not want proper portraits of my family to be taken in this lighting situation.
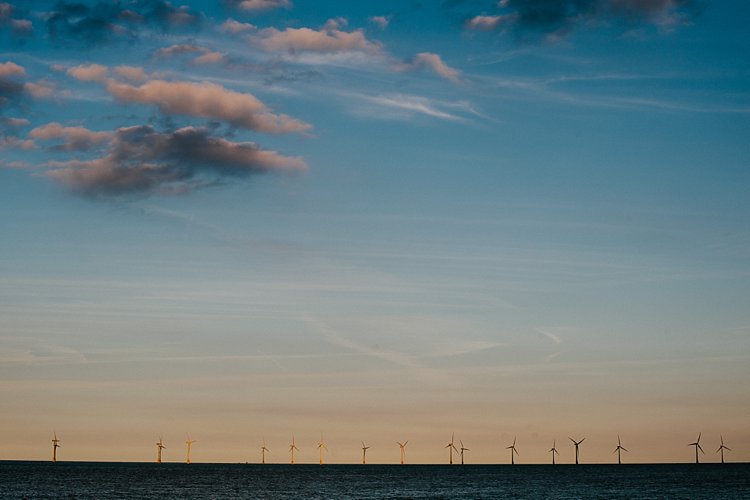
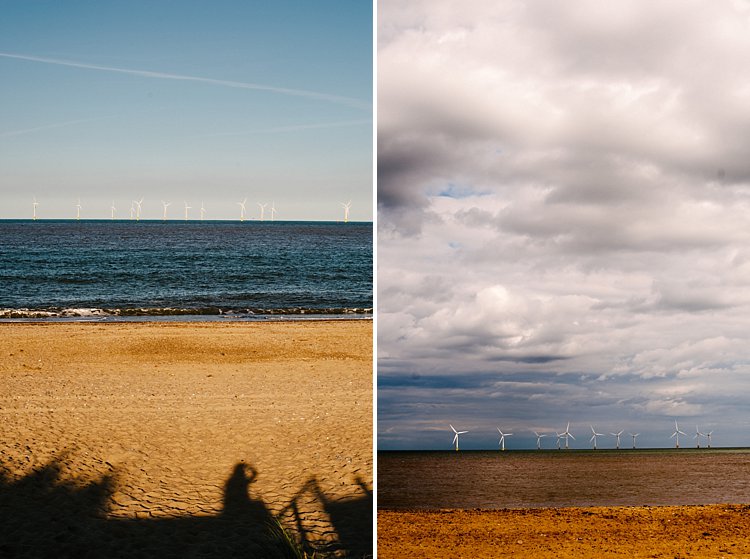
    creative-ways-available-light-with-the-50mm_0000

    creative-ways-available-light-with-the-50mm_0000

    creative-ways-available-light-with-the-50mm_0000

    Harsh shadows

    The second issue is the harsh shadows. As a professional photographer, this would never be my lighting position for people or portraits. Even if the sun was coming in at a side-angle, undiffused sunlight directly hitting the subject still produces harsh shadows and hotspots. I would prefer for the sun to be behind the subjects, also known as backlighting, rather than directly in front of them.

    If your intention is to take nicely lit portraits with a background that is not blown out, for backlighting to work, you would need to have a big enough flash or reflector to illuminate your subject to avoid silhouettes. Conversely, you can simply expose for your subject but you will have to blow out (overexpose) the background. Therefore, you end up with a white sky rather than a blue sky.

    An example of backlighting is this sunset photo below. The houses and the boats were not illuminated. I was too far away for my pop-up flash to be of any help, and I didn’t have a tripod for a long exposure and smaller aperture. But I still wanted to capture some of the soft sky color along with the sunset. Balancing the exposure was tricky and I ended up shooting this image with the following settings; f/5, ISO 200, 1/320th. While the ambient light of the sunset was captured, the other elements in the photo were too dark and ended up almost like silhouettes.
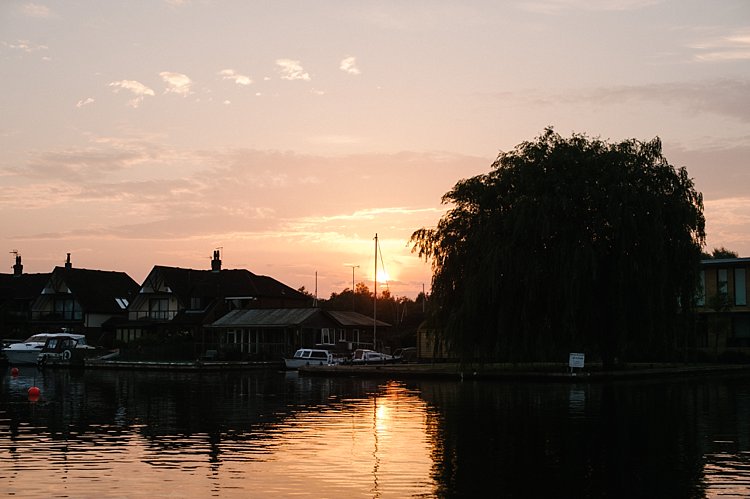
    creative-ways-available-light-with-the-50mm_0000

    What if you have nothing else but a camera and lens with you? You do not want all your photos to be silhouettes when shooting backlit, or too dark when shooting in the shade. So what you can do is leverage your surroundings by positioning your subject carefully in relation to the light. If you have to shoot backlit portraits in a situation similar to above, shoot an intentional silhouette or use your flash for fill light (more on this below).

    If you’re doing portraits where you want to focus on well-exposed faces, avoid positioning your subject where they are facing the sun which results in harsh light and shadows. On a very sunny day, you may want to wait for the golden hour – the time shortly after sunrise or before sunset –  when the sun is much lower on the horizon and the light is much softer. This yields a light that is much more flattering for portraits. If it is a bright but overcast day, the clouds act as a huge diffuser and the shadows are not as harsh so it is easier to photograph portraits in those conditions.

    #2 Look for ideal light

    Ideal light is often indirect, reflected, or subtractive light. This can take various forms:

    • Indirect lighting can be the soft diffused light coming from a window.
    • Reflected light can be that bouncing off a white floor, wall, bright sand, or from white or light-colored clothing you are wearing.
    • Subtractive light can be achieved by blocking the light with a diffuser, umbrella or a flag (any flat black object large enough to block any direct light hitting your subject).

    Get out of the sun

    As this article does not involve any equipment other than your camera and lens, instead of blocking the light, I positioned my subject in the shade. So that instead of subtracting light from my subject, I subtracted my subject from the light and put her in the shade.

    In this example below, it was a very bright day and I did not want any direct light falling on my daughter’s face. I put her completely in the shade but deliberately next to the caravan wall which was light beige. There is some reflected light from the side that helps illuminate her face and the generally shadowed area we were in.

    creative-ways-available-light-with-the-50mm_0000

    In this photo below taken in the zoo, there was no natural light at all. A fluorescent light illuminated the box where the snake was. You can see this white light reflected on the top part of the snake’s eye (catchlight). I waited for the snake to get into this position and used the light which was bouncing from the ceiling onto him to get this shot.
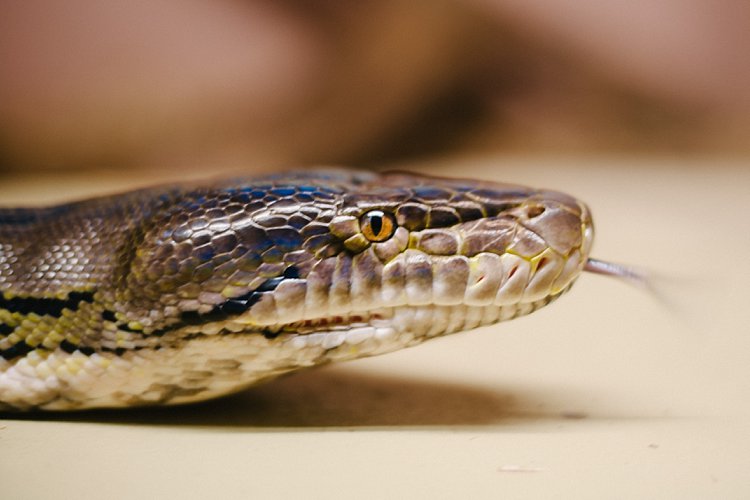
    creative-ways-available-light-with-the-50mm_0000

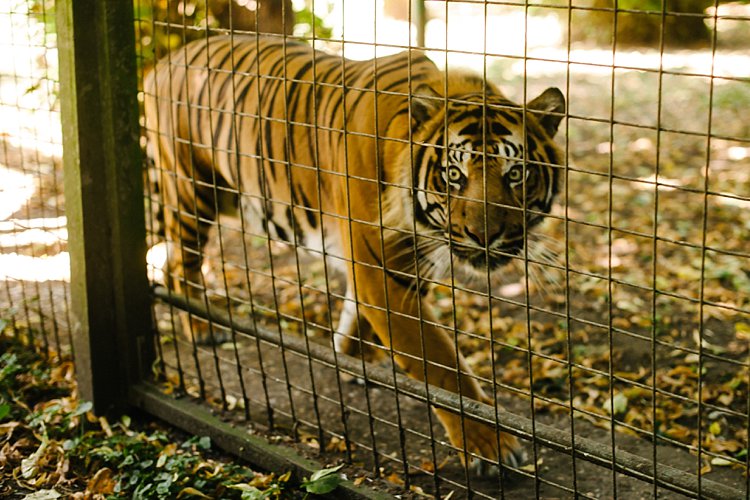
    In this photo below, there was no ideal light! We were in a pretty darkly shaded area and the enclosure was mottled with spots of sun and shade. I positioned myself where I knew I could catch a good close up of the tiger in complete shade and waited for it to pass by.  The contrast between the light and shade was so strong that had I taken the photo of the tiger with his body in half sun and half shade, it would not have come out well at all.
    creative-ways-available-light-with-the-50mm_0000

    #3 Use your pop-up flash as fill light

    Now I know that photographers are sometimes funny (and snobby) about using the camera’s built-in pop-up flash. I am one of those photographers, with good reasons. The camera’s pop-up flash blasts light directly onto your subject. It gives you a rather flat and unflattering light with a harsh shadow around the jaw and head to boot. Unless your intention is to shoot like this such as some fashion houses do (and they do it so professionally by the way), then this is a no-no in portrait photography. Ideally, you want the light bounced and angled – anything but aimed directly from the camera toward the subject.

    However, I do use my pop-up flash quite a bit! In fact, I use it when I don’t have a flash gun (speedlight) and I’m shooting backlit, especially when the sun is strong. And I have no qualms using it as a direct light in this situation because the camera’s flash is not strong enough to overpower the sun anyway. So the most you get out of it is a little bit of fill light.

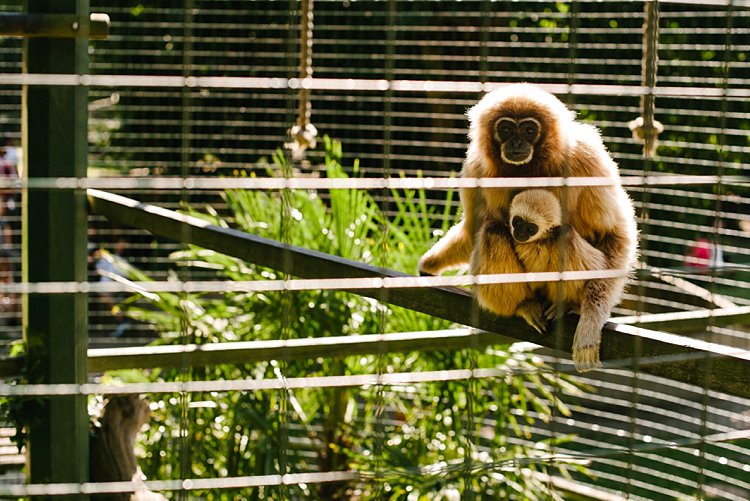
    Take this photo of the monkeys below. Had I not used my pop-up flash, there would have been no detail captured on the monkey’s face at all. The sun was too powerful that the pop-up flash could never have flattened the face and created harsh shadows anyway, and I was also too far away from the monkeys for that to happen.
    creative-ways-available-light-with-the-50mm_0000

    Using the pop-up flash is a fast and easy way to add light. Just be mindful of the caveats and be circumspect when using it.

    #4 Try long exposures to capture natural light

    Shutter speed has everything to do with ambient light regardless of whether you are doing long exposures or using on-camera, off-camera, or pop-up flash. In fact, with regards to the latter three, flash exposure is completely unaffected by shutter speed.

    With long exposures, you can take photos even when very little light is available. You need a tripod, or something steady and flat to rest your camera on like a table or chair, and you’re good to go. So why would you want to slow down your shutter speed and when must you do it? Do it when you want to capture the ambient light.

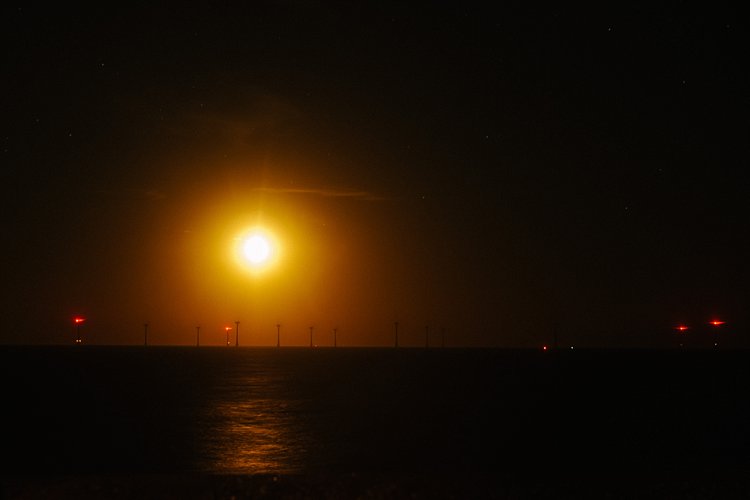
    Armed with just a 50mm and the camera placed on a steady surface, I slowed my shutter speed right down to a few seconds using the bulb setting. I may have captured the moon rising but the sky is pitch black and not enough ambient light was captured. My shutter speed might have been slow but not slow enough. Ambient light was very crucial here because there were stars in the sky.
    creative-ways-available-light-with-the-50mm_0000

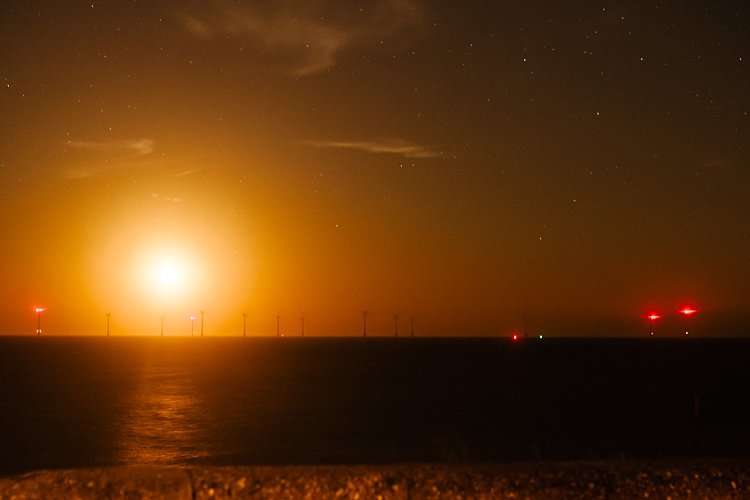
    In contrast to the above, the photo below is the same scene photographed with a much slower shutter speed so that the stars are visible.
    creative-ways-available-light-with-the-50mm_0000

    Even with just the 50mm you can photograph the starry sky such as below. However, don’t go over 10 seconds as you would then start capturing the star trails.

    creative-ways-available-light-with-the-50mm_0000

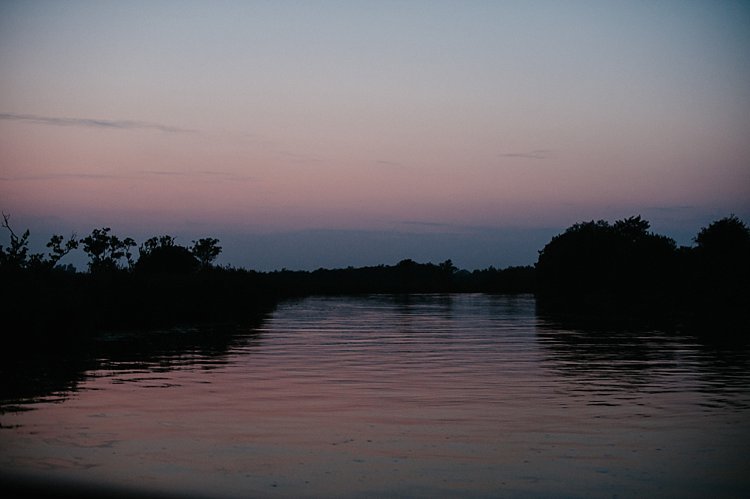
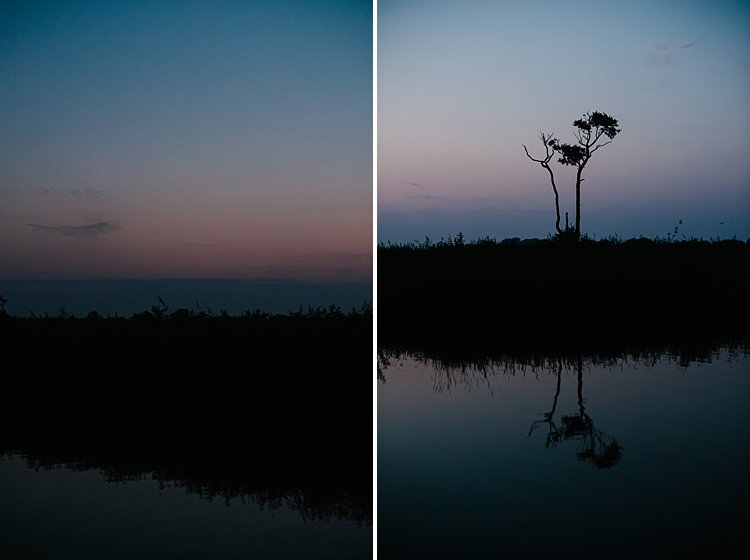
    Using shutter speed wisely and skillfully is a great tool for capturing mood, color, and ambient light, even when there is very little of it. There is some light you don’t ever want to kill such as the soft evening light just after sunset. These photos were taken simply with a camera with a 50mm lens at a slow shutter speed, a wide aperture, and a fairly high ISO (as I was on a slow moving boat). These images were shot at;  f/2.5, ISO 2500, 1/100th. A faster shutter speed would have killed this light and rendered the sky pitch black. Too slow I would have run the risk of blurry photos due to the moving boat.
    creative-ways-available-light-with-the-50mm_0000

    creative-ways-available-light-with-the-50mm_0000

    creative-ways-available-light-with-the-50mm_0000

    creative-ways-available-light-with-the-50mm_0000

    googletag.cmd.push(function() {
    tablet_slots.push( googletag.defineSlot( “/1005424/_dPSv4_tab-all-article-bottom_(300×250)”, [300, 250], “pb-ad-78623” ).addService( googletag.pubads() ) ); } );

    googletag.cmd.push(function() {
    mobile_slots.push( googletag.defineSlot( “/1005424/_dPSv4_mob-all-article-bottom_(300×250)”, [300, 250], “pb-ad-78158” ).addService( googletag.pubads() ) ); } );

    The post 4 Tips to Leverage Natural Light Using Just your Camera and One Lens by Lily Sawyer appeared first on Digital Photography School.


    Digital Photography School

  • Fantasy is Now Reality: Twisting Tree-Covered Callebaut Tower Taking Shape

    [ By SA Rogers in Architecture & Cities & Urbanism. ]

    callebaut-taipei

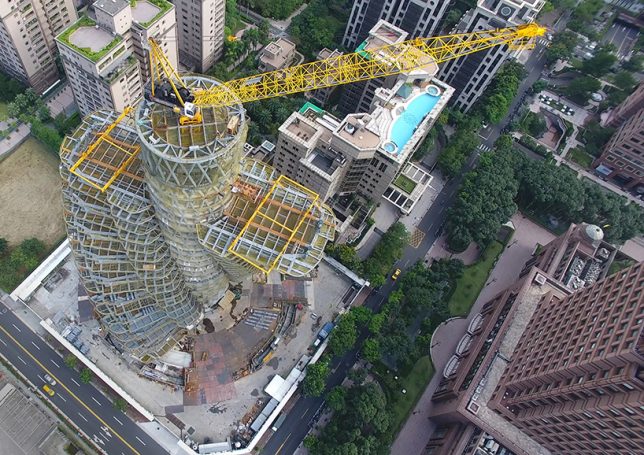
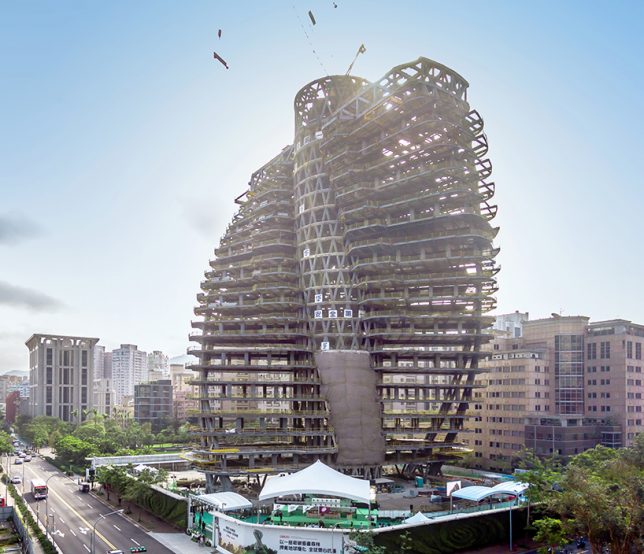
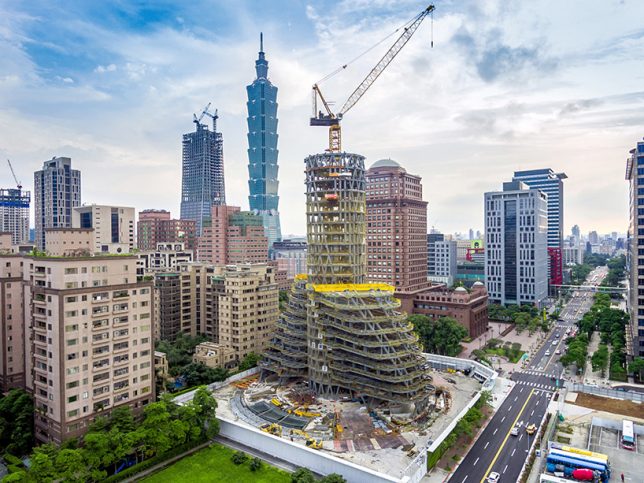
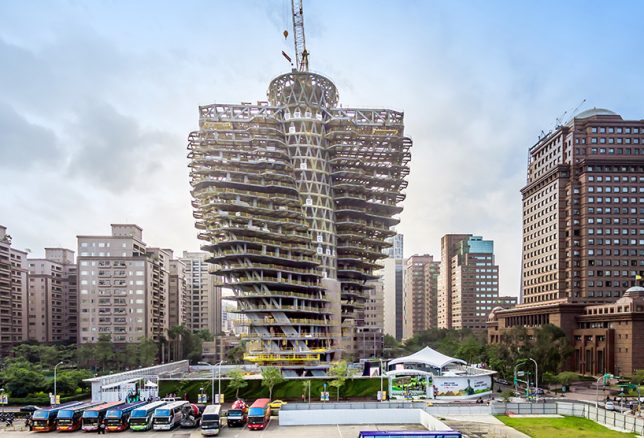
    We’ve seen lots of dazzling concepts by Belgian architect Vincent Callebaut, most of which seem far too fanciful to ever actually materialize, but his twisting high-rise tower in Taipei is finally taking shape in three dimensions. ‘Tao Zhu Yin Yuan’ is about halfway complete, pivoting on a central axis for a layout that enables outdoor space brimming with greenery on every floor. Scheduled for completion in September 2017, the residential tower will support 23,000 trees absorbing up to 130 tonnes of carbon dioxide each year.

    callebaut-concept

    callebaut-taipei-2

    The tower is conceived as a ‘inhabited tree,’ set upon a circular footprint with towers extending from the core in a double helix shape. From the north or south, it looks like a pyramid, while east and west views give onlookers a fuller idea of the building’s scale. It will contain 40 luxury apartments and additional facilities, and is set to meet LEED gold status as well as diamond-level Low Carbon Building Alliance certification.

    callebaut-taipei-6

    callebaut-taipei-5

    Callebaut is known for proposals that emphasize sustainability, self-sufficiency, the inclusion of vegetation and eye-popping shapes. Examples include his dragonfly-wing-shaped urban farm, the Lilypad floating city concept, the ‘Asian Cairns’ residential towers and a series of futuristic ‘smart towers’ aiming to reduce pollution and create renewable energy while integrating into existing built environments.

    callebaut-taipei-3

    Most of these concepts either appear too wild and expensive to developers and investors to inspire confidence for real-world success, or rely on theoretical technology that hasn’t been fully developed or proven. But nobody can accuse Callebaut of limiting his own creativity in the way he envisions the future of architecture, in a world where the choices we make for our cities directly impact our ability to withstand the consequences of climate change.

    callebaut-taipei-4

    “In 2050, we will be 9 billion of human beings on our blue planet and 80% of the world population will live in megacities,” says Callebaut. “It’s time to invent new eco-responsible lifestyles and to repatriate the nature in our city in order to increase the quality of our life with respect of our environment.”

    Share on Facebook


    [ By SA Rogers in Architecture & Cities & Urbanism. ]

    [ WebUrbanist | Archives | Galleries | Privacy | TOS ]


    WebUrbanist