Blog

  • How to Publish Images Directly to Instagram From Lightroom

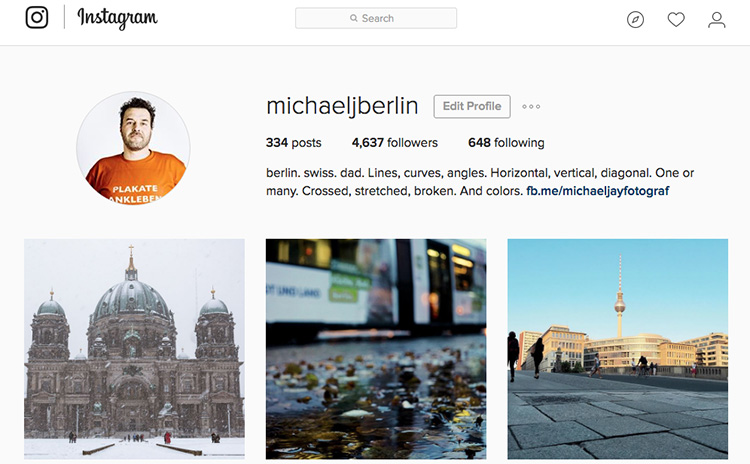
    The Lightroom Library module offers more than just the option to organize your images. With its Publish Services, it allows uploading content to online services from within its interface. The best known Publish Services might be connections to Facebook or Flickr built into the software by Adobe. Since the summer of 2016, you can add Instagram to this list. The LR/Instagram plugin allows publishing on the popular sharing platform through a direct connection from the Library module.
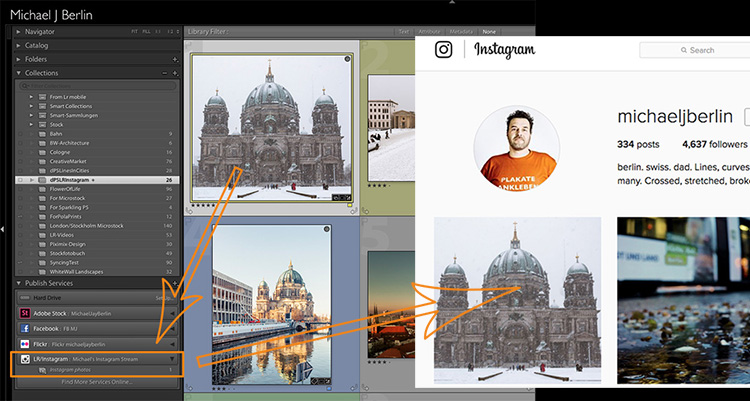
    From Lightroom to Instagram

    This comes in pretty handy since Instagram does not allow uploads from desktop computers directly. Until now you had to find ways to export images from Lightroom and transfer them to your smartphone before being able to publish them on Instagram.

    Installation of the LR/Instagram plugin

    The plugin is free to download and try, and there is no time or volume limit to the usage. The publisher, however, asks for a $ 10 payment if you like it. The payment can be done through the plugin manager in Lightroom with a PayPal transaction.

    Please also note that this plugin is programmed by a third party, neither Adobe nor Instagram can offer any support, and the plugin may fail at times when either Lightroom or Instagram change their code. So keep yourself updated through the author’s website.

    The LR/Instagram plugin acts as a publishing service within the Lightroom Library module. To install the plugin, you first need to download a ZIP file from the website and unpack that to your hard drive.
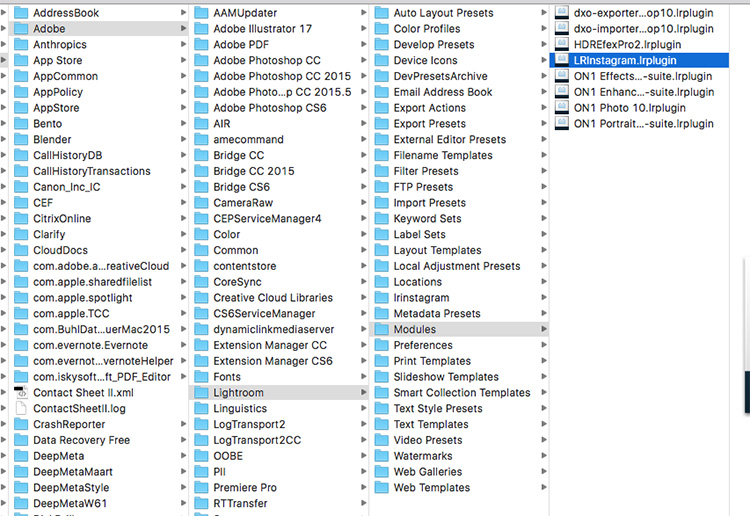
    Lightroom Module folder

    While Lightroom allows you to install the plugin from that location, I recommend first moving it from your download folder or desktop to a more permanent location. I use the “Modules” subfolder in the Application Library structure on my hard drive to store my LR plugins. But as your system may vary, make sure it is located in a folder that is related to your Lightroom installation.

    Now in Lightroom, open the Plug-In Manager through the File menu structure. Below the list of existing plugins you can find an “Add” button. Point Lightroom to the location of the plugin and tell it to “Add Plug-In”.
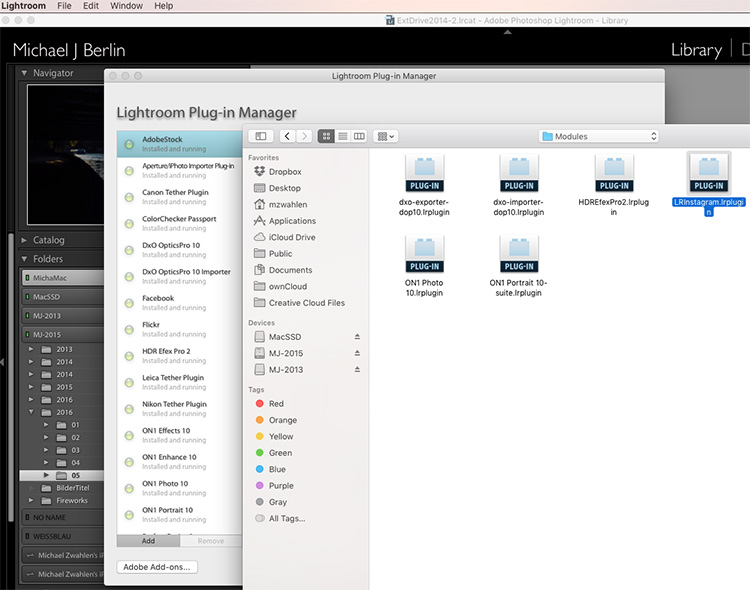
    Add LR/Instagram Plug-In

    How to set up your Instagram Publish Service in Lightroom

    Once it is installed, you have to set up a Publish Service using that plugin. For this, press the Plus button on top of the Publish Services section in Lightroom’s Library module. The Publishing Manager will show up and offer LR/Instagram as an additional service. You can name the new service and enter your Instagram username and password.

    Please note that the plugin does not work with a Facebook connection login, you need to have a password directly on the Instagram site.
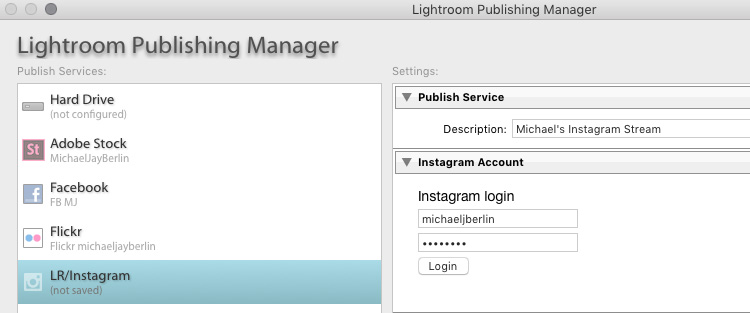
    Setting up the LR/Instagram Plug-In

    If you now press the Login button, the plugin will show your Instagram profile picture if successful.

    Configure settings

    In the Preference section, you can limit the number of images published at once. As Instagram and its users might react negatively to one user filling up pages of images at once, it is recommended to set this to a value of around five.

    Since Instagram changed their platform to also allow non-square images, you could upload portrait or landscape oriented images to the platform. Still, some users prefer to make their images all appear in the commonly known square format. For this, you can have the plugin add a white or black padding border for images that are not natively in square format.

    However, I prefer to crop my images to square format before uploading them to Instagram. For this, I usually create a Virtual Copy of my image in Lightroom before making the Instagram crop. I might upload the original format to other platforms like Facebook and want to avoid going back and forth between different formats.

    As Instagram widely relies on #hashtags for users to find content outside of their followings, the LR/Instagram plugin offers a separate metadata field with the option to add these hashtags within the Lightroom interface. You can find the hashtag field in the Metadata section through the drop down menu selecting the LR/Instagram section.
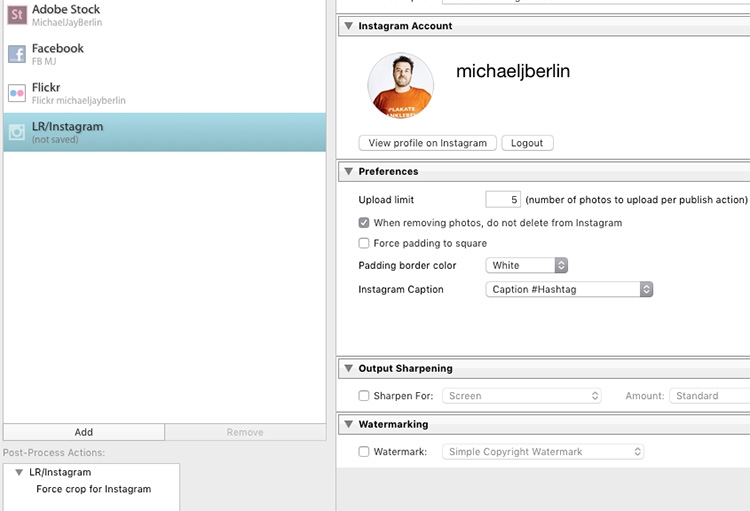
    LR/Instagram Preferences

    In the preferences area of the Publishing Manager, you can choose to “Caption #Hashtag” as an option to publish the image on Instagram using your caption and add the hashtags from that separate field. If preferred, you can also just publish the image using Title or Caption from your metadata as you also could enter hashtags in a second stage on the Instagram platform directly.

    Publishing images to Instagram from Lightroom

    Once set up, the new Publish Service will appear in your Library module. You can now simply drag the image you want to publish to the “Instagram photos” collection. This serves as a collection like all others in Lightroom. If you prefer, you can also set this as your Target Collection which allows you to use the B shortcut to directly add images from anywhere in your library into it.
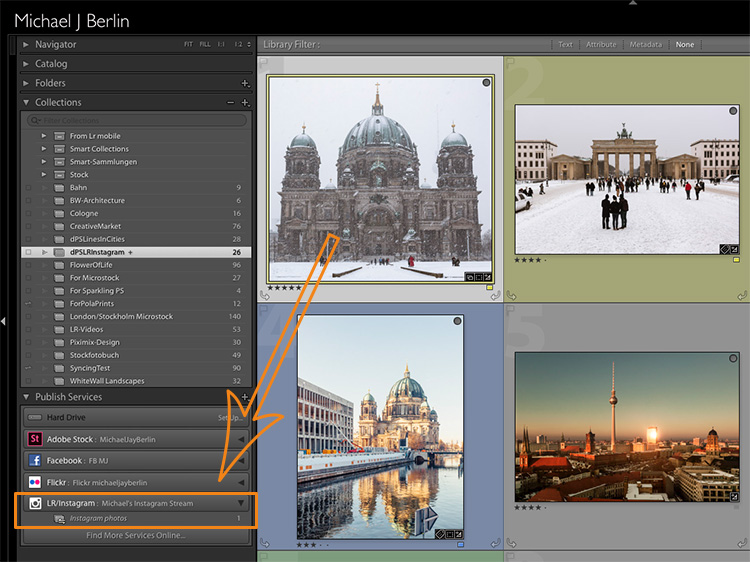
    Drag and drop images in Lightroom

    When you are finished adding images, you can now tell Lightroom to publish those images. Personally, I try to limit myself to one new image each time. But if preferred, the plugin will now publish as many images as you have recently added to its collection or the limit you have set in the Preferences as explained above. The Publish Service will now run in the background and use Instagram’s API to publish your image.
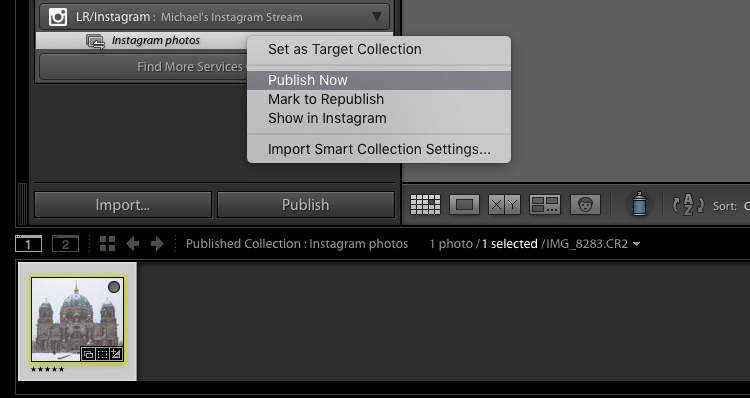
    Publishing from Lightroom to Instagram

    Instagram Stream with photo from Lightroom

    If you ever want to change the settings you have originally entered, just press the Plus button on the Publish Services section in the Library module and open the Publishing Manager again.

    You can also set up multiple different publishing streams, either with different settings or even for a separate Instagram account.
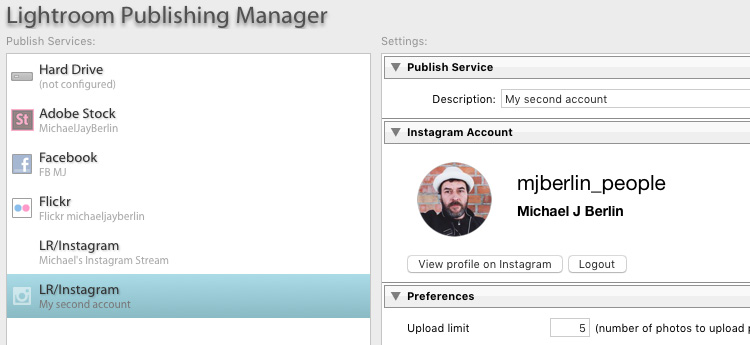
    Multiple Publishing Streams for second account

    Give it a go

    So if you’re on Instagram you might want to have a look this the LR/Instagram plugin. If you’ve used it tell us about your experience. Please share your profile so others can see your work, and follow dPS on Instagram as well.

    Read this on how to get more Instagram followers too.

    googletag.cmd.push(function() {
    tablet_slots.push( googletag.defineSlot( “/1005424/_dPSv4_tab-all-article-bottom_(300×250)”, [300, 250], “pb-ad-78623” ).addService( googletag.pubads() ) ); } );

    googletag.cmd.push(function() {
    mobile_slots.push( googletag.defineSlot( “/1005424/_dPSv4_mob-all-article-bottom_(300×250)”, [300, 250], “pb-ad-78158” ).addService( googletag.pubads() ) ); } );

    The post How to Publish Images Directly to Instagram From Lightroom by Michael Zwahlen appeared first on Digital Photography School.
    Digital Photography School

  • Cokin launches vintage-styled Riviera Classic tripod

    $ (document).ready(function() { SampleGalleryV2({“containerId”:”embeddedSampleGallery_5732238301″,”galleryId”:”5732238301″,”isEmbeddedWidget”:true,”standalone”:false,”selectedImageIndex”:0,”startInCommentsView”:false,”isMobile”:false}) });

    If putting your gorgeous retro-styled camera on an ugly, modern tripod just bums you out, filter maker Cokin has a solution. They’ve worked with Slik to produce the Riviera Classic, a tripod designed to match your rangefinder-esque mirrorless camera with vintage touches like a wooden tightening handle and faux-leather leg section covers. The whole thing comes with a handsome carrying pouch. No word yet on pricing or availability.

    Press release

    Cokin introduces RIVIERA Classic

    Modern tripod for retro cameras. And vice versa.

    PARIS—November 24, 2016—Cokin is proud to announce the first tripod to adopt the look of current retro cameras.

    Inspired by old camera design, Riviera Classic is the only tripod to combine leather and wood elegancy with aluminum sturdiness in a timeless design.

    Incredibly stable and extremely stylish, with metal tightening dials similar to those found on antique manual cameras, Riviera Classic is the tripod that was missing to affirm the neo retro look of current cameras. Although traditional in its approach, Riviera Classic provides nevertheless all the features of a modern tripod: telescopic sections, inversible central column, multi-actions head, ergonomic wooden tightening handle, unlockable angles etc.

    Made of Iroko wood, known for its exceptional durability, and hand crafted by Atelier Farol at La Rochelle, France, the Riviera Classic handle has been designed to provide optimal control. Over time, and upon usage, the wood patina will make it even more unique.

    Covered with a material similar to that found on premium camera bodies, the Riviera Classic leather-inspired sections are both elegant and delightful to handle. Once opened, they reveal the brilliance of brushed aluminum, contrasting with the tripod body. Each section ends with a high density nonslip rubber cap insuring the best support on all types of field.

    Every details have been carefully thought, right down to the tightening dials of the Riviera Classic, inspired by the ones found on retro cameras. Made of knurled aluminum, they offer an excellent grasp in order to precisely adjust sections and central column.

    We have brought the same care in the making of the soft pouch that comes with Riviera Classic, made of leather-inspired and hessian fabric. The cord is robust and comfortable, to carry it anywhere, with style.

    It was very natural that Cokin collaborated with Slik to develop Riviera Classic. Founded in 1948, Slik is renowned for its unique know-how in long lasting tripods making.

    Named after its founder Jean Coquin, a famous french photographer of the 70’s, Cokin is the inventor of the innovative Creative Filters System (adaptor ring + filter-holder + filters), the most popular filter system in the world.

    Technical specifications:

    • Maximum operating height: 160 cm – 63 in
    • Folded tripod length: 60 cm – 23.6 in
    • Maximum center column extension: 29.7 cm – 11.7 in
    • Weight: 1.54 kg – 3.4 lbs
    • Maximum loading capacity: 5 kg – 11 lbs
    • Multi-action head with 360° plate
    • Carrying case included

    Articles: Digital Photography Review (dpreview.com)

  • How to Avoid Blurry Photos of Kids

    One of the most frequent questions that I see on the Digital Photography School Facebook Group is some variety of this: “Help! Every photo of my kid is blurry! What am I doing wrong?!” If you’ve found yourself wondering the same thing, I’ll walk you through five things that you can do to help you avoid taking blurry photos of kids.

    photographing-kids

    1. Mind Your Aperture

    When it comes to photographing children and experiencing blur, many issues can be solved by either stopping down or opening up your aperture. That said, if you’re relatively new to photography, it can be difficult to know which direction you need to go.

    sharp-kid-photos

    If you’re currently shooting with a large aperture and notice some issues. Like an aperture of f/1.4 or f/1.8 and only part of your child’s face is in focus, or only one of several children in the image is in focus even when they’re fairly close together. Then, you might want to try stopping down (making it smaller) your aperture (in other words, make the number larger like f/4 or f/5.6).

    If you’re currently shooting with an aperture of f/5.6 or greater (like f/8 or f/11) and you notice a lot of camera shake or motion blur, you may want to try opening up your aperture (make the number smaller like f/4 or f/2.8) if you can. That will allow in more light, which can help create a better balance between the aperture and shutter speed.

    2. Utilize Shutter Priority Mode

    photograph-moving-kids

    If you’re using one of your camera’s shooting modes and are currently photographing kids that are moving, you may want to try shooting in Shutter Priority Mode with your shutter speed set at 1/500th or even faster. By using Shutter Priority Mode, you’ll set the shutter speed, and your camera will select the other settings to balance out the shutter speed that you’ve selected.

    Keep in mind that you can still select your ISO in Shutter Priority Mode. You will definitely want to watch your exposure make sure you’re making adjustments to your ISO (or set it to auto). Often, leaving your ISO at 100 in Shutter Priority Mode with a fast shutter speed can result in very dark, or even black images.

    3.Use Burst Mode Selectively

    photos-moving-kids

    In the photography world, the practice of “spray and pray” where you take a series of images using burst mode and hope that one of them turns out, has received a lot of negative attention lately. Certainly, we shouldn’t use burst mode through the entirety of every session, but there are some instances when it comes in handy photographing kids.

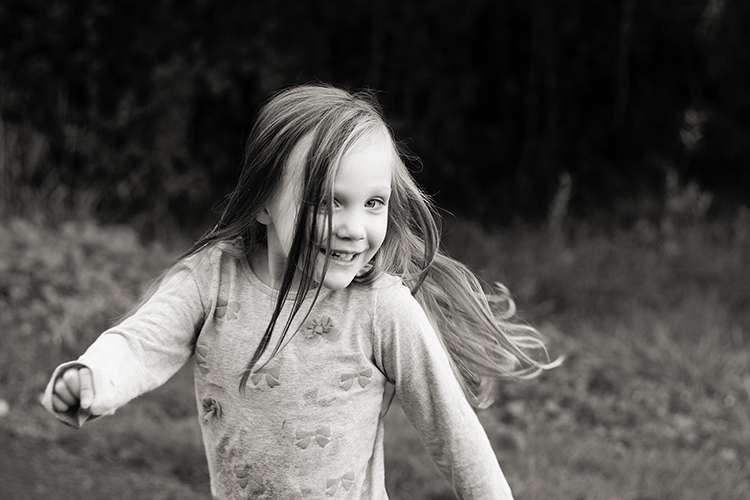
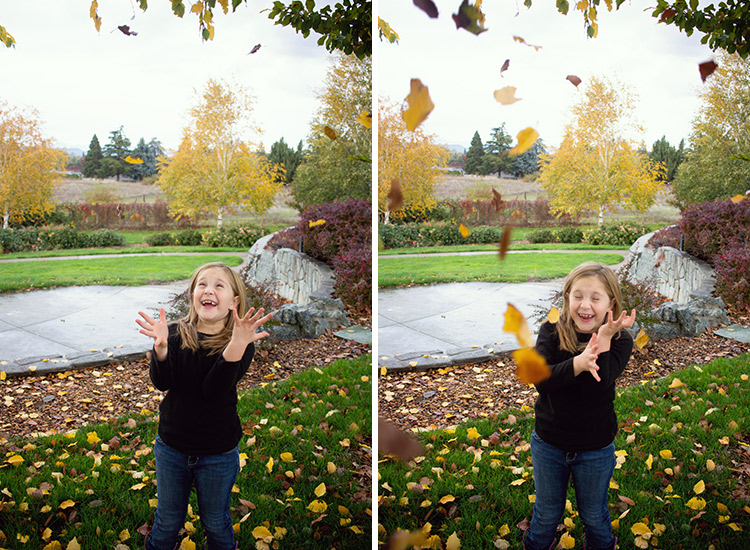
    The other day, we took my girls to the park. They were having a blast tossing piles of leaves into the air and letting them fall down onto their heads. In that instance, I chose to use burst mode because it allowed me to capture an event in which the action/movement changed very quickly, as did their expressions.

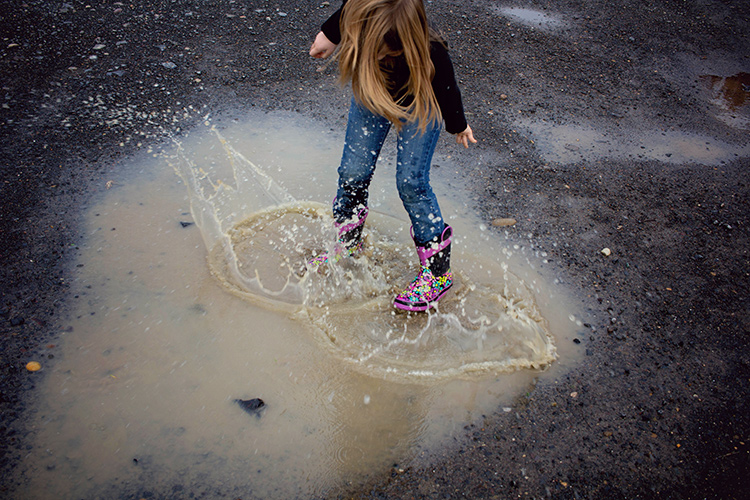
    I sometimes use burst mode in a short series of images to capture kids twirling, running, or any time they’re moving very quickly for a limited period of time. It’s never a bad idea to practice capturing those same events without using burst mode. But when I know that my opportunity to capture a particular event is limited (a child attempting a goal in a soccer game for example), I choose to use burst mode to my advantage.

    4. Don’t Be Afraid of Autofocus

    sharp-images-moving-kids

    Somewhere along the way, a rumor was started that you’re not a “real” photographer unless you shoot in full Manual Mode all the time. I don’t know how that particular rumor got started or why it has taken such a hold on the photography world, but it’s garbage.

    If you’re trying to photograph really active kids, please don’t be afraid to use autofocus! It will make life so much easier! If you’re already using autofocus but are still experiencing problems, there are two other things to try adjusting. First of all, it has been my experience that selecting a single focus point for my camera yields far more in-focus images than allowing the camera to auto-select one. If you have the ability to select a focus point for your camera, you may want to try selecting a single point (start with the center point if you’re unsure where to begin) for your camera, and see if the focus improves.

    moving-kid-photo2

    Focus modes

    Another option when it comes to autofocus is to change the autofocus mode. If you’re trying to photograph moving children, and your autofocus mode is currently set to One Shot (Canon) or AF-S (Nikon), try switching to continuous autofocus mode – Al Servo (Canon) or AF-C (Nikon).  One Shot mode is designed to focus on objects that are largely inanimate, and consequently it’s not the best choice when you’re photographing quickly moving children.

    When you switch to Al Servo, you’re selecting continuous autofocus. In continuous autofocus mode, you can push down the shutter halfway and let the camera focus, but the camera will continue to track that subject and recompose focus (even as the subject moves) until you depress the shutter button all the way.

    moving-kid-photo-2

    Some camera models also have a hybrid setting called AI Focus (AF-A for Nikon), which is designed to fluctuate between an object that starts out as stationary but then begins to move. I have been less satisfied with the images I’ve captured in AI Focus than other modes. But each camera model works a little differently, so it’s certainly worth experimenting with the hybrid autofocus mode if your camera has that option.

    5. Use a Flash (Sparingly)

    fix-blurry-photos

    Though I prefer to shoot without a flash whenever possible, there are certainly instances in which using a flash can help to freeze the action, and help you avoid blurry images. When it comes to using a flash, my best advice is to use it sparingly.  Balance it with the available/ambient light (use only the strength of flash you absolutely need), and diffuse or bounce the flash whenever possible in order to create an image that looks crafted rather than like a snapshot.

    Photographing children can certainly be a test of patience. These five tips will help you eliminate the blur, and begin to capture photographs of your children that you’ll treasure for years to come! Do you have any other tips? Please share them, and your images of kids in the comments below.

    googletag.cmd.push(function() {
    tablet_slots.push( googletag.defineSlot( “/1005424/_dPSv4_tab-all-article-bottom_(300×250)”, [300, 250], “pb-ad-78623” ).addService( googletag.pubads() ) ); } );

    googletag.cmd.push(function() {
    mobile_slots.push( googletag.defineSlot( “/1005424/_dPSv4_mob-all-article-bottom_(300×250)”, [300, 250], “pb-ad-78158” ).addService( googletag.pubads() ) ); } );

    The post How to Avoid Blurry Photos of Kids by Meredith Clark appeared first on Digital Photography School.

    Digital Photography School

  • VLC 3.0 technical preview launches with 360 video and photo support

    VideoLan has launched VLC 360, a new version of the media player that supports 360-degree videos and images. The current release is a technical preview; all of its features are slated for inclusion with the final VLC 3.0 release across all platforms. VLC 360 Technical Preview is currently only available for macOS 10.10 or later and Windows 7 or later.

    VideoLan teamed up with Giroptic to introduce these new features, which include the ability to play 360-degree video and photos, display 360 content with ‘Zoom,’ ‘Little Planet,’ and ‘Reverse Little Planet’ modes, and control content using both a mouse and keyboard. Future mobile versions of VLC with 360 will also support control using a phone’s built-in sensors.

    VLC’s makers plan to release future versions of its software with 360-degree features for Xbox One, iOS, and Android. As well, VideoLan says the media player ‘will probably support’ virtual reality headsets like the Oculus Rift and Google Daydream View starting next year. VideoLan is also working on 3D audio playback support.

    Via: VideoLan

    Articles: Digital Photography Review (dpreview.com)

  • RNI’s Colibri app gives your digital images a slide-film look

    If you think your smartphone photos and other digital images look a little bland straight out of camera, you now have one more app at your disposal to give them more of a film-like appearance. London-based app maker RNI has launched its new Colibri app. Colibri is essentially an image filter app for the iPhone, albeit a slightly special one. The filter algorithms behind the app use machine learning and its makers say Colibri has been fed some of the ‘finest slide film scans’ to create its range of filter options. 

    Colobri’s ‘more color, less editing’ tagline indicates that the app is not meant to be an all-purpose editor but instead puts a focus on enhancing the image’s color and tonal properties to simulate a slide-film look. That said, there are cropping and rotation tools available and you can adjust the intensity of your filters, brightness and contrast using a range of sliders.

    Of course it’s all a matter of taste, but some the image samples on the RNI website look quite promising. So, if you like this type of effect, Colibri might be well worth its download price of $ 1. If you like this type of film simulation apps but would prefer a little bit more control over the conversion process, you could also have a look at the Filmborn app we reported on recently.  

    Articles: Digital Photography Review (dpreview.com)

  • How to Be Invisible: 15 Anti-Surveillance Gadgets & Wearables

    [ By SA Rogers in Gadgets & Geekery & Technology. ]

    anti-surveillance-prosthetic-mask-2

    We don’t have to wait for a dystopian future in which our faces are scanned as we walk down the sidewalk and our every movement is logged – we willingly carry personally identifiable tracking devices in our pockets everywhere we go, and cameras are everywhere. What’s the average law-abiding citizen concerned with privacy to do, let alone activists and protesters seeking to exercise their constitutional rights? These wearable counter-surveillance designs, including drone-evading cloaks, signal-blocking phone cases and fingerprint spoofers aim to provide us with privacy-preserving tools in the age of Big Brother.

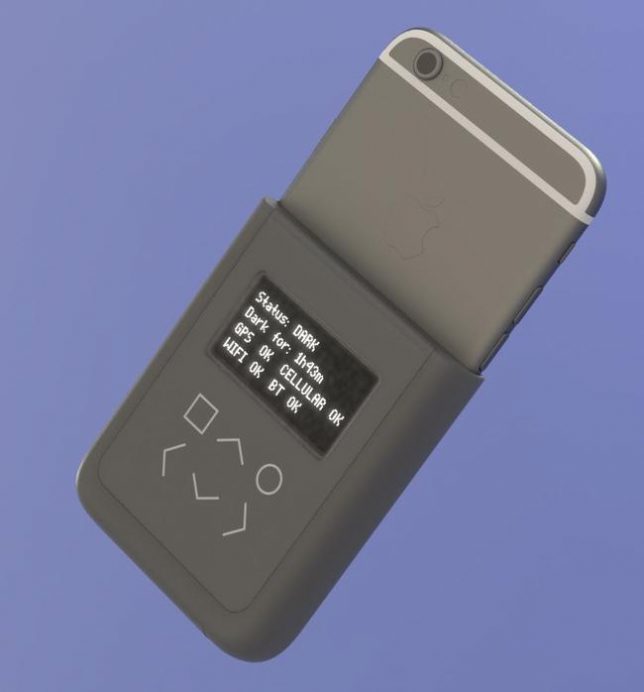
    Edward Snowden’s ‘Snitch’ iPhone Case & The Tunnel Case

    anti-surveillance-phone-case-edward-snowden

    anti-surveillance-phone-case

    Designed by the infamous whistleblower Edward Snowden himself, who knows a thing or two about the NSA, this modified iPhone 6 case features a screen that monitors when an iPhone is transmitting, covers the rear camera and triggers alerts when the phone is transiting data via radio signals that can make a user detectable.

    “If you have a phone in your pocket that’s turned on, a long-lived record of your movements has been created,” Snowden explained while presenting the case at MIT’s Media Lab via video connection from Russia. “As a result of the way the cell network functions your device is constantly shouting into the air by means of radio signals a unique identity that validates you to the phone company. And this unique identity is not only saved by that phone company, but it can also be observed as it travels over the air by independent, even more dangerous third parties.”

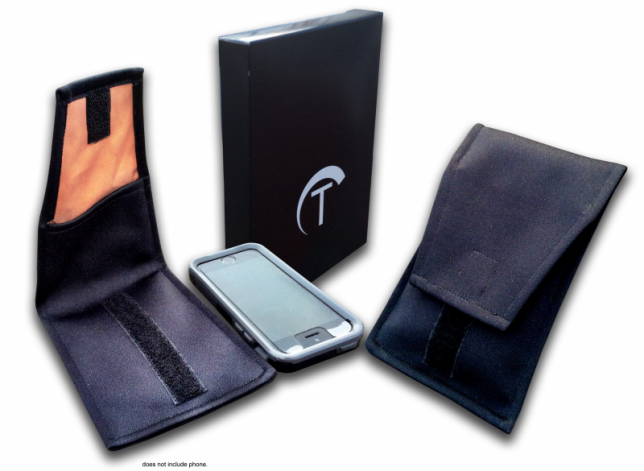
    A lower tech option with similar albeit less robust features, called the Tunnel case, provides similar benefits and is available now, unlike Snowden’s concept. It’s a signal-jamming copper-lined sleeve that blocks all electromagnetic frequencies within ten seconds, making you untraceable.

    URME Anti-Surveillance Prosthetic Mask

    anti-surveillance-prosthetic-mask

    anti-surveillance-prosthetic-mask-2

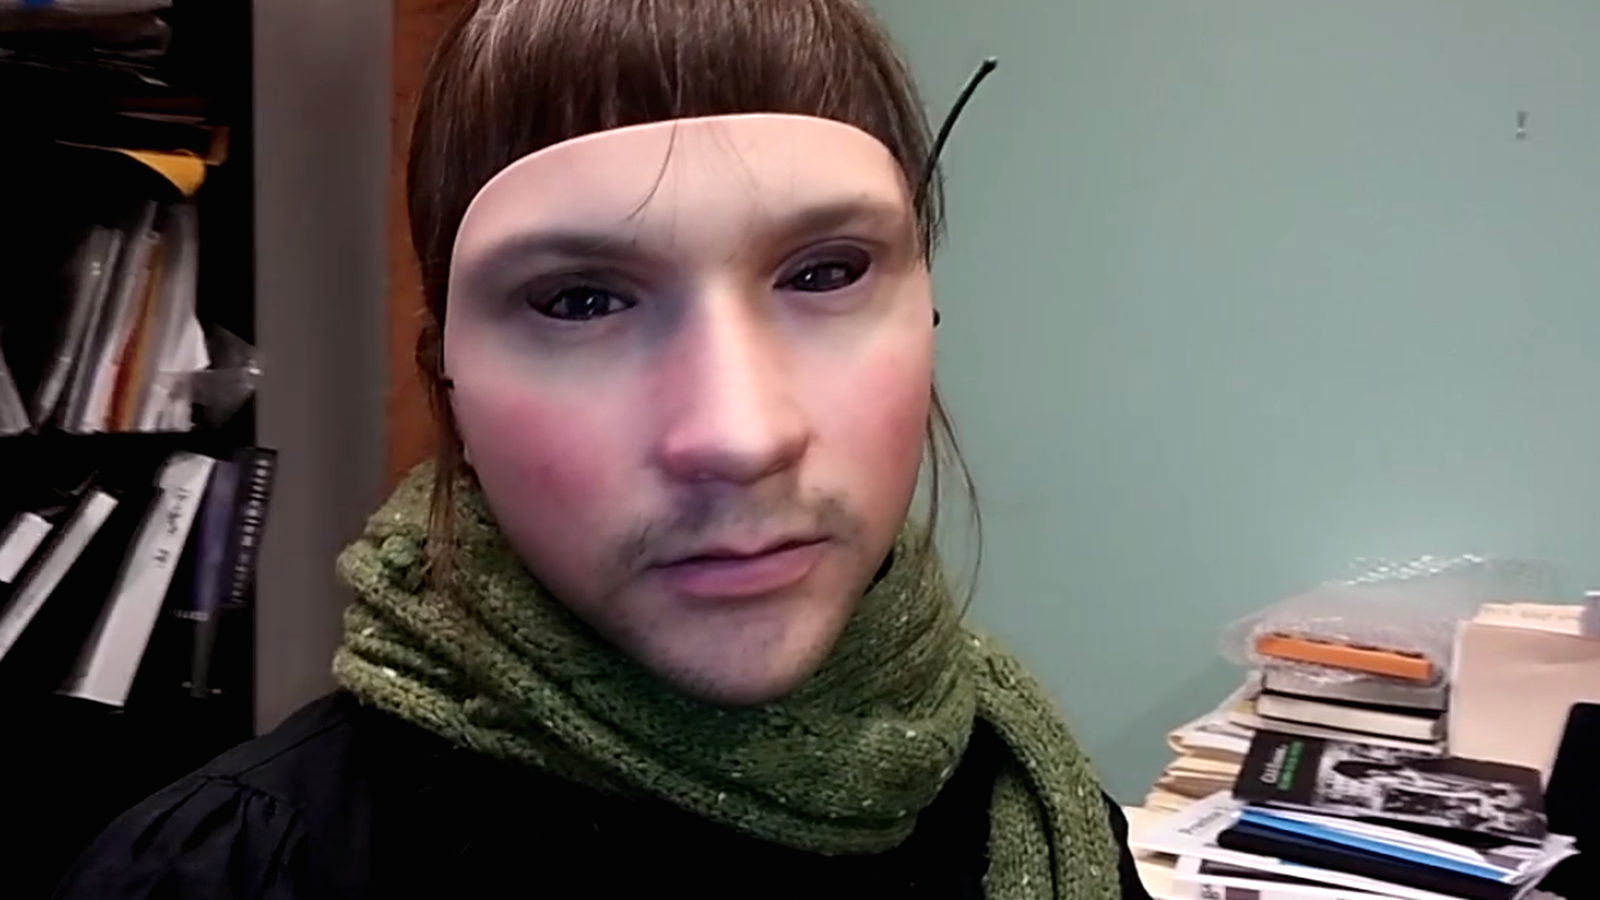
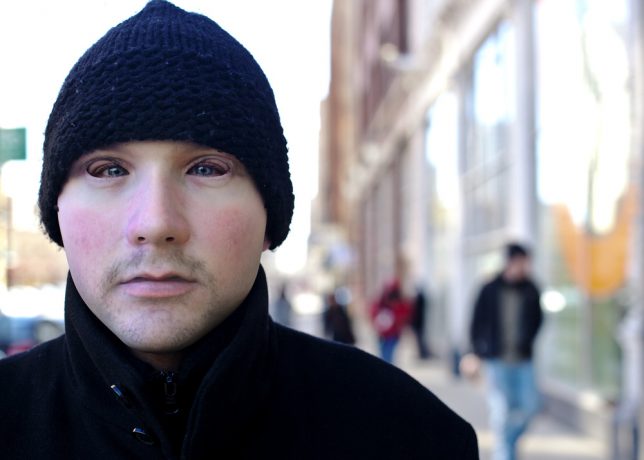
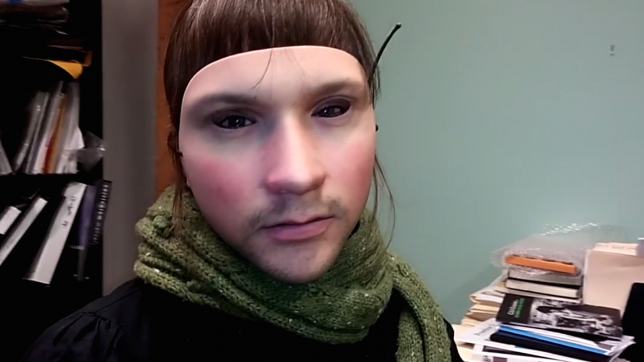
    There’s no denying that this 3D-printed resin prosthetic mask is creepy looking – especially the way the wearer’s eyes tend not to line up correctly with the eye holes. But wearing another man’s face can help you slip past biometric scanners without revealing your true identity. Artist Leo Selvaggio has lent us all the use of his visage so facial detection software identifies the wearer as him. The mask is also available in a budget-friendly, printable paper version.

    “Our world is becoming increasingly surveilled,” reads the URME website offering the mask. “For example, Chicago has over 25,000 cameras networked to a single facial recognition hub. We don’t believe you should be tracked just because you want to walk outside and you shouldn’t have to hide either. Instead, use one of our products to present an alternative identity when in public.”

    Fingerprint-Spoofing Strips

    anti-surveillance-fingerprint-spoofing

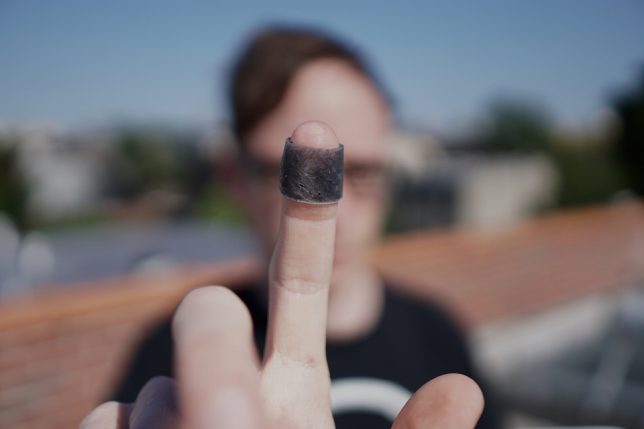
    The IDENTITY kit by Mian Wei is a ‘fingerprint substitute’ you apply to the tips of your fingers like band-aids. Since fingerprints are biological identifiers that we can’t change, they can be used against us, and the rise of consumer devices requiring a fingerprint passcode can put this crucial piece of identity verification at risk. The black prosthetics are made of a mixture of conductive silicone and fibers so you can assign ‘false fingerprints’ to your iPhone and other devices, and so your ‘fingerprint’ can’t be molded and used as a key to your life.

    Makeup That Thwarts Facial Detection

    anti-surveillance-makeup-1

    anti-surveillance-makeup-2

    anti-surveillance-makeup-3

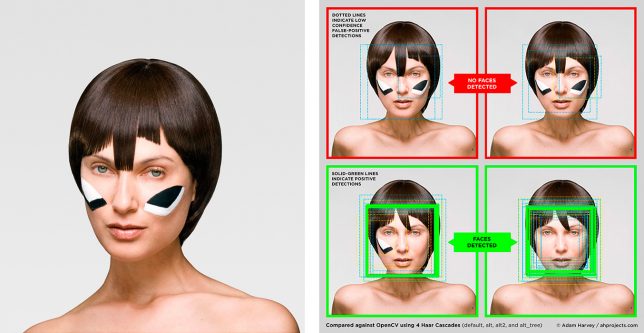
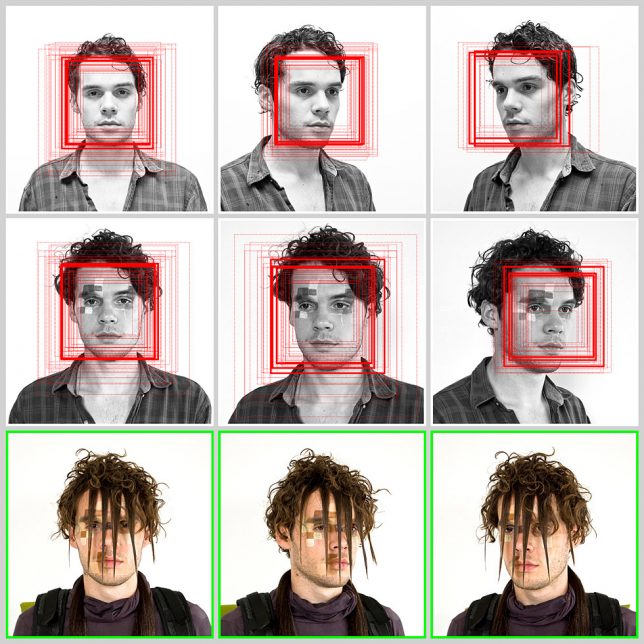
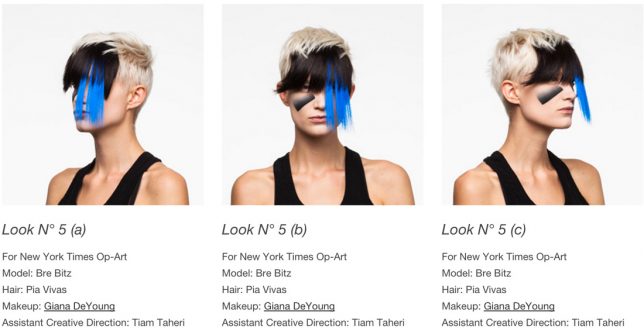
    For now, facial detection software still isn’t quite advanced enough to recognize human faces that significantly depart from the usual symmetric arrangement of features. That’s where the ‘anti-face’ comes in, a way of altering your appearance via hairstyles and cosmetics to fool computers into thinking they’re looking at something other than a face. The CVDazzle project explores this idea with a series of six style tips for reclaiming privacy, explaining how to foil detection via makeup, obscuring the nose bridge and eyes as well as the elliptical shape of your face, modifying contrast and avoiding symmetry.

    Next Page – Click Below to Read More:
    How To Be Invisible 15 Anti Surveillance Designs Installations

    Share on Facebook


    [ By SA Rogers in Gadgets & Geekery & Technology. ]

    [ WebUrbanist | Archives | Galleries | Privacy | TOS ]


    WebUrbanist

  • Review and Field Tests of the new Canon 5D Mark IV – Is it Worth Upgrading?

    Canon recently announced the new incarnation of its 5D lineup, the Canon 5D Mark IV. I myself have owned the 5D Classic (Mark I), and I currently own the Mark III. Personally, I don’t have any plans to upgrade as I went another way instead, choosing to shift to the Fuji X-series as they are smaller and lighter for traveling. However, I am eyeing the new X-T2!

    For those of you considering an upgrade on your Canon camera body, here are some reviews and field tests I found for the 5D Mark IV. Whether you’re going from an APS-C camera up to full frame, or just looking to upgrade from an older 5D model, do your own testing and decide if it’s the right move for you.

    The Camera Store Guys

    This store is in Calgary, AB, Canada – a mere four hours drive from my city. Not the place you’d expect world class camera reviews to come from – but these guys really do some great tests, in real-world situations and they produce some great videos that are totally impartial. If they find a flaw or sticky bit, they will tell you about it. I like that.

    Let’s see what they had to say about the Canon 5D Mark IV:

    Hmmm, interesting! Watch to the end where Chris sums up his thoughts on the 5D Mark IV they may surprise you. He’s very honest about it.

    PhotoRec TV – Comparison of three cameras

    The Canon 5D Mark IV, 5D Mark III and the Sony A7RII

    Toby from PhotoRec TV has some notes for you comparing three different cameras including the 5D Mark IV’s predecessor, and the Sony A7RII full frame camera. He talks about what’s new and improved from the Mark III and how it compares to the Sony.

    Dphog discusses the new dual-pixel RAW capability

    This is a new introduction by Canon, dual-pixel RAW format. What does that mean? Quoted from Canon’s UK site:

    Using the Dual Pixel RAW Optimizer in Digital Photo Professional software, users can make use of the Dual Pixel data recorded with the Dual Pixel RAW image for micro-adjustments of the position of maximum sharpness using the depth information contained within the file.

    Is it worth it? Would you use this feature?

    Pye from SLR Lounge shot a wedding with the Mark IV

    Pye has done quite a few articles for us here on dPS, so you may be familiar with him. He took this camera to a wedding shoot and put it to work. He pushed the limits on it in many areas and tested ISO, dynamic range, the new dual-pixel RAW and some of the great new focus features.

    Conclusion

    So are you considering buying the Canon 5D Mark IV? If so you can price them out here:

    • On Amazon.com
    • On B&H Photo’s site

    I would be remiss if I didn’t mention there have been some reported issues with the 5D Mark IV. So do some research and due diligence if you are thinking about buying this camera.

    Have you tried one of these cameras out yet? Give us your thoughts in the comments below.

    googletag.cmd.push(function() {
    tablet_slots.push( googletag.defineSlot( “/1005424/_dPSv4_tab-all-article-bottom_(300×250)”, [300, 250], “pb-ad-78623” ).addService( googletag.pubads() ) ); } );

    googletag.cmd.push(function() {
    mobile_slots.push( googletag.defineSlot( “/1005424/_dPSv4_mob-all-article-bottom_(300×250)”, [300, 250], “pb-ad-78158” ).addService( googletag.pubads() ) ); } );

    The post Review and Field Tests of the new Canon 5D Mark IV – Is it Worth Upgrading? by Darlene Hildebrandt appeared first on Digital Photography School.

    Digital Photography School

  • Video: Shooting Dog Portraits with the Sony a6300

    Here at DPReview, we love dogs. They’re great. But they’re notoriously hard to photograph. Even the best-trained are unpredictable and fast-moving, and when they’re not running around they’re unable to sit still.

    In this video, DPReview’s Sam Spencer takes one of our favorite cameras – the Sony a6300 – to shoot some of our favorite pups. During a busy day of shooting, we gave both the animals and the a6300 a good workout, culminating in a studio portrait session for the lucky dogs at the Motley Zoo animal rescue center, in Seattle.


    This is sponsored content, created in partnership with Sony. What does this mean?

    Articles: Digital Photography Review (dpreview.com)

  • How to Use Light Painting to Take Incredible Car Photos

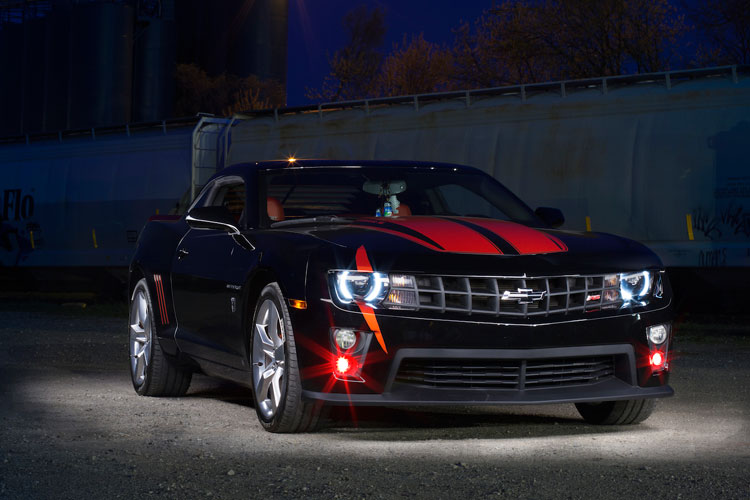
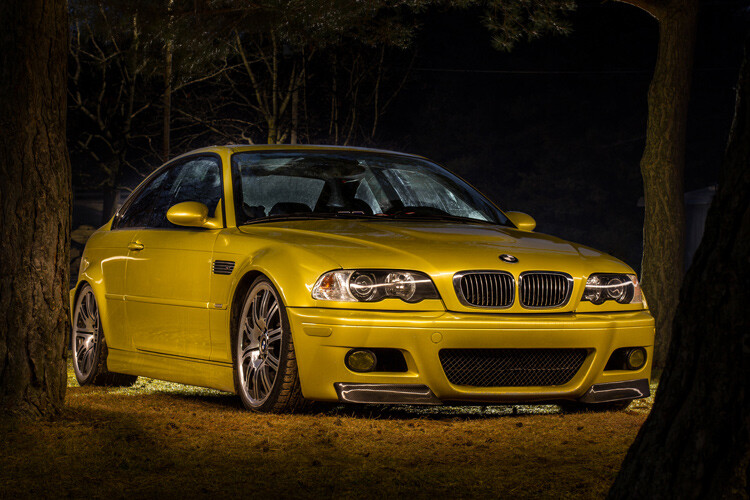
    Whether you drive a beat up station wagon from the 80s or a finely tuned Porsche, light painting is an excellent way to photograph your car and truly make it shine! Light painting results in incredibly unique and impressive images. With a bit of persistence and creativity, you can create pictures that look like commercial photoshoots – even without heavy editing.

    A photo of a car taken using the light painting style

    The reason that a light painted picture looks so incredible is because the light is literally wrapping around the subject. Normally, we see objects lit from only one angle, often the sun, which can get a bit dull at times. In addition, there will be cool reflections on the body of the car that trace the path of your light, giving the shot a highly commercial look.

    Getting started

    What’s the first step? Clean the car! Light makes every speck of dirt and grime become immediately visible. Unless you are going for a grungy style, you’ll want to make sure the car is squeaky clean.

    Since light painting involves leaving the shutter of the camera open for some time, you will need to wait until it is dark outside. If you try light painting during the day, you will get a completely white image as the sensor collects all the sunlight.

    Alternatively, if you have room in your garage, you could park your car in there and cover all windows so that there is no ambient light.

    Your light source

    One of the cool things about light painting is that you don’t need to invest thousands or even hundreds of dollars in equipment to get started. Literally, any light source can be used, whether it is a professional video light or simply a flashlight app on your mobile phone.

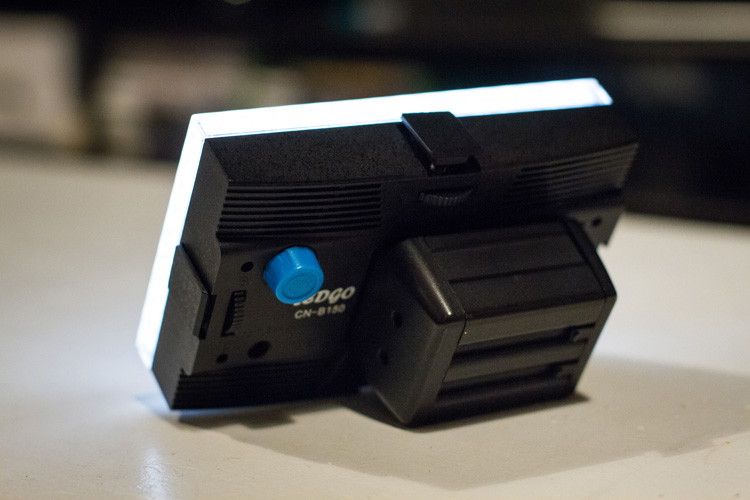
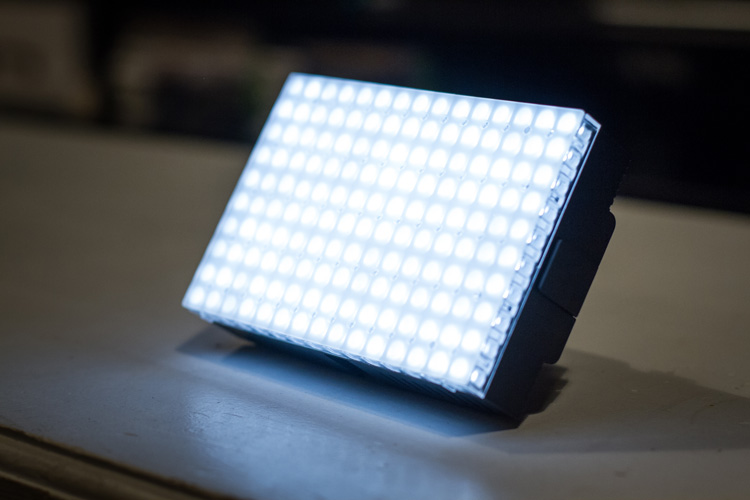
    For my example picture, I will be using an LEDGo Portable Video Light, which is a small but powerful light that I can hold in my hand.

    video-light-for-light-painting-1

    video-light-for-light-painting-2

    One drawback of this type of light source is that it throws light everywhere, including back at the camera. If possible, you will want to find some way to shield the light so that it is directed only at your subject. Professional light painting lights, like the Westcott Ice Light, have flaps that prevent the light from spilling everywhere.

    A light painted car where the light source is visible

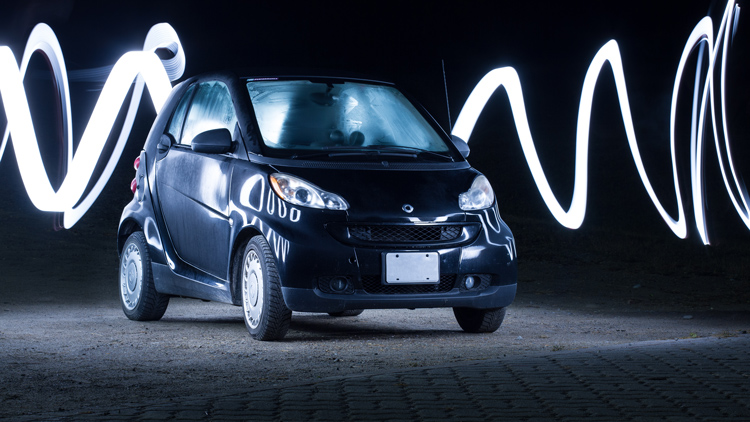
    In this example, the light source was seen by the camera, which created a unique halo effect around the car.

    A light painted car with the light source not visible in the final image

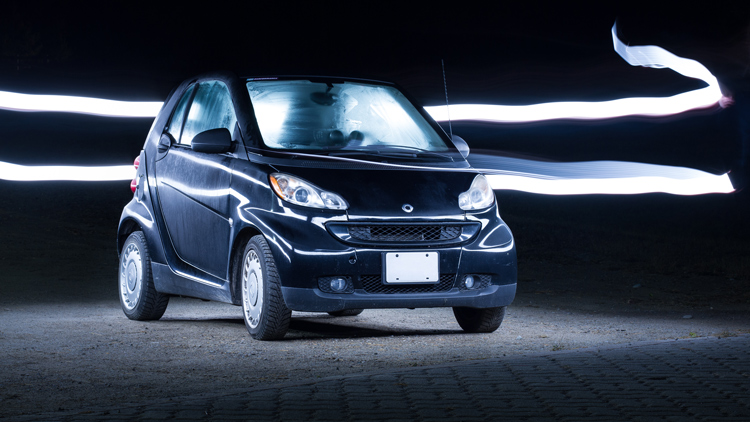
    In this image, the light was shielded from the camera and pointed only at the car, so that the light path isn’t visible.

    Setting up the shot

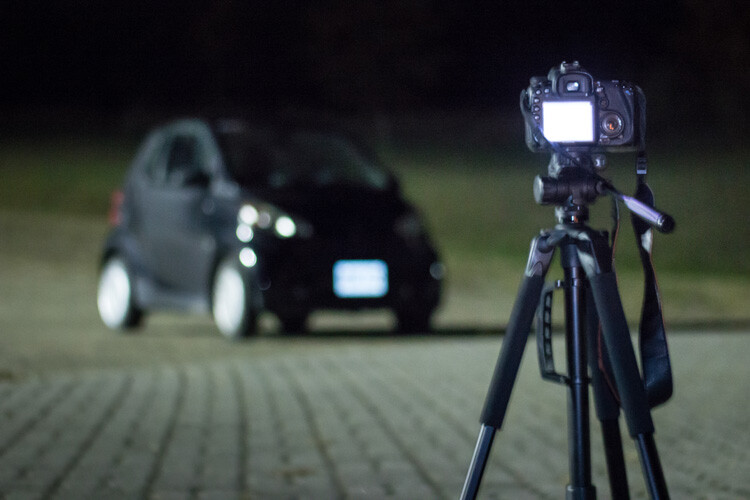
    Perhaps the most important piece of equipment you will need for light painting is a sturdy tripod. This is because you will be taking a picture that lasts for many seconds. A tripod that shifts over the course of the picture, or that is blown around by wind, will result in some serious frustration and blurry images.

    You don’t need a special or expensive lens for light painting – any lens will do! When you are setting up your tripod, remember how zoom influences a picture. Shooting from close with a wide angle lens will make the car look fatter. Shooting from a distance with a bit of zoom will lessen the distortion.

    Behind the scenes of light painting car photography

    Behind the scenes of the setup. There is some light filtering in from the left from a streetlight, but I can use my camera settings to reduce the effect of that ambient light.

    Exposure settings

    The first goal will be to get a base exposure. This requires that you go full manual on the settings. If you leave the camera on auto, it will try to compensate for the low light and may pop up the flash.

    To make an image with a black background like the one in my example, you will want your base exposure to be very dark. If you want more of the surroundings to be visible, you can make your base exposure lighter. Be aware, however, that will mean that you are more likely to show up in the final image as you walk around the car with your light.

    1. First, select a low ISO so the sensor doesn’t collect much light from the surrounding area. As an added benefit, using a low ISO will also result in a very high-quality image.
    2. Next, you will want to choose a fairly narrow aperture. This will keep a large portion of the image in focus. It will also help to make the image darker, as needed.
    3. Last, choose a shutter speed that gives you a bit of time to paint the car. For my purpose, I chose 25 seconds.

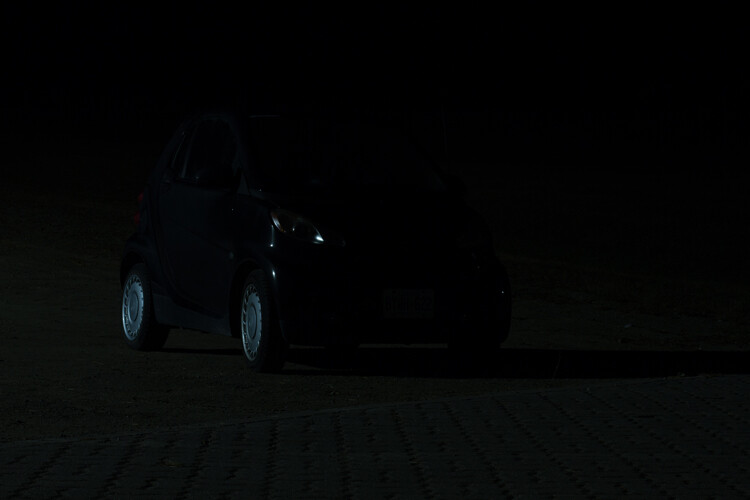
    As you can see below, this base image is nearly completely dark. This is perfect. Now the final image will only be what I paint with my light.

    The base exposure for a light painting car image

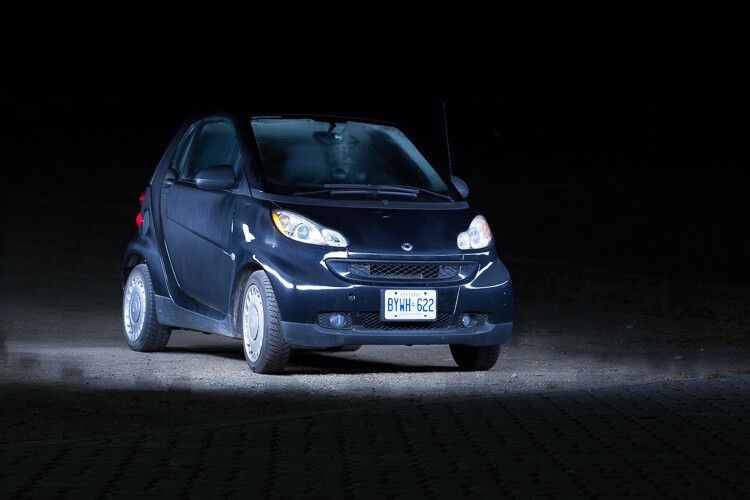
    The base exposure for my image was ISO 100, f/9, 25 seconds.

    Let there be light (painting)

    Now we’re ready to start painting!

    You can either have a friend press the shutter button, or you can put the camera on a short timer so that you can start light painting immediately after the shutter releases.

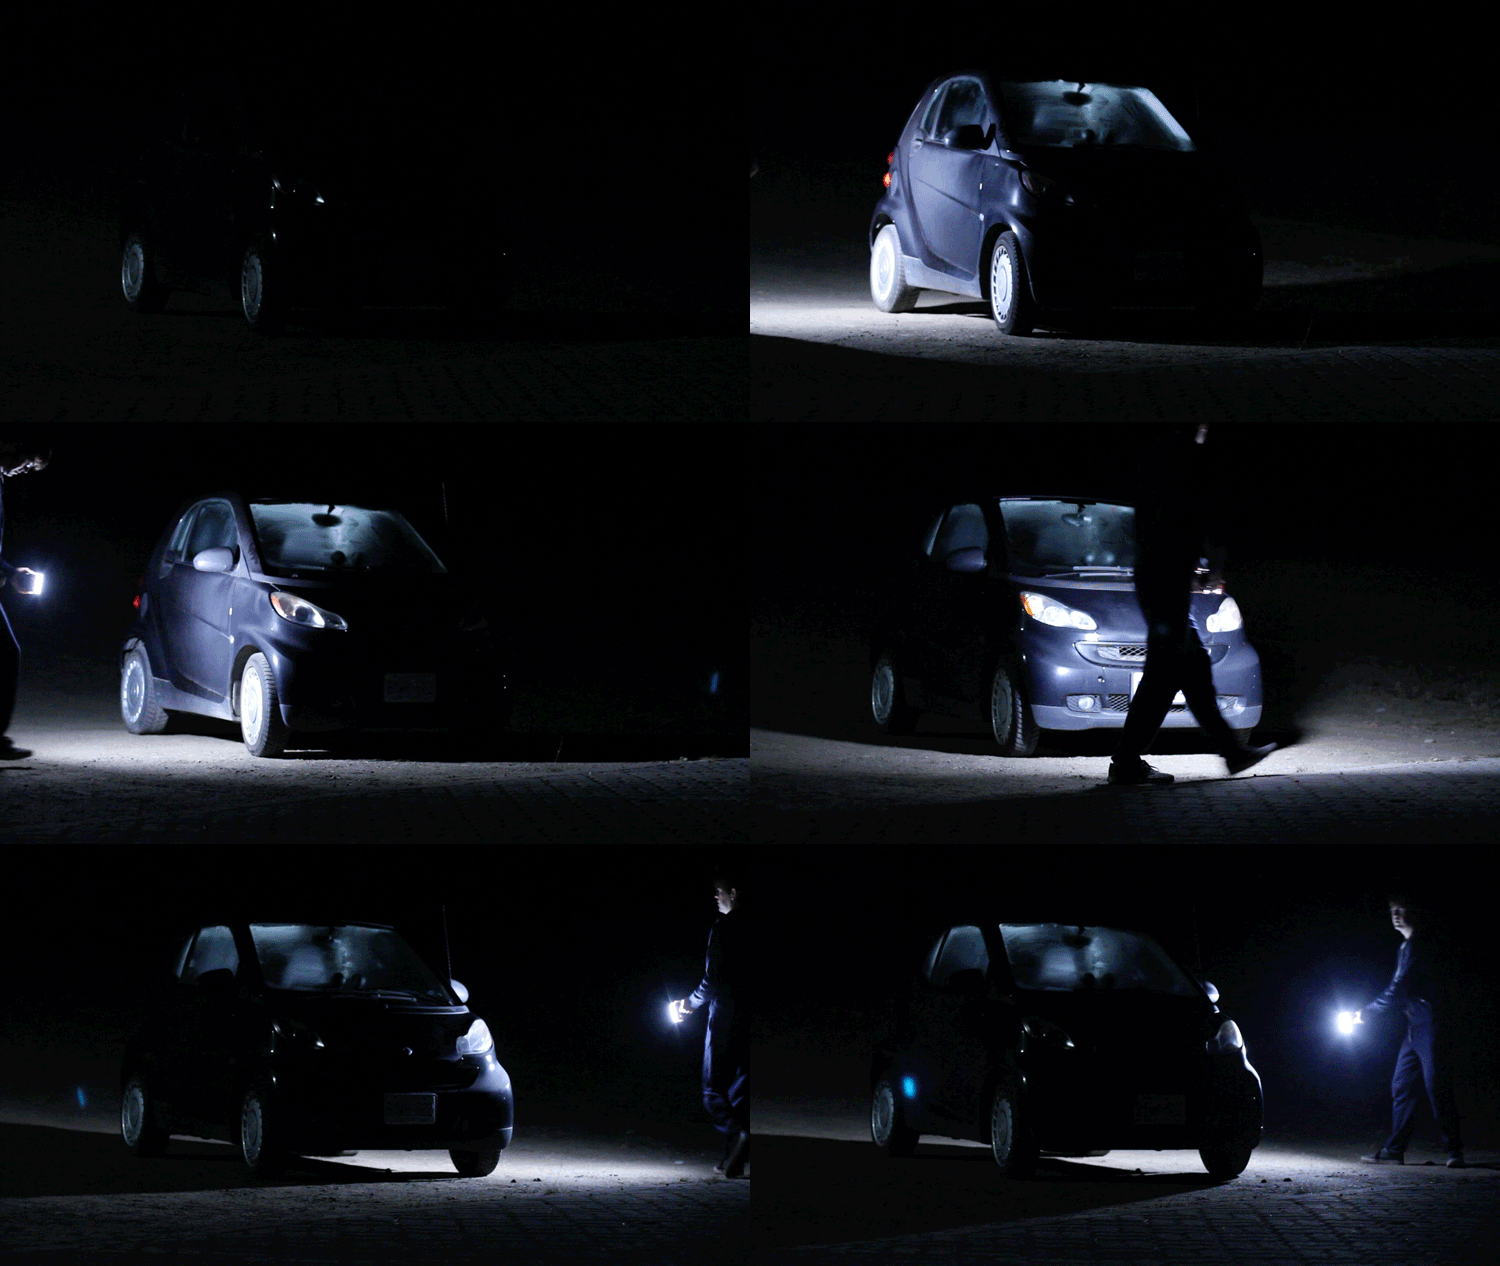
    There will inevitably be a bit of trial and error as you try to find the right angles at which to paint the car. Pay close attention to how the light is reflecting in the body of the car and try to find ways to make it look flattering. Typically this involves moving the light at a uniform level so that there is a clean and crisp line of light reflected on the car.

    light-painting-example

    Chances are you’ll have to throw away a lot of images because parts of the car weren’t lit well enough, or the reflections looked messy. Don’t let this discourage you. The more you practice, the more you will get a feel for how to move the light.

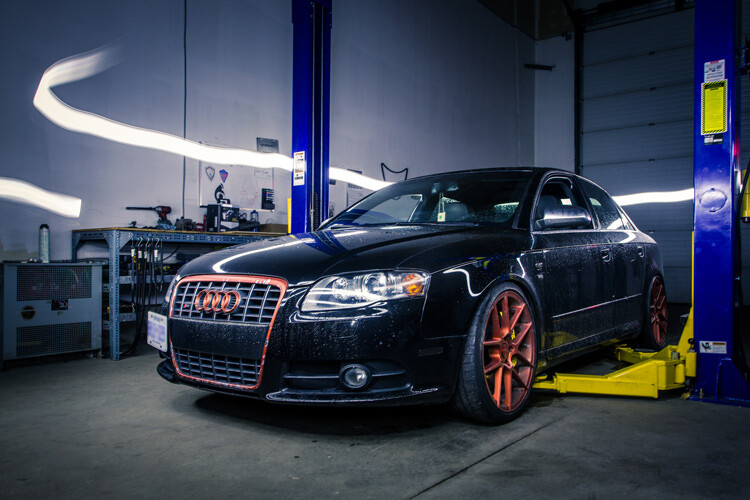
    Don’t forget to play a little bit. Waving your light around in circles, for example, can make some cool light trails and some memorable images.

    A light painted car with light trails

    A light painted car with light trails

    How come you don’t show up in the final image?

    A camera can only see objects that have light shining on them. When you aim the light source away from yourself and keep moving the entire time the picture is being taken, you simply won’t be in one place long enough for the camera to record your image.

    If you do see yourself faintly in the final image, this can be due to one of three things:

    • You might have been caught in the light reflecting off of the car (or accidentally lit yourself up).
    • There might be too much ambient light. Try adjusting the settings to make your base exposure a bit darker.
    • You stood still in one place for too long, keep moving.

    Typically, these ghostly appearances can be fixed easily enough with Photoshop later on, though you may want to adjust some settings to save yourself some time in the editing room.

    Controlling the power of your light

    If you find that your light isn’t having so much of an effect on the final image, there are two ways to control this.

    To effectively make your light more powerful, you can choose a wider aperture (lower f-stop number) or raise the ISO. Either of these options will make the camera more sensitive to all light, including the light in your hand. Be aware that these changes will also affect your base exposure for the ambient light conditions. So you may also need to change the length of the shutter speed in order to keep the image properly dark.

    If all else fails, your last option might be to simply to purchase a more powerful light. Yes, it is possible to do light painting with a small flashlight, but if you are serious about light painting, it might be a good idea to upgrade to something with a bit more power and control.

    Making some final edits

    Often, light painted pictures look pretty awesome right out of the camera. By pulling the picture into an editing program like Lightroom, you can make some simple tweaks to complete the image.

    The original, straight from camera image of a light painted car

    This is the image straight from the camera. It has a really unique look, even before we do any edits. You can see that my feet were caught in the reflected light and will need to be edited out.

    It’s a good idea to shoot your light painting images in RAW. Shooting in RAW as opposed to JPG gives you some extra flexibility when it comes time to edit.

    General adjustments

    First, you’ll want to find a nice looking white balance. Light painted cars often look very sleek with a steely, cold white balance, but you can experiment to find a nice balance for the car you are working with.

    As I mentioned earlier, it’s important to make sure the car is clean before you photograph it. Any minor imperfections or dirty spots that might still be visible can be removed using the spot healing tool in Photoshop or similar editing programs. You may also want to use this tool to reduce or remove bright and distracting glare reflecting off the car. I used this method to remove a harsh reflection in the example picture just above the front wheel.

    Selective adjustments

    Next, you may want to take some time to selectively lighten or darken parts of the image. In the course of your light painting, it is possible that you might have spilled some light into an area of the picture that you wanted to leave dark. You can control this by using gradients or adjustment brushes to precisely control the amount of light on different areas of the image.

    For my picture, I wanted the light to quickly fall off around the car. I was able to emphasize this by using gradients and a vignette to darken the edges of the image.

    The final edited image of a light painted car

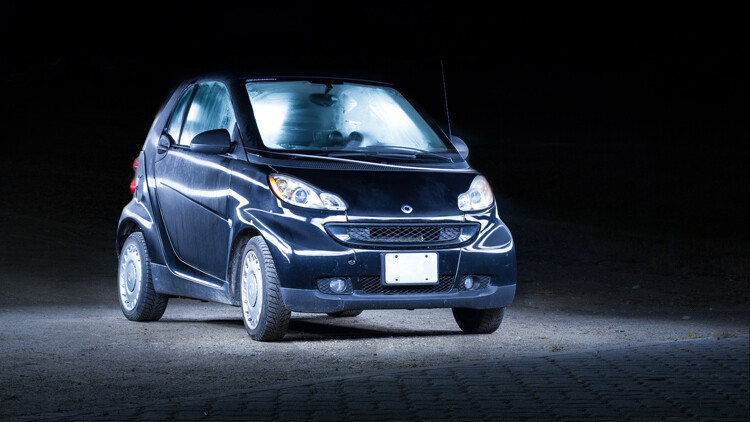
    As you can see, the final image isn’t drastically different than what came out of the camera! This final image in a combination of two of the images, borrowing some features from both shots.

    Get out there and start light painting

    Light painting is a very fun, simple and rewarding style of photography. It doesn’t take any special equipment to get some incredible and truly creative results that will amaze your friends. Give it a try and share your light painted car images in the comments below.

    googletag.cmd.push(function() {
    tablet_slots.push( googletag.defineSlot( “/1005424/_dPSv4_tab-all-article-bottom_(300×250)”, [300, 250], “pb-ad-78623” ).addService( googletag.pubads() ) ); } );

    googletag.cmd.push(function() {
    mobile_slots.push( googletag.defineSlot( “/1005424/_dPSv4_mob-all-article-bottom_(300×250)”, [300, 250], “pb-ad-78158” ).addService( googletag.pubads() ) ); } );

    The post How to Use Light Painting to Take Incredible Car Photos by Frank Myrland appeared first on Digital Photography School.

    Digital Photography School

  • Cantilevered Cabin: Dizzying Alpine Shelter Hangs Off the Edge of a Cliff

    [ By WebUrbanist in Boutique & Art Hotels & Travel. ]

    cantilevered-cabin

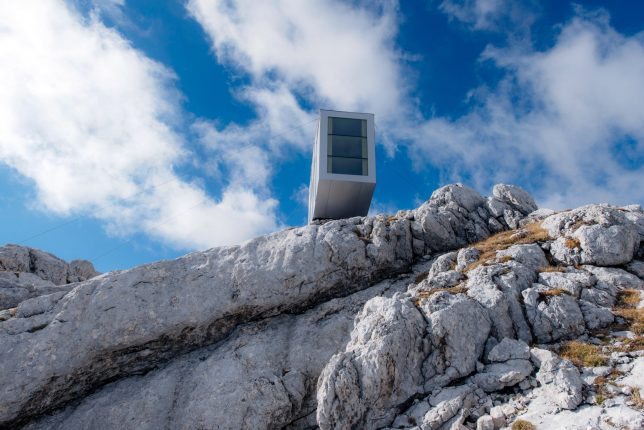
    Even someone brave enough to overcome fears of heights and climb a mountain may not have the stomach to spend the night in this suspended shelter on the edge of a vertigo-inducing abyss.
    cabin-on-cliff

    mountain-cabin-prefab-view

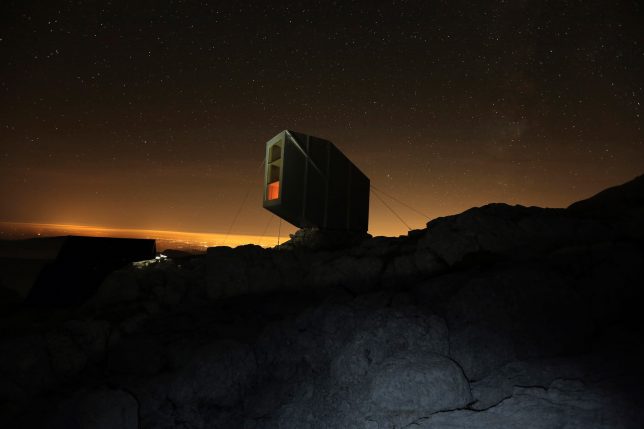
    Designed by OFIS Arhitekti (images by Janez Martincic), this precariously-perched space sits on Slovenian-Italian border and boasts 360-degree views over the landscapes of both countries. Inside, a series of resting platforms and a few pieces of minimalist rustic decor are the extent of the amenities provided.

    cabin-at-night

    Despite its fragile appearance, the cabin was (of course) constructed to deal with the extreme conditions of the location’s altitude and weather exposure on Mount Kanin. Indeed, it took multiple attempts for a helicoptered construction crew to get the prefab structure in place and tether it to the surrounding stone.

    sleeping-spaces-wood

    cabin-interior

    The cozy refuge from wind, snug and landslides (overnight guests may not want to know) is intended in part as a test of the materials, to see how they will stand up over time.

    extreme-mountain-cabin

    “The challenge is to install real objects remote sites … and study their response to extreme weather, radical temperature shifts, snow and rugged terrain” say the designers. “The harsh conditions of wind, snow, landslides, terrain, and weather require a response of specific architectural forms, structures and concept.” Despite those daunting challenges, the space is intended to “become a destination for hikers, climbers, cavers, mountaineers, nature lovers and romantics.”

    Share on Facebook


    [ By WebUrbanist in Boutique & Art Hotels & Travel. ]

    [ WebUrbanist | Archives | Galleries | Privacy | TOS ]


    WebUrbanist