Blog

  • HTC announces U Ultra 5.7″ phablet with 12MP camera

    If you liked the camera performance of last year’s HTC 10 but would prefer a larger screen, the HTC U Ultra, which has been announced today, might just be what you’ve been waiting for. The Ultra U comes with the same rear camera module that can be found in the 5.2″ HTC 10. A 12MP 1/2.3″ sensor with 1.55µm pixels is combined with a fast F1.8 aperture and optical image stabilization. The camera also comes with phase detection AF and is capable of recording 4K video and 12-bit Raw files. 

    Compared to the HTC 10 the front camera has received a serious upgrade, though. It now comes with a 16MP resolution and a pixel-binning low-light mode that puts out 4MP files. Images can be viewed on a 5.7″ Quad-HD display that comes with a secondary small screen on top, similar to what we’ve seen on the LG V20. The Android OS is powered by Qualcomm’s  Snapdragon 821 and 4GB of RAM. 64GB and 128GB storage options are available and can be expanded via microSD slot. 

    Like the latest iPhones, the U Ultra lacks a 3.5mm headphone jack and only comes with a USB Type-C port. The latter is used to charge the comparatively small 3,000 mAh battery. Thankfully, quick-charging is supported. All the components are packed into HTC’s new ‘Liquid Surface’ design metal unibody that is entirely covered in glass, so a solid case might be a useful investment for future U Ultra owners. The new model will be available globally this quarter. In the US the U Ultra will set you back $ 749 and can be pre-ordered now. Start of shipping is slated for mid-March.

    Articles: Digital Photography Review (dpreview.com)

  • PhotoSpots uses Google Maps to pinpoint photography hotspots

    When you’re traveling, it’s always a good idea to scope out shooting locations ahead of time. Here to help is a newly launched online service called PhotoSpots. With PhotoSpots, photographers can find so-called ‘photography hotspots’ highlighted around the globe using Google Maps and the image hosting website 500px. The service was created by photographer Mike Wong, who recently detailed his creation on Reddit.

    ‘I thought that it would be interesting to see where and when other photographers were taking photos,’ Wong explained in his Reddit post, ‘so I decided to create a small website that shows exactly that.’ The photography hotspots are presented as a heat map, with red areas representing heavily photographed regions. A bar beneath the map shows thumbnails for images taken in a particular region and uploaded to 500px.

    Clicking PhotoSpots’ menu icon opens a slider that filters photos by month, while hovering over a specific photo thumbnail reveals the precise location it was taken via the map. “I’m also planning to make a filter for categories (e.g. nature, cities etc.) to make it more personalizable,’ said Wong, though he didn’t provide a timeframe for when that feature will be added.

    Via: PetaPixel

    Articles: Digital Photography Review (dpreview.com)

  • Lighting 103: Introduction

    Abstract: Our flashes are calibrated to produce white light. But in the real world, white light is a rarity.

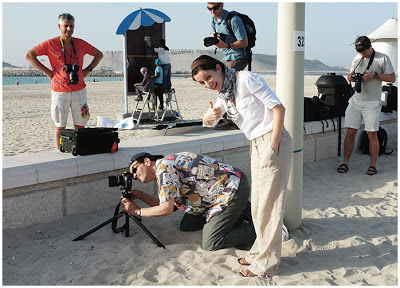
    Sara Lando (your mollusk portraitist from Lighting 102) gives a thumbs up while spending a week assisting for photographer Gregory Heisler (seen squinting through camera).

    She was assisting Greg for a week of shooting and teaching at Gulf Photo Plus in Dubai. Sara learned a ton of stuff, duly reported on in a three-part series that to this day remains one of the most popular pieces ever written on this site.

    Many of the things she learned while following Greg around had little to do with photography: his work ethic, thought process, etc. (Seriously, read the series.) But the week also changed the way Sara thought about light, her most important takeaway being this:

    "White light is a lie."
    Read more »
    Strobist

  • Inverted Roofs: Bowl-Shaped Rain Collectors Naturally Cool Desert Homes

    [ By WebUrbanist in Architecture & Public & Institutional. ]

    rainwater-roof-system

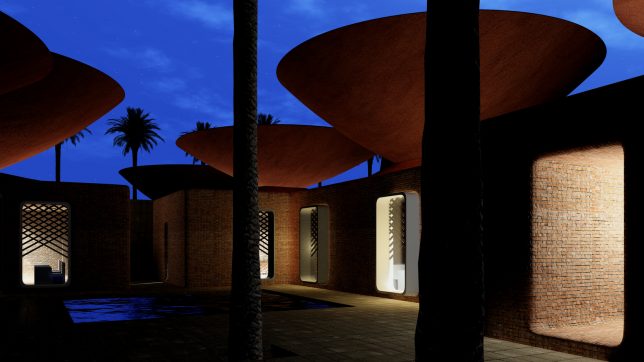
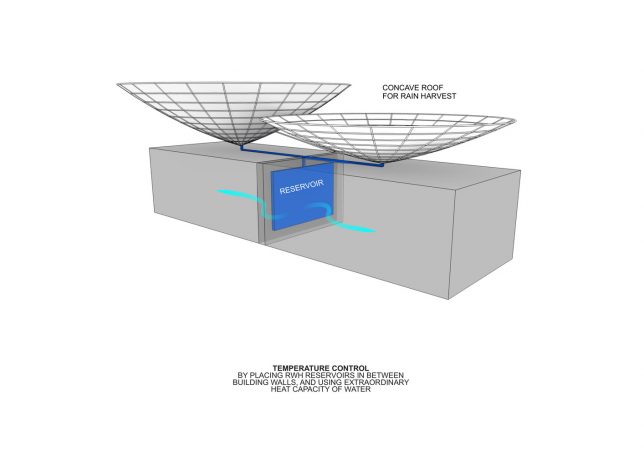
    Iranian architects have developed a Concave Roof system to collect rainwater in arid climates with low precipitation, helping cool buildings in hot and dry regions of the world. The water can in turn be filtered for drinking or integrated into interior graywater systems.

    roofs-at-night

    These systems help reduce reliance on artificial air conditioning (or work were it is unavailable). They could ultimately help keep people in their home regions who might otherwise have to move due to climactic changes.

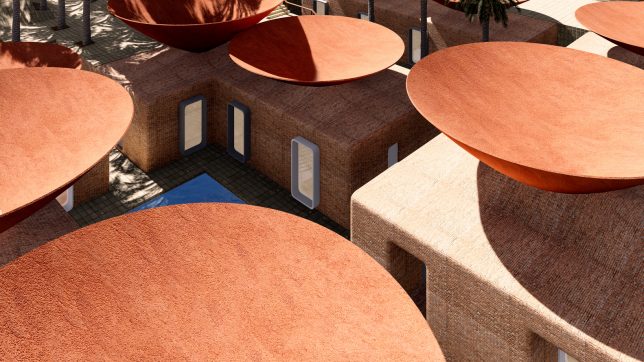
    roofs-from-above

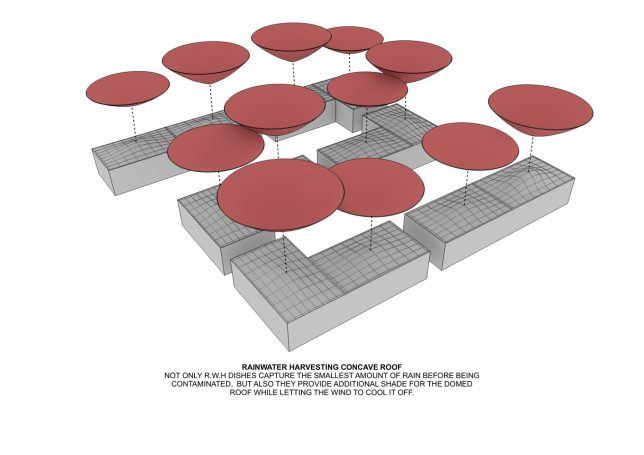
    BMDesign Studios’s addresses rapid evaporation with the bowl-shaped roof additions, designed to channel even the smallest amounts of accumulated rain, coalescing them into drops big enough to harvest before they evaporate.

    desert-roof-bowls

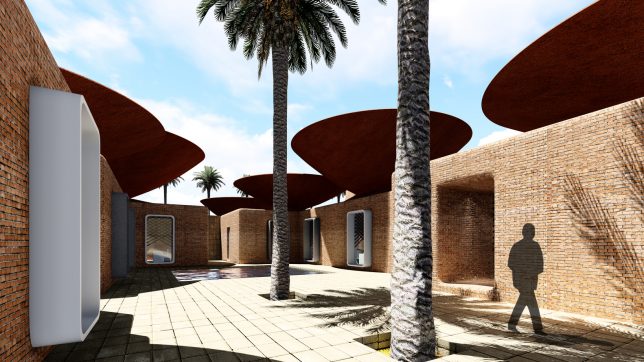
    These inverted shells also provide shade while allowing air to pass between upper and lower roofs, acting as a cooling system in the process.

    roof-in-arid-climate

    wall-reservoir

    Reservoirs tied into the system are situated between building walls to take advantage of the thermal capacity of the water to regular interior temperatures.

    concave-roofs

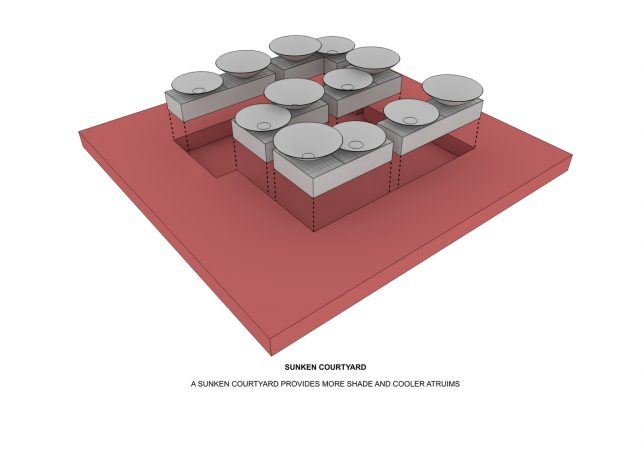
    sunken-courtyard

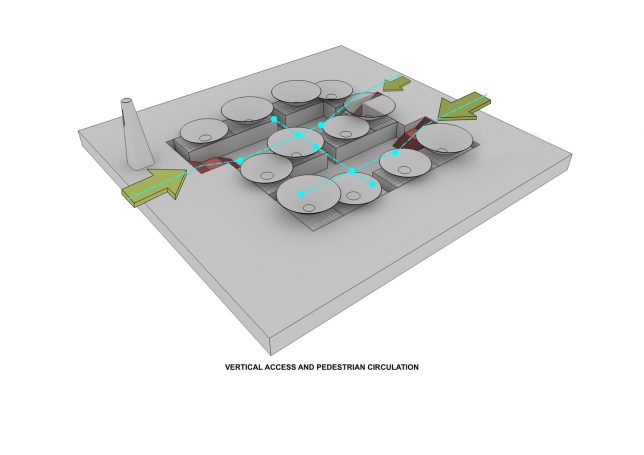
    circulation

    The courtyard and circulation spaces are also sunken to further cool the complex. Temperatures are higher and precipitation in parts of Iran is as much as 2/3 lower compared to global averages, so every drop counts.

    Share on Facebook


    [ By WebUrbanist in Architecture & Public & Institutional. ]

    [ WebUrbanist | Archives | Galleries | Privacy | TOS ]


    WebUrbanist

  • Company behind Lily drone shuts down despite $34m worth of pre-orders

    When the Lily camera drone was announced in May 2015 it garnered a lot of attention for being one of the first drones capable of flying itself and tracking a user while capturing video footage for up to 20 minutes. As a consequence the company managed to secure $ 15 million in investment and an additional $ 34 million in pre-orders.

    However, today the founders of Lily have announced in a letter and email to customers that the start-up is shutting down operations because it failed to raise additional funding to start production of its drone. The founders promise to reimburse all pre-order customers within the next 60 days.

    “We have been racing against a clock of ever-diminishing funds,” wrote the company’s co-founders, Henry Bradlow and Antoine Balaresque. “Over the past few months, we have tried to secure financing in order to unlock our manufacturing line and ship our first units – but have been unable to do this. As a result, we are deeply saddened to say that we are planning to wind down the company and offer refunds to customers.” 

    The Lily drone was launched with a pre-order price tag of $ 499 and scheduled to ship in February 2016. Shipping was later delayed until summer and then again to early 2017. In the same time frame tracking drones from DJI, Zero Zero Robotics and Yuneec have all been brought to market successfully.

    Articles: Digital Photography Review (dpreview.com)

  • Initial impressions of the Manfrotto Spectra LED Light 500S

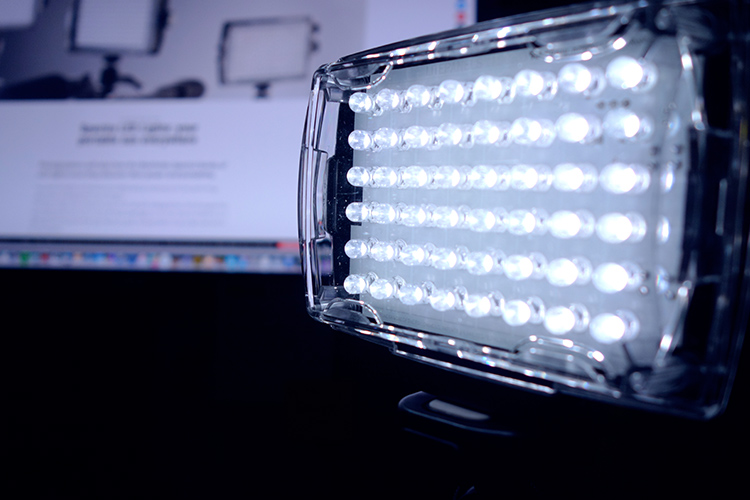
    I wanted a small portable LED for video work primarily to either pop on the hot shoe of my camera or use on a light stand off camera. I also really like the white light emitted from a LED source. So I purchased the Manfrotto Spectra LED 500s.

    Manfrotto Spectra LED 500S

    The portable Manfrotto Spectra LED 500S

    Why did I purchase it?

    LEDs are becoming more popular in photographers’ studios where continuous lighting is used. The main advantages of LEDs are they don’t get hot, unlike tungsten or incandescent lights. Another important factor is that LEDs use less power (watts) per unit of light generated (lumens). So they are extremely eco-friendly.

    In this article, I will describe my initial impressions of using the Manfrotto Spectra 500s light for photography. I haven’t had it for long enough to give it a more comprehensive review.

    Most of my work is location based, so portability is essential and plays an important role when choosing my photography gear. Nothing irks me more than going to a shoot and feeling like some poor-beast-of-burden overloaded with camera equipment!

    I could have purchased a cheaper similar model off Amazon. However, I sourced online with a local company that had it in stock. I got this particular model at a discounted price and more importantly if I had any problems with the light I could easily return it with minimum fuss. Plus, I have built a trust with the brand over the years.

    Disclaimer: I bought this Manfrotto Spectra light. I wasn’t sponsored to write this article. The opinions expressed in this article are mine alone.

    What’s in the box?

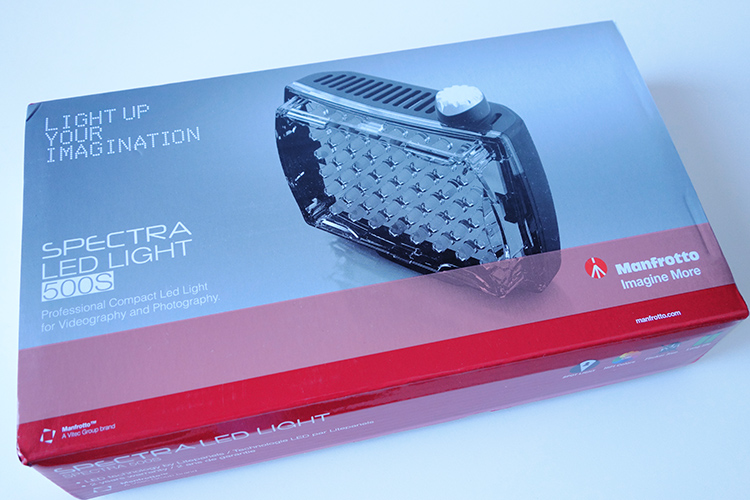
    manfrotto-spectra-light-box

    The Manfrotto Spectra LED 500s box

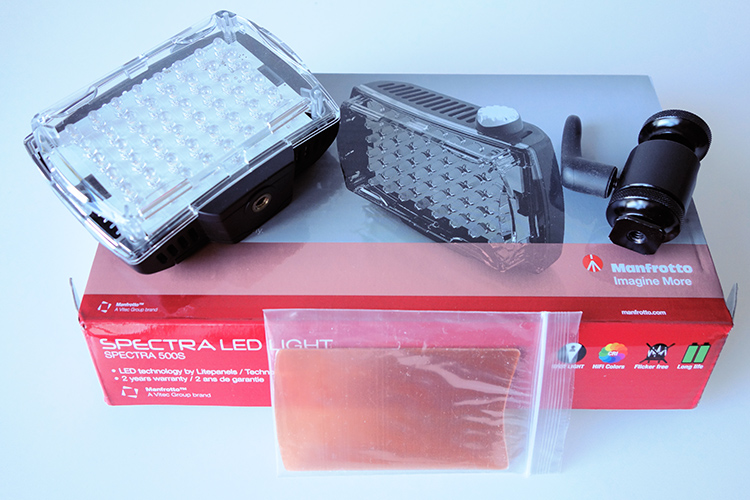
    The unit itself is really compact and measures 3.7 x 4.4 x 1.7″ (including the on/off knob). It has one power switch which also acts as a variable dimmer, very cool. It is daylight balanced at 5600 Kelvin. Also included with each light is a set of filters, including one ¼ CTO, one ½ CTO, and one opal diffuser. It also comes with a ball head shoe mount.

    Manfrotto Spectra LED 500s in the box

    The Manfrotto Spectra LED 500s light comes with 2 CTO gels and one opal diffuser. It also comes with a ball head adapter for mounting on a hotshoe or tripod.

    I did find this mini ball head adapter a bit clunky to use. I had to fiddle with the lever to release the tension to get it to move and then lock it back in place. Not ideal when you’re on a shoot, time is of the essence, and you just want your equipment to work effortlessly.

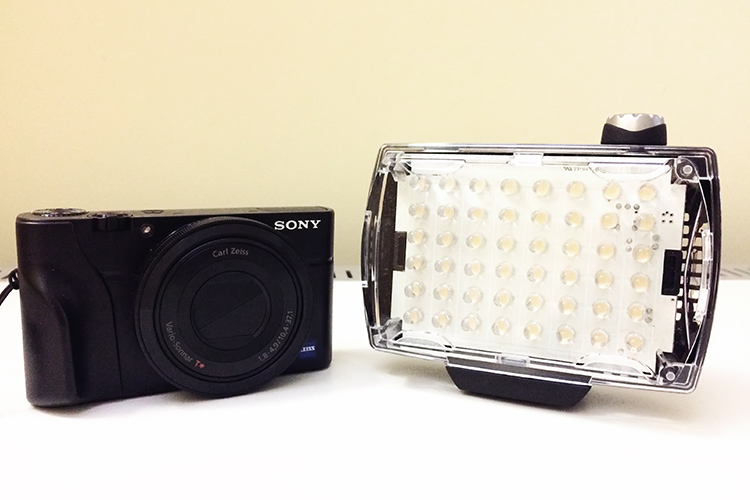
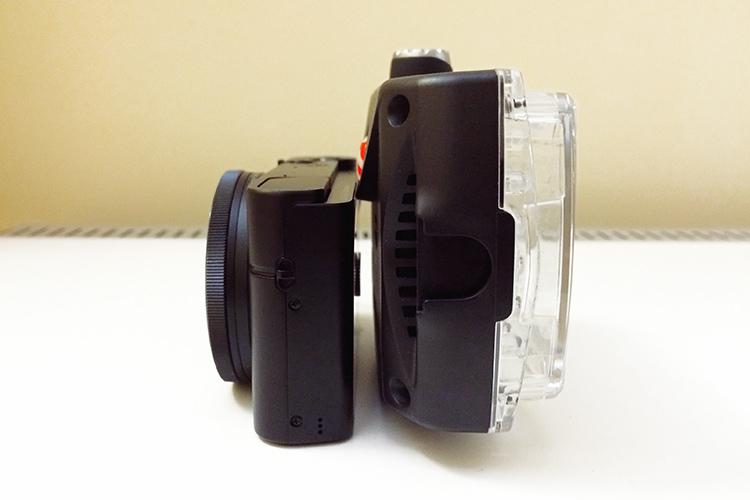
    This unit is slim and very compact, as you can see in comparison to my Sony RX100 camera (below).

    Manfrotto Spectra LED 500s Sony RX100

    Side by side size comparison of the Manfrotto Spectra 500s LED Light with the Sony RX100.

    Manfrotto Spectra LED 500s size

    The Manfrotto Spectra LED 500s is quite compact and slim.

    How is it powered?

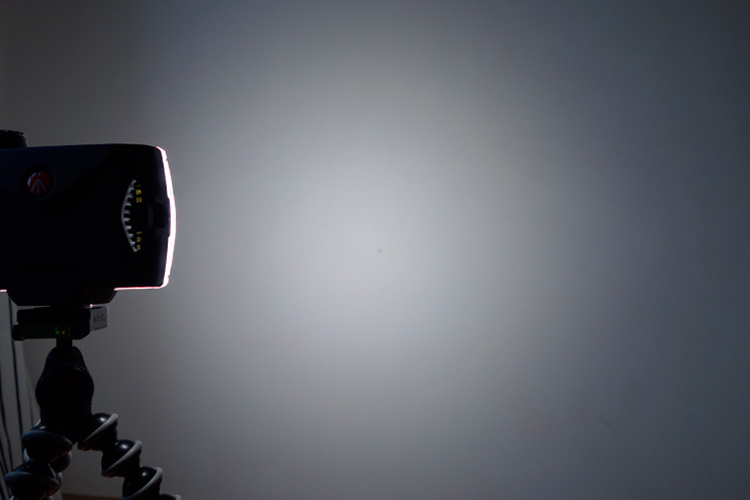
    This little unit, the 500S is the smallest in the range of five models by Manfrotto. The S stands for spot, as a beam of light emits at a 30-degree angle. It produces 300 lux at one meter. The Spectra 500s takes four Alkaline AA batteries. It is simple to use, turn the knob to switch it on. It is also dimmable which makes really useful to control the amount of light being powered.

    Rechargeable AA and Lithium-Ion AA batteries can be used as well. It can also be powered by an AC adaptor (ADAPTOR12V0.5A) to use through the mains. I can’t see myself bothering with this but the option is there. You can also purchase an adaptor (Manfrotto  L7.2V-Battery Adapter) which mounts at the back of the spectra unit and uses Sony L-Type batteries. Again, another alternative.

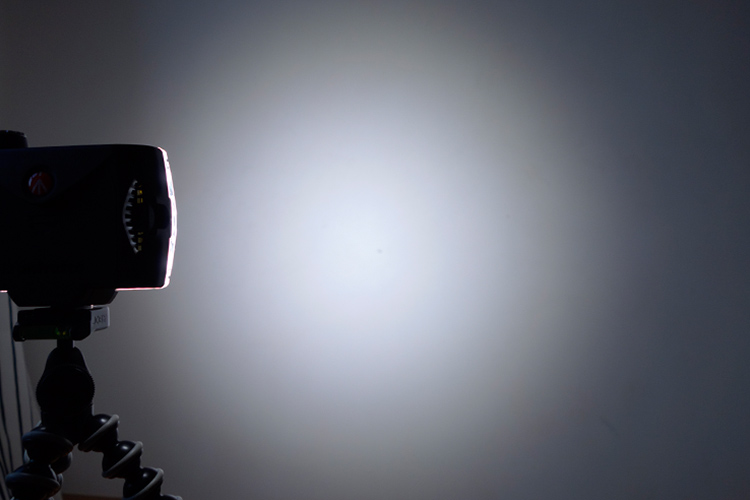
     Manfrotto Spectra LED 500s

    The Manfrotto Spectra LED 500s on full power at one meter.

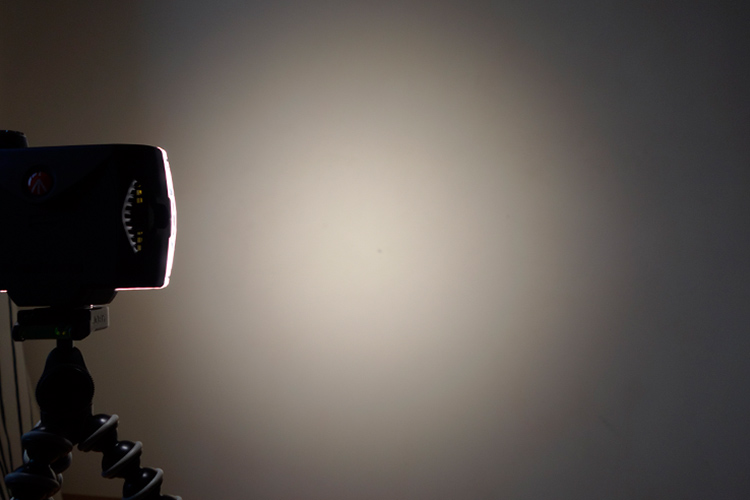
    lighter-cto-gel

    Here, the the 1/4 CTO gel has been applied over the light.

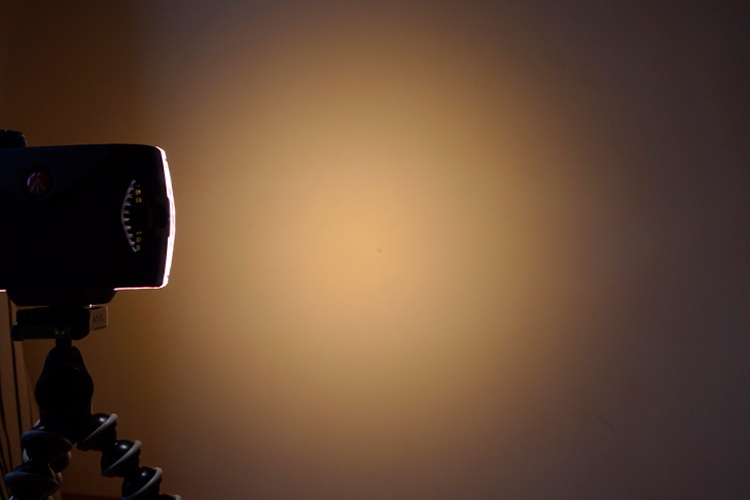
     Manfrotto Spectra 500s LED

    The Manfrotto Spectra 500s LED light with a CTO gel.

     Manfrotto Spectra 500s LED opal diffuser

    The Manfrotto Spectra 500s LED light with the opal diffuser.

    LED versus flash lighting?

    To see how using speedlights fared against this little LED I did a quick test. I didn’t set out to pitch one light source over the other, as that would be like comparing apples to oranges. I only wanted to get a comparison to see the results.

    The speedlight is way more powerful, I know that. For the shot below, I used a speedlight with a shoot through umbrella, which was about two feet away from the subject at an angle of 45 degrees. The power on the flash was only at 1/8th power. I kept the ISO the same at 200 for both. Shutter speed was at 1/60 second and the aperture was f/7.1.

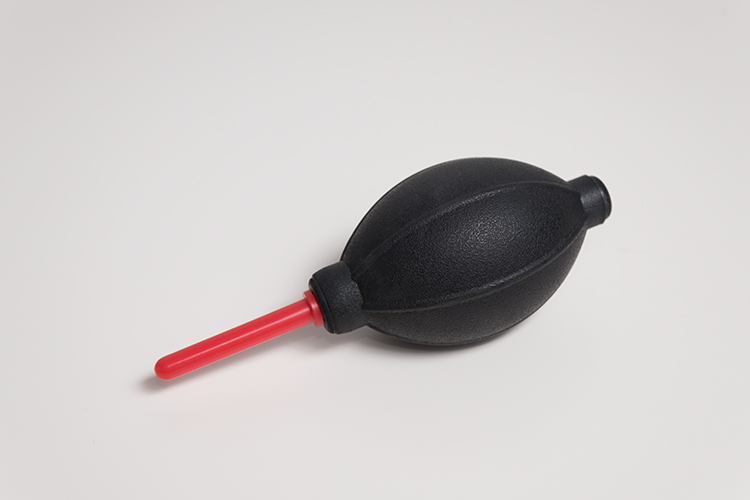
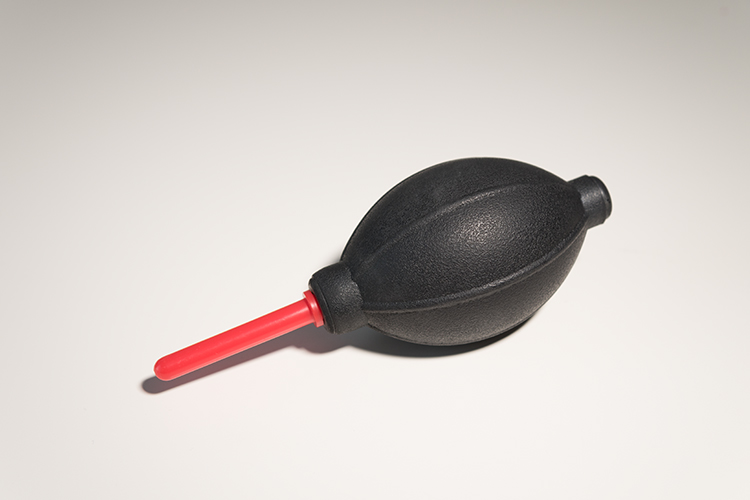
    In contrast to the Spectra light, I had the light switched to full power and I had to get really close, 10-12 inches away from the object. The camera settings were 1/15th of a second at f/5.6. I didn’t put a diffuser on the Spectra light as a result, there is a harsh shadow under the air blower.

    speedlight versus Manfrotto Spectra 500S LED

    This was shot using flash with a speedlight.

    Manfrotto Spectra 500s LED

    This was shot using the Manfrotto Spectra 500s LED light.

    What to look for when choosing LED lights

    First, CRI (color rendering Index) is important when choosing an LED light. The closer it is to 100, the more ideal it is. Less than 90 is considered not great. The Manfrotto Spectra LEDs claim >90. What does this really mean? Natural light is classified as having a CRI of 100, the best possible.

    Secondly, make sure the LED is flicker free.

    Pros of LED lights

    • Extremely portable
    • Lightweight and compact, even with the batteries
    • Easy to use
    • Don’t overheat
    • Can be used for both video and photography
    • Great for small product shots
    • Handy in low light conditions
    • As it is a portable continuous light source, this makes LED lights ideal for beginners to learn about how light affects the subject/model
    spectra-light-unde-pendant-shade

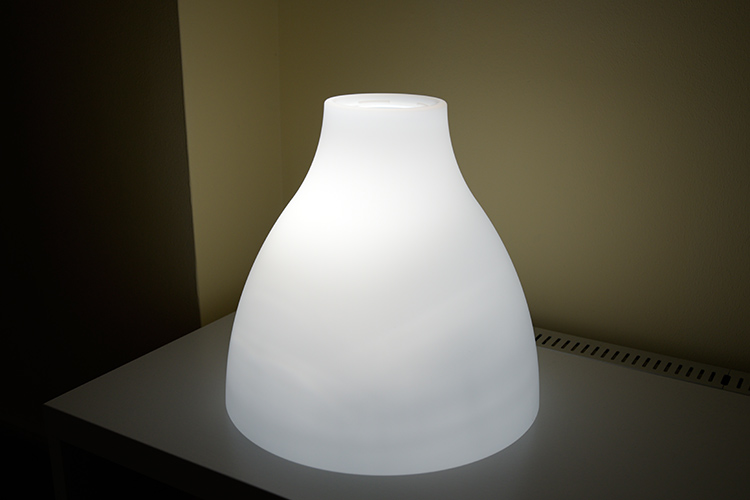
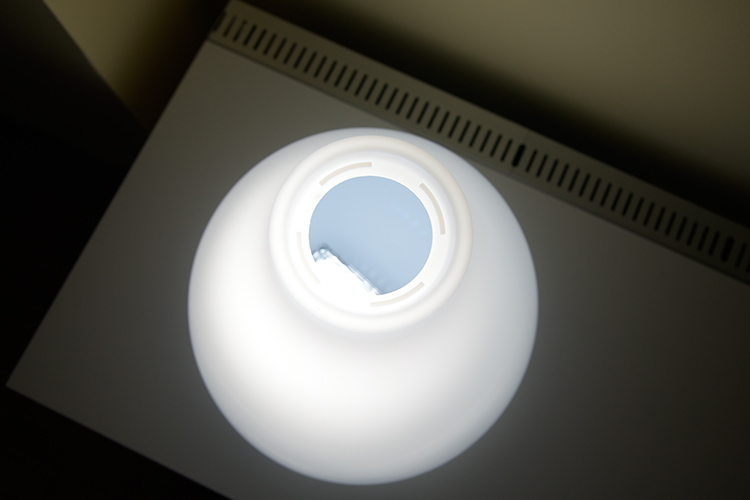
    I put the Spectra light inside this pendant shade. This is where the LED light could come in handy by mimicking other light sources to create atmosphere or mood in your shot.

    spectra-light-in-shade

    I just placed the Spectra LED LIight under this shade to see how effective it could be to mimic another light source to add atmosphere in your shot.

    Cons

    • A little pricey, unless you get a discounted price
    • The white light may not be appealing to some – but the gels included compensate for that
    • The mini ball head adaptor is clunky and fiddly to use – not a deal breaker but annoying nonetheless
    • Not powerful enough in some situations where there is a lot of ambient light to balance against.

    Conclusion

    As I stated at the beginning of this article I set out to describe my initial impressions so far to date. As this is a very recent purchase, I have yet to test it out fully. But so far I give it 3.5 stars out of five. This may seem a bit harsh but I took a half star away for each of the following:

    • The mini ball head adapter is quite cumbersome to use.
    • It’s fairly expensive compared to other similar less expensive models.
    • This light is not really powerful enough in certain situations and other cheaper models are more powerful.

    In terms of photography use, LEDs are terrific and so easy to use. The Manfrotto Spectra 500S is the smallest but not as powerful as its siblings in the Spectra range. That said, I won’t be putting away my speedlights just yet.

    So, if you are new to LEDs lights and you would like to test them out for your photography. Check out my article here on how to use an inexpensive LED flashlight to take shots.

    Do you use LED lights in your photography? Please leave a comment below, and tell us more.

    googletag.cmd.push(function() {
    tablet_slots.push( googletag.defineSlot( “/1005424/_dPSv4_tab-all-article-bottom_(300×250)”, [300, 250], “pb-ad-78623” ).addService( googletag.pubads() ) ); } );

    googletag.cmd.push(function() {
    mobile_slots.push( googletag.defineSlot( “/1005424/_dPSv4_mob-all-article-bottom_(300×250)”, [300, 250], “pb-ad-78158” ).addService( googletag.pubads() ) ); } );

    The post Initial impressions of the Manfrotto Spectra LED Light 500S by Sarah Hipwell appeared first on Digital Photography School.


    Digital Photography School

  • Improve Your Photos with the Very Best Photo Editing Apps

    We snap photos so fine, we don’t need editing apps … but every now and then a photo needs a touch of sharpening, or a cooling filter, or a clip art robot, just to spruce it up.

    Who are we kidding? We’re obsessed with editing apps. And so are you – we asked!

    Read along to see our favorite editing apps, and the favorites of all of our followers.

    You’ll be a pro editor in no time, whether you snap perfect pics or not.

    (…)
    Read the rest of Improve Your Photos with the Very Best Photo Editing Apps (638 words)


    © laurel for Photojojo, 2017. |
    Permalink |
    No comment |
    Add to
    del.icio.us

    Post tags:


    Photojojo

  • Throwback Thursday: the Panasonic GH1 – mirrorless video arrives

    Last week at CES Panasonic officially unveiled its newest flagship model, the DC-GH5, a video/stills hybrid camera that looks to be an indie filmmaker’s dream. To see just how far we’ve come, for this week’s TBT we decided to take a look back at where it all began: the Panasonic DMC-GH1.

    The GH1 was announced way back in March, 2009, a few months after Panasonic’s first mirrorless camera, the G1. The G1 delivered on the promise of a mirrorless ILC system, but despite all its advances it lacked support for video. Fast forward a few months and Panasonic gave us the GH1 – essentially a G1 with video features added.

    It’s hard to remember now, but back then there weren’t many ILCs that captured video. The best known was the Canon 5D Mark II, which was famous for its full-frame depth of field and low light capabilities. Although it was based around a smaller Four Thirds sensor, GH1 quickly became a favorite of the video crowd thanks to its compact size, excellent video specs, and (relatively) good codec.

    The camera shot 1080/24p as well as 720/60p video. (1080/24p video was actually encapsulated in a 1080/60i wrapper.) 1080/24p was a magic number for video enthusiasts and indie filmmakers, and thanks to the camera’s multi-aspect sensor it was possible to capture a lens’s full angle of view when shooting video in 16:9 format.

    Although the camera’s 1080p footage was competitive with other cameras from the era, I can tell you from first-hand experience that it tended to fall apart quickly if the image was too complex or involved a lot of motion, thanks to the 24 Mbps AVCHD codec. On the other hand, 720p footage generally held up much better, and that’s actually how I ended up shooting the camera most of the time.

    720/30p video shot on the Panasonic GH1. Yep… we used bagpipers for our video test. Crank up the volume for your neighbors.

    Of course, one advantage we had back then was that most people weren’t actually viewing content on HDTVs or at 1080 resolution online, so it was a reasonable tradeoff. Heck, I even did a bit of commercial work for a client using the GH1’s 720p footage, and they loved it.

    When it came to stills, the GH1’s 12MP photos held up well against APS-C cameras of the time, such as the Canon EOS 500D (Rebel T1i). On the other hand, its performance left a little to be desired: from power on to taking a photo took 1.3 seconds. The camera could manage a respectable 3.3 fps of continuous Raw shooting… up to a total of 4 frames before the buffer filled up.

    Perhaps what I really loved most about the GH1, and part of the reason it got so much traction in the market, was the virtually universal lens mount of the Micro Four Thirds system. This was particularly important to videographers and filmmakers as it allowed us to utilize virtually any glass we could lay our hands on with the system, a fact I took full advantage of by attaching all my old Nikkor primes to the camera with adapters. Crazy times, I tell you.

    With a launch price of $ 1499 (including the 14-140mm F4.0-5.8 kit lens) the GH1 seemed expensive at the time. In that context, the $ 1999 price for the GH5, which can run rings around the GH1 in its sleep, doesn’t seem too far out of line.

    I have a GH1 sitting on my desk as I write this. I may have to charge up the battery and do a shootout against the GH5 as soon as we get it back in.

    For a blast from the past, read our full review of the Panasonic GH1

    Articles: Digital Photography Review (dpreview.com)

  • How to Swap Colors in Photoshop – Two Methods Explained

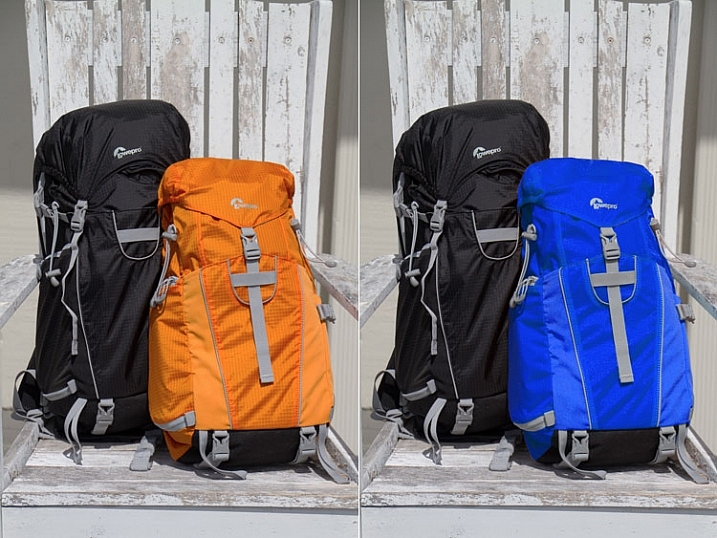
    Color swapping in Photoshop is both a fun thing to do and a very handy tool for product photographers with clients in need of options. It’s not a hard technique and it only takes a try or two to get it right. This article outlines two methods for how to swap colors in Photoshop.
    final-side-by-side-color-swap


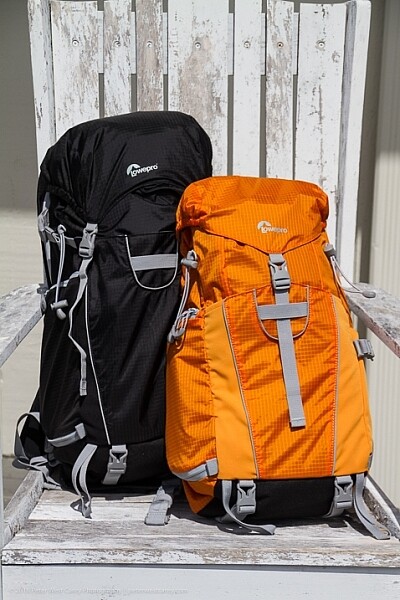
    The first is a quick method and the second tends to do a better job. I’ll be using this the image below from my review of the Lowe Pro Photo Sport 100/200 AW bag. This demonstration was created with Photoshop CC 2017.

    The Quick Method

    This method is a quick color swap that may or may not cover your needs. If your subject has nice, solid colors without very much tonal difference, you can likely use this method by itself. Go ahead and open your file in Photoshop and let’s get started!
    How to Swap Colors in Photoshop - Two Methods Explained

    Sample Image

    Step #1 Create a Hue/Saturation Adjustment Layer

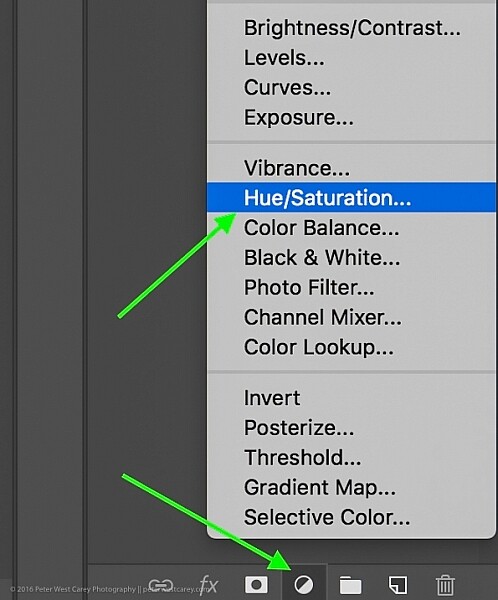
    Click on the “Create New Adjustment Layer” button on the bottom of the Layers panel and choose “Hue/Saturation”.
    How to Swap Colors in Photoshop - Two Methods Explained

    Choose Hue-Saturation

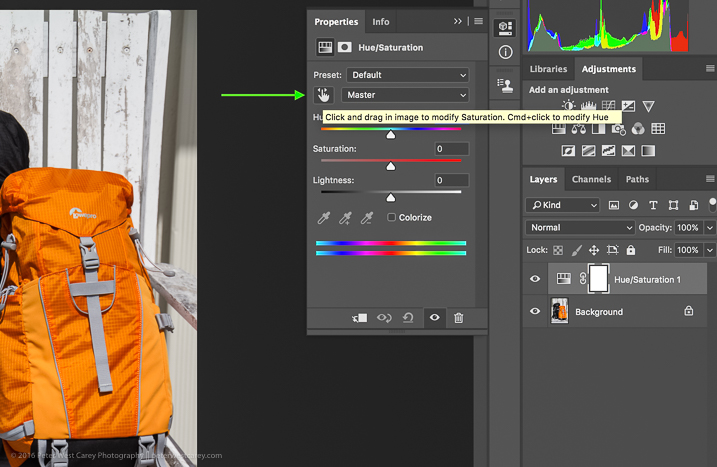
    In the Properties window that pops up, there is a little hand with a pointer finger in the upper left side of the box. Click that.
    How to Swap Colors in Photoshop - Two Methods Explained

    This is where my method deviates from some others. As you can see in the image above, there is an option to hold Cmd/Ctrl as you drag the mouse, and change the Hue straight away.

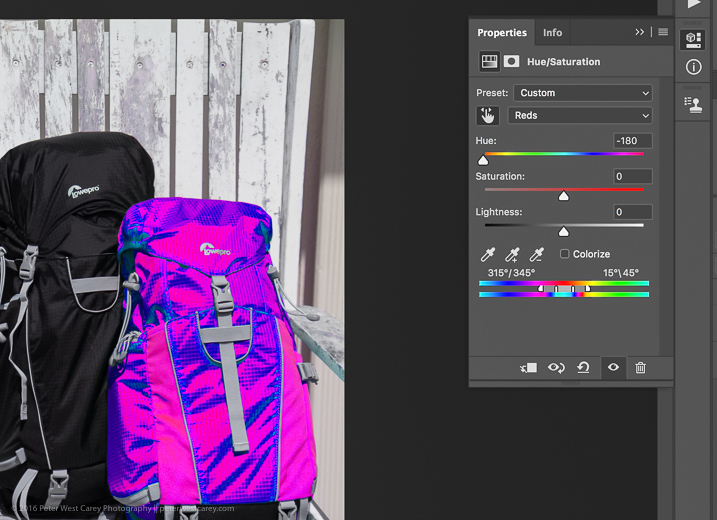
    This is a tempting method, for sure. But it won’t always get you as close to your desired results as if you follow the rest of these instructions. For instance, I used that method to try to change the orange pack to blue and this was the result.
    How to Swap Colors in Photoshop - Two Methods Explained

    Not what I wanted. So….

    Step #2 – Select a color range

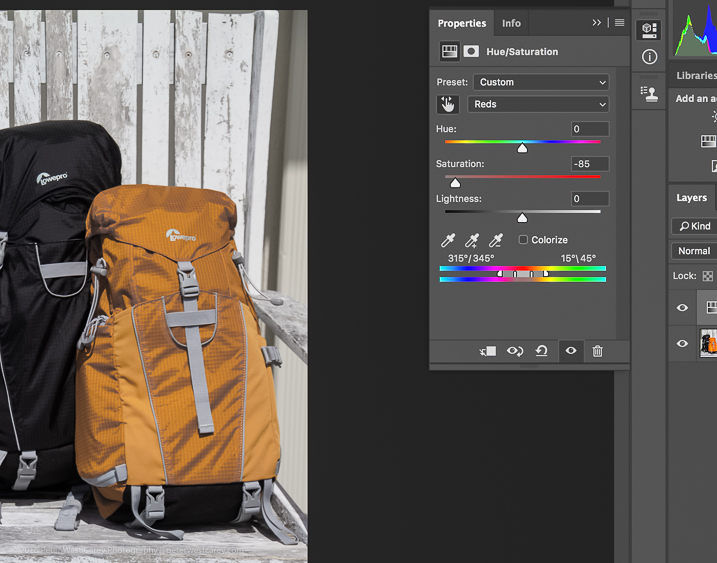
    After you click that little finger and hover over your source color (the orange bag), click there to select the color. Your screen will change depending on which color you pick, but more or less it will look a little like this.
    How to Swap Colors in Photoshop - Two Methods Explained

    I chose a dark spot so my saturation for all orange dropped and now there is a little slider in the color bands at the bottom of the properties box. You will be using those bands and the saturation slider to refine your selection.

    Step #3 – Adjust to get all the color

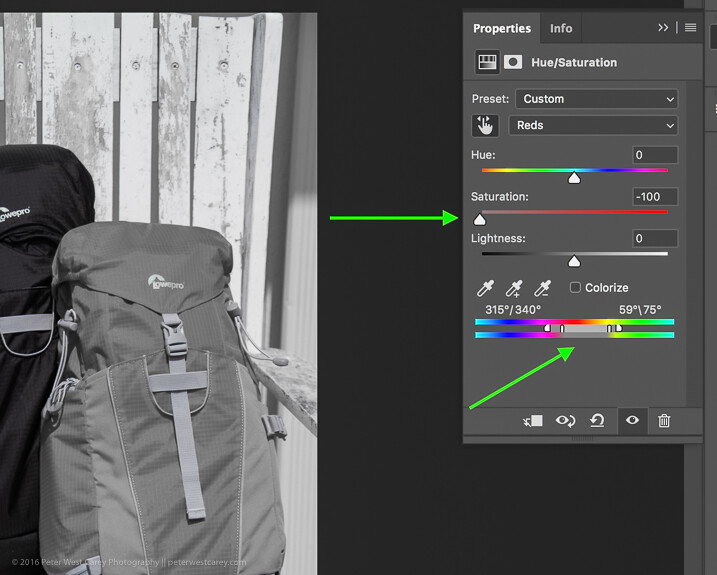
    To know you have the right colors you want to work with, move the Saturation slider all the way down, essentially turning off the source color. If that doesn’t get all the color you want, move the little white bands on the color slider on the bottom until it captures all your source color.
    How to Swap Colors in Photoshop - Two Methods Explained4

    Move Saturation to -100, and adjust the bands (bottom green arrow) left or right, or apart, until there is no more of the selected color showing.

    Can you see how that lighter gray box on the sliders at the bottom is larger (they were moved farther apart) in this image compared to the one above? That is to make sure I gobbled up all the orange, including some reds and yellows. Fiddle with this option to capture all your source color.

    Step #4 – swap the color for a new one

    Now that you know you have the right source color, jack up the Saturation slider then move the Hue slider until you get a color you like.
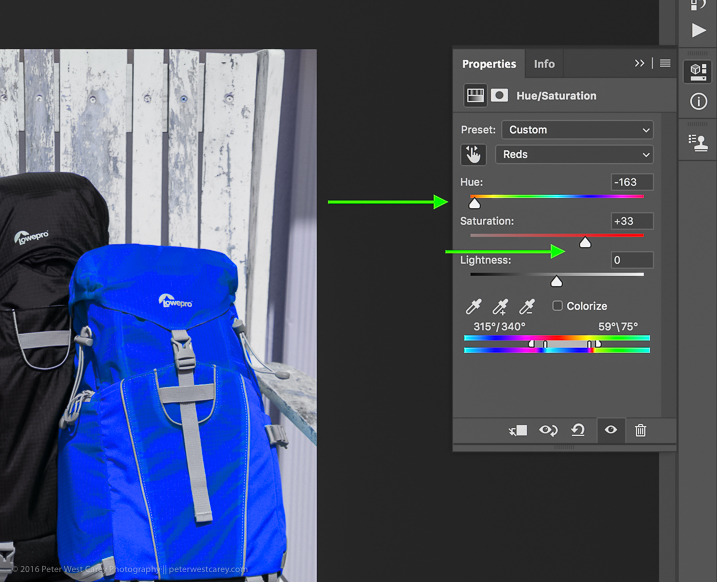
    How to Swap Colors in Photoshop - Two Methods Explained

    If you’re looking for quick and easy, you are essentially done! Save the file with a new name and you’re good to go.

    But wait! Things aren’t as good as they could be with this method. For one thing, there is now a slight tint to the entire image as the mask was applied to the entire image. Let’s clean that up a little.

    Method #2 for swapping colors

    Method #2 picks up where Method #1 left off and continues:

    Step #5 – Apply a layer mask

    In this step, you want to apply a mask to the Hue/Saturation adjustment layer (seen on the right side of the layer) just to the backpack so it doesn’t tint the whole image. Click on the layer mask and the information panel will change to show mask options.
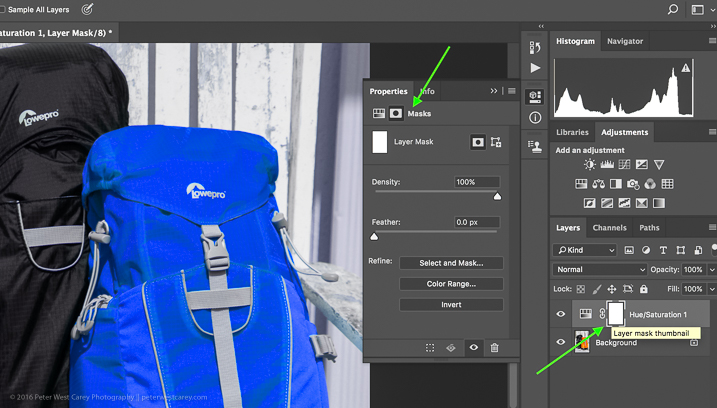
    How to Swap Colors in Photoshop - Two Methods Explained

    Choose “Color Range…” from the “Refine” options at the bottom.
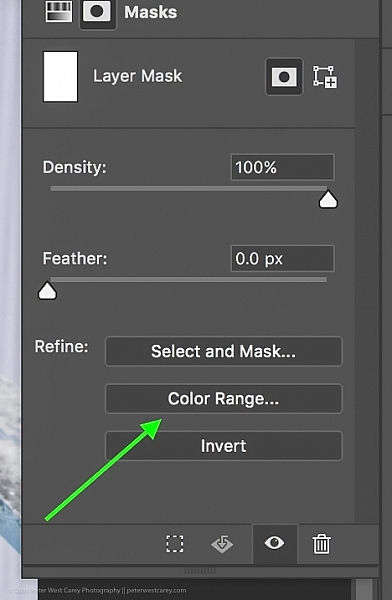
    How to Swap Colors in Photoshop - Two Methods Explained

    This should bring up a mask with the color range you have already selected and changed in the steps above. Your mask should show the area of color you are swapping as white, like so:
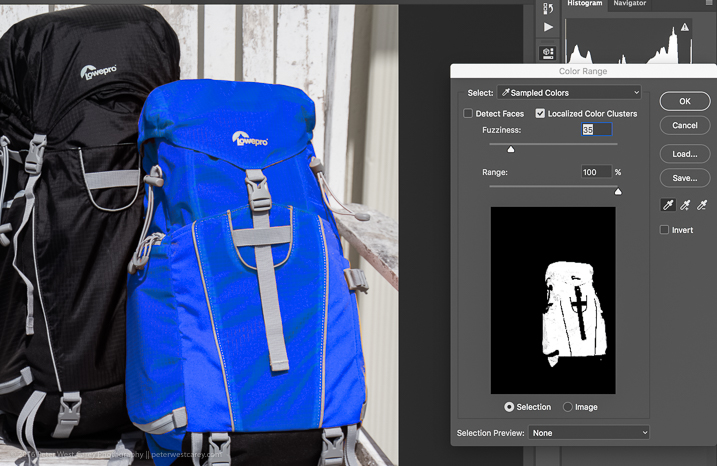
    How to Swap Colors in Photoshop - Two Methods Explained

    Click OK to apply the layer mask.

    Step #6 – Refine the layer mask

    Now you need to refine the layer mask just a little as Photoshop is not always perfect. Take a look close in my example and you can see some orange peeking through.
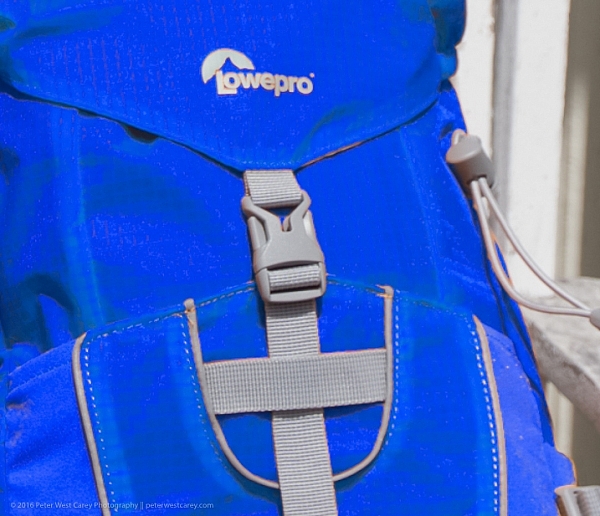
    How to Swap Colors in Photoshop - Two Methods Explained

    To eliminate this effect, click on “Select and Mask”, once again in the “Refine” options area.
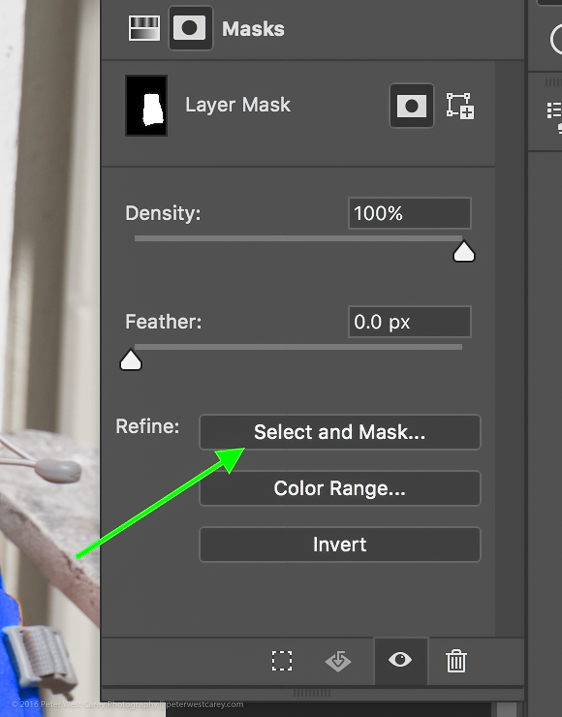
    How to Swap Colors in Photoshop - Two Methods Explained

    Choose to use the “Marching Ants” View to make it easy to find the missing areas.
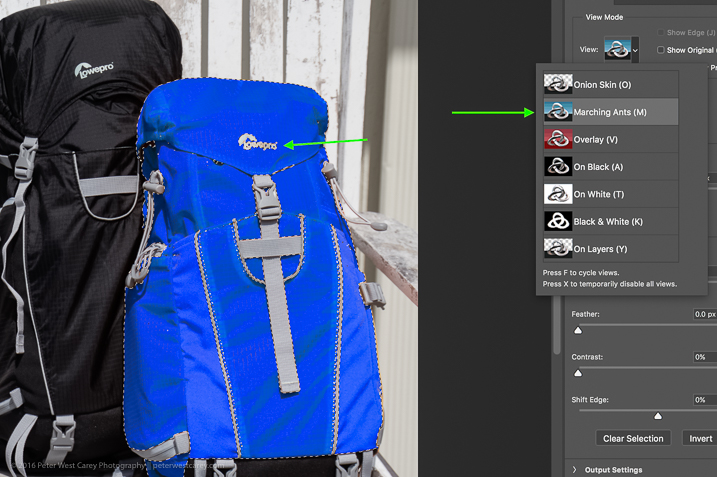
    How to Swap Colors in Photoshop - Two Methods Explained

    Then in the upper left corner, choose the Brush Tool and make sure the “add” feature (+) is selected. Lastly, choose a radius size to make the selecting easy. In this case, I used 365.
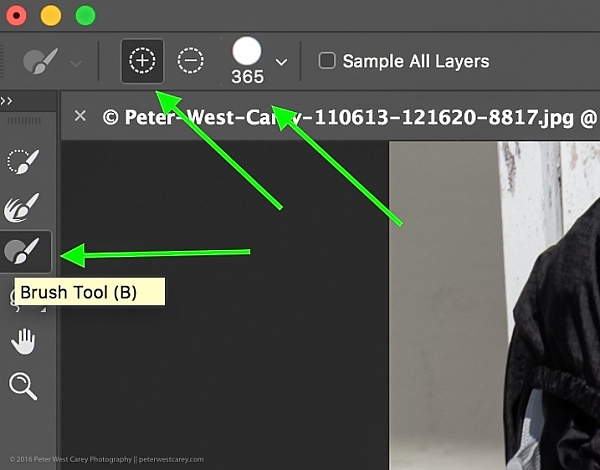
    How to Swap Colors in Photoshop - Two Methods Explained

    Now paint all over the area you want to change to the new color. It’s okay to go slightly over the edges to ensure all of the color is changed. If you are making drastic changes or if your background color will interfere, you may need to be more careful with your painting.
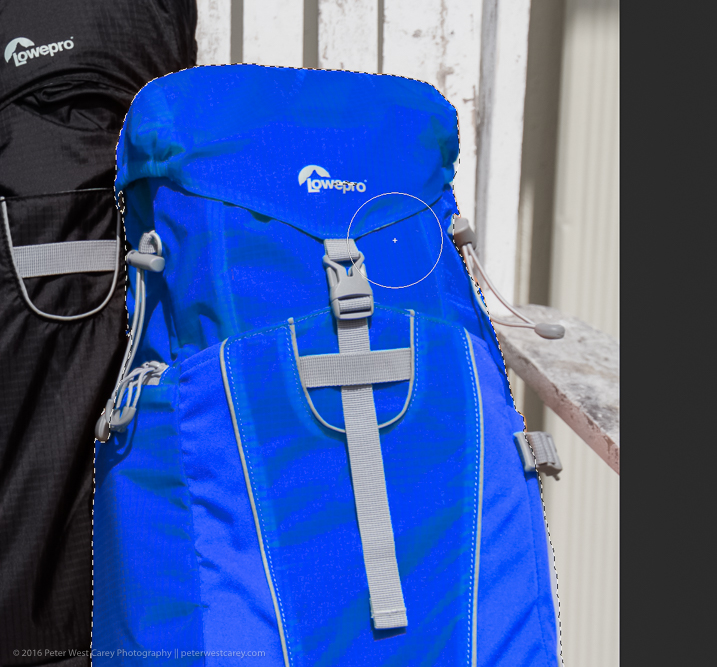
    How to Swap Colors in Photoshop - Two Methods Explained

    Zooming in, you can see that I missed some edges here and there and overlapped a little too much. Take your time and make it look good.
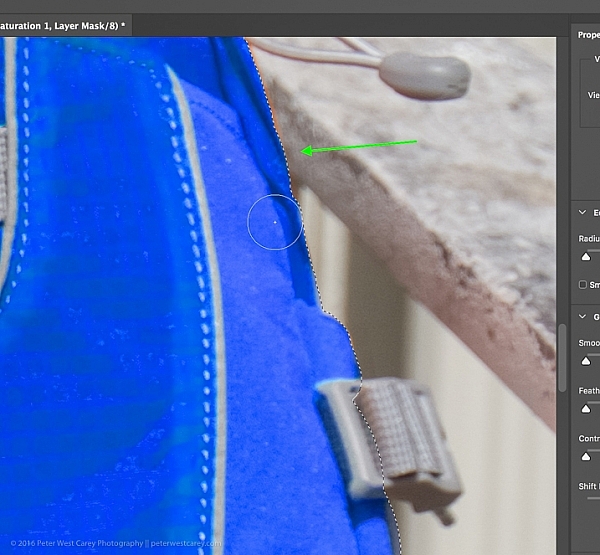
    How to Swap Colors in Photoshop - Two Methods Explained

    You can also see in the image above that there is still an orange cast on the armrest of the chair. To make the scene complete, I’ll swap that color as well.

    Click OK when you are finished painting in the area to swap. You’re just about done!

    Step #7 – Layer blend mode

    Depending on what you’re swapping and the textures and colors involved, you may be able to get a slightly better result by choosing a different blend mode option for this layer. Click the word “Normal” above your layer and play around with the different layer blend mode choices.
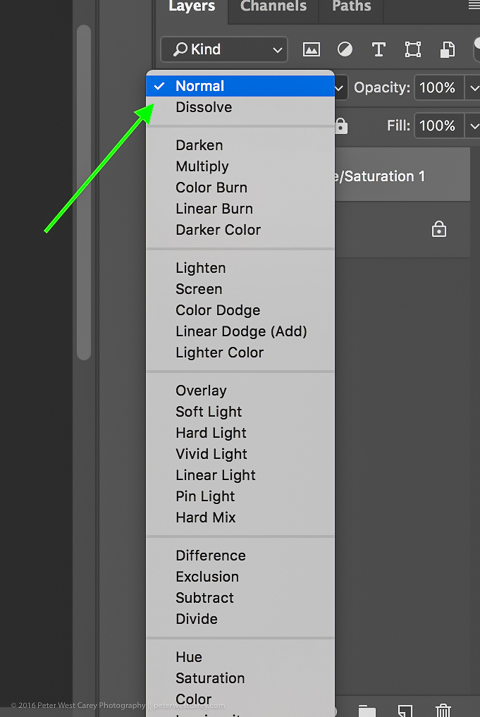
    How to Swap Colors in Photoshop - Two Methods Explained

    You’re done!

    From here, you can fiddle until your heart is content. Try new blending modes and opacities. Refine your masks. Then sit back and enjoy your handy work!

    final-side-by-side-color-swap


    Cautions

    1. Watch out for white objects when there is a lot of white in the scene. These can be tricky.
    2. For that matter, watch out for the color you want to swap appearing anywhere else in the image. You’ll need to remove the mask from those areas manually (Step #6 but use the “minus” option).

    googletag.cmd.push(function() {
    tablet_slots.push( googletag.defineSlot( “/1005424/_dPSv4_tab-all-article-bottom_(300×250)”, [300, 250], “pb-ad-78623” ).addService( googletag.pubads() ) ); } );

    googletag.cmd.push(function() {
    mobile_slots.push( googletag.defineSlot( “/1005424/_dPSv4_mob-all-article-bottom_(300×250)”, [300, 250], “pb-ad-78158” ).addService( googletag.pubads() ) ); } );

    The post How to Swap Colors in Photoshop – Two Methods Explained by Peter West Carey appeared first on Digital Photography School.


    Digital Photography School

  • Focus ramping intervalometer Timelapse+ View goes on sale

    US accessories manufacturer Timelapse+ has announced that its latest on-camera timelapse controller is now on general sale. The Timelapse+ View allows photographers to program complex timelapse sequences and preview them as they happen on its built-in monitor. The controller can itself be controlled via a smartphone app which will also display the progress of a shoot as it is recorded.

    Users can select start and end points for focus shifts during the timelapse sequence and determine over how many shots the changes will take place, and the device automatically shifts the focus of the attached camera’s lens during the shoot. Gesture detection allows previews to be activated without the photographer having to actually touch the set-up.

    The company says that View also can be connected by Bluetooth to the Dynamic Perception NMX motion controller for moving-camera shots, and the files created are fully compatible with timelapse software LRTimelapse. The device supports a range of DSLR cameras from Canon, Nikon and Sony and costs $ 399.

    For more information visit the Timelapse+ website.

    Press release

    Auto ramping intervalometer enables you to preview your timelapse

    Time lapse hardware maker Timelapse+ announced today that after a successful KickStarter campaign, manufacturing for the second batch has already begun, with shipment expected to be around mid-January.

    The VIEW ran a successful Kickstarter campaign in April 2016, with Timelapse+ successfully raising $ 131,337 of its $ 100,000 goal in 30 days.

    The VIEW is a breakthrough intervalometer for cinematographers and photographers that allows for automatic bulb ramping, live time lapse preview — watched either on the VIEW or a smartphone – and touch-free gesture controls. Since the end of the KickStarter campaign, Timelapse+ has been actively adding new features and working with other vendors to include third-party integrations to the VIEW.

    The VIEW now has integrations to automatically connects to the Dynamic Perception NMX motion slider via Bluetooth and LRTimelapse support added to XMP data.

    Additional new features include:

    • Automatically optimizes buffer time during ramping
    • Configurable ISO and shutter speed limits for auto ramping
    • Red theme option
    • Power button activates help screen for the currently selected item
    • Supports Canon, Nikon, and Sony Alpha

    Elijah Parker, inventor of the view, said, “After reaching both the funding and shipping milestones, I’m excited to start this next phase.”

    Pricing, updates, and availability
    Retail Price: $ 399.

    Pricing may vary by country for non-USD purchases and additional fees may apply,
    including tax and shipping costs. Estimated to ship January 21st, 2017.

    About Timelapse+
    Timelapse+ is an innovator in hardware for time-lapse and HDR photography, with the original Timelapse+ Intervalometer and the new VIEW Intervalometer.

    Articles: Digital Photography Review (dpreview.com)