Blog

  • Some Options for Backing Up Your Photos Online

    Backing up your data is an essential part of your photography workflow. While many photographers still advocate for using physical external hard drives, there are also many online services where you can store your images. In this article, I will go over the pros and cons of several popular sites to backup your photos online. Please note that these photo solutions are constantly changing their features, so always check with them directly to verify any details.

    Photo backups versus photo sharing sites

    Some Options for Backing Up Your Photos Online

    It’s important to note the differences between a designated photo backup services and photo sharing websites. Traditional photo backup services such as Backblaze and CrashPlan focus purely on backing up data and can be set to backup an entire computer or hard drive. This is good in the sense that you can have everything you’ve ever created on your computer saved to the cloud. However, these backups end up being extremely large files and they take extra time to retrieve. So if you need to constantly and quickly access your backed up photo data, it may not be wise to rely solely on these types of providers.

    Photo sharing sites, on the other hand, are not meant to be comprehensive backups of your entire computer. Many of these sites impose limits on the types and sizes of files that can be uploaded. Thus, photo sharing websites are best used to upload, store, and share edited photos.

    How I backup my photos

    My advice is to have a backup for your backup. As a professional photographer who shoots primarily in RAW, I have terabytes of data to store, but I don’t generally need frequent access to those original files. I opt for CrashPlan to do automatic backups of my RAW images, in addition to storing them on external hard drives.
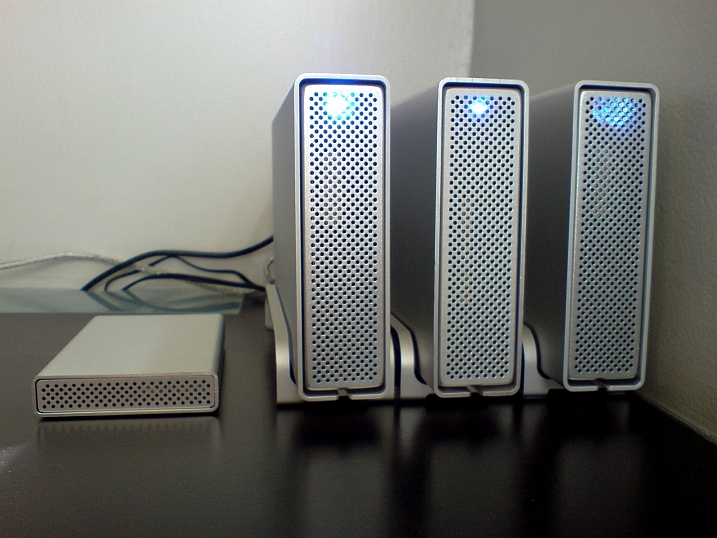
    Charles Wiriawan

    Image By Charles Wiriawan – external hard drive method of backing up.

    My photography business is such that I constantly need to dig up old high-resolution photos to present to clients, and CrashPlan doesn’t give me easy, immediate access to those files. So I save edited, high-resolution copies of every photo I take and upload them to SmugMug. This way, I have quick access to the photos and can easily prepare an online gallery to share and sell images to clients. I also have Google Photos set to do automatic online photo backups anytime I save a new JPG image to my computer. In the end, I have four ways of backing up my photos.

    Backup Services

    These are comprehensive backup and cloud storage solutions meant to hold large amounts of data. Set them to automatically backup your entire computer or hard drive, and practically any file type or size will be accommodated. On the plus side, these backup solutions are pretty affordable for what they offer. However, it can take a long time to backup huge files, and file restoration can also take a bit of time.

    Backblaze

    One of the most popular backup solutions, Backblaze can automatically backup an unlimited amount of data from a single computer (note; it will connect and backup external drives as well). There’s no restriction on file type or size, and there’s only one pricing plan. It costs $ 5.00 per month or $ 50 USD per year for a Backblaze account. You can even pre-pay $ 95 for a 2-year plan. It’s an affordable and reliable solution for making sure everything on your computer is backed up.

    Some Options for Backing Up Your Photos Online backblaze

    CrashPlan

    Virtually the same as Backblaze, CrashPlan also offers automatic computer backups. The main difference is that CrashPlan offers several different subscription plans. Included in the free plan is an automatic backup to a local hard drive or another computer. If you want to backup your data to CrashPlan’s cloud, the cost is $ 5 per month to backup one device for unlimited cloud storage and mobile file access. To add an extra device (as many as 10), the Family Plan is available for $ 12.95 per month.

    crashplan Some Options for Backing Up Your Photos Online

    Amazon Cloud Drive

    At $ 11.99 a year for unlimited photo storage (or free for Amazon Prime members), Amazon offers competitive cloud storage solutions, but at some expenses. The main downside to Amazon Cloud at the moment is its lack of features when compared to other more established solutions. For example, a desktop client must be used to upload files larger than 2GB, there are no automatic backup features, and stored files are not automatically updated. Given these underdeveloped features, Amazon Cloud Drive at this moment seems more like an off-site hard drive rather than a true backup solution.

    amazon-online-photo-backup

    Microsoft OneDrive

    Formerly known as SkyDrive, OneDrive is Microsoft’s cloud storage solution that works with Windows, Mac, iOS, and Android devices (but still no Linux). Base plans include a generous 15GB of free storage. Paid plans start at $ 1.99 a month for an extra 100 GB, or $ 6.99 for 1TB of space. The main downsides are a slow upload and download speed, a 10GB size limit per file, and the need to have a Microsoft, Outlook, or Xbox Live account in order to access OneDrive. This may be a hurdle for those who don’t use any Microsoft or Windows products.

    onedrive-online-photo-backup

    Google Photos

    The photo storage solution offered by Google takes a slightly different approach than that of Dropbox or Flickr. Google Photos offers unlimited backup of a wide variety of file formats (including RAW images). You can also set automatic backups to occur whenever a new photo is taken on your mobile device or saved to your computer. However, all photos and videos must be under 16 megapixels or 1080p HD video.

    If you upload larger files under the unlimited plan, your files will be compressed to fit these maximum size requirements. The only way to upload original, full resolution images is to opt for a plan with limited storage. In a way, this makes sense. You pay for more storage space if you need it.
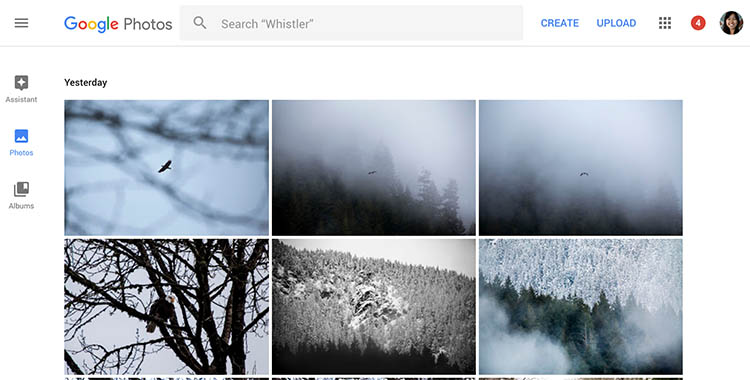
    google-photos-online-photo-backup

    Photo Sharing and Image Hosting Websites

    These websites were not originally meant to be comprehensive backup solutions. However, many photographers have begun using them as such. Most of these websites have limitations when it comes to data storage or file types that you can upload. Thus, they may not be the best all-around backup solution for your photos, depending on your needs.

    Dropbox

    One of the most popular tools to backup photos online is Dropbox. It exists in the form of a mobile app, website, and desktop app and allows you to store all types of media including photos, documents, videos, and other files. Anything you add to Dropbox can be immediately accessed anywhere when you log in via the corresponding website or app.

    Using the free version gives you 2MB of storage space, but you can purchase additional space. Dropbox made an attempt at pushing an automatic photo backup feature in the form of Dropbox Carousel. However, this app along with Dropbox’s email app Mailbox shut down in early 2016. Thus, it’s questionable if they will make future investments into further feature development.

    dropbox-online-photo-backup

    Flickr

    Yahoo’s venerable photo solution, Flickr, has withstood the test of time and continues to be popular among amateur and professional photographers. Even with a free account, you get 1TB of photo storage space. However, you cannot get more than 1TB of space, even with a paid Flickr Pro account. Instead, the paid account just removes ads and gives you access to your account stats. While Flickr isn’t the best for sharing photos with clients, it does give you the option to license and sell your photos.

    The main downside to Flickr has to do with file size limits. Uploaded photos cannot be more than 200MB and videos must be 1GB or less in size. Additionally, RAW images cannot be uploaded.

    flickr-online-photo-backup

    SmugMug, Zenfolio, and Photo Shelter

    These three paid photo-sharing websites are popular for presenting and selling photos to clients:

    1. SmugMug
    2. Zenfolio
    3. PhotoShelter

    However, the push for offering unlimited photo storage has elevated these sites into becoming viable ways for photographers to backup images. All three sites also offer components that help you build your photography website. SmugMug and Zenfolio are among the most affordable, while PhotoShelter is more expensive.

    In Conclusion

    So which photo backup solution is best for you? It truly depends on what media you are looking to backup, how often you will access it, and your budget. Whichever solution you choose, remember to always have a backup for your backup. Also, please remember that these services are constantly offering new promotions and features. The information in this article may change, so always check directly with the provider to verify details.

    How do you backup your photos? Let us know in the comments below.

    googletag.cmd.push(function() {
    tablet_slots.push( googletag.defineSlot( “/1005424/_dPSv4_tab-all-article-bottom_(300×250)”, [300, 250], “pb-ad-78623” ).addService( googletag.pubads() ) ); } );

    googletag.cmd.push(function() {
    mobile_slots.push( googletag.defineSlot( “/1005424/_dPSv4_mob-all-article-bottom_(300×250)”, [300, 250], “pb-ad-78158” ).addService( googletag.pubads() ) ); } );

    The post Some Options for Backing Up Your Photos Online by Suzi Pratt appeared first on Digital Photography School.
    Digital Photography School

  • A Couple of Overviews of the New Nikon D3400

    Last fall an update to the D3300 was released, the new Nikon D3400. I looked around and was able to find a couple of videos that go over the features and how it compares to the D3300, and also to the relatively new Canon T6.

    The Nikon D3400 Review by Chris Winter

    In this video photographer, Chris Winter goes over the features in the Nikon D3400 as compared to upgrades from the D3300, and some pros and cons. He mentions the new Nikon app Snapbridge as one of them, which allows you to receive photos to your smartphone directly from the camera without wifi.

    Nikon D3400 versus the Canon T6

    This next video compares the Nikon D3400 and the Canon T6 in several areas. See which one Chris rates on top:

    • Size and weight
    • LCD screens
    • Menus
    • Wireless integration
    • Video
    • Battery life
    • Burst mode
    • Autofocus

    Field test of the Nikon D3400

    In this last video you can see the D3400 in use in the field in more practical situations, and how it performs.

    Which camera is for you?

    So if you are looking for an entry-level DSLR the Canon T6 or the Nikon D3400 might be for you. Have you given them a look? Which fits your needs and why? Tell us your thoughts in the comments below.

    • Shop for the Nikon D3400 on Amazon.com or on B&H Photo
    • Shop for the Canon T6 on Amazon.com or on B&H Photo

    Note: The D3400 also made this list: The 19 Most Popular DSLRs Among our Readers

    googletag.cmd.push(function() {
    tablet_slots.push( googletag.defineSlot( “/1005424/_dPSv4_tab-all-article-bottom_(300×250)”, [300, 250], “pb-ad-78623” ).addService( googletag.pubads() ) ); } );

    googletag.cmd.push(function() {
    mobile_slots.push( googletag.defineSlot( “/1005424/_dPSv4_mob-all-article-bottom_(300×250)”, [300, 250], “pb-ad-78158” ).addService( googletag.pubads() ) ); } );

    The post A Couple of Overviews of the New Nikon D3400 by Darlene Hildebrandt appeared first on Digital Photography School.

    Digital Photography School

  • Clone Wars: How Star Architect Frank Lloyd Wright Inspired the Design of Naboo

    [ By WebUrbanist in Architecture & Public & Institutional. ]

    naboo-architecture

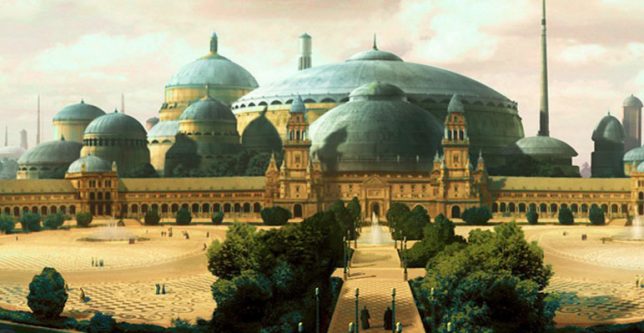
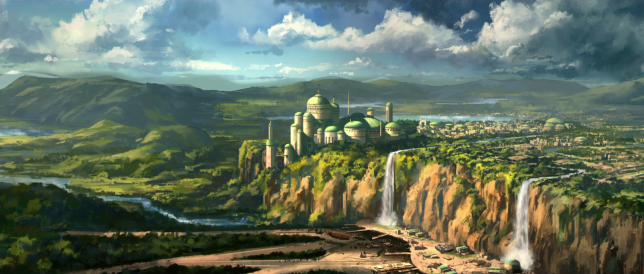
    Much of the magic of the Star Wars films derives from the fantastic landscapes and exotic built environments that serve as backdrops for its intergalactic tales of empires and rebellions. But when world-makers like George Lucas create these places, they often draw on real architects and architecture for inspiration, including the last and largest work of starchitect Frank Lloyd Wright.

    democratic-design-star-wars

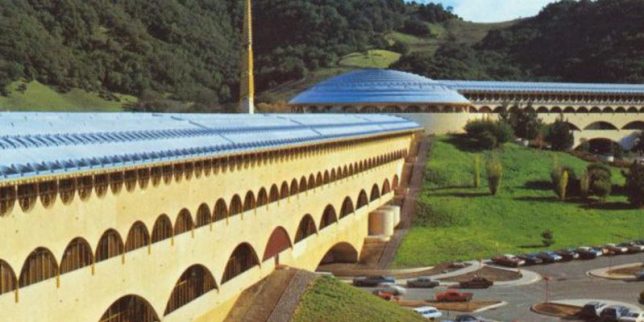
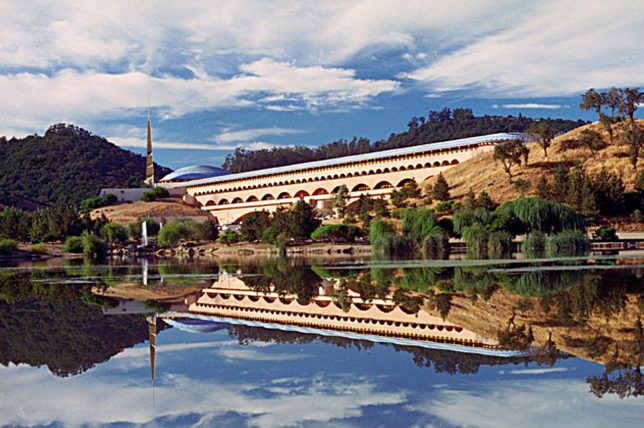
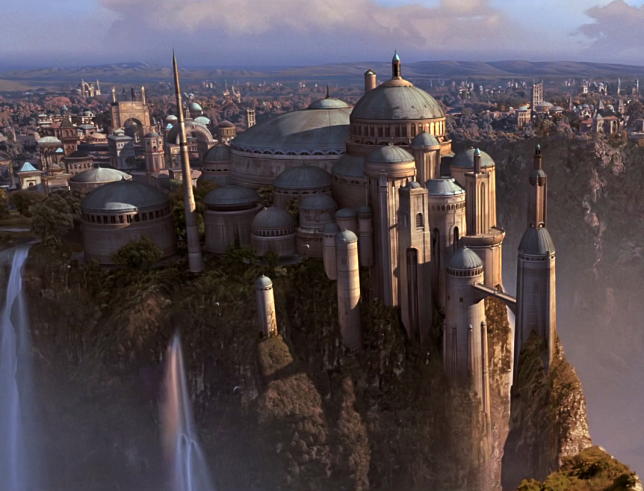
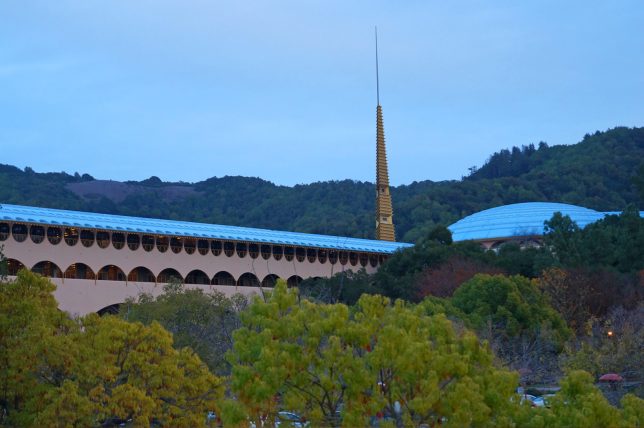
    Located north of San Francisco, the Marin County Civic Center consists of a massive rotunda housing a public library, offset by a strong vertical spire and long Hall of Justice (a classic Wright move to emphasize and juxtapose both horizontals and verticals). These same features can be found in the heart of Naboo, a Mid Rim world (near the Outer Rim Territories) featured across a series of Star Wars films.

    marin-count-city-civic

    royal-palace

    As with their cinematic counterparts, Wright’s structures for Marin were designed to relate to the landscape – curved blue roofs pick up on the tones of the sky above while beige/pink walls tie into the earthen surroundings. Arched supports and the voids they create at different scales are also immediately recognizable as similar between the original Terrestrial architecture and its echos in Star Wars scenes.

    civic-center-design

    views-of-naboo

    For Wright as well as Lucas, there is an underlying idea at work in the design: a combining of grandeur worthy of civic architecture but also an aspiration toward something democratic, beautiful but accessible. The settings are also similar: complex and lush landscapes, fitting a similar vision found in both the architect’s and filmmaker’s works: a focus on working architecture into natural settings rather than envisioning dense cities. Lucas has directly acknowledged a debt to Wright for inspiring the architecture found in the Star Wars franchise, but has yet to announce whether he will be working on a sequel story: some of us are still waiting on Starchitecture Wars.

    Share on Facebook


    [ By WebUrbanist in Architecture & Public & Institutional. ]

    [ WebUrbanist | Archives | Galleries | Privacy | TOS ]


    WebUrbanist

  • 8 Tips for Getting Great Expressions in Family Portraits

    8 Tips for Getting Great Expressions in Family Portraits

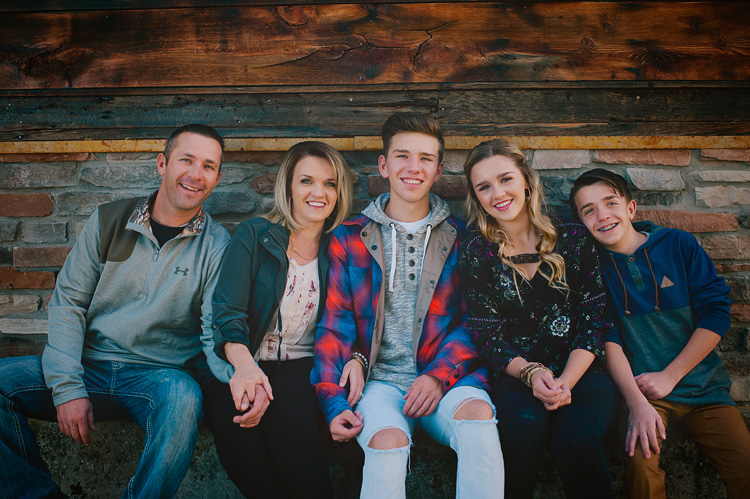
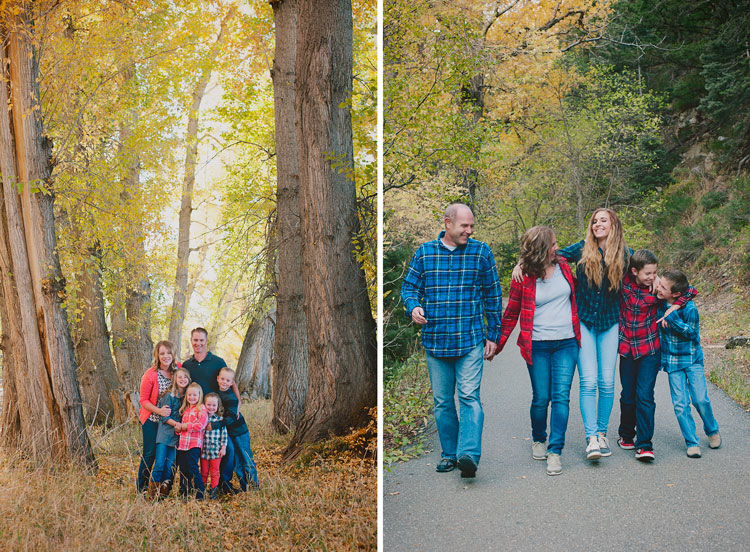
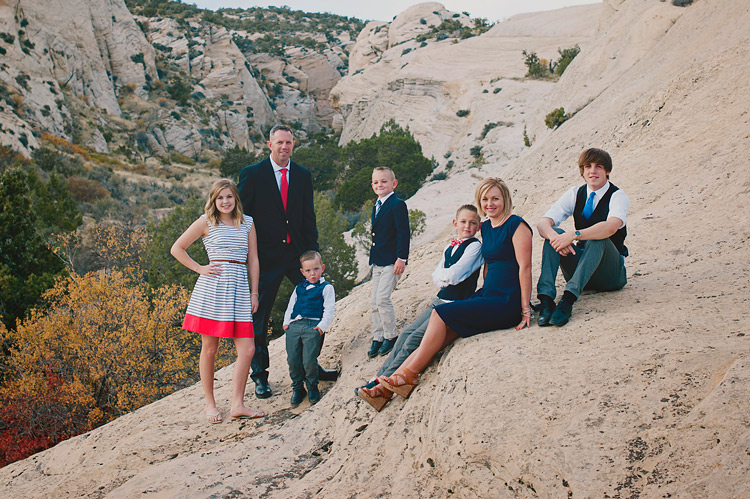
    Sometimes as a photographer, you are lucky enough to get a family session full of models with perfect natural smiles in every photo. It doesn’t take much to get a photo that is ready to hang on the wall. However, most of the time with family portraits it isn’t that easy.

    Maybe you’ve got somebody who doesn’t want to be there or little kids that have no idea what you’re trying to get them to do. And maybe, just maybe, you’d like to have some photos that show some extra personality. Everyone looking at the camera and smiling is nice, but I always love the ones that show a little more of who the family really is. I’ve got a few tricks up my sleeve to help you through the more difficult sessions, and to help you get some fun full-of-personality shots and great expressions with any family.

    1. You’re in charge of the kids

    8 Tips for Getting Great Expressions in Family Portraits kids

    Many times during a family session, you’ll have parents that are really concerned about whether or not their kids are looking and smiling at the camera. They don’t realize that the moment their little one looks and smiles, their faces aren’t photo-ready because they’re spending all their time wondering what their kid is doing.

    Remind the parents to keep their faces ready for photos at all times, and you, as the photographer, will take care of getting their kids to look and smile. If they are talking to their child, it will be hard for their child to look at you, because he’ll think he needs to be looking at mom or dad. Whether you want the parents looking at the camera or not for a particular photo, remind them to do their part for the photo and leave the rest to you.

    2. Let the parents help sometimes

    parents - 8 Tips for Getting Great Expressions in Family Portraits

    This might seem to contradict point #1 above, but there are times when getting those genuine smiles from the kiddos requires a little bit of help from the parents. If you have a reluctant smiler and you want to get a good individual photo of the child smiling, ask the parent to make a funny face, or do something silly off-camera. If you want the subject looking at the camera, ask the parent to get right behind you. Parents often know one silly word that will get their child giggling, or the child might just need the comfort of seeing a parent smiling at them to know that it’s all okay.

    You can also have photos with the parents interacting with their children in the frame. These often end up being some of my favorites. I love capturing the genuine interactions, and those expressions that the parent sees every day. Put the parent and child together, and simply ask them to smile at each other. Often this initially awkward directive gets them really giggling together, and you’ve got the perfect expressions.

    3. Laugh at the silly one

    laugh silly - 8 Tips for Getting Great Expressions in Family Portraits

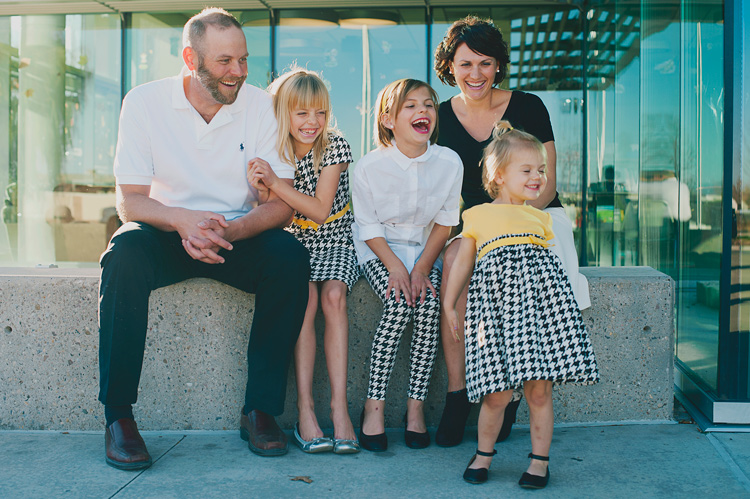
    One of my most effective prompts for natural looking family interaction and genuine expressions is to ask them to laugh at the silly one. Sometimes they all look to the same person right away, and everyone will start truly laughing. Sometimes they all look at someone different, and after a second of bewilderment, they all start laughing.

    This one can backfire, though, and needs to be used with caution. Some kids automatically think that laughing means to be over the top silly, and they over-exaggerate a huge laugh that doesn’t look natural at all. Some kids think that laughing also must be accompanied by pointing, and that never looks great in a photo either. In these cases, I tell them to giggle quietly and to keep their hands down. Usually, that solves the problem. If it doesn’t, I just move on to something else and let the moment go.

    4. Simply hug

    hug - 8 Tips for Getting Great Expressions in Family Portraits

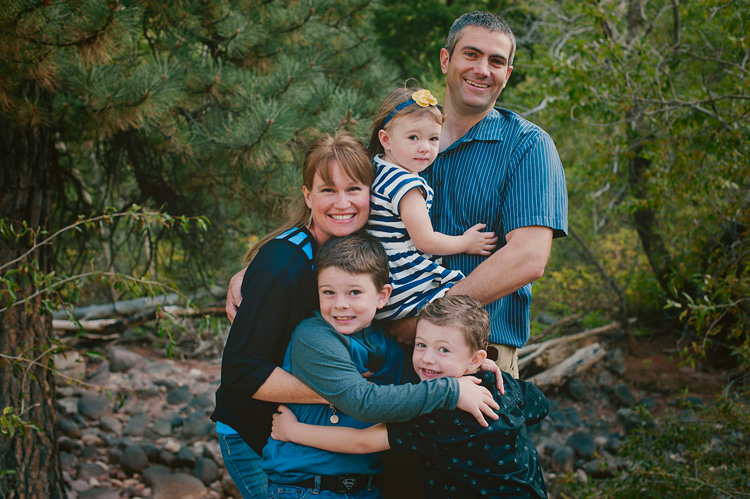
    Oftentimes in sessions, I position everyone into a nice arrangement, take a photo of them all smiling and looking, and then I just say, “Now, everyone hug each other.” or “Put your arm around the person next to you.” When I look at the photos side by side later, I’m always amazed at how much more natural the smiles are in the hugging photos.

    I think that when photos feel really formal, it’s hard to relax, and people end up with stiff smiles. When they feel comfortable, the true smiles come out. There’s just something about being surrounded and hugged by those you love that makes you feel safe. Sometimes you need to prompt them to hug each other but make sure they’re still looking at you. Occasionally you get the real huggers that will turn right around and give their mom a bear hug. Although that looks cute in real life, it doesn’t work as well for a photo.

    5. Let the personalities shine

    personality - 8 Tips for Getting Great Expressions in Family Portraits

    Sometimes you might have a perfect photo in mind, but you just have some little guys that have big personalities. You could spend the whole session trying to get them to be somebody they’re not, or you can just go with it and laugh about it.

    Let’s be honest, sometimes those expressions that just scream personality make the best photos. Families will treasure those photos and laugh about them throughout their whole lives. You can try to get that perfect family photo for mom, but don’t make everyone miserable by insisting on squelching unique poses and expressions every time they pop up. That said, I don’t encourage them in their silliness because sometimes that can make them go a bit out of control. Just simply take the photo, and don’t make a big deal out of it.

    6. Big groups are fun too

    big groups - 8 Tips for Getting Great Expressions in Family Portraits

    Giant group photos can look very dull at times. When you have tons of people in one photo, it can be a task just to get them all arranged, and then after all that work the photo just looks like a bunch of little boring faces.

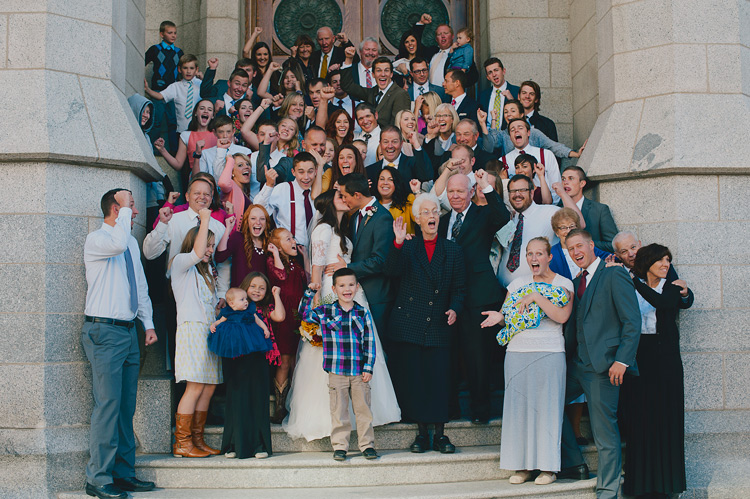
    Try getting a few photos that are just for fun. Ask the entire group to hug or kiss their neighbor. (Give them the option. Nobody likes to be told they must kiss the person next to them.) If you have a bride and groom, you can have the bride and groom kiss, and ask everyone else to cheer or to react however they’d like.

    When you have a big group of people with funny happy faces, it makes a photo that you want to look at for awhile, and you can’t help but smile. These photos are never perfect, but they’re fun, and end up being the photos the families really love.

    7. Capture life

    life - 8 Tips for Getting Great Expressions in Family Portraits

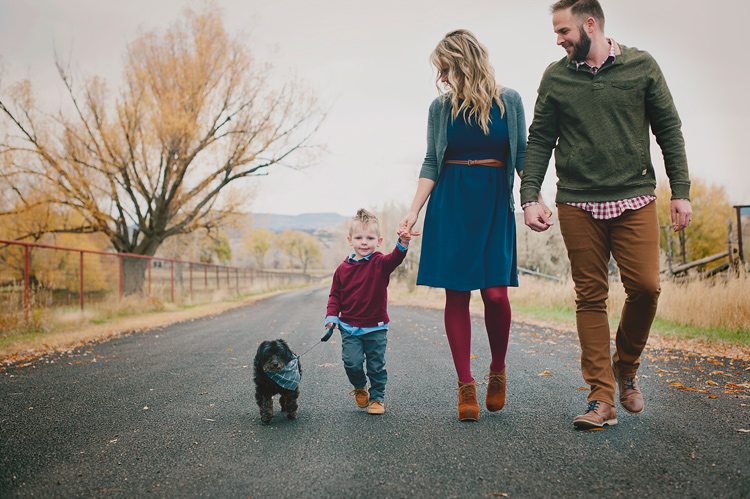
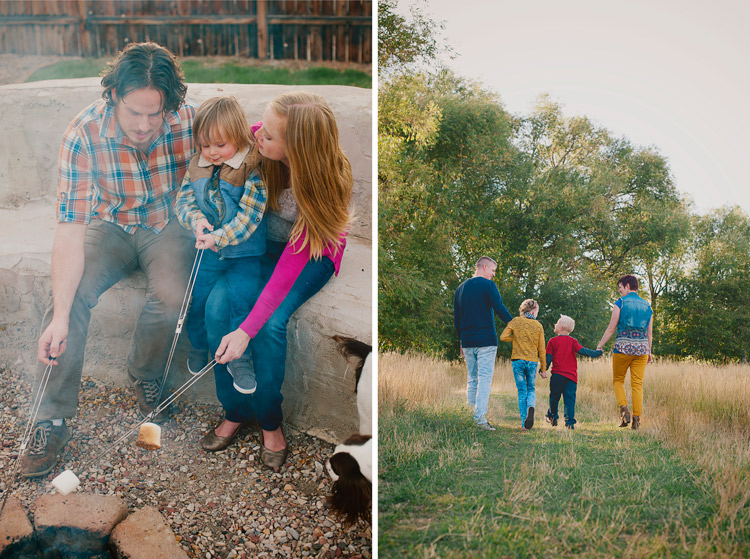
    You don’t always need smiles, nor do you need all the eyes showing. Capture the family participating in an activity together, and just let their expressions happen naturally. These lifestyle photos will capture the family as they are, right now. They will be the photos that really bring back memories for your families when they come across them later. You don’t have to set up anything elaborate. It can be as involved as a picnic together with the blanket and basket and everything, or as simple as holding hands and walking together. If you do have them walking away from you, ask the family to look at each other as they walk, so you get some profile expressions, and interaction with each other.

    You don’t have to set up anything elaborate. It can be as involved as a picnic together with the blanket and basket and everything, or as simple as holding hands and walking together. If you do have them walking away from you, ask the family to look at each other as they walk, so you get some profile expressions, and interaction with each other.

    8. Take a lot of photos in a row

    8 Tips for Getting Great Expressions in Family Portraits

    When you’ve got a lot of people to capture at once, the chances of getting all of them with a great expression at the same time is slim to none. I snap a lot of photos in a row of one pose because the chances of catching smiles and open eyes for each person go up greatly when you have a lot to choose from. If all else fails, you have a lot in nearly the same position, so you can swap eyes, faces, or heads if needed.

    It can be so frustrating when you have a family photo that is nearly perfect, but one family member is blinking. Trust me, even three in a row may sometimes not be enough to get every expression that you need. I don’t head swap often because I usually have one in the series that captures everything as I want, but it’s nice to have the option of swapping something if needed.

    I’d love to see your family portraits in the comments! What tricks have you found to capture great expressions in your family sessions?

    googletag.cmd.push(function() {
    tablet_slots.push( googletag.defineSlot( “/1005424/_dPSv4_tab-all-article-bottom_(300×250)”, [300, 250], “pb-ad-78623” ).addService( googletag.pubads() ) ); } );

    googletag.cmd.push(function() {
    mobile_slots.push( googletag.defineSlot( “/1005424/_dPSv4_mob-all-article-bottom_(300×250)”, [300, 250], “pb-ad-78158” ).addService( googletag.pubads() ) ); } );

    The post 8 Tips for Getting Great Expressions in Family Portraits by Melinda Smith appeared first on Digital Photography School.

    Digital Photography School

  • Ultimate travel kit – Thailand with Olympus’ E-M1 II & 25mm prime lens

    Introduction

    ISO 200, 1/4000 sec, F2.

    When I travel, I always bring a dedicated camera with me. My preferred form of ‘travel photography,’ at least when taking pictures for myself, is to document my experiences and create a visual diary. I like to travel as light as I can while still being able to come back with results of decent quality (though a personal trip to Iceland with a D810 was a notable exception to the notion of traveling light).

    So, what would I bring for a planned personal trip to Thailand? My D700’s are solid but a bit bulky, and I’m not entirely sure how my original X100 would stand up to high humidity, beaches and possibly a rain shower or two (understatement of the year, as I’ll get to in a bit). I considered the Nikon D500 or the Pentax K-3 II, but both are also fairly bulky, though I was still hoping to end up with a camera that had a larger sensor than the waterproof Nikon AW1.

    My constant companion, based on a combination of size, speed and durability.

    Luckily, Olympus has been kind enough to allow us an extended loan on our OM-D E-M1 Mark II for continued testing, particularly in anticipation of future firmware updates. I also decided on just a single lens for the whole trip; the Olympus 25mm F1.2 Pro.

    It was settled, then. An informal travel experience with a Micro Four Thirds camera and a fixed, 50mm-equivalent lens to document the trip of a lifetime. What could possibly go wrong?

    Full disclosure: This was a personal trip paid for entirely by myself. The choice to bring along an Olympus E-M1 II and lens was mine alone. I do wish to express gratitude to Olympus for allowing DPReview to hold on to our E-M1 II review sample, as well as my fellow staffers at DPReview for allowing me to borrow it for this trip.

    All images processed and cropped to taste in a beta version of Adobe Camera Raw unless otherwise noted.

    Living with your choices

    When I told photo-nerd friends that I was going to Thailand with only an E-M1 II, they thought that was awesome. When I told them that I was going with only a 50mm equivalent lens, a sort of shade passed over their faces; a mixture of interest, bemusement and pity.

    Wat Pho is also known as the Temple of the Reclining Buddha, which measures 15 meters high and 46 meters long and resides in a confined space. This made using my 50mm equivalent lens…challenging. Straight out of camera JPEG cropped slightly to taste. ISO 400, 1/125 sec, F1.2.

    Despite being primarily a prime-lens shooter, I do not shoot the 50mm focal length very often. Yes, it was the de-facto ‘kit lens’ for entry level film SLRs of yore, but after discovering how much I preferred prime lenses to zooms, I gravitated toward the 35mm focal length years ago and haven’t wavered much since.

    As anyone who shoots mostly prime lenses knows, familiarity with a focal length often allows you to ‘see’ pictures that will work before the camera is even to your eye. Given my unfamiliarity with the 50mm focal length, I found myself working a lot harder on my compositions than I anticipated.

    I found that for general photography in Thailand, including landscapes and basic ‘I was here’ images, 50mm was difficult to adjust to. ISO 200, 1/1250 sec, F4.

    What worked and what didn’t

    To state the exceedingly obvious, there are times to experiment with new gear and times to stick with what’s familiar. It wasn’t long into our time in Bangkok that I began to second-guess my decision to bring this single lens.

    Sometimes, the 50mm field of view was an asset, allowing me some more working distance than I was used to. Other times, it was constricting. ISO 200, 1/200 sec, F2.8.

    Bangkok is a busy, bustling metropolis with a sea of activity surrounding you at all times, whether you are in the back alley of a flower market or anxiously waiting for a seat at Thip Samai for some of the best pad thai you’ll ever eat. In this sense, the camera and lens combination was perfect. The E-M1 II is one of the most responsive mirrorless cameras out there, and the autofocus on the 25mm F1.2 lens is swift and accurate – all of this ensuring that the camera was ready to capture a moment when I was.

    Spongebob says, ‘Buy me. You know you want to.’ ISO 200, 1/200 sec, F2.8.

    The problem was in developing my ability to ‘see’ an image with the 50mm focal length, as I would often swing the camera around, only to realize that I really needed to take a few steps back. I was finding it difficult to capture single images with both a strong subject as well as a sense of context, which I generally find much easier with the 35mm focal length. 

    But as we made our way from Bangkok to the Krabi province in southern Thailand, I had other things to worry about than my framing and compositions.

    Until next time, Bangkok. ISO 200, 1/2500 sec, F5.6.

    The rain

    Shortly into our time in the Krabi province, southern Thailand was ravaged by unseasonably strong rain and winds (the rainy season is supposed to end in November). The result was large-scale flooding affecting around 700,000 people and resulting in dozens of lives lost.

    The beginning of the storms roll in to Koh Phi Phi. 1/100 sec, ISO 6400, F4.

    The worst of the weather was to the east of us, as we experienced stormy conditions but largely less severe flooding. It wasn’t until much of the rain had subsided that we had realized the gravity and impact of the situation; we had simply been attempting to make the best of our trip, as did the countless tourists that surrounded us.

    Rain begins to fall on tourists and locals on Koh Phi Phi. ISO 640, 1/125 sec, F1.2.

    I bring this up so as to make clear that as I go on with this piece, it is with respect and acknowledgment of the scale of the human impact we were lucky enough to have avoided the worst of.

    Though the rains did their part to keep me from taking as many photographs as I would have otherwise, the E-M1 II’s purportedly extreme weather sealing meant that I was comfortable having the camera with me much of the time. So while I was taking fewer photographs, the point is that I was still taking them.

    Flooding continued in the town of Krabi even after rains had ceased, forced multiple reroutings of traffic on and off Route 4 to the airport. ISO 1250, 1/125 sec, F1.2.

    Growth and challenges

    The final region we visited in Thailand was Chiang Mai, in which we planned a visit to the Elephant Nature Park. Here, all elephants in residence are rescues and not subject to rides, tricks or shows. Instead, visitors are able to experience an elephant’s life in a more natural, simple and tranquil setting.

    As far as the relative simplicity of shooting with only a 50mm equivalent lens throughout my trip, it ended up being a positive experience despite my earlier hesitations. While my images weren’t exactly how I had envisioned them, I found that wasn’t a bad thing. Most importantly, I struggled a bit and found some enjoyment in the challenge of shooting different subject matter with a different selection of gear than I’m accustomed to. It might sound strange to challenge one’s self on a ‘vacation,’ but I guess I’m a bit weird like that.

    Forcing myself to work with the 50mm focal length was a challenge that often forced me to see scenes in front of me a little differently than I would with a wider lens. ISO 200, 1/1000 sec, F2.

    To be sure, there are other solutions out there I could have chosen for this journey, but I was more than pleased with the Olympus E-M1 II. It offered an good balance of size, ergonomics, speed, weather resistance and image quality. It would have been nice in some dimmer scenes to have a larger sensor with lower noise levels, and I didn’t particularly have a use for the ultra-high burst rates the Olympus is capable of. But as a travel camera for this particular journey, the camera performed admirably. Maybe next time I’ll even take a zoom lens.

    ISO 200, F8, 1/3200 sec.

    Samples Gallery

    All images were shot in Raw + JPEG with a 3:2 crop as personal preference. Many of the edited Raws were differently cropped, and were produced using a beta version of Adobe Camera Raw. Please do not reproduce any of these images on a website or any newsletter / magazine without prior permission (see our copyright page).

    We make the originals available for private users to download to their own machines for personal examination or printing (in conjunction with this review), we do so in good faith, please don’t abuse it. Unless otherwise noted images taken with no particular settings at full resolution.

    $ (document).ready(function() { SampleGalleryV2({“containerId”:”embeddedSampleGallery_4976169775″,”galleryId”:”4976169775″,”isEmbeddedWidget”:true,”standalone”:false,”selectedImageIndex”:0,”startInCommentsView”:false,”isMobile”:false}) });
    Articles: Digital Photography Review (dpreview.com)

  • How to Conquer the Biggest Fear in Street Photography

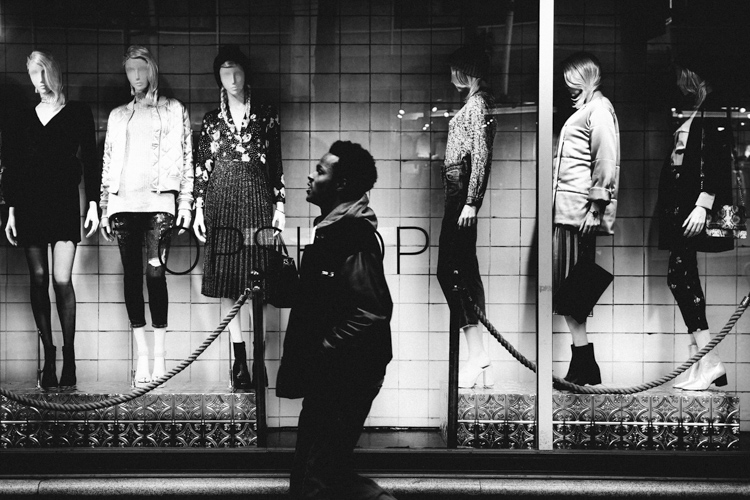
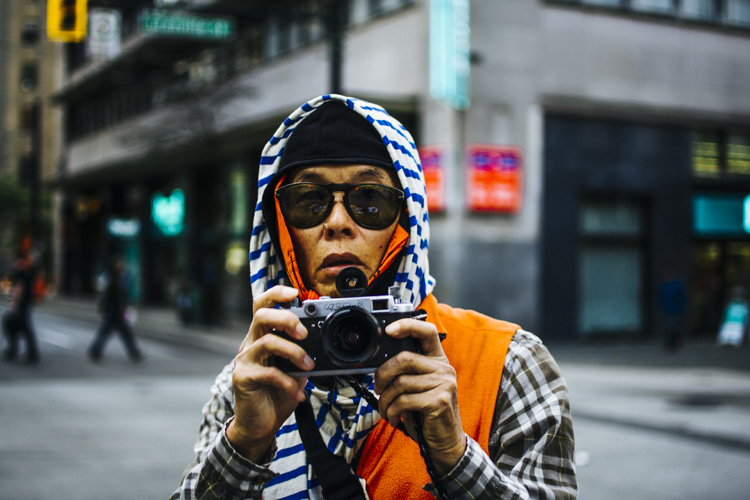
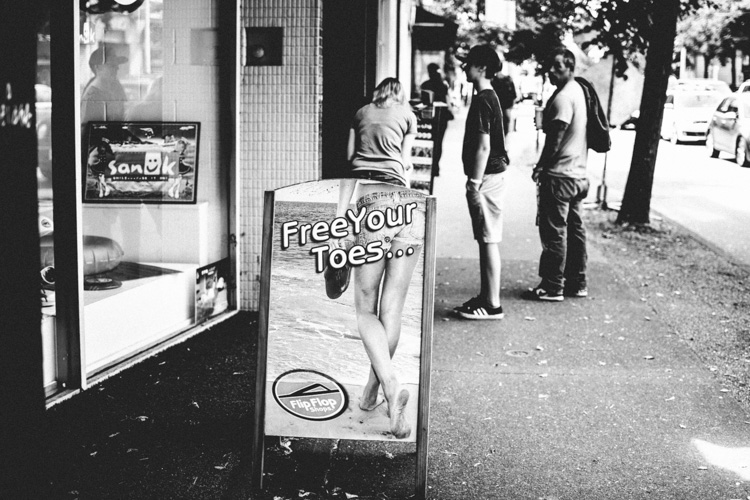
    As a street photographer you may have had fear sometimes taking photos on the street. All of us who spend time in the streets shooting know that not everyone likes when you take photos of them. When photographing strangers, our biggest fear is of people noticing that we are taking photos of them or people complaining about being in the frame.

    How to Conquer the Biggest Fear in Street Photography

    The biggest fear in street photography

    Every time this thought hits your mind, just realize that there’s nothing to be afraid of. I’d say that 99% of the fear and anxiety taking photos of strangers comes from inside you, not from the outside. You need to deal with your fears and know that the biggest problem you could have is someone calling the police (which doesn’t happen really often, at least it’s never happened to me). In most of the countries taking photos on the street is allowed and you don’t need permission. Always check the regulations of the country or the province where you are shooting.

    If you want to photograph kids I’d recommend always asking for the permission of the parents. In a lot countries you can get in trouble really easily for taking photos of minors without permission. If you want to check in which countries you need consent to take photos, please check this link: Countries that need consent.

    Requests to delete the photos

    How to Conquer the Biggest Fear in Street Photography

    From my personal experience I have to say that sometimes it’s tricky to take shoots of strangers. Some people have come to me asking to delete the photos in front of them. You don’t necessarily need to do that. As per the law in Canada (British Columbia) I can take photos in public places as much as I like. If I want to publish them it’s different story, but you can take photos without having to be worried about getting in trouble. When people ask me to delete their pictures I do it, not because I’m afraid of them because I don’t want to start arguing with someone and lose time that I could be shooting, and out of respect for that person.

    Advice to help you be invisible

    Since I started shooting I’ve changed my technique a lot. With time you’ll get better and you will feel more confident asking for permission or framing your photo to get an interesting composition.

    I have tried different tips and techniques that you can find on the internet, most of them from Eric Kim (one of the biggest street photographers of our time) and from other photographers like Bruce Gilden, among others.

    How to Conquer the Biggest Fear in Street Photography

    Here is a list of different things people do and my opinion about each of them.

    The shooting from the hip technique

    You’ll find that this way of taking photos helps you at the beginning but it won’t take you really long if all the photos you do are like this. You need to frame your photo and think about what you want in your frame, otherwise you’ll end up just being lucky.

    Shooting from the hip doesn’t allow you to decide, you are just finding something interesting and trying to get lucky pressing the shutter. Let’s be honest, if you want to get good photos don’t do this. Street photography isn’t easy, so you need to be confident and earn the photo. Last but not least it looks pretty shady having your camera on your chest and pressing the shutter when you see something.

    How to Conquer the Biggest Fear in Street Photography

    Here is my advice to avoid shooting from the hip to give you a better result. What you can do is walk with your camera around like you are shooting a video, people will think that you are just a tourist and won’t care that much what you are doing.

    Dress code

    There isn’t a proper dress code for street photography, but I will recommend you to dress according to the style of shooting you are gonna be doing. If you go to poor neighbourhoods don’t dress fancy. I often dress with damaged or old clothing to fit in more in that kind of environment.

    In case you are shooting in the middle of the city my recommendation would be always dark clothes rather than brighter ones. People won’t notice you that much, and if you want to capture candid moments that’s what you need to blend in more.

    Camera and equipment go as light as possible

    How to Conquer the Biggest Fear in Street Photography camera gear

    In terms of camera equipment, you should always go as light as possible. The less you carry the more freedom you will have when you’re shooting. In my case, I bought my first camera about a year ago (Nikon D7200) and even tho I love the camera I realized after a short amount of time that I couldn’t take the camera around. It was too heavy and too noticeable.

    When you are shooting street photography you want to be as invisible as possible, that’s why months later I decided to buy another camera (Ricoh GR II). The advantage of this camera is the fact that it’s super small and I can carry it around all the time. Now I take photos every day, and that helps have no regrets when I see something that I want to shoot.

    My personal experience

    How to Conquer the Biggest Fear in Street Photography

    Since I started I haven’t had a lot of problems. A bunch of people said no when asking for permission but many others said yes. Sometimes people will yell at you for taking photos and others will try to run away from you, but the more shots you take more confident you’ll feel.

    I’ve experienced more problems taking photos of rich people than poor people. Which is funny to me, people who have less are seemingly willing to give more than those who have everything.

    Rough neighborhood

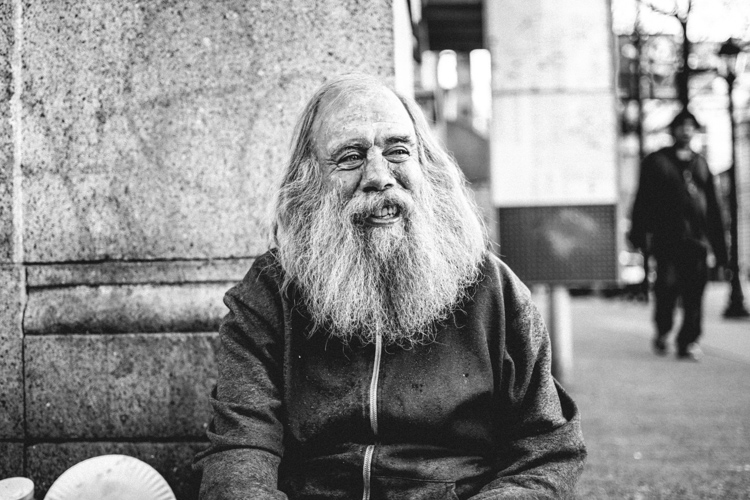
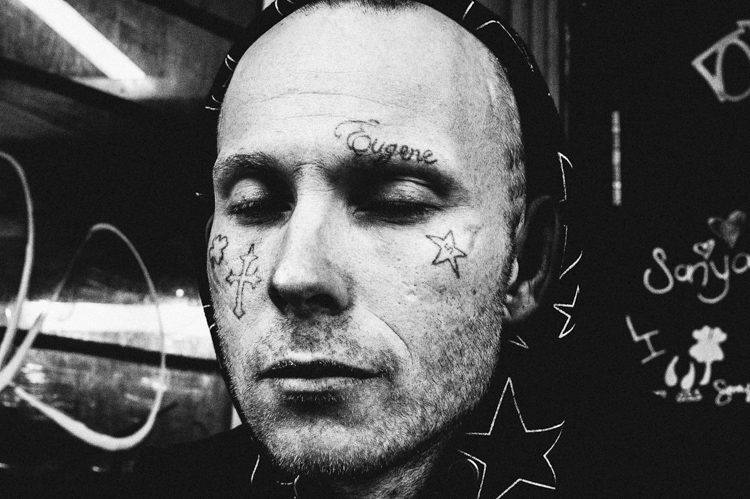
    As a photographer based in Vancouver, I find my inspiration in neighbourhoods like Vancouver East Side which is known for their problems with poverty and drug abuse in some zones. Hastings Street is the part of Vancouver East Side that interests me the most. There is where I take most of my portraits and where I get to talk and share some moments with the people.

    How to Conquer the Biggest Fear in Street Photography confidence

    In the image above you can see my portrait of a man with tattoos on his face. When I saw him I was by myself and I wished to take his photo. I won’t lie to you I was afraid. Taking photos of people doing drugs or in bad situations is not easy. I get too close emotionally sometimes and feel bad for taking photos of them, like I am stealing something from people who have nothing. But in these cases you need to be strong and see photography not as a weapon but as a way to capture something beautiful and exciting to you. Back to the point, I saw this man and I hesitated taking the picture or not, but eventualy I did.

    I asked him, “Excuse me, I really like the tattoos on your face and I would like to take your portrait, do you mind?”. (Always compliment your subject, it gives you a reason for taking the photo.) The man looked at me seriously and said, “Just one, do it fast because I’m mad.” So I took the photo as fast as I could and after thanking him I left and continued taking photos of other people.

    Be brave but also be safe

    How to Conquer the Biggest Fear in Street Photography

    In most cases when you are in areas where is not always safe you don’t want to take a long time taking the photo so I switched to automatic and just took one frame. The outcome was great from my point of view but it is not always like that. Rushing is not always a friend of success, but in some cases you don’t have an option.

    Many times some of the tough guys you see if you get closer and ask them for a photo you realize how easy is to take photos of them.

    Note from the editor: Always put your own safety first and if you feel it would be dangerous or unsafe to take a photo then do not do so.

    My point with this article is to help you realize it’s okay to take photos of strangers in street photography. Think about Robert Frank, Bruce Gilden, or Henri Cartier-Bresson. They didn’t hesitate when the shot showed up in front of them, the question is, would you?

    googletag.cmd.push(function() {
    tablet_slots.push( googletag.defineSlot( “/1005424/_dPSv4_tab-all-article-bottom_(300×250)”, [300, 250], “pb-ad-78623” ).addService( googletag.pubads() ) ); } );

    googletag.cmd.push(function() {
    mobile_slots.push( googletag.defineSlot( “/1005424/_dPSv4_mob-all-article-bottom_(300×250)”, [300, 250], “pb-ad-78158” ).addService( googletag.pubads() ) ); } );

    The post How to Conquer the Biggest Fear in Street Photography by Camil Adell appeared first on Digital Photography School.

    Digital Photography School

  • ZeroTech to introduce 4K action cam with built-in gimbal

    Chinese drone manufacturer ZeroTech has announced it will introduce a handheld action camera that features an in-built 3-axis stabilization gimbal. The Rollcap will shoot 4K video and 13MP stills while providing +/-0.03° of angular vibration compensation as well as gimbal movements to smooth video footage. The company says its built-in gimbal can tilt up to +/- 30°, can pan up to +/-40° and has a roll range of +/-85°.

    The lens offers a 94° angle of view, so compares approximately to a 21mm on a full frame system. The camera features are controlled remotely via a smartphone app and recording can also be started and stopped at the camera. Features include slow motion video, high drive burst modes, time lapse, self-timer and HDR. A tripod thread allows the Rollcap to be mounted on a pole, helmet or accessory grip, and a single charge of the internal battery is said to be good for 110 minutes of 4K footage.

    The device will be available later this year, and pricing will be between $ 500-600. For more information visit the ZeroTech website.

    Articles: Digital Photography Review (dpreview.com)

  • How to Create Magic in Your Photos with the Pixelstick

    Who doesn’t want special super powers? Popular culture is awash these days with characters with added extras. To date, these include wizards with magic wands, Jedi’s with light sabers, and now there are photographers with pixelsticks! That’s right, welcome to the future because the pixelstick is here and it’s going to change the way you do photography if you embrace it. The pixelstick enables you to make amazing light paintings in camera, so let’s take a look at it and see why it’s an essential purchase for those who like creative photography.

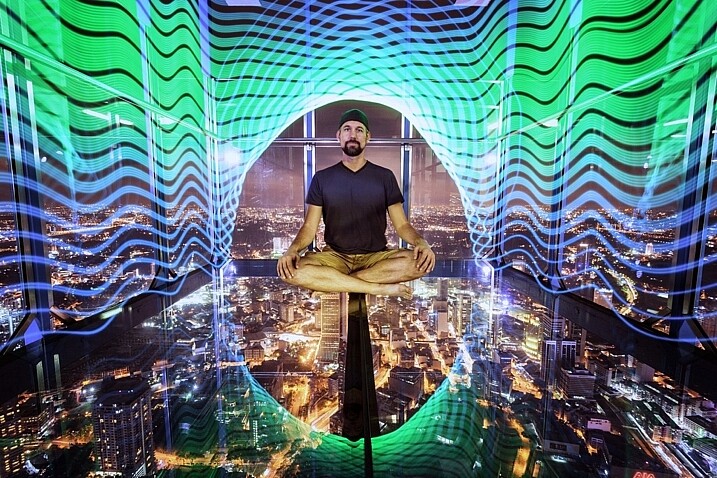
    The light from the pixelstick perfectly framed my friend and fellow DPS write, Pete DeMarco.

    The light from the pixelstick perfectly framed my friend and fellow DPS writer, Pete DeMarco.

    What is light painting?

    Light painting is a technique you can use to create fascinating images. To do it you need to photograph at night, use long exposure, and have a light source. You can divide light painting into two types, those that you do in front of the camera, and those you do with the camera.

    1. Light painting with the camera: Using the camera to light paint is called kinetic light painting and involves techniques such as zoom bursts, or camera rotation.
    2. Lighting painting in front of the camera: You can also move lit or glowing objects in front of the camera during a long exposure, to paint the scene in front of the camera.

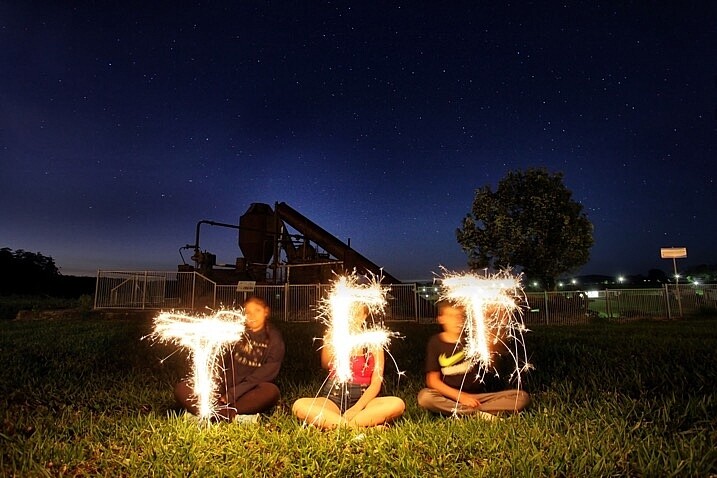
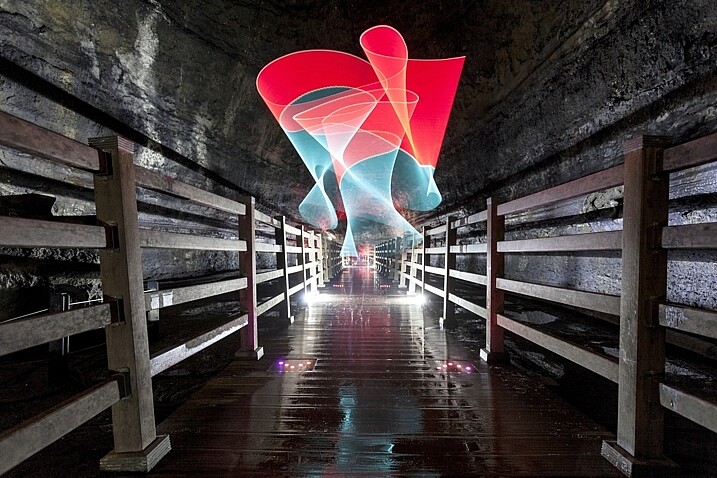
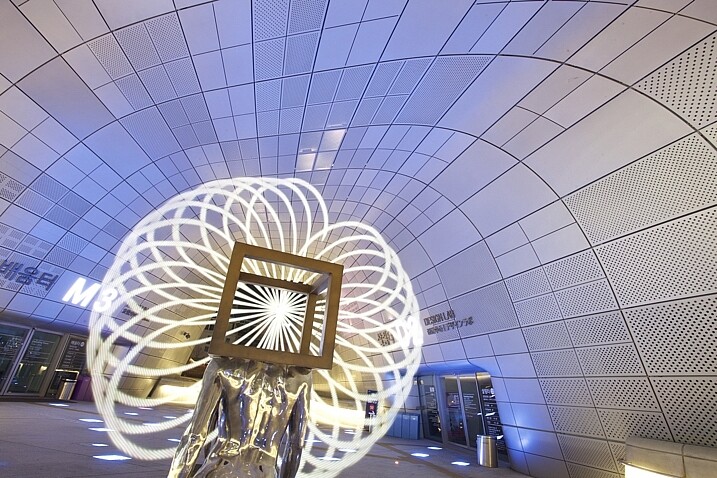
    In many cases the first time you do any light painting it will be to spell your name using sparklers or a flashlight. The next step if you became more serious would usually be making light orbs, and other light painting shapes with things like fairy lights. Now there is the pixelstick, which makes light painting both easier to do, and more sophisticated.

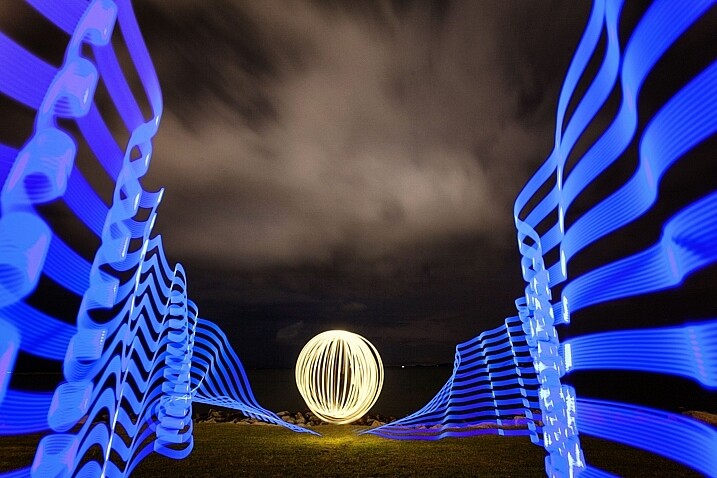
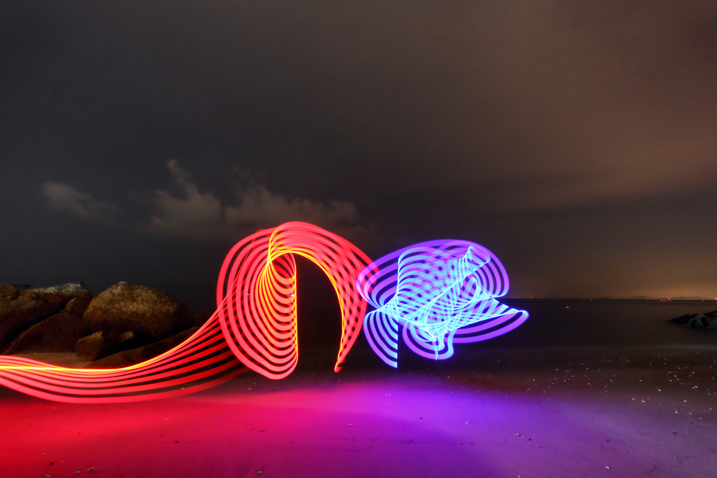
    Light orbs are a lot of fun to create, it's even more fun to light paint with the pixelstick as well.

    Light orbs are a lot of fun to create and it’s even more fun to light paint with the pixelstick as well.

    The game changer, introducing the pixelstick

    The pixelstick is the result of the inevitable evolution of light painting, and the advancement of technology. The pixelstick is a product designed and produced by bitbanger labs, following a successful Kickstarter fundraising campaign. The neat thing about the pixelstick is that you can program it to create any light pattern you want, in fact, you can even use it to create light painted pictures.

    How to Create Magic in Your Photos with the Pixelstick

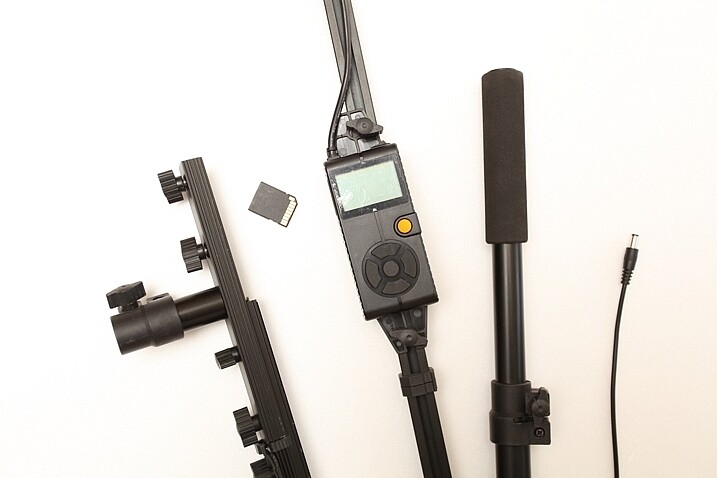
    This is possible through importing BMP files onto an SD card, which can then be slotted into the pixelstick’s operating system. You have control of many useful aspects, brightness of the light, the speed of the pattern transmission, repeat firing of the pattern, white balance, and delayed fire, are some of the useful functions.

    The pixelstick comes with a controller that you can change the light painting with.

    The pixelstick comes with a controller that you can use to change the light painting design.

    Vital stats, what you need to know about the pixelstick

    The pixelstick at full length is great for light painting, but not so good for traveling. It’s fortunate that the design allows you to break it down to half its length, and store it in the bag. But, the length is still too long for hand luggage on a plane, which presents a problem if you plan on using it in more exotic locales. The essential information about the pixelstick and what comes with it are:

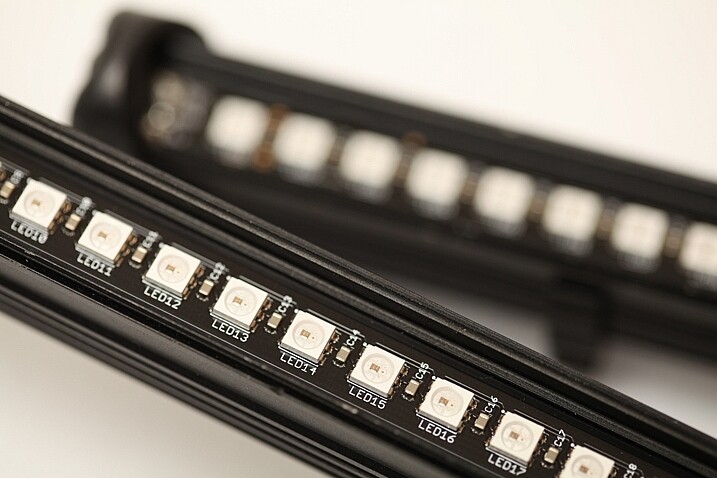
    • Comprised of a strip of 200 RGB LED lights, allowing for a combination of 16 million colors.
    • Has an aluminum case housing, to protect the LEDs from damage.
    • Full-length 187cm (73.5 inches), and a storage length of 109cm (43 inchses).
    • Weight is 1.8kg (4 pounds).
    • The device uses 8 AA batteries.
    • There is a control center with a battery pouch that attaches to the stick, with cables to connect everything together.
    The 200 LED lights on the pixelstick come enclosed in a light weight metal case, this protects them from damage.

    The 200 LED lights come enclosed in a light-weight metal case which protects them from any damage.

    How to do light painting

    Light painting is a long exposure technique, which you’ll need a tripod to achieve. You can follow the steps set out below, or for a more detailed guide check out: Beginner’s Guide to Light Painting .

    1. Choose a location and time of day that will be dark. You need to be able to expose for at least 10 seconds in most cases, so locations with less ambient light are ideal.
    2. Dress in black clothes, this will minimize the chance of you showing up in the photo.
    3. Place your camera on a tripod, and compose your scene. As you’re light painting, make sure there is enough space within the composition set aside for the design. In other words, plan where and how big the light design will be, then make sure it will all be contained inside the frame.
    4. Take the light source into the scene you composed, turn it on, and leave it in front of the camera.
    5. Turn on your camera’s LiveView function, and focus on the light source using manual focus (use the + or zoom button to show a magnified view which will make it easier for you to focus). Leave the camera in manual focus to make sure your focus point remains the same.
    6. Set the camera’s self-timer to 10 seconds, and begin the countdown. If you have a remote shutter release you may prefer to use that to trigger their camera.
    7. While the camera is counting down, move into position in front of the camera with your light source in hand.
    8. Just before the shutter releases, begin your light painting pattern.
    9. Carry out any light painting you wish to do. Then, once you have finished painting, turn off your light source and move out of the frame.
    10. Go back to your camera and wait for the exposure to finish. Check your result and repeat if necessary.
    A lot of people have fun using sparklers to create light paintings. These can look nice, the pixelstick takes you to the next level.

    A lot of people have fun using sparklers to create light paintings. These look nice, but the pixelstick takes it to the next level.

    Using the pixelstick to create abstract light paintings

    There are many different types of light sources, the pixelstick is just one example. However, these effects can also be achieved by using something as simple as a kid’s toy light saber. The focal point of your image is going to be the light painting itself, or perhaps an architectural feature that you’ll emphasize with light.

    How to Create Magic in Your Photos with the Pixelstick

    The main thing is to keep it simple, with the light flowing through the scene. If you over-elaborate and make too many movements then it’s the digital equivalent of scribbling on a piece of paper, and it usually doesn’t turn out well. So when you’re making abstract light paintings, keep these things in mind:

    1. Keep the line flowing. You probably know leading lines work well in photos, and light painting is a great way of introducing some into your frame. Have a plan for the direction the line will flow in your frame, and how it will lead the viewer’s eye to the point of interest.
    2. Use repetition. Having a pattern in your frame and repeating it makes a nice light painting. Repetition often works well for photographs, and the control you have with the pixelstick allows you to do this more easily.
    3. Keep it simple. There is a temptation to overcook (do too much) a light painting. With practice, you’ll find the strongest scenes use a more minimalist approach. A simple rotation of the pixelstick or light saber is often all that’s needed.

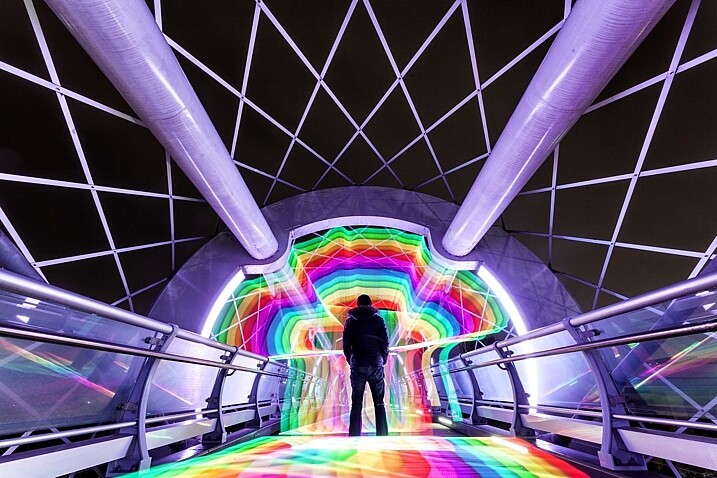
    The pixelstick is really good for abstract work. The preset light patterns that come with the stick will help get you going quickly.

    The most effective light paintings can often be when things are kept simple.How to Create Magic in Your Photos with the Pixelstick

    The most effective light paintings happen when things are kept simple.

    The pixelstick for portraits

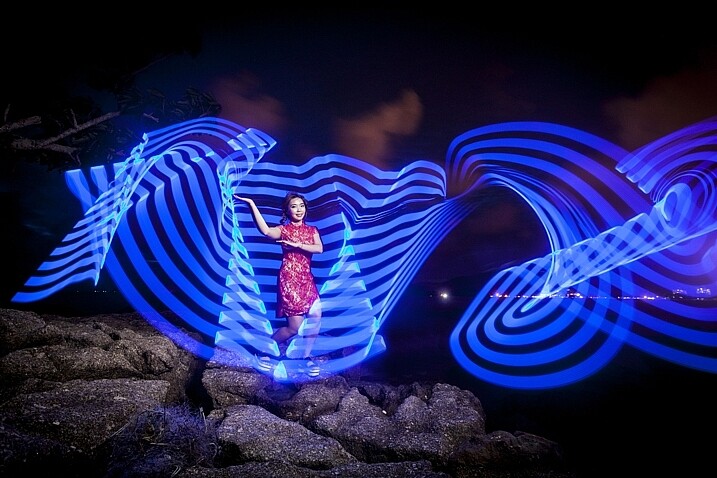
    The pixelstick can be used to frame a model, and/or create leading lines towards the subject making it a powerful tool for portrait photographers. The difficulty you will encounter when shooting long exposures with a model is freezing them so they’re sharp. The pixelstick itself isn’t any better than other light painting tools you can use, but the following tips can help.

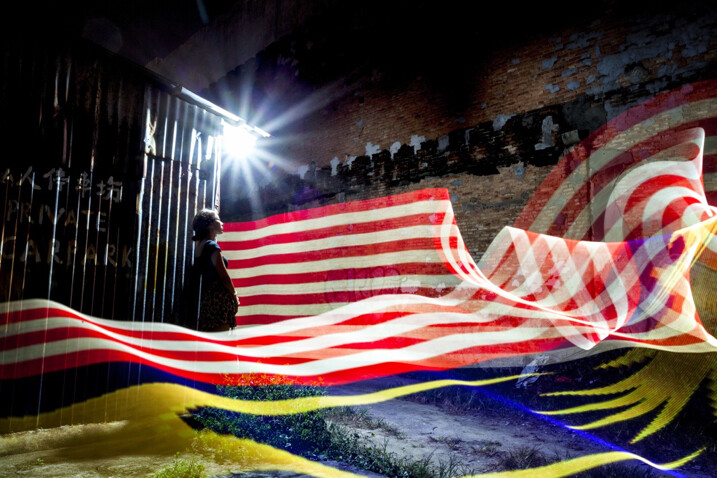
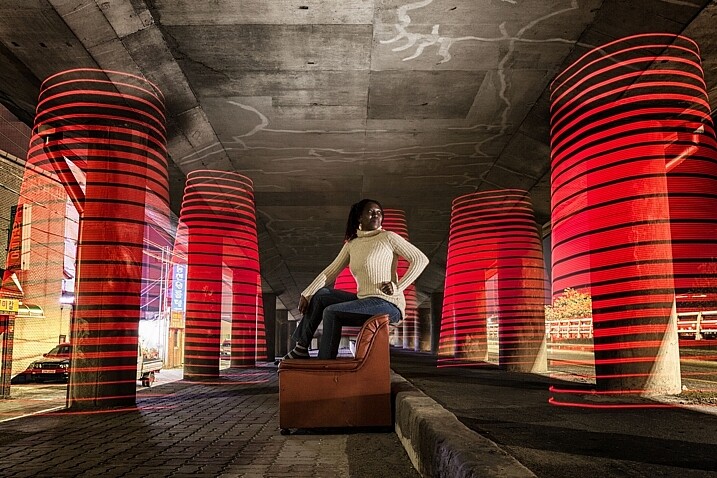
    In this photo a Jinbei 600 flash was used to light the model, while the pixelstick produced the light painting.

    In this photo, a Jinbei 600 flash was used to light the model, while the pixelstick produced the light painting around her.

    • Keep the exposures short. The shorter the exposure, the less chance there is your model will move. This will mean shorter, simpler light paintings.
    • Use strobes to light the model. Using a strobe (flash) to light your model means that any movement in the model is less likely to show.
    • Ask the model to hold still. This is easier said than done, but if your model can hold really still for 20 seconds, then you can create longer more complicated light paintings.
    • Have the model face away from the camera. Any movement of the model’s face will show in the image. So, having the model face away from the camera helps it look less obvious.

    Where the pixelstick really works well is how you make it interact with your model. This may mean that the colors in the light painting contrast with the color of the model’s clothes. Or maybe you can make the model appear to be holding some of the painted light. The creative potential of light painting combined with a model is vast, so you should have fun.

    Asking the model to face away from the camera makes it much easier to mask any movements there may have been. How to Create Magic in Your Photos with the Pixelstick

    Asking the model to face away from the camera makes it much easier to mask any movements there may have been during a long exposure.

    Light painting for product photography

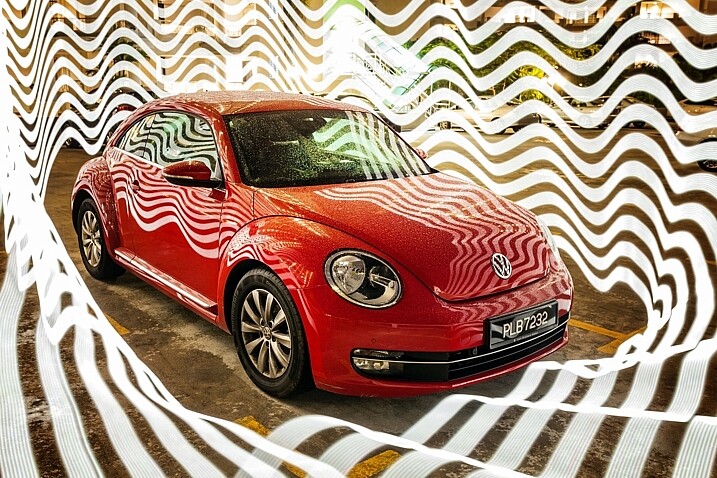
    The customization available with the pixelstick makes it a fantastic choice for product photography. One of the main niche genres is car photography, where the ribbon lines or checkered flag designs can be used.

    This technique is similar to photographing a model, only your product won’t move, which allows for longer exposures. You can program in the name of the product, or even the company’s logo. The pixelstick really beats other types of light painting hands down, as the light design can be made to specifically match the product or branding.

    Cars are great subject for light painting of all forms, the pixelstick gives you even more scope to experiment.

    Cars are great subjects for light painting of all forms. The pixelstick provides more options for experimenting.

    Personalizing your light design

    The ribbon presets, and the downloadable BMP files that come with pixelstick provide a lot of creative variety. But the real fun starts once you begin to add your own designs into the pixelstick. It’s this feature more than any other that gives this tool its power. The creativity is really infinite so here are a few ideas for you:

    • Find images through creative commons of national flags.
    • Edit the color scheme of some of the downloadable patterns that pixelstick provides.
    • Photograph textures shots of leaf beds or brick walls and use them to light paint.
    • Use your own landscape photos.
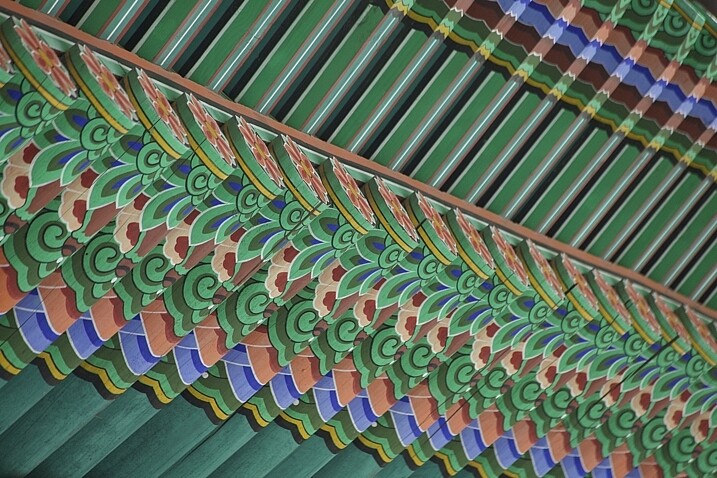
    The texture and patterns of traditional Korean roofing looks beautiful, and made for a great light painting pattern.

    The texture and pattern of this traditional Korean roof made for a great light painting pattern.

    Converting your files for use with the pixelstick could not be easier. Pixelstick has a drag and drop service on their website where you can do this easily. Alternatively, you could design and edit your image with Photoshop. Your image needs to be sized to 200 pixels high, with the length being as long as you desire. Once this is done the file needs to be flipped counter clockwise and saved as a BMP file. When creating a new file, any black areas will appear as blank (no light) when the light painting occurs.

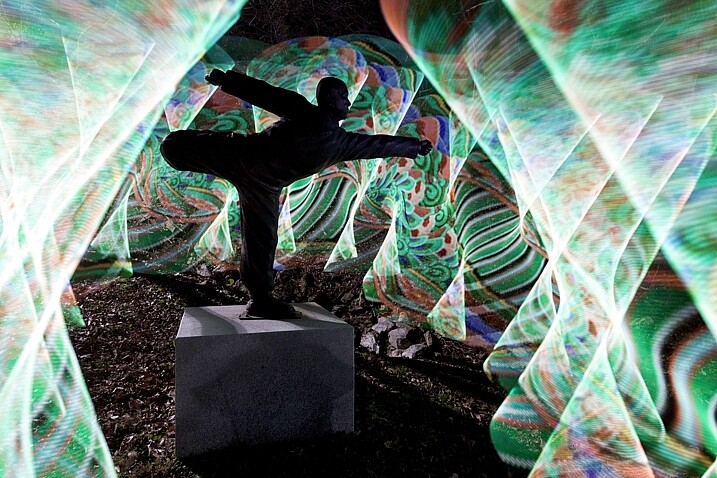
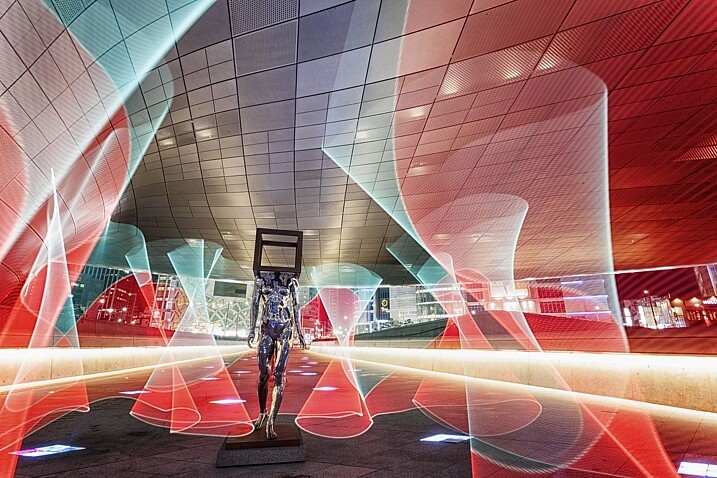
    In this photo the statue of a buddhist grandmaster has been light painted around using traditional Korean patterns as the light source.

    In this photo, the area around the statue of a Buddhist grandmaster has been light painted using the traditional Korean pattern I created (above) as the light source.

    Vibrant videos with the pixelstick

    The pixelstick’s scope of creativity goes beyond still photography, and it can do amazing things for animation. You are going to create a stop motion video with the pixelstick, and use a series of long exposure photos to make this. Think of an animation flipbook, only this is the digital version of that.

    Steps to create an animated GIF

    Animating a single scene with the pixelstick could not be easier. Follow these steps to make an animated gif (like the one below) or perhaps a short video. You don’t need a pixelstick to create this type of animation of course, but you have a lot more options at your fingertips if you do.

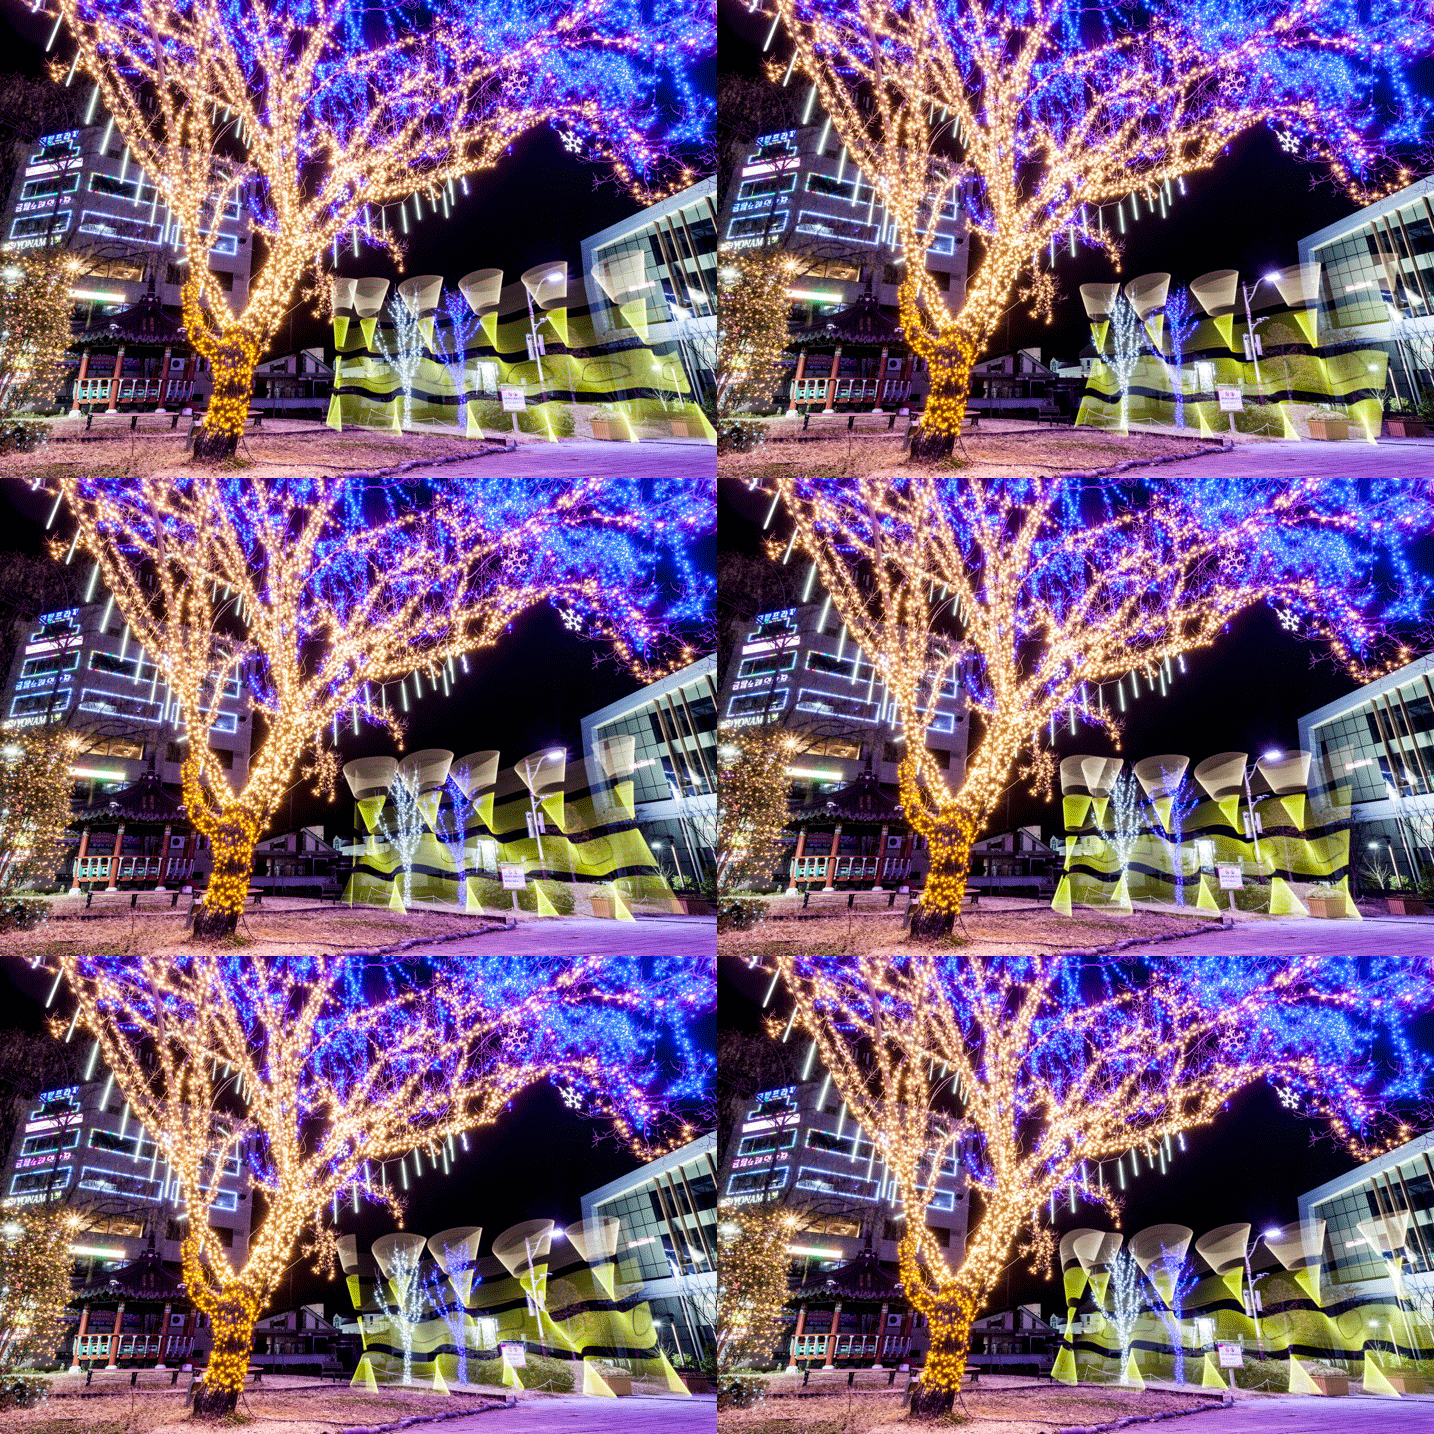
    The pixelstick can also be used for make smaller gif animations. The creative potential here is huge.

    The pixelstick can also be used for make smaller gif animations. The creative potential here is huge.

    1. Set your camera on a tripod, and ensure it doesn’t move.
    2. Compose your scene, and decide where your light painting animation will occur.
    3. Use a remote cable shutter release, this will prevent any movement of the camera.
    4. Allow a long enough exposure for you to complete the light painting.
    5. Begin the exposure, and move into the frame to start and complete the light painting.
    6. Repeat the exposure and the same light painting at least 10 times.
    7. Take your camera home, and import the photos to your computer.
    8. You now need to import the files to photoshop. To do this go to file>scripts>load files into stack.
    9. Open the timeline window, and select “create frame animation”. This will import one frame into your animation.
    10. On the right-hand side of the timeline window click the menu option, and select “create frames from layers”. Now reverse the order of the frames.
    11. Hit play and remove any frames that interrupt the flow of your animation.
    12. The file is now ready, export it as a gif file.

    Stop-motion videos

    Creating a longer stop-motion video is very similar to making an animation, in essence, you’re just making an extended version. As opposed to repeating a light painting many times, you may well simply move through a scene when making this type of video.

    It’s better to use a dedicated stop-motion app for making this type of video, with stop-motion studios for windows, and istopmotion for mac being a couple examples of options.

    pixelstick

    One frame from the series used to make the stop-motion video below.

    Conclusion

    The pixelstick really is a magical tool. You can create spellbinding images that will wow your friends if you decide to purchase one. The size of the stick is something of a double-edged sword, thought. It allows for bigger more dramatic light paintings, but it is also harder to transport, even when broken down into its carry bag. Is the pixelstick worth dropping the extra cash on, versus a cheaper D.I.Y. light stick? If you’re serious about improving your light painting, then yes it’s worth the money in my opinion.

    The ability to customize the type of light emitted gives you so much control. Doing this with a DIY light-stick would take many hours, and in many cases would be impossible to replicate what the pixelstick does. At around $ 350, you could spend more money on other photography gear without getting the same level of creative energy you get from this tool. Whether you’re interested in still photos or animation, this will quickly become a vital part of your setup.

    The way you make light interact with it's surrounds can be highly effective.

    The way you make light interact with the surroundings can be highly effective.

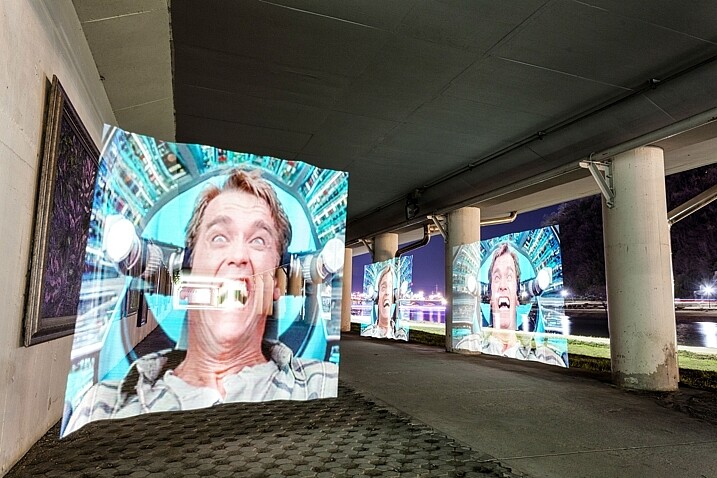
    The light paintings the pixelstick is capable of are highly sophisticated.

    The light paintings the pixelstick is capable of are highly sophisticated.

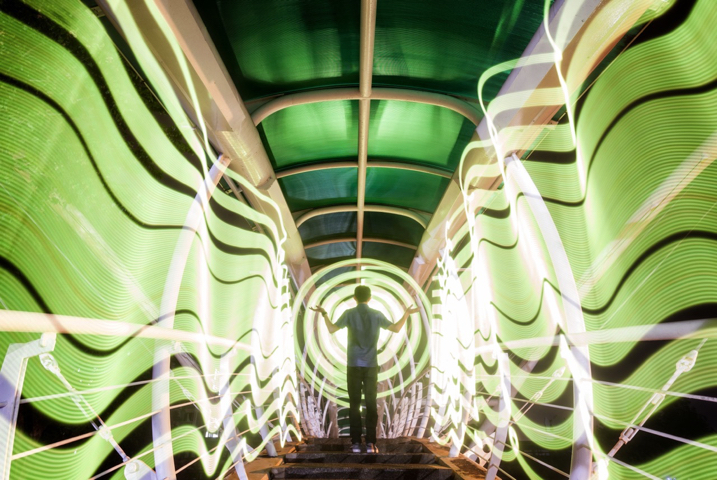
    In this image the pixelstick was used to add repetition to the scene, and an otherworldly feel.

    In this image, the pixelstick was used to add repetition to the scene, and create an otherworldly feel.

    The flow and lines that you can create with the pixelstick make the photo stand out much more.

    The flow and lines that you can create with the pixelstick make the photo stand out much more.

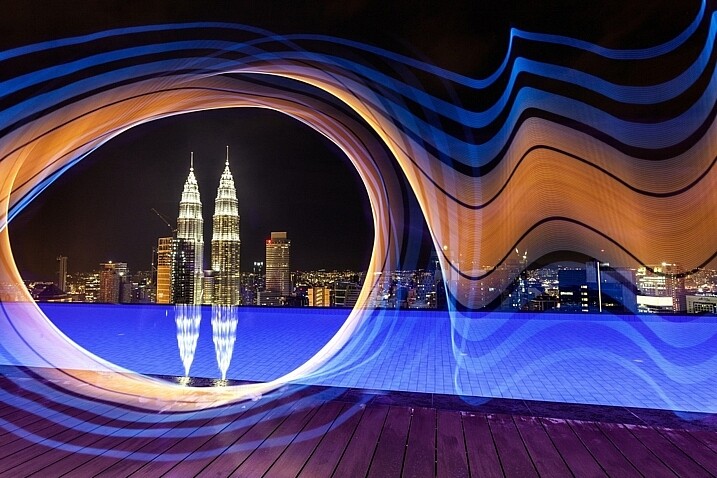
    The petronas towers in Kuala Lumpur are framed using light from the pixelstick, adding a lot of interest to this photo.

    The Petronas towers in Kuala Lumpur are framed using light from the pixelstick, adding a lot of interest to this photo.

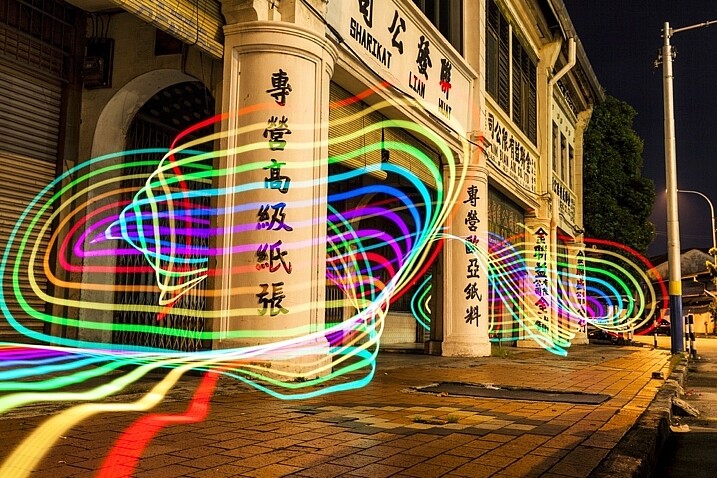
    The light weaves in and out of the pillars, adding direction to this photo.

    The light weaves in and out of the pillars, adding direction to this photo.

    googletag.cmd.push(function() {
    tablet_slots.push( googletag.defineSlot( “/1005424/_dPSv4_tab-all-article-bottom_(300×250)”, [300, 250], “pb-ad-78623” ).addService( googletag.pubads() ) ); } );

    googletag.cmd.push(function() {
    mobile_slots.push( googletag.defineSlot( “/1005424/_dPSv4_mob-all-article-bottom_(300×250)”, [300, 250], “pb-ad-78158” ).addService( googletag.pubads() ) ); } );

    The post How to Create Magic in Your Photos with the Pixelstick by Simon Bond appeared first on Digital Photography School.


    Digital Photography School

  • Can’t afford a Hasselblad? Win one instead in the 2018 Masters contest

    Natalia Evelyn Bencicova
    Hasselblad Masters 2016
    Winner of the Portrait category

    Hasselblad is giving away 11 medium-format cameras in what it’s describing as the biggest Masters competition it has ever held. The 2018 contest introduces a new category for aerial photography in tribute, Hasselblad says, to the company’s roots in aerial work – its first camera was an aerial camera. The inclusion may also have something to do with drone-manufacturing share-holder DJI.

    Entrants need to be working professionals, with a specification that you should have been professional for three years, and any brand of film or digital camera can be used. The Project/21 category though is open to all photographers who have yet to reach the age of 22. Submissions should consist of three images which don’t have to be a set or related in any way so long as they fit the brief of the category.

    Each category winner will receive a Hasselblad digital medium camera as a prize, but will also be loaned Hasselblad equipment to produce a set of images for the Hasselblad Masters commemorative book.

    2018 Categories include:

    • Aerial (New for 2018)
    • Architecture
    • Fine Art
    • Fashion/Beauty
    • Landscape
    • Portrait
    • Product
    • Project/21 (Under 21)
    • Street/Urban
    • Wedding
    • Wildlife

    The competition is open now and will close on June 10th 2017, and entry is free. For more information see the Hasselblad website. 

    Press release

    Hasselblad’s Prestigious Masters 2018 Competition Opens for Entries

    Hasselblad is proud to officially open its renowned Masters competition for 2018. Photographers across the globe are invited to submit three images that best demonstrate their photographic ability for the chance to be named a Hasselblad Master. The Hasselblad Masters is one of the world’s most prestigious professional photographic competitions and gives acclaimed professionals, as well as aspiring newcomers, the chance to make their mark in the world of high-end photography.

    Winners will not only receive the coveted accolade but will take home a state of the art medium format Hasselblad camera and have their work published in the Hasselblad Masters commemorative book, to be launched in 2018.

    This year’s competition is bigger than ever with 11 categories, including the brand new ‘Aerial’ sector that pays tribute to Hasselblad’s history of aerial photography, with its technology used on several space missions including the first landing on the moon.
    The 2016 Masters competition proved to be the most popular to date, with over 10,000 entries. The quality of entries was extremely high and the ten crowned Masters encompassed ambition, imagination and photographic skill. Each created truly outstanding work for Hasselblad Masters Volume 5 book, drawing on the theme of ‘Inspire’. Their images were displayed at photokina 2016 and across galleries and media publications around the world.

    Previous Hasselblad Masters are some of the biggest names in photography; including Anton Corbijn (2001), Rodney Smith (2002), Charlie Waite (2002), Patrick Demarchelier (2003), Albert Watson (2004), Marco Grob (2007), Kevin Then (2008), and Hans Strand (2008).

    Hasselblad Masters are judged on their photographic ability, creativity, compositional skills, conceptual strength and technique – and are acknowledged to have made a compelling contribution to the art of photography. Each entrant must submit three images per category, with the jury voting on the images rather than the photographer.

    Entrants will first face an Internal Jury of Hasselblad staff, experts in the field of photography and supremely knowledgeable about Hasselblad cameras. The Internal Jury will select ten finalists in each category that showcase a high level of technical skill and creative flair. These finalists will then reach the professional Masters Jury, compiled of 24 of the best names in photography. Together with the public vote, which acts as a 25th jury member, the Hasselblad Masters are chosen.

    The 2018 main Masters jury will be unveiled later in the year; past jury members have included world renowned photographers such as Marco Grob, Steve McCurry, and Tim Flach.

    Hasselblad CMO, Johan Åhlen said “After the overwhelming response we received to the 2016 Hasselblad Masters, we’re excited to see what’s in store this year. The quality of entries in previous years has been simply outstanding and we’re immensely proud to continue to inspire and empower talented photographers across the globe. Our Masters become part of the Hasselblad family and we want to equip them with everything they need to make their mark on high-end photography.”

    Open for entries 24th January – 10th June 2017. Entries are submitted via www.hasselblad.com. Winners will be announced in January 2018.
    For full details on competition download Masters 2018 Rules & Regulations
    Previous edition of Hasselblad Masters 2016 published in “Hasselblad Masters Vol. 5 – Inspire”: http://teneues-books.com/hasselblad-masters-vol-5-9815

    Articles: Digital Photography Review (dpreview.com)

  • 3 Ways to Make Selective Color Portraits Using Lightroom and Silver Efex Pro 2

    3 Ways Make Selective Color Portraits Using Lightroom and Silver Efex Pro 2Selective coloring is a post-processing technique where you convert an image to black and white, but leave part of it in color. It has a bad reputation because it can be used to create some truly horrendous images where the only thing on display is the photographer’s lack of ability.

    But the good news is that you can use selective coloring in a far more sophisticated way to create some interesting images. The key is to keep it subtle and to use it only on suitable photos. I like to make selective color portraits, but of course you are free to experiment with other subjects as well (but please, no flowers).

    I prefer to keep my workflow within Lightroom whenever possible as it saves hard drive space and makes the entire photography workflow much simpler. The first two techniques below are for Lightroom, the third uses Silver Efex Pro 2, a free plug-in you can download from Google.

    1. Selective color in Lightroom using the Adjustment Brush

    The first example, below, shows what you can do in Lightroom. This is the portrait that I am going to work with for this technique.

    3 Ways Make Selective Color Portraits Using Lightroom and Silver Efex Pro 2

    The simple background means it’s ideal to use for a selective color portrait.

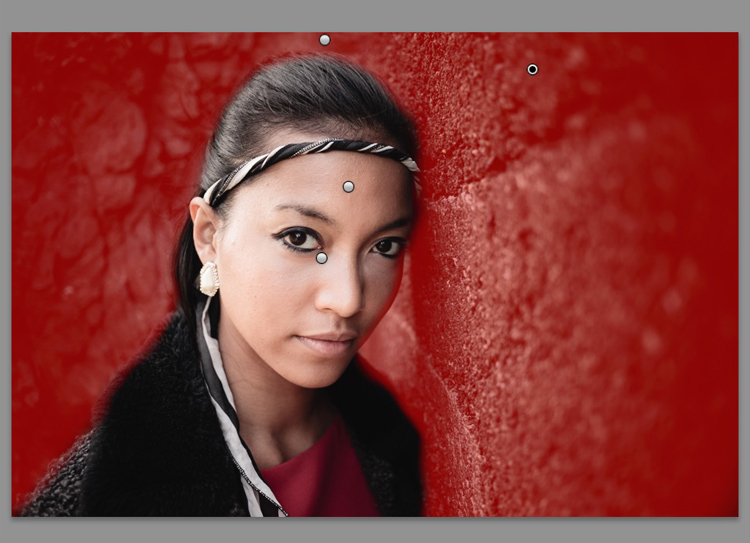
    Start by going to the Develop module and activating the Adjustment Brush tool. Paint in the background to create a mask (as shown below).

    3 Ways Make Selective Color Portraits Using Lightroom and Silver Efex Pro 2

    The mask is shown here in red.

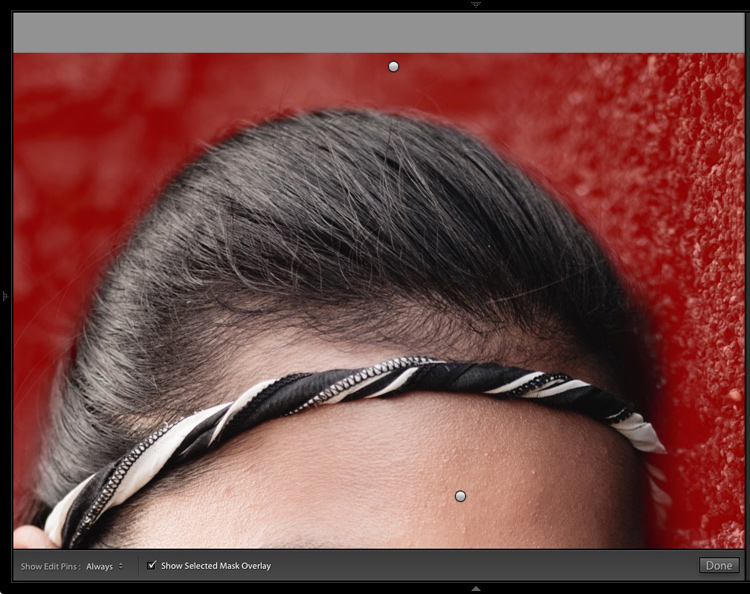
    It may help to zoom in and use a smaller brush around the model for a more accurate mask.

    3 Ways Make Selective Color Portraits Using Lightroom and Silver Efex Pro 2

    View zoomed in so you can mask more accurately around the model.

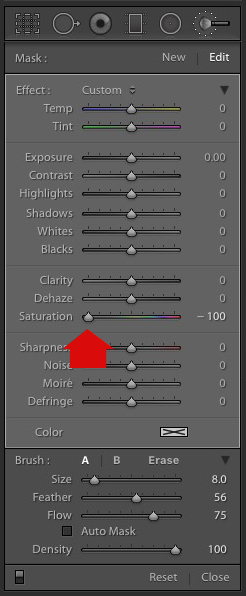
    Go to the Adjustment Brush sliders and set the saturation to zero.

    3 Ways Make Selective Color Portraits Using Lightroom and Silver Efex Pro 2 - set saturation to zero

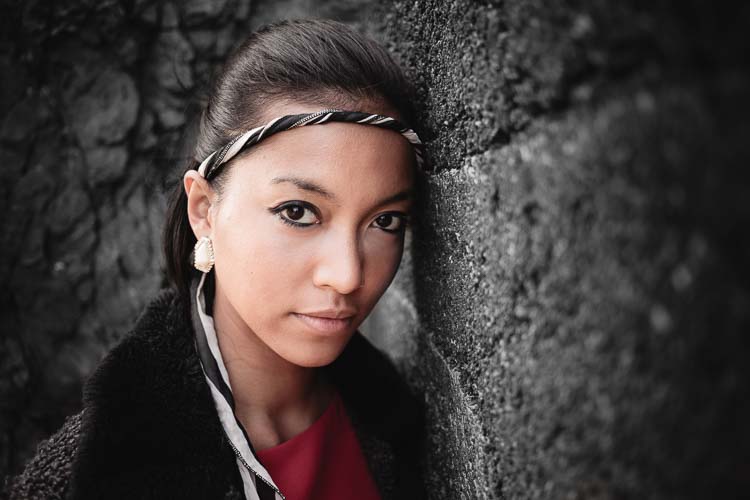
    That removes all color from the background, giving this effect. Don’t forget you don’t have to move Saturation all the way to zero – you can simply lower it to reduce the color intensity of the background. Play around and see what works best for your image.

    Selective coloring in Lightroom

    It’s important that you chose the correct image for this technique to get the best effect. There are several reasons it works well with this portrait.

    • The background is monochromatic. It wouldn’t work as well with a colorful background.
    • The rocks in the background have plenty of texture, which looks good in black and white.
    • Some of the model’s clothes are black or charcoal gray, so introducing this color into the background fits with the overall aesthetic of the image.

    2. Selective coloring in Lightroom using the HSL

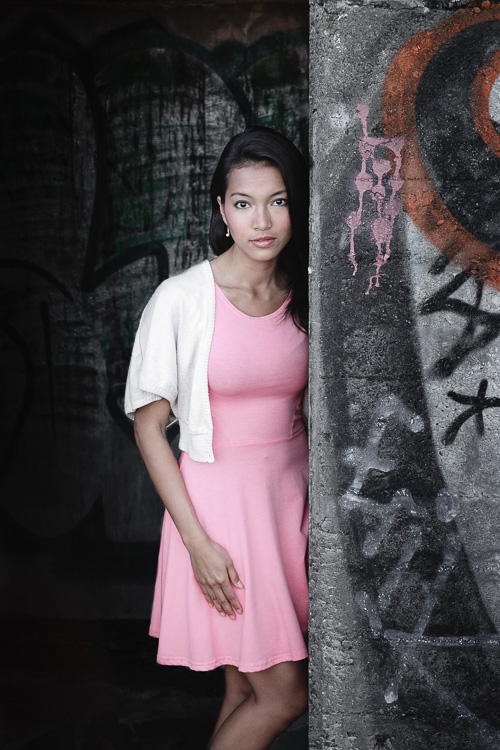
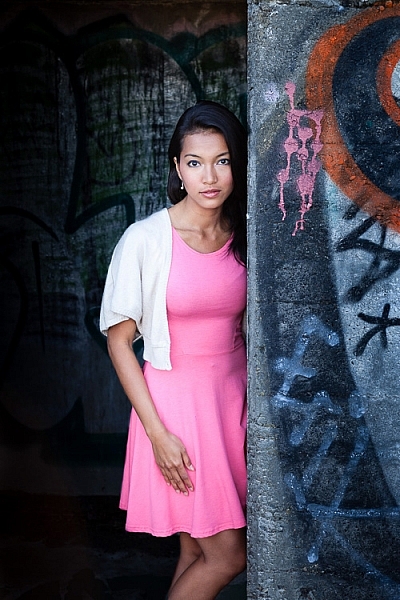
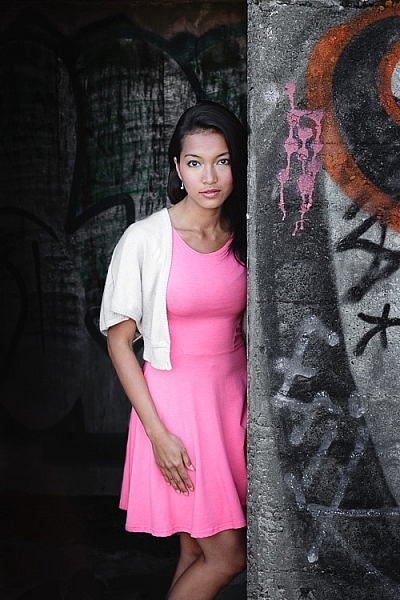
    The next portrait (below) has a more colorful foreground. I’m not going to remove the color completely, but I would like to make it more monochromatic. That will help the subtle colors in the model’s dress and skin to stand out.

    3 Ways Make Selective Color Portraits Using Lightroom and Silver Efex Pro 2

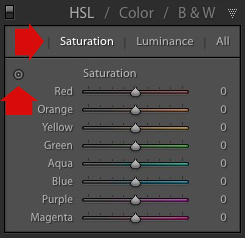
    Go to the HSL / Color / B&W panel in the Develop module. Click the Saturation tab, then the Targeted Adjustment tool (marked below) to activate it.

    Selective coloring in Lightroom

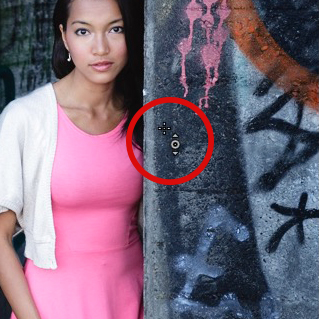
    Move the cursor over part of the image that you want to desaturate. In this case, the foreground has a blue cast that I want to remove, so I chose this spot (marked by the small cross circled in red below).

    Selective coloring in Lightroom

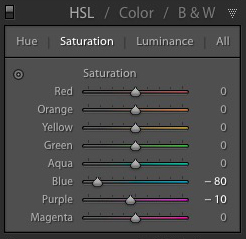
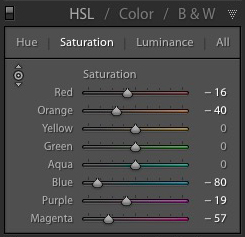
    Click and hold the button as you move the mouse downward. Lightroom reads the pixels under the cross representing the Targeted Adjustment tool and reduces the saturation of those colors across the entire image. The matching color sliders in the HSL panel move to the left. When I did this, Lightroom set Blue to -80 and Purple to -10.

    Selective coloring in Lightroom

    This is the result.

    3 Ways Make Selective Color Portraits Using Lightroom and Silver Efex Pro 2

    I took it further by repeating the technique. This time using the Targeted Adjustment tool on the pink and orange paintwork on the wall, resulted in the following saturation settings.

    Selective coloring in Lightroom

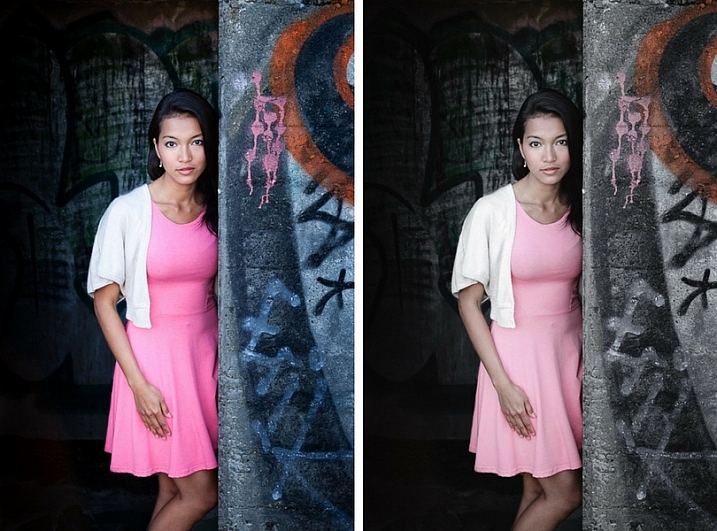
    This is a before and after of the final portrait showing these extra adjustments.

    selective-colored-portrait-01

    Notes:

    One key thing to be aware of is how the colors in your photo are related. In the photo above reducing the saturation of the pink paint affected the model’s dress, which is also pink.

    Reducing the saturation of the orange paint also affected the model’s skin. In this case, it worked out okay, but you should always zoom in and double check, especially when changing the color settings of Red, Orange or Yellow hues, as this can have some strange effects on skin tones.

    3. Selective coloring using Silver Efex Pro 2

    Silver Efex Pro 2 is one of my favorite black and white plug-ins. I’d like to show you how to use it for making a selective color portrait with a subtle effect that almost looks like an old style hand-tinted black and white print.

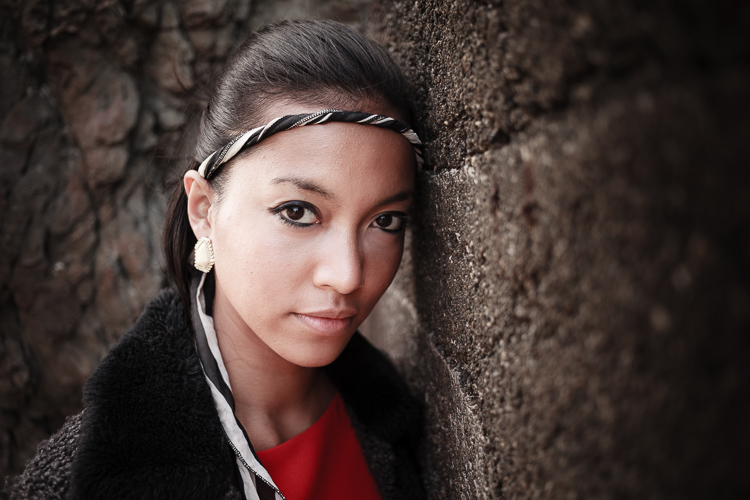
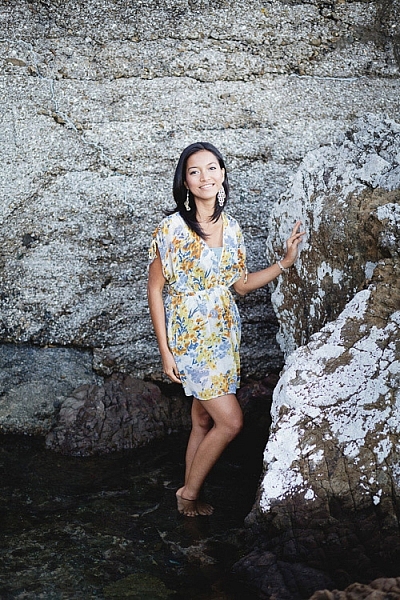
    This is the portrait I’m going to use. It’s a good photo to use as the colors are subtle.

    3 Ways Make Selective Color Portraits Using Lightroom and Silver Efex Pro 2

    If you don’t have Silver Efex Pro 2 already, you can download it for free from the official Nik Collection website.

    Once it’s installed go to Lightroom’s Library module and select the photo you want to edit. Go to File > Edit In > Silver Efex Pro 2 (you can also find this option by right-clicking the photo).

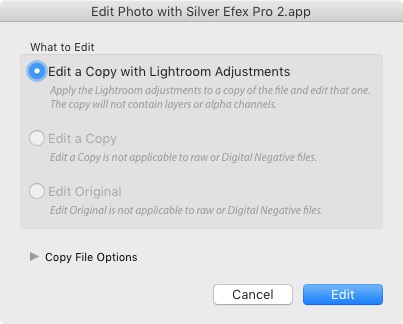
    Select the option that says “Edit a Copy with Lightroom Adjustments” in the next window (it will probably be the only one you can select) and click Edit. Lightroom converts the Raw file to a TIFF file and opens it in Silver Efex Pro 2.

    Selective coloring in Silver Efex Pro 2

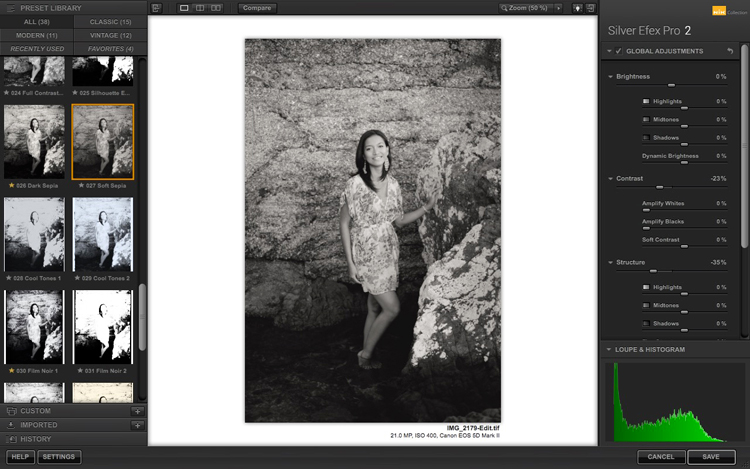
    Your first task in Silver Efex Pro 2 is to decide whether you want to stay with the default neutral black and white conversion or use one of the built-in presets. I selected the Soft Sepia preset (below), then made some adjustments to the tonal values until I was ready to apply selective coloring.

    3 Ways Make Selective Color Portraits Using Lightroom and Silver Efex Pro 2

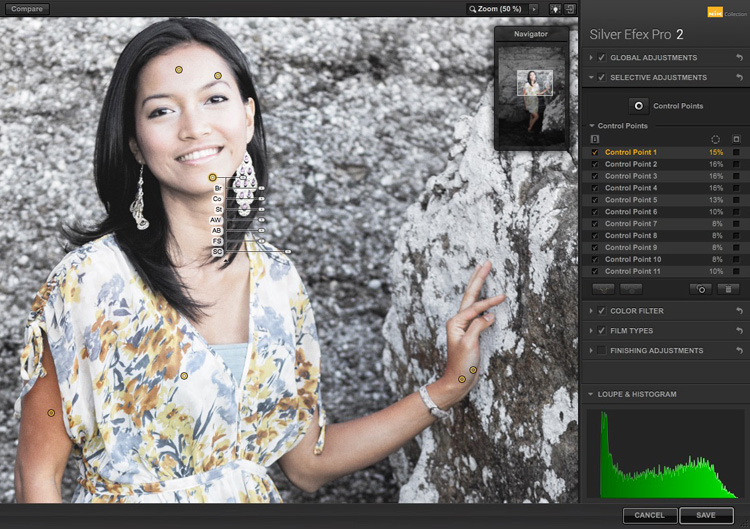
    In Silver Efex Pro 2 you make local adjustments by going to the Selective Adjustments panel and adding Control Points. This screenshot shows seven of the Control Points that I added to this photo. Each one is depicted by a yellow dot.

    Selective coloring in Silver Efex Pro 2

    Using Control Points

    Control Points work by analyzing the color and brightness of the pixels underneath them, then applying the selected effect to the pixels within the circle. In this photo, I moved the Selective Coloring slider (SC) to the right to bring the colors back to the model, but not the background.

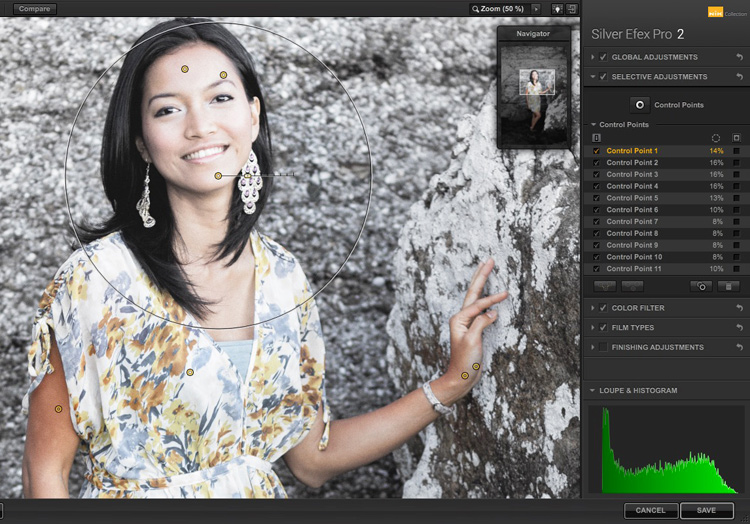
    You control the size of the circle by moving the top slider. Silver Efex Pro 2 displays a circle to show you the area affected by the Control Point.

    3 Ways Make Selective Color Portraits Using Lightroom and Silver Efex Pro 2

    Add multiple Control Points with circles that cover the model but as little of the background as possible. When you are finished, click the Save button. Silver Efex Pro 2 closes, saving the new TIFF file in the same folder as the original file and adding it to the same Collection in Lightroom.

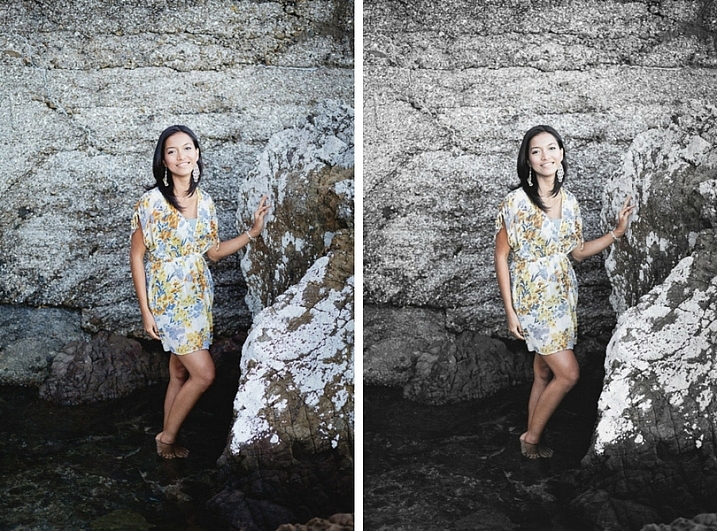
    Here’s the before and after with portrait after selective coloring in Silver Efex Pro 2. Notice it’s very subtle.

    selective-colored-portrait-02

    Conclusion

    Hopefully, this article has shown you how to use selective color in a subtle and sophisticated way that moves on from the garish examples you have probably seen online. Do you have any questions about these techniques? Let me know in the comments below.


    If you’d like to learn more about Lightroom, then please check out my popular Mastering Lightroom ebooks.

    googletag.cmd.push(function() {
    tablet_slots.push( googletag.defineSlot( “/1005424/_dPSv4_tab-all-article-bottom_(300×250)”, [300, 250], “pb-ad-78623” ).addService( googletag.pubads() ) ); } );

    googletag.cmd.push(function() {
    mobile_slots.push( googletag.defineSlot( “/1005424/_dPSv4_mob-all-article-bottom_(300×250)”, [300, 250], “pb-ad-78158” ).addService( googletag.pubads() ) ); } );

    The post 3 Ways to Make Selective Color Portraits Using Lightroom and Silver Efex Pro 2 by Andrew S. Gibson appeared first on Digital Photography School.


    Digital Photography School