Blog

  • Selfly pocket-sized camera drone snaps to a smartphone when not in use

    A new pocket-sized consumer camera drone has launched on the crowdfunding website Kickstarter, where the team behind it seeks $ 125k in funding. Called Selfly, this drone is dubbed a ‘smart flying phone case camera’ due to its unique storage design. When not in use, Selfly folds into a compact rectangular shape that can be attached to the back of an included smartphone case.

    Selfly is a small autonomous camera drone that, when stored, folds into a 9mm phone case. When removed from the case, four rotors appear to automatically lift the drone into the air where it hovers by default. The related mobile app offers optional control modes, including ‘Stick Control,’ ‘Voice Control,’ and ‘Fly By Picture.’ 

    The integrated camera features an 8MP sensor able to record video at 1080p/30fps; live video broadcasting is supported, though flight time tops out at only five minutes. The drone is compatible with all 4″ to 6″ smartphones via its Universal Flip Cover Case. Additionally, Selfly has dedicated phone cases for the iPhone 6/6 Plus/7/7 Plus, Galaxy S6/7 edge, Galaxy 7, and the Nexus 6.

    Selfly is similar to the pocket-sized AirSelfie drone that launched on Kickstarter late last year. That drone’s campaign has ended after exceeding its funding goal; backers pledged more than €570,000.

    Via: News Atlas

    Articles: Digital Photography Review (dpreview.com)

  • Throwback Thursday: Five camera accessories you probably didn’t need

    Five camera accessories you probably didn’t need

    Plenty of useful camera accessories come on to the market every year – but among them are some real duds. So let’s take a look back at some of the worst offenders, shall we? The first product that comes to mind, at least around here, is the Sony Party-shot.

    The Party-shot, introduced in 2009, was actually pretty clever. You popped on a compatible camera (originally the Cyber-shot DSC-WX1 and TX1) and off it went. The ‘personal photographer’ could rotate 360° and tilt up or down 24°, and would use the camera’s Face and Smile Detection features to follow subjects and take a photo at the right moment. It even used the Rule of Thirds for proper composition! The Party-shot was portable, making it the thing to talk about at parties (no pun intended).

    Oh, and be sure to watch this:

    Five camera accessories you probably didn’t need

    No more waving your arms or calling out your childrens’ names to get them to look at the camera, thanks to the Look Lock by Tether Tools. It’s a simple enough gadget: it’s a smartphone holder on an articulating arm that attaches to your camera’s hot shoe. What you put on the screen is up to you. It can be videos, photos or, God forbid, clowns.

    To give credit where it’s due, Samsung produced several DualView cameras that had an LCD panel on its front plate to essentially do the same thing. And it did have a clown mode.

    Five camera accessories you probably didn’t need

    Back in 2007 SanDisk released special ‘Ducati’ edition memory cards as well as a USB stick. This wasn’t just an unusual marketing scheme: at the time these ‘turbo-charged’ cards were also significantly faster than SanDisk’s other offerings at the time. They were also pricey, with that 8GB CF card going for $ 315 and the 4GB SD card priced at $ 130. That snazzy 4GB USB stick was $ 125.

    In case you’re wondering about that SD card, it’s what SanDisk called ‘SD Plus’. The card could split open, exposing a hidden USB connector, so you could plug the card right into your PC. Not surprisingly these cards broke quite easily, and the ‘Plus’ designation now means ‘above average’ in SanDisk’s lineup.

    Like many things, the partnership between SanDisk and Ducati didn’t last long, which is why I still treasure the 8GB SanDisk Extreme Ducati Edition CF card that I hide in my desk.

    Five camera accessories you probably didn’t need

    Back in the late 1990s transferring photos from camera to computer was a pain in the butt. You had to hook up a serial cable and those big 1.3 Megapixel files chugged along at a whopping 115kb/sec.  Then a company called SmartDisk said ‘why not make a device that lets you put that SmartMedia card into your floppy drive!’ And so the FlashPath adapter was born. 

    The concept was pretty simple. Just pop two watch batteries into it, put the SmartMedia card into the side and insert it into your PC’s floppy drive (remember those?). That assumes that you’ve installed the proper drivers for Windows 95/98 or Mac OS, of course. The FlashPath wasn’t blazing fast, but by our estimates it was about double the speed of a serial cable, so it did save time. Not long after the FlashPath arrived, Sony did the same thing for its Memory Stick format. And not long after that, floppy drives started to disappear from PCs, starting with the iMac.

    Five camera accessories you probably didn’t need

    There have been plenty of accessory lenses for iPhones, but none is more ridiculous than the Turtleback iPhone SLR jacket. This $ 249 accessory, introduced in 2012, let you attach a Nikon F or Canon EF lens to the front of your iPhone 4. To make that happen you had to first attach a case to the phone and screw on an depth-of-field adapter ring, and then you could attach the lens of your choice. It goes without saying that using the SLR jacket required two hands, otherwise something terrible would happen to your iPhone.

    We tested the SLR jacket at the time and it earned 2/5 stars, due mainly to do the fact that the iPhone is actually taking a photo of the focusing screen in the depth-of-field adapter, so you see the pattern of the screen and lots of dust. To its credit, Turtleback did offer an app which automatically flipped the image (since there’s no mirror, the image is upside-down) and calibrates the iPhone’s camera to maximize image quality.

    Did we miss your most favorite, least useful camera accessory? Let us know in the comments.

    Articles: Digital Photography Review (dpreview.com)

  • Applying color theory to landscape photography

    This is Albert Biestadt’s painting entitled ‘Among the Sierra Nevada’ from 1868. As you can see he employed the use of what we now call color theory to create a color harmony in his painting.

    Color Theory can be an extremely complex subject, especially if you start looking at the mathematics and physics behind the theory itself. On a more aesthetic level it’s an integral part of what can make an image of a landscape pleasing to the eye. Composition, subject and light all play a considerable roll in landscape photography, but color, and more importantly the idea of color theory, helps to weave all of those elements together to form a successful image. 

    The most commonly utilized types of color harmonies are analogous, monochromatic, complementary, split complementary, triadic and quadratic. These color harmonies are essentially different combinations of groups of colors that work well with with one another, or for lack of a better word, are harmonious in their visual representation. 

    Painters such as Albert Beirstadt, who is best known for his renditions of the American West during the mid to late 1800s, utilized what we now call color theory extensively in his paintings of breathtaking landscapes. In the above painting entitled ‘Among the Sierra Nevada’ Beirstadt utilized a triadic color harmony to add balance to the scene.

    In the modern era of landscape photography, the same principles that Beirstadt utilized in the 1800s, can be applied to the way we compose images today. Consider the example below taken from Ted Gore’s blog post on the subject. As you can see, the color balance that he strikes in this image helps to solidify an already strong composition with excellent leading lines by guiding your eye through the scene through the use of the colors present in the image.

    In this graphic, Ted has outlined the use of the Triadic Color Harmony present in this image taken along the Napali coastline on the island of Kauai, HI.

    The Triadic Color Harmony present in the above image combines three groups of colors that are equally spaced from each other on the color wheel. The greens, yellows/oranges and blues all work to add balance to the overall scene and to create a very well composed final product that is pleasing to the eye. This is just one example of the several provided by Ted in his blog post. 

    To find out more on the subject please give his blog post a read as we think that it does an excellent job explaining how color harmonies work and how they can be utilized effectively in modern landscape photography.

    If you want to dive even further into the science behind color theory, give Dave Morrow’s blog post a read as well.

    Articles: Digital Photography Review (dpreview.com)

  • Landscape shooter Lisa Bettany shares her story of healing through photography


    $ (document).ready(function() { SampleGalleryV2({“containerId”:”embeddedSampleGallery_7608234858″,”galleryId”:”7608234858″,”isEmbeddedWidget”:true,”standalone”:false,”selectedImageIndex”:0,”startInCommentsView”:false,”isMobile”:false}) });

    Lisa Bettany is a renowned landscape photographer whose career began as she was recovering from a traumatic injury. Born in Canada, she was a competitive figure skater until the age of 21 when she suffered a back injury while skating. Years into her recovery it was still extremely difficult to walk and sit up, but when she acquired a camera things started to change for the better. One day at a time she ventured farther and farther from home, increasing each trip minute by minute, growing stronger and learning the art of photography. For her, learning photography was very much a journey from darkness into light, and nothing has slowed her down since then.

    You can read the inspiring account of how her career started and the success she’s achieved as a pro photographer over on Resource Travel. You can also take a look at a few of her images above.

    Has photography helped you achieve things that previously seemed impossible? Tell us in the comments below.


    Articles: Digital Photography Review (dpreview.com)

  • Hasselblad CEO Oosting to leave next week

    The CEO who oversaw Hasselblad’s dramatic turn of fortunes over the past two years is to step down within the next week. Perry Oosting is widely credited with extracting the company from one of the worst periods in its 75-year history by finding new investors and helping to modernize the brand’s produce offering with the H6D and X1D cameras.

    Oosting was a member of Hasselblad’s Supervisory board before taking the helm in January 2015. After a long period of creative stagnation and persistent rumors of financial crisis and hostile take-overs, not to mention some very poor branding decisions, Hasselblad made some real progress under Oosting and surprised the world with the first handheld medium-format mirrorless system last year when it launched the X1D.

    Oosting leaving the company comes against a background of rumors that DJI has quietly become a majority shareholder. The Chinese drone manufacturer took a ‘strategic’, but minority, stake in Hasselblad in October 2015 – a move that provided the funds needed to launch the H6D and to develop the X1D. However, the massive uptake of the new mirrorless camera system took the company by surprise and rumors suggest Hasselblad had to look to DJI for further investment so it could upscale production to meet demand.

    That the company has appointed an interim CEO suggests that Oosting’s departure wasn’t part of a long-term plan – had it been a smoother transition would have been arranged. However, as much as Oosting is seen by some as Hasselblad’s ‘knight in shining armor’ products like the H6D and the X1D must have been on the drawing board and at some stage of planning before he took over, so the company still has the staff to continue along the current path. Paul Bram, who is to stand in as CEO, is already an advisor to the supervisory board, has been involved in decisions around the new direction and has some history with the company, while Ove Bengtson, who was the hands-on guy during the development of the new products, is still the company’s product manager.

    Hasselblad hasn’t had much luck with managerial direction over the last ten or so years. It was CEO Larry Hansen who instigated the disastrous rebranding exercise with Sony that spawned the Lunar, and Ian Rawcliffe who worked under Dr. Hansen and became CEO when Hansen was removed suddenly and quietly at the end of 2014. Rawclifffe lasted a year.

    With a full order book for the X1D and many previous R&D staff back within the company Hasselblad must now be in a more healthy position than it has been since it only sold film cameras. The challenge of course will be to deliver the pre-ordered X1D units, develop the X series of lenses and maintain the H series at the same time – while still expanding the range of products on offer. I’m told that production of the X1D is now well on track, and was in fact at an all-time high only yesterday.

    DJI certainly knows how to create a successful business from its base and factory in China. How that experience will translate for a Swedish factory and ideology, and whether they will be hands-on or hands-off, we shall have to wait and see.

    Press release

    Hasselblad announces change of management structure

    Gothenburg, January 2017

    Hasselblad, the leader in high-quality professional medium format cameras today announced that Perry Oosting, CEO, will step down from his role by the end of this month.
    Having guided Hasselblad to stability, strong sales as well as the partnership with aerial camera company DJI, CEO Perry Oosting has accomplished what he was asked to achieve and has decided to step down from his operational responsibilities and return to a role as advisor to the board.

    “We would like to thank Mr Perry Oosting for his extraordinary efforts. Under his leadership a foundation for future growth is established and the company has extended its customer base substantially,” said the Supervisory Board.

    “In the beginning of 2015 I was asked to take the role as CEO to secure sustainable growth and prepare the business for the next steps in its development. During 2016, we launched several new products and a complete new electronic platform. The market reaction to the strategic direction and its products were overwhelming. I would like to thank all involved and foresee a bright future for the team of Hasselblad.” said Perry Oosting.

    The Board of Directors has, effective as of Feb 1, appointed Paul Bram, currently Advisor to Hasselblad, as Interim CEO.

    “We are happy to announce Mr Paul Bram as an interim CEO. Paul is coming from his position within Hasselblad as Advisor and has a vast leadership experience from his time at Ericsson and Gambro,” said the Supervisory Board.

    “I am honoured to take on the role as interim CEO for this iconic and much-loved company. Hasselblad represents outstanding quality, passion for fine art and pioneering technology. Over the coming months we will continue the started path and strategic direction, including accelerating R&D and software development in Gothenburg, Sweden. Going forward I am immensely proud to be part of this continuing journey. ” said Paul Bram.

    Articles: Digital Photography Review (dpreview.com)

  • Study finds consumers are ready to embrace selfies as a tool

    For some, selfies are a form of self-expression. Others find them annoying. But one thing is certain: they won’t go away anytime soon. A Sony-commissioned study has found that the top ten future uses for smartphone cameras will include banking, shopping, healthcare and dating. The study finds that over a third of consumers would feel more secure if banks used selfies as passwords and a quarter would prefer to see their general practitioner via a selfie or video call than in-person.

    The study was undertaken by futurologist organization Futurizon with the market research company OnePoll who conducted data research and surveyed 6500 people across the UK, Germany, France and Spain.

    The report identified the top ten ways consumers believe selfies could be used in the next five years:

    1. Dating: Taking a selfie with your date to find out what they really think
    2. Medical: Over a quarter of people would prefer to see their GP via a selfie or video call, in the first instance
    3. Banking for the selfie generation: Nearly half of 25-34 year olds would feel more secure if accessing their bank through a ‘selfie password’
    4. In leisure: Around half of thrill-seekers would like to try a ‘selfiecoaster’ – a rollercoaster that puts you in control of capturing your experience on the ride
    5. In a gym / fitness: selfies that work with AI (Artificial Intelligence) to capture body monitoring e.g. testing heart rates and even suggesting how to improve on technique and how accurately a move is being performed
    6. Made to measure clothes: taking a 3D body image for made-to-measure clothes
    7. In retail: using your smartphone camera to try on different outfits suited to your body shape, at the touch of a button
    8. Social currency: paying for entry to the cinema or a tourist attraction through a selfie
    9. Robots: Using your smartphone to control drones or robots to take selfies from other or extreme locations
    10. Home: Using selfies to secure and access our homes and cars

    Dr Ian Pearson, Futurologist and creator of the Future of Selfies report said, “The results clearly show that selfies are well on their way to transitioning from frivolous fad to technological phenomenon, and provide food for thought to a number of industries. The potential is huge, and it will be exciting to watch this unfold over the coming years.”

    Most of the selfie applications described above seem technologically possible today. So, if there’s a market for them, we’ll probably be able to use them at some point in the short to medium term.

    Would you be interested in using selfies in any of the ways listed above? Let us know in the comments. 

    Articles: Digital Photography Review (dpreview.com)

  • Lighting 103: How to Safely Gel a Speedlight

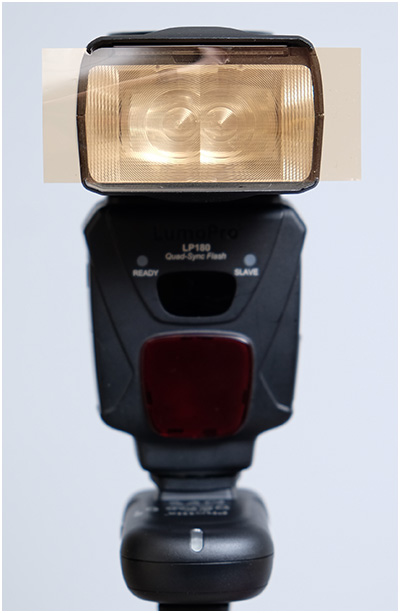
    Do you work mostly with speedlights? If so, congratulations. Gelling your lights is going to be quick, easy and cheap. The fresnel lens on your speedlight (where the light comes out) is only about 3-4 square inches. And that is all you are ever going to need to gel on a speedlight.

    As far as how to attach the gel, you have several choices and all are simple. But there are also a few things to watch out for, unless you want your gel to be permanently heat-welded to your flash. Read more »
    Strobist

  • 3 Handy Lightroom Features I Discovered by Accident

    When I first started to dabble in photography, I knew very little about post-processing. I used Picasa to edit my photos. It’s free and easy to use. I experimented with the different settings and created some pretty interesting images (they weren’t very good). Needless to say, I had no idea what I was doing.

    This was the extent of my early post-processing attempts. I created collages in Picasa.

    This was the extent of my early post-processing attempts. I created collages in Picasa.

    Self-learning methods and benefits

    Like many of you, I am a self-taught photographer. My degree is in English Literature, and photography was something I dabbled in as a hobby. I learned photography by reading books, participating in online forums and through trial and error. It’s been a long hard road but it’s been well worthwhile.

    I learned most of my post-processing by watching YouTube videos. It has become one of my favorite ways to learn. There’s some inspirational stuff available that you can use to teach yourself all kinds of different skills. It’s a lot of fun, and the benefit of learning in this way is that you can go at your pace.

    This type of learning is perfect for my lifestyle, and I’m sure for many of you the same factors apply. It always amazes me what we can teach ourselves when we put our minds to it. Check out this video. Sean Tucker experiments with landscape photography and discusses how important it is to continue to learn and push ourselves.

    Three Lightroom Features Discovered by Accident

    Now that we are on the path to self-directed learning I would like to share with you three Lightroom shortcuts, hacks, tricks, or whatever you want to call them, that I learned completely by accident. I just pushed buttons to see what would happen. By just experimenting, the results paid off. I learned some very efficient ways to manage my post-processing workflow, and I want to share them with you.

    Accidental Discovery #1 – the Alt key

    By simply pushing buttons I discovered some pretty cool functions. If you hold down the Alt key while in the Library module, little numbers appear by each keyword. You can then simply hit the number, and the module will tag your images with that keyword. Brilliant!!!

    If you create a set keywords, this little trick becomes even more useful. The keyword set is then added to your images by simply typing in the correct number.
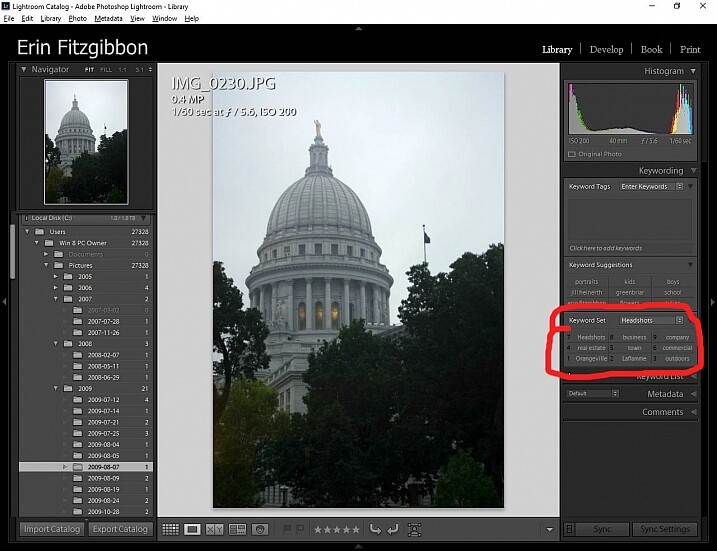
    Alt key Lightroom Library module

    This little discovery saves me loads of time.

    In the Develop module, the Alt key is very useful when setting black and white points in your images. Hold down the Alt key while hovering your cursor over the Blacks slider. The image will go completely white and as you move the slider from side to side (move it left to darken or add black) you will be able to see when the blacks begin to clip in your image.

    This is a great way to adjust your image and super easy to see (and adjust) how much contrast range it will have. You can use the same principle to adjust the white points in your image. Give it a try. It’s one of the first steps I take when editing my work.

    Note: It’s okay and even desired to have some blacks clipping in your image, but ideally you want to keep any whites from doing so. Clipping means areas with no detail in that tonal range.
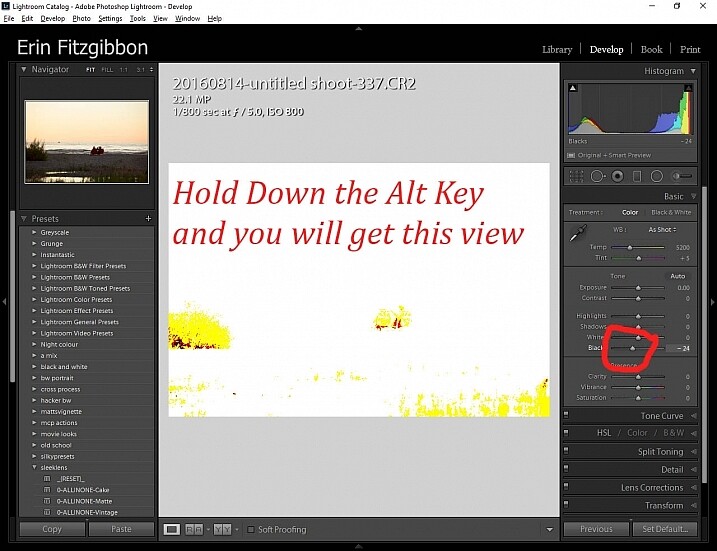
    Alt key Lightroom Develop module black point slider.

    Here’s a screen shot of the black point slider.

    Accidental Discovery #2 – Navigator Window

    The Navigator window is very useful when you need to zoom in. This is probably really obvious and silly to those who have formal Lightroom training. Before discovering this little trick, I would zoom in and out applying the adjustment brush to small sections of the image. It was very tedious.

    Then one day I discovered that if I click the 1:1 button on the Navigator (preview) window and then slide the square around on the screen, I could apply the adjustment brush without the tedium of closing the adjustment brush and moving out to the full-screen view.
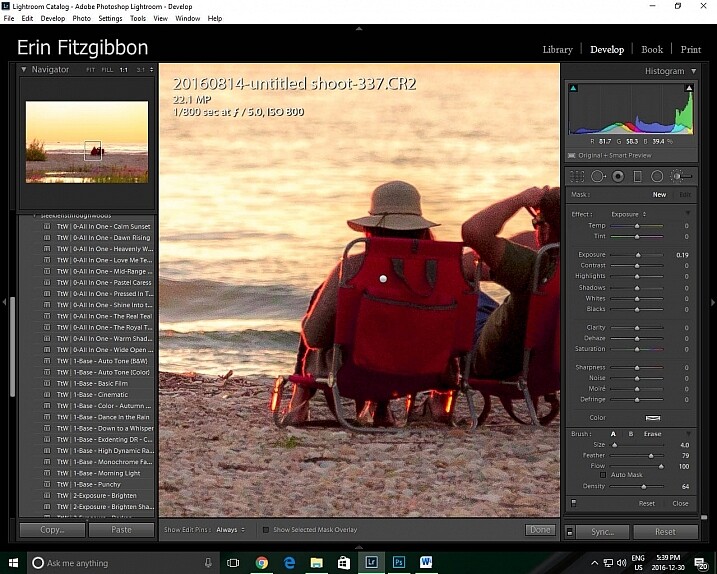
    Lightroom features 1:1 preview window

    When I need to apply the same brush to several different areas of an image I click on the 1:1 feature and slide around the image making adjustments.

    Accidental Discovery #3 – Lights Out in the Library

    It took me a little while to figure out this trick. Again, I was just experimenting and pushing buttons. I had learned to use the Lights Out feature in the develop module.  When you press the letter L on your keyboard, it dims the surrounding panels so that you can focus more on the image at hand (press L again for total black around your image, and once more to return to normal). This same tool works well in the library module. I now use the “Lights Out” feature to isolate specific images. Simply select the images you wish highlight then hit the “L” button. It’s a neat little trick.
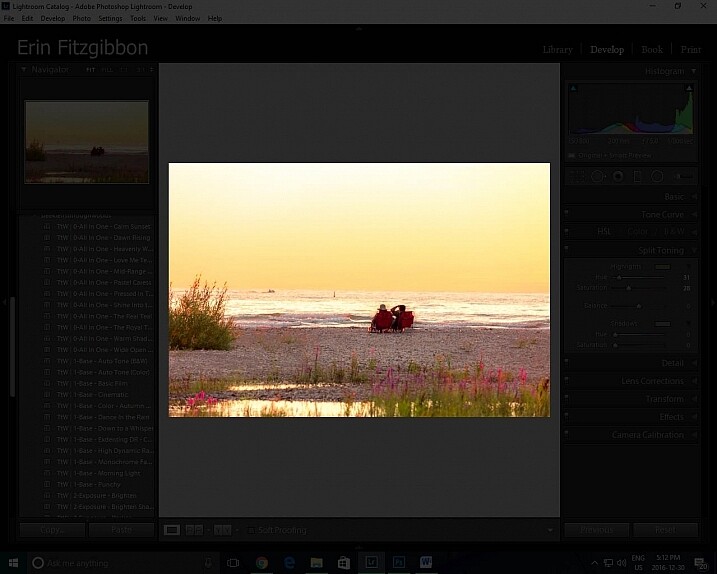
    This same tool works well in the library module. I now use the Lights Out feature to isolate specific images. Simply select the images you wish highlight then hit the “L” button. It’s a neat little trick.

    Lightroom features Lights Out in Library module

    I use this feature to help me analyze an image before I decide it’s finished.
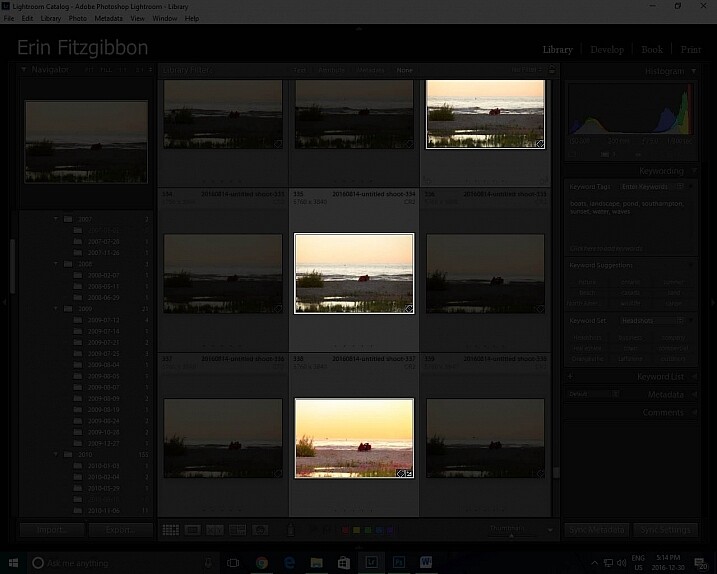
    Lightroom features Lights Out in Library module

    Look how easy it is to isolate specific images in the library module.

    Conclusion

    Experimentation is never a bad thing. We live in an age when we are lucky to have so many resources available to us. The internet is a true cornucopia of opportunity. Don’t be afraid to try different things. You really can’t break the program.

    Sure there have been times when I have had to call Adobe and ask for assistance because I’ve pushed some button and haven’t been able to reset the program, but those times have been very few and far between.

    Let me know about some of the tricks you use when post-processing. I’m sure there’s so much out there I still need to learn and I’m hoping you can add to my list of discoveries. What have you taught yourself about post-processing or using Lightroom in general? Please share in the comments below.

    googletag.cmd.push(function() {
    tablet_slots.push( googletag.defineSlot( “/1005424/_dPSv4_tab-all-article-bottom_(300×250)”, [300, 250], “pb-ad-78623” ).addService( googletag.pubads() ) ); } );

    googletag.cmd.push(function() {
    mobile_slots.push( googletag.defineSlot( “/1005424/_dPSv4_mob-all-article-bottom_(300×250)”, [300, 250], “pb-ad-78158” ).addService( googletag.pubads() ) ); } );

    The post 3 Handy Lightroom Features I Discovered by Accident by Erin Fitzgibbon appeared first on Digital Photography School.


    Digital Photography School

  • LenzO underwater housing for iPhone 7 is rated for 100 meters

    Sure, your iPhone 7 Plus can probably stand up to a little water, but if you’d like to dive deep you might not want to press your luck. That’s why ValsTech is seeking funding for a new LenzO underwater housing designed for the iPhone 7 and iPhone 7 Plus. As with the iPhone 6/6s version, the iPhone 7 housing is rated for depths down to 100m / 328ft, and features an optical dome lens, total phone control while under water, a selfie lens, and dual tripod mounts. Unlike the previous LenzO housing, though, the iPhone 7 variety is also buoyant.

    LenzO is designed for recording videos and snapping photos underwater, and includes different color correction filters to compensation for various bodies of water. The case has a wake/sleep button for the phone, a camera start/stop trigger, swing arm actuators and a secure seal latch.

    The underwater housing doesn’t require any special camera apps. Users can easily toggle between photo, video, panorama, and slow-mo modes while using the housing.

    ValsTech is offering Kickstarter backers one LenzO for iPhone 7 housing for pledges of at least $ 230. The planned retail price will be about $ 400. Shipments to backers are estimated to start this upcoming April, and will be available globally.

    Via: Kickstarter

    Articles: Digital Photography Review (dpreview.com)

  • Hopes of Kodachrome relaunch put on ice

    Photo by pittaya via Flickr. Used under CC license

    Hold your horses, all you would-be Egglestons: Kodachrome probably isn’t about to make a comeback. In all the excitement about the re-launch of Ektachrome, the Chief Marketing Officer of Eastman Kodak said that the company was going to look into bringing back the iconic filmstock.

    The problem was, it was the wrong Kodak. Now, in an interview with TIME.com, a senior representative from Kodak Alaris, the UK-based company that owns the Kodak stills film division, says it’s unlikely, given the need for specialist processing.

    Dennis Olbrich, president of the imaging, paper, photo chemicals and film division at Kodak Alaris is quoted as saying ‘I would love for it to be Kodachrome, obviously. But it’s a very difficult proposition to get that whole infrastructure back in place.’

    He did stress that the company was still interested in re-launching older filmstocks, though. ‘We’re already starting to evaluate what other films we could bring back and whether it would make sense to do it,’ he said.

    Kodak Alaris acquired the stills film division as part of a settlement with Kodak’s UK pension scheme, during its restructuring under the US’s Chapter 11 bankruptcy protection process. US-based Eastman Kodak manufactures the film on the UK company’s behalf and still sells cine film and filmstocks for the movie industry.

    Articles: Digital Photography Review (dpreview.com)