Blog

  • How to do Multiple Exposures In-Camera

    Combining two or more exposures into a single image is a technique that almost certainly began as an accident (much like photography itself). When using early film cameras, it was all too easy to press the shutter button while forgetting to change the plate – a faux pas that was generally rewarded with an overexposed jumbled mess. When roll films became popular, camera manufacturers thought it prudent to build a mechanical interlock into the film advance mechanism to prevent accidental multiple exposures (unless you used a special override button).
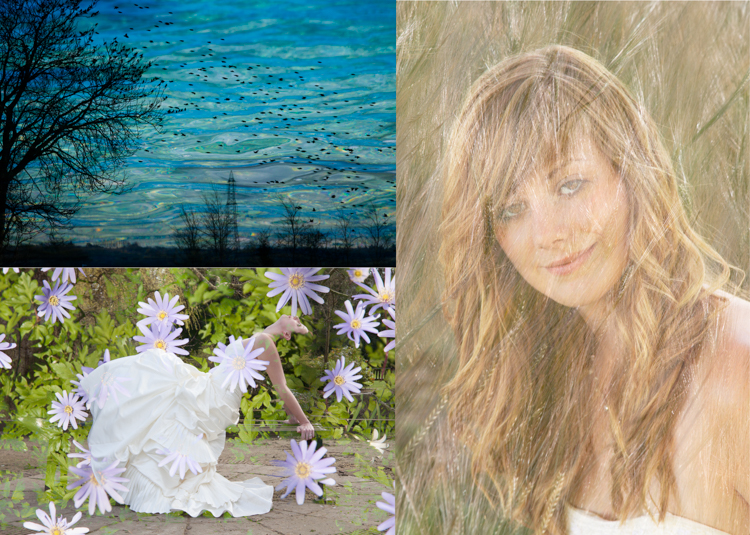
    Most digital cameras carried on the tradition of discouraging such mischief by simply not providing the facility at all. As a consequence, a distinctive style of this sometimes serendipitous art began a steady decline – until recently. Today, the thirst for retro styles is gaining popularity and many photographers are once again experimenting with this old technique.

    Traditional multiple exposure methods

    If you cannot do the electronic equivalent of resetting the shutter without winding the film, how can you achieve this effect? Unless your camera offers you special multiple exposure options, you’re limited to doing everything during one long exposure so that your image can accumulate on the sensor.

    One method is to build up your image by firing a flash several times during a long exposure, under low ambient light. This technique is often used by cave photographers as it allows them to create what appears to be a floodlit underground chamber by popping off a number of flashes in different parts of the scene. The disadvantage is that you need a dark environment, but the technique can be effective – particularly when using a flashgun set to produce a rapid burst of flashes in strobe mode to capture fast-moving action.
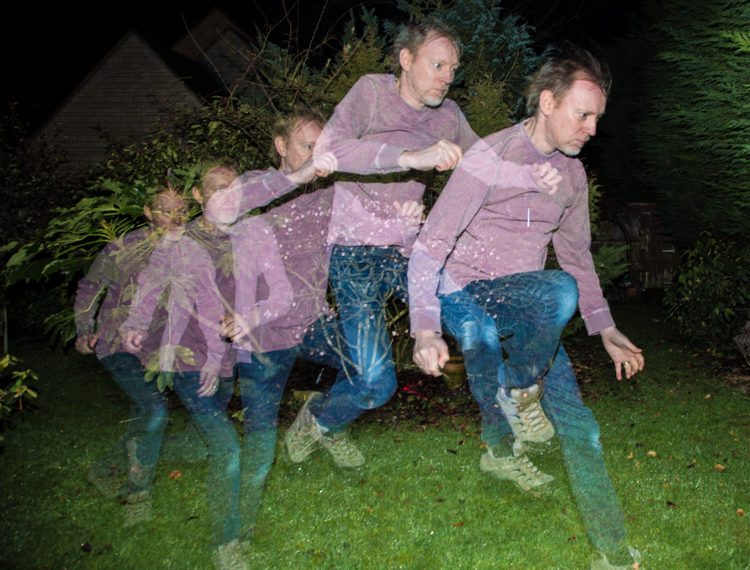
    In normal daylight conditions, the only way to achieve a long exposure is to employ a neutral density filter, which will allow you to achieve an exposure time of ten seconds or more. During this time, you can cover and uncover the lens as needed to superimpose a series of still images.

    Since both of these methods rely on accumulating more and more light on the sensor from different subjects during a long exposure, it’s easy to produce a result that’s overexposed unless you carefully compensate by underexposing each shot in the sequence. It’s also somewhat tricky to see how your composite image is turning out until the exposure is complete.

    New possibilities

    Some digital cameras now offer a multiple exposure function, that not only provides a simple means to recreate the traditional effect but also extends the creative possibilities by using more sophisticated blend modes. In addition, the technology is not limited to just high-end DSLRs. Now even smartphone users can enjoy making multiple exposure images using apps such as Multiple Exposures for the iPhone or Photo Blender for Androids.
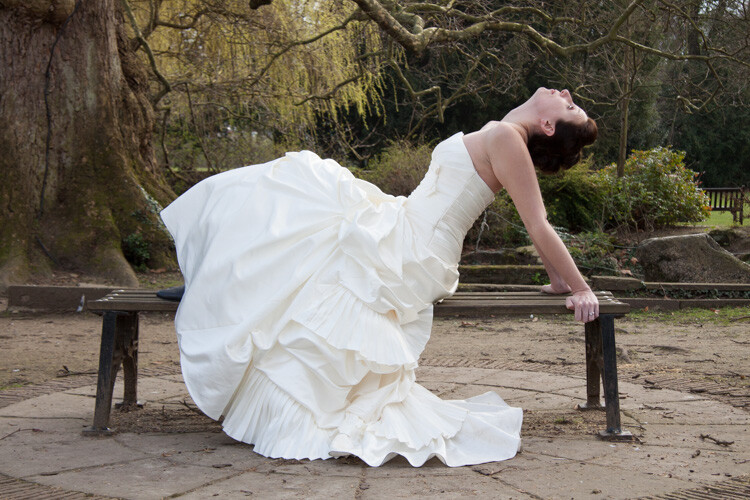
    Photo #1

    Photo #2
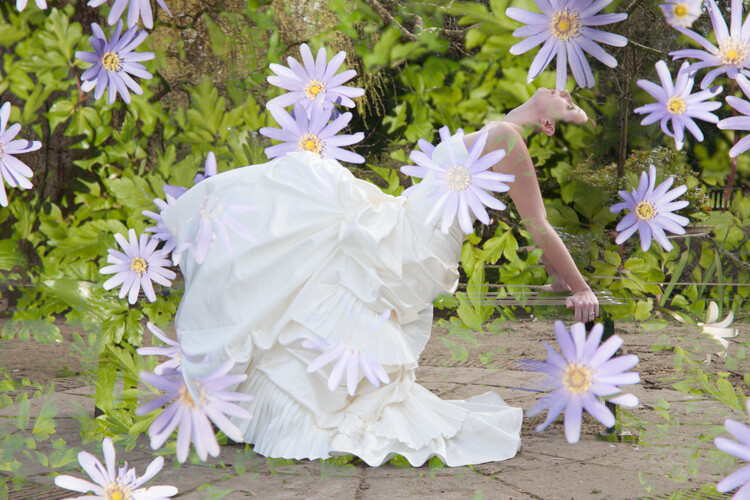
    Combined using the Photo Bender app.

    If you have a recent camera model, it’s increasingly likely that it will sport some form of multiple exposure feature. Check your camera user manual for details. The specific facilities on offer will vary from one camera model to another, but all those that have this feature will be able to simulate the original technique. So let’s start with a simple double-exposure example using a Canon 5D Mark III.

    Double-take

    In this technique, both images are exposed normally and then added together. This means that the brightest parts of the final image will be made from the brightest parts of either of the two component images, a fact which can effectively be used to make each image cut out the other. Set the camera’s multiple-exposure setting to take two photos and blend them in the Additive mode, as shown here for the 5D Mk III:
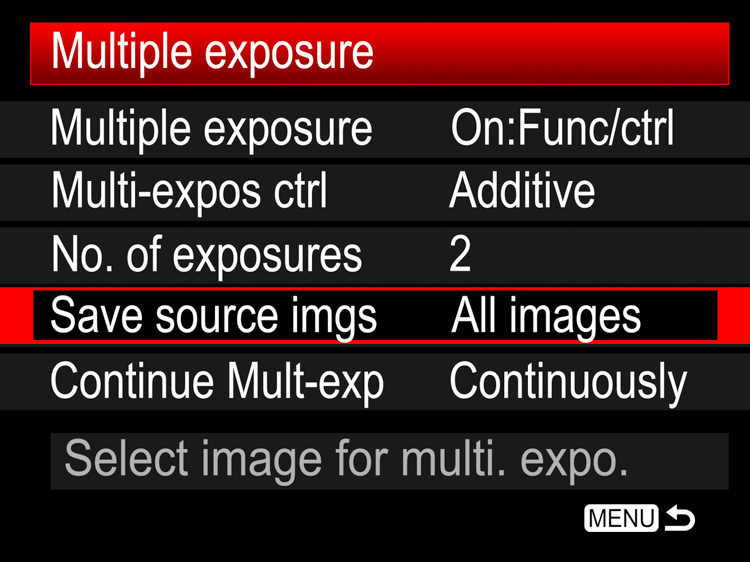
    In camera multiple exposures 01

    Shooting the images

    For the best results, you will need two images with light backgrounds. In this example, my subject was photographed indoors against a fairly light background (below left). If your subject is outdoors, it’s often useful to position yourself low down so that your subject is against the sky.

    In camera multiple exposures 02 In camera multiple exposures 03

    For the second image, look for a high contrast subject that has white areas where you want the first image to be cut-out. In this case, I chose to photograph a tree against the sky (above right), remembering to use the camera in portrait mode but rotating it such that the tree was inverted.

    When the images are added in the camera, the light pixels around the subject’s head overwrite the dark pixels from the tree. In the same way, the light pixels from the lower left and right corners of the tree image overwrite the pink feather boa in the first image. Depending on how light the background is in each image, this pixel addition will produce something between a faint high-key effect to a full blown-out white wherever the two subjects don’t overlap.

    In camera multiple exposures 04

    Camera settings

    By default, the multiple exposure setting is disabled. When it is activated on the 5D Mk III, it can be set to either allow you to review and change some settings between exposures or just fire away continuously without slowing down to review images. For this example, I chose the “On:Func/ctrl:” option to allow me time to compose the next shot. One big advantage of selecting that option with Canon cameras is that it enables you to switch to “LiveView where you can see an overlay of your previous shot to help you line up the next one.

    Using a previous image

    Canon cameras allow you to combine a photo taken the conventional way, with an exposure taken in the multiple exposure mode. To try this, choose the “Select image for multi.expo” option. If you’ve set the total number of exposures to two, you now only have to shoot one extra exposure in multiple exposure mode to complete your composite.

    Nikon cameras take this a step further by allowing you to select any two images from the camera’s media card and combine them using a feature Nikon called “Image Overlay”. This is particularly flexible because you can simply keep combining pairs of images and applying exposure adjustments as needed to make your composite raw image.

    Auto exposure compensation

    If you shoot in this Additive mode and don’t want to exploit the cut-out effect, then you need to reduce the exposure of the individual images according to the number of shots you include in your composite. For example, you should underexpose each shot by one stop if you’re combining two images, or by two stops if you’re combining four images. Alternatively, you can leave the adjustment to the camera. Since you’ve already told the camera how many exposures you wish to combine, it can work out how much exposure compensation to apply in order to create a composite that still retains details in the highlights.

    To apply this compensation automatically, simply select “Average” instead of the “Additive” option and set your camera to either aperture or shutter priority mode. If you want to experiment with overlaying textures and making abstract patterns, Average is a good initial blend mode.

    Bright and dark

    Both the Additive and Average options effectively just accumulate one image on top of another with optional exposure adjustment, so these modes are not that different to conventional film multiple exposures. However, thanks to the increased computing power on some DSLRs, you’re no longer limited to just overlaying images by simply adding their brightness values. Images can also be combined by taking pixels from either one source image or the other, based on which one is brightest (or darkest). To show how this works, consider this combination of window and clouds.

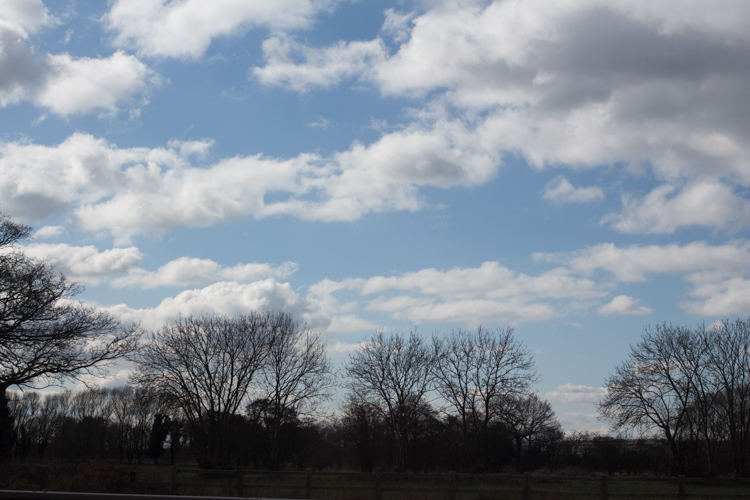
    In camera multiple exposures 05

    In camera multiple exposures 06

    Selecting the Bright mode gives priority to the clouds, which will appear in front of the window at the top of the composite. The dark trees will be excluded in favour of the brighter parts of the window at the bottom of the composite.
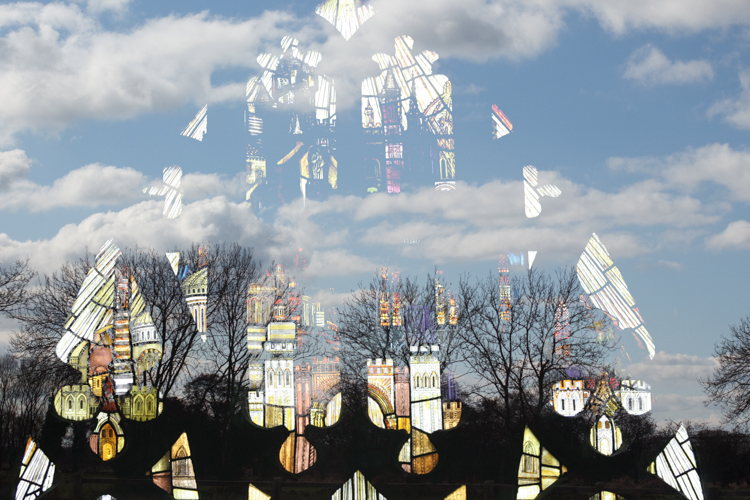
    In camera multiple exposures 07

    If you select Dark, then the darkest pixels win and the clouds appear behind the window in this rather more subtle version.

    In camera multiple exposures 08

    Other creative techniques

    Having tried out the various blend modes your camera has to offer, it’s worth considering what changes you might want to introduce between shots. As long as you don’t turn the camera off, you could swap lenses, filters or even countries between shots so that you could combine, for example, a macro image with a landscape. Since cameras invariably allow you to combine a live image with one previously stored on the card, there’s a great deal of scope for creatively combining images. Here are two simple examples you might want to try.

    Layering a landscape

    Zoom lenses provide a very convenient way to create a layered effect from a simple skyline. In this example, I combined four shots of different parts of the horizon and also adjusted the camera’s white balance for each exposure to simulate a distance haze.
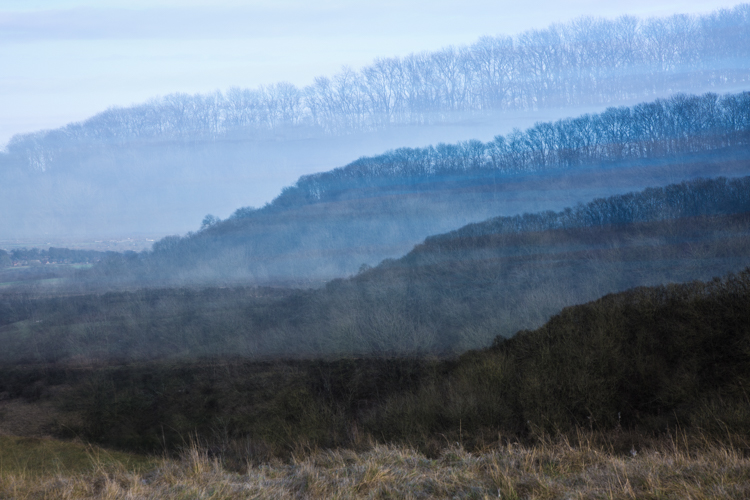
    In camera multiple exposures 09

    To produce this effect, follow these steps:

    1. Set up your camera to take four exposures in Average multiple exposure mode using either aperture or shutter priority.

    2. Set the white balance to 2500ºK to produce a strong blue tint and zoom out for a wide-angle shot. Position the horizon in the top quarter of the viewfinder and take the first photo in the sequence.

    3. Turn on LiveView and zoom in slightly so that you can see the magnified overlay which will become your next nearest line of hills. Pan the camera to a different part of the horizon to create some topographic variety and tilt the camera up to position the next horizon just below the previous one. Set the white balance to 4000ºK to create a less intense blue bias and take the second photo.

    4. Reposition the horizon lower still on the LiveView screen. Zoom in a little more and with the white balance set to 5500ºK, take the third photo.

    5. Finally, zoom in fully, pan the camera again for some foreground interest and position the horizon near the bottom of the screen. Increase the white balance to 7000ºK and take the final photo.

    Focus effects

    Most of the time, we strive to achieve a sharp focus in our pictures, perhaps with some creative background blur. Shooting multiple exposures enables you to combine a pin-sharp image with a soft out-of-focus one of the same subject to smooth out highlight details or make it glow with an unusual soft-focus effect. Here are the steps used to make a highlight-smoothed image:

    1. Set the camera on a tripod and set the multiple-exposure blend mode to Dark.

    2. Take a sharply focused photograph of the subject. In this case, some roses were set against a dark background to give them more definition in the final image.

    In camera multiple exposures 10

    3. Defocus the image (set the lens focus to manual to stop it refocusing on the next shot). In this example, I’ve defocused rather drastically to illustrate the effect.

    In camera multiple exposures 11

    4. Take the second photo.

    Since the highlights are blurred, they become darker. In the Dark blend mode, these darker tones make it to the final image instead of the original highlights. The dark background from the sharper image also takes priority over the fuzzy edges in the defocused image, resulting in a composite image that’s well defined against the dark background but with highlight details smoothed out.

    In camera multiple exposures 12

    For a more traditional soft-focus effect, it’s necessary to preserve the highlight detail and add the highlight blur around it. You can achieve this effect by simply selecting the Bright blending mode to produce a soft glow, as shown here.

    In camera multiple exposures 13

    Action shots

    In the techniques considered so far, the camera has been set up to review the image after each shot in the sequence and if your camera allows, to store each component image to the media card. This is useful to help line up each new image with the previous one.

    But for fast-action shots, this takes too much time to process in-camera. If you want to take a composite photo of someone jumping over a fence, (then apart from arranging for a bull to be located in the same field as the subject) these are the basic steps to follow:

    1. Set the multiple exposure mode such that it doesn’t display the image after each shot or write to the card. On the 5D Mk III, this is achieved by setting the Multiple Exposure menu item to “On:ContShtng” for continuous shooting.

    2. Set the number of exposures according to the speed of the action you’re anticipating (more exposures for faster action) and set the shutter speed and aperture to values that will be able to capture a sequence of sharp images.

    3. Set the camera on a tripod and pre-focus at the distance where the action is to take place. Set the lens focus to manual to ensure the focus doesn’t change during the shoot.

    4. Set the drive mode to continuous high speed burst.

    5. When the action takes place, press and hold the shutter button to ensure that all the individual exposures are taken.

    Blend modes

    If you leave the blend mode set to Average, you’ll get a solid background with a number of ghostly overlays corresponding to the various exposures. This is because the exposure of each image in the sequence is automatically reduced to prevent the accumulating image from becoming too bright, but the results can be rather thin and disappointing, like this shot of a Canon camera swinging against a light background.
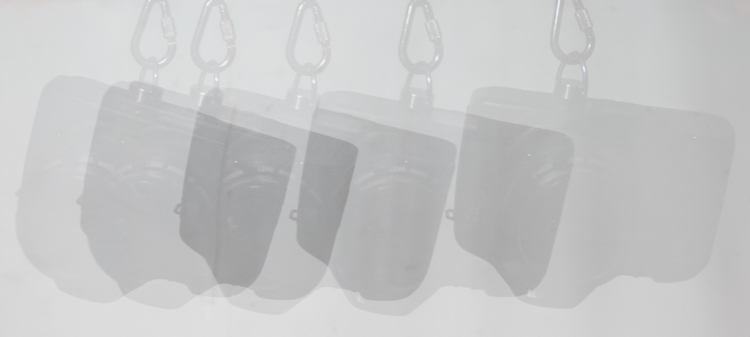
    In camera multiple exposures 14

    If you set the blend mode to Dark when using a light background, the results will be much more defined like this:
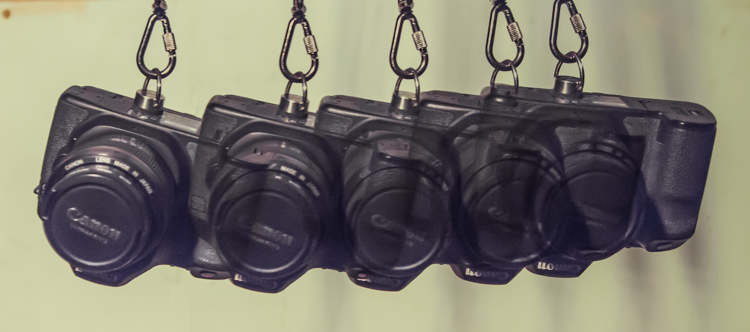
    In camera multiple exposures 15

    It follows that the converse is also true. When you are shooting a lighter colored object moving against a darker background, the best results are obtained by selecting the Light blend mode:
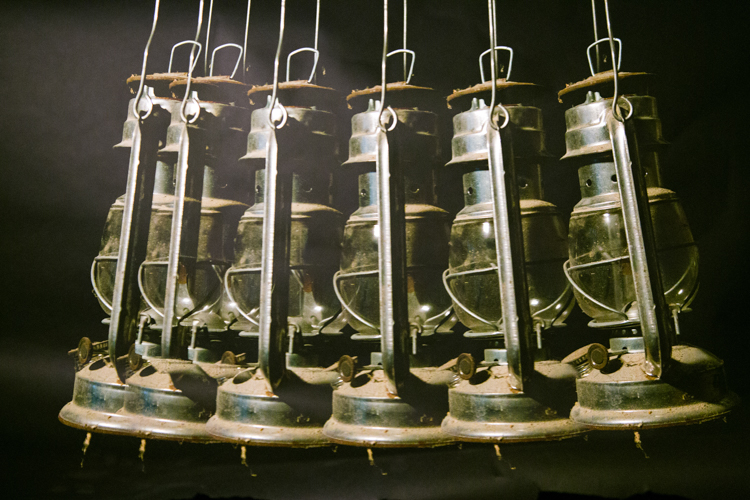
    In camera multiple exposures 16

    Slowing down

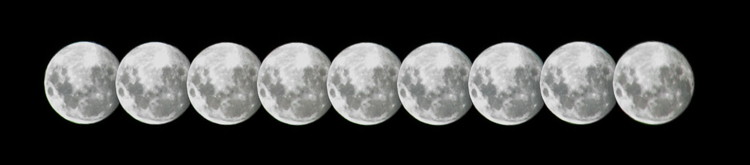
    Not all multiple exposure action shots need to be frantic. This image was made using an EOS 6D in multiple exposure mode set to take nine exposures in the Bright blend mode. One image was taken every two minutes.
    In camera multiple exposures 17

    Look for future image material

    Much more sophisticated multiple exposure techniques can be achieved by using dedicated editing software such as Adobe Photoshop. At the moment, you may only be interested in combining some images in-camera, but bear in mind that you might want to experiment on your computer in the future. Even if you’re not familiar with powerful desktop editing software just yet, it’s always worth getting together the raw material you can process on a rainy day.

    The next time you’re out and about with your camera, think about photographing interesting textures, silhouettes, and fast-action sequences, instead of just taking single photos. You’ll soon be on your way to creating some eye-catching multiple exposure photos.

    googletag.cmd.push(function() {
    tablet_slots.push( googletag.defineSlot( “/1005424/_dPSv4_tab-all-article-bottom_(300×250)”, [300, 250], “pb-ad-78623” ).addService( googletag.pubads() ) ); } );

    googletag.cmd.push(function() {
    mobile_slots.push( googletag.defineSlot( “/1005424/_dPSv4_mob-all-article-bottom_(300×250)”, [300, 250], “pb-ad-78158” ).addService( googletag.pubads() ) ); } );

    The post How to do Multiple Exposures In-Camera by Dave Baxter appeared first on Digital Photography School.

    Digital Photography School

  • Handle with Care: 10 Years of Fragile Glass Boxes Broken by FedEx

    [ By WebUrbanist in Art & Sculpture & Craft. ]

    fedex-box-arts

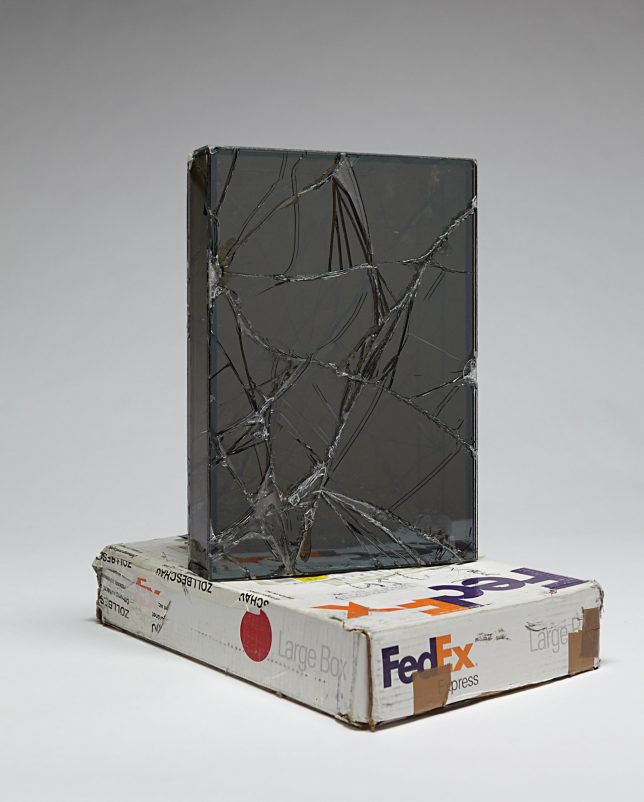
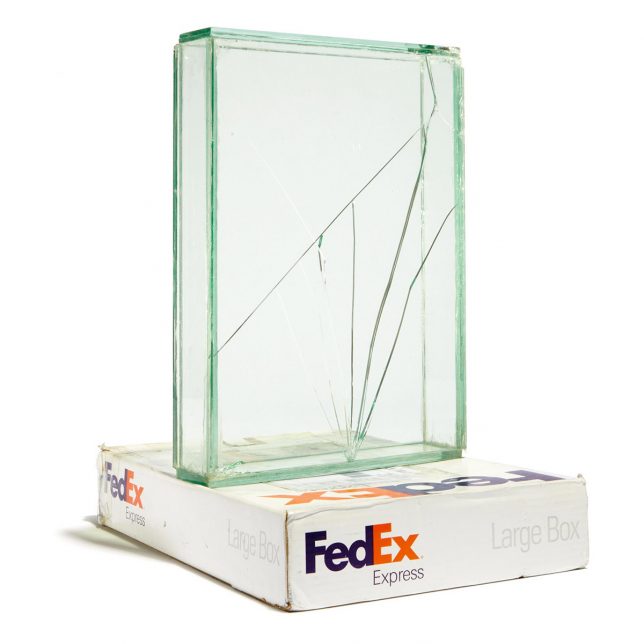
    Packing and shipping artwork is a delicate and costly process, unless your intention is to create new pieces by allowing them to break along the way. Starting in 2005, artist Walead Beshty began a decade-long project, sending works of art to galleries around the world with an important twist: the key element of their creation happened in transit.

    fedex-cubic-assembly

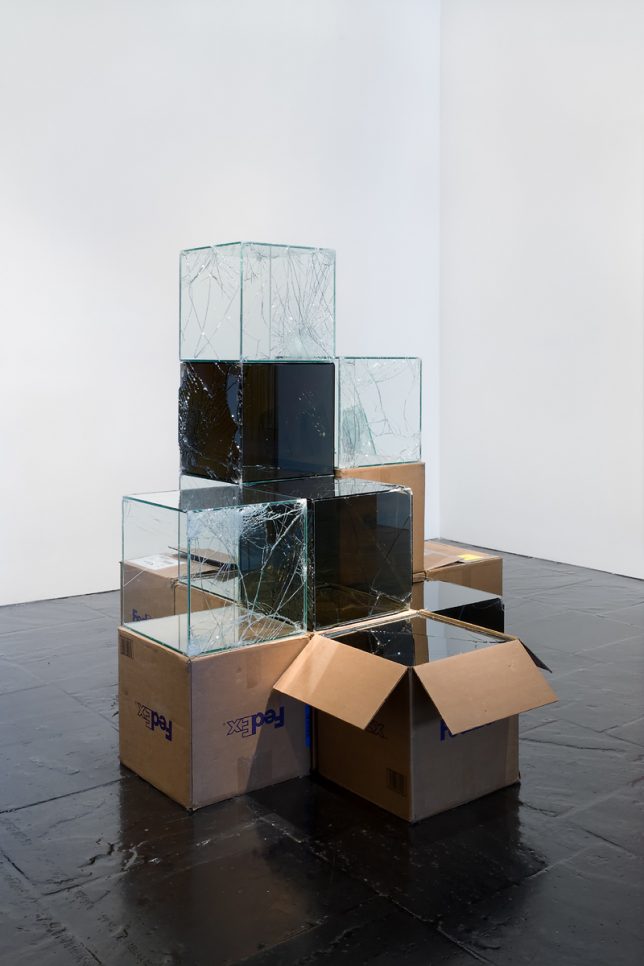
    Beshty would construct glass boxes to fit inside the cardboard shipping containers, matching their interior dimensions (no padding or other protection). Curators then unpacked the finished works, usually cracked but not totally destroyed (being constructed from shatter-proof glass).

    fedex-express-tube-art

    Each piece was given a descriptive name including the date of shipment, tracking number and box dimensions, then put on display (resulting in titles like: FedEx® Large Box ©2005 FEDEX 139751 REV 10/05 SSCC, Priority Overnight, Los Angeles-New York trk#795506878000, November 27-28, 2007). In some cases, the glass contents are reshipped, changing form again and again as they move between exhibitions.

    fedex-pedestals

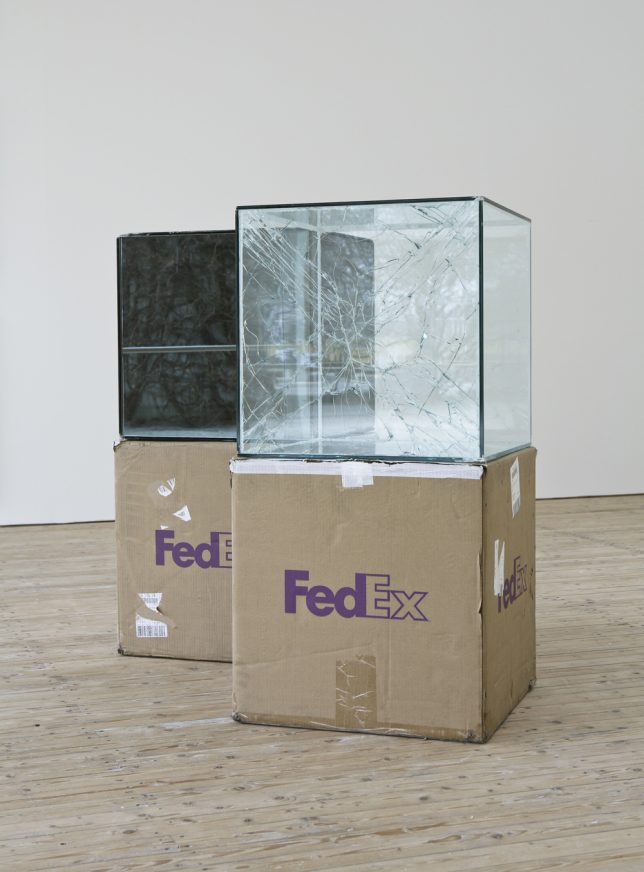
    The net result is a work that tells the story of its own travels, particularly a period between leaving the hands of the artist and being received by a museum or collector. The displays vary, but in some cases the battered boxes become pedestals for the finished sculptural displays.

    not-borken

    But beyond this fixation with the story behind the art, there is another element that drove Beshty: the “perversity of a corporation owning a shape” – as it turns out, FedEx has managed to copyright the dimensions of their box designs.

    fedex-glass-cube

    “They are basically a unit of space owned by a corporation in which to ship objects,” explains the artist. This idea of a company being able to “own” an empty volume of air designed to transport goods seemed surreal, and was another factor motivating this unusual mobile art project.

    Share on Facebook


    [ By WebUrbanist in Art & Sculpture & Craft. ]

    [ WebUrbanist | Archives | Galleries | Privacy | TOS ]


    WebUrbanist

  • 10 DIY Valentine Ideas Featuring Your Photos

    There are a certain three little words everyone wants to hear this Valentine’s Day.

    But aren’t 1,000 words even better?

    Use a photo (they’re worth 1,000 words!) to make a Valentine this year, and you’ll say so much more than “I love you.”
    (…)
    Read the rest of 10 DIY Valentine Ideas Featuring Your Photos (385 words)


    © laurel for Photojojo, 2017. |
    Permalink |
    No comment |
    Add to
    del.icio.us

    Post tags:


    Photojojo

  • Throwback Thursday: Minolta’s prosumer DiMAGE 7

    PMA 2001 was a pretty exciting show for new cameras. It saw the release of the Nikon D1X and D1H, the Fujifilm S1 Pro, Kodak mc3 camera/MP3 player (a camera so bad that I couldn’t complete my review) and the impressive Sony Cyber-shot DSC-S75. Along with those was probably the biggest vaporware product of all-time: the Silicon Film EPS-1. A prototype of a full-frame Pentax DSLR was also shown, but whether that’s also vaporware is up for debate. 

    One of the real highlights was the Minolta DiMAGE 7, a prosumer camera with an unconventional design, a long lens and tons of direct controls. Its 2/3″ 5 Megapixel CCD had the highest resolution of any non-pro camera at the time. All of that came at a price: $ 1500, to be exact.

    The Minolta GT apochromatic lens had a manual zoom ring (please, someone do this again on a long-zoom camera!) and a fly-by-wire focus ring. The maximum aperture range was F2.8-3.5 with an equivalent focal range of 28-200mm.  Notably, the lens had a pair of anomalous dispersion elements, which Minolta claimed improved color accuracy. The D7’s lens was not stabilized.

    The D7’s body was made from a single piece of magnesium alloy, though despite that, DPReview’s Phil Askey was unimpressed with its overall build quality. The camera had a ton of physical controls, including the quick settings dial you can see above. Images were stored on a CompactFlash slot that supported Type II cards, such as the IBM Microdrive.

    The DiMAGE 7 had a status LCD on its top plate, along with a standard-issue 1.8″ LCD (with 112k dots). The D7 also had a tilting EVF, a feature that has become increasingly popular in recent years. The EVF used ‘ferroelectric’ technology and was one of the best out there at the time.

    The camera was generally snappy (though AF could be sluggish at times), image quality was good, and the APO lens kept chromatic aberration to a minimum. One unusual thing about the DiMAGE 7 was that it used its own color space, so users would have to convert it to sRGB manually. Once that was done, colors were much more vivid. One niggle Phil brought up in his review was regarding the D7’s poor battery life: you needed to bring a spare set of batteries as a backup for your other spare set of batteries.

    A year after the DiMAGE 7 arrived, its successor (the 7i) was announced. It had a faster burst rate, more movie options (though it remained at 320 x 240, 15 fps), wireless flash control and a slightly updated design. It was also $ 500 less. A DiMAGE 7Hi later followed, with a snazzy black body, more manual controls and performance enhancements.

    Did you have any of the DiMAGE 7-series cameras? Share your memories in the comments below!

    Read DPReview’s DiMAGE 7 Review

    $ (document).ready(function() { SampleGalleryStripV2({“galleryId”:”8179673960″}) })

    Sample photoSample photoSample photoSample photoSample photo

    Articles: Digital Photography Review (dpreview.com)

  • 9 Mistakes That Can Cause Blurry Photos

    While I agree that sharpness is a bourgeois concept, to become a better photographer you will need to learn how to take sharp shots. The key to capturing these sharp photographs is to learn about all of the pitfalls that can cause blurry photos. Once you know all of the ways you can make a mistake, the only thing between you and sharpness is your hand-eye coordination.

    The 9 Mistakes That Can Cause Blurry Photos

    1. Back focus

    Back focus is the bane of almost every photographer’s existence. This occurs when you think you are autofocusing on your main subject, but the camera misreads the situation and focuses on what is behind them instead, ruining the image. This happens primarily in situations where the focus is placed near an edge between your subject and the background.

    Gowanus, New York Street Photography

    The only way to fix this is to be aware of situations where it could happen. If you are photographing near an edge, be more careful, or lock the focus in a safer area before recomposing. Constantly pay attention to whether you think the focus is accurate or not, and if you have a keeper image, it can’t hurt to capture a couple photographs just to make sure the focus is correct.

    2. Shutter speed too slow for shooting handheld

    The rule of thumb is that your shutter speed must always be ONE divided by the focal length of your lens to offset handheld camera shake. So if you have a wider angle lens such as a 30mm, then you need a slower shutter speed of 1/30th of a second to guarantee sharpness. If you have a telephoto lens such as a 200mm this tip is even more important since you will need a 1/200th of a second to offset the shake in your hands.

    Photographers shooting on aperture priority mode often get caught by this when they do not pay attention to their shutter speed, which can easily dip below the acceptable number.

    The 9 Mistakes That Can Cause Blurry Photos

    Keep in mind that if you have a cropped or micro 4/3rds sensor, you will need to figure out your full-frame equivalent focal length to calculate the minimum shutter speed necessary. For example, if you have a cropped sensor with a factor of 1.5x, and you are using a 200mm lens – the minimum shutter speed required is:  200mm x 1.5 = 300 or 1/300th of a second.

    3. Shutter speed too slow to freeze motion

    To freeze motion you need to use a fast shutter speed. The number that I use is 1/250th of a second for people who are walking. Running and sports can be between 1/500th and 1/1000th depending on the speed, but it all depends on how fast your subject is moving. Make sure to pay closer attention to your shutter speed when photographing something in motion (especially if you shooting in Aperture Priority mode).

    4. Not focusing on the eyes in portrait photography

    The 9 Mistakes That Can Cause Blurry Photos

    If you are photographing someone’s face, particularly with a shallow depth of field and close up, the focus needs to be on the subject’s eyes (unless you decide otherwise due to creative reasons). The nose or the chin is not good enough – it needs to be on the eyes. I can’t tell you how many portraits I ruined early on where the person’s ear was sharper than their eye.

    5. Not raising your ISO high enough

    The 9 Mistakes That Can Cause Blurry Photos

    In situations when you are not trying to capture a shallow depth of field, raising the ISO is often a very good strategy, even up to 1600, 3200, or 6400 depending on your camera and the light. Raising your ISO will allow for a faster shutter speed to offset handheld camera shake and freeze motion, and for a smaller aperture so you can have a larger depth of field. The added grain/noise will usually be very worth the added sharpness in the scene.

    6. Not stopping fully to take a photograph

    The 9 Mistakes That Can Cause Blurry Photos

    This is my biggest pet peeve, and I see it done particularly when people are traveling and overstimulated by their environment. If you are going to take a photograph, make sure to stop yourself. Take a second to frame the photograph before you shoot it. If you capture a photograph while you are in motion, it will be slightly blurry unless you are using an insanely fast shutter speed.

    7. Not cleaning the front of your lens

    Smudges on your lens will reduce the sharpness and can ruin some of your photographs. Carry a lens cloth or use a thin soft t-shirt to clean it.

    8. Missing the focus in dark situations

    The 9 Mistakes That Can Cause Blurry Photos

    Your camera’s autofocus capability, particularly with entry-level cameras, will diminish significantly in darker places. Make sure to pay even more attention to where the camera is locking its focus, and try to look for white, shiny, or contrasty objects to lock the focus on. If all else fails, go to manual focusing.

    Using a lens with a larger aperture (like the 50mm f/1.8) will help, as will using the center most focusing point in your camera. It is a cross-point type and as such is more accurate and can often focus better in lower light situations.

    9. Tripod mistakes

    When using a tripod, you want to make sure to never touch it while a picture is being taken. Even holding it to keep it steady will introduce blur. Use a remote shutter release or set your camera on a 2-second delay before you take the photograph.

    The 9 Mistakes That Can Cause Blurry Photos

    Pay particular attention to your tripod when photographing on a windy day. The wind can also shake the camera and add some blur. To combat this, try to capture your photographs in-between wind gusts and even consider raising your ISO up so that your shutter speed will be faster. It is much easier to take a 10-second exposure in between wind gusts than a 30-second exposure.

    Finally, make sure to turn your image stabilization off when photographing on a tripod. This might not matter with certain newer cameras, but it is always a good habit to get into. The stabilizing system has the potential to add minor vibrations to the camera when it is fully still.

    You may also want to read: 5 Tips to Get Sharp Photos While Using a Tripod.

    Conclusion

    If you follow these nine tips you should be better equipped to avoid getting blurry photos. Do you have any other tips to add? Please post them and any questions you have in the comments section below.

    googletag.cmd.push(function() {
    tablet_slots.push( googletag.defineSlot( “/1005424/_dPSv4_tab-all-article-bottom_(300×250)”, [300, 250], “pb-ad-78623” ).addService( googletag.pubads() ) ); } );

    googletag.cmd.push(function() {
    mobile_slots.push( googletag.defineSlot( “/1005424/_dPSv4_mob-all-article-bottom_(300×250)”, [300, 250], “pb-ad-78158” ).addService( googletag.pubads() ) ); } );

    The post 9 Mistakes That Can Cause Blurry Photos by James Maher appeared first on Digital Photography School.

    Digital Photography School

  • Hands on with Tamron 70-200mm F2.8 and 10-24mm F3.5-4.5 ‘G2’ zooms

    Hands on with Tamron 70-200mm F2.8 and 10-24mm F3.5-4.5 ‘G2’ zooms

    Tamron announced two zoom lens updates at this year’s WPPI show in Las Vegas – the full-frame SP 70-200mm F2.8 Di VC USD G2 and the APS-C format 10-24mm F3.5-4.5 Di II VC HLD. Technically, both are ‘updates’ to older products, but the improvements are fairly significant. This is the 70-200mm F2.8, mounted on a Canon EOS 5D Mark II.

    Hands on with Tamron 70-200mm F2.8 and 10-24mm F3.5-4.5 ‘G2’ zooms

    The ‘G2’ 70-200mm F2.8 now carries the ‘SP’ designation, which Tamron reserves for its highest-end lenses. The lens has been completely redesigned, and the new optical design consists of 23 elements in 17 groups. These include extra low dispersion and low dispersion elements to reduce chromatic aberrations. 

    Hands on with Tamron 70-200mm F2.8 and 10-24mm F3.5-4.5 ‘G2’ zooms

    Mechanically, there have been some changes too. Like Nikon’s new 70-200mm F2.8E, the Tamron 70-200mm F2.8’s zoom ring can be found near the front of the lens, while the focus ring is positioned closer to the camera. Feel free to argue about whether this is a good idea or not in the comments. Minimum focus distance is unequivocally improved, being reduced to 95cm (37.4″) from the previous model’s 130cm (50.7″).

    Hands on with Tamron 70-200mm F2.8 and 10-24mm F3.5-4.5 ‘G2’ zooms

    Autofocus performance has also been improved, thanks (according to Tamron) to the inclusion of two microcomputers and a new AF algorithm. Vibration Compensation (VC) is enhanced too, and can now compensate up to a claimed 5 stops.

    Hands on with Tamron 70-200mm F2.8 and 10-24mm F3.5-4.5 ‘G2’ zooms

    The removable tripod collar can be loosened and removed over the lens mount (as opposed to clamshell designs which can be attached and detached when the lens is mounted to a camera). The Nikon mount version of this lens now offers electronic aperture actuation, which is becoming standard on all newer Nikon lenses and should improve exposure accuracy, especially during high framerate burst shooting. 

    Hands on with Tamron 70-200mm F2.8 and 10-24mm F3.5-4.5 ‘G2’ zooms

    Build quality seems excellent, as we’ve come to expect from all of Tamron’s new generation of ‘SP’ lenses. Dust and moisture seals (including a grommet around the lens mount) help to keep the 70-200mm safe when shooting in tough conditions. The front element is fluorine coated, which should make it easy to quickly clean off water or oily fingerprints. 

    Hands on with Tamron 70-200mm F2.8 and 10-24mm F3.5-4.5 ‘G2’ zooms

    And here’s the 10-24mm F3.5-4.5 Di II VC HLD. Designed for APS-C format DSLRs, this wide-angle zoom covers an equivalent focal length range of 15-36mm (16-38mm equiv on Canon).

    Hands on with Tamron 70-200mm F2.8 and 10-24mm F3.5-4.5 ‘G2’ zooms

    The biggest change in this lens compared to its 2008 predecessor is the addition of Vibration Compensation. Tamron claims 4 stops of compensation, which means that in theory, it should be possible to hand-hold exposures of up to ~1 second at 10mm. Don’t quote us on that, though.

    Hands on with Tamron 70-200mm F2.8 and 10-24mm F3.5-4.5 ‘G2’ zooms

    The 10-24mm zoom features Tamron’s new HLD (High/Low torque modulated Drive) AF motor, for smooth and fast autofocus. We’ve only had a few minutes with a prototype lens, but just anecdotally, focus certainly seems fast. Optically, this new lens differs from its predecessor by offering more elements (16, as opposed to 12) in more groups (11, compared to 9) including one LD (Low Dispersion) lens element, one XLD glass element, one molded glass aspherical element, and one hybrid aspherical lens.

    Hands on with Tamron 70-200mm F2.8 and 10-24mm F3.5-4.5 ‘G2’ zooms

    Again, the 10-24mm is sealed against dust and moisture, and build quality is excellent. Like the 70-200mm F2.8 G2, versions of this lens for the Nikon mount now feature fully electronic aperture actuation, allowing aperture to be changed during live view.

    We’re looking forward to getting our hands on a production sample to see whether the various upgrades have made a significant difference to image quality. 

    The Tamron 70-200mm F2.8 Di VC USD G2 is expected to arrive in March for $ 1299. The Tamron 10-24mm F3.5-4.5 Di II VC HLD is slated for availability this spring for $ 499.

    Articles: Digital Photography Review (dpreview.com)

  • Westcott introduces one-of-a-kind Omega 360, a 15-in-1 reflector

    Photography lighting accessory company Westcott has introduced a new Omega reflector product, the 15-in-1 Omega Reflector 360. Unlike the previous Omega reflector, this model offers 15 different usage scenarios, a world’s first according to Westcott. The reflector features a removable 13in / 33cm center disk, as well as multiple diffusion fabrics (white, silver, sunlight, black and 1-stop), a hanging hook, and a carrying case.

    The Omega Reflector 360 is a 40in / 102cm ring-shaped reflector made with a spring steel riveted frame, pure white and black nylon, and double-laminated reflective cloth. The unit weighs only 2.5lb / 1.1kg, and can be collapsed down to a third of its open size. The 13in inner disk attaches to the reflector ring using Velcro.

    Westcott is offering the Omega Reflector 360 now through its website for $ 130.

    Articles: Digital Photography Review (dpreview.com)

  • Hands-on with Sony 100mm F2.8 STF G Master and FE 85mm F1.8 lenses

    Hands-on with Sony 100mm F2.8 STF G Master and FE 85mm F1.8 lenses

    Sony announced a pair of short telephoto prime lenses at this year’s WPPI show in Las Vegas – the FE 100mm F2.8 STF GM OSS and the FE 85mm F1.8, both intended for use on the company’s a7-series mirrorless interchangeable lens cameras.

    Here’s the FE 100mm F2.8 STF GM OSS, which joins Sony’s growing ‘G Master’ lineup, as one of the company’s flagship lenses. 

    Hands-on with Sony 100mm F2.8 STF G Master and FE 85mm F1.8 lenses

    The 100mm F2.8 has a complex optical design, featuring 14 elements in 10 groups, including ED and aspherical elements. Somewhat unusually, this lens is a ‘Smooth Trans Focus’ (STF) design, which incorporates an APD (apodization) element. The APD element acts as a radial gradient filter, which – in simple terms – improves the quality of out of focus areas, by diffusing bokeh circles. Traditionally, we’ve seen APD elements in lenses specifically aimed at portraiture, for obvious reasons.

    Unlike the Minolta-designed 135mm F2.8 [T4.5] STF lens that Sony still offers for A-mount cameras, the 100mm F2.8 STF is an autofocus lens.

    A ‘macro’ switch enables the lens to be focused down to 0.57 meters (a little under 2 feet), and built-in stabilization should enhance its usefulness when hand-held.

    Hands-on with Sony 100mm F2.8 STF G Master and FE 85mm F1.8 lenses

    Eleven aperture blades means an almost perfectly circular aperture even when the 100mm F2.8 is stopped down. This isn’t the sole determinant of bokeh quality but it goes towards ensuring out-of-focus highlights remain circular.

    Hands-on with Sony 100mm F2.8 STF G Master and FE 85mm F1.8 lenses

    The FE 100mm F2.8 features a ‘manual’ aperture ring. It’s not mechanically linked, and offers an ‘A’ position to transfer aperture control to the camera body. The ring can operate either as a conventional ‘clicked’ dial with third-stop detents, or ‘declicked’ for smooth, stepless operation. For video work, ‘declicking’ allows for much more practical brightness adjustment during shooting. 

    Hands-on with Sony 100mm F2.8 STF G Master and FE 85mm F1.8 lenses

    Like all of Sony’s G Master lenses, the 100mm F2.8 is built to a very high standard, and features dust and moisture sealing. A rubber grommet runs around the circumference of the lens-mount, to help maintain the seal between camera and lens. Despite the complex optical construction and high standard of build, the lens is relatively lightweight, weighing in at 700 g (1.54 lb).

    Hands-on with Sony 100mm F2.8 STF G Master and FE 85mm F1.8 lenses

    Much lighter though, is the new FE 85mm F1.8, a budget short telephoto prime aimed at enthusiast Sony FE shooters who don’t need (or can’t quite justify) the GM 85mm F1.4. This affordable prime weighs in at 371 g (0.82 lb).

    Hands-on with Sony 100mm F2.8 STF G Master and FE 85mm F1.8 lenses

    The optical design of the FE 85mm F1.8 is much simpler in comparison with the 100mm F2.8, comprising 9 elements in 8 groups. The button above the AF/MF switch can be customized and assigned together with functions in the camera body. On most bodies it’s a focus hold control by default, but you could for instance assign it to EyeAF.

    Hands-on with Sony 100mm F2.8 STF G Master and FE 85mm F1.8 lenses

    Sony makes life easy for camera journalists by writing some key spec directly onto the lenses. Here, we can see that the filter ring is 67mm and minimum focus distance is 0.8m (2.6ft). Compared to the 100mm F2.8 this isn’t great (it’s pretty standard for a short tele prime) but it’s fine for mid-length portraiture, of the kind that lenses of this type are ideally suited to.

    In contrast to the more expensive Zeiss Batis 85mm F1.8, the Sony isn’t stabilized. However, unlike the similarly unstabilized 85mm F1.8s from Canon and Nikon, the Sony FE 85mm F1.8 can be used with the second-generation a7 series cameras, which offer in-body stabilization.

    Hands-on with Sony 100mm F2.8 STF G Master and FE 85mm F1.8 lenses

    Despite its lower cost and lack of ‘GM’ designation, the FE 85mm F1.8 is also dust and moisture sealed, although we don’t know whether the amount of sealing is equivalent to Sony’s high-end lenses. Like the FE 100mm F2.8, the 85mm features a rubber grommet around its mount, to help keep dirt and moisture out of the lens throat. 

    Both lenses are expected to ship in March. The FE 100mm F2.8 STF GM OSS will cost $ 1500, while the FE 85mm F1.8 will sell for around $ 600.

    Articles: Digital Photography Review (dpreview.com)

  • Inner Space: 14 Modular All-in-One Living Cubes to Organize Interiors

    [ By SA Rogers in Design & Fixtures & Interiors. ]

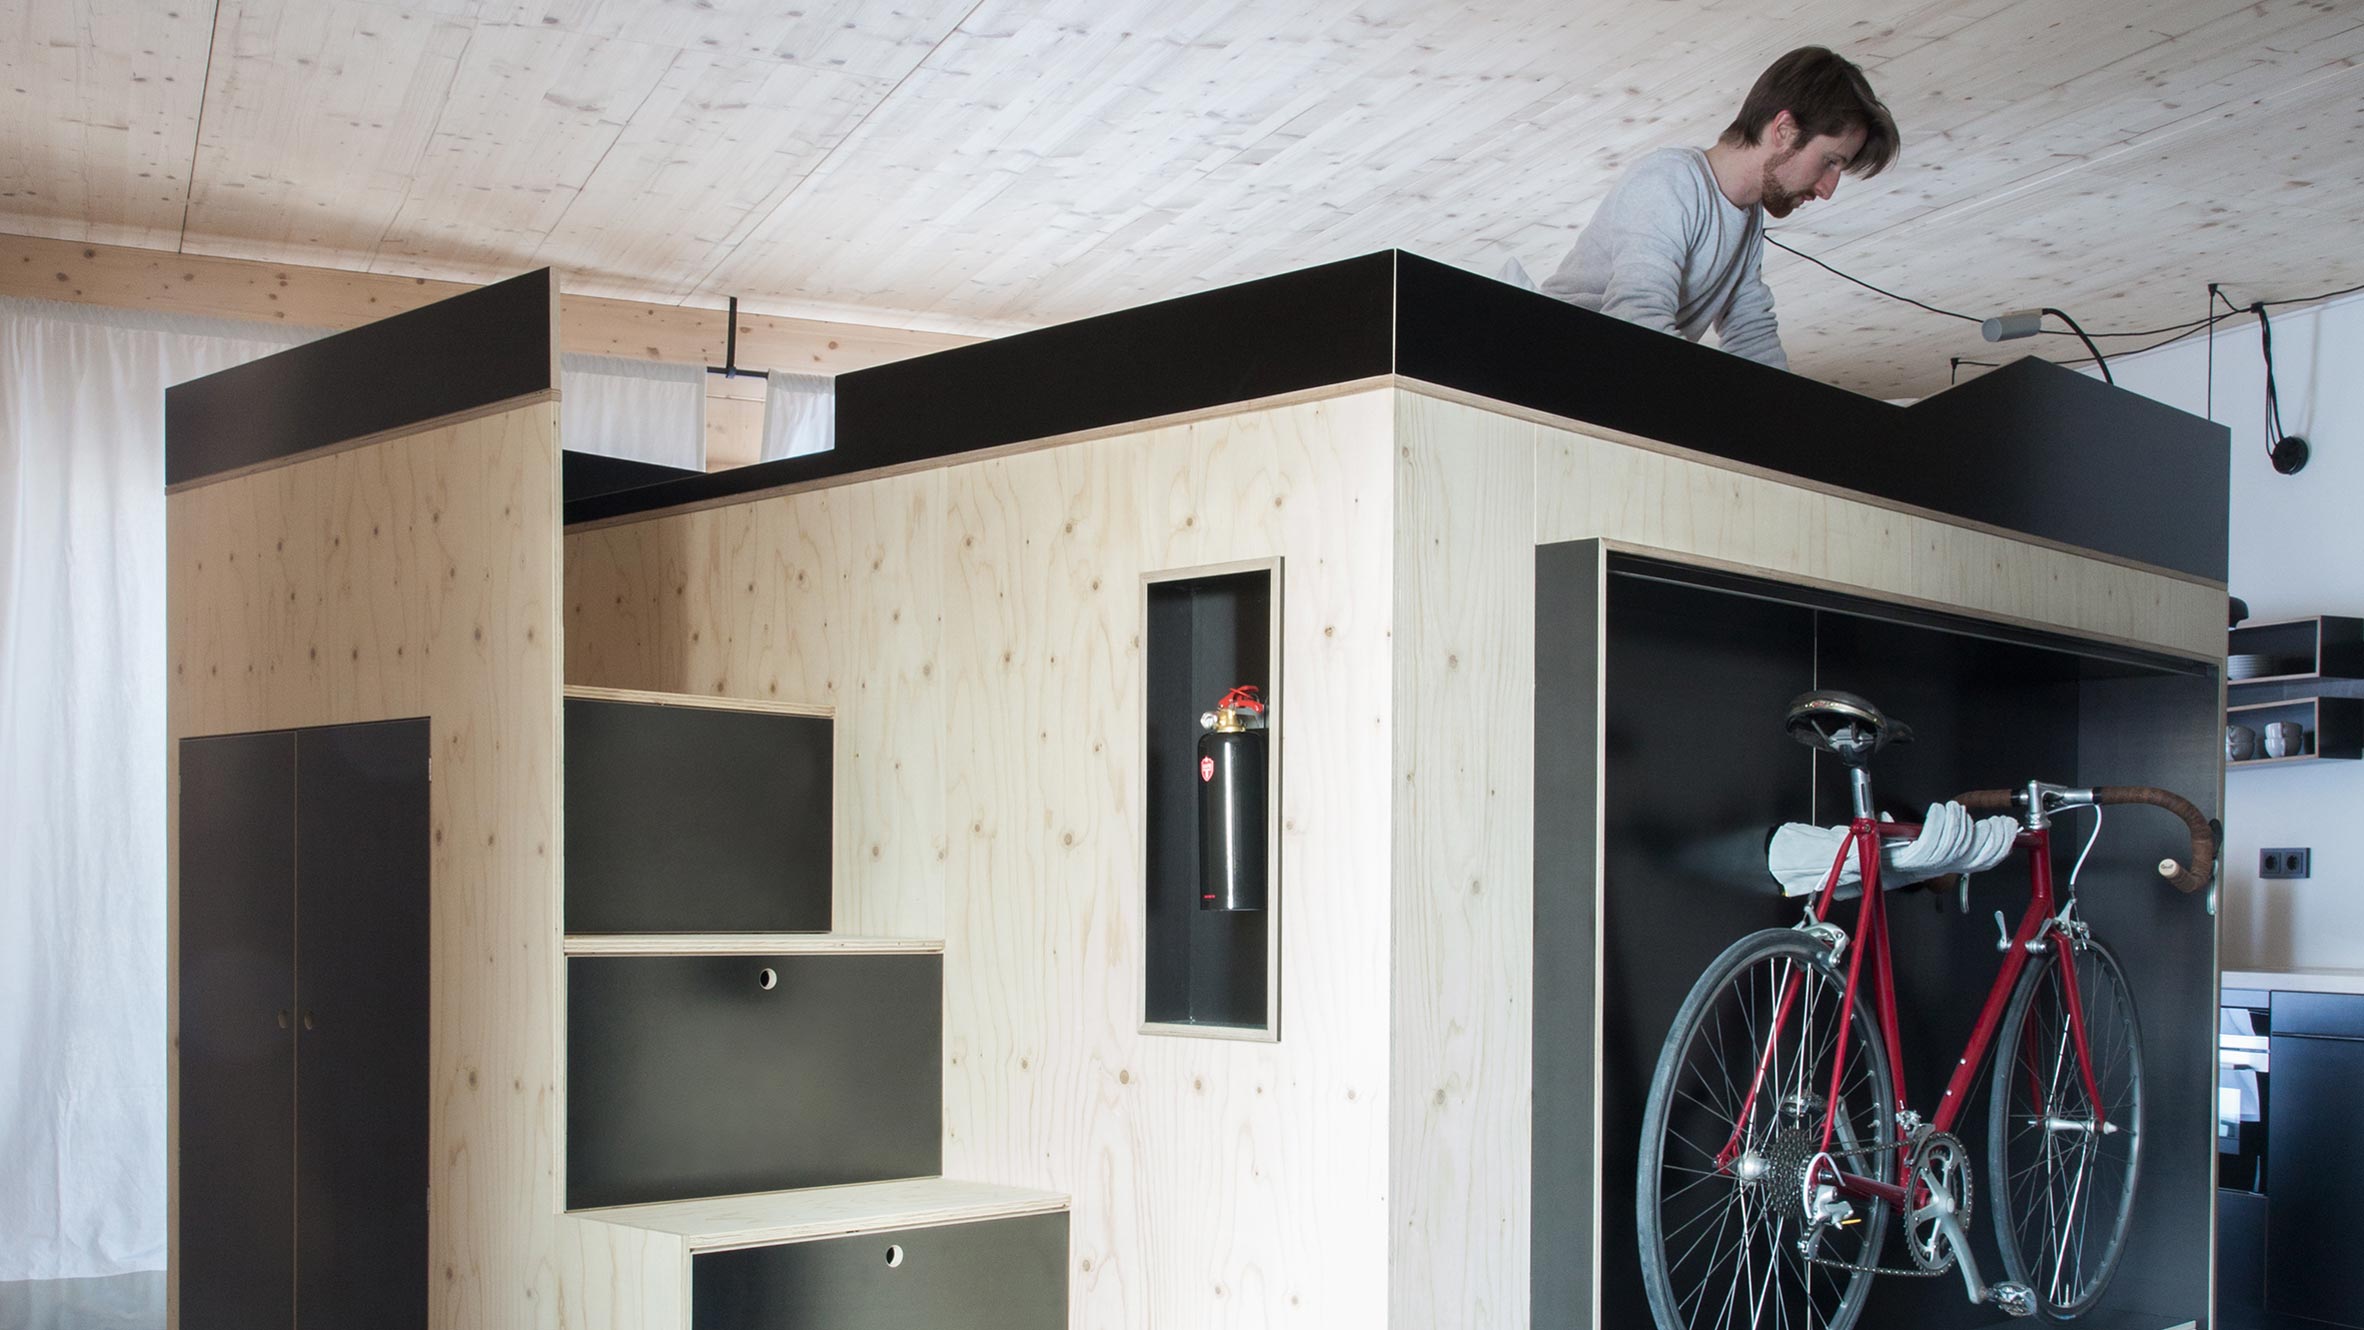
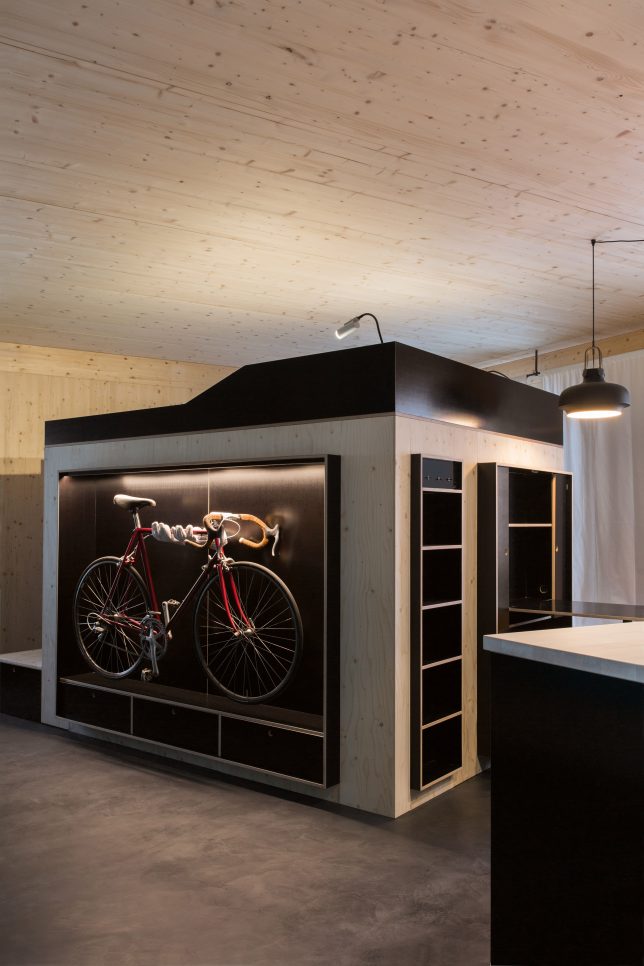
    kammerspiel cube 1

    No shelter is too small or too basic to accommodate a comfortable lifestyle when everything you need, from your bed and kitchen to walk-in closets and mini theaters, is contained in one compact, mobile, modular ‘living unit.’ Often fitted out for plumbing and boasting their own internet and sound systems, these rooms-within-rooms can instantly make warehouses and other typically uninhabitable spaces into cozy apartments or save an astounding amount of space when square footage is severely limited.

    Kammerspiel Unit by Nils Holger Moormann

    kammerspiel cube 2

    kammerspiel cube 3

    Designed for people living in micro apartments, Nils Holger Moormann’s ‘Kammerpsiel’ contains just about everything you need in an apartment, in one compact and highly efficient package. The bed is lofted above the walk-in closet, while important functions are located along the perimeter, like the couch, storage, desk, dining are and even a place to display and store your bike.

    Cubitat by Urban Capital and Luca Nichetto

    cubitat 2

    cubitat 1

    cubitat 3

    Measuring 10 by 10 by 10, the Cubitat by Luca Nichetto and urban Capital is designed to be a ‘plug and play’ living space containing a built-in kitchen, living room, bed, bathroom and closets. The idea is that you could move into virtually any kind of building and instantly make it inhabitable without the need for further renovations.

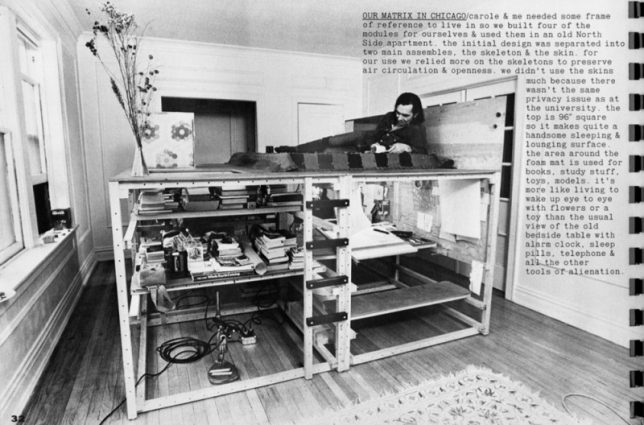
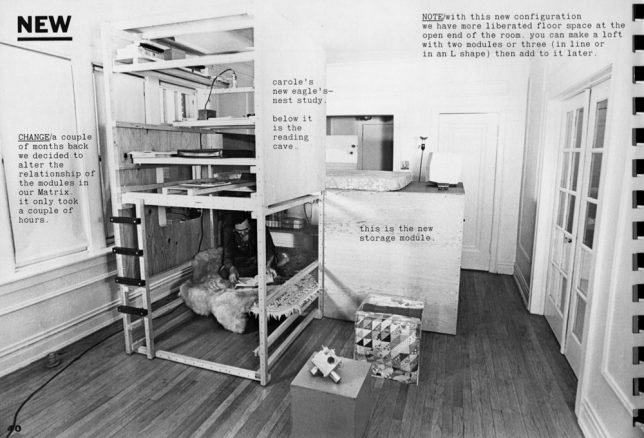
    Living Cube by Ken Isaacs

    ken isaacs living cubes

    ken isaacs living cube 2

    The first designer to come up with this concept seems to have been Ken Isaacs, whose 1974 book ‘How to Build Your Own Living Structures’ still serves as a roadmap to modular room systems today. Isaacs reportedly came up with the idea when he was a poor Chicago student needing a place to live and work. The whole book is downloadable here.

    The Hub by Kraaijvanger Architects

    the hub

    the hub 2

    the hub 3

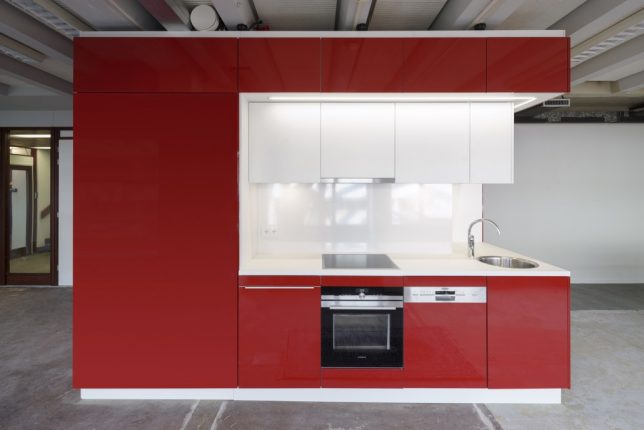
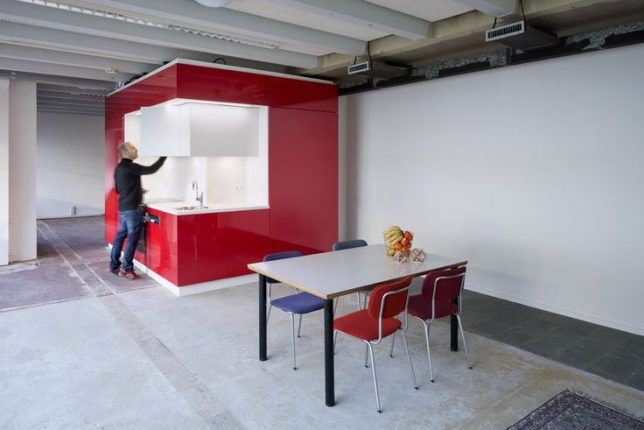
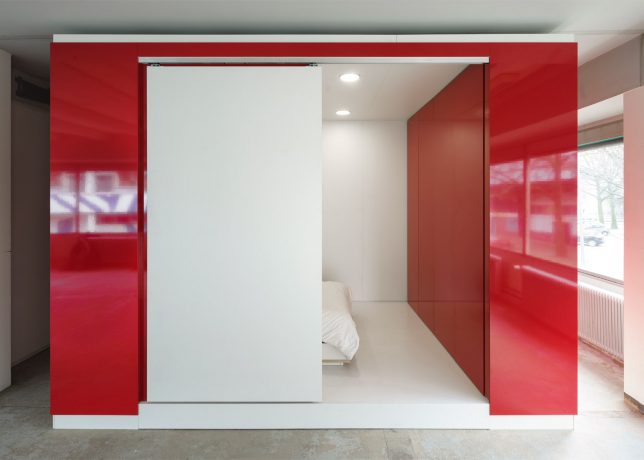
    Another all-in-one apartment system, the Hub by Rotterdam-based architects Kraaijvanger, contains everything you need to make a warehouse a comfortable place to live – even plumbing. It measures just a little more than 160 square feet, hooks up to existing water mains through an access point in the floor, and has its own internet, heating and sound system.

    Wooden Mountain Hotel Suite, Volkshotel

    photo: Arend Loerts

    photo: Arend Loerts

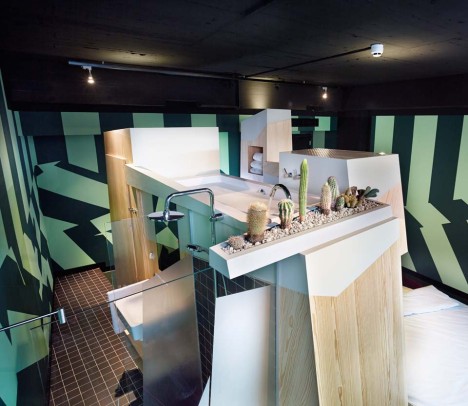
    Not all modular living systems are cubes, though. The Wooden Mountain in the Volkshotel’s Edmund Suite packs just as much function into an amorphous wooden structure, including a wardrobe, double bed, shower, toilet, full-sized soaking tub and even a cactus garden. Photos by Arend Loerts.

    Next Page – Click Below to Read More:
    Inner Space 14 Modular All In One Living Cubes Organize Interiors

    Share on Facebook


    [ By SA Rogers in Design & Fixtures & Interiors. ]

    [ WebUrbanist | Archives | Galleries | Privacy | TOS ]


    WebUrbanist