Blog

  • Everypixel Aesthetics uses neural networks to judge your photographs

    Designers and image editors often have to browse through large numbers of low-quality photographs before they find the stock image that is most suitable for their purposes. Now, a new algorithm has been created to filter images based on their aesthetic value and get rid of the junk before it clogs up your search results. 

    Everypixel uses neural networks for ranking stock images and for this purpose has trained the algorithms to judge the aesthetic value of a stock image in the same way as a human would do.

    Everypixel’s CEO Dmitry Shironosov said: “Designers, editors and experienced stock photographers helped us generate a training dataset with 946,894 positive and negative patterns. We wanted to create a technology that can measure not only aesthetics of stock images, but their commercial potential as well. This is the main difference between our smart filter and other solutions that exist today.”

    The neural network is capable of estimating the visual quality of an image and applies a score to every file which, if working properly, could save many man hours of human image curation. The algorithm is currently in beta stage but you can already test it with your own images on Everypixel. We’re not so sure about the scoring, but the system already looks pretty good at assigning correct keywords. How did your images do? Let us know in the comments.

    Articles: Digital Photography Review (dpreview.com)

  • Leica offers free fix for faulty AF in some S lenses

    Leica has finally announced that it has found a reliable replacement for the defective focus drive units in some of the S lenses from its medium-format system. The faulty units created complete AF failure in affected lenses and it has taken the company some time to find a permanent solution.

    In what Leica describes as an act of ‘goodwill’ users with lenses that have already stopped working can have the AF drive units replaced for free, as can anyone whose unit fails up to five years from the date of purchase. Those whose drive units are still functioning can also have theirs replaced but for a charge of around $ 400 according to Red Dot Forum. That fee includes an extra year of product warranty for all lenses, no matter how old.

    The free replacement service has been on offer since the end of 2015 but until now the company was replacing broken units with the same kind of drive motor. This new announcement relates to a new drive unit that is said to be more reliable.

    Press release

    Official Release from Leica AG

    In some cases, a defect may appear in the autofocus drive unit of Leica S-Lenses. Under certain unfavorable conditions, this may lead to a complete loss of the autofocus function.

    We are pleased to inform you that we have successfully completed the development and stringent quality assurance testing of a new generation of autofocus drive units under practical conditions.

    Leica Camera AG is prepared to offer a free replacement of the autofocus drive unit of S-Lenses affected by this problem within the terms of a goodwill arrangement.

    In light of this, we would like to remind our customers that we can offer free replacement of the autofocus drive unit only for S-Lenses affected by this concrete defect. The goodwill arrangement will remain valid for a period of five years from the date of purchase of the respective S-Lens.

    Preventive replacement of the autofocus drive unit (including a warranty extension of 12 months) may be requested at your own expense.

    Should the defect described above occur in one of your S-Lenses, we recommend that you send it directly to Leica’s Customer Care or the authorized Customer Care department of your country’s Leica subsidiary.

    Contact:
    customer.care@leica-camera.com or Telephone: +49 (0)6441 2080 189.
    http://en.leica-camera.com/Service-Support/Repair-Maintenance

    We consider it our obligation to provide only technically faultless products. We therefore particularly regret that the functions of one of your S-Lenses could have been be impaired by this defect. We hope that the goodwill arrangement we are offering will allow us to resolve this issue as soon as possible and rebuild and maintain the trust you have always placed in the Leica brand and its products.

    Articles: Digital Photography Review (dpreview.com)

  • Mini Living: Breathable Cylindrical Home Slots Into a Tiny Alleyway

    [ By SA Rogers in Architecture & Houses & Residential. ]

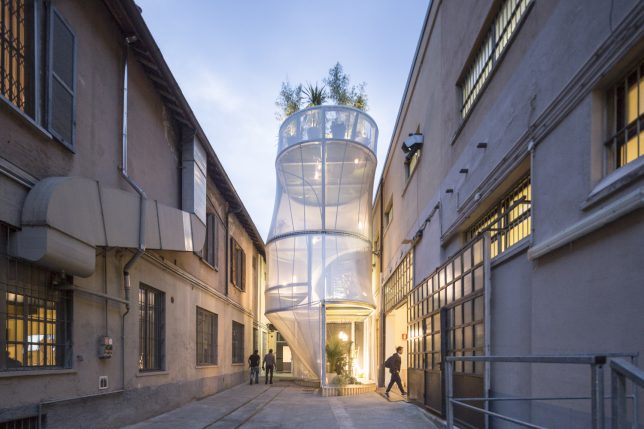
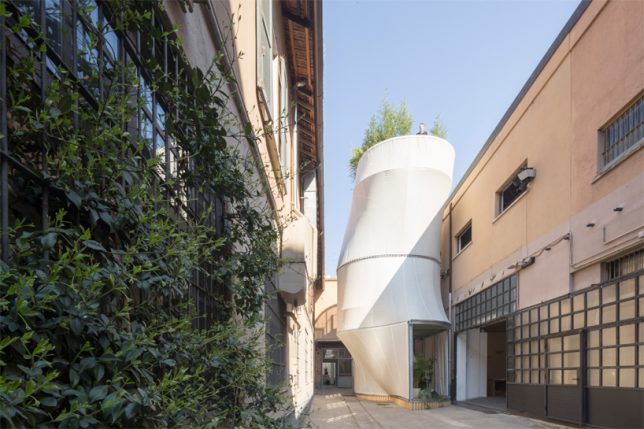
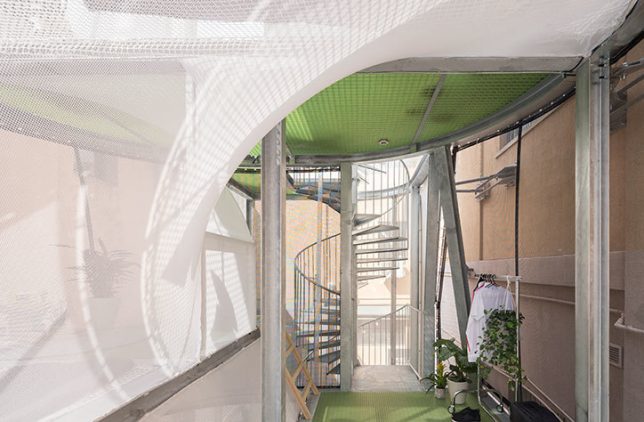
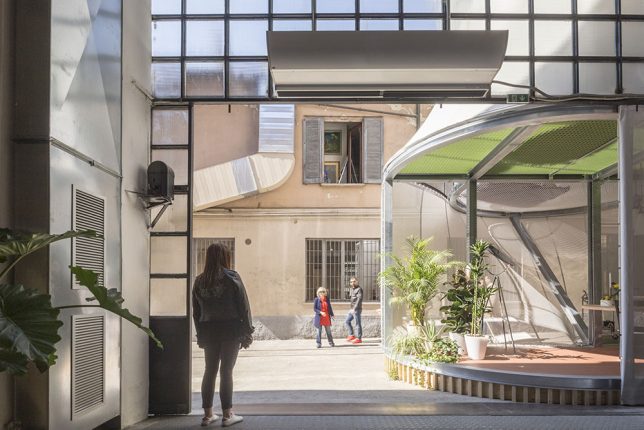
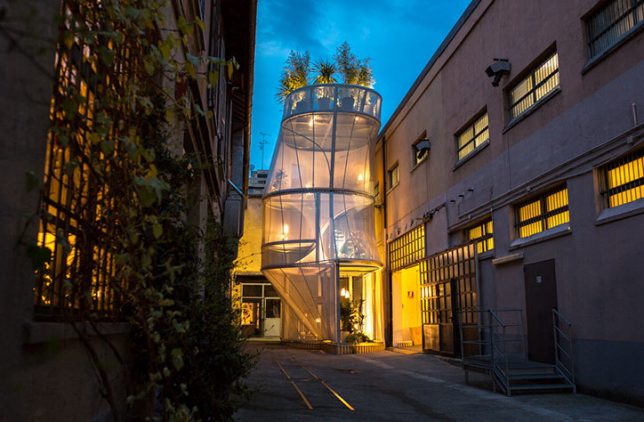
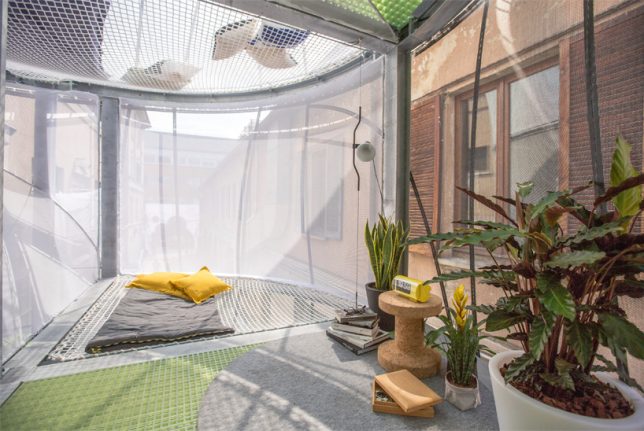
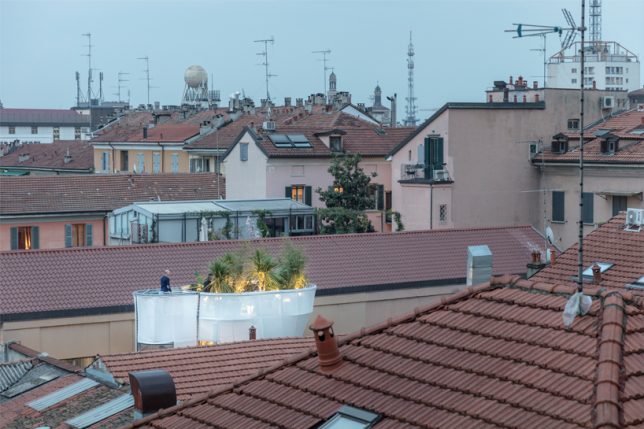
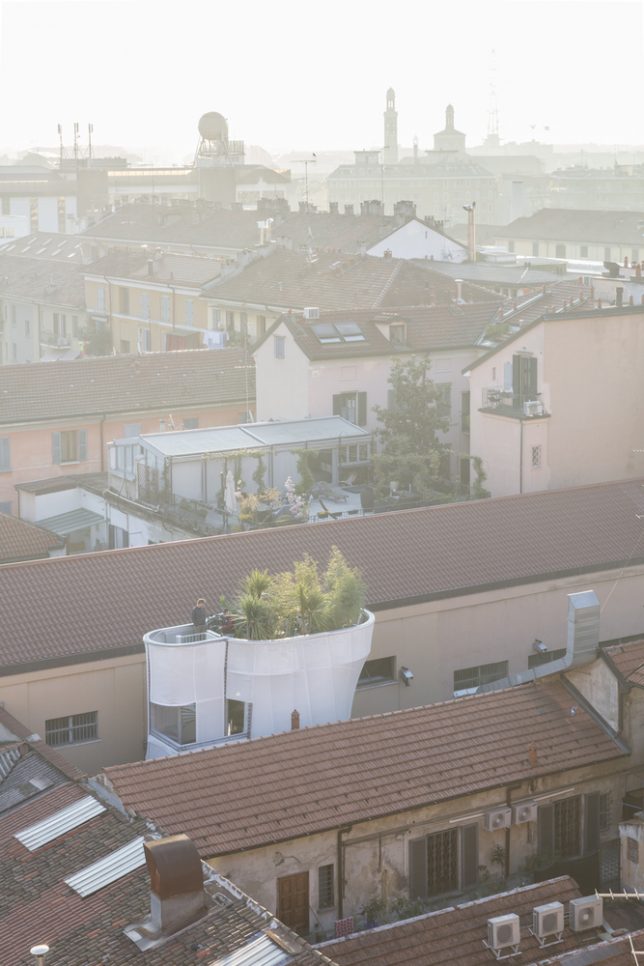
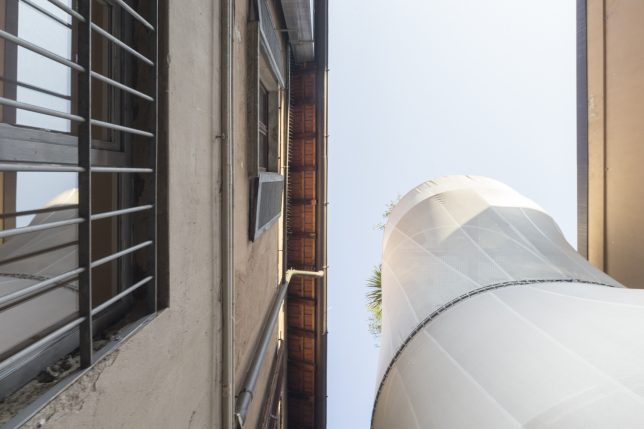
    Extending beyond the existing rooftops like a fast-growing plant, this compact cylindrical home slotted into an unused urban plot in Milan features a breathable ‘skin’ connecting the interiors to the outdoors. Designed by New York-based architects SO-IL for Milan Design Week 2017, the MINI LIVING ‘Breathe’ installation is a response to the growing challenge to maximize available space in cities to comfortably accommodate more residences.

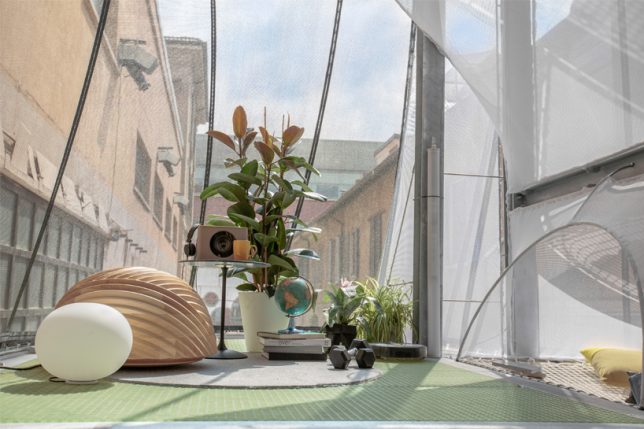
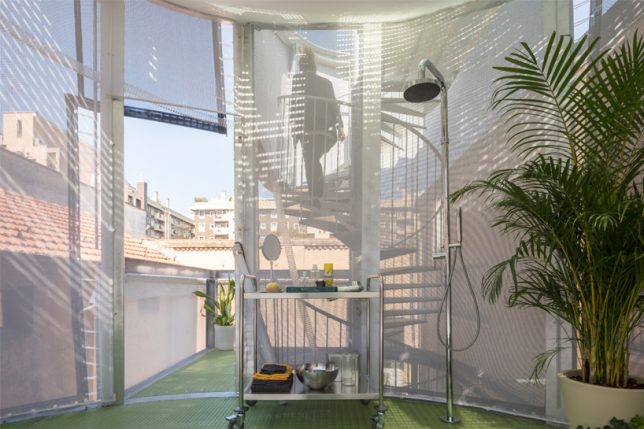
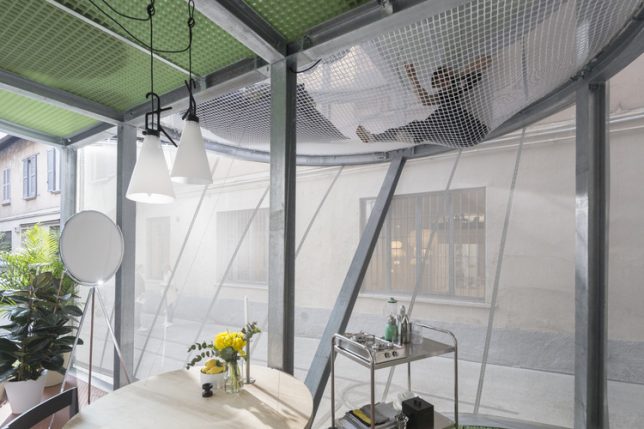
    Built on a modular metal frame covered with a flexible, semi-translucent envelope that reacts organically to the environment, the home was designed for a family of three, and features six rooms and a lush rooftop garden. The ground floor is transparent to encourage interaction with the world outside; climb the spiraling staircase and you’ll find a series of private spaces for relaxation, work and sleeping, all separated by fabric canopies.

    The outer skin lets in filtered sunlight, while the rooftop garden collects rainwater and helps filter the city air. Hammock-like nets suspended from the upper levels look out onto both the city outside and the interiors below. The architects describe the skin as a ‘jacket’ that can be zipped and arranged differently to protect against various external conditions. The more you layer it, the more privacy or water resistance it offers, so inhabitants can customize the needs of different rooms.

    The idea, in part, was to ‘tune’ the interiors to the rhythms of the city, the weather and the sun outside, eliminating the closed-off feel that many homes tend to have. While the tent-like design may not be viable for many urban centers where cold weather, rain and theft might be a problem, it’s an intriguing idea for layering with more solid and secure materials like glass.

    Share on Facebook


    [ By SA Rogers in Architecture & Houses & Residential. ]

    [ WebUrbanist | Archives | Galleries | Privacy | TOS ]


    WebUrbanist

  • MagMod and MagBeam Speedlight Modifiers – Thoughts and Field Test

    MagMod made their debut on the photography scene in 2013 with their original speedlight flash modifiers. Recently, they debuted their latest lighting product for photographers, the MagBeam. Functioning as a fresnel lens for your flash, the MagBeam provides a creative boost by easily adding a blast of color or patterns to your images. This article will highlight some of MagMod’s newest products with a special emphasis on the new MagBeam.

    What is MagMod?

    MagMod (short for MagnetMod) is a company which offers a series of compact, super durable flash modifiers that easily attach to your speedlight flash via ultra strong magnets. The magnets make it super simple to switch out modifiers, or even add color gels without having to pause and interrupt your photo shoot for too long. We first introduced this unique speedlight modifier in a MagMod review awhile back (read it to learn more about the MagGrip, MagGrid, and MagGels).

    Since that initial review, MagMod has expanded its product line to include the products below (the MagSphere, MagSnoot, MagBouce, and MagGrip). All of them have a built-in slot for easily adding color-correcting gels.

    MagMod and MagBeam Speedlight Modifiers - Thoughts and Field Test

    Basic MagMod kit with MagSphere, MagSnoot, MagBouce, MagGrip, and color gels.

    MagSphere

    MagSphere is an omnidirectional modifier that transforms your speedlight’s harsh flash into a bare-bulb light source by increasing the size of your flash over 250%. Use it like a small bounce card or on-camera diffuser.

    The MagSphere

    MagMod and MagBeam Speedlight Modifiers - Thoughts and Field Test

    Food photo, taken with the MagSphere.

    MagBounce

    Made from a large piece of silicone, the MagBounce increases the size of your flash by 300%. It delivers incredibly soft light and is akin to having a small softbox that is super easy to setup.

    MagMod and MagBeam Speedlight Modifiers - Thoughts and Field Test

    A portrait, taken with the MagBounce.

    MagSnoot

    This unique, collapsible snoot can easily be expanded or contracted to deliver a focused beam of light. MagSnoot is perfect for using as a hair light or highlight in product or portrait photography.

    MagMod and MagBeam Speedlight Modifiers - Thoughts and Field Test

    Left to right: MagSnoot (collapsed), MagBounce, MagSphere.

    MagBeam

    If you’ve ever wanted to project a variable spotlight pattern as a photography supplement or background, MagBeam has you covered. This compact system gives you a portable Fresnel spotlight that produces an even light with soft edges and a soft shadow. Since this product is a little more complex that the above-mentioned modifiers, we’ll be doing a deeper dive into its features.

    Two main uses of the MagBeam

    MagBeam can be paired with one of two different lenses that produce very distinct effects. The MagBeam Tele Lens is used to project a focused beam of light, similar to a spotlight. It also gives you two to three extra stops of usable light. This is handy for wildlife photographers to light subjects in the distance. You might also use this Tele Lens to get a tight, concentrated, beam of light for creative portrait or product photography.

    The other option is a MagBeam Wide Lens. Use it in conjunction with custom-made metal disks known as MagMasks and you can create projected light patterns for creative backgrounds or lighting effects. You can also stick MagMod color gels into the MagBeam to add a blast of color.

    MagMod and MagBeam Speedlight Modifiers - Thoughts and Field Test

    MagMod and MagBeam Speedlight Modifiers - Thoughts and Field Test

    Taken with MagBeam, wide fresnel lens, MagMask, and creative color gels.

    What’s in the MagBeam Kit box?

    The MagBeam can be purchased in several different ways, but the most comprehensive way is to order the whole MagBeam Kit. It comes with the MagBeam itself, a tele lens, wide lens, and MagMask Standard Set. You can add on extra MagMasks as accessories, and load up on colored artistic and creative gels as optional accessories.

    MagMod and MagBeam Speedlight Modifiers - Thoughts and Field Test

    What’s in the box of the MagBeam kit.

    MagBeam in Practice

    The MagBeam itself is like a bigger, wider version of the MagSnoot. It’s made of black silicone and can be easily collapsed or extended. When collapsed, the MagBeam is super compact and easy to stick in your camera bag. Using the MagBeam is simple. All you have to do is attach the magnetic end to your speedlight flash via a MagGrip (NOTE: this is not included with the MagBeam you need to buy it separately), then stick a plastic fresnel lens on the wide end.

    MagMod and MagBeam Speedlight Modifiers - Thoughts and Field Test

    Collapsed MagBeam with a patterned MagMask and red color gel attached on one end. The wide fresnel lens is on the other end.

    Speaking of the two Fresnel lenses, they look identical but are actually quite technical, so you must use them correctly to get the right effect. As an example, the wide fresnel lens must be used when the MagBeam is fully collapsed in order to use the included MagMasks (described in detail below) to create a light pattern. It’s not complicated, but you might have to do some experimenting and read some manuals before jumping right in.

    Pratt_MagMod MagBeam Review_001
    Pratt_MagMod MagBeam Review_001
    Pratt_MagMod MagBeam Review_001
    Pratt_MagMod MagBeam Review_001

    Things to Consider

    There is only one possible thing to consider about the MagMod before investing in this system. MagMod magnets that attach to your flash are impressively strong. Once you attach the modifier, it certainly isn’t going to fall off by accident. But sometimes the magnets are a little too strong. I often have to use two hands to carefully pull the MagMod modifiers off to avoid accidentally breaking my flash. I also have to make sure the MagMod units aren’t too close to other magnetic items in my camera bag otherwise, they’ll stick together.

    NOTE: If you have any concerns about using magnets next to your electronic equipment this video should answer your concerns. Items they do say to keep away from magnets include: 

    • Older spinning hard drives
    • Credit cards and bank cards
    • Older televisions
    • Speakers
    • Most importantly, pacemakers!

    In Conclusion

    Overall, I love the MagMod system and always have it in my on-the-go photography kit. In particular, I’ve been using the MagSphere for event photography and the MagBounce as a replacement to my Westcott Rapidbox softbox for food and portrait photography. In both cases, I appreciate how compact the modifiers are. They’re so convenient that I can stash them in my camera bag and simply pull them out whenever I need them.

    While the MagBeam took a little more trial and error to figure out, I’ve also been using the wide fresnel lens and gobos to add a splash of color and creativity to my product and food shots.

    If you shoot a lot with speedlights and are looking for compact and flexible lighting modifiers to add to your kit, I highly recommend the MagMod system!

    The post MagMod and MagBeam Speedlight Modifiers – Thoughts and Field Test by Suzi Pratt appeared first on Digital Photography School.


    Digital Photography School

  • Canon EOS Rebel T7i / EOS 800D Sample Gallery

    We’ve posted an assortment of photos from Canon’s EOS Rebel T7i / 800D, which is the midrange camera in Canon’s lower-end DSLR lineup. The T7i features a 24MP APS-C sensor with Dual Pixel autofocus, fully articulating LCD and snappy DIGIC 7 processor.

    It’s Spring here in Seattle, so expect plenty of flower photos!

    Articles: Digital Photography Review (dpreview.com)

  • 10 Things to Photograph Indoors When There’s Bad Weather Outside

    No matter where in the world you live, there are some seasons that are more conducive to outdoor photography than others. That said, bad weather is no excuse to stop learning about photography! Here are 10 beginning photography exercises to try the next time you’re cooped up indoors due to bad weather. Each exercise includes a subject theme, discussion about the type of skills you’ll practice with that particular subject, as well as some questions and/or ideas to walk through in order for you to really take your understanding to the next level.

    1. Flowers

    bad weather

    Pick up an inexpensive bouquet of flowers the next time you’re at the grocery store and bring it home. Pop the flowers in a vase, and start shooting!

    If you choose a bouquet with a range of colors (including white flowers if possible), you’ll be able to practice properly exposing your images across the dynamic range. Photographing flowers is also a great opportunity to play around with different apertures. If you’re currently shooting in Auto, pop your camera over into Aperture Priority mode, and give things a try. How does changing from f/2.0 to f/5.6 affect the image? Which look do you prefer?

    2. Candles and/or a Fireplace

    bad weather

    There are a few different benefits to spending some time photographing a flame. Whether you’re photographing a collection of candles or a fireplace, try experimenting with different exposure lengths in Shutter Priority mode. Try both long and short exposure times, and also be sure to note how the shutter speed affects the overall exposure of your image. Does a longer shutter time translate to a lighter or a darker overall image? How could you balance out a longer shutter opening without overexposing the entire image?

    Another benefit to photographing flames is that it also makes you consider composition in a way that many subjects do not, especially in terms of reflections. Try putting a mirror or other shiny surface underneath a candle and photographing it. How does the reflection of the flame affect the overall image? Do you want to include the reflection in your image, or do you prefer to crop it out?

    3. Oil and Water

    This simple project packs a big punch!

    bad weather

    Equipment and supplies

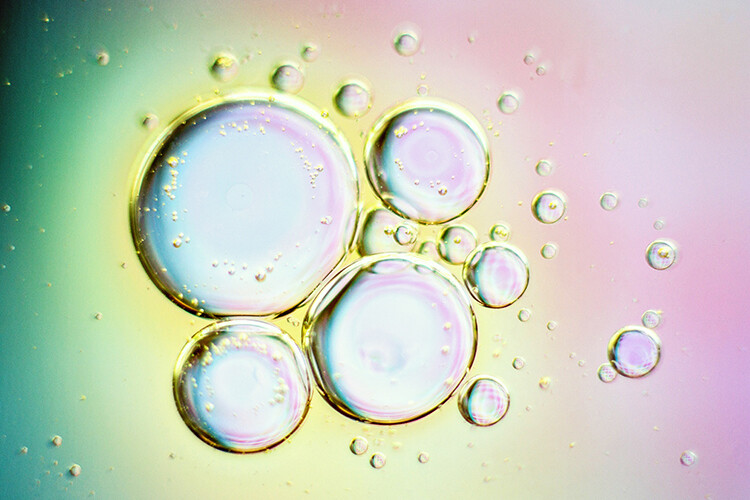
    A macro lens will help you out tremendously here, but if you don’t have one, extension tubes are also a great option. This image was taken with a $ 15 set of extension tubes and a 50mm lens. Basically, all you need is a clear glass dish, two cups, colorful paper, water, and olive oil.

    Setup

    First, take your colorful paper, and set it on a table or counter. Then take your two cups and set them on top of the paper, several inches away from each other. Next, take your glass dish and set it on top of the cups, so that it’s elevated off of the colorful paper. Add a little water, then a little olive oil, and be ready to photograph the bubbles that appear. You may want to spend some time experimenting with photographing the glass dish at differing heights above the paper underneath. Experiment with different types of colorful paper; scrapbook paper is a great resource for this. Try differing amounts of oil and water, and see how those small changes affect your image.

    This is a great opportunity to experiment with macro-like photography in a way that has a pretty big impact. If you are using extension tubes rather than a macro lens, keep in mind that your extension tubes may or may not work with your camera’s autofocus. If you’re having trouble getting the bubbles to come into focus, you may need to focus manually (try the LiveView focus technique).

    4. Food

    bad weather

    Photographing food is a great opportunity to play around with styling, as well as post-processing. It’s my humble opinion that much of your direction in terms of styling and processing will come from the food itself. In this case, I had a rustic loaf of bread that was covered in different seeds. It reminded me of rustic, communal dinners, and so I wrapped it in a tea-towel and stuck it directly on my table (something that happens with fair frequency to loaves that have just come out of the oven around here). I also knew from the get-go that I’d apply a more matte post-processing technique than I usually use in portraits in order to echo the rustic feel of the bread.

    On the other hand, what approach would you take to styling and photographing a sleek cheesecake? Or a classic fruit salad? This short little exercise allows you to push yourself in terms of styling and post-processing, trying out skills and techniques that you may not typically use, as well as spending some time thinking about what types of styling and post-processing would best represent the subject.

    5. Window Silhouettes

    bad weather

    I don’t know about where you live, but around here it can often be rainy and sunny at the same time. If you find yourself faced with similar weather, it’s a great opportunity to try doing a window silhouette.

    Window silhouettes are a great exercise if you are learning photography because it will help you understand how your camera sees light. If your camera is on auto, and you focus directly on your subject, what does your camera try to do? If you move your focal point off of your subject, what does your camera “see” then? Does it affect the focus of your image? What happens if you try out the different metering modes? Does one seem to be more effective than the others in creating a silhouette?

    6. Food Coloring and Water

    bad weather

    Grab a tall glass or vase, fill it with water, and then drop a couple of drops of food coloring into it.

    This is a simple and colorful way to examine both shutter speed and light. Try using a short shutter speed. What does the image look like? Try using a long shutter speed. How is that image different?

    In addition, try shooting with all different types of light. The transparency of the water is a great opportunity to practice capturing backlit images.

    7. Interiors

    bad weather

    You don’t need to have perfectly clean or perfectly decorated rooms in order to gain valuable experience and knowledge from photographing them. Just a pick a room and go for it.

    Experiment with light sources. How does the final image look when you use only natural light? What happens when you use only overhead and/or floor lights with the curtains closed? How does the image look when you use a combination of natural light and accent lighting? Think both in terms of exposure, and also the color balance of the image. Which look do you personally prefer?

    8. Books

    bad weather

    I’m a huge bookworm, so it’s no surprise that I really enjoy photographing books in all sorts of scenarios. I love the texture of the pages, I love the different colored spines. I love basically everything about books!

    Photographing books is also a great way to learn about aperture. Pick any book, and crack it open. Look for a short passage that you enjoy. Set your camera to Aperture Priority mode, and start with the lowest number you’re able to select (f/4 or f/2.8 for example). Set your focal point to your desired passage, and shoot. How much of the image is in focus?

    Now set your aperture to one or two numbers higher than your first setting. How much of the image is in focus this time? Continue shooting up and down your available aperture range, noticing how the image changes as you do so. When might you want to use an image with only a sentence or two in focus? When might you want an image that included more of the book in focus?

    9. Pets

    bad weather pets

    Photographing a pet can often present many of the same challenges that you might experience when photographing children. Certainly, this will depend greatly on the type of animal you have as well as their temperament, but it holds true for our cat.

    She moves quickly and is often not super interested or cooperative when I’m attempting to photograph her. So, trying to photograph our cat is a good opportunity to practice shooting candidly, as well as waiting patiently for just the right moment. Our cat is obviously never going to walk right in front of me, sit, and smile for a photo. Instead, it’s my responsibility to sit on the couch with my camera, waiting patiently. When she decides to come over and investigate, I’ll be waiting and ready. (Read: 9 Tips for Taking Better Photos of Cats) 

    10. Craft Supplies

    bad weather

    Craft supplies are a great tool for photographic exercises because they’re usually a good source of color. Play around with color and group items randomly. Then group similar colors together.

    Next, pick one single item or color to focus on. Photograph it alone, as well as grouped with the others. Is the image stronger with only one color or with many? Do you prefer the colors to be randomized, or grouped together?

    Conclusion

    Have you tried any of these approaches? What other ideas do you have for bad weather, indoor photography exercises that would help beginners understand an element of photography better?

    The post 10 Things to Photograph Indoors When There’s Bad Weather Outside by Meredith Clark appeared first on Digital Photography School.


    Digital Photography School

  • Western Digital launches its first portable SSD

    Western Digital today announced its first portable SSD, adding solid state storage technology to its My Passport line of portable storage devices. The new My Passport SSD comes with a USB Type-C port and with transfer speeds of up to 515 MB/s is WD’s fastest current My Passport model. 

    The My Passport SSD is available with capacities ranging from 256GB to 1TB and its small dimensions make it very portable. It has also been drop tested from a height of 2m / 6.5ft and Western Digital claims it can withstand 1500G of force.

    The Western Digital My Passport SSD comes with a USB-C to USB-C cable and a USB-A adapter in the box. It is available now from Best Buy and from other select retailers starting this quarter. The 256GB model will set you back $ 99.99, the 512GB version is $ 199.99, and for the 1TB variant $ 399.99 have to be invested. More information is available on the Western Digital website.

    Articles: Digital Photography Review (dpreview.com)

  • How to Create Portraits with a Black Background

    Who does not love a crisp, deep black background for a portrait? You can achieve this with the application of just two ideas, and just a little post-processing too.

    black background

    We are talking about a couple of techy things in hopefully, a non-techy way. These two ideas will give you tips for how to make black backgrounds for your portraits.

    No calculations necessary

    As an erstwhile teacher of Mathematics, I should not apologize for numbers, should I? There is quite a lot of Mathematics in photography. However, you may be pleased to know that I think you can achieve everything, without thinking much beyond the basics. If you have a broad understanding of the concepts you will be absolutely fine.

    These techniques are not just applicable to portraits.

    Two Tips for Making Portraits with a Black Background

    Banana palm leaf

    Firstly, please think of stops of light as units. Using the term stop is like saying that something weighs 12 kilograms or that it is 10 miles away. As photographers, we tend to talk about stops and stopping down, but it is just as valid to say units. The thing is not to get bogged down in technicalities, the term stop is only a unit of measure.

    The falling off of the light

    The first concept might be stated simply as light falls off rapidly. Fleshing that out just a little, the amount of light available decreases greatly as you move away from the source of the light. But we are photographers and we do tend to think that a picture is worth a thousand words, so look at the diagram below:

    In the example above, one unit of light arrives at our subject, one meter away from the window. If she moves two meters away, just one-quarter of a unit of light will now be arriving at her. Then, if she moves three meters away from the window, which is the source of light, there will be only one-ninth of a unit of light. The available light disappears very quickly.

    It might suit some if I illustrate the same point with a graph (which, in the past, I have tended to introduce to students as a Mathematical picture).

    Two Tips for Making Portraits with a Black Background

    A mathematical picture tells a story?

    How does that affect the background?

    When trying to achieve a black background, you are interested in the amount of light hitting it. Again, pictures tell the story best. Both these photos had only white balance and very small adjustments to balance exposure done in post-processing.

    Two Tips for Making Portraits with a Black Background

    Not happy

    The image on the left has the background close to the subject, about three feet (one meter) behind her. Then, on the right, the white background is about thirteen feet (four meters) back. You do not need me to do calculations, quote some nice formulae, to prove what is happening above. It is obvious, isn’t it?

    In these photographs, the subject hasn’t moved and the exposure does not change. The background moves farther away, and the amount of light reaching it reduces rapidly. Even when the background is white, rather than the desired black, it gets much darker the greater the distance it is positioned from the light source.

    In the practical world, there may be limits to what you can do, perhaps by the shooting space you have available. However, the message is simple, push the background as far away as possible, and even a seemingly small distance will help make it appear darker.

    Two Tips for Making Portraits with a Black Background

    Young Filipino.

    The background for this photograph was the inside of a room. The teenage Filipino boy was standing in a doorway, getting full benefit from the light source. The background, the far wall of the room, might be only eight feet (just over two meters) away, but it is getting very close to the blackest of blacks, isn’t it?

    Combine this reasonably straightforward science, the way light falls away, with the science of the dynamic range of camera sensors and you will be a long way towards achieving black backgrounds for your portraits.

    Dynamic Range

    Please understand that the numbers I am using here are approximate. They do vary from camera to camera, and from the conclusion given by one source to another. But I am going for using what is easy, what is really needed to make the point so you understand.

    Dynamic range is the measurement from the darkest to the lightest item which can be seen. Your camera has a great deal less dynamic range than the human eye. It is much less capable of seeing into dark and light areas at the same time. That is why, when your camera produces an image with blown out highlights, and blocked up shadows. But your eye can still see the detail of a bird, which sat in bright sunlight, and you can also see the black dog which sat in the darkest shadows. Your camera simply cannot see both at the same time.

    Two Tips for Making Portraits with a Black Background

    Light the subject, not the background

    It might be stating the obvious, but it needs to be said – the first step to getting a black background is to use a black backdrop. Then, if you can get the subject lit more brightly than the background, that will push the background into the underexposed, dark areas, outside the camera’s more limited dynamic range.

    Portrait setup

    If you can throw some extra light onto the subject and have them exposed correctly, in the brighter end of the dynamic range, that will help to send the rest of the image into darkness. The brightly lit subject should be properly exposed. Then there is a good chance that the background will be outside of the part of the dynamic range for which you are exposing. It will, at the very least, be heading towards black.

    Portrait setup

    Here is the setup for a portrait, with only natural light hitting the subject. It is not as obvious in this reduced jpeg as in the original RAW file, but the background is rather muddy, certainly getting towards black, but not the pure black you are looking for. In the original, you can clearly see folds in the cloth.

    Two Tips for Making Portraits with a Black Background

    Still not happy – most people would describe the background as black, but it is not the blackest of blacks, is it?

    Here is the same set up again, with some extra light on the subject.

    black background

    I think the point is illustrated. Is it clear that the background is worthy of the classic description “inky”? Other things could be improved with a few post-processing tweaks. They are presented to show the backgrounds, not as finished portraits, and I’ve only changed color balance and tried to balance the exposures.

    Use the natural law (it is called the Inverse Square Law) which dictates that light falls away rapidly from the source, and the limited dynamic range of your camera and you are a long way to getting a good, deep black, background. Next, you can help complete it further in post-processing.

    Post-processing

    I am referring to Lightroom here, but there are equivalent tools in other software.

    Two Tips for Making Portraits with a Black Background

    A bit of a muddy RAW file.

    This is the photograph from the top of the article, as it first appeared out of the camera. You do not want to hear my excuses, but I did not get it as completely right in-camera as I would normally like to do. However, it turns out that is lucky, as it makes a good example for a post-processing in this case. Because the file was produced with the application of the ideas talked about above, it is very workable.

    Most of the way to being processed in just a very few steps.

    Edit intuitively

    One of the best bits of advice I ever received, which I sometimes manage to apply, is to ignore the numbers. You should move those sliders till they give the look which you think suits the picture. Look at the photo and see what happens, take a breath, pause for a moment, and make some judgment as to whether it gives you what you’re looking for. Often this involves going a bit too far (whether it be with sharpening, or exposure, shadows, or whatever) and then dialing back a little.

    I managed to do just that with this image. It makes me smile when I look at it now, a few weeks later, as I am slightly surprised at how far I went. I adjusted the color balance, brushed some negative clarity onto mom’s face, rotated the image counter-clockwise a little, but the exposure was not adjusted at all as the faces looked fine to me. Then I started pushing the sliders around.

    Push the limits

    It was a bit of a surprise to see just how far towards the negative I had moved the contrast slider. This may be counter-intuitive when you are trying to make parts of the image darker, but because we have got a reasonably well-produced file, we can get away with reducing the contrast, and this has the pleasing effect of lightening the hair and separating it from the background.

    Of most significance to this exercise is the shadows slider which was moved in the opposite direction to usual. It was moved to the negative, to block up the shadows, rather than to the right, to try to pull out some detail.

    I was also a bit surprised at how far I moved the black point. It seemed to work, though. As I say, I think it often works best if you move the sliders, without too much concern for the numbers they represent. Try to look at each photograph individually, rather than apply some sort of formula.

    The final image had only a couple more, tiny, detailed tweaks.

    black background

    Extra Tips

    A couple of other things.

    How you decide to throw some light onto the subject of the photograph is for other articles. There are many other great Digital Photography School articles, which offer a huge number of suggestions for illuminating subjects. I thought you should know that I do very much like my LEDs, as I like being able to see the light. I also use reflectors. However, the first source of light in all the photographs above is natural light. You do not necessarily need a fancy kit.

    In respect of the black cloth, most advice will suggest that you buy black velvet. I am sure it does an excellent job of absorbing light from all directions. But it is expensive, and with careful technique, it seems to me that another dark, non-shiny cloth can do the job too. One thing to pay a little attention to is making sure that you stretch the background cloth out a little. Try to get it as smooth and even as possible, with no creases, as any imperfections are liable to catch the light.

    black background

    Conclusion

    The power of photography! 25 years after the event, I paid a bit of homage to Annie Leibowitz’s photograph of Demi Moore. I was not trying to replicate it as such, just nod in the photograph’s direction. But I did manage to get a really black background, didn’t I? Please give it a go yourself.

    Share your images and questions in the comments below. I’m happy to try to help further if I can.

    The post How to Create Portraits with a Black Background by Richard Messsenger appeared first on Digital Photography School.


    Digital Photography School

  • 7 Questions to Help You Choose the Best Lens For Any Situation

    Cameras and lenses – in fact, anything to do with gear – often spark heated debates amongst photographers. People love to discuss which lenses you should buy or use in certain situations. So I thought it would be interesting to look at a few common scenarios and ask what lenses you might want to use in each of them.

    This article presents a slightly different perspective on the debate as the answers are led by creative considerations rather than the subject. Lens choice is often subjective – what might be right for one photographer may be the wrong choice for another.

    7 Questions to Help You Choose the Best Lens For Any Situation

    Here, then, are some of the things you need to think about when it comes to using lenses. Of course, in practice, your choice is limited by the lenses you actually own. But these considerations are still useful and will help you decide which lenses to buy in the future.

    Question 1: Do you want to get the entire scene in focus?

    The types of photos where you might want to get the entire scene in focus include; landscape photography, street photography, travel photography, and environmental portraiture.

    The depth of field, and how much of it you want in your image, is a creative decision. Once you’ve made that decision you can think about the type of lens you need to use to make that happen.

    Wide-angle lenses are the natural choice when you need a wide (lots of it) depth of field. There are exceptions – for instance, you could focus on something distant with a telephoto lens and use a small aperture to make sure everything included in the frame is sharp.

    But generally speaking, wide-angles are the best choice. They also help you include more of the scene. Some photographers refer to wide-angle lenses as story telling lenses. The phrase describes the way you can use the lens to include enough detail to give your subject context. This approach is most likely to be used in character portraits and documentary work.

    7 Questions to Help You Choose the Best Lens For Any Situation

    I used an 18mm wide-angle lens to capture the entire scene in sharp focus.

    7 Questions to Help You Choose the Best Lens For Any Situation

    I used a 40mm lens (strictly speaking, not a super wide-angle lens on a full-frame camera, but wider than normal) to capture this scene and the rock formation the group is standing in front of. The environment is as important in this image as the musicians so I wanted it to be sharp.

    Question 2: Do you want bokeh?

    If you don’t want to get the entire scene in focus then perhaps you intend to go the other way and use bokeh in the composition. You can do this with zoom lenses, but you really need a telephoto lens with a maximum aperture of f/2.8 or f/4.

    It’s easier to create bokeh with a prime lens as the aperture is much wider. You also have more choice. You can use the widest aperture of the lens for an ultra-shallow depth of field, or a more conservative setting such as f/2.8 that still blurs the background but gets more of the subject in sharp focus.

    If bokeh is your thing, then use a prime lens.

    7 Questions to Help You Choose the Best Lens For Any Situation

    I made this photo with an 85mm lens set to f/1.8. The wide aperture completely blurred the background behind the lizard.

    Question 3: How close can you get to your subject?

    Telephotos are essential for most types of wildlife and sports photography. They even have their uses in street photography. If there is something that stops you getting physically close to your subject, then you need a telephoto lens to bridge that distance.

    7 Questions to Help You Choose the Best Lens For Any Situation

    I needed a telephoto lens to photograph this jousting tournament. It wasn’t possible to get any closer to the horse and rider.

    Question 4: How much weight do you want to carry?

    Sometimes it’s tempting to take an array of lenses on a shoot to cover every conceivable situation. The problem is that carrying too much weight can tire you out. This makes it harder to concentrate, be creative, and make good photos.

    It’s something to think about whether you’re taking photos on the street for a few hours, or going away for a month. Think carefully about the number of lenses you need to take with you while traveling. The more you have, the heavier your camera bag gets and the more difficult it is to carry everything around. Two or three lenses is often all you need.

    Of course, there are times when you do need a lot of lenses. This applies to pros in particular who take lots of gear on commercial shoots to cover every eventuality. That’s part of the job and has to be done. But you’re unlikely to need a lot of gear for personal work.

    7 Questions to Help You Choose the Best Lens For Any Situation

    I used my 35mm lens for over 73% of the photos taken during a recent trip to China (the above photo is one of them). Another 10% were taken with my 18mm lens. I could easily have got by with just these two lenses.

    Question 5: Will you be shooting in low light without a tripod?

    If you are, then you need to consider how you are going to cope with the low light levels. Luckily, the high ISO performance of many cameras is so good that you can probably push ISO to 6400 or beyond (depending on your camera). This will help greatly when it comes to achieving shutter speeds fast enough to take sharp photos.

    But there are a couple of other things you should think about. A prime lens will also help by letting you shoot at wide apertures if you need to.

    7 Questions to Help You Choose the Best Lens For Any Situation

    The Leica Noctilux M 50mm lens has a wide aperture of f/0.95 – over five stops faster than the f/5.6 aperture of a typical kit lens. It may be too expensive for most (over $ 10,000 if you’re curious) but it will certainly help you work in low light.

    A lens with some sort of image stabilizer (if your camera doesn’t have it built into the body) will also help you take sharper images at slower shutter speeds. But remember that while the background will be sharp at slower shutter speeds, anything that moves (such as people) won’t be.

    Wide-angle lenses also help as they require slower shutter speeds for safe hand-holding (using the one of the focal length rule). For example, when I used my 56mm lens (on an APS-C camera) I prefer to set the shutter speed to at least 1/250 second to guarantee sharpness. But with my 18mm wide-angle I can comfortably use 1/60 second – a two stop difference.

    Question 6: Will you be shooting portraits?

    If so, then you need to decide what approach to take. One option is to use a telephoto lens. The flatter perspective flatters your model and helps isolate her from the background.

    Another is to use a wide-angle lens for a documentary style. But don’t get too close with this type of lens unless you deliberately want to distort your model’s face.

    7 Questions to Help You Choose the Best Lens For Any Situation

    I used an 85mm lens to isolate the model from the background in this portrait.

    Question 7: Do you need a specialty lens?

    There are times when you may need a specialty lens such as a macro, a fisheye lens, a tilt-shift lens or a Lensbaby. If you know that you may need a specialized optic for a shoot (or an accessory like extension tubes), then you can plan in advance to buy, borrow, or rent one if you don’t own it already.

    7 Questions to Help You Choose the Best Lens For Any Situation

    I made this photo with an 85mm lens fitted with an extension tube to get close to the small flowers.

    Conclusion

    Rather than tell you that a certain lens is required for a specific situation, I prefer to take a different approach and get you to think about what you want to achieve before the shoot, so you can select the most appropriate lens. It’s a different, less prescriptive approach to lens selection that puts creative considerations in front of technical ones.

    What lenses do you like to use and why? Please let us know in the comments – I’m curious to see your answers.


    Andrew is the author of the ebook Mastering Lenses: A Photographer’s Guide to Creating Beautiful Photos With Any Lens.

    The post 7 Questions to Help You Choose the Best Lens For Any Situation by Andrew S. Gibson appeared first on Digital Photography School.


    Digital Photography School

  • Meyer-Optik announces move into high-end lenses for mirrorless cameras with Primagon 24

    German lens manufacturer Meyer-Optik-Gorlitz has announced it is to produce a new premium 24mm lens that will come in mounts for all mirrorless camera systems. The Primagon 24 will feature a maximum aperture of F2.8 and will use seven elements including one aspheric. The company says that although the lens uses the Primagon name, it isn’t a recreation of a vintage model, but is a completely new design.
    Meyer goes to some length to emphasize that the lens will be made in Germany from German-constructed parts and glass. It is said to be the first in a new series aimed at compact system users that will incorporate popular focal lengths and which aims at ‘best in class’ optical performance.

    The information released by the company makes no mention of autofocus, so we should assume this will be another manual lens like the brand’s other optics. Meyer says it will allow 30 photographers the chance to buy the lens at half price before general production begins so they can give feedback to the lens designers so it can be improved or altered before it goes on general sale. We’d guess that those 30 will also receive a full-production model once they become available. To qualify for this opportunity, you need to already be a backer of the company’s Kickstarter campaign for the Trioplan 35+ lens, announced earlier.

    The Primagon 24 is expected to be ready at the beginning of 2018, and will retail for approximately €4.999/$ 5,499 . For more information visit the Meyer-Optik-Gorlitz website.

    Press release

    Meyer-Optik Takes Quantum Leap with New High-End Primagon 24mm

    Lens Maker Seeking Photographers to ‘Test’ Lens

    With its latest Kickstarter campaign for the historic Trioplan 35+ successfully underway, Meyer-Optik is moving boldly into the world of high-end, high-performance photography with the newest addition to its lineup of hand-crafted lenses. Today, Meyer-Optik announced the new Primagon 24 mm f 2.8, which will have 7 individual lenses, including one aspheric lens. It will have an 84 degree angle of view and will impress with its image quality, compact size and weight of less than 9 ounces (about 250g). It will be available for practically all mirrorless cameras.

    Even though the Primagon takes its name from a famous line of historic Meyer-Optik lenses, the new Primagon 24 is a totally new development. With this lens, the young Meyer-Optik brand strives for the highest image quality achievable, sticking to its guiding principles and guarantees that practically all mechanical and optical parts are made in Germany and the lenses will also be hand assembled as individual pieces of craftsmanship in Germany. With the help of world famous development engineers, the Meyer-Optik team has been working on the Primagon 24 for more than a year. The team is also working on several more lenses for this new series to cover the full range of the most needed and popular focal lengths. These lenses are all developed under the premise that they will provide the best in class high-performance tools for the ambitious photographer.

    Even though photographers will have to wait until early 2018 to get a look at this lens, as one of the rewards for backing its Kickstarter for the Trioplan 35+, Meyer-Optik is allowing 30 photographers to receive the Primagon 24 for about half of its expected retail cost. The photographers will get a chance to use the lens months before it heads into serial production, allowing them to give Meyer-Optik feedback that the company could use to make final refinements. The “testing” promotion is a unique way to reward a select group of Kickstarter backers, while giving the company a chance to receive some feedback on how the lens performs in the “real world.”

    “Even though the new lenses are already high performers, we want to listen and learn from the feedback of our users,” said Dr. Stefan Immes, founder of the revived Meyer-Optik brand.

    “The opinion of the Kickstarter community and the direct feedback is very important to us. We are striving for technical perfection with this lens – but we will not make any compromises when it comes to the creative part of photography. Personality and character are the most important features of all our lenses. This starts right at the beginning of the development process and we are proud that some of the best engineers nationally and internationally are supporting our team in Goerlitz,” Immes said.

    The new lens will be available at the beginning of 2018. It will be available for all mirrorless mounts. The suggested retail price will be 4.999,–€/5,499 US $ .

    Articles: Digital Photography Review (dpreview.com)