Blog

  • Boxfish 360 Micro Four Thirds camera can record 5K spherical videos

    Boxfish Research has announced the launch of its new Boxfish 360, a 5K camera equipped with multiple Panasonic Micro Four Thirds sensors able to capture spherical photos and video. This model is designed for professional use and, according to the company, offers better clarity and colors than similar 360-degree rigs created using multiple action cameras. The camera made its debut at CES 2017.

    Boxfish 360 features 185-degree circular fisheye lenses with an F1.8 maximum aperture, an internal battery offering up to 90 minutes of recording per charge and both 1/4-inch and 3/8-inch mounting threads. Though the cameras are secured within a fully waterproof housing, Boxfish Research says the battery and microSD cards (up to six supported) can be quickly accessed without using tools via a hatch.

    Videos are recorded using the H.264 codec with a bit rate of 60Mbps, and still images are saved as JPGs and DNGs. Boxfish 360 offers up to a claimed 10 stops of dynamic range and records camera metrics such as water temperature, water depth and camera orientation during recording. Operators are given various elements of control, such as underwater start/stop and manual aperture control. 

    Boxfish released the camera for preorder last week and will begin shipping the next batch starting May 15. Interested buyers can pay a 50% balance of the $ 14,990 USD price tag to secure a unit, or buyers can pay outright ahead of the shipment date. A total of ten cameras are offered in the next batch, some of which are already reserved.

    Via: Boxfish Research

    Articles: Digital Photography Review (dpreview.com)

  • Fujifilm GFX 50S vs Pentax 645Z vs Hasselblad X1D

    Introduction

    Digital medium format has previously been the preserve of professional photographic businesses; commercial concerns that can justify investing tens of thousands of dollars on a tool that offers resolution and image quality beyond the capabilities of consumer cameras (or, at least, those that can recoup the rental cost). These cameras have tended to have 54 x 40mm (essentially the 645 film format) or 44 x 33mm sensors: considerably larger than used in most DSLRs. They were also often based on CCD chips, since these are easier to build on large scales and small volumes and cleaner at low ISO settings (though with limited dynamic range by modern standards).

    As full frame cameras have become less expensive, this has put pressure on the medium format market (particularly the smaller variant) but has also seen CMOS technology filter upwards. This has led to us starting to see the first sub-$ 10,000 medium format cameras. The first that a dedicated hobbyist might consider, as well as wider professional market. So, as we keep being asked, which of these cameras is best?

    Introducing the contenders

    Launched in 2014 The Pentax 645Z is the granddaddy of ‘affordable’ medium format. After the somewhat fitful development process of the original 645D, the arrival of CMOS technology brought us the 645Z. Built around a 50MP 44 x 33mm sensor, Ricoh’s flagship camera is a traditional DSLR that uses the film-era Pentax 645 mount (hence the name).

    In the past year, two more companies with medium format heritage have unveiled their offerings, but both Hasselblad and Fujifilm have developed new, mirrorless systems, rather than continuing to use existing mounts. This allows the Fujifilm G and Hasselblad XCD systems to be considerably smaller with shorter flange back distances (especially in the case of the Hasselblad, which does without a focal plane shutter). As well as size, this shorter flange back distance leaves room to adapt all sorts of legacy lenses: something both Hasselblad and Fujifilm have promised.

    We’ve been shooting all three cameras and look at their relative strengths in different shooting scenarios.

    Landscape work – durability

    One of the most obvious requirements a camera needs for landscape work is a degree of solidity and resilience. As soon as you venture into the outdoors, rain, mud and grit will all feature to a varying degrees.

    All three of these cameras claim they’ve been designed with a degree of environmental sealing in mind. None of the makers go so far as to guarantee any degree of weather resistance, so it’s difficult to know whether any one of these has the edge over the others. There are plenty of stories of Pentax DSLRs surviving all sorts of mistreatment, so we’d be fairly confident of the 645Z. The Fujifilm and Hasselblad it’s harder to know about, especially since both are likely to sell in small enough quantities that it’ll always be difficult to establish a statistically useful sample size.

    Landscape work – battery life

    Another major factor is battery life. While it’s quite possible to carry spare batteries with you, it’s not always practical to change them in ‘the field.’ It can also be frustrating to find yourself having to worry about battery level or change batteries with any kind of frequency, especially as temperatures and battery endurance drop.

    The 645Z’s DSLR design gives it a huge advantage in terms of battery life. Given you can do most of your shot setup using the optical viewfinder, the camera gains a rating of around 650 shots per charge from its relatively small battery.

    The Fujifilm GFX 50S requires either the rear screen or electronic viewfinder to be active making it rather harder on batteries. Thankfully its powerpack is a lot larger, helping it to a still respectable 400 shot per charge rating. The Hasselblad does least well in this respect, despite it doing everything it can to reduce usage by constantly shutting its screen off. A smaller battery than the Fujifilm and no percentage indicators mean it’s the camera I’d most worry about staying alive, when I was working off the grid.

    Operability (with gloves)

    Another aspect of outdoor photography is that it can often be cold: even in summer the best light tends to come first thing in the morning and last thing in the evening, which means colder temperatures in many parts of the world.

    Of the three, the Pentax is the camera I’d be happiest operating with gloves. It has rather a lot of external controls but all of them are large and distinct enough to be controlled with gloves. The Hasselblad does well in this respect, too. Most of its buttons and dials are distinct enough to be operated without error and there’s no function that necessitates touchscreen control.

    This leaves Fujifilm’s buttons and dials are rather small and recessed but most of its principle controls are easily operated with gloves. That said, its AF point joystick is arguably the easiest way to control AF positioning with gloves on.

    Camera stability

    To get anything like the full resolution out of these cameras, you need to keep them very steady. We’ve experienced shutter shock across a range of cameras, as higher resolutions highlight the issue in ever greater detail.

    Large, high-resolution sensors are especially susceptible, since the mass of the shutter and mirror mechanisms involved are so much greater and the ability to discern any shake is that much higher. The Pentax offers a mirror-up mode, which allows you to separate the lifting of the mirror and the firing of the shutter, to allow the mirror-induced shake to dissipate (which is reassuring, given the camera’s Ikea-furniture-being demolished mirror/shutter sound). It also has a mounting point to allow stable attachment to a tripod when in the portrait orientation, however, there’s no electronic first curtain mode to reduce the impact of shake from the shutter mechanism.

    The other two cameras don’t even have mirrors to worry about. On top of this, the Fujifilm offers an electronic first curtain shutter mode, which means there’s minimal mechanical movement before the exposure starts, all but eliminating the risk of shock and with no delay added before the exposure. The Hasselblad takes this philosophy one step further and contains no moving parts in the camera body at all (though there’s still a little clunk and click as the leaf shutter moves).

    Landscape work – Portability

    Perhaps the greatest benefit for a landscape shooter, though, is any reduction in size and weight makes it easier to work with. For all the internet bravado about real men liking big cameras, most people having to lug cameras around on a regular basis will appreciate any saving in size and weight they can get.

    The Hasselblad X1D has a clear edge, here. It’s significantly smaller and lighter than any of the other three cameras here (it’s lighter than most full frame DSLRs). The Fujifilm is only 200g (7oz) heavier but will demand a considerably larger bag to house it. Then there’s the Pentax 645Z, which is the size of some European cars and, at over twice the weight of the X1D, is about as easy to carry. I jest, of course, but I’d still rather not have to hike any great distance with one.

    Studio shooting – Operability

    In the studio, there’s more time to consider and control your shot. The Pentax’s proliferation of direct controls takes sometime to learn, but there’s a control for just about everything. The Fujifilm, meanwhile, takes after its mass market cameras: direct controls for most exposure settings, then a handful of customizable buttons and an editable Q menu for less frequently changed options.

    The Hasselblad takes the most minimalist approach and consequently is the one most likely to require menu diving. It does give direct access to most core features though.

    All three cameras can be shot, tethered, using proprietary software or third-party plugins for Adobe Lightroom (the 645Z was the first camera we encountered to include a USB 3.0 connection, for exactly this reason). Sadly we’ve not yet had time to try them all.

    Studio shooting – AF Coverage

    Even if studio work buys you a little more time, as soon as you include a human subject, that luxury is curtailed. The more complex the pose, the less time you have to shoot it (assuming you’re not a monster to your models). Similarly, that perfect facial expression that you’ve been coaxing out of your subject with increasingly fanciful invocations won’t necessarily last long enough to switch to live view, zoom in and manually focus.

    What you need is the best possible AF coverage which give you high precision AF points exactly where you need them. Fujifilm does best in this respect, giving you choice of 117 or 425 very fine AF points across a large area of the image. The Hasselblad offers slightly less coverage and only 35 fairly large AF regions.

    The Pentax’s phase-detection system offers a very limited coverage, but in live view allows the AF point to be moved into 2030 positions. This number of positions means it takes a fraction longer to position your AF point but does mean you can be certain of being able to put the AF point where you need it.

    Outdoor fashion – Flash Sync

    Outdoor fashion photography combines many of the demands we’ve already seen in landscape and studio shooting and then adds some more. Away from the controllable lighting of the studio, a battle between ambient and supplemental lighting breaks out, a battle for which the best weapon is a high flash sync speed.

    Sure, there are High-speed sync options that provide lighting for a long enough duration that they can successfully light an image even though the camera’s shutter is never fully open, but these tend to require increasing amounts of power the higher your shutter speed, which is not what you need if you’re using large lights and heavy battery packs. You may even hit the limits of your strobe’s capability, which then limits your ability to separately control ambient and subject exposure. Also, the relatively slow-moving shutters implied by the low sync speeds on the Pentax and Fujifilm cameras may limit even the use of some high-speed sync systems.

    The Hasselblad is the clear winner here. Its use of leaf shutters gives greater control over ambient light without having to resort to specialist lighting and keeps control of light sources decoupled. Fujifilm has built an adapter for using its own leaf-shutter Fujinon HC lenses, allowing flash sync at up to 1/800th but there are no native leaf shutter lenses on the roadmap at present. Until that time, the Fujifilm tops out at 1/125 sec, as does the Pentax, unless you can find one of the seemingly discontinued 75 or 135mm ‘LS’ leaf shutter lenses. Meanwhile the X1D can sync all the way up to 1/2000th of a second, giving it a huge advantage.

    Outdoor fashion – AF Coverage and speed

    For outdoor posed shooting the urgency of capturing the moment before your model gets frustrated is made more pressing by the additional risk of pneumonia and heatstroke. Or just the need to catch the light you want, if you’re shooting away from the poles or equator. This requires fairly swift AF.

    Try to shoot dynamic poses, dancing or action of any sort and the need for fast autofocus becomes even greater. None of these cameras excel in this respect. The Hasselblad is currently the slowest of the three, with the Fujifilm being the fastest in CDAF mode. The Pentax is a little quicker when shot through the viewfinder using its dedicated phase-detection AF system, but this limits you to focus right near the center of the image and introduces a degree of inaccuracy and imprecision that tends to come from secondary-sensor AF. And we wouldn’t exactly recommend focus and recompose in studio setups or with the shallow depth of field and high resolutions of medium format.

    Realistically, none of these cameras is great for fast-moving subjects, so the photographer’s technique for working around these limitations is likely to play just as much of a role.

    The value of good JPEG/TIFFs

    More so than the general consumer audience, the audience for this camera is likely to shoot Raw, with the expectation that post-processing will be a necessary part of the final image. So why would we care whether these cameras produce good JPEGs?

    For a start, a good-looking JPEG can be used as a proof for a client almost as soon as you shoot the image.

    Clearly this puts the Pentax and Fujifilm at an advantage, since these companies have more experience of delivering customer-friendly JPEGs. However, the GFX benefits further, not only gaining the results of Fujifilm’s well respected color response in JPEG, but also in that some of that color knowledge has been shared with Adobe, meaning that Film Simulation-simulating profiles are available in Lightroom and Camera Raw, to provide an attractive starting point for processing.

    Ultimately, the nearer you can get to your preferred output at the start of the process, the less post-processing you need to do; saving time and money on every image.

    Conclusion

    Overall, there’s little to choose between these cameras in terms of image quality. This should be no great surprise, given they’re likely to be using sensors with similar underpinnings (even if we know some of the specifics of microlenses and ISO behavior differ).

    However, that isn’t to say there’s nothing to choose between them. The Pentax 645Z is the immediate choice for anyone who wants an optical viewfinder. It also exists as part of a longer-established system (though some of the lenses significantly pre-date the demands of high-res digital).

    Somewhat perversely, for all its compactness, the Hasselblad X1D’s high sync speeds and limited battery life mean it’s more comfortable in the studio whereas, despite its greater bulk, the Fujifilm’s faster focus and greater endurance makes it more tempting for shooting in further flung locations.

    Some of these strengths and weaknesses aren’t set in stone: leaf shutter lenses for the Fujifilm would greatly extend its capability, as would updated firmware for the X1D (especially if it could result in faster and easier to position autofocus).

    Overall, of course, these are exotic pieces of kit. Expensive and, despite the mass-market roots of the Pentax and Fujifilm’s interfaces, still more complex to shoot with than the full frame cameras that are probably the more sensible choice for most mortals, given the price, image quality and performance offered. That said, there’s something special about shooting with such daunting machines, and something that’s likely to immediately impress most would-be clients.

    Articles: Digital Photography Review (dpreview.com)

  • Artistically Enabled: 18 Weird & Creative Handicapped Parking Signs

    [ By Steve in Culture & History & Travel. ]

    Blue & white Handicapped Parking signs and stencils are one of urban life’s most familiar icons… and then there are those that have been creatively hacked.

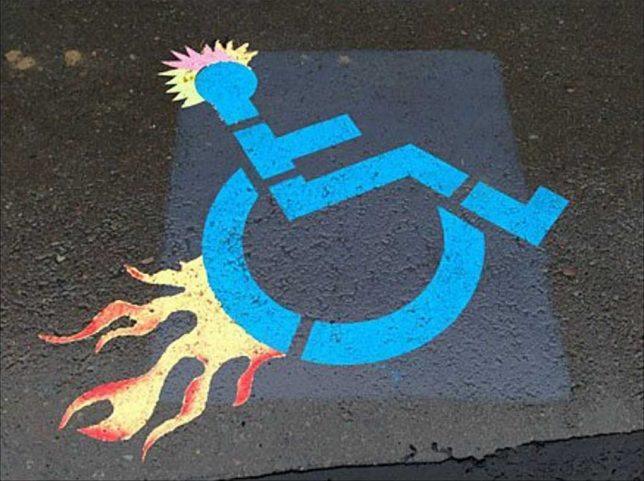
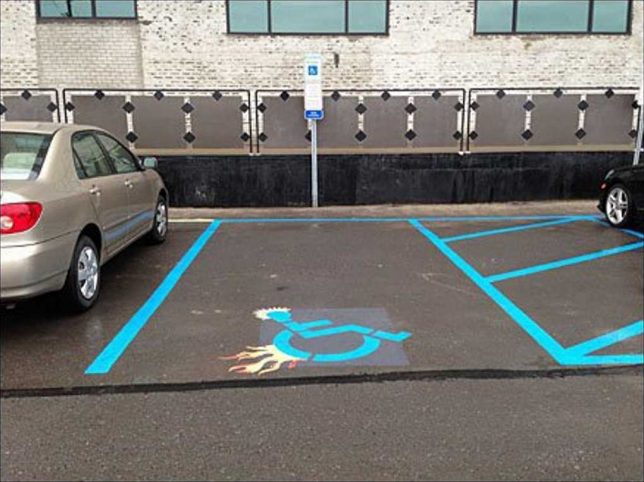
    There’s a fine line between amusement and mean-spiritedness but when it comes to visual imagery, outrage is often in the eye of the beholder. With that in mind, this edgy, spiky, flame-enhanced “Parking Space Designator” (is that what the kids are calling them these days?) follows the road blazed by TV’s Dr House and his boss flame-graphic walking cane. You’ll find the stencil on steroids above outside a Retail Boutique Incubator, tentatively attributed to Sean McDougal of Disfunctional Design Store.

    Interlocked & Loaded

    Those interlocking driveway paving stones can be fit together in any number of patterns, including a reasonable, recognizable facsimile of the accessible parking graphic. Flickr user zwei zwei (zwei1189) captured this image on February 5th of 2015.

    Brazil Not

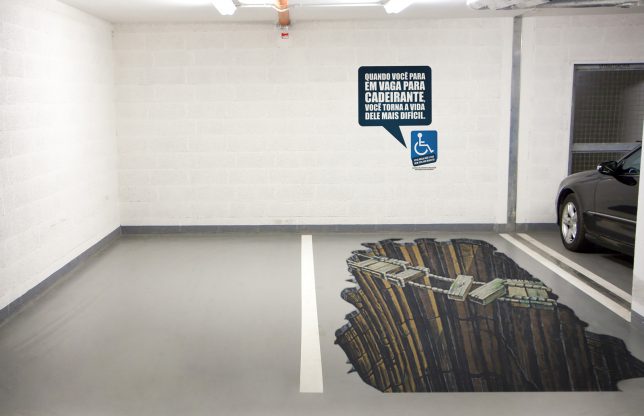
    A parking spot reserved for the “Sorcerer” truck, we assume? Not quite – this clever conjunction of a designated handicapped parking space and some awesome eye-fooling 3D graphic art comes from Brazil, where there’s an ongoing problem of able-bodied people parking in handicapped spaces “just for a minute”. Yeah, riiight. The explanatory text on the wall roughly translates from Portuguese to read “When you stop in place for disabled, you make his life more difficult”. It’s a theme we’ll revisit further on in this post.

    Hold My Beer And Park This

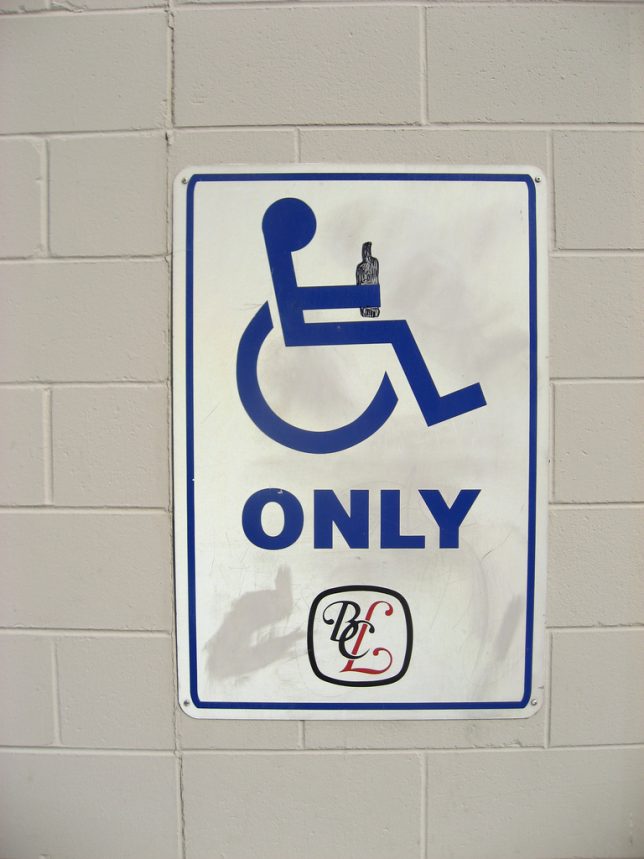
    Flickr user Mike Klassen snapped this mildly yet distinctively modified accessible parking sign behind a BC Liquor store in late September of 2008. As for that “fine line” we mentioned previously, well, this edges close to it but we’ll leave the last word to Nathan Ridge, one of the commenters at Klassen’s photo page: “I’ve heard of discrimination against disabled persons, but this is the first time I’ve heard of it the other way around! I love it, especially since I’m in a wheelchair myself!”

    Triple Chair Lift

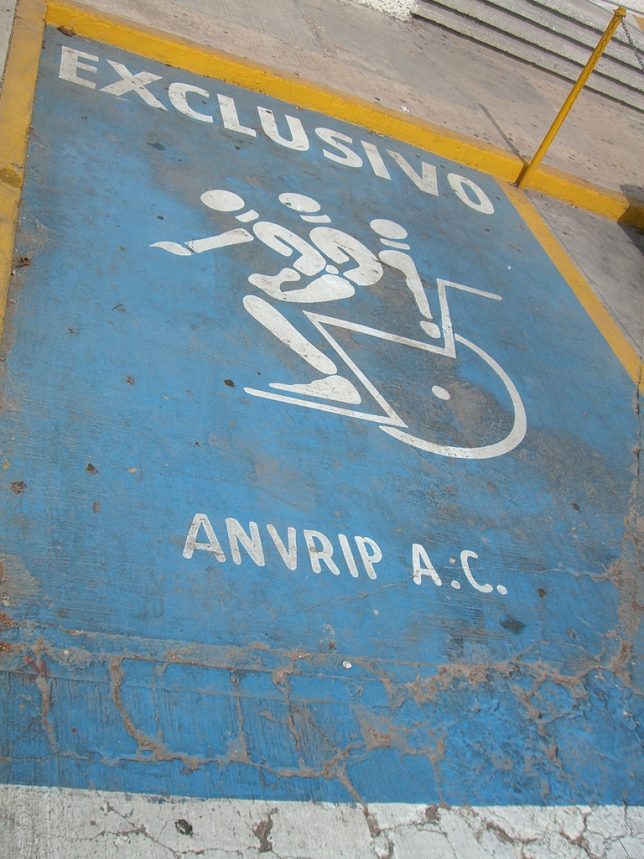
    When Mexico sends us their handicapped parking place stencils, they’re not… actually sometimes they ARE sending us their best. Take the “EXCLUSIVO” stencil above, snapped by Flickr user Mary Doyle (buffoonmeatmary) on August 5th of 2007. We can’t say whether this awesome graphic shows a disabled person getting into or out of their wheelchair but either way, the image demands a Six Million Dollar Man bionic sound effect to accompany it.

    Elderly Man Driver

    Elderly man driver, that elderly man driver, he don’t say nothing but he must know something, he just keeps rolling along… at 10mph under the speed limit until he (or she) parks, right on top of this designated Elderly-only parking space. Who knew this even existed? One might state just being a senior citizen isn’t actually a “disability” in the strict sense, though don’t try convincing any grouchy cane-wielding oldster of that. Flickr user Wee Viraporn snapped what appears to be a standardized stencil on January 3rd of 2010.

    Next Page – Click Below to Read More:
    Enabled 18 Weird Creative Handicapped Parking Signs

    Share on Facebook


    [ By Steve in Culture & History & Travel. ]

    [ WebUrbanist | Archives | Galleries | Privacy | TOS ]


    WebUrbanist

  • Sigma sd Quattro H real world samples gallery

    ISO 200 | 1/500 sec | F5.6
    Photo by Carey Rose

    With a large APS-H sized Foveon sensor, Sigma’s sd Quattro H promises a lofty 51MP of equivalent resolution when compared to more traditional Bayer-sensor cameras. The sd Quattro lineup is also the first series of Sigma cameras ever to output Raw files in an accessible DNG format, meaning you can open them with almost any Raw converter, as opposed to being locked into Sigma’s Photo Pro software. Take a look through our gallery of cherry blossoms, cars, cityscapes and studio shots and download a few files to check out the impressively sharp Foveon rendering for yourself.

    Check out our Sigma sd Quattro H sample gallery

    $ (document).ready(function() { SampleGalleryStripV2({“galleryId”:”4388344015″}) })

    Sample photoSample photoSample photoSample photoSample photo

    Articles: Digital Photography Review (dpreview.com)

  • Opinion: Shooting DNG on the Sigma sd Quattro H is a game changer

    Introduction

    With the changing of the seasons comes a big change in how I shoot Sigma cameras.
    ISO 100 | 1/1600 sec | F5.6
    Photo by Carey Rose

    Fifteen years.

    That’s how long it’s been since the release of the SD9, Sigma’s first digital camera, which was also the first camera to use the layered Foveon sensor design. From then on, for better or for worse, Sigma has continued to refine its unique layered sensors. While no one will argue that their cameras are capable of insanely sharp output, you still have to put up with an awful lot of shortcomings.

    Early on, there was the low pixel density. And there’s still poor battery life. And Huge file sizes. Long card write times. Heat. Lots of heat. (And there’s plenty of other image quality concerns, as well).

    But significantly, fifteen years is also the length of time we’ve had to use Sigma’s Photo Pro software to get any sort of decent results from these cameras. In the early days, you were almost forced into it, as the SD9 didn’t shoot JPEGs and Adobe Camera Raw support that was present up until the Merrills was laughable or simply non-existent. So until now, if you wanted to shoot Raw on a Sigma digital camera, you’d have to fire up Sigma Photo Pro and wait. And wait. And wait some more. And then relaunch it once it crashes, because crashing was a foregone conclusion (though to be fair, it is far less stable on Mac OS than Windows).

    We as a staff collectively find, even above and beyond all of Foveon’s shortcomings, that the biggest hurdle to using Sigma cameras is their very own software. Even now, in the year 2017, Sigma Photo Pro is just painfully slow and unstable.

    But Sigma is that rare company that listens to its customers. Last year while at CP+ in Japan our Technical Editor Rishi Sanyal was afforded a rare opportunity to sit down with the ever-charming, warmly receptive and almost unusually frank Sigma CEO Kazuto Yamaki and talk all things camera and optics. One of the topics covered was the usability of Sigma cameras, where we re-stressed the common request for wider Raw support of Sigma cameras but, more importantly, outlined what might go into making the most flexible DNG possible from Foveon Raw data. Just a short year later, the new sd Quattro interchangeable lens cameras can shoot DNG format Raw files straight out of the camera.

    A hearty thank you.

    And this just might be what Sigma needed to do to bring Foveon tech to the mass market – a place it really hasn’t been before.

    Sigma + DNG = <3

    The sd Quattro cameras’ ability to shoot in DNG means is that you can finally edit your Foveon Raw files using a converter other than Sigma Photo Pro. As you might expect, there’s a few caveats. When you enable DNG capture on the Quattro H, you don’t have an option to simultaneously capture a JPEG (although there is a whopping 13MB JPEG embedded in every DNG, should you want to dig it out).

    The highest resolution output you can get from these is 25.6MP, which is the same resolution as the top sensor layer, as opposed to the upscaled 51MP files that are possible when shooting JPEG in-camera or using Sigma Photo Pro with an X3F file (but if you think you might want those files, check out the comparison at the end of our samples gallery). And while upscaled 51MP may sound suspect, the pixel-level sharpness of the Foveon files means it may not be as gimmicky as it initially sounds (we’ll reserve final judgement until after our in-depth testing).

    Lastly, you’d better have a big memory card – the DNG files weigh in at around ~150MB each*. For comparison, uncompressed Raw files from the Nikon D810, Sony a7R II and Fujifilm GFX 50S weigh in at around 70MB, 85MB and 110MB, respectively (and two out of those three offer lossless compression to bring those sizes down anyhow).

    Out-of-camera white balance Adjusted in Adobe Camera Raw
    Despite setting the white balance manually in-camera, the default DNG output was too yellow for my taste, but adjustments in ACR were a breeze. Click through to see the crazy sharpness.

    Okay, enough with the caveats. Opening these DNG files in Adobe Camera Raw is an almost surreal experience. You still get the absolutely astounding crystalline sharpness Sigma’s cameras are known for, but now you can make any adjustment you’d ordinarily make to a Raw file, and with a decently powerful computer, it all happens in real time. No more making a small adjustment and waiting ten seconds (or thirty) for a full re-render.

    So far, the files appear as flexible as one would expect from Raw: white balance works wonderfully, and you can turn all noise reduction and sharpening off. We’re still examining if the 12 bit DNGs are losslessly gamma compressed 14-bit data as we’d asked for, but it’s not clear this would matter anyway: 12-bit DNGs and 14-bit X3Fs show similar flexibility thus far, which makes sense given the comparatively lower base ISO dynamic range of these cameras.

    The fun factor

    So editing the DNG files is great, even if you need to pick up a couple extra hard drives to store them. But the real kicker for me is that it changed the way I shoot this camera relative to previous Sigmas. It’s just more fun.

    ISO 100 | 1/500 sec | F4
    Photo by Carey Rose

    I ended up using the camera more and taking more photos just to see how the camera would render various scenes – and I was regularly blown away. I no longer had to worry about living with the JPEGs and poor white balance, and I didn’t have to go through a whole batch of X3F files over the span of an entire evening with Sigma Photo Pro.

    Previous Foveon cameras I’ve used were good for some quirky fun, but I never really considered picking them up off the shelf after we’d put the wraps on our older sample gallery. But now, without the workflow woes of the past, the sd Quattro H is something I’m going to be using a lot more often. If you’ve never tried a Sigma camera before, now is the time to pick one up and have a go for yourself.

    See our Sigma sd Quattro H sample gallery

    $ (document).ready(function() { SampleGalleryStripV2({“galleryId”:”4388344015″}) })

    Sample photoSample photoSample photoSample photoSample photo

    *Foveon sensors don’t directly capture red, green and blue information, nor do they require the demosaicing process required by Bayer sensors, so they require totally different processing (hence the historic lack of good Raw support). The Quattro H performs the necessary deconvolution and interpolation process required to derive red, green and blue information for each pixel, so that the Raw processing software doesn’t need to. Unfortunately that means having to save three 12-bit values for every pixel (which, given the lower resolution of the camera’s lower two layers, means storing twice as much data as was actually captured), resulting in 150MB files.

    Articles: Digital Photography Review (dpreview.com)

  • How to Get the Most Out of Photographing at Golden Hour

    The infamous golden hour is a photographer’s dream. That one key period of time that could make even the most stringent artist swoon with inspiration. The sun will dance across your viewfinder, and an endless array of possibilities will present themselves. Regardless of whether your photographic style is vibrant, monochrome, gentle, or contrasted, the golden hour will grant you the ultimate canvas upon which to paint your vision.

    So, what is golden hour exactly?

    golden hour

    The golden hours include the first hour after sunrise and the last hour of light before sunset. Predicting this short window of time depends upon your geographical location and the current season. What makes this lighting situation so ideal for photography is the sun’s positioning relative to what you are photographing.

    Due to the sun beginning its speedy rise or setting in the sky, the light source is now closer in relation to your subject. It is also going through more of the earth’s atmosphere at this low angle. When this occurs, soft diffused light is produced.

    Generally speaking, soft light is considered the best canvas for a photographer. It does not create harsh shadows and tends to be very dynamic-range-friendly, as your images will not feature harsh shadows or blown-out highlights. The golden hour casts a warm color temperature as well, which can be enhanced upon or corrected via post-processing. This warm color cast lends itself to being a flattering illumination upon any subject of your choosing.

    golden hour portrait

    Five key lighting situations at golden hour

    Any type of photography, from portraits to landscapes to action, can benefit from the use of the golden hour. There are five key lighting situations you can create during this time:

    Front-Lighting

    This is when your subject faces the sun directly. During the golden hour, this lighting gives a very warm feel to images. Because the sun is not directly above them, in many cases, your subject will not have to suffer the intensely bright light and need to squint. This lighting situation is very easy to photograph in and will make a lasting impression.

    golden hour front-lighting

    An example of front-lighting at golden hour.

    Back-Lighting

    Back-lighting occurs when the sun is behind your subject. During the golden hour, this lighting situation creates a soft, warm, hazy, glowing effect. Be sure to expose for your subject’s proper tones, and enjoy the masterpiece that you create.

    Golden hour back lighting.

    An example of back-lighting.

    Rim Lighting:

    Rim lighting is when the sun is positioned in such a way to create a halo around your subject. This halo is especially prevalent when placed against a dark background. The sun doesn’t need to be directly behind your subject to achieve this effect, though, as long as the background is dark. You will have to move around to find the sweet spot to achieve this effect, but a good way to start is by shooting from a lower camera angle.

    golden hour - rim lighting

    Sun Flare

    A sun flare occurs when light hits your lens. Different lenses render different types of flares, so this effect is very fun to try with different types of equipment. To achieve a flare, just move your lens around until you see the light hit it through the viewfinder.

    During the golden hour, the sun is at its optimal height for this exact outcome. A simple way to achieve a flare is to move your camera and lens so that your subject is only partially covering the sun. Move around (sometimes you only need to move an inch or two left or right) to find the angle that best creates a sun flare. Another way to achieve a flare is to position your lens and camera so the sun is just out of the frame.

    Read more on sun flares: How to Photograph Sun Flares: 14 Tips for Beginners

    Golden hour sun flare

    An example of a sun flare.

    golden hour

    A different type of sun flare.

    Silhouette

    A silhouette is created when your subject is completely black without detail, against a bright background. When the sun is near the end of the golden hour, it becomes fairly easy to achieve a silhouette. Photograph your subject directly against the light, and add some contrast in post-processing.

    Golden hour silhouette.

    An example of a silhouette at golden hour.

    There are several tips to truly take advantage of the golden hour. Here are a few to help you:

    1. Observe the sky the day before

    The best way to figure out when the golden hour will be at its peak is by observation! Peek out of the window the day before your photo session, and see how the sun moves and how the light changes. This will allow you to get a better idea of what the lighting situation will be like on the day of your shoot.

    golden hour

    2. Plan your photo session around golden hour

    No one wants to feel stressed, anxious or rushed when doing photography, so be sure to plan well ahead of time! It is a good idea to begin setting up for your photo session an hour before the golden hour. That way you have plenty of time to ensure that your subject and equipment are ready for that perfect moment.

    Golden hour portrait

    Anani Inaru with Trinket photographed at golden hour.

    3. Watch out for clouds!

    Depending on the level of cloud coverage in the sky, your golden hour can change (or not appear at all!). Clouds can enhance the brilliant sunrise or sunset, or they can block your view.

    golden hour

    4. Set your White Balance to Cloudy

    By changing your White Balance setting, you ensure that the images you produce hold true to the colors you want to appear. This allows you to get the warm look the golden hour is famous for – choose Cloudy or Shade to add even more warmth and golden hues to your images.

    golden hour

    5. Shoot with a wide aperture

    How the light dances during this brilliant hour can make for an incredible bokeh (the aesthetic quality of the out-of-focus parts of a photograph). The dazzling yellows, reds, oranges, and golds make a rather exceptional backdrop.

    Golden hour

    Golden hour bokeh.

    6. Keep photographing, because the light will change every couple of minutes!

    The sun moves faster than you may expect, so keep shooting and don’t stop! Every position of the sun will create a brand new image for you to take.

    golden hour

    7. Try different angles and positions.

    The sun flares, colors, and intensity of the light in your image are all affected by how you angle your lens. Experiment and try as many different positions as humanly possible! The best way to get the absolute most out of the golden hour is to take advantage of how easy it is to manipulate this unique lighting situation.

    golden hour

    8. Underexpose a bit to add more vibrancy

    You can always lighten up your subject(s) in post-processing, but it is harder to darken an overexposed image. Underexpose just a bit to bring out the beautiful vibrancy of the sunset or sunrise.

    Golden hour

    9. Explore the use of HDR

    Photograph multiple exposures and then layer them on top of one another in post-processing, and see how many incredible lighting details you can achieve. Read more on HDR: Step by Step How to Use HDR Merge in Lightroom

    HDR golden hour

    10. Play with post-processing

    What colors can you bring out in your image? Use post-processing to really enhance the colors that you capture. You will be surprised at what colors you can see when the sky has a few clouds in it.

    Conclusion

    The golden hour is full of limitless possibilities, and no two photographs will look the same. Experimentation is key, explore the light. How do you use golden hour for your photography? Share your thoughts and images below.

    The post How to Get the Most Out of Photographing at Golden Hour by Anabel DFlux appeared first on Digital Photography School.


    Digital Photography School

  • Dockless Bike Shares: Convenience of Uber & Car2Go for Urban Cyclists

    [ By WebUrbanist in Technology & Vehicles & Mods. ]

    dockless share

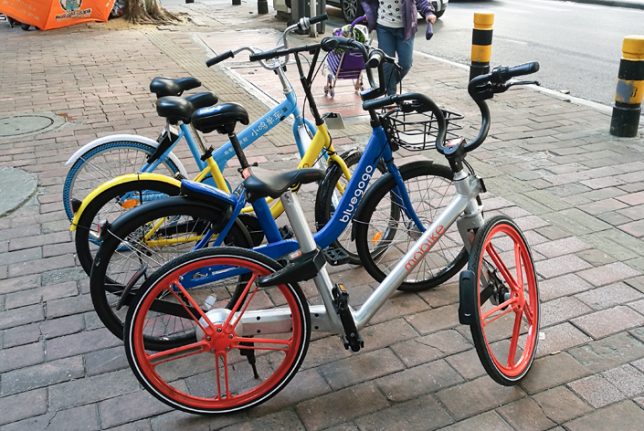
    Promising the convenient pick-ups of Uber (found all over) and drop-offs of Car2Go (which can be parked anywhere), new cycle-sharing services aim to overturn paradigm of dock-to-ride-to-dock. A single company in China has already put more than a million such bicycles on the streets. Users simply pull up an app to locate the closest bike then unlock it digitally (by scanning a QR code) and head on their way.

    Anyone who has used dock-based bike sharing systems know they come with problems — they might not be close by, or could be filled (when you’re dropping off) or empty (when you’re picking up). On the automobile front, similar issues with some sharing companies have been solved by allowing users to leave cars wherever they want. This can result in concentrations of cars, though, that need to be spread back out — and a similar problem exists for bikes.

    While small but similar programs exist elsewhere, The Guardian describes the problem as it has unfolded in China: “Seven hundred miles to the south-west, on the streets of the fast-growing Pearl River manufacturing hub of Guangzhou, the colourful dockless share bikes are everywhere. They are parked up by the hundred outside shopping malls and metro stations, often blocking the pavement; others, rendered useless by missing saddles, broken locks.” In other places, the shared bikes are piled up in alleys and vacant lots.

    Some companies believe that docking stations are the long-term solution, but others continue to experiment with alternative approaches, like: marking out preferred spots on the sidewalk then adding or deducting credits based on bike drop-off placement. For now, though, these reports have to be done manually, relying on crowd-sourced participants. As GPS gets more accurate, though, it may be possible to do this automatically. In a way, this method would replace physical stations by creating virtual ones in the form of acceptable micro-areas on the digital map.

    Share on Facebook


    [ By WebUrbanist in Technology & Vehicles & Mods. ]

    [ WebUrbanist | Archives | Galleries | Privacy | TOS ]


    WebUrbanist

  • Headed to Havana? Check out these photo spots

    $ (document).ready(function() { SampleGalleryV2({“containerId”:”embeddedSampleGallery_6485310145″,”galleryId”:”6485310145″,”isEmbeddedWidget”:true,”standalone”:false,”selectedImageIndex”:0,”startInCommentsView”:false,”isMobile”:false}) });

    Resource Travel has shared some helpful tips for photographers headed to Cuba, and now they’re offering a handy guide to Havana’s most photogenic spots. Photographer Edin Chavez shares his go-to spots for photographing the vibrant colors and culture that make up the fabric of Havana. Included are helpful tips, like the best time of day to go, and Google Map locations so you can save them for reference later.

    Read the full post on Resource Travel

    Have you been to Havana? Let us know what your favorite photo spots are in the comments.

    Articles: Digital Photography Review (dpreview.com)

  • Lensrentals: Tamron 70-200 F2.8 G2’s resolution is excellent

    Roger Cicala over at LensRentals has put Tamron’s new SP 70-200mm F2.8 Di VC USD G2 lens to the test. 

    Cicala notes that on its own, the Tamron is impressively sharp all the way to the edges at its wide end, and even better in the middle of its focal range. Sharpness drops a bit at full telephoto, but Cicala still says the 70-200 ‘puts in a very good performance.’

    The Tamron SP 70-200 F2.8 G2 impresses at its wide end of 70mm.

    The Tamron’s performance is comparable to Canon’s 70-200 F2.8L II, though a bit softer at the wide end. When put up against what Cicala calls ‘the best 70-200 zoom on the planet’ – the Nikon F2.8 FL ED VR – the Tamron struggles to keep up, though the gap narrows at 200mm.

    Sample variation from ten Tamron SP 70-200 G2 lenses at 70mm.

    In addition to lots of MTF charts, Cicala provides some helpful information about copy variation using ten of the new Tamron 70-200mms.

    Read the full story on the
    LensRentals blog

    See our Tamron 70-200mm F2.8 Di VC USD G2 sample gallery

    Articles: Digital Photography Review (dpreview.com)

  • At the market: Panasonic GH5 sample video

    We’ve been hard at work testing the new Panasonic GH5, and while we put the finishing touches on our review, we wanted to share a video we shot with the camera at Seattle’s Pike Place Market.

    The video was recorded in UHD 4K with the GH5’s 4:2:2 10-bit color settings. To capture the wide dynamic range in many of the scenes, we filmed using VLog gamma and used a VLog to Rec.709 LUT as a starting point for color grading. We also wanted to see how well the GH5’s white balance worked, so the entire video was captured using auto WB, and we haven’t made any white balance corrections, allowing you to see how the camera did in this regard. Audio was recorded using the built-in microphones.

    Enjoy this little slice of life in Seattle as we finish up our review of the GH5!

    Articles: Digital Photography Review (dpreview.com)