Blog

  • 5 Non-Portrait Ideas For Photographing Kids

    When it comes to photographing kids, we spend a lot of time discussing how to capture images of them smiling naturally and looking at the camera. Of course, every parent wants that sort of image of their child or children, and learning how to cultivate those genuine reactions is an important skill for any photographer to have.

    photographing kids

    That said, full-face portraits are just one small type of people photography. When it comes to photographing kids in particular, if you only capture that style of image, you’re missing out on a whole lot! Here are five things not to miss when it comes to photographing your children!

    1. Little Details

    photographing kids - details

    Fingers. Toes. Eyelashes. When it comes to photographing kids, don’t forget to capture the little details! Years later, a photo of dirty feet will bring to memory hours spent playing in the backyard. Mismatched fingernails will remind parents of the “I’ll do it myself!” years of budding independence. These aren’t (typically) the photos that make it onto Christmas cards or Facebook profile images, but they are images that parents will be thankful for down the road.

    photographing kids - details

    2. Silhouettes

    photographing kids

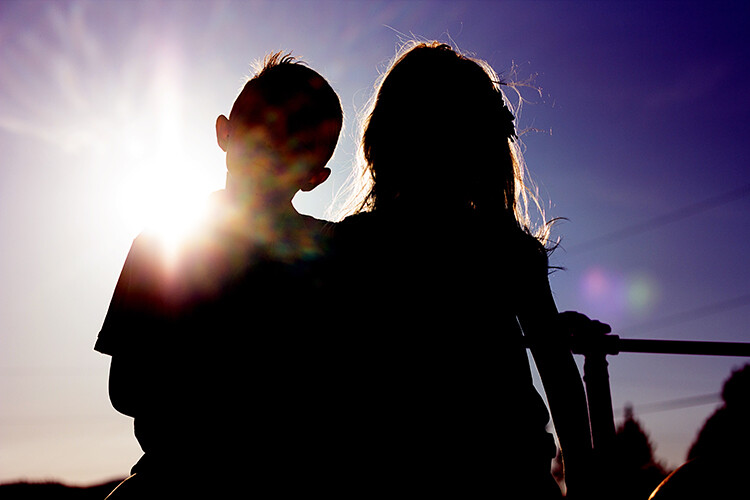
    It’s amazing how much body language can convey in a photo, and that’s never more evident than in the case of a silhouette. I love capturing silhouettes of kids because they highlight body language and details in a different way than a full-face portrait does.

    In a standard portrait, the wisps of hair take a backseat to adorable toothless smiles. I love a good toothless grin, but I want to remember the cowlicks and hair wisps as well. I want to remember the way that the kiddos sat on top of a fence so close to each other that not a single ray of light was able to sneak through.

    photographing kids - silhouette

    Don’t forget to try silhouettes from a number of different facial views. Try them with the kid facing away from your camera. Try them with the kiddo facing the camera head-on. Definitely, try them in profile! Again, it draws attention to the little details like the shape of their nose and their facial features.

    3. Their Little Quirks

    photographing kids - quirks

    This category is one instance where you’ll be at a huge advantage if you’re photographing your own children (or close relatives) because you know your kids best.

    You know the silly way they sit on their feet while they’re eating. You know the way they press their hands into their face while they’re making up a “once upon a time” story. Only you know the goofy faces that they make and you also know the way that one kiddo always tries to photo-bomb the other. You already know the funny little quirks that your own kids have, so make sure to photograph them!

    Take it from me, you won’t remember them as well as you think you will, and someday you’ll be grateful for the reminder.

    photographing kids

    4. Sleeping

    photographing kids

    This is a category of images that is easy to forget about, but I really try to make an effort to occasionally photograph my kids while they’re sleeping. The other day, my first grader fell asleep unexpectedly. She has the tendency to act older than she really is in a lot of different ways, so my expectations for her tend to be pretty high.

    I grabbed my camera and snapped a few photos because I was struck by how young she looked while she was sleeping. Nearly every time that I make the concerted effort to photograph my kids while they’re sleeping, I find myself thankful for the reminder that even though they may act older than their ages, the truth is that they’re still little.

    5. Different Angles and Facial Views

    photographing kids

    As I look through the many, many photographs that I’ve taken of my children, there are very few images that are shot from unusual angles and different facial views. Anytime I find an image that’s shot in silhouette, I’m always pleasantly surprised! There aren’t many of them, but I’m always pleased to come across them because they capture a different sort of expression than full-face images. In my experience, kids aren’t typically photographed in profile very often, and I think it’s such an important aspect in capturing their personalities!

    Similarly, I always try to get down to their level when I’m photographing kids. That’s usually a good thing, but on occasion, it’s nice to have an image that’s shot from above, below, or other non-traditional angles. Make an intentional effort to photograph your children from a variety of different perspectives – you won’t regret it!

    Over to you

    Please share your tips for photography kids below as well as your images. I’d love to see them.

    The post 5 Non-Portrait Ideas For Photographing Kids by Meredith Clark appeared first on Digital Photography School.


    Digital Photography School

  • How to Photograph Northern Lights (The Aurora Borealis)

    A trip to photograph Northern Lights (also called The Aurora Borealis) often tops the wish list for many photographers. For good reason too; the aurora is a natural phenomenon unlike any other. Lights dancing over the frozen winter landscape is ethereal, beautiful, and at times, jaw-dropping. Living in Alaska has provided me the opportunity to shoot the lights more often than most, and yet more than once, I’ve had to stop clicking and just watch the curtains shift and dance. In fact, let that be my first tip if you are planning an aurora

    In fact, let that be my first tip if you are planning an aurora photo shoot – occasionally just stop and watch. Seriously, put that camera down for a moment and relish the sight. Okay, now let’s figure out how to photograph the Northern Lights.

    How to Photograph Northern Lights (The Aurora Borealis)

    Gear

    Tripod

    You need one. There is no faking this one, get one and use it. If it’s brutally cold (which, let’s face it, it probably will be) you’ll appreciate carbon over cold-channelling aluminum, but either will work. Bring it, use it, no excuses.

    Camera

    I’ve seen beautiful images of the Northern Lights made with everything from good point and shoot cameras to high-end mirrorless and DSLRs. So don’t feel too restricted by your choice of camera. That said, a camera with low noise at high ISO is definitely preferable. Though not absolutely necessary, the ability to change lenses, too, is a major asset.

    Lenses

    As a general rule, you want a lens that is wide and fast (has a large maximum aperture). The faster the better. My primary aurora lens is a 14mm f/2.8, but I’m eyeing a 20mm f/1.8 for the extra speed. All lenses will need to be manually focused, so make sure that is straight-forward. A variety of focal lengths, either in the form of a zoom, or a choice of lenses is also helpful. I’ve used everything from a 70-200mm to my fixed 14mm to photograph Northern Lights.

    How to Photograph Northern Lights (The Aurora Borealis)

    I’ve got to admit, living in the far north has its advantages. I merely needed to step out my front door to make this image. (If you are wondering what that strange U-shaped white form in the sky is, it’s the exhaust trail from an aurora research rocket fired off by the University of Alaska Fairbanks).

    Remote Release

    Though not absolutely necessary, a cable or wireless release for your camera will help reduce camera shake when you click the shutter. A jiggly blur in the stars can ruin an otherwise good shot. If you don’t have a release, use the camera’s self-timer, many have a 2-second setting which is useful. Keep in mind that using a timer rather than a release will slow you down.

    Clothing

    Maybe I should have put this one at the top of the gear list, because it is probably the most important thing for a successful winter shoot of any kind. Right now, as I’m writing this article, I’m sitting in a cabin 70 miles north of the Arctic Circle in the Brooks Range of northern Alaska. I’m leading an aurora photo tour, and the warmest night-time temperature we’ve seen so far was -35F (-37c). Good clothing has not just been important, but vital.

    How to Photograph Northern Lights (The Aurora Borealis)

    Right now, as I’m writing this article, I’m sitting in a cabin 70 miles north of the Arctic Circle in the Brooks Range of northern Alaska. I’m leading an aurora photo tour, and the warmest night-time temperature we’ve seen so far was -35F (-37c). Good clothing has not just been important, but vital. I don’t want to go into too much detail here, but a thick down coat with a hood, down or synthetic fill pants, mittens, liner gloves, face masks, and warm hats should all be on your list.

    That said, I do want to take just a second to talk about footwear. Trips like the one I’m currently leading are not the time to toy around with light winter boots. This is not the time for fashion. Pack boots, god-ugly bunny boots, mukluks, and other extreme-cold footwear, a couple sizes too big (to account for thick socks and toe warmers) are what you are looking for. Nothing will wreck a night of photography more quickly than painfully cold, or (please no) frost-bitten toes. Enough said.

    How to Photograph Northern Lights (The Aurora Borealis)

    Interesting foregrounds are an important part of any image, and aurora shots are no different. In this case, I climbed a rock outcrop and used a wireless trigger to make this image.

    The Day Before

    Prefocus – autofocus rarely works in the dark, so you’ll need to manually set your focus. The first thing I do when I’m leading a photo workshop or tour is to take my clients out in the daylight, before our first night chasing the lights, and have them set their focus to some distant mountaintop. After making sure it is tack sharp, I hand out small pieces of electrical tape and have everyone tape the focus in place so it won’t shift around accidentally.

    With the excitement of the first aurora show, no one has to worry about messing with their focus points, or worse, find their shots heartbreakingly soft. A caveat: You still need to check your focus periodically. I’ve found that some lenses will shift their focus point slightly when there are extreme temperatures. Pixel-peep occasionally and adjust as necessary.

    How to Photograph Northern Lights (The Aurora Borealis)

    When the lights are directly overhead, sometimes pointing your camera straight up can be the best option.

    In the Field

    Have patience. The aurora is a fickle lover, and she only appears when she wants. Even when the forecasts are coming together and everything seems set for success, the lights may take awhile to appear, they may erupt when you don’t expect it, or clouds may obscure the sky. Plan several nights to account for bad weather or uncooperative conditions. Be prepared to stay up late, and again, be patient.

    Exposure

    How to Photograph Northern Lights (The Aurora Borealis)

    This is one of my first images of the aurora. The lights were bright, and while I managed to capture some color, the 20-second exposure blurred the details into an indistinct curtain. I know better now.

    In the days of film and early days of digital, long exposures of 15 or 30 seconds for the aurora were the name of the game. This allowed the lights to appear bright and colorful, but details within the aurora, the pillars, and beams blurred away leaving behind an indistinct curtain. Technology has moved beyond this.

    You want the shortest shutter speed possible that allows sufficient brightness and low noise. ISOs in the 1600-6400 range are typical. I start with a setting of f/2.8, ISO 1600 or 3200, for 5 seconds. From there, depending on what the lights are doing, the amount of moonlight, and other factors, I’ll adjust up and down.

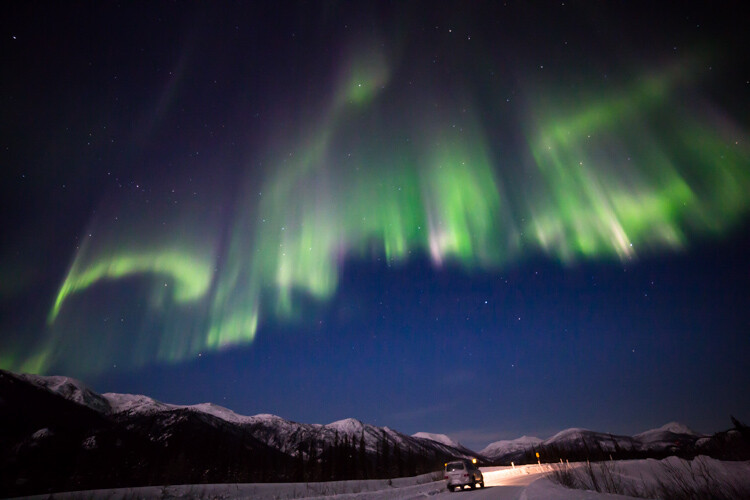
    Last night, for example, for about 10 minutes the lights brightened and started moving VERY fast. Sacrificing some noise, I went to ISO 6400, f/2.8, and a 1-second exposure. The shots needed a bit of noise reduction in post-processing, but I was able to capture the details of the curtains, and that sharpness in the aurora makes the images successful. A shutter speed just a second or two longer would have blurred the lights.
    How to Photograph Northern Lights (The Aurora Borealis)

    In contrast to the previous image, for this shot of a very fast moving display, I used a shutter speed of just one second at ISO 6400, f/2.8. As a result, the pillars of light and details in the curtains are sharp.

    Composition

    When the aurora is hopping, your attention will shift to the sky and away from the foreground. This is natural, but try to pay attention to your composition, just as you would with any landscape image. In the dark, a poorly framed image may not stand out the way it does in daylight. But, I’ll guarantee that you’ll notice when the photos appear on your computer the next morning, and you’ll kick yourself.

    Consider where you are, provide some context, avoid distractions, and compose carefully.

    How to Photograph Northern Lights (The Aurora Borealis)

    A red aurora is a very rare thing indeed. Of the hundreds of nights I’ve spent shooting the Northern Lights, this one had the deepest, brightest reds I’ve ever seen. (FYI, I used my headlamp to light paint the trees in this image.)

    Where and When to Photograph the Northern Lights

    Choosing the right location for an aurora trip is a big decision. The Aurora Borealis can be seen around the planet’s northern regions. Scandinavian countries, Iceland, northern Canada, and of course Alaska, are popular destinations. While your budget and available time may limit you, it is important to consider the likely weather conditions, local tours, lodging and transportation options, and seasons.

    The aurora is primarily a winter phenomenon. In the far north, nights don’t get dark enough in the summer for the lights to appear. Here in Alaska, you can see the lights from late August or early September through mid-April, but prime time is late September through early April.

    How to Photograph Northern Lights (The Aurora Borealis)

    The nearly full moon in this image was not enough to blow out the bright display of lights, but it takes strong aurora to overcome a full moon. Moonlight is great for foregrounds but can cause issues with visibility of the Northern Lights. If you are shooting the aurora for the first time, I recommend making your trip around the new moon.

    Research weather patterns. Some months are more likely than others to have clear skies. In Alaska, March is the driest month with the best chance for clear skies, but other locations will differ.

    Moonlight is another thing to consider. While great lights can occur regardless of how bright the moon is, during the dark nights of a new moon, even low-grade aurora displays will appear more distinct against the darker sky.

    Getting Help

    How to Photograph Northern Lights (The Aurora Borealis)

    One of my clients on an aurora photo workshop photographs the northern lights in the Brooks Range of northern Alaska.

    Like any discipline of photography, learning to shoot the aurora takes practice. This can make aurora photography a frustrating pursuit for people new to it or with limited time. Organized workshops or tours, or private photo-guide services are a great way to assure some success. Even if you prefer to shoot independently, hiring a local expert for a night to get you started may help you dodge the usual pitfalls and find the best locations to shoot.

    How to Photograph Northern Lights (The Aurora Borealis)

    Patience Pays Off

    Last night it was bitterly cold here in the Brooks Range. We started the night about 9:00 p.m. by driving 50 miles north to a spot high above tree line, a stone’s throw from the continental divide. There, we waited in the moonlight for the Northern Lights to appear. They didn’t, not for the three hours we sat patiently watching the sky. I had a sinking feeling that we were about to get skunked.

    Half past midnight we gave up, turned around, and headed back to our rented cabin. Another hour later we pulled in and started unloading the gear. I glanced toward the sky, and there, sure enough, was a single, pale band of northern lights. It was nearly 2:00 a.m., and I’ll admit, my warm bed was sounding really good. But stubbornly, we reloaded our camera bags and tripods and drove a few miles back up the road where the mountains loomed close. When the lights exploded 20 minutes later, we were ready. Our cameras popped in the frigid air as the aurora swirled. We made some of the best images of the trip there.

    How to Photograph Northern Lights (The Aurora Borealis)

    Be Ready

    We were patient, had the right clothing to handle the -40 temperatures, and had our cameras and settings ready. That’s really the core lesson here: be ready. The lights sometimes don’t last long and if you are fiddling with camera focus, or clothed improperly, you’ll miss it. However, preparation and research will greatly increase your chances of success. A chance to photograph Northern Lights, or simply observe them, is not an opportunity to squander.

    The post How to Photograph Northern Lights (The Aurora Borealis) by David Shaw appeared first on Digital Photography School.


    Digital Photography School

  • Sony is now #2 in the US full-frame interchangeable lens camera market

    Sony has announced that it is now ranked second in the U.S. full-frame interchangeable lens camera market, a position formerly held by Nikon. The data comes from The NPD Group, which shows a 23% increase in Sony’s full-frame interchangeable lens cameras and lenses sales this year. According to Sony, its ‘key models,’ including the a7R II and a7S II, were large factors behind this increase.

    As the graph above demonstrates, the full-frame interchangeable lens camera market as a whole benefitted from Sony’s success; without it, the overall market would have experienced a 2% decrease year-on-year. Such data is based on NPD Group’s sales figures for Sony from January and February 2017.

    Press release

    Sony Overtakes #2 Position in U.S. Full-Frame Interchangeable Lens Camera Market

    Record Sales from Sony Driving Growth in Overall Full-Frame Market

    SAN DIEGO, April 14, 2017 /PRNewswire/ — Sony Electronics – a worldwide leader in digital imaging and the world’s largest image sensor manufacturer, has announced today that their continued growth has vaulted them into the #2 overall position in the U.S. full-frame interchangeable lens camera market. 1

    Sony’s interchangeable lens cameras and lenses have seen record sales in 2017, in particular within the U.S. full-frame camera market, where they have experienced double-digit growth (+23%) 2 compared to the same period last year. The popularity of key models including ?7RII and ?7SII has been paramount to this success.

    Additionally, Sony’s rapid growth has helped to drive growth of the overall full-frame interchangeable lens camera market compared to the same period last year. Without Sony’s contributions, the full-frame market would be facing a slight decline. 3

    “Our commitment to the industry is stronger than ever,” said Neal Manowitz, VP of Digital Imaging at Sony North America. “We are always listening to our customers, combining their feedback with our intense passion for innovation to deliver products, services and support like no other.”

    A variety of exclusive stories and exciting content shot Sony ? products can be found at www.alphauniverse.com , Sony’s community site built to educate, inspire and showcase all fans and customers of the Sony ? brand.

    1 The NPD Group / Retail Tracking Service, U.S., Detachable Lens Camera, Full Frame, Based on Dollars, Jan- Feb 2017

    2 The NPD Group / Retail Tracking Service, U.S., Detachable Lens Camera, Full Frame, Based on Dollars, Jan/Feb 2016- Jan/Feb 2017

    3 The NPD Group / Retail Tracking Service, U.S., Detachable Lens Camera, Full Frame, Based on Dollars, Jan/Feb 2016- Jan/Feb 2017

    Articles: Digital Photography Review (dpreview.com)

  • Five Ways to Improve Your Composition Skills

    Composition is one of the most important skills you can learn as a photographer. The interesting thing about composition is that it’s all to do with observation and learning to see. You may need to invest in a book or two to help you understand the basic principles, but nothing more. It’s a much more cost-effective way of becoming a better photographer than buying a new camera or lens!

    There are five things you can do right away to improve your composition skills.

    Composition and photography

    1. Learn how to use your camera properly

    The aim is to know your camera so well that you can photograph without thinking about it. This comes through familiarity and practice.

    Try this exercise. Close your eyes and pick up your camera. Which buttons and dials do you need to use to adjust aperture, shutter speed, and autofocus? How do you select the active AF (autofocus) point? How do you apply exposure compensation? If you don’t know the answers without looking, then read your manual. You should be so familiar with these settings that you can adjust them automatically, with no more than a glance at your camera.

    Learn this simple approach

    Digital cameras have lots of menu options and it’s easy to get caught up in adjusting settings. I suggest you ignore most of them and keep your approach simple. Here’s how:

    • Always shoot RAW format and set White Balance to Daylight or Auto and keep it there. Pick one camera profile and stick with it. You can adjust all of these settings afterward in Lightroom.
    • Don’t touch any settings such as lens corrections, contrast, dynamic range, noise reduction, sharpness or highlight preservation. These are all irrelevant if you shoot RAW.
    • Don’t switch between metering modes. Stick to one and learn how it works.
    • Understand your camera’s focus modes and when to use each one.
    • Learn how to select the active AF point so you can make the camera focus where you want.
    • Make sure you know how to switch to Manual shooting mode and when you should do so.
    • Learn how to apply exposure compensation, preferably without taking your camera away from your eye.

    For most forms of photography, you don’t need to know anything more than that. The main exception is anything that involves fast action, as you may need to adjust your camera’s autofocus settings to suit. The idea is to know your camera so well that you can concentrate on observing the subject and finding the best possible composition.

    Composition and photography

    Some photographers say that the dials on cameras like the Fujifilm X-T1 (shown above) and old style film cameras help them adjust settings quickly.

    Fiddling with your camera’s settings is a distraction. The more attention you pay to your settings, the less you’ll pay to the composition of your images.

    2. Look beyond the obvious

    The first viewpoint you find when you take a photo of something may not be the best or most interesting.

    When you find a worthwhile subject spend some time with it. Try and look beyond what first attracted you to it. This is called working the subject.

    • What happens if you photograph it from another angle?
    • With another lens?
    • Or if you get closer or further away?
    • Is there anything interesting about the subject that you have overlooked?

    For example, if you are taking someone’s portrait it might be because they have a captivating or beautiful face. But what else is interesting about them? Their clothes? Jewelry? Tattoos? Look beyond the face and see what you can find.

    Composition and photography

    I made some portraits of a friend of mine. But he also has interesting hands. After I made the portraits I asked him to hold his hands out and made this photo.

    3. Educate your eye

    You can learn a lot about composition by studying the work of master photographers. It’s time to pick some photographers whose work you like and get analytical. I like looking at photos taken decades ago. Photographers back then worked with much simpler equipment and didn’t have our technological advantages. Yet the best still created beautifully composed images.

    So, how did they do it? When looking at somebody else’s work ask yourself these questions:

    • Are they working in black and white or color? How would switching from one to the other affect the composition?
    • What is the focal point of the image? Is it positioned in the frame according to the rule of thirds or could there be other principles at work?
    • What shapes and patterns do you see?
    • Is there any negative space in the photo? How much room does the subject have to breathe?
    • Is the photo balanced or unbalanced? What is the visual relationship between the various elements in the scene? Which are dominant and which are secondary in importance?
    • Can you tell what lens focal length the photographer may have used? How would using a different focal length affect the composition?
    • How did the photography create a sense of depth?

    Questions like these deepen your understanding of the work of other photographers. The answers inform your work as you evolve as a photographer.

    Composition and photography

    This landscape scene was lit by the light reflected from the clouds and sky after the sun disappeared below the horizon. I first became aware of the beauty of this type of light when looking at the work of Galen Rowell, a famous adventure and landscape photographer.

    4. Work with geometry and symmetry

    Learn to look for shapes in your photos. A good place to start is with anything man-made, as we tend to build things with recognizable shapes like triangles, squares, and circles.

    Repeating shapes create patterns and symmetry that can also form the basis of an interesting composition.

    For example, when you look at this photo, what do you see?

    At first glance, it’s a photo of an outdoor cinema screen in a Chinese village. But look closely and you start to see shapes. The rectangle of the screen is an obvious one. But did you notice the diamonds made by the pattern in the flooring? Or the organic shapes of the Chinese characters on the wall?

    5. Use punctuation and gesture

    Jay Maisel talks a lot about gesture and Bob Holmes talks about punctuation. Look up the work of these two photographers to learn more about these concepts.

    Punctuation is the addition of something interesting, often a human figure, that completes a scene. The photo needs that little something extra to lift it above the ordinary. Punctuation is an important part of street and travel photography.

    For example, this photo is completed and made stronger by the presence of the woman in the doorway.

    Composition and photography

    In his book “Light, Gesture & Color” Jay Maisel defines gesture as the thing that reveals the essence of the subject. Everything has it. Gesture takes us beyond the superficial to the essence of the subject and reveals itself through observation.

    Imagine you are photographing a mountain. What do you see? Maybe it’s the shape of the mountain against the sky. The textures of the rocks scattered over the surface, the steepness of its cliffs, or the way that clouds wrap themselves around the summit. All these things are part of the gesture of the mountain, the things that make it what it is.

    With people, gesture is a mixture of body language and attitude. If you are making a street photo it may be in the body language or appearance of somebody in the photo. If you are making a more formal portrait it is something in the model’s expression or body language that helps create mood or communicate character.

    In this photo the pose and expression of the dancer are gesture.

    Composition and photography - gesture

    Punctuation and gesture are advanced concepts. But it’s worth thinking about how you can apply them to your photos, as they help make the composition of your images stronger.

    Conclusion

    Composition is an important skill. It takes time to master, but it’s worth the effort as the quality of your photos will improve immensely.

    Do you have any other suggestions for ways to improve your composition skills? Please let us know in the comments. I’m looking forward to seeing what ideas you come up with.


    Andrew is the author of the ebook Mastering Composition.

    The post Five Ways to Improve Your Composition Skills by Andrew S. Gibson appeared first on Digital Photography School.


    Digital Photography School

  • Keep your camera dry and look like a dork with this $60 hands-free umbrella (or not)

    Uh, what’s that thing on your head?

    Did you know it rains a lot in Seattle? No? Well, it does. It rains every day for 11 and a half months. Naturally, this poses some challenges for outdoor photography. Sure, more and more cameras are offering some degree of weather sealing, but staying dry is a hot commodity in our rainy city, and weather sealing can’t keep moisture off your lens.

    ‘If only there were some sort of hands-free device that could keep me dry all the time, while also making me look like a total and complete dork,’ we find ourselves musing.

    “Yeah I’ve got a Nubrella bro.”

    Fortunately for us there’s the Nubrella, a back-pack style umbrella marketed toward photographers. It is essentially a $ 60 product ($ 66.98 with shipping) that not only keeps you dry but makes people on the street wonder whether you’re headed to Comic-Con dressed as Spaceball’s Dark Helmet.

    Let’s hope the wind doesn’t catch that thing.

    One wonders if they called it the Nubrella because you must be a certain degree of ‘nu(m)b’ to social norms to actually wear it. Then again, perhaps the SoloWheel-riding, vape pen-toting crowd has yet to catch on to this marvelous device that offers hands-free convenience for the small price of $ 66.98 and one’s dignity.

    Here’s an idea: instead of wasting your money on such a silly and overpriced solution to a simple problem, our ever-wise colleague Wenmei suggests investing in an $ 11 umbrella hat. Not only does it serve the same purpose as the Nubrella, you can purchase one with a silver reflective lining that allows it to double as a reflector. Sure, you’ll still look like a dork wearing one, but at least you’ll be a thrifty dork.

    This umbrella hat is about $ 10 and can double as a reflector.

    After all, it’s easy to come across a product and jump to the conclusion, “I need that in my life!” That’s why infomercials continue to exist. But please, before spending any cash on some sort of expensive photography gizmo, shop around and see if there’s an affordable alternative. Because sometimes the job of a $ 60 wrist-strap can be done with a $ 6 bootlace.

    Moreover, $ 66.98 could go a long way to purchasing photo gear that will actually, you know, make you a better or more creative photographer.

    Wenmei in umbrella hat.

    Articles: Digital Photography Review (dpreview.com)

  • Ricoh denies Nikkei report that it may leave camera business

    Ricoh has issued a response to a report from the Nikkei Asian Review, denying that the company is considering leaving the consumer camera business. Ricoh’s statement says that it will focus its attention on ‘high added value products’ in its Pentax and GR lines. Additionally, the company says it plans to keep expanding its VR business, where it sees plenty of growth.

    Nikkei’s article suggests the company considered, or is considering, a more drastic approach:

    ‘The Japanese company will radically review a production and manufacturing strategy centered on cameras for the retail market, including such brands as Pentax and GR. Options include withdrawing from this segment altogether.’

    An investor relations presentation published by Ricoh today only directly mentions the company’s camera division once, indicating that Ricoh will ‘leave no stones unturned’ in examining losses in its camera business. But the overall tone of the document indicates that the company is looking to break from past approaches to structure and growth.

    The Nikkei article and Ricoh’s statement seem to be in agreement that the company is looking to expand into commercial applications. Nikkei mentions that Ricoh plans to use spare capacity at compact camera production facilities to increase production of automotive products.

    Below is Ricoh’s full statement addressing the article:

    With regard to the article about RICOH today

    Apr. 12, 2017
    Ricoh Co.,Ltd.

    Today there was an article saying that RICOH considers to shrink the camera business and withdraw from consumer products. This article is not based on RICOH’s official announcement.

    RICOH is focusing its resource on the high added value products such as PENTAX and GR that are appreciated by the existing users and photo hobbyists. RICOH is also a market leader of input device? in the VR or AR market with its “RICOH THETA” where we can see rapid growth, and will keep on expanding the business even more in this field. In addition, RICOH will develop and expand the imaging business in the solution business field for corporate, by creating new market utilizing its own camera technology.

    Articles: Digital Photography Review (dpreview.com)

  • Photographers react with outrage at National Geographic train tracks photo

    ‘Don’t take photos on train tracks.’

    If you feel like you’ve been hearing this message a lot lately, it’s because you have. And it bears repeating because apparently, it hasn’t gotten through. Not even a month after another tragic, well-publicized incident, National Geographic is coming under fire for posting a photo of a woman standing on train tracks at sunset to its Instagram account.

    One more time for everyone in the back: Don’t take photos on train tracks.

    Taking photos on active train tracks, or putting your subjects on train tracks, is illegal and dangerous. As a recent Today Show segment reminded us, despite their size trains are surprisingly quiet and may not be heard until it’s too late.

    Plenty of Nat Geo’s Instagram followers have apparently heard the message and taken it to heart, judging by the numerous negative comments posted in response to the photo. But many other commenters are expressing approval, and the photo has well over 485,000 likes. Regardless of the circumstances surrounding this particular photo, publishing it to a much-respected and much-followed account could lead others to think taking this kind of photo is a good idea.

    Unfortunately, there are many, many examples of why this is not a good idea. 

    Articles: Digital Photography Review (dpreview.com)

  • Big Sky Country: Local photographers share their favorite Montana photo spots

    $ (document).ready(function() { SampleGalleryV2({“containerId”:”embeddedSampleGallery_0904372940″,”galleryId”:”0904372940″,”isEmbeddedWidget”:true,”standalone”:false,”selectedImageIndex”:0,”startInCommentsView”:false,”isMobile”:false}) });

    Montanans celebrate an unofficial holiday on April 6th every year since ‘Big Sky Country’ as it’s known is covered by just one area code: 406. In honor of the day, Resource Travel recently rounded up a list of locals’ favorite photography spots across the state. Take a look at just a few examples of Montana’s gorgeous scenery and then head to Resource Travel for exact locations and more photos to whet your travel appetite.

    Articles: Digital Photography Review (dpreview.com)

  • Blue Earth Alliance: Collaboration is key for photography that makes a difference

    Blue Earth Alliance: Collaboration is key for photography that makes a difference

    Natalie Fobes on assignment in Russia for National Geographic. Fobes is an award-winning photographer who founded the nonprofit Blue Earth Alliance in order to work with photographers to share their stories.

    “You don’t have to travel overseas to make a difference with your photography. Your world starts outside your front door,” says Natalie Fobes, a Seattle-based photographer with a resume many photographers dream of. Assignments for major magazines including National Geographic, dozens of awards as well as being a finalist for a Pulitzer, a photography instructor with courses on Lynda.com, and now a successful wedding and commercial photography business in Seattle, Washington where she lives with her family.

    It all might sound a little intimidating, but spend just a few minutes in conversation with Fobes and you’ll come to understand not only her passion for the power of photography, but how much she wants to help other photographers succeed.

    Almost 22 years ago Fobes formed the non-profit Blue Earth Alliance, along with fellow photographer Phil Borges and attorney Malcolm Edwards, who provided legal guidance. The philosophy behind Blue Earth Alliance is simple – photography and filmmaking can lead to positive change.

    DPReview had the opportunity to talk with Fobes about Blue Earth Alliance, the impact of photography and the mission of Blue Earth Alliance.

    Blue Earth Alliance: Collaboration is key for photography that makes a difference

    The opportunity to share her photographs and the difficulty in finding funding lead Fobes to collaborate and begin Blue Earth Alliance. Photo by Natalie Fobes.

    Blue Earth Alliance was formed almost 22 years ago to help photographers. Why did you feel it was needed?

    I had just had a book published, had spent 10 years traveling the Pacific Rim and was doing well and I was approached to put together a traveling exhibit. It was expensive to put on the exhibit and hard to find sponsors. I was told if I had been a 501(c)(3) sponsors could help, and I learned other photographers were having similar problems. We saw the media landscape was changing and it was going to get harder to do long documentary projects.

    I think the underlying philosophy of Blue Earth Alliance is we feel an individual can make a difference in this world. There are so many things that need attention:  the environment, disappearing cultures, social issues or a local situation. These are all things that matter in our lives, no matter if you live in a small town or in New York City or Seattle. By raising awareness of these issues, you can make a difference; you can make a change. It’s a very high level look, but I think that no matter who you are — whether you’re a professional photographer or advanced amateur — you recognize the power of photography.

    Blue Earth Alliance: Collaboration is key for photography that makes a difference

    Photojournalist Tom Reese spotlights the devastation of toxic waste in his project, “Choosing Hope: Reclaiming The Duwamish River.” Photo by Tom Reese.

    Can you explain how Blue Earth Alliance works with photographers who become sponsored?

    First, I need to be very clear:  Blue Earth does not provide direct funding or grants. That is a common misconception about Blue Earth. The biggest service Blue Earth provides is fiscal sponsorship. This is a huge asset to individual photographers and filmmakers since when we accept a project for sponsorship we extend our 501(c)(3) status to it. The photographer/filmmaker can then apply for grants from organizations and foundations that only donate to a 501(c)(3). After 21 years, we have a great reputation with funders for sponsoring worthwhile projects. Blue Earth provides a vetted seal of approval for donors.

    Sometimes photographers and filmmakers just need encouragement for their projects. More than one photographer has mentioned that when Blue Earth selected their project for sponsorship, it encouraged and inspired them to continue their work.

    Blue Earth Alliance: Collaboration is key for photography that makes a difference

    Daniel Beltra’s project has documented conservation around the planet. He has shot on all seven continents, many of his photographs are shot from the air. Photo by Daniel Beltra.

    Blue Earth Alliance has sponsored more than 134 photography and filmmaking projects over the last two decades. Can you reflect on a few that have had an impact?

    We have had had many, but a couple that stand out. These projects can start the conversation, even raise the visibility of some of these issues. One was a really long term project by the late Gary Braasch. He came on board in the late 90’s, early 2000 and was talking about global warming before it became popular. It was important work in that it elevated the conversation because of his photography and his dedication.

    Another is Subhankar Banerjee and his story about the Arctic National Wildlife Refuge and how important it was to keep that area pristine. He had worked at Boeing and had no professional photography experience. He came to us and wanted to do this project and applied for sponsorship.

    He spent a couple of years in the Arctic and showed how beautiful it was even when some senators were calling it a frozen wasteland. The Preserve is one of the last pristine areas of that particular environment and there was a lot of discussion about oil, a lot of senators wanted to open it out to oil exploration. He also contracted with a number of museums including the Smithsonian to exhibit his work from this project. In one of the Senate debates about drilling in the refuge Senator Boxer held up his book.

    Blue Earth Alliance: Collaboration is key for photography that makes a difference

    Katherine Jack’s project with Blue Earth Alliance is documenting life in the Palawan Sea, in the Philippines and how changes to our marine ecosystem is affecting the life of the Palawan residents.

    What are the steps a photographer would need to take to get support from Blue Earth Alliance? What are the criteria that makes a project worthwhile?

    Blue Earth accepts project proposals twice a year: January 20 and July 20. The submission requirements can be found on our website. In a proposal we look for a clear description of the project, a unique viewpoint or topic and clarity around how the project fits within the Blue Earth mission. Having a project with a 501c3 status does not mean that money magically appears. Finding funding can be difficult, and it takes time to thoughtfully research funders and write grants.

    When we review our project proposals one of the first things I look at their budget to see if they know what they are doing financially.

    We have a responsibility to make sure funds are used as they should be. One of the first things I look for is are the photographers paying themselves, through a stipend. We are too important not to pay ourselves.

    Blue Earth wants our project photographer/filmmakers to succeed, and we scrutinize all proposals in order in ensure that likelihood.

    Blue Earth Alliance: Collaboration is key for photography that makes a difference

    Greg Constantine’s decade-long project, Nowhere People, focuses on the plight of people forced from their homes, without citizenship and looks at the challenges of their daily lives and their future. Photo by Greg Constantine.

    What advice do you have to photographers who are looking for a way to use their photography to make a difference?

    Photographers and filmmakers should try to form coalitions with other like-minded people and organizations. I believe in the strength of an individual. But I believe in the power that comes when individuals come together for a common goal.

    Photographers and filmmakers also need to realize that one grant will seldom fund their entire project. They should apply for many: large, small and in-between. For my first long-term project I used my savings, a grant and assignments to fund it.

    It’s imperative to create a coalition of funders. Funders like to see support from other organizations when considering an application. They see it as a third-party endorsement of the photographer/filmmaker and the project. It’s true that success leads to success.

    Photographers and filmmakers often forget, or are afraid of, including friends and family in their fundraising efforts. People are often more likely to give a donation to someone they know. Crowd-sourcing websites make fundraising campaigns much easier than in the past.

    If a photographer doesn’t believe they can make a difference then they won’t.

    Blue Earth Alliance: Collaboration is key for photography that makes a difference

    Natalie Fobe’s captured the extensive damage of the Exxon Valdez oil spill in Prince William Sound while on a three month assignment for National Geographic. Photo by Natalie Fobes.

    Your photography has included extensive work around the Pacific Salmon, wildlife and landscapes. What are you most proud of?

    I think probably the work that may have had the most impact on society was the Exxon Valdez oil spill in. That was also the hardest story I photographed because of the difficulty of the working conditions and getting access. And the chaos, the chaos of the spill and the emotional impact of the destruction of the environment. The horrible pain that the animals and birds suffered and the people too.

    This happened in a beautiful pristine area that was home and sustenance for the native Alaskans but also the commercial fishermen and townspeople who lived there.

    Blue Earth Alliance: Collaboration is key for photography that makes a difference

    Annie Musselman’s first project with Blue Earth Alliance focused on the delicate balance of human impact on wild animals. Her project Wolf Haven documents animals in sanctuaries. Photo by Annie Musselman.

    What does the future hold for Blue Earth Alliance?

    We are an organization with a passionate and dedicated board that donates thousands of hours each year to our mission.

    We hold an annual conference “Collaborations for Cause.” This will be held in May 5-6, 2017, in Seattle. The goal of Collaborations for Cause is to put non-profits, educators, communications professionals and visual storytellers in the same room for education, inspiration and networking. Presentations and interviews of our past speakers can be viewed at photowings.org.

    Our conference supports our mission to form a coalition of non-profits and visual storytellers. We hope that our photographers’ projects educate the public about important issues. Simply: we want our projects to change the world for the better.

    Blue Earth Alliance: Collaboration is key for photography that makes a difference

    Photographer Tim Matsui’s project focused on human trafficking and lead to the film, ‘Leaving the Life’ as well as working with King County Government in Washington State to create policy around human trafficking. Photo by Tim Matsui.

    DPReview also spoke with Tim Matsui, a photographer who has worked on two projects in conjunction with Blue Earth Alliance. He explains how the organization helped him to make a difference with his photography.

    I first went to Blue Earth because I was ‘just a photographer’ and unable to apply to many foundation grants or other funding opportunities. I was doing grassroots fundraisers, silent auctions, even burger-beer events with local businesses willing to support my work with their proceeds. Old school.

    Leaving the Life is my second project with Blue Earth. My first one, over a decade ago, used documentary multimedia—when slide projectors and dissolve units were still a thing—to create dialog about the lasting effects of sexual violence on individuals and communities.

    Being accepted at that time was not only validating of the social justice work I felt compelled to do, but it opened the door to foundation grants and private donations; something I knew very little about.

    The learning curve was steep, but I was no longer ‘just a photographer.’ I was in the company of others who were much more accomplished than myself. I had access to their knowledge and this helped me understand how I could increase the impact and reach of my work.

    Years later, when I realized Leaving the Life and The Long Night could create impact, I reapplied to Blue Earth. This allowed me to receive a grant from The Fledgling Fund. That grant lead to the policy work I’ve done with King County government.

    In fact, it was a screening of The Long Night at Collaborations for Cause where I met a King County employee who became instrumental in my work with King County. Without her, I doubt that two-year journey would have come to fruition.

    Blue Earth continues to support my work as I’m now looking for investors for a follow up film to The Long Night— these are people who see their return on investment not as financial renumeration, but policy change. And through Blue Earth I’ve had the opportunity to share what I’ve learned about using film to support social and policy change. Blue Earth is grassroots, created and run by photojournalists, and helping stories have impact is woven into the fabric of the organization. That matters to me.


    Blue Earth Alliance’s Collaborations for Cause takes place May 5th and 6th in Seattle. You can find the speaker schedule and registration information online at blueearth.org.

    Articles: Digital Photography Review (dpreview.com)

  • Throwback Thursday: Pokémon Snap

    Photography makes guest appearances on plenty of video games, but it has rarely been the entire point of a game. Pokémon Snap is a rare exception, and if you ask any child of the 90’s who owned a Nintendo 64, it’s a heck of a way to spend hours of your time.

    Pokémon Snap debuted in North America in June 1999, and gameplay is extremely simple. You play as Todd Snap, a guy on a perpetual Pokémon safari armed with a camera and a few tools designed to elicit interesting responses from the Pokémon: a Poke-flute and an endless supply of apples and ‘pester balls.’ 

    The objective, per usual, is to ‘catch them all’, but in this game, catching them means taking a photo as you coast around Pokémon Island in a cart. At the end of each level Professor Oak rates and scores your photos based on composition and subject matter. Being the late ’90’s you are shooting film (looks like Fuji maybe?) so you have a limited number of frames to work with on every outing.

    And that’s the whole game: figuring out what series of events or combination of annoyances will make Pokémon show themselves and provide the most photogenic reactions. Lure Pikachu to a surfboard with a trail of apples, and voila: surfing Pikachu photo. You could also hit them with pester balls, which seems like a poor way to treat a Pokémon, but you get a lot of points if they faint for your photo. And here’s a fun fact – apparently ‘participating Blockbuster stores’ would make small prints of your best Pokémon shots if you brought your cartridge in.


    If you never played it then I imagine it sounds pointless at best. And if you offered it to a kid who’s grown up on a steady diet of big-budget, modern blockbuster games, I’m sure it looks about as exciting as Pong. But it was an unlikely hit with my generation, selling 1.5 million copies and achieving ‘cult classic’ status.

    I didn’t have any particular interest in Pokémon or photography at that point, but I spent countless hours playing Pokémon Snap. It was irresistibly cute and rewarded experimentation. Before its US release IGN predicted it would be ‘a game solely intended for a Pokémon-crazed Japanese audience,’ but were eventually won over, calling it ‘an addictive, surprisingly fun gem of an experience that definitely deserves a rent.’ Looking back at the game almost two decades after its release, I’d still say that sums it up pretty well.

    Articles: Digital Photography Review (dpreview.com)