Blog

  • Alpine Labs’ Spark 3-in-1 camera trigger seeks funding on Kickstarter

    Alpine Labs, the company behind the Pulse camera remote, is back on Kickstarter with a more powerful and versatile triggering device. The Spark camera remote allows for triggering your camera in three ways: you can either use it as an infrared wireless remote, control, plug it into your camera with a cable and use it as a wired remote, or connect it to your smartphone and a dedicated app via Bluetooth to unlock a variety of creative trigger options. 

    The app offers customizable settings and lets you shoot timelapses, HDR brackets and long exposures and can trigger up to three cameras at once. Using the infrared connection you can trigger single shots or capture time lapses at one-second intervals by holding-down the shutter button.

    The cable connection offers more reliability and doesn’t require line of sight to your camera’s infrared sensor. According to Alpine Labs the button battery will work for over 2,000 hours of use. In addition the device works with a large number of cameras. The Spark Kickstarter campaign will be running until May 20. Until then you can reserve a Spark device for $ 44 which is 25 percent off the envisaged future retail price.

    Articles: Digital Photography Review (dpreview.com)

  • Nikon D7500: Should I upgrade from my D7200?

    D7500 vs D7200

    The D7500 is Nikon’s latest enthusiast DSLR that gains a handful of components and refinements from the higher-end D500. However, it’s also a model that loses a couple of features in order to leave a more decisive gap between the two models.

    So where does that leave existing D7200 owners? It’s fairly unusual for successive models to offer enough of a change to provide a significant upgrade, so does the D7500 do that? For that matter, should would-be buyers try to pick up the last of the D7200s, while they’re cheap?

    Image quality

    For all the hoopla about better image quality, we’ve seen little significant difference between this 20MP chip (when it appeared in the D500) compared with the 24MP sensor in the D7200. The differences that do exist become visible in side-by-side comparison at extremely high ISO settings, but don’t expect a significant uptick in noise or dynamic range performance in return for the slight cut in resolution.

    The D7500’s highest native ISO rises by 1EV and its extension settings keep going to a dizzying Hi 5, which is equivalent to ISO 1.6 million (I’m not going to speculate about how Nikon’s engineers celebrated when they achieved this milestone), but the main benefits of this chip appear to be readout speed, rather than significant differences in image quality.

    Autofocus improvements

    For us, one of the most significant factors will be how closely the D7500 can match the D500’s autofocus. It gains the much higher resolution metering sensor used for subject tracking, along with nominally the same processing (though Nikon’s Expeed naming system doesn’t necessarily mean they have the same chip).

    However, the D7500 doesn’t gain the AF module from the D500, which means it can only offer 51 AF points (15 of which are cross-type), rather than 153 points, 99 of which are cross-type. This also means it misses out on the incredibly broad AF coverage that the D500 offers.

    Even so, the processing and meter module should ensure the autofocus and, in particular, the subject tracking, works better than the already rather good D7200. It remains to be seen whether it can match the uncannily good performance of the D500.

    Autofocus auto fine-tune

    One of the nice features to make its way down to the D7500 is the Auto AF fine-tune system. This allows you to set the focus precisely in live view such that the camera can then check this against the results of its separate phase detection AF module. Any difference is captured as a correction value.

    This is a useful addition since it allows the user of the camera to calibrate their lenses without the considerable degree of trial and error required with the D7200’s AF fine-tune system (which essentially required that you guess and check a correction value).

    The autofocus fine-tune system isn’t a panacea: it applies a single correction value for all focus points, so will not necessarily improve the performance of off-center focus points, which tend to be less reliable, particularly with lenses that exhibit spherical aberration.

    High-speed shooting

    Obviously the biggest change with the D7500 is the move from six frame per second to eight frame per second shooting. This isn’t a match for the D500’s 10 fps shooting but it’s likely to be enough for a lot of people. Hell, this is around the level of performance that the world’s best sports shooters used around 2005.

    As well as 8 fps shooting, the D7500 has a buffer nearly three times deeper than the D7200’s. 50 uncompressed 14-bit Raws in a burst is likely to be enough for all but the most demanding action shooters.

    4K Video

    The D7500 brings 4K UHD video recording and, assuming it looks like the D500’s output, it’s pretty good. It’s taken from a 1.5x crop of the sensor, meaning it’s using sub-Four Thirds sized sensor region, which means you won’t get the ‘Super 35’ style noise or depth-of-field characteristics that other APS-C cameras can offer. The significant crop also means your lenses will offer a significantly less wide field of view when shooting. A standard Nikon 18-something DX zoom will start at a fairly restrictive 40mm equivalent field of view.

    Just as significantly as the addition of 4K is the gain of power aperture, which means you can change aperture in live view mode on the D7500. On the 7200 it’s a dance of dropping out of live view, changing the aperture and then jumping back in again, with no way at all to change it once you’ve hit REC.

    Backwards compatibility takes a step backwards

    The D7500 also loses a little in the way of backwards compatibility. Nikon has tried to keep its F mount as backwards compatible as possible, even as it’s added more modern features. The D7X00 series has, for some time now, been the lowest level of Nikon to retain a screw drive for older AF-D lenses but the D7500 sees another small element of compatibility chipped away. Specifically, the tab that checks what aperture old ‘AI’ lenses are set to (pictured, center) has been removed, meaning the camera can only use manual exposure mode with these lenses, with no aperture priority option.

    For most users, this is likely to be irrelevant (manual focusing using the viewfinder focusing screen of a DX DSLR isn’t the most life affirming process), but it does mean anyone with an older lens collection will need to think about the D500 as their next step, and it’ll be another factor to consider when scouring eBay.

    SnapBridge

    The D7500 gains the SnapBridge system that uses a constant Bluetooth LE connection to auto-transfer 2MP images or keep the hailing frequencies open for when you want to use Wi-Fi.

    We remain unconvinced by SnapBridge, especially in terms of what it offers the higher-end, more shutter-button-happy user, but it’s not necessarily worse than the D7200’s system. That may sound like damning with faint praise but, until Nikon develops more distinct ways of using SnapBridge, we feel it’s better suited to the D5600 user than it is to the more demanding enthusiast user of the D7500.

    Still, the D7500 does gain a batch in-camera Raw conversion system, which we’re hoping will work well in conjunction with SnapBridge to provide an effective Raw + Wi-Fi workflow. Time will tell.

    Flip-up touchscreen

    The D7500 gains a flip-up/down touchscreen. The flip screen is likely to be handy for video shooting but, with underwhelming video autofocus and no sign of the D5600’s ability to use the rear panel as an AF point touchpad, we don’t think the touch sensitivity of the screen is less exciting. Sure, the D5600’s touchpad implementation only really worked for photographers who put their right eye to the viewfinder, but that at least made it a major benefit for those users.

    The LCD panel itself has also changed, but don’t read too much into the lower dot count. The new panel may only be 922k dots, rather than 1.2 million, but the difference is that there is no longer a white ‘dot’ making up each pixel: they’re both displaying 640 x 480 pixels.

    Battery life/battery type

    The D7500’s battery life rating has fallen 15%, compared with the D7200, presumably as a result of the demands of the faster processor and possibly less energy-efficient screen.

    It uses a new version of the EN-EL15 battery called the EN-EL15a. Other than coming in a lighter grey plastic case, Nikon was unable to give specifics about what’s changed. Our assumption is that it’s just Nikon making it easier to distinguish between the newest versions of the EN-EL15 and the older ones which don’t seem to get on with its newest cameras.

    However, this is where you see another attempt to put more clear water between the D7500 and the D500: the 7500 no longer has a port for connecting to a battery grip. So you’ll need to stick with your D7200 or jump to the D500 if you regularly shoot beyond the capacity of a single battery or appreciate the improved ergonomics for portrait orientation shooting.

    Is this really the D7200 replacement?

    Yes. Absolutely.

    While it’s true that the D7500 isn’t a step up from the D7200 in every last respect, it follows the D7X00 pattern in every way that matters. Twin dials, screw drive, large prism viewfinder and comparable price point. Nikon will, naturally, say that the D7200 and D7500 will sit alongside one another, but that’s what manufacturers say to avoid devaluing any stock left in retail channels.

    However, it’s important to bear in mind that when the D7200 was launched, it sat at the top of Nikon’s DX lineup, whereas the D7500 has to slot in beneath the D500. Inevitably that means some users will be better served by stepping up a tier, but we don’t think it’ll inconvenience a significant number of users. 64, 128 or 256GB cards offer plenty of capacity and card errors are rare enough that a second card slot isn’t a vital feature. The D7500 is still a camera that shoots faster and for longer, and can capture better video than its predecessor, so it’s not like Nikon’s evil marketing department has left would-be D7X00 users out in the cold.

    Should I upgrade?

    To a large extent, the degree to which we’d recommend upgrading from the D7200 to the D7500 will depend on how its new AF system performs. If you’ve already been thinking about a camera with faster performance, though, then take a look at our D500 vs D7500 comparison: the D500 will give you a bigger performance boost.

    If your needs are less action driven, it’s a much harder call and, unless the AF performance turns out to be great, the answer has to be that it’s probably not worth it. However, if you own a D7000 or even a D7100 that’s starting to show its age, the D7500 offers a host of benefits, not least better dynamic range, faster shooting and a much deeper buffer.

    Overall, then the D7500 isn’t better than the D7200 in every respect, but it’s at least a little better in most of the ways that will matter to most people. But, while the last of the D7200s are available at end-of-life prices, it’s worth thinking about how much the extra features are worth, to you.

    Articles: Digital Photography Review (dpreview.com)

  • Labyrinthine Loophole: Bar Entry Maze Beats 500 Meter Minimum Distance Law

    [ By WebUrbanist in Architecture & Offices & Commercial. ]

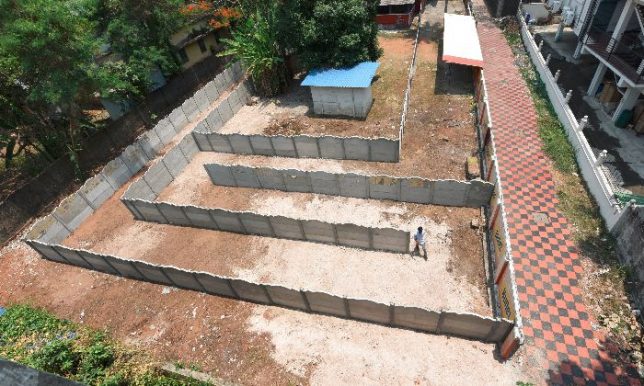
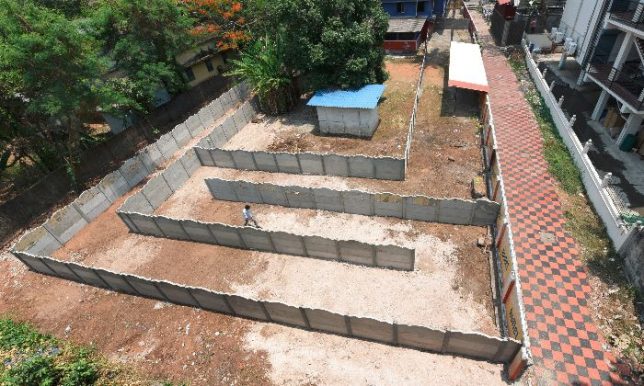
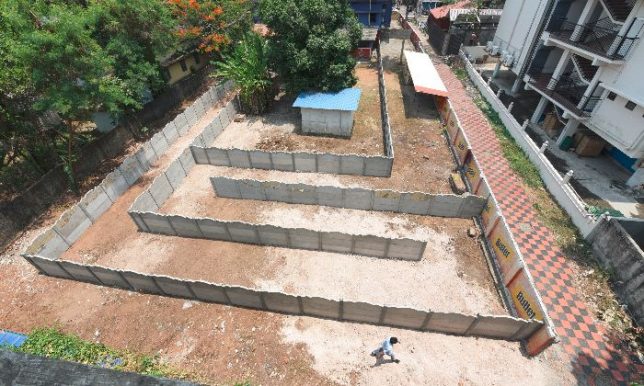
    Following a Supreme Court of India ruling that bars must be a minimum of 500 meters away from highways, one intrepid watering hole wrapped itself in a 250-meter maze to effectively circumvent the law. Handed down earlier this month, the ruling has closed down liquor-serving establishments across the country prompting some to get creative.

    Owners of the Aishwarya Bar in North Paravoor, a Kochi suburb, maintain: “We have done nothing illegal. The plot behind the bar also belongs to the owner and we have constructed an extended way to reach the bar. Now it is 520 meters from the highway. We are set to approach the circle inspector of excise with the new route map to authorize the reopening of the bar.”

    Perhaps most remarkably: since the purpose of the law relates to walking distance (rather than linear), officials have given their blessing to this unusual solution — he intent of the legislation, after all, is to reduce intoxicated driving accidents. With that potential code violation remedied, the only accusation left leveled against the establishment related to changing around the property without a building permit, resulting in a small fine.

    The solid-walled fence shaping the labyrinth was installed at minimal cost in a matter of days, expanding into adjacent property also owned by the bar’s manager. Pub crawlers, meanwhile, may find themselves somewhat lost when loaded, but at least there are no dead ends. However, bars like this one may still find themselves with fewer customers since the federal ruling also prohibits roadside signage directing drinkers to pubs. Other specific exceptions have been granted on a case-by-case basis, but this particular solution may lead to a series of similar approaches.

    Share on Facebook


    [ By WebUrbanist in Architecture & Offices & Commercial. ]

    [ WebUrbanist | Archives | Galleries | Privacy | TOS ]


    WebUrbanist

  • How to Use Colored Gels for Creative Off-Camera Flash Photography

    Diving into off-camera flash photography opens up a world of exciting, new and creative possibilities. Besides giving you the option to shape and control the light in your image with a flash unit, you can also use colored gels to modify the color of your scene to add either a subtle creative touch or a more dramatic impact.

    off-camera flash using a blue colored gel

    A man playing electric guitar lit creatively by an off-camera flash colored blue.

    This guide will help you to get started using off-camera flash and colored gels to bring your photography to the next level!

    What are colored gels and how are they used?

    Colored gels (sometimes called color filters or lighting gels) are thin pieces of colored transparent material. They can be fitted over the top of your flash unit to modify the color of the light.

    Examples of colored gels that can be used to modify the color of light from off-camera flashes

    A small example of the variety of colored gels available.

    Often, the reason for using a colored gel is to tone of the flash so that it matches the color (white balance) of the room. For example, a typical camera flash fired in a room lit by tungsten light bulbs will appear much bluer against the orange ambient background light. By covering the flash with a gel that is tinted orange, you can make the flash match the existing lighting conditions so that all sources contribute the same color to your final image.

    Attaching the colored gels to your flash

    A gel can be attached to a flash in a number of ways. Perhaps the most common method for portable flash units is with a velcro strap that wraps around the flash tube. If you’re in a real pinch, you could even simply use a piece of tape. Just make sure that the gel completely covers the flash so that it completely modifies that color of the light.

    Note: Magmod makes a system to do just that – read Suzi Pratt’s overview of Magmod options here.

    • Magmod Basic Kit on Amazon including attachment device and gels – $ 89.95 (are a bit more durable and will last longer than the gels).
    • Honl Photo Speed Strap – $ 10.95
    • Honl gel kits – around $ 19.95
    A red colored gel filter covering an off-camera flash unit

    A red gel has been attached snugly to the flash unit and will now change the color of the light from the flash to red.

    A sideview of a colored gel fitted over a flash unit, attached by a Velcro strap

    A view of the Honl Photo Speed Strap, which uses velcro to allows you to quickly and easily attach a color gel to your flash unit.

    Gels come in a wide variety of colors and are very inexpensive, which makes it easy to get started experimenting with this fun style of photography. Also, they can continue to be used even if they are scratched or folded. You only need to replace a gel if it has a rip or a small hole.

    Once you have your off-camera flash or multiple speedlight units ready, you can begin to get creative!

    Using colored gels with a dark background

    When getting started, one of the best ways to get a sense of how to use color gels is by taking pictures in a dark room. This gives you full control over the light throughout the scene. Creating a dark background doesn’t have anything to do with putting up black curtains or finding a wall that is painted black – it’s all about controlling where the light spills.

    First, you’ll want to find a medium to large sized room. Dim the lights so that you can produce a perfectly black image without flash (available room light only). Place your subject a fair distance away from the far wall. By directing the light from your flash units only towards your subject and away from the wall behind them, you can create a completely black background.

    To add just a hint of color, put a color gel only on your secondary flash. The key (main) light provides adequate lighting for the subject, while the secondary flash adds drama, intrigue, and style to the photo.

    A man plays guitar with a burst of blue color from the flash behind him

    This photo was taken with two flashes – the one in the front hitting him is not tinted with any color, the one behind him is gelled blue. Light from the blue-tinted flash has been allowed to “spill” towards the camera lens, created the colored lens flare effect.

    Once you’ve mastered this straight-forward style of shot, you can start to mix and match colors for unexpected and fascinating results.

    Getting creative with color

    Color plays an incredibly vital role in telling a story or establishing a mood. We are all familiar with typical color associations – yellow represents happiness, red represents anger, blue represents sadness, and so on.

    With a variety of color choices at your fingertips, you can craft a precise feeling or mood in your images simply by adding a colored gel over your flash unit.

    A portrait of a man taken with a light from a flash that has been tinted blue

    This image was lit by a single flash with a blue colored gel to give it a mood of introspection and melancholy.

    It is important to visualize the final image you intend to create, otherwise, your shot can quickly turn into a jumble of mismatched colors.

    Remember that you can also color more than just the subject. Firing a colored flash at the background wall can instantly update it, which is perfect for adding some variety to studio-style portrait shots.

    An image of a man with a lightsaber, made possible through a red colour placed over an off-camera flash unit

    Since lightsabers haven’t been invented yet, an off-camera flash that has been covered with a red color gel provides the distinctive glow for this image. The lightsaber itself was added later in Photoshop.

    How understanding color can help you create drama

    Once you start playing with color, it helps to have an understanding of how and why certain colors work better together than others.

    Colorwheel

    You can apply even some basic knowledge from a color wheel to get a sense of how you can create bold and vibrant color pairs. For example, colors directly opposite each other on the color wheel are called complementary colors, as they pair together very well. Knowing this you can mix blue and orange for a dramatic shot. Many Hollywood movies use color theory to help make their footage more vivid.

    Or, you can break the rules for more surprising and unexpected results!

    A man holding a guitar, lit by light from blue and red colored gels on off-camera flashes

    Blue and red create a strong contrast, which adds a feeling of tension and drama to this image.

    Once you get comfortable with controlling and creating colored light, your creative options are endless. For example, you can use a flash tinted orange to recreate the glow of a sunset. You can also begin mixing and matching with ambient light conditions, which is much trickier but can be very rewarding.

    You’ll be surprised how much a thin sheet of colored plastic can transform your photography!

    Some important tips to remember

    • Darker color gels, such as deep reds or blues, block a portion of the light that the flash gives off. When working with these colors you will need to increase the amount of flash power compared to when you use flash on its on.
    • If you don’t have a full set of colors, you can layer two colored gels over top of each other. For example, blue and red colored gels can be combined to make purple. Remember that doubling them up will block even more light and require additional flash power.
    • You can use any traditional flash modifiers, such as umbrellas and soft boxes, along with color gels in order to soften or shape the light that is produced.
    • Experiment and play! Even if it seems intimidating or complicated at first, trial and error is a fantastic way to learn a new skill or technique that you can add to your repertoire.

    Please share your questions, comments and images shot with colored gels below.

    The post How to Use Colored Gels for Creative Off-Camera Flash Photography by Frank Myrland appeared first on Digital Photography School.


    Digital Photography School

  • NK INK: North Korea Graffiti, Stencils & Street Art

    [ By Steve in Art & Street Art & Graffiti. ]

    North Korea may be making the headlines like never before but the world’s graffiti artists have been featuring the Hermit Kingdom’s leaders for years.

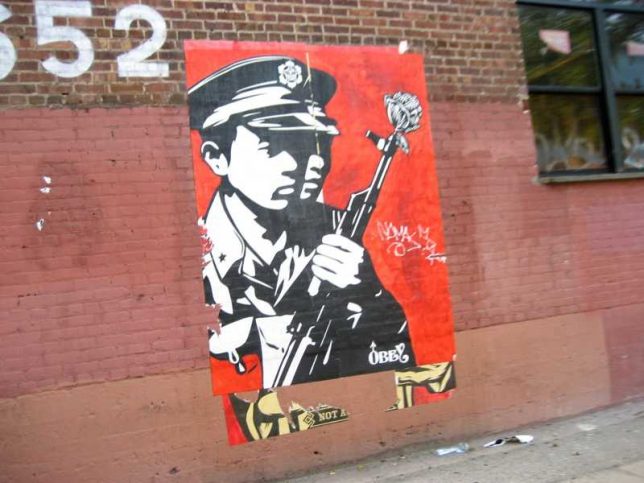
    When it comes to North Korea, there’s a lot to look down on. Take the country’s unique leadership – a communist dynasty? Who knows what the late Karl Marx might think of that (though it’s not hard to guess). In any case, NK-themed graffiti and street art should never be looked down upon, at least not by those living outside North Korea. Flickr user _eddie999_ brings us our lead image featuring Team America: World Police’s take on Kim Jong-il, snapped in Brighton, UK early in 2012. Just below, Mauricio Balvanera’s (maubrowncow) 2007 photo of a stenciled North Korean soldier with a flower in the muzzle of his rifle gazes out from a wall near the Toy Factory Lofts in Los Angeles, California.

    The Sun Is (Still) There

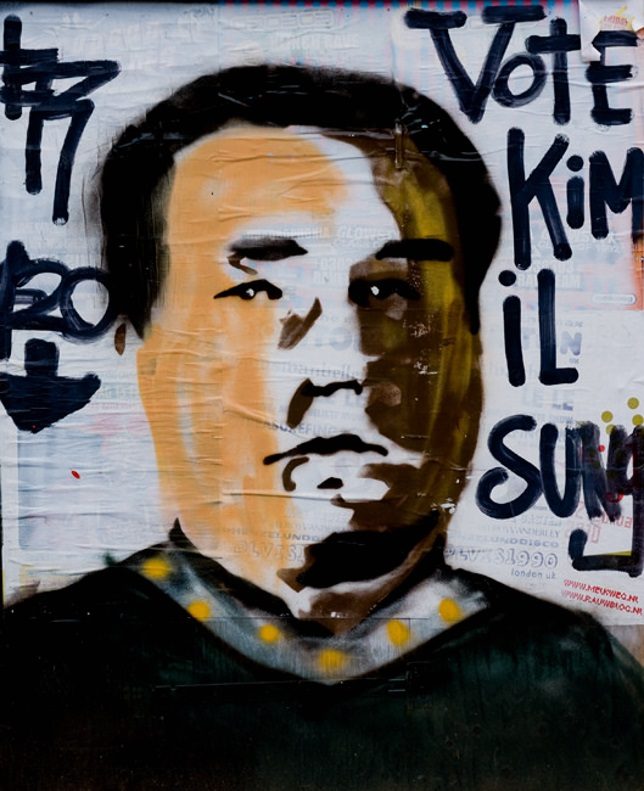
    Kim Il-sung (“Kim become the sun”) was North Korea’s first supreme leader – the “Great Leader” in official parlance – who held power from 1948 to his death from natural causes in 1994. Among his most lasting accomplishment was the establishment of the Kim ruling dynasty, now into its third generation in the form of Kim Jong-un. Speaking of lasting accomplishments, Flickr user Loïc Brohard snapped the above artwork captioned “Vote Kim il Sung” in Amsterdam, the Netherlands, in April of 2010.

    The Son Is Here

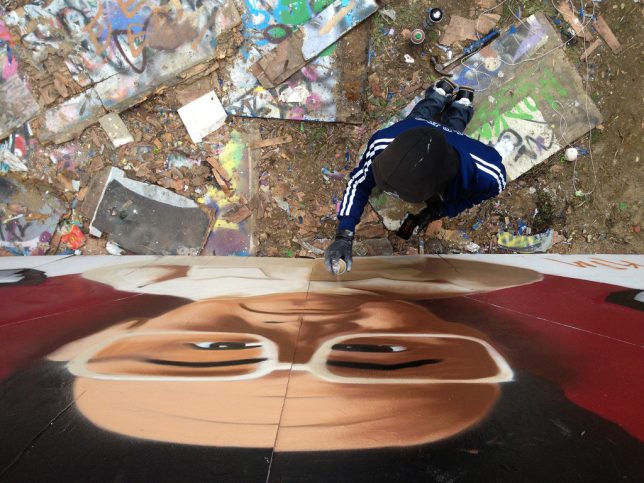
    Kim Jong-il inherited power from his father in 1994 and was known in North Korea as the “Dear Leader”. Flickr user Larry Jones (westbymidwest) captured this full-color portrait of Kim Jong-il in full panhandler mode on September 20th of 2009 at the Albany Bulb, an artificial landfill peninsula extending westward from the the east shore of San Francisco Bay. It’s uncertain whether the splash of orange paint across the portrait’s “HELP” sign is part of the original composition or a later amendment.

    A Spectacles Of Himself

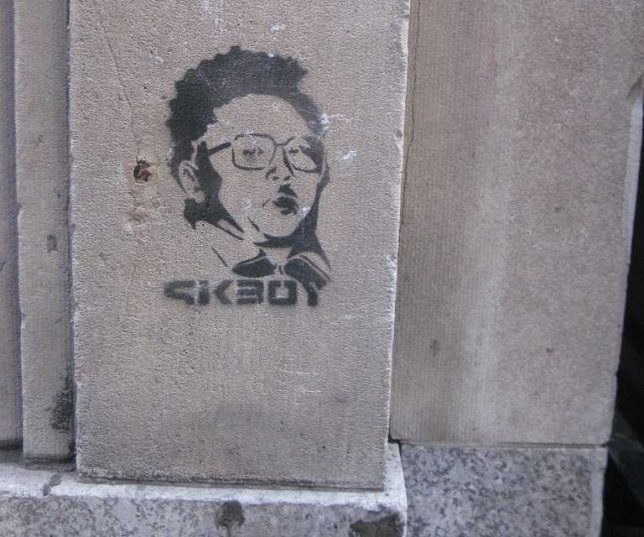
    Kim Jong-il was over 50 years old when he assumed North Korea’s leadership but he had been groomed for the position since the early 1980s. Kim the Second raised the cult of personality established and encouraged by his father to ever-greater heights. The stencil above, found in NYC’s Koreatown district, dates from 2009 and was captured in April of that year by Flickr user e.yamasaki.

    The Future’s So Bright…

    Kim Jong-il’s designer shades take center stage in the above NYC photo pastiche snapped in late 2011 by Flickr user allan molho (amolho4). Sources state Kim Jong-il was a fervent fan of Western cinema, boasting a collection of over 20,000 titles including every Elvis Presley flick. His fascination with “The King” in his late-1960’s rhinestone jumpsuit phase may have influenced Kim’s sartorial preferences, at least when it came to prescription and fashion eyewear.

    Thanks, Obama

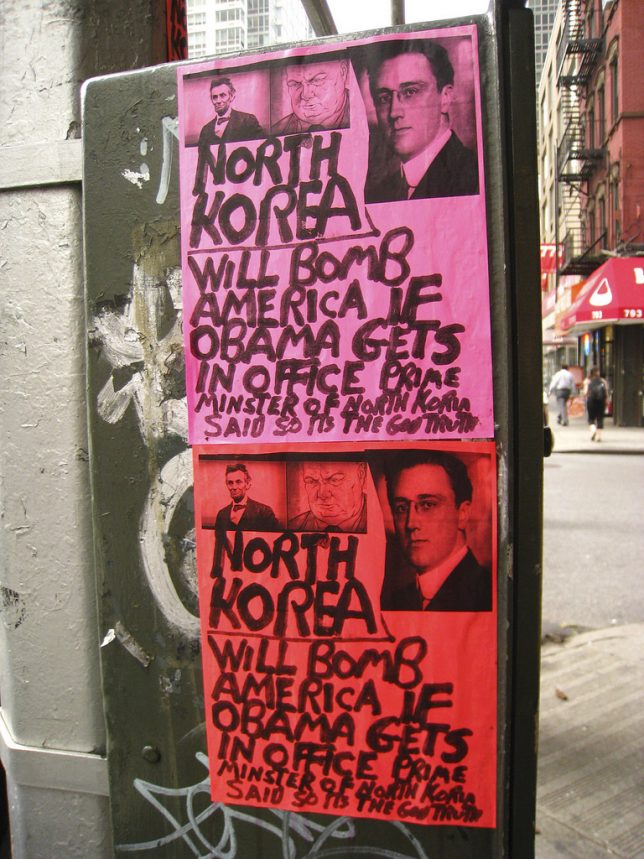
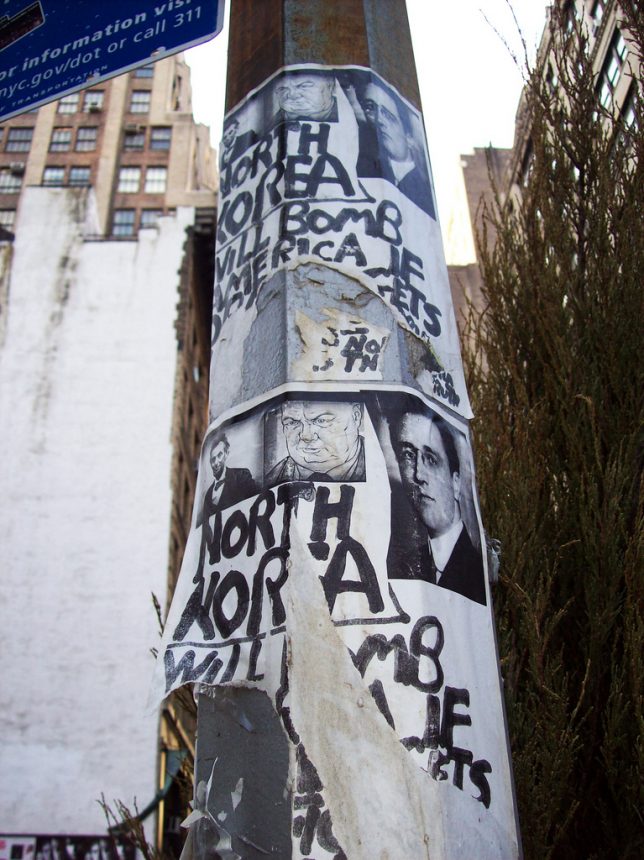
    First rule of tinfoil-hat prognostication and doomsday cult propaganda: never predict near-future events! The unknown creator of the above paste-up mini-manifesto evidently didn’t get that memo. To their credit, they did manage to evoke the spirits (and images) of Lincoln, Churchill and an alarmingly youthful FDR to add weight to their shrill Cassandra callout. Bonus: stating “Prime minister of North Korea said so its the God truth.” Kudos to Flickr users shoehorn99 and allan molho (amolho4) for capturing these ravings in August of 2008 and April of 2009, respectively.

    Next Page – Click Below to Read More:
    Nk Ink North Korea Graffiti Stencils Street Art

    Share on Facebook


    [ By Steve in Art & Street Art & Graffiti. ]

    [ WebUrbanist | Archives | Galleries | Privacy | TOS ]


    WebUrbanist

  • The dPS Ultimate Guide to Getting Started in Lightroom for Beginners

    Note: this is one of the most comprehensive articles we’ve written on Lightroom. Read it below or get a free downloadable copy to print and/or refer to later by adding your email address below and we’ll send you a copy.


    Download “The dPS Ultimate Guide to Getting Started in Lightroom for Beginners”

    We respect your email privacy

    If you’re new to Lightroom you may be wondering what it does, how it differs from other programs (like Photoshop), and how to use it to its full potential – this article will answer a lot of questions and help you get started.

    The reason that Lightroom has become so popular is because it is a workflow application. You use it to manage your photos the moment they are downloaded from your camera’s memory card and saved on your hard drive. Once they are inside Lightroom you can organize them into Collections (a type of virtual folder) and process RAW, JPG, and TIF files.

    You can also add photos to a map to organize them by location, create a photo book or slide show, print photos, or export them to other programs for further processing. Lightroom remains at the heart of your workflow as you do it all.

    The Ultimate Guide to Getting Started in Lightroom for Beginners

    Lightroom can be used for printing photos as well as processing and organizing them. It’s the complete workflow tool.

    The Lightroom Catalog

    The Lightroom Catalog is a database containing a preview of every photo you have imported into Lightroom. It also contains a record of each photo’s metadata (which includes all processing done to it) and the location where it is saved on your hard drive. Lightroom works by saving the edits you make to your photos as a series of text commands in the Catalog. This includes any and all processing instructions you set up for each image.

    The benefit of working this way is that it saves a lot of hard drive space. This is especially true when working with RAW files, as there is no need to convert them to 16-bit TIF files first (as you do in Photoshop) to work on them. All processing in Lightroom is non-destructive, meaning you can undo any steps or everything, and return to the original state of the file at any time.

    Lightroom Modules

    Lightroom has seven modules (Library, Develop, Map, Book, Slideshow, Print, and Web). You can only work in one module at a time. This article concentrates on the Library and Develop modules, as they are the most important to learn first, and one you’ll use most often.

    Scroll down to the end of the article for links to other articles I have written that explain how to use the other Lightroom modules. I’ve also linked to other articles throughout this guide that expand on the points within.
    The Library Module

    The Library module is the heart of Lightroom. It’s where you view, search, filter, and organize your imported photos. For example, if you want to find all your photos taken with a particular camera or lens, that’s easy in Lightroom (it takes seconds).

    The Ultimate Guide to Getting Started in Lightroom for Beginners

    This example search shows all the photos taken with my Fuji X-T1 camera and a 35mm lens in 2016.

    But the real benefit of the Library module is that it lets you organize your photos any way you want. It does this by using Collections, a type of virtual folder system.

    Folders are limited for organization purposes. Let’s say you took some photos of a friend called Peter in New York in September. You can only save those photos in one folder on your hard drive (which may be named Peter-New York-September or something similar).

    But in the Library module you are free to add the photos to as many Collections as you want. In this example, you could have a collection named Peter, another called New York, and another named September. In fact, you can add the photos to as many Collections as you want. You have complete freedom to organize your photos how you see fit.
    How to Import Photos Into Lightroom

    As Lightroom is built on a database (the Catalog) you have to import photos before you can do anything with them. During the import process, Lightroom adds your selected photos to the Catalog and generates previews for viewing. Imported photos stay in the Catalog forever (or until you remove them) and don’t have to be imported again.

    If this is the first time you have used Lightroom, then it will look something like this when you open it. There are no photos to see because nothing has been imported yet.

    Lightroom tutorial 03

    The screen is divided into four. This basic layout is repeated throughout the seven modules.

    1. The Module picker: The bar at the top that tells you which module is currently active. Click the grey triangle (arrow) at the top to make it disappear, saving screen space.

    2. The side panels: The left and right-hand panels containing all the Library module tools. Click on the grey triangles (arrows) to hide them.

    3. The Filmstrip: This displays thumbnails of the photos in the currently selected Folders, Collection, or search results. Click the grey triangle (arrow) at the bottom of the screen hide it.

    4. The Content window: This is the central display area. You view photos here after they have been imported into Lightroom. Use the keyboard shortcut Shift + Tab to hide all four side panels and see only the middle content window portion. This is handy when you are sorting and flagging images.

    More on sorting and flagging images in Lightroom here: 4 of the Most Important Elements of the Lightroom Library Module.

    Importing Photos into Lightroom

    If this if your first import you will probably be adding photos that you have already downloaded from memory cards to your hard drive. You can also import photos directly from a memory card, or a connected camera or smartphone.

    If you have already saved your photos in folders it is best to import one folder at a time. This gives you time to organize your images as you go along. Be aware that Lightroom will make you wait a long time while it builds previews if you import too many images in one go.

    This is what happens during the import process:

    • Lightroom notes where the imported photos are saved and adds this information to the Catalog.
    • Lightroom reads each photo’s metadata and saves that in the Catalog. This includes the camera settings and file names, data that is used to help search images.
    • Lightroom creates a preview of each imported photo and saves it on your computer’s hard drive.
    • The previews are saved in a previews (.lrdata) file.

    Please note the following: This is important and often trips up first-time Lightroom users. Your photos are not stored in the Catalog. Backing up the Catalog does not back up your images. Nor are your photos stored in the cloud if you’re a Lightroom CC subscriber. The Catalog only stores the metadata and processing information.

    Always remember that your photos are saved on your hard drive. You can only back up your photos by backing up the hard drive on which you’ve saved them.

    The Import Window

    Get started by clicking the Import button. Lightroom opens the Import window. It’s divided into four areas.

    The Ultimate Guide to Getting Started in Lightroom for Beginners

    1. Source: This designates from where Lightroom will be importing the photos. All devices and hard drives connected to your computer are shown here.

    2. Photo thumbnails: Ticked photos will be imported into the Lightroom Catalog when you press the Import button. You can choose Check All or Uncheck All at the bottom of the thumbnail window. To select several in a row tick one, hold the Shift key and select another – Lightroom will tick all of the images in between. To select random images hold the CMD/CTRL key and click each one individually.

    3. Import options: These tell Lightroom what to do with the photos. You have four options, they are:

    • Copy as DNG – Lightroom copies your files and converts any non-DNG Raw files to the DNG format. Only select this if you understand the benefits (and disadvantages) of using the DNG format.
    • Copy – Lightroom copies the selected files without changing the format. Use this to copy files from a device or memory card over to a hard drive.
    • Move – Lightroom moves the selected files from their current location to a new one. This is the same as Copy, except that Lightroom deletes the originals afterwards. This option is NOT recommended if you are downloading from your memory card! Always use Copy for that, so that if anything goes wrong during the import process you still have your original images on the car.
    • Add – Lightroom adds the selected photos to the Catalog, without copying them. Use this if the imported photos are already saved in the correct place on your hard drive (i.e. you aren’t downloading them from a card).

    4. Destination: Where you tell Lightroom to save the imported photos and what to do with them along the way.

    If you select the Add option you’ll see two panels here. File Handling (where you can select the preview options and save a second copy to another drive) and Apply During Import (which allows you to apply Lightroom develop presets to all the images being imported, this can save a lot of time if you wish to apply things like Lens Corrections, a slight edge vignette, etc., to all your images).

    If you select Copy as DNG, Copy or Move you’ll also see the File Renaming (where you can rename and number your images) and Destination (tell Lightroom where to put your actual images) panels.

    Further reading: Make Lightroom Faster by Using DNG.

    Putting it Together

    Now it’s time to import your first photos. This initial workflow assumes that you’re importing files that you have already previously saved to a hard drive.

    1. Under “Source”, navigate to the folder containing your photo files.
    2. Select the Add option from the top section.
    3. Open the File Handling panel (on the right, click on the heading to open and close panels). Set Build Previews to 1:1.
    4. Open the Apply During Import panel and set Develop Settings and Metadata to None. This is just to keep your first import simple.
    5. Click the Import button. Lightroom takes you to the Library module and starts importing the selected photos. It takes a while to create the 1:1 previews, but the wait is worth it as it makes viewing your photos much quicker.

    The Ultimate Guide to Getting Started in Lightroom for Beginners

    At some point, you’ll want to import photos directly from a memory card, camera, or Smartphone. There are a couple of extra steps in this process.

    1. Under “Source”, navigate to your memory card containing your photo files.
    2. Select Copy (instead of Add) at the top of the Import window.
    3. Set the File Handling and Apply During Import panel settings as above.
    4. Ignore the File Renaming panel (advanced users only).
    5. Under “Destination Folder”, select where you would like to save the imported photos. You can create a new folder by right-clicking on an existing one and selecting Create New Folder.
    6. Click the Import button when you’re ready.

    The Ultimate Guide to Getting Started in Lightroom for Beginners

    How to Organize Your Photos in Lightroom

    Photos are saved in folders (on your hard drive) and organized in Collections (in Lightroom). You can view both Folders and Collections in the Library module, but you can only view Collections in the other modules. This is one of the reasons why you will want to use Collections to organize your images.

    You can create as many Collections as you like. The more you use Collections, the more you will appreciate how useful they are.

    Lightroom has several types of Collections

    Collections: Virtual folders to which you can add any photos imported into Lightroom.

    Collection Sets: Another type of virtual folder. You can add Collections and other Collection Sets to a Collection Set, but not photos. They are for organizing Collections.

    Smart Collections: Collections populated automatically according to criteria set by you. Lightroom already contains several Smart Collections, you can add more as you see fit.

    Published Collections: These have a lot of uses, but the most common is for sending images to photo sharing websites like 500px and Flickr. This is for advanced users only.

    For Further reading on this topic, check out:

    • How to Upload Photos to Flickr and 500px Using Lightroom 5 (the information applies to Lightroom 6 and Lightroom CC as well).
    • How to Publish Images Directly to Instagram From Lightroom.

    Book, Slideshow, Print, and Web Collections: Created in Book, Slideshow, Print, and Web modules. These collections keep track of images used in these modules for specific projects you create.

    This screenshot shows the icons used to represent Collections in Lightroom.

    The Ultimate Guide to Getting Started in Lightroom for Beginners

    1. Devon (1) is a Collection Set that contains a Collection.
    2. Speke’s Mill Walk (2) is a Collection containing photos.
    3. Print (3) is a Print Collection.
    4. Web Gallery (4) is a Web Collection.
    5. The Collection Set Smart Collections (5) contains . . .
    6. The default Smart Collections (6) that come with Lightroom.

    The numbers on the right tell you how many photos are in each Collection. We will concentrate on Collection Sets and Collections in this article.

    Creating Collection Sets

    1. Go to the Collections panel and click on the plus (+) icon. Select Create Collection Set.

    The Ultimate Guide to Getting Started in Lightroom for Beginners

    2. Give the Collection set a name. This might be something like the year or the country where the photos you imported earlier were taken.

    The Ultimate Guide to Getting Started in Lightroom for Beginners

    3. Right-click on the Collection Set you created and choose Create Collection. Give it a name (relevant to the photos you just imported), tick the Set as Target Collection Box and click Create.

    The Ultimate Guide to Getting Started in Lightroom for Beginners

    4. Go to the Catalog panel and click Previous Import. Lightroom displays the images you imported earlier in the Content window. Go to Edit > Select All to select all the photos and press the B key. Lightroom adds the selected photos to the Target Collection – the one you just created.

    The Ultimate Guide to Getting Started in Lightroom for Beginners

    Further reading

    Now that you understand the basics of the Library module, you can learn more about organizing and searching your photos with these articles.

    • 5 Essential Things You Need to Know About the Lightroom Library Module
    • Use Lightroom Collections to Improve your Workflow
    • How to Organize Your Photos in Lightroom
    • Making Sense of Lightroom’s Grid View
    • The Hidden Secrets of Lightroom 5’s Loupe View
    • How to Find Your Best Images With Lightroom 5’s Compare View
    • Comparing Images with Lightroom 5’s Survey View
    • How to Create and Use Smart Collections
    • Four Advantages of Using Lightroom Collections
    • How to Use the Filter in Lightroom’s Library Module

    The Develop Module

    Now that you understand the basics of the Lightroom Library module, it’s time to get started post-processing some photos. To do so, select an image by clicking on it, then press the D key. This keyboard shortcut takes you straight to the Develop module.

    The layout of the Develop module is similar to that of the Library module. The Filmstrip (bottom) and Module Picker (top) are the same. What have changed are the panels on the left and right-hand sides.

    The Ultimate Guide to Getting Started in Lightroom for Beginners

    When you’re ready, hide the Module Picker, Filmstrip and left-hand panels by clicking on the grey arrows (triangles). Your screen should look something like this – the photo you’re working on is in the centre of the screen (the content window) and there are some panels on the right.

    The Ultimate Guide to Getting Started in Lightroom for Beginners

    The panels on the right contain most of Lightroom’s RAW processing tools. You can jump around these in whichever order you want, but it makes sense to use a purposeful workflow and approach them in a logical order.

    I’m going to show you my workflow. Follow this to start with (it works) but don’t be afraid to switch things around if you find a way that works better for you.

    This article isn’t long enough to cover every tool in the Develop module, but I will cover the most important ones, and include links to articles that explore the other tools in more depth.

    Camera Calibration Panel

    There are two important settings you will want to take note of in this panel:

    1. Process: This should be set to 2012 (Current).
    2. Profile: The options here match the color profiles of the camera used to take the photo (and vary by manufacturer), plus the Adobe Standard option. Select the most appropriate for your photo. This should be done at the beginning of your post-processing as the profile affects both color and contrast.

    The Ultimate Guide to Getting Started in Lightroom for Beginners

    Don’t worry about the other sliders in the Camera Calibration panel they are for advanced users only.

    I set Profile to Camera Landscape for this photo. This is the best profile to use as it brings out the soft blue hues of the early evening sky.

    The Ultimate Guide to Getting Started in Lightroom for Beginners

    By comparison, this version using the Camera Standard profile, is not as effective. There is a big difference between the colors in both photos, which shows why it is important to set the most appropriate profile at the beginning of your workflow.

    The Ultimate Guide to Getting Started in Lightroom for Beginners

    Lens Corrections Panel

    Some photographers like to work with this panel near the end of their workflow. I place it near the beginning because it’s important to correct barrel distortion in landscape and architectural photos, otherwise you can’t straighten horizons using the Crop tool accurately.

    To get started there are only two things you need to do inside the Lens Corrections panel. Both are found under the Profile tab.

    1. Tick the Remove Chromatic Aberrations box. This tells Lightroom to automatically remove any chromatic aberrations in the photo. {Link to this URL with the highlighted text https://digital-photography-school.com/chromatic-aberration-what-is-it-and-how-to-avoid-it/ }

    2. Tick the Enable Profile Corrections box. Lightroom should automatically detect the lens used to take the photo and apply the correct profile to eliminate barrel distortion and any edge vignetting that is present.

    The Ultimate Guide to Getting Started in Lightroom for Beginners

    There are two things to note here:

    1. The screenshot shown is from Lightroom CC. If you have Lightroom 6 or an earlier version of Lightroom the Lens Corrections panel has a different layout.
    2. Don’t tick the Enable Profile Corrections box if the Built-in Lens Profile applied message is displayed underneath. Some cameras have built-in lens profiles that are automatically applied by Lightroom. You won’t find profiles for them in the menu.

    The Ultimate Guide to Getting Started in Lightroom for Beginners

    If you have Lightroom 5 or earlier, the Built-in Lens Profile applied message isn’t displayed, even if the photo has one. If you can’t find the profile for your lens in the menu, it is either an old lens that Adobe hasn’t profiled or a new lens with a built-in profile (this mainly applies to lenses from Mirrorless camera systems).

    Ignore the other tools in the Lens Corrections panel for the moment, they are for more advanced users.

    Basic Panel

    The Basic Panel is quite important as the work you do here establishes the tonal values and colors of your photo. Most of your post-processing is done here, and the tools in the other panels are used for refining the image.

    White Balance Sliders

    The Ultimate Guide to Getting Started in Lightroom for Beginners

    Here you can use one of the presets (Auto, Daylight, Cloudy, etc.) or adjust the Temp and Tint sliders yourself. Move the Temp slider left to make the image cooler or move it right to make it warmer. The Tint slider is for removing green or magenta color casts (usually caused by fluorescent lights).

    Alternatively, select on the eyedropper icon and click a neutral grey or white area in the image. Lightroom analyzes the pixels under the cursor and sets the White Balance sliders to remove any color cast (making the image color neutral).

    There are three ways to use White Balance:

    1. Create an image with neutral color.
    2. Give the image a warm color tone. You might do this with a landscape taken during the golden hour (when the light is naturally warm) or a portrait (as warm colors are more flattering for skin tones than cool ones).
    3. Create a cool color tone to give the photo a cold feel (perhaps for a landscape photo taken in the winter).

    Once you have decided which of these three paths you want to go down, you can adjust the sliders to suit. For example, I gave this portrait a warm tone by setting the White Balance to the Shade preset.

    The Ultimate Guide to Getting Started in Lightroom for Beginners

    Here, I set White Balance to Daylight. This gave the portrait a blue cast which is much less pleasing to the eye.

    The Ultimate Guide to Getting Started in Lightroom for Beginners

    Presence Sliders

    There are two more sliders at the bottom of the Basic panel that affect color. They are called Vibrance and Saturation. Move them left to reduce the color intensity, or right to increase it.

    The Ultimate Guide to Getting Started in Lightroom for Beginners

    The Saturation slider affects all colors equally. The Vibrance slider has a greater affect on saturated colors. Play around with them on a few different photos to get a feel for how they work. Be careful – these sliders are best used for desaturation of colors (lowering the intensity) rather than increasing them (which often looks false).

    The Clarity slider emphasizes texture when you move it right, and reduces texture when you move it to the left. Setting Clarity to +20 or +30 improves most photos (but beware of using it on portraits where it can over-emphasize skin texture and wrinkles and become unflattering to the subject). It may also change the brightness of the image.

    This photo has Clarity set to zero.

    Lightroom tutorial 16a

    This version has Clarity set to +30, bringing out the texture in the bricks and roof tiles.

    Lightroom tutorial 16b

    Further reading: Four Ways to Improve Your Photos with the Clarity Slider.

    Tone Sliders

    The Tone sliders are for adjusting brightness and contrast. If you’re feeling lucky press the Auto button to see what happens. If you don’t like the effect simply go to Edit > Undo to step backward.

    Lightroom tutorial 17

    • Exposure slider: Move it left to make the photo darker, right to make it brighter.
    • Contrast slider: Move it left to decrease contrast, right to increase it.
    • Highlights slider: Move it left to make only light tones darker, or right to make them lighter.
    • Shadows slider: Move it left to make only dark tones darker, or right to make them lighter.
    • Whites and Blacks sliders: Don’t worry about these sliders at this stage.

    The best way to learn how to use the tone sliders is to use them and see what happens. Take the following photo as an example. This is how it looked before making any adjustments.

    Lightroom tutorial 17a

    In this version I set Shadows to -68 to make the bottom part of the image darker, and Highlights to +43 to make the sky lighter. Notice that this effectively increased the overall contrast of the image as well.

    Lightroom tutorial 17b

    Tone Curve Panel

    This is an easy one for newcomers to Lightroom, as my recommendation is that you avoid it for the moment. You can work just as effectively with the Tone sliders in the Basic panel.

    There’s just one exception to this – some of you may be comfortable with the Tone Curve because you have used in extensively in another program like Photoshop. In that case you can go right ahead and use it in Lightroom too.

    Lightroom tutorial 19

    HSL / Color / B&W Panel

    The sliders in this panel give you much greater control over the colors in your image. You can also use them to convert your photo to black and white. The complexities of this panel are a little beyond the scope of this article, so I’ll point you towards the following articles to learn more.

    Further reading:

    • Mastering Color in Lightroom using the HSL Tab
    • How to Convert Photos to Black and White in Lightroom
    • Understanding the HSL Panel in Lightroom for Beginners

    Lightroom tutorial 20

    Split Toning Panel

    This is another panel that is useful both when working in color (for color grading – adjusting the overall color balance of the image) and in black and white (for toning photos). Once again, it’s a little advanced for Lightroom newcomers, but you can learn more with these articles.

    Lightroom tutorial 21

    Further reading:

    • How to Split Tone Black and White Photos in Lightroom
    • How to Create a Vintage Look using Lightroom
    • Understanding the HSL Panel in Lightroom for Beginners

    Detail Panel

    The controls in this panel have two purposes. The Sharpening sliders are there because RAW files are slightly soft (they are unsharpened) straight out of the camera. The Noise Reduction sliders are for reducing noise caused by using high ISO settings or long exposures (longer than five minutes).

    Lightroom tutorial 22

    The best thing to do is leave them at their default settings. They are good enough for most photos.

    Effects Panel

    The Effects panel is used for adding vignettes, adding grain (to imitate the look of film) and (with the Dehaze slider, available only in Lightroom CC) for removing atmospheric haze.

    Lightroom tutorial 23

    It’s another panel you can skip over for the moment. This will give me space to tell you about something that will really help improve your photo processing in Lightroom – making local adjustments.

    Local Adjustments

    Local adjustments are kind of a big deal in Lightroom because they are what elevate your post-processing technique from good to great. There are very few photos that can’t be improved by some sort of local adjustment.

    First, let’s look at a definition. A global adjustment is one that affects the entire image. All the Develop module tools you have learned to use so far are global adjustments.

    Local adjustments affect only part of the image. If you have a Photoshop background, then you know that you can make local adjustments in Photoshop using selections or masks. The theory is the same in Lightroom, but the tools are different.

    Lightroom has three tools for making local adjustments; the Graduated Filter, the Radial Filter and the Adjustment Brush. You have the same options for each one.

    Lightroom tutorial 30

    The most obvious use of a local adjustment is to make part of the image lighter or darker (using the Exposure slider). But you can also adjust contrast (with the Contrast slider), color (with the Temp, Tint or Saturation sliders) or emphasize texture (with the Clarity slider). The more you use your imagination the more uses you will figure out for local adjustments.

    The Graduated Filter

    This tool is named after graduated neutral density filters used by landscape photographers to make the sky darker. The Graduated Filter inside Lightroom does something similar. The key to making the most of the Graduated Filter is to look past its most obvious use in landscape photography, and think about how it can be used elsewhere.

    To start, click the Graduated filter icon (marked below), or use the keyboard shortcut M. The Graduated filter panel opens beneath the histogram.

    Lightroom tutorial 29

    Add a Graduated filter by clicking on the photo and holding the left mouse button down. Hold it and drag the mouse down over the image.

    The Graduated filter is marked by three lines, which spread farther apart as you move the mouse. The further apart you pull the lines, the softer the graduation of the effect you’re applying will be. You can move the Graduated Filter by clicking and dragging the grey pin at the center.

    This may sound complicated, but a few minutes playing with the Graduated Filter tool is all that’s required to get the hang of it.

    I used three Graduated Filters on the following image. This is what I started with:

    Lightroom tutorial 24

    This is the result:

    Lightroom tutorial 25

    These screenshots show you the location of each Graduated Filter (shown in red) and the settings used for each one.

    Lightroom tutorial 26

    Lightroom tutorial 27

    Lightroom tutorial 28

    The Radial Filter

    The Radial Filter was introduced in Lightroom 5. It creates a circle or oval shaped selection. You can apply the affect to the area inside or outside the selection.

    Click on the Radial Filter icon (marked below) or use the keyboard shortcut Shift+M. Hold the left mouse button down and drag the mouse across the photo to create the filter.

    Lightroom tutorial 31

    You can change the size and shape of the Radial Filter by clicking and dragging the four white squares around the edge. Rotate it by moving the cursor to the edge of the filter until it changes from a hand or plus icon to a double curly arrow. Click and drag on the arrow to rotate the Radial filter.

    Use the Feather slider to set the softness of the gradient at the edges of the Radial filter. The default setting of 50 seems to work well, but you can change it as needed.

    Lightroom applies the adjustments to the area outside the Radial filter by default. Tick the Invert Mask box to apply the adjustments to the area inside it instead.

    One use for the Radial filter is to darken the edges of your image to draw the eye towards the subject. Here’s an example, using a photo of a dandelion that I decided would look better if I made the green area darker. This is what I started with:

    Lightroom tutorial 32

    Original image.

    Lightroom tutorial 33

    This is the difference with the Radial Filter applied.

    This screenshot shows the location of the filter, the area affected by the adjustment (in red), and the settings used.

    Lightroom tutorial 34

    Further reading:

    • Lightroom’s Secret Weapon: The Radial Filter and How to Use it.
    • Understanding the Radial Filter in Lightroom.

    The Adjustment Brush

    The Adjustment Brush is for making local adjustments that can’t be easily carried out with either of the Graduated or Radial filters. Click the Adjustment Brush icon (marked below) or use the keyboard shortcut key K. The Adjustment Brush panel opens up underneath the histogram.

    Lightroom tutorial 35

    You’ll find sliders for setting the size, softness (feather0, and strength of the brush at the bottom. Start by selecting Brush A (if it’s not already selected). Use the [ and ] keys to adjust the brush (you can also use the Size slider).

    Use the Feather slider to adjust the softness of the brush (or hold the Shift key down and use the [ and ] keys). The size of the Adjustment Brush is displayed with two circles. The inner circle shows the area fully covered by the brush. The outer circle shows the feathered area. The gap between the two circles changes as you adjust the Feather setting (make it bigger for a more gradual effect).

    Lightroom tutorial 36

    Here’s an example of the how to use the Adjustment Brush. I wanted to emphasize the texture in the baboon’s face. The Adjustment Brush is the best tool to use for this because I could paint over an area that matched the shape of his face.

    This screenshot shows the masked area (in red) which will be affected. I set Clarity to +51 to bring out the texture in the animal’s skin and fur.

    Lightroom tutorial 37

    Lightroom tutorial 38

    This is the starting image.

    Lightroom tutorial 39

    This is how it looks with the adjustment made.

    You can create another Adjustment Brush by clicking on B and changing the settings. You can switch between the A and B brushes whenever you like. If you want another that is different just click New and you can add as many Adjustment Brushes as you need.

    If you paint over an area you don’t want to effect, just select Erase then paint over the parts where you want to remove the mask.

    Flow controls the opacity of the brush; density sets the maximum strength. For now, keep both at 100 (you can learn more about these controls if you get into advanced retouching techniques) and vary the strength of the effect with the slider settings.

    Leave the Auto Mask box unticked for now. It’s bit of a specialized tool that often doesn’t work very well.

    Further reading:

    • How to Retouch a Portrait with the Adjustment Brush in Lightroom
    • 5 Tips for Using the Lightroom Adjustment Brush Tool
    • How to Create and Import Custom Adjustment Brush Presets for Lightroom

    Combining Local Adjustment Tools

    In Lightroom 6 and Lightroom CC you can use the Adjustment Brush to refine the mask created by the Graduated and Radial filters. This is an advanced tool that is very useful for creating precise selections.

    Further reading:

    • New Graduated and Radial Filter Features in Lightroom 6
    • How to Save Images Using Export in Lightroom

    The Other Lightroom Modules

    Lightroom has several other modules, which aren’t possible to cover here. These articles will help you learn more about the Map, Slideshow, Print, Book, and Web modules.

    Further reading:

    • How to Create a Simple Blurb Photo Book in Lightroom
    • Two Useful Lightroom Print Module Custom Layouts
    • How to Create a Simple Slideshow in Lightroom
    • An Overview of Lightroom Web – What is it and who is it for?

    Conclusion

    Lightroom may seem intimidating when you are new to the program, but the reality is that once you understand the basics of importing and processing images it really is surprisingly straightforward to use. The lessons learned from this article lay a foundation on which you can build to truly master Lightroom. This powerful program will become the center of a new and efficient workflow that saves you time and is easy and enjoyable to use.

    If you have questions about the content of this article then please let us know in the comments below. I’ll do my best to help.

    For more Lightroom learning you can also check out our course Lightroom Mastery here on dPS.

    Author bio: Andrew S. Gibson is a long time Digital Photography School contributor and the author of the Mastering Lightroom ebooks.

    Note: did you enjoy this guide to Lightroom? – get a free downloadable copy to print and/or refer to later by adding your email address below and we’ll send you a copy.


    Download “The dPS Ultimate Guide to Getting Started in Lightroom for Beginners”

    We respect your email privacy

    The post The dPS Ultimate Guide to Getting Started in Lightroom for Beginners by Andrew S. Gibson appeared first on Digital Photography School.


    Digital Photography School

  • Ask the staff: How are you shooting the cherry blossoms?

    Mention ‘the Cherry Blossoms’ to a Seattleite and they’ll know exactly what you mean: the week or so in early spring when the University of Washington’s cherry blossom trees are in full bloom on ‘the Quad.’ It’s a thing.

    It’s also beautiful, if you can work around the mobs of people who flock there each year. The unpredictable, often dismal weather and the crowds make for interesting challenges to overcome, but DPR staff are always up for a challenge. So we gathered at the Quad recently, each equipped with a camera and lens of our choosing, and challenged ourselves to take our best cherry blossom shot. Take a look at the video above to see how we fared.

    Articles: Digital Photography Review (dpreview.com)

  • 7 Ways to Become More Spontaneous with Your Street Photography

    As you become more experienced and comfortable doing street photography, you will notice that the way you shoot will begin to change. You will notice more, focus more on what you like, and your work will improve significantly. At this point, it can be important to embrace spontaneity in the way that you shoot.

    street photography NYC

    So often the first shot of a scene that you take will be the best, for reasons I can’t explain, except that your gut and instinct are something to embrace with this type of photography. The more experienced you become, the more vital they will be.

    Here are some tips that have helped me to shoot in a more spontaneous fashion.

    1. Choose your camera settings so that you can forget about them

    The first step is to figure out your camera settings so that you can forget about them. You don’t want to worry about your camera or changing settings as you’re shooting. When you’re feeling good, it often feels like the camera isn’t there.street photography

    If it’s a shady day and the lighting is consistent, then it’s easy to choose your settings and not have to worry about them. But it becomes tough when you are shooting in direct sunlight, where some areas are lit with extreme light and others are in the shadows.

    For these situations, what I will do is change my camera to Aperture Priority mode, around f/8, and I will put my ISO up high, to around 1600. I will make sure that when I point my camera at shady areas it will still give me a fast enough shutter speed, like 1/250th of a second, to freeze motion in people. Then, when I point the camera in sunny areas, the shutter speed will be something insane, maybe 1/1000th or more of a second.

    Obviously, these settings are not perfect for sunny areas since the ISO is high, but with newer cameras, ISOs of 1600 look beautiful. I prefer to shoot with these settings because it allows me to forget about my settings regardless of what light I walk into. It makes the day much more fun and relaxing, and I can spend more energy looking around.

    2. Slow down and shoot quick

    street photography NYC

    When I work with newer photographers, I often seeing them run from place to place, searching for that elusive spectacular moment, as if the more ground they cover will yield more of those moments. Those moments will occur whether you are moving fast or not. Except when you are moving fast, you’re not focusing on the area that you’re in at the moment. There are interesting photos everywhere, particularly in places that you might have previously disregarded.

    The slower you move, the faster you will be able to react when something happens. By increasing your awareness, you will allow yourself to be more spontaneous. You will have more gut feelings to follow. This will allow you to react much quicker when actually capturing the photograph.

    3. Spend more time looking with your eyes than the viewfinder

    street photography scene

    In street photography, your eyes should be the real viewfinder. Focus your energy on looking around. It’s actually hard to do, especially if you are easily distracted or going from place to place. Notice the potential for something to happen with your eyes and get in position, then the viewfinder and camera will follow. But it should almost feel like the camera isn’t there – the hard work is done before you even bring it up to your eye.

    4. Figure out how to take good photographs anywhere

    street photography - garbage

    Stop taking things for granted. The more you think an area will not provide you with a good photograph, the more you should try to get a good one there. Much of the time you’ll get nothing, but you will be surprised how often this works out, and it’s a fantastic way to train your eye.

    This will also allow you to create unique and interesting photographs. By shooting in areas where not many others photograph, your good shots will be unexpected. They will stand out.

    5. Go with your gut

    street photography - crosswalk

    We’ve talked a lot about going with your gut already, but what does that really mean? When you’re out there shooting, you’re going to get feelings that moments are about to happen. Most people wait to actually see something happen before they shoot, and often the moment has disappeared by then.

    When you feel something good is about to occur, capture the moment in a quick and spontaneous way. Go for it instinctively – use your instincts to your advantage and develop them. While many of these shots will turn out to be nothing, when you hit one at the perfect moment, you will be left with an incredible image that you could not have captured otherwise. Be spontaneous.

    6. Don’t worry about perfection

    street photography

    It is common for newer photographers to worry about cutting people’s feet off, something getting in the way, or the shot being skewed. I have heard so many comments about wishing that a person, group, or object wasn’t in the background or in a certain location. This is, of course, important stuff to consider. But when I hear these comments being made, I detect that the reason they find these things annoying is because they ruin the perfection of the image.

    Have you ever shown an image to someone and the first thing they notice is this random background detail that’s barely noticeable? This is part of having too much focus on perfection, and it can drive you crazy. You’re trying to get the most perfect and clean image possible, and that is rarely possible in street photography. You take what is given to you, and an interesting moment is an interesting moment.

    Street photography is supposed to feel real, and so many of those imperfections can add to that feeling of it being a spontaneous moment. They can improve an image just as much as they can ruin it. Try to embrace these imperfections when you can as being part of a real and special moment.

    7. Don’t be afraid to take weird photographs

    street photography - weird

    These photographs are for you. You don’t need to take photographs that appeal to everyone, and not everything has to be perfect, grand, and pleasing. Capture photos that are not standard, off in some way, and weird. Focus on what interests you and try to foster that. This is where the voice in your work will begin to shine.

    The post 7 Ways to Become More Spontaneous with Your Street Photography by James Maher appeared first on Digital Photography School.


    Digital Photography School

  • 5 Tips for Photographing Street Portraits

    Isn’t it always the way that the most daunting things in life are usually the most rewarding? It takes a certain amount of backbone to shoot street portraits. Whether it’s walking up to a total stranger and asking their permission, or taking a more candid, reportage style approach, many photographers get put off through lack of confidence.

    It’s a great shame because there is no more fascinating photographic subject than people.

    Street portraits Thailand

    If you follow the Humans of New York project, you’ll know that every single person has a story to tell; sometimes uplifting, often heartbreaking, occasionally hilarious. The very best street portraits give us a glimpse at those stories in a single frame.

    If you’ve always wanted to give it a go but have yet to summon up the courage, hopefully, the following tips will give you all the motivation you need.

    The approach

    The first time you approach a potential subject is going to be the hardest. It can sometimes feel like an insurmountable hurdle. But try and think about it from your potential subject’s point of view. He or she is going about their daily routine, possibly doing the same thing they have been for years and finding it all a little boring. Then, out of nowhere, someone has judged them interesting enough to want to take their picture. Chances are, you’ve just made that person’s day. At the very least, you’ve given them an anecdote to tell their friends.

    He or she is going about their daily routine, possibly doing the same thing they have been for years and finding it all a little boring. Then, out of nowhere, someone has judged them interesting enough to want to take their picture. Chances are, you’ve just made that person’s day. At the very least, you’ve given them an anecdote to tell their friends.

    street portraits photography China

    Different methods

    So, what’s the best way to approach someone? Different photographer’s stand by different techniques. Some just come straight out and ask if they can take a picture. Others want to try and make a connection first in a more roundabout way, striking up a conversation or asking questions.

    One psychological technique favored by many salesmen is to first ask for a small, unrelated favor, such as directions or whether they have the correct time. Studies have shown that once someone has done you one favor, they’re much more likely to say yes to another, bigger one. Don’t ask me why—people are complex!

    In any approach, confidence is obviously vital, but enthusiasm is just as important. Enthusiasm is contagious. Be genuinely interested, listen carefully to what they’re saying and be respectful. Also, if you can make them laugh, or at least smile, you’ll find all their barriers will start to lower.

    The environment

    Street portraits market London

    Where you find your subject (i.e. their environment) can sometimes tell you as much about them as what they look like.

    Finding an impeccably groomed city trader striding around the financial district is to be expected. But finding him in a crowded flea market hints at a story. If the environment adds to the portrait, include as much of it as you need to enhance the photograph.

    If you want your portrait to be all about the person, if they have an interesting face or you want to highlight the way they dress, try and find a background that won’t distract from them. A busy background can confuse the eye and take away from the impact you’re trying to make. If you need to, open up your aperture to throw the background out of focus and bring attention back to where it should be.

    Street portraits photography East Timor

    The eyes have it

    The most important part of your portrait will always be the eyes. The eyes tell us everything; how the person is feeling, what they’re thinking, if they’re happy or anxious, and even if they would rather you stopped taking their picture.

    street portraits photography China

    Eye contact

    Eye contact is incredibly powerful in real life. If you’re talking to someone and they maintain a natural, unwavering eye contact, there’s something primeval that makes you trust them and creates a connection. It’s the same with a portrait. You need that eye contact to make a successful shot.

    If you photograph a subject who’s not looking directly back at you, the natural instinct is to follow their gaze to see what they’re looking at. You can sometimes use this to your advantage to draw the viewer’s eye towards an element of the picture you want them to focus on. For example, in this shot of a man carrying baskets full of rabbits, the eye line of the two children always brings us back to the cages.

    street portraits candid photography China

    On a technical note; as I’m sure you’ve noticed, people tend to blink. Try to take a quick burst of shots of your subject to ensure you capture at least some with their eyes open. Autofocus systems can also tend to hunt around, and taking more shots increases your chances of grabbing a pin sharp image.

    The candid street portrait

    If you’re looking for a way to ease yourself into this genre, shooting candid street portraits holds some definite advantages. You do away with the whole nail-biting business of asking permission and perhaps suffering a rejection. You capture people as they really are rather than the front they put up when a camera’s pointed at them.

    But that’s not to say candid street photography is easy. If anything, it’s more difficult (or, at least, a different kind of difficult) and can be just as nerve-wracking.

    street photography portrait candid Jerez

    Your timing has to be split second in order to capture the spontaneous moments that occur all around you. You need to know your equipment inside out in order to be able to frame a great composition and adjust settings as needed quickly.

    Capturing great candid street pictures takes a great deal of practice and a lot of luck. Whatever your personal feelings are on the ethics of taking someone’s photo without permission, there are people who really don’t appreciate it.

    It would be very unlikely you’d get into any serious trouble, but it’s worth using your street smarts and common sense. As a personal rule of thumb, if a certain person looks too mean for me to even consider asking permission to photograph them, there’s no way I’d try and sneak a shot.

    The technicalities

    Whatever type of street portraits you’re taking, the one thing you don’t usually have on your side is time. With candid shots, you’re constantly reacting to the world as it unfolds in front of you at its usual breakneck pace, and with the more posed approach, you’re still cutting into someone’s, probably busy, day.

    You need to be able to work quickly, without fussing over settings or lens changes or tripping over bags. Keep your equipment as simple as possible—a single camera body and a zoom lens that covers all eventualities. I put a lot of trust in my Canon 24-70mm f/2.8L. It might not have the widest aperture in the world, but I’m happy to trade that for the versatility.

    I generally shoot in Aperture Priority as well. So I only really need to think about the depth of field I want in a shot and let the camera’s far superior brain work out the rest of the details for me.

    street portrait photography China

    One area where you do need to stock up is memory cards. Make sure you have plenty of storage space with you, you’ll be taking a lot of images—especially if you’re heading out for a day of sneaky candid shooting. Throw in a couple of freshly charged batteries as well, just in case.

    Conclusion

    Like every area of photography, shooting street portraits has challenges all of its own. By far the most difficult thing to overcome is finding the courage to approach your subjects.

    The good news is, if you’ve always felt too intimidated to attempt this genre of photography, you’re in esteemed company. Legendary names such as Diane Arbus and Elliott Erwitt have said they’ve used their cameras as both a kind of license to take photos and to act as a barrier between them and their subject. There’s still something mysterious about a camera that intrigues people—even more so these days when most photos are taken on phones.

    street portrait photography candid Jerez

    All it takes is a little daring, a projected air of confidence, and you can capture some unique moments and great street portraits.

    The post 5 Tips for Photographing Street Portraits by Andy Callan appeared first on Digital Photography School.


    Digital Photography School

  • How to Photograph Hummingbirds

    NOTE: Get Jim’s e-book Fundamentals of Photography Made Easy now 30% OFF at Snapndeals, only until April 25th AUS time.


    Birds have captivated wildlife photographers from the beginning of photography, and no group of birds is more intriguing than hummingbirds. It’s not difficult at all to photograph a hummingbird when you see one in a garden hovering above a flower. But unless you do it right your efforts will only result in mediocre pictures.

    Photograph hummingbirds 02

    The challenge with hummingbirds

    The challenge itwo-foldld: First, you want the tiny birds to fill a significant part of the frame, and second, you want the birds to be sharp. Blurred wings are fine for snapshooters, but for serious photographers nothing less than tack sharp wings will do.

    The wings of hummingbirds beat about 80 times per second. The range of shutter speeds that we normally use for fast moving subjects is between 1/250th and 1/1000th of a second. This is too slow to freeze the wings. 1/2000th and 1/4000th of a second are not even fast enough to get sharp pictures and to reveal the detail in individual feathers. Some cameras go up to 1/8000th, but even if this were fast enough to get tack pictures of hummers, the light would be so reduced that you would be forced to shoot with a large lens aperture and a high ISO – neither of which are ideal solutions.

    Add flash

    The technique that works is to use flash. However, it’s not very straightforward at all. The typical flash duration (the length of time that the flash tube is actually illuminated during an exposure) is typically about 1/1000th of a second when used on manual. However, when the power output of the flash unit is reduced to 1/16th power, the flash duration becomes much shorter, about 1/16,000th of a second. This is definitely fast enough to freeze the wings of hummingbirds as you can see in these photos.

    The setup

    The setup I use consists of four elements:

    Photograph hummingbirds 03

    1. Four flash units (I use Canon 430EX Speedlites). Two flashes are placed in front of the setup, one on either side. One flash is used as a backlight to give a little separation between the subject and the background, and one flash is placed to illuminate the background. Metal stands support the flash units.
    2. A 24×36″ photographic print of out of focus foliage is placed in the background. I have several different prints that can be easily changed. The large prints are simply clamped to a piece of foam core.
    3. A wireless transmitter sits on top of the camera to trigger the strobes. Units that work well for are the Canon ST-E2 or the Pocket Wizard. For Nikons, the built-in commander mode works.
    4. A flower that can hold the nectar is clamped to a support like a metal stand, the back of a chair, or anything that is sturdy. The same sugar water that is used in hummingbird feeders (the nectar) is placed in the flower using a syringe so the birds hover above the flower to drink.

    Shoot in burst mode

    At 1/16th power (all the flash units are set to the same power output), the recycle time is very fast – it’s almost instantaneous, in fact. That means I could shoot as rapidly as I can press the shutter. I fire in rapid succession each time a bird comes to feed. It’s impossible to ascertain whether or not the wings are in an attractive position when I snap the shutter, so I have to take a lot of pictures to get a winner.

    Photograph hummingbirds 06

    Refinements

    To vary the exposure for each flash unit, I simply move the flash closer or farther away. Three or four inches makes a significant change in exposure. In this way, I could adjust the lighting ratio based on what I se on the LCD monitor. A handheld light meter is not needed at all.

    With two flash units in front of the hummingbirds, you will get two catchlights in their eyes. This is unnatural looking because in nature, there is only one light source, the sun. Therefore, in post-processing, I clone out one of the dots of light using the clone tool or the spot healing brush.
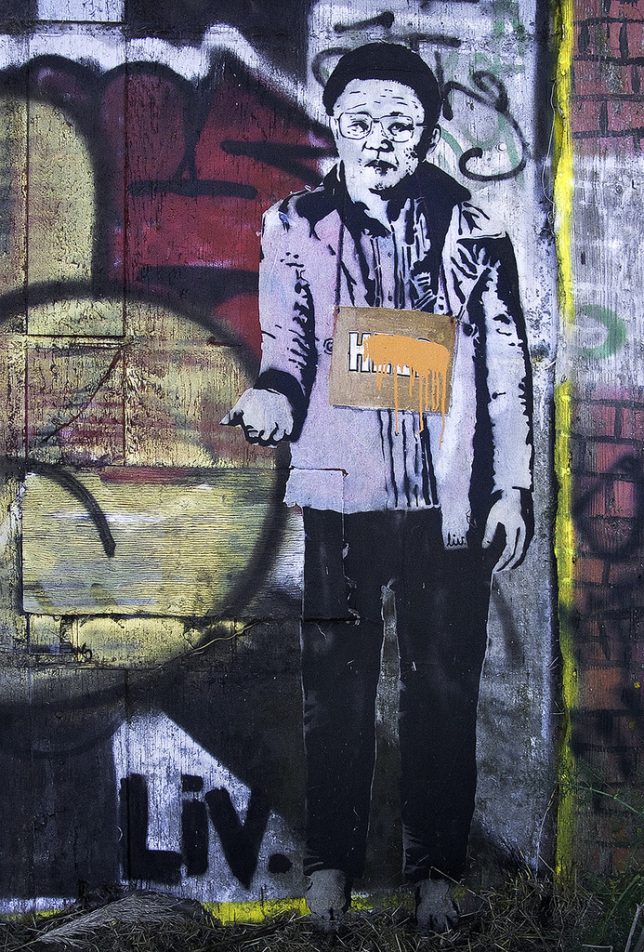
    Photograph hummingbirds 04

    Note: These photos were taken during a photo tour I led to Costa Rica.


    NOTE: Get Jim’s e-book Fundamentals of Photography Made Easy now 30% OFF at Snapndeals, only until April 25th AUS time.
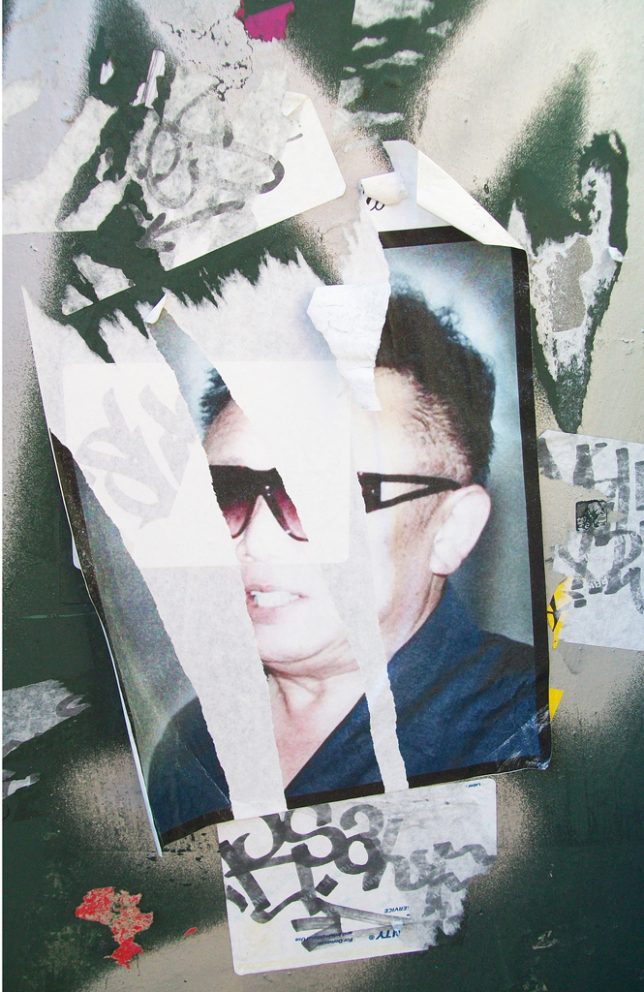
    The post How to Photograph Hummingbirds by Jim Zuckerman appeared first on Digital Photography School.


    Digital Photography School