HTC has today announced its newest member of the One smartphone family, the One A9, which slots into the HTC device line-up just under the flagship One M9. In the camera department the new model comes with a lower 13MP sensor resolution than the M9 with its 20MP chip, but on the plus side offers a slightly faster F2.0 aperture and an optical image stabilization system which could easily make it the better option in low light. Read more
Month: October 2015
-
Holloway Roads: Tunnels Eroded by Passage of People Over Time
[ By WebUrbanist in Culture & History & Travel. ]
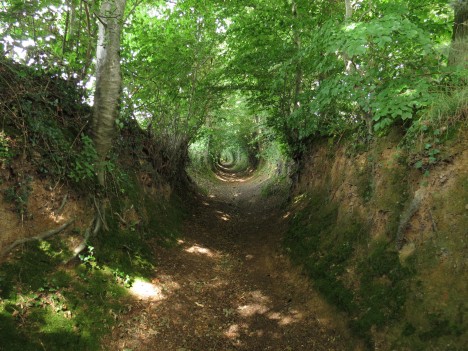
Holloways (or: hollow ways) are desire paths gone wild, reflecting centuries or even millennia of informal, slowly transforming them from flat paths to sunken lanes and, in some cases, semi-subterranean tunnels worn right into the Earth.
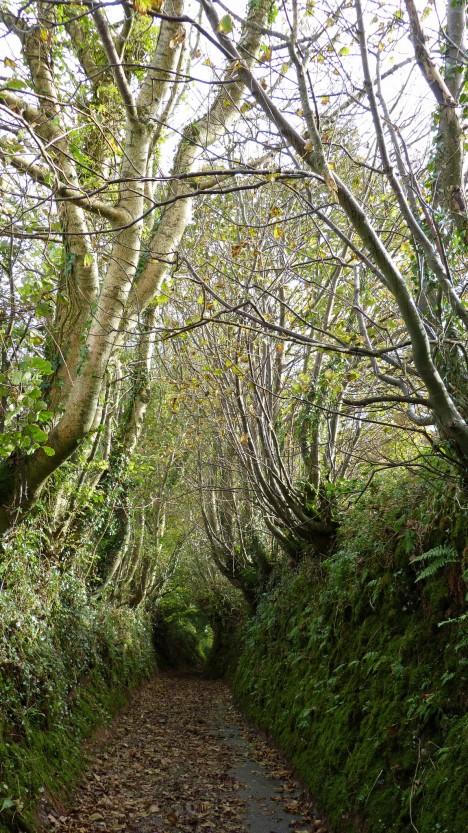
Eroded by foot traffic, farm animals, laden carts and the passage of water, many of these remarkable half-tunnels are thought to date back to Roman times. Their development is often aided by the presence of softer ground materials like sandstone and chalk.
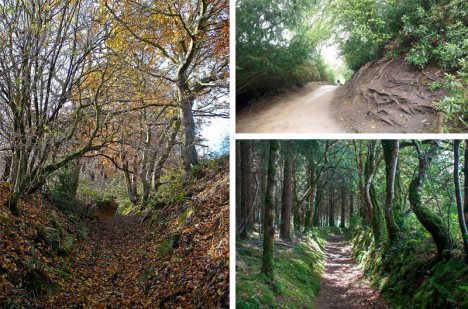
Over time, trees can be found on either side, reinforcing the impression of a completely-enclosed tunnel. Some plants also thrive in the peculiar light and temperature conditions formed by these passageways.
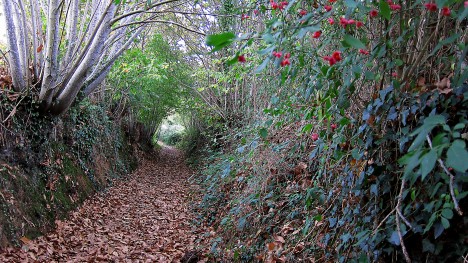
In times of war, holloways have served as passages as well as defensive positions, effectively serving as already-existing trenches for troops in the Civil War and World Wars. In Germany, a network of holloway hiking trails winds for dozens of miles at up to 15 feet deep. In the Middle East, many holloways are thought to be thousands of years old.
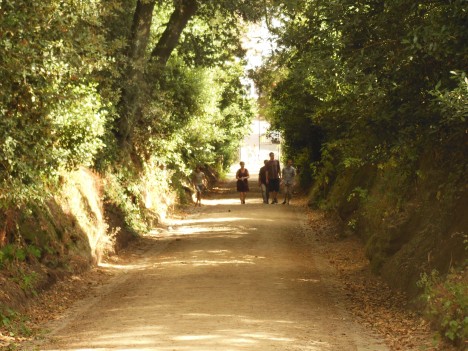
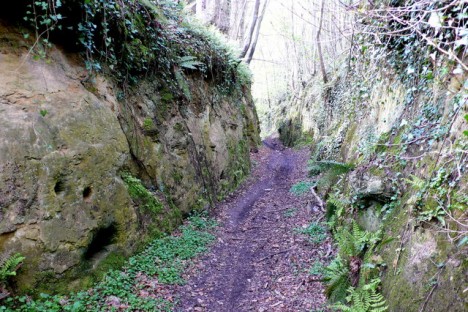
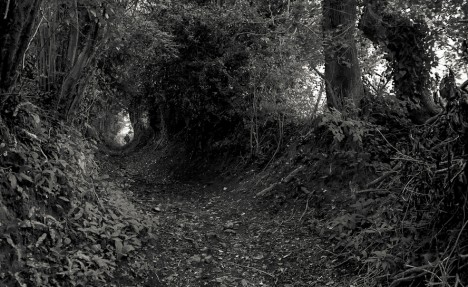
While most examples formed naturally over time, some younger ones were simply created for irrigation or other purposes, their presence then reinforced by foot or vehicle traffic over the years. Photographs by Jean-François Gornet, Olybrius, Romain Bréget, Jean-François Gornet, David Coombes, Nigel Mykura, Jibi44, Tim Green, Andrew.
Want More? Click for Great Related Content on WebUrbanist:
Subterranean Secrets: The Mystery of Liverpool’s Tunnels
Starting in the basement of a home owned by a wealthy philanthropist in the 1700s, a network of tunnels descends into the earth beneath the city of Liverpool, …
Click Here to Read More »»
Twisty Mystery: Ancient Underground German Tunnels
At least 700 cramped, mysterious tunnel systems exist beneath urban and rural Germany with many more in the rest of Europe – but what were they for?
Click Here to Read More »»
Subterranean Secrets: 10 Tunnels for Smuggling & War
Secret tunnels exist all over the world, used for all kinds of purposes – but these 10 in particular played pivotal roles in smuggling operations and war.
Click Here to Read More »»


[ By WebUrbanist in Culture & History & Travel. ]
[ WebUrbanist | Archives | Galleries | Privacy | TOS ]
-
Go big: Leica SL studio and real-world sample gallery
Leica has just unveiled its first full-frame mirrorless camera, the SL Type 601. The new camera uses a modified version of the 24MP CMOS sensor from the Leica Q in tandem with a Maestro II processor, allowing ISO 50-50,000 shooting, 4K video recording and 11 fps continuous shooting. With early access to a full production SL, we’ve been able to test it against our studio test scene as well as in a variety of real-world shooting conditions. Read more
-
20. Oktober 2015
Das Bild des Tages von: Charlotte Grimm

Im Ausblick: Ein Baum reist um die Welt, großformatige Fotos und blaue Lava.
kwerfeldein – Fotografie Magazin | Fotocommunity -
Next Steps to Getting Started in the Lightroom Develop Module
A previous article showed you how to get started in Lightroom’s Develop module by using the Camera Calibration, Lens Corrections and the Basic panels.
In this article you’ll learn how to use the remaining right-hand panels in the Lightroom Develop module:
- Tone Curve panel
- HSL / Color / B&W panel
- Split Toning panel
- Detail panel
- Effects panel
This guide is aimed at photographers who are new to Lightroom, so it doesn’t cover every aspect – just the important things you need to know if you’re just getting started with it.
It is quite possible that you won’t have to touch any of the panels listed above when processing a photo. Many photos can be developed in Lightroom just by using the Camera Calibration, Lens Correction and Basic panels, plus local adjustments. But the panels mentioned above will help you be more creative with your processing, especially when it comes to working with colour and tone.
The Tone Curve panel
One purpose of the Tone Curve panel is to give you another way of applying the same tonal adjustments that you can make with the Basic panel sliders. If you’re accustomed to using curves in Photoshop, the Tone Curve panel gives you the option of doing the same in Lightroom in addition to, or instead of, using the Basic panel sliders.
This is what you will see when you open the Tone Curve panel for the first time.
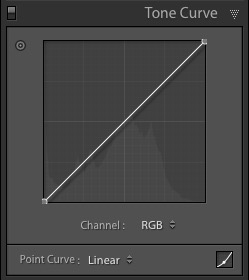
This is the RGB curve. Adjusting this curve affects the brightness values, but not the colours, of the photo.
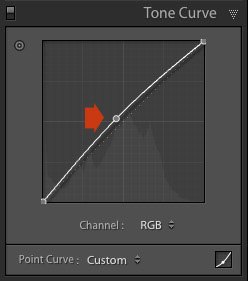
You can move the curve upwards (as shown below) to make the image lighter. To do so, left-click once on the midpoint of the curve to add an adjustment point. Then click and drag the adjustment point to move it up, and change the shape of the curve.
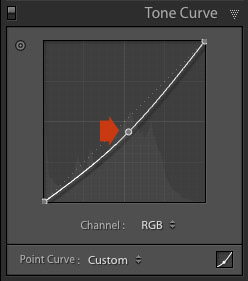
You can also move it downwards to make the image darker.
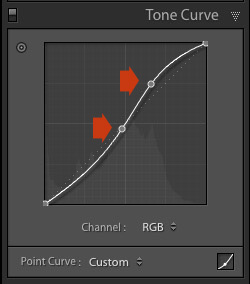
You can create an S-curve like this to increase contrast (add a second adjustment point first).
You can create the matte look with a curve like this. Add an adjustment point near the bottom of the curve then lift the left-side up. This makes the darkest tones in the photo dark grey rather than black, imitating the look of a print made on matte paper.
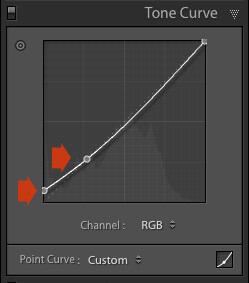
Notice the lower left point is not touching the bottom, this creates a matte look.
You can return to the original straight tone curve at any time by going to the Point Curve menu and selecting Linear.
Colour curves
Underneath the Tone Curve is a menu that lets you select the Red, Green, or Blue tone curves individually. These curves affect each of the color channels in the photo respectively. The blue curve is shown below.
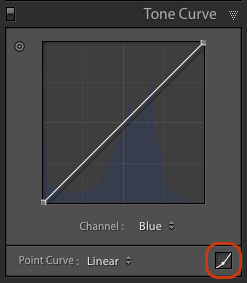
More options
If you click the icon in the bottom right-hand corner of the Tone Curve panel (circled above) the panel opens up to reveal four sliders, called Highlights, Lights, Darks and Shadows (see below).
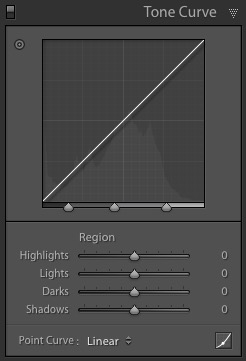
These sliders give you another way to make adjustments to the tone curve. When you move one of the sliders, the corresponding region of the tone curve is highlighted, so you can see which tones are affected.
The illustration below shows what happens when you move the Highlights slider. The top right of the tone curve is marked in grey. This part of the curve changes when you move the Highlights slider.
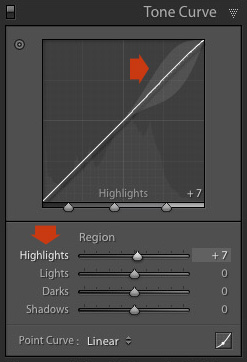
You can click and drag on a single adjustment point (but not multiple points) to change the shape of the curve. The sliders change value as you adjust the curve. The diagram below shows the effect a simple S-curve has on the sliders.
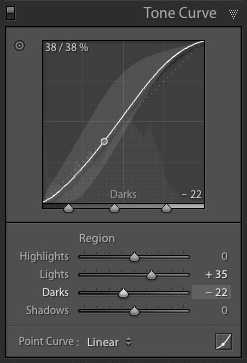
Double click on any slider heading to reset that slider to zero. That covers the basics of curves. You can learn more advanced techniques by reading our article Lightroom’s Tone Curve Explained.
HSL / Color / B&W
The HSL / Color / B&W panel is for adjusting colour values. It is also for converting photos to black and white. This is beyond the scope of this article, but you can learn more by reading my article How to Convert Photos to Black and White in Lightroom.
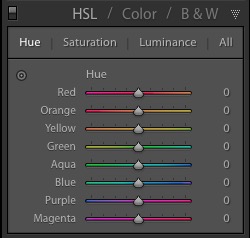
The HSL / Color / B&W panel is divided into three tabs. The HSL and Color tabs are the ones you need for making adjustments to colour. They contain the same sliders, just arranged in a different order. The screen shots below are taken from the HSL panel.
The Saturation and Vibrance sliders in the Basic panel affect all the colours in the photo. The HSL and Color tabs allow you to target individual hues without affecting others. You can target a specific colour and change the following:
- Hue
- Saturation
- Luminance
Adjusting Hue replaces the selected colour with an adjacent colour on the colour wheel. For example, you can target red tones and make them more magenta (pink tone) or orange. Or you could target blue tones and make them aqua or purple.
You don’t need a colour wheel to see how colours are affected by the Hue sliders. You can just look at the eight Hue sliders. For example, the Red slider (top in the diagram below) is coloured magenta to the left and orange to the right. Moving the slider in those directions changes red colours in the photo to either magenta or orange.
The easiest way to see how this works is to try it. The examples below show the effect that moving the Red slider to -100 and +100 (the strongest available settings) have on the image.
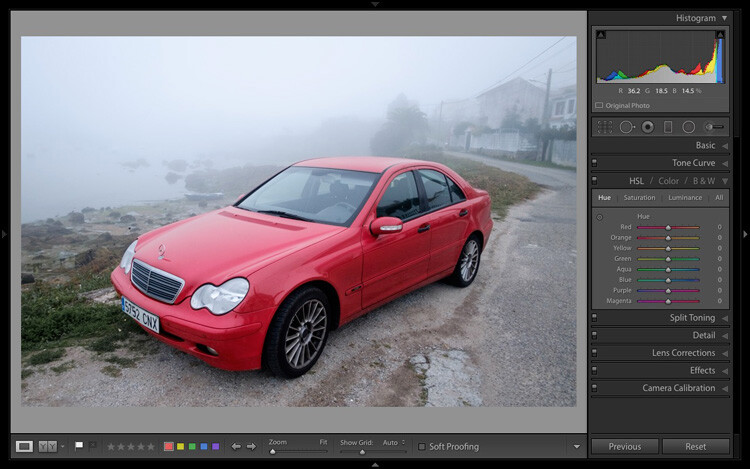
No adjustment.
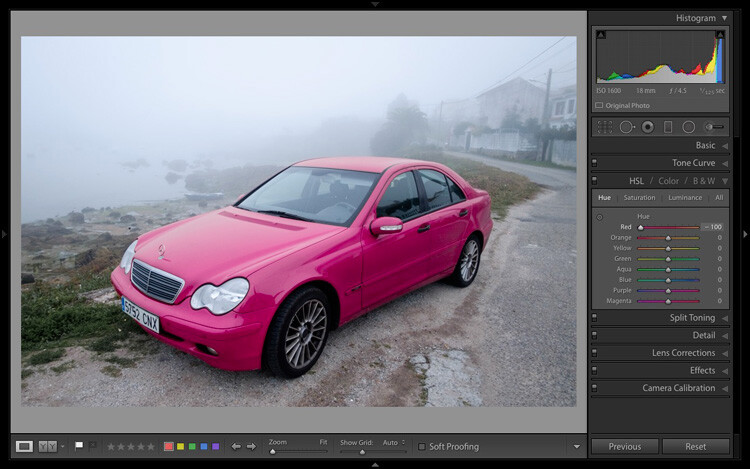
Red -100.
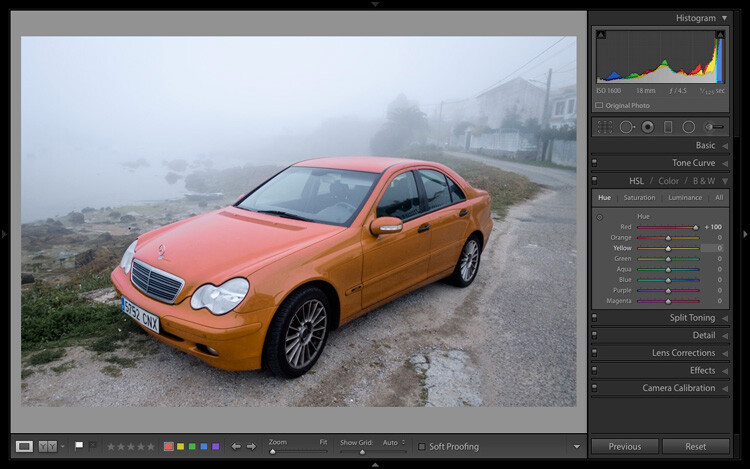
Red +100
The Saturation and Luminance sliders work in a similar way. Saturation adjusts the saturation (intensity) of specific colours, and Luminance adjusts the brightness.
Targeted Adjustment Tool
The Targeted Adjustment Tool gives you an even more precise way of adjusting colour values. To use it, click on the Targeted Adjustment Tool icon in the HSL / Color / B&W panel (circled below).
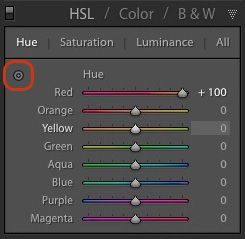
Then move the cursor over the colour (area) in the photo you want to adjust. Click and hold the left mouse button, while you drag the mouse downwards to reduce the Saturation or Luminance of the colours underneath the cursor, or adjust the hue.
Move the mouse upwards to increase the saturation or luminance, or adjust the hue in the opposite direction. Lightroom analyzes the colours underneath the cursor and moves the sliders in the HSL / Color / B&W panel accordingly. All similar colors in the image will be affected.
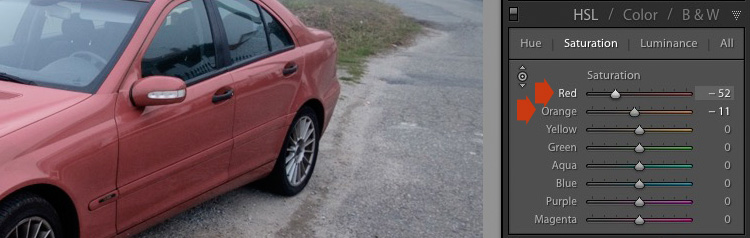
For example, in the following photo I activated the Targeted Adjustment Tool, then clicked on the car’s paintwork and dragged the mouse downwards to reduce the Saturation. Lightroom adjusted both the Red and Orange sliders, showing that the red paintwork is comprised of those two colours. This is more accurate result than only moving the Red slider.
The Targeted Adjustment Tool is a useful tool that appears in other Develop module panels.
Read my article Mastering Color in Lightroom using the HSL tab to learn more about the HSL / Color / B&W panel.
The Split Toning panel
The Split Toning panel is for toning photos. While this is a technique traditionally associated with black and white photography, you can also use it with colour. If you’re a beginner, split toning is a little advanced for you at this stage, so I’ll direct those of you who are interested to articles that cover it in detail.
How to Split Tone Black and White Photos in Lightroom shows you how it’s done with black and white photography.
How to Create a Vintage Look using Lightroom shows you how to split tone colour photos (it also covers tone curves and Lightroom Develop Presets)
The Detail panel
The Detail panel is for adjusting the default image sharpness and noise reduction settings. For beginners it is simplest not to touch these. You won’t need to do so until you are a more advanced user.
Those of your curious to learn more can read our articles Learn How to Use the Sharpening Tools in Lightroom and How to Do Noise Reduction in Lightroom.
The Effects module
Use the Effects module to apply a creative vignette, add grain or (new in Lightroom CC only) add or remove atmospheric haze.
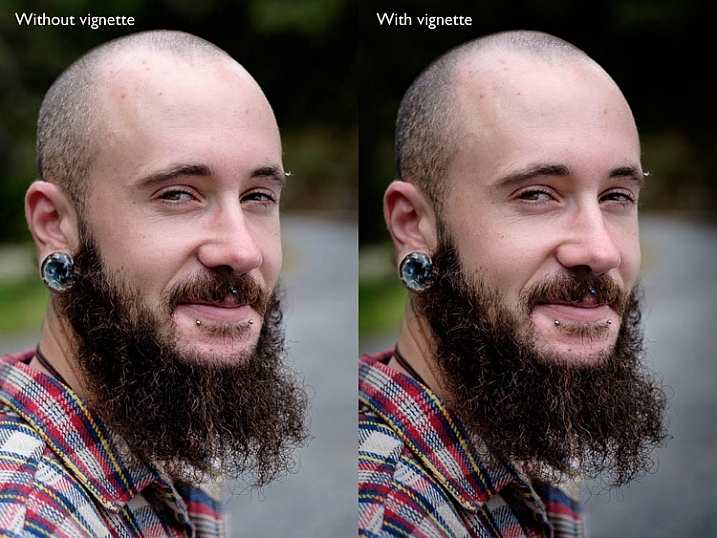
Vignetting lets you darken (or lighten) the edges of your photo, gently guiding the viewer’s eye towards the centre. Many images, especially portraits, can be improved by adding a subtle dark vignette. Here’s an example:
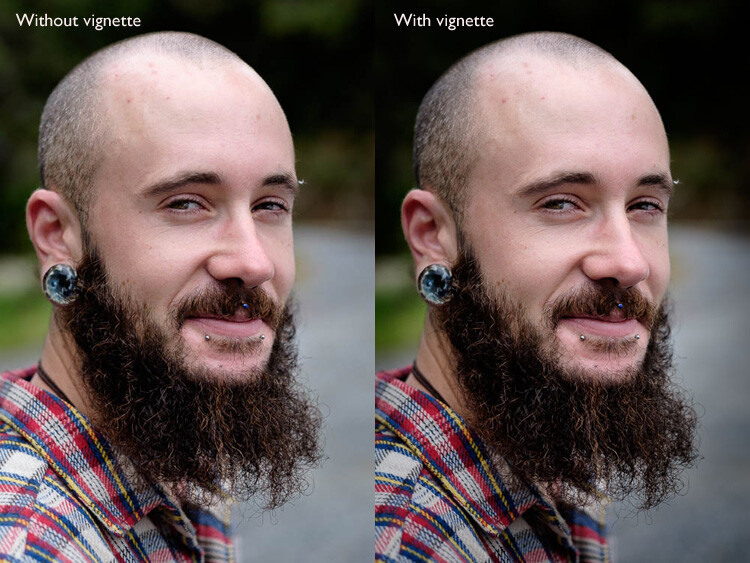
You may have to look closely to see it as the effect is subtle, but the portrait on the right has a vignette. It is most obvious in the bottom right corner.
These are the settings used to create this vignette:
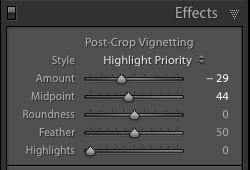
- Move the Amount slider left to darken the edges of the image, or to the right to lighten them.
- Move the Midpoint slider left to make the area covered by the vignette larger, or right to make it smaller.
- Move the Roundness slider left to make the vignette squarer, or right to make it more circular.
- Move the Feather slider left to make the edge of the vignette harder (a more defined end and beginning of it), or right to make the edge softer (graduates slower from dark to light).
- Move the Highlights slider right to preserve any highlights present in the area covered by the vignette.
Tip: The easiest way to see what these sliders do is to set Amount to -100. Then move the other sliders to see what effect they have.
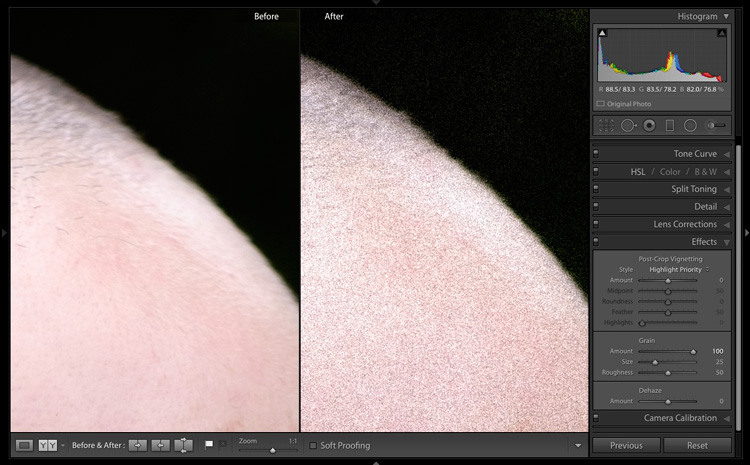
Use the Grain sliders to add grain to your photos. This is only useful if you would like to emulate the look of photos taken with film. Move the Amount slider right to add grain (there is no grain at the zero setting) and then use the Size and Roughness sliders to adjust the size and appearance of the grain. This before and after image shows the effect of increasing Grain to 100, the maximum setting:
Dehaze is a new slider that is only available in Lightroom CC. Use it to reduce atmospheric haze caused by flare, mist, or pollution. You can also use it to increase haze – a good example of this is with photos taken in foggy conditions.
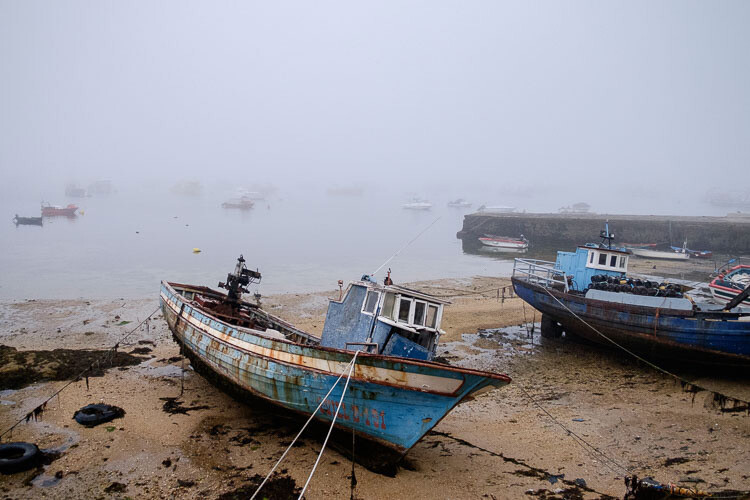
Photo taken in foggy conditions. Dehaze set to zero (the default).
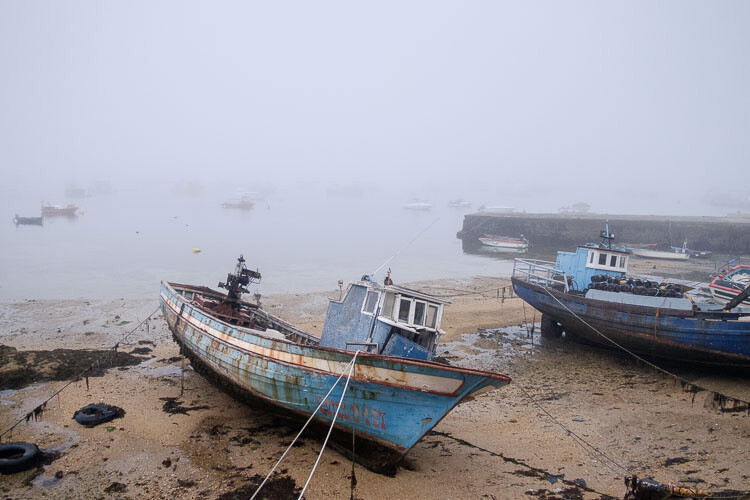
Dehaze set to -10 to increase effect of fog.
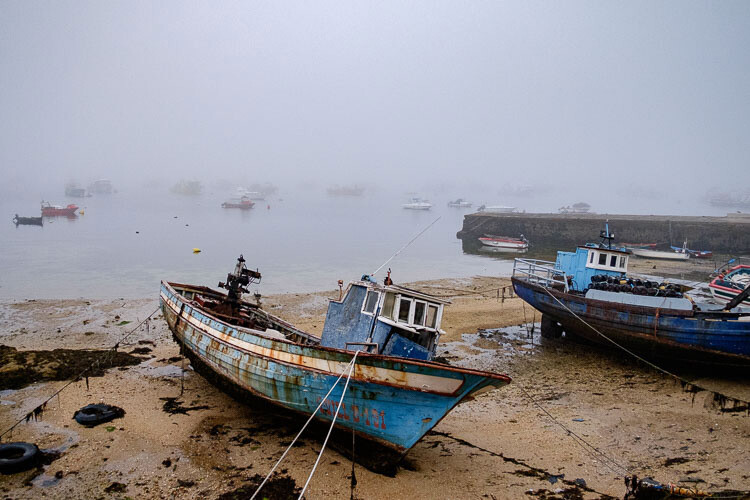
Dehaze set to +30 to decrease effect of fog.
I’ll show you how to build on the work done in the right-hand panels by making local adjustments in my next article. In the meantime, if you have any questions about the techniques in this article, please let me know in the comments.
The Mastering Lightroom Collection
My Mastering Lightroom ebooks will help you get the most out of Lightroom. They cover every aspect of the software from the Library module through to creating beautiful images in the Develop module. Click the link to learn more or buy.
googletag.cmd.push(function() {
tablet_slots.push( googletag.defineSlot( “/1005424/_dPSv4_tab-all-article-bottom_(300×250)”, [300, 250], “pb-ad-78623” ).addService( googletag.pubads() ) ); } );googletag.cmd.push(function() {
mobile_slots.push( googletag.defineSlot( “/1005424/_dPSv4_mob-all-article-bottom_(300×250)”, [300, 250], “pb-ad-78158” ).addService( googletag.pubads() ) ); } );The post Next Steps to Getting Started in the Lightroom Develop Module by Andrew S. Gibson appeared first on Digital Photography School.
-
10 Crucial Things You Need to Think About for Portrait Photography
Darlene’s Portrait Fundamentals course is on sale for $ 75 (50% off) now until November 3rd only. Find out more or grab the deal over at Snapndeals.com.
There are many pieces to doing a portrait – it’s not easy. You have to think about the technical stuff like exposure and focus, as well as the non-technical stuff like composition and working with a live subject. It can be daunting if you’re just starting out doing portrait photography so let’s break it down into all the pieces so you can work on one at a time, then put it all together.
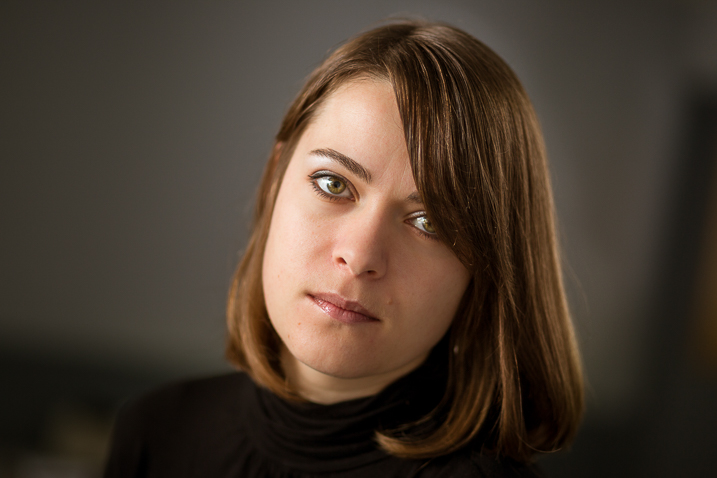
Here are the 10 crucial elements you need to think about when doing portrait photography:
- Lighting Pattern
- Lighting Ratio
- Quality of light
- Lens selection
- Background
- Exposure/metering
- Sharpness – getting it in focus
- How to position the subject (posing)
- Facial view and camera position
- Expression
THE TECHNICAL STUFF
#1 Lighting pattern
This is how the light falls on the subject’s face. How you set up the light will determine the mood of the final portrait and whether or not the subject is flattered. Lighting partner is a critical piece to get right. There are four main type of patterns and two styles, they are:
- Split lighting
- Loop lighting
- Rembrandt lighting
- Butterfly lighting
- Short lighting
- Broad lighting
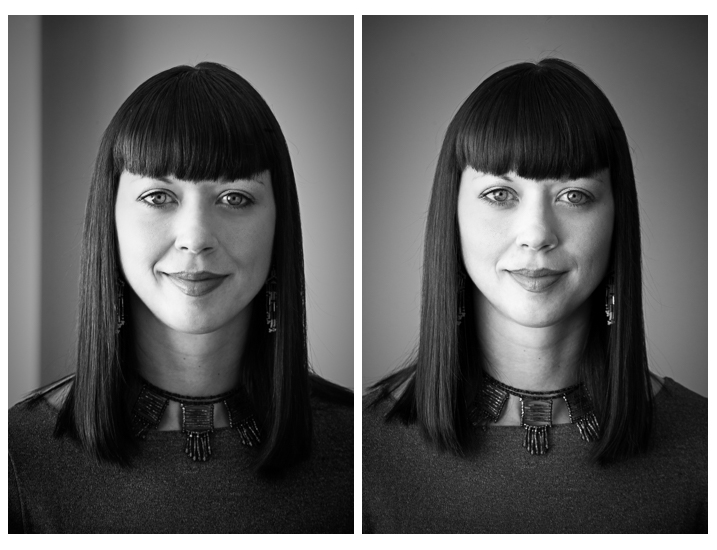
Left – Split lighting. Right – Loop lighting.
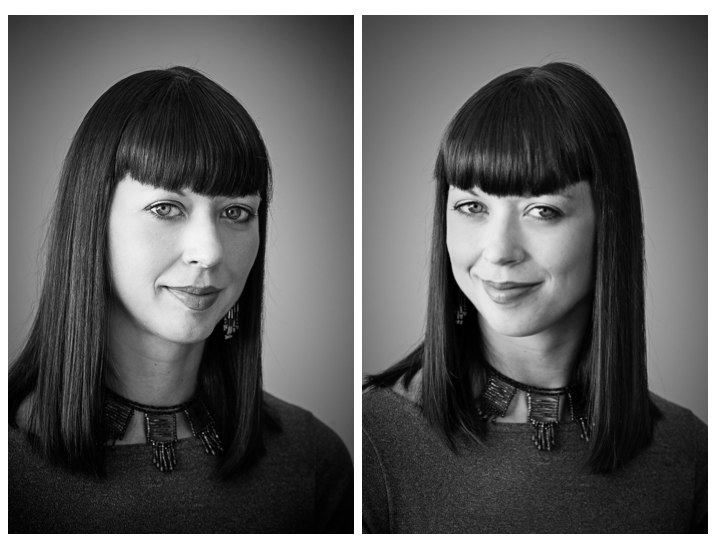
Left: Broad lighting. Right: Short lighting. Notice how different she looks in each image, particularly her nose!
Knowing what each looks like and when to use them is very important. Read more here: 6 Portrait Lighting Patterns Every Photographer Should Know.
#2 Lighting ratio
A ratio is a comparison of one thing to another and in terms of lighting it is comparing the dark and light sides of the face. How much difference is there is from the shadow, to the highlight side? The greater the ratio, the more contrast the image will have, and the more moody the portrait will become. The lower the ratio, the less contrast, and the portrait will have a lighter, fresher feeling.
Look at the following examples:
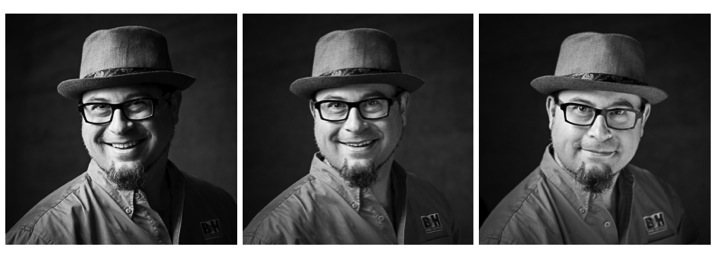
In the images above the ratio on the left is very strong, about 16:1 or four stops. The missing is about 4:1 or two stops, and the right is almost 1:1 or even. The only difference from one to the next is use of a reflector. Notice how the mood and feel of the portrait changes, as the contrast is adjusted.
For more detail on ratios read: Lighting Ratios to Make or Break your Portrait
#3 Quality of light
Another aspect of lighting you need to decide is whether you will use hard or soft light.
Hard light is produced by a small light source and is characterized by high contrast, enhanced texture of the subject, added drama, and harsh well edge-defined shadows. Examples of hard light sources are:
- The sun (even though it is large, it is far away so its relative size is small)
- A bare light bulb
- The small built-in flash on your camera (including your speedlight without modifiers)
Here are two portraits done using hard light. Which is more appropriate use of this type of lighting for the subject?
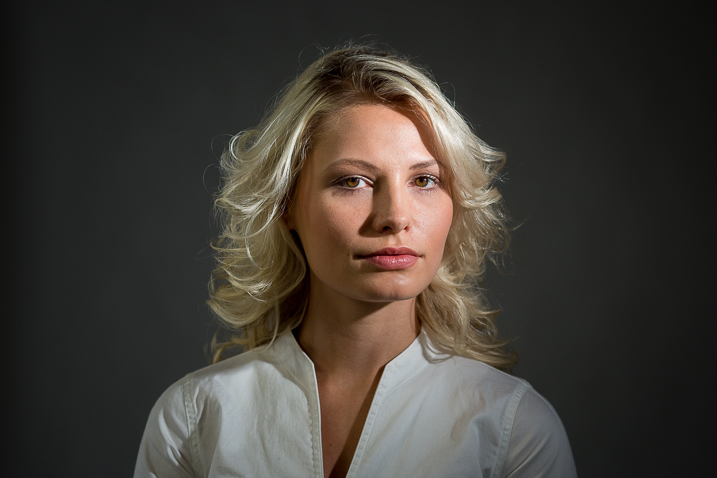
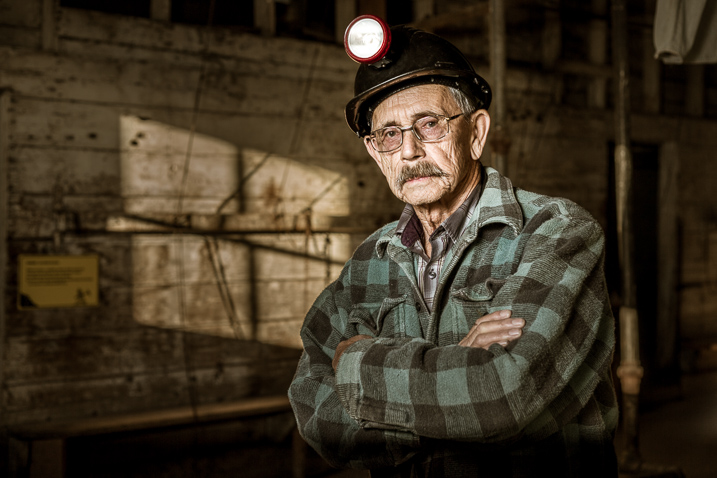
Soft light is produced by a very large light source. It is low contrast (or can even be quite flat), less textureenhancing, and is more forgiving and flattering for people photography. Examples of soft light sources are:
- The sky on an overcast day
- Large studio softboxes
- A large reflector like 42” or 52”
- An on-camera flash that has been bounced off a ceiling or wall
Here are two portraits done using soft light. Which is more appropriate use of this type of lighting for the subject?
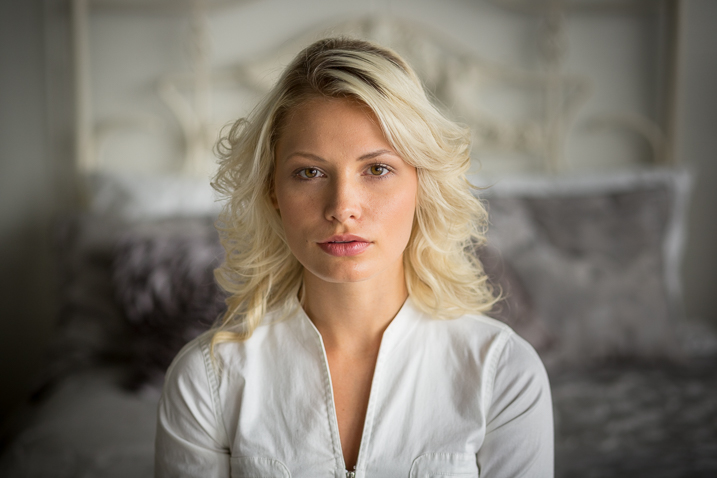
So along with the ratio, the quality of light will have a great affect on the mood and feeling of your portrait. Choose soft light for portraits that flatter the subject, and choose hard light for an edgier look with more grit and drama.
#4 Lens selection
The lens you select will change the appearance not only of the subject, but the background as well.
Using a wide angle lens will introduce distortion and cause the subject’s face to look abnormal, sort of stretched. It will also allow you to see a large sweeping view of the background behind them.
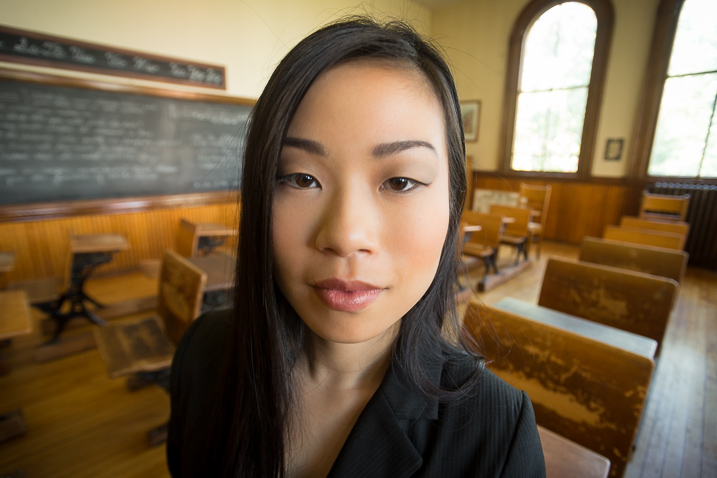
Notice how the shape of her face and her features are distorted? This is not something most people will desire.
However, there may be instances where you want this look such as a humorous portrait, kids, or an editorial style portrait of a street vendor at a market where you want to see his environment.
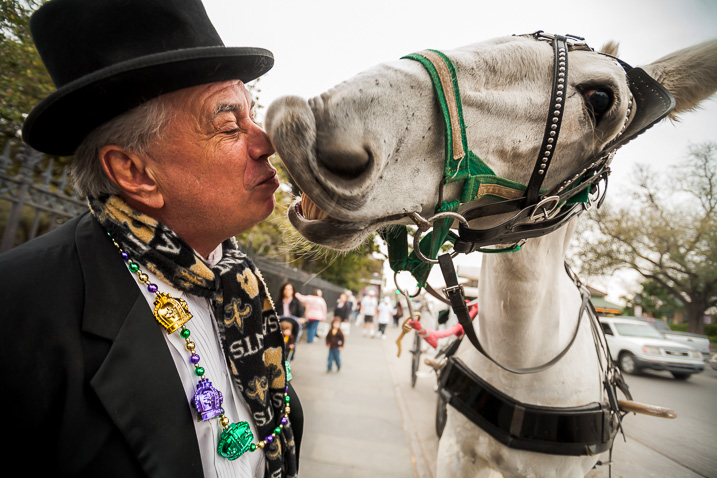
The wide angle view adds to the comical nature of this portrait.
Telephoto lenses compress perspective – this does two things. First it is usually more flattering to the subject, their facial features look less distorted. Second, it simplifies the background by seeing less of it, and often it’s less in focus as well (dependant on distance to the background) putting more emphasis on the subject, which is what you want. Read more at: How to Achieve Blurred Backgrounds in Portraits.
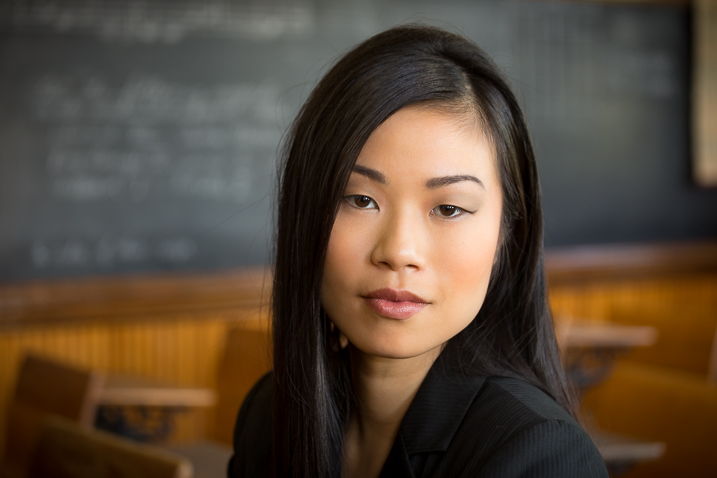
Same girl as the portrait above. Compare her face in the two images, and take note of the background as well. See how much less of the room, and how it is more out of focus than the wide image above?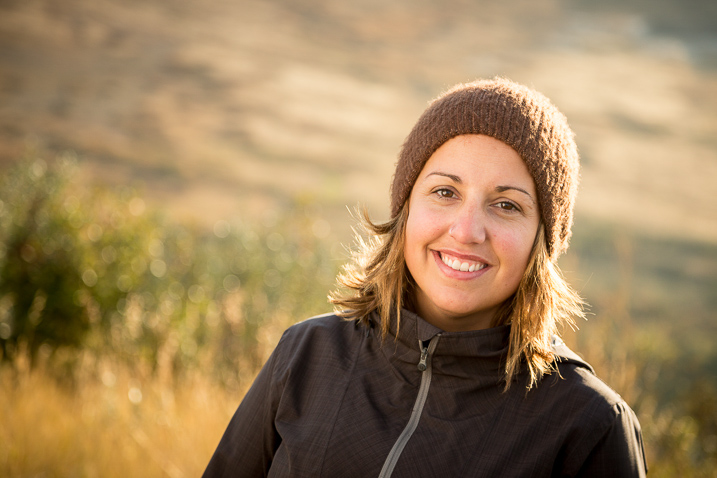
The long lens used for this image has compressed the background and because it is so far away (across the river on the other side) it is really out of focus and provides a soft background to enhance the portrait, not take away from the girl.#5 Background
One thing many of my students forget to control and think about is the background. It’s so easy to be focused on all the other stuff and working with your subject that you forget to even look at the background.
Two things you want to make sure about for the background are: it makes sense with the portrait, and doesn’t distract the viewer from the subject. There are four things that can do that, watch for them in your background and adjust your camera position or composition accordingly if they show up:
- Contrast
- Bright colours (warm tones are the worse for distraction like red and yellow)
- Sharpness
- Bright areas
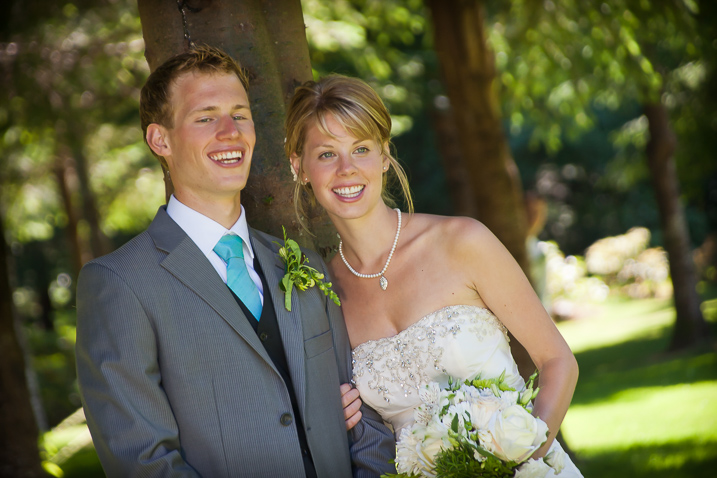
See how the bright areas, which are also high contrast, in the background draw your attention away from the wedding couple?
Any or all of those can draw the eye away from the subject if they are in your background. The eye is attracted to the brightest area of an image, as well as the sharpest. So get your portrait subject away from the background far enough to get it out of focus, and watch for hot spots that grab the eye. Sometimes simply moving your camera a foot or two to the left or right can eliminate trouble areas and give you a cleaner background – allowing the subject to be the star.
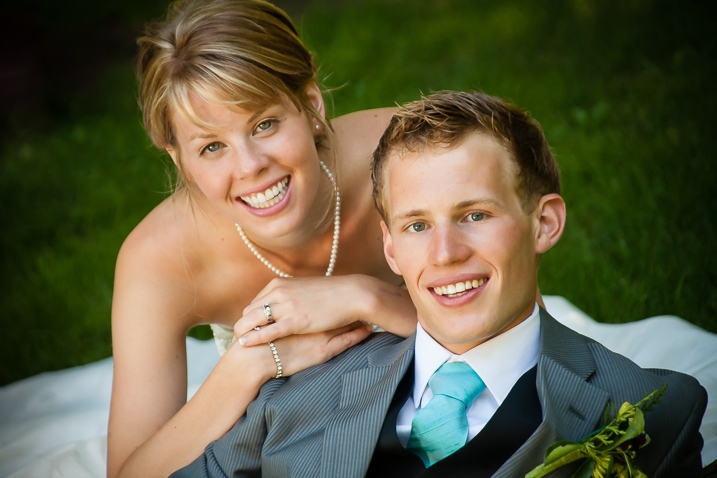
Use of multiple techniques here have drastically improved this portrait over the one above. The background is now solid, out of focus, and it does not take your eye away from the couple but rather compliments the overall portrait.#6 Exposure and metering
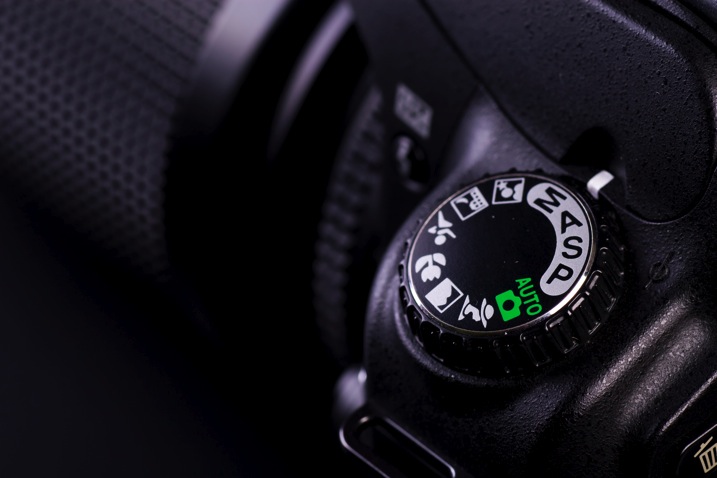
For a portrait where the subject is not moving, I almost always use the following camera settings:
- Manual shooting mode
- Single shot drive mode (when I press the button it takes one image only)
- Single point focus (not multi or zone)
- One-shot or AF-S focus mode to focus and lock (not continuous)
- Shade White Balance preset (as I am usually working in the shade, if you’re in the bright sun choose that – but pick one that matches your lighting condition and leave it, anything but AWB!)
- Shoot in RAW
That gives me the most control over doing one very important thing – having a consistent exposure from one frame to the next. That may not seem like a bit deal but if you ever decide to do portraits for a friend or have real paying clients – you want to be able to show them the images on the back of the camera and not worry about the one in the middle that was black cause you forgot to adjust the exposure.
The other thing it does is makes editing in the post-production stage much faster.
So basically set your exposure, do a test shot (review it for exposure using the histogram), then don’t touch it unless you either move to a new location, or the light changes.
#7 Sharpness – getting it in focus
I already mentioned the settings I use for focus above. Back button focus is something I highly recommend as well. It allows me to lock focus on the subject, precisely on their eye if I’m in close enough, and then recompose my portrait and shoot away. Unless the subject or I move, changing the distance between us, there is no need to refocus.
Here are a few more focus tips from a past article I did: 5 Tips for Getting Sharper Images. Obviously if you’re shooting a moving target, like kids in action, you’ll want to choose different focus settings. Try Continuous focus (Servo or AF-C) and burst mode (continuous shooting mode or drive).
THE AESTHETIC STUFF
#8 Posing the subject
Getting your subject or model into a comfortable, yet flattering pose can be tricky. People are generally nervous when being photographed and will look to you for guidance on how to stand, hold their body, turn their head, and adjust their hands. So you need to have a few ideas ready for them, making sure they can hold it comfortably and they look good at the same time.
Here are a few tips:
- You’ve likely heard this before, but if it bends – bend it. Meaning get them out of a stiff body position bending one leg slightly, and bending elbows and wrists.
- Get them to shift their weight away from the camera (hip away) it will be more flattering that way.
- Add a slight head tilt for ladies to add a touch of femininity.
- To get people to turn their body when standing – tell them to turn and point their feet, the body will follow naturally.
- Turn shoulders slightly to narrow the body width, which is more flattering for most people.
- Let them pose naturally and just make slight tweaks or adjustments. Watch how they move on their own so it still looks like them.
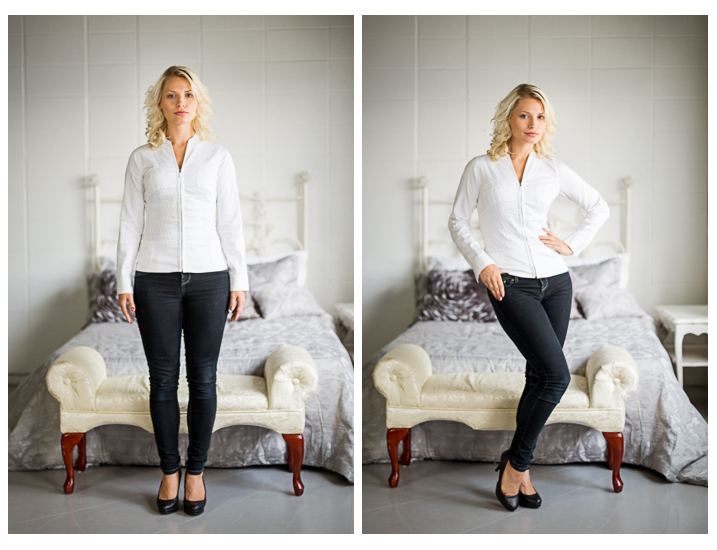
Left – stiff and boring. Right – bend the parts that bend and make a more dynamic pose, it’s also more flattering, and in this case feminine.
For more tips on posing read these dPS articles:
- Portrait Posing Tips- How to Help People to Relax and Take Better Photos
- Tips for Posing Men
- Posing Guide for Photographing Women: 7 Poses to Get You 21 Different Photos
- Or grab the dPS ebook Portraits: Strike the Pose
#9 Facial view and camera position
How you position the subject’s face is another factor that determines how flattering the portrait will be, and the mood. Some people look really great in full face view (facing the camera directly) while most benefit from turning slightly to one side, thus narrowing the face a little.
Profile view is something people cannot see in the mirror, so many have never seen theirs, and have no idea what they look like from the side. Only by trying it out will you see and know if it’s flattering for them.
The key to choosing the right angle for their face is to observe them. Do they tend to turn slightly when talking to you? Take note – that is probably the side the subconsciously prefer.
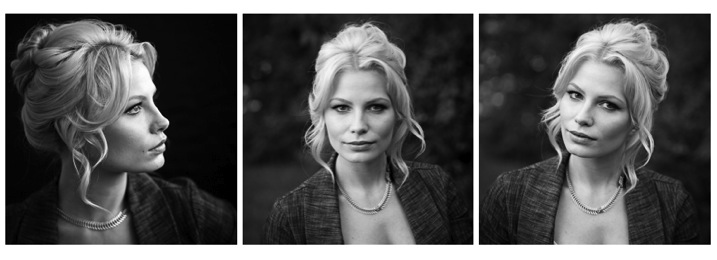
Three different views of the same girl’s face (above). She has a really gorgeous profile and a square jaw. I think the profile and last image (¾ face view) are the most flattering for her but she looks great in any image. Not all your portrait subjects will have that, so you have to help them look their best by making choices like this. If in doubt, shoot all three and choose later, or let them pick. You’ll learn from the subject what they like and what they think looks flattering.Tip: for people who have a bump on their nose that do not want it to show – try photographing them facing both ways. One way will show the bump, the other it will be hidden. How you do that is shoot one way with the light say off to camera right. Then trade places with them so the light is coming from the other way and do a second shot. See which shows, and which hides the bump – then you’re ready to go.
What camera position you choose will decide what you’re emphasizing on the subject. A low camera angle can show height (especially if shooting full body) and make someone look taller, but it also emphasizes the body more. Not a good choice if someone wants to appear slimmer. Getting low down near kids level puts you closer to the action and makes them appear less small.
A slightly above eye level camera angle will emphasize the face and minimize the body, a good choice for most people. It also makes kids look smaller and can be effective if that’s the look you want. A really high angle will make the forehead prominentant (perhaps not the best choice for a receding hairline).
Just be conscious that where you place your camera will affect the final look of the portrait.
#10 Expression

Even though my Spanish is limited I was able to talk to this little girl and got this reaction and expression. She is holding a photo of her auntie’s ultrasound and her new baby cousin to be that she was really excited about. I just asked her to show me her baby primo (cousin) and she did this.
Okay, this is the ultimate thing you need to get right for great portraits. You can nail all nine points above, but if the subject has a bad expression, they will not like the image. There is one big tip I have for getting the best expressions in your portraits – talk to the subject and interact with them. There is one huge barrier to doing that which I see happen all the time.
There is a big black thing in between you and the real person sitting in front of you!
Yes, I mean the camera. Try this exercise if you dare:
Get a friend, or one of your kids or grandkids, to pose for you. Now put the camera up to your eye and take a few shots. How did it feel to you? Did you feel connected to your subject? Ask them how they felt?
Now put the camera on a tripod – yes the dreaded beast we all hate but it a necessary evil – and take a few shots using a remote trigger to fire the camera. How did you feel then? What about your subject? Were you able to make them laugh or smile? I’m going to go out on a limb and guess that you both had a better experience the second time and you got better expressions in the photos.
The key to expression is eye contact and you cannot do that with a camera between you.
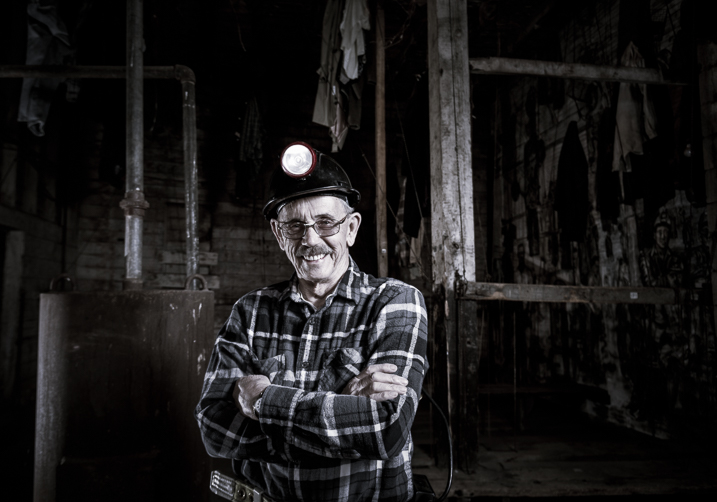
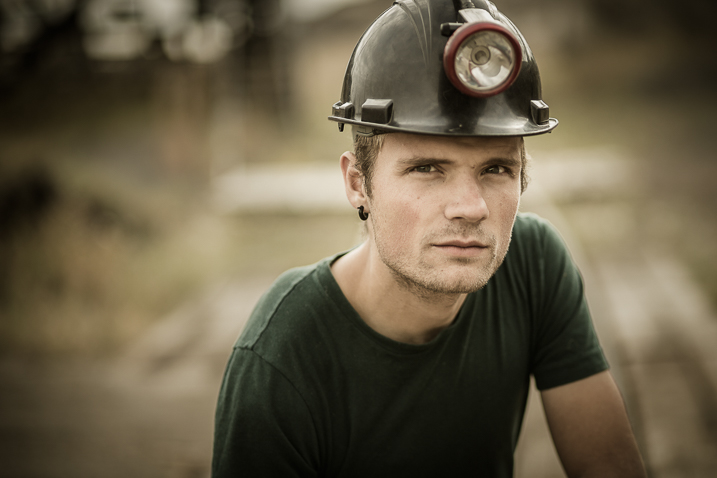
I’ve photographed Bob many times. He is a volunteer at an old coal mine where I do a workshop twice a year. He was a miner way back in the day and is as spry in his 70s as many people who are 40! He loves telling stories about the mine and ghosts so I just get him talking and let him go. We have fun, he loves being a “model” for a day, and it shows in the images.Try it and see if it doesn’t make a difference. The tripod will also make you slow down and think about your camera, settings, and everything. Your tripod is not evil, it is your friend. Make friends with your tripod and use it.
Putting it all together
Whew! See I told you doing portraits is a lot to think about. But you can do this, you got this. Just take it one step at a time. If you aren’t at the stage of getting all 10 of these things yet, just pick one at a time and work on that. Choose patient models that will help you and practice. The only way to get better is by doing.
My students often ask me, “How do you make it look so easy?” – then answer – I’ve been doing this a really long time and it becomes instinct and subconscious after so many hours. Put in your 10,000 hours and we’ll talk!
If you have any questions or want to share your images – please do so in the comments below.
 Darlene’s Portrait Fundamentals course is on sale for $ 75 (50% off) now until November 3rd only. Find out more or grab the deal over at Snapndeals.com. Take more professional looking portraits in 30 days! The Portrait Fundamentals course covers everything you need to know, from camera basics to using a multi-flash set-ups. Over 6.5 hours of video lessons with two experiences instructors.
googletag.cmd.push(function() {
tablet_slots.push( googletag.defineSlot( “/1005424/_dPSv4_tab-all-article-bottom_(300×250)”, [300, 250], “pb-ad-78623” ).addService( googletag.pubads() ) ); } );googletag.cmd.push(function() {
mobile_slots.push( googletag.defineSlot( “/1005424/_dPSv4_mob-all-article-bottom_(300×250)”, [300, 250], “pb-ad-78158” ).addService( googletag.pubads() ) ); } );The post 10 Crucial Things You Need to Think About for Portrait Photography by Darlene Hildebrandt appeared first on Digital Photography School.
-
Umeå Hardcore
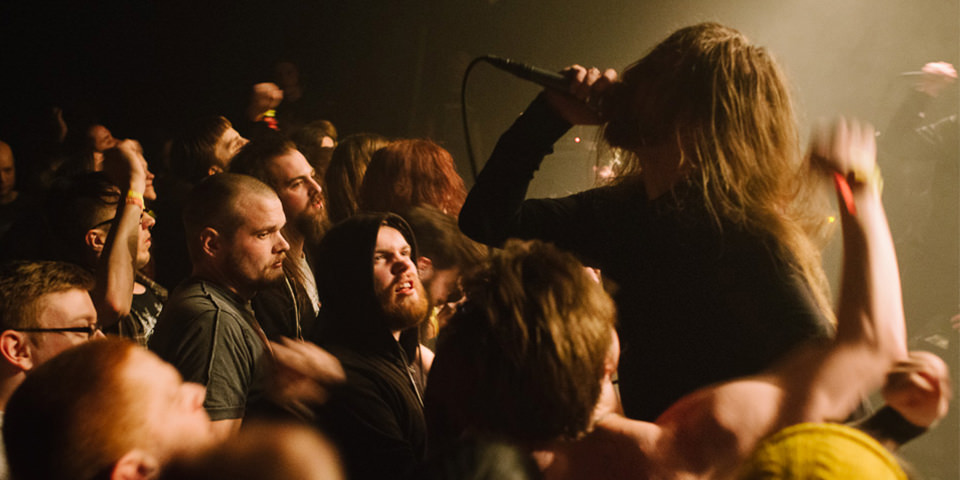
Ein Beitrag von: Jörg Brüggemann
Es muss irgendwann im Laufe des Jahres 1998 gewesen sein, als ich zum erstem Mal „New Noise“ hörte. Der Song war wie ein Blick in die Zukunft, ein vollkommen neuer Sound – repetitives Gitarrenriff, Elektro-Samples, harte Breaks und exzessiv geschriene Parolen. Seit diesem Tag ist er mein ständiger Begleiter.
kwerfeldein – Fotografie Magazin | Fotocommunity -
Wide lens, right price? Nikon 24mm F1.8G ED real-world samples
Earlier this year Nikon expanded a series of F1.8 primes with the 24mm F1.8G ED, sitting alongside 20mm and 35mm models. Compact and lightweight, it hits a $ 750 price point that’s relatively reasonable, considering the F1.4 version retails for over $ 2000. We’ve spent some time shooting with the new 24mm prime – take a look at its performance out and about. Read more
-
Top 10 Things to do When Your New Camera Arrives
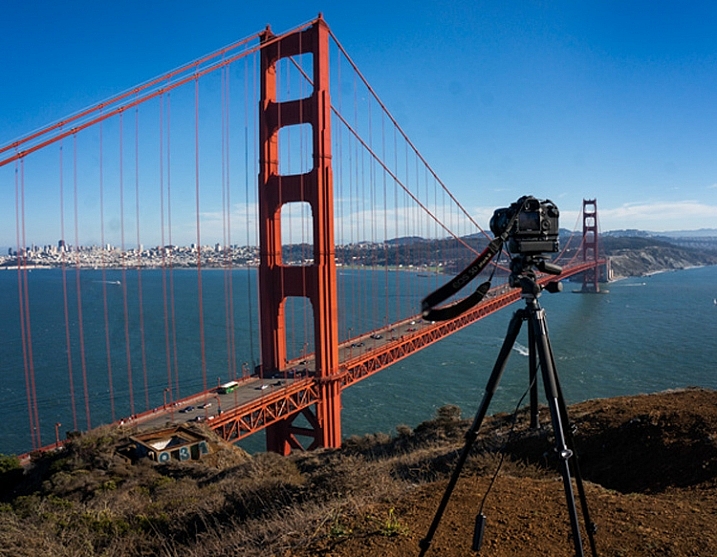
I recently found myself in the position of having to buy a new camera. It is an exciting time, but the new camera will take some getting used to.
Once you have put the battery in, the lens on, and inserted the memory card, it’s time to make your camera your own. Here are some steps to do so:
#1 Set your diopter
If your camera has a viewfinder, there will be a tiny dial near the eye piece. This is called the diopter and it affects how you see through the lens. Be sure to set it for your eyes, or things might not appear sharp when you look through the viewfinder.
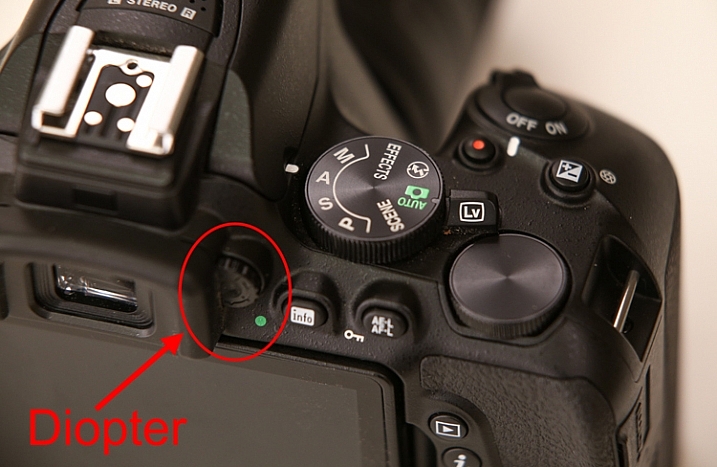
Actually, if you’ve been shooting for a while and have never set your diopter, go ahead and do it now. You might be amazed at how much clearer things appear.
#2 Set your Modes
You already know to set your mode dial (get it out of Automatic), but there are some other modes to worry about.
First, set the Drive Mode to what you want. I suggest Continuous because it will allow you to bracket your photos, or just shoot rapidly. If you do it now, you won’t be in the field wondering why your camera is only taking one photo at a time.
Next, you will need to set your Metering Mode. This is the way the camera determines the proper exposure level. The camera can either use a large portion of the scene to measure the brightness level, or just one specific point. The choices you have are:
- Automatic Mode: which is called Evaluative by Canon, Matrix by Nikon, and Multi-Segment by Sony
- Partial Metering: where the camera uses the center portion of the scene to measure light
- Spot Metering: where the camera meters using only one specific point (small area)
Any one of these modes is fine, just be sure to set the one you like best (Spot metering is more advanced so use with caution until you are up to speed with it).
Finally, set your Autofocus Mode, and by that I mean setting the focus points. You can either have the camera automatically select the focus points, or you can do it. If you do it yourself, set it so that the camera uses the center point to focus, it is the fastest and most accurate.
#3 Add your externals
Most of the time you will be adding a few things to your camera. Obvious items are the strap and the battery grip, if you have one. But another item you should add right away is the quick release plate for your tripod. That way, you won’t forget it, and you will also be able to put the camera on the tripod quickly when you are in the field.
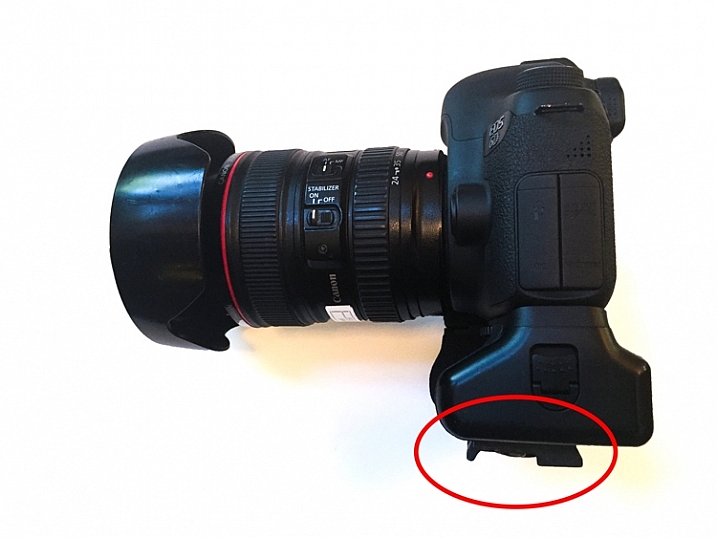
While we are on the subject of external items, this is probably a good time to make sure you have an intervalometer, or remote shutter release, that is compatible with your new camera. These things are very cheap these days, so go ahead and get one.
#4 Arrange Image Review
All cameras will show your picture on the LCD after you take it. The camera will not necessarily do it the way you want though. Here are the settings to check to make sure it is set up according to your preferences:
- Length of time: In the camera’s menu, there will be an option to set the length of time your image appears. You might as well set this on its longest setting, as you can always click it away.
- Orientation: If you shoot with your camera turned to a vertical orientation, sometimes the camera will turn the image on your LCD so it fits horizontally on the screen. The result is a tiny image, so you may want to turn this off (Note: this may be called “Auto Rotate” in some cameras).
- Show Histogram: Definitely set your review so that it shows the histogram with the image review. That is the best way to make sure you have a proper exposure.
- LCD brightness: Set your LCD brightness level to the highest level. Otherwise, when you are out in the sun you will have a very difficult time seeing the LCD at all.
While I am on the subject of the LCD, I want to mention one tricky little item for Canon shooters. On many Canon cameras, to use the Live View function, you have to go into the menu and enable it. I recently rented a Canon camera and actually thought it was broken because the Live View didn’t work. Turns out, I just needed to enable it!
#5 Set the Image Quality
The next setting to check is image quality. This is where you tell the camera what type of file to create.
Do I have to tell you that this setting should be Raw? No? Good. You might as well have the camera also create a JPEG while you are at it though. It won’t cost you anything but a small amount of memory.
#6 Create a Custom Menu
There are certain things you will only want to access sometimes, but you will want to get to them fast. Mirror Lock-up and Auto Bracketing come to mind for me. Fortunately, most cameras allow you to create a custom menu. That way you can add the features and settings you use the most, to one menu screen. That will save you a lot of time digging around in your camera’s menu.
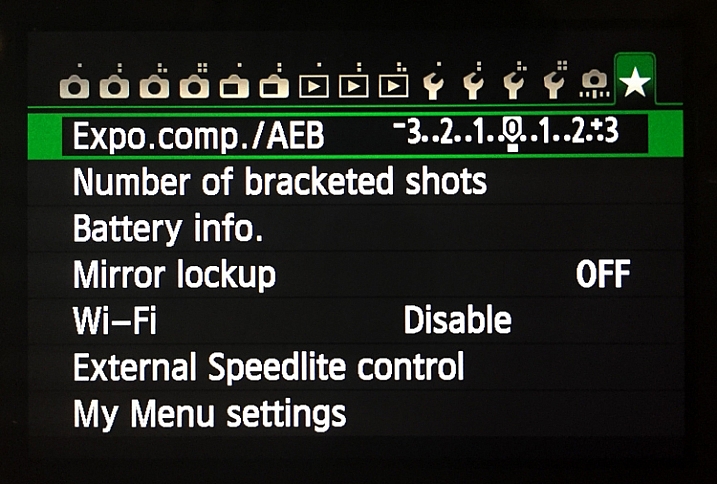
My custom menu settings
#7 Set up Back Button Focus
Normally your camera will focus when you press the shutter button halfway down. That works okay, but the better way is to set your camera to instead focus when you press a button on the back of the camera. This way the focus will not automatically reset with each picture. The setting will be in your camera’s menu.
#8 Protect your gear
I suggest using a label maker to put a label with your name and phone number on each camera, lens, or other piece of equipment you own. We are all careful with our gear, but sometimes things move fast, and I know people that have inadvertently left lenses or other items behind. What are the odds that someone who finds something you left behind will actually call the number on the label to return the item? I don’t know. Maybe they are not high. But I do know that the odds of someone returning something with no ability to identify where it came from to be precisely zero percent.
You can also add some protection for your gear by registering it with Lenstag. It is a free service where you register your camera and/or lenses with them, then if your item is stolen they put the word out to help you recover it. Does it actually work? Mercifully I’ve never had anything stolen, so I don’t know. But it is free so you might as well try it.
#9 Set up the Wifi
Almost all new cameras have a Wifi feature these days. To take advantage of it, you will have to download an app to your phone and go through a set-up process. It’s best to sit down and do that right away so that when you are out and about you are ready to take advantage of the Wifi feature.
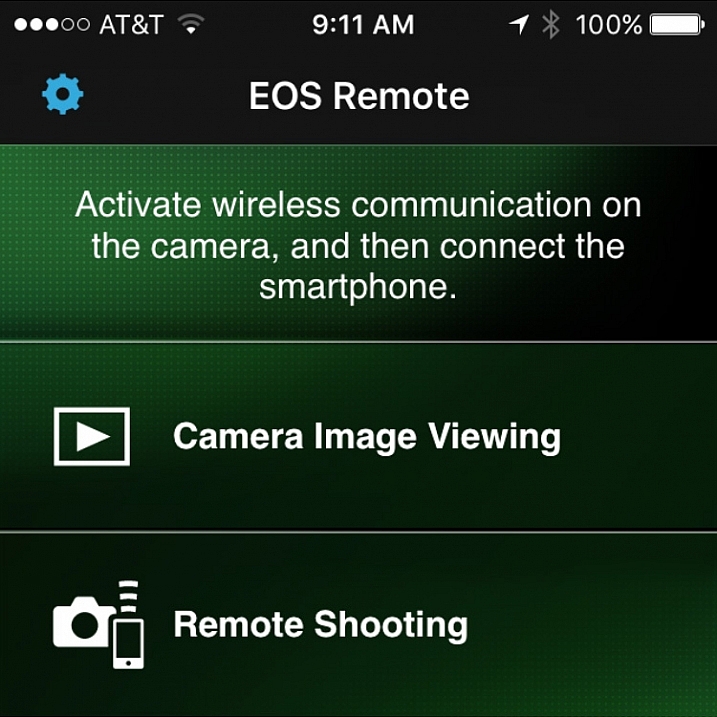
Set up the connection between your camera and your phone to enable remote shooting and camera image viewing.
#10 Read the Manual
You knew this was coming, didn’t you? Yes, you need to read your camera manual. Yes, it can be tedious, but you’ll be glad you did.
Do you have any other tips to add for new camera owners? Please share in the comments below.
googletag.cmd.push(function() {
tablet_slots.push( googletag.defineSlot( “/1005424/_dPSv4_tab-all-article-bottom_(300×250)”, [300, 250], “pb-ad-78623” ).addService( googletag.pubads() ) ); } );googletag.cmd.push(function() {
mobile_slots.push( googletag.defineSlot( “/1005424/_dPSv4_mob-all-article-bottom_(300×250)”, [300, 250], “pb-ad-78158” ).addService( googletag.pubads() ) ); } );The post Top 10 Things to do When Your New Camera Arrives by Jim Hamel appeared first on Digital Photography School.
-
Phantom City: Thousands Spot Towers Floating in the Clouds
[ By Steph in Architecture & Cities & Urbanism. ]
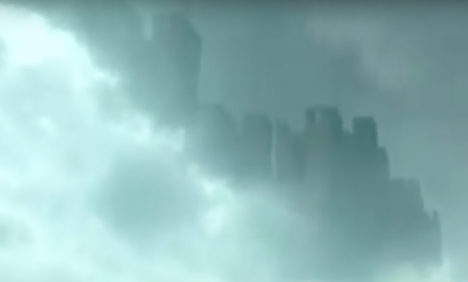
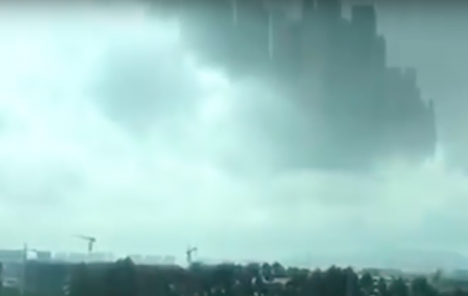
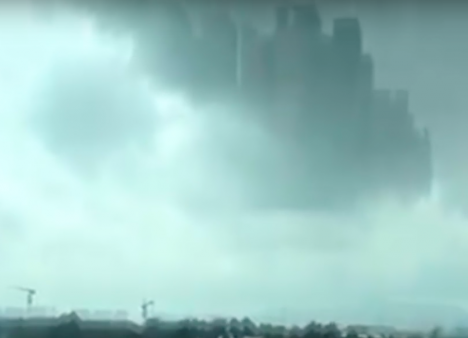
When thousands of residents of the Chinese cities of Jiangxi and Foshan reported seeing a ‘floating city’ in the clouds earlier this month, theories attempting to explain it ran wild, speculating everything from experimental holographic technology to glimpses of an alternate reality. A shaky video captures what appears to be the silhouette of a city skyline high above the horizon, at a larger scale than that of the real skyscrapers on the ground.
Naturally, conspiracy theorists are having a field day with this one, even going so far as to wonder aloud whether NASA is attempting to establish a new world order through something called the ‘Blue Beam Project.’ The most likely explanation may not be quite as exciting, but it’s still a fascinating phenomenon that has mystified people for centuries.
As Wired explains, a Jesuit priest named Father Domenico Giardina swore that he saw a crystal city floating in the air over Siciily in 1643, which quickly transformed into a garden and a forest crawling with armies before it all disappeared. You might think he’d claim he had a mystical vision sent from God, but he actually mused that perhaps minerals and salts were rising up into vapors in the clouds and condensing to become a sort of moving mirror. That may not be entirely accurate, but it’s relatively close to the truth.
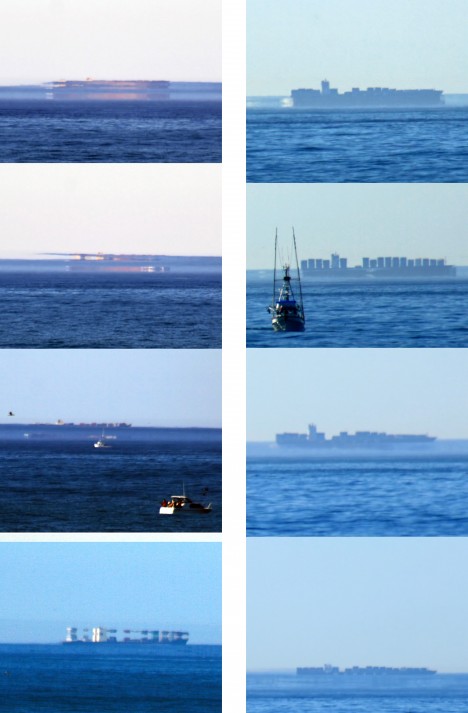
What we’re actually seeing in the video from China is most likely a ‘Fata Morgana,’ a rare type of mirage caused by a certain set of weather conditions bending light rays in just the right way. The clouds are essentially reflecting the nearby city. It’s most often seen above bodies of water, which explains the origins of the legendary ship the Flying Dutchman and hundreds of other age-old sailor stories about disappearing castles.
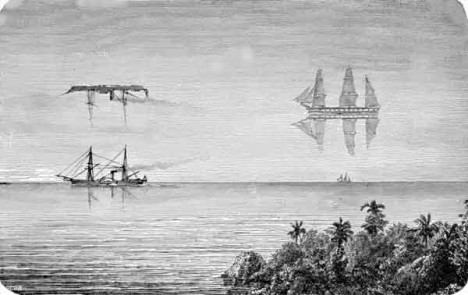
The images above show how two ships appear to change shape from one second to the next as well as an illustration of the Flying Dutchman, and a video of a ‘ghost boat’ that looks awfully similar to it. In the second video, what looks like a landscape becomes an amorphous, dissipating blob.
Want More? Click for Great Related Content on WebUrbanist:
Phantom City: App Provides Glimpse of Unbuilt NYC
An iPhone app allows users to explore the New York City that could have been if visionary architectural proposals had become reality.
Click Here to Read More »»

Mobile Micronations: 5 Floating Utopia & Ocean City Projects
Who hasn’t imagined living on their very own floating paradise? But imagine you are not just on a ship, but floating in a city alongside … other cities!
Click Here to Read More »»

Futuristic Floating Airport for London Features Underwater Tunnels
London could get a new floating airport in the Thames River with underwater tunnels connecting passengers to European rail service, in this proposal by Gensler.
Click Here to Read More »»
[ By Steph in Architecture & Cities & Urbanism. ]
[ WebUrbanist | Archives | Galleries | Privacy | TOS ]