Month: March 2015

  • Die 5 Fotobücher des Monats

    Ein Stapel Foto-Bücher und Bände sitzen auf einem älteren Sessel.

    Freundinnen und Freunde des gedruckten Bandes, es ist wieder soweit. Gefühlte hundert neue Fotobücher haben große und kleine Verlage auf den Markt geworfen. Man mag es kaum glauben, aber das alles durchzugucken ist Arbeit! Allerdings eine tolle – oder gar: Die beste?
    kwerfeldein – Fotografie Magazin | Fotocommunity

  • Overview of the New Affinity Photo Editing Software

    In early February, software company Serif announced the free beta version of Affinity Photo, a Mac-only photo editing program said to rival the likes of other editing tools, including the standards for creative professionals, Adobe Photoshop and Lightroom. In this article, I’ll walk through the public beta version of Affinity Photo and describe some pros and cons to using this new software.

    Affinity Photo Basics
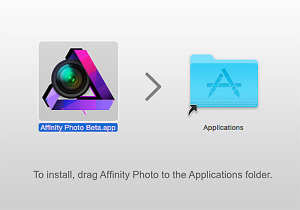
    Affinity Photo editing software for MacAt the moment, Affinity Photo beta is available as a free online download and is compatible with Apple OSX Lion 10.7.5, and up. Some key features that move Affinity up in the ranks include support for CMYK color, RAW file processing, 16-bit editing, 64-bit Photoshop plug-in compatibility, ICC color management, and LAB color. A few other noteworthy tools include Affinity Photo’s Inpainting feature, which is essentially the equivalent of Adobe content-aware fill, and real-time editing that will apply edits instantly without the need to render a preview.

    It’s uncertain when Affinity Photo’s full version will launch, but when it does it will be available for purchase in the Mac App Store for about $ 49.99. A Windows/PC version of the app is said to be in works, but again no solid timeline is available.

    Pro: Speed and reliability

    The first feature of the tool that really stood out was its speed and reliability. Affinity Photo is extremely fast and it never once crashed during the seven times I used it, which is impressive for a beta version. The tool’s speed is accredited to it being built on an entirely new and modern codebase, unlike Adobe Photoshop, which recently celebrated its 25 year anniversary and thus has been built on architecture that is also a couple decades old.

    Con: Default RAW file conversion

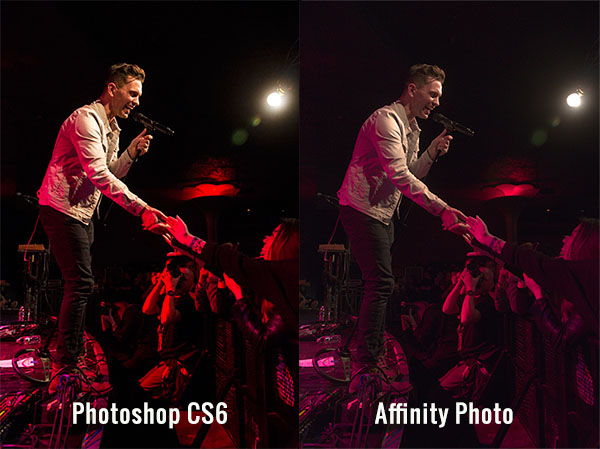
    One of the most striking differences that I immediately noticed was the default adjustment that Affinity Photo made to my RAW image when I first imported it. While these defaults could likely be adjusted to taste, I was surprised at how drastically Affinity altered my image when all I did was import it.
    Affinity Photo editing software for Mac

    Pro: Easy access to basic photo editing tools

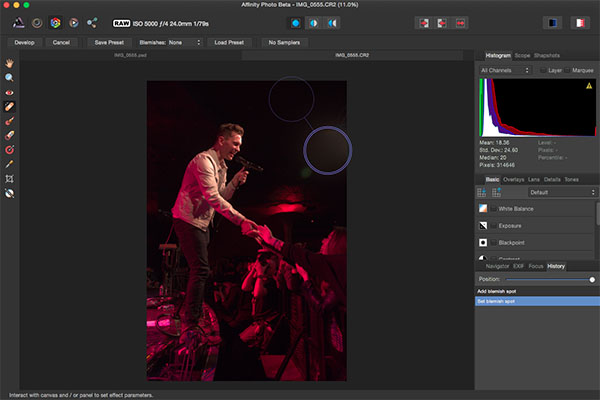
    The interface, and ease of use, is where Affinity Photo really shines. Despite being a longtime Photoshop user, I’ll admit that its layout can be overly complicated, presenting too many tools that are beyond the scope of basic photo edits. While Affinity’s interface definitely borrows some features from Photoshop, its basic layout is relatively straightforward and easy to understand without requiring a ton of customization. The top bar below the menu shows all of the basic details of your photo (file format, ISO, shutter speed, aperture, etc.), which is something that seemed rather hidden and hard to find in Photoshop.

    Basic editing tools are presented in the right hand panel under the histogram, the tools are nicely labeled, and easy to adjust with sliders. There is also a History tab that, in the same way that Photoshop does, keeps track of every edit, making it easy to track and reverse any changes. Hardcore photo retouchers might find these editing tools to be lacking, but for beginners or photographers in need of basic edits, these tools will get the job done in a straightforward manner.
    Affinity Photo editing software for Mac

    As a photographer who shoots almost exclusively in RAW, I’ve grown accustomed to the seamless integration of Camera RAW with Photoshop and Lightroom’s smooth handling of RAW image conversion. The way that Affinity handles RAW editing took a bit of troubleshooting, but was straightforward when all was understood.

    Initial RAW Editing Tools

    When you first open a RAW file into Affinity, there are distinctly fewer editing options and adjustments to choose from. The Basic tab offers easy access to make basic adjustments to white balance, exposure, contrast, shadows and highlights, clarity, vibrance, and black points. What was curiously missing from this panel were saturation and tint control. The Lens tab offers adjustments for lens correction, chromatic aberration reduction, vignettes, and defringing. The Details tab allows for detail refinement, noise reduction, and noise addition. The Tones tab is where you can adjust curves, split toning, and black and white image conversion. In this mode, the left hand panel also has a vertical tool bar reminiscent of Photoshop’s, but when editing RAW files, it is noticeably much sparser containing just 10 tools versus the 20+ tools in Photoshop.

    Unlocking the Full Editing Menu

    In order to unleash Affinity Photo’s full set of editing tools, it’s essential to click the small Develop button in the upper left hand corner of the RAW image editing window. This will transform Affinity’s interface dramatically to more closely resemble that of Photoshop. If you work exclusively with JPGs, this step will automatically be done for you upon the uploading of the JPG image, but this is an extra step when working with RAW files that to me was not so intuitive.
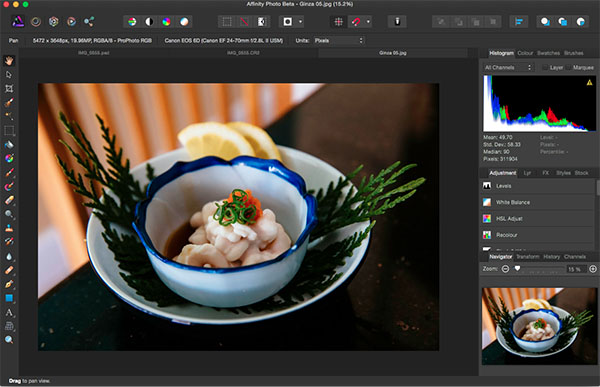
    Affinity Photo editing software for Mac

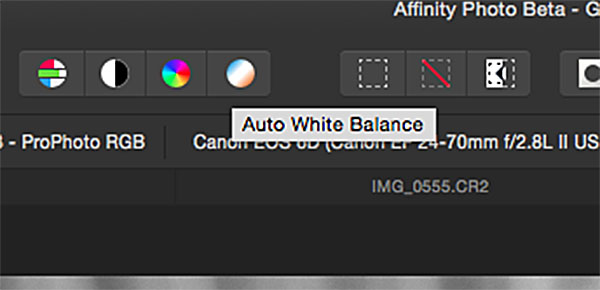
    Within the full Affinity Photo interface, you no longer get the image EXIF data in the menu bar, but instead a full row of icons that offer shortcuts to quick edit features such as auto white balance, contrast, and color. There are also several icons on the right that describe different personas such as Liquify, Develop and Macro Persona. A couple of these were not yet available in thw beta version, but clicking on the Liquify Persona offered just about the same editing tools and capabilities that Photoshop’s liquify feature does. For the sake of demonstration, the below image shows off the use of Affinity’s Liquify Twirl Tool, which was intuitive and easy to use.
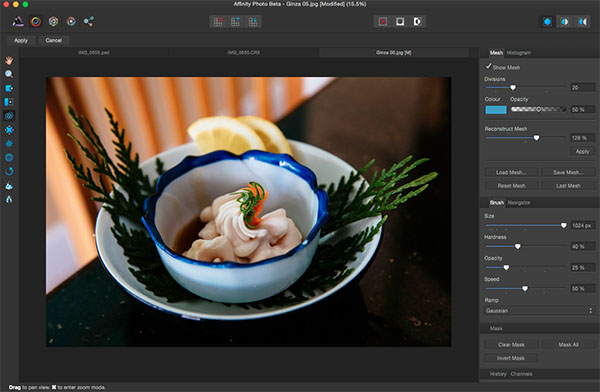
    Affinity Photo editing software for Mac

    Affinity Photo editing software for Mac

    Note that the left hand tool bar is significantly longer offering; paint brushes, clone tools, dodging and burning, text overlays, and much more. The right hand editing tool panel is also laid out differently with tabs including Adjustment, Layers, Effects, and Styles. Want to add a Gaussian blur or 3D effect to your image? Just head over to the Effects tab and check the box next to the desired effect, and it is instantly applied as opposed to hunting around menus or creating an action as you would do in Photoshop.
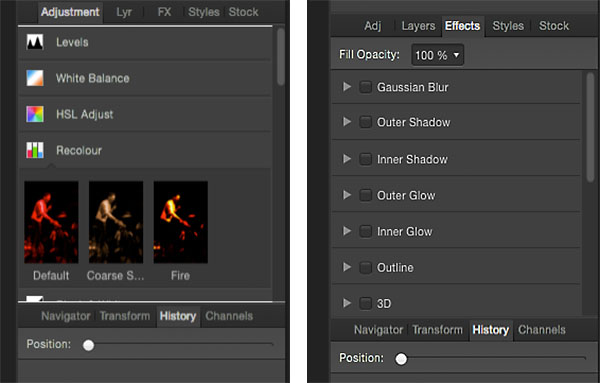
    Affinity Photo editing software for Mac

    Closing Thoughts

    It’s not often that a platform emerges to go head-on with Adobe, but so far Affinity Photo is setting itself up as a professional-grade app. While there are many high level features for advanced photo editing, there are also lots of basic photo editing tools that are intuitively positioned, making Affinity much more approachable for beginning or amateur photographers.

    Whatever the fate of Affinity Photo, the fact that companies like Serif are working on platforms to advance the process of photo editing adds healthy competition to an industry that has long been dominated by big players like Adobe and will hopefully give photographers more options in the future.

    Have you tested out Affinity beta yet? If so, what are your thoughts about what works well, and what could be improved?

    googletag.cmd.push(function() {
    tablet_slots.push( googletag.defineSlot( “/1005424/_dPSv4_tab-all-article-bottom_(300×250)”, [300, 250], “pb-ad-78623” ).addService( googletag.pubads() ) ); } );

    googletag.cmd.push(function() {
    mobile_slots.push( googletag.defineSlot( “/1005424/_dPSv4_mob-all-article-bottom_(300×250)”, [300, 250], “pb-ad-78158” ).addService( googletag.pubads() ) ); } );

    The post Overview of the New Affinity Photo Editing Software by Suzi Pratt appeared first on Digital Photography School.


    Digital Photography School

  • Mini Sky City: 57-Story Chinese Skyscraper Built in 19 Days

    [ By WebUrbanist in Architecture & Offices & Commercial. ]

    sky city speed

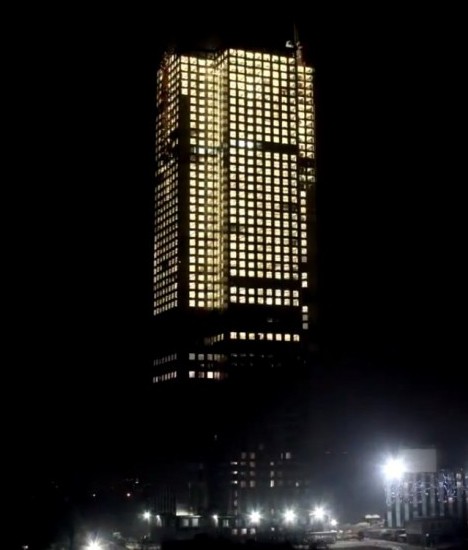
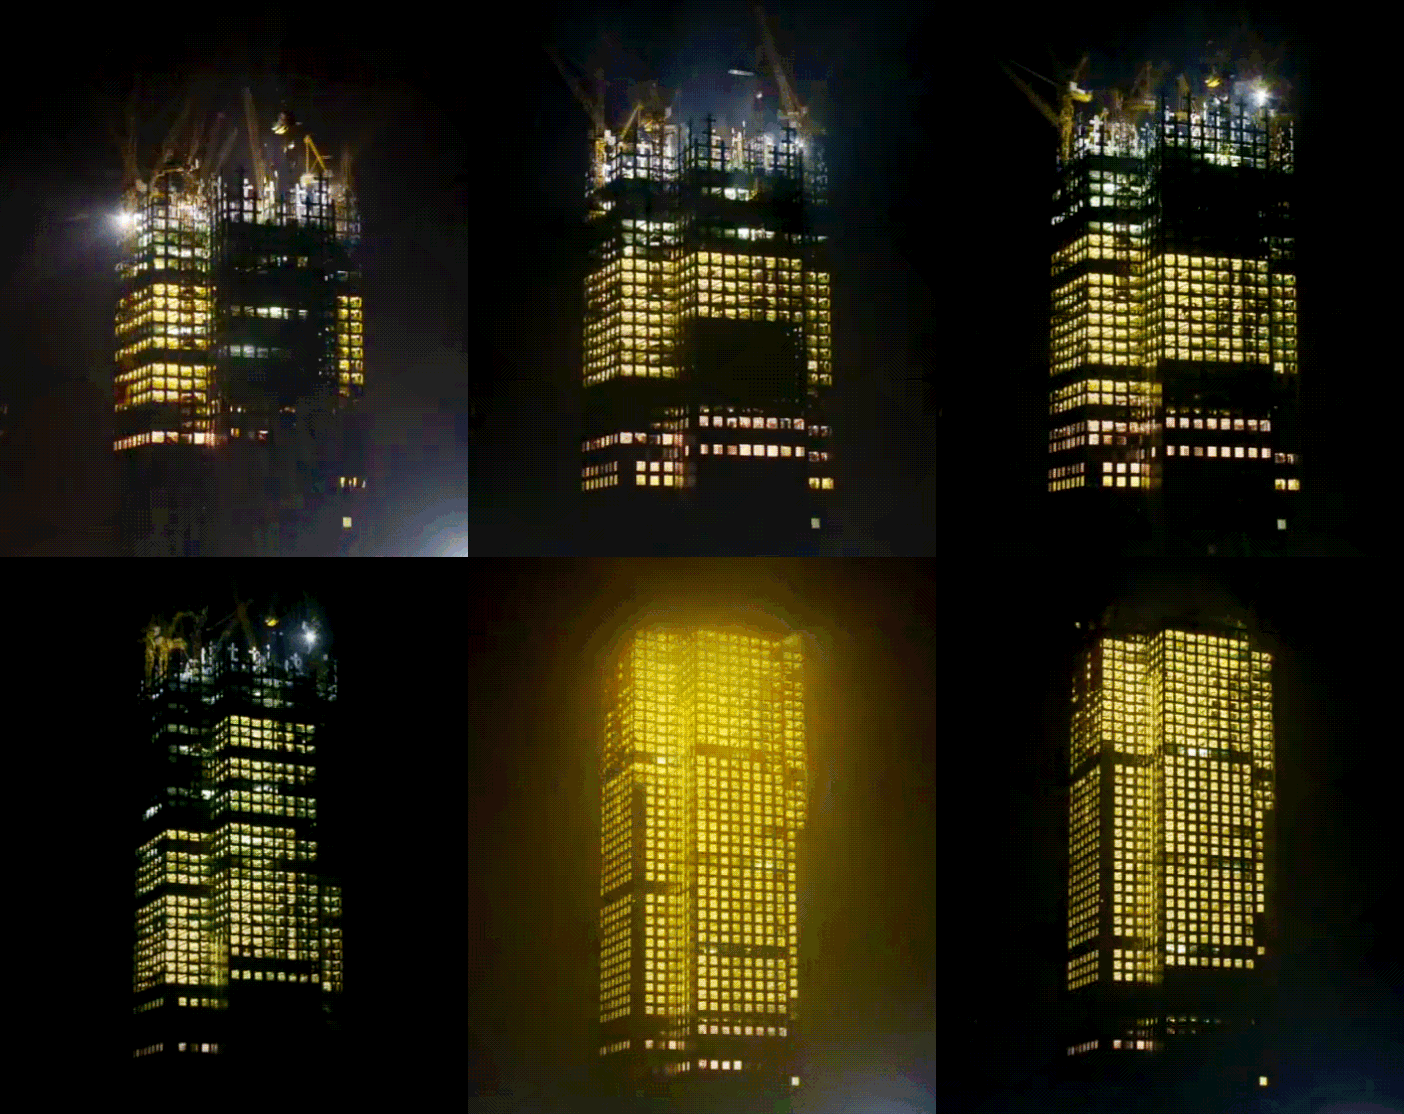
    The world’s tallest prefab building has just been constructed at a rate of 3 stories per day, showcasing the power of modular design and industrial prefabrication operating at scale. Located in Changsha, China, the record-breaking building is designed to be connected by sky bridges to a larger Sky City complex yet to be completed.

    fast

    This first step in the grand scheme is this mixed-use structure featuring 800 apartments and office space for 4,000 workers with a total of over 2,000,000 square feet as well as 19 giant atrium spaces.

    Producing many of the component parts in advance in factories, including entire truss systems, saves time and energy on site and also reduces pollution associated with busy construction sites and cast-on-site concrete. Its builders at BSB estimate a reduction in output of carbon dioxide by 12,000 tons thanks to these techniques as well as other environmental benefits, including a decrease in dust and particulates in the air around the building site.

    sky city interior

    Mini Sky City, as the tower is titled, is to be part of a larger Sky City series of interconnected skyscrapers that will include vertical farming spaces. One of the less-obvious byproducts of building at such speeds: China is able to effectively rapid-prototype urban design experiments at scale, testing novel strategies for vertical interaction and horizontal integration across structures.

    sky city interiors

    The country recently saw the successful completion of the world’s first 3D-printed apartment complex as well as the rapid creation of 10 houses 3D-printed from scrap materials put together in just one day.

    sky city progress

    If you have ever driven past a skyscraper in progress day after day, you will know from experience just how fast this assembly really is compared to industry standards around the world – the precision of parts and management of contractors involved would be staggering in a situation with less-tight coordination as well.

    sky city part one

    Whether this will all become part of China’s ultimate bust in real estate, the technologies, techniques and principles on display here can and should be studied by architects from around the world.

    Share on Facebook


    [ By WebUrbanist in Architecture & Offices & Commercial. ]

    [ WebUrbanist | Archives | Galleries | Privacy | TOS ]


    WebUrbanist

  • 28. März 2015

    Das Bild des Tages von: Lambda_X

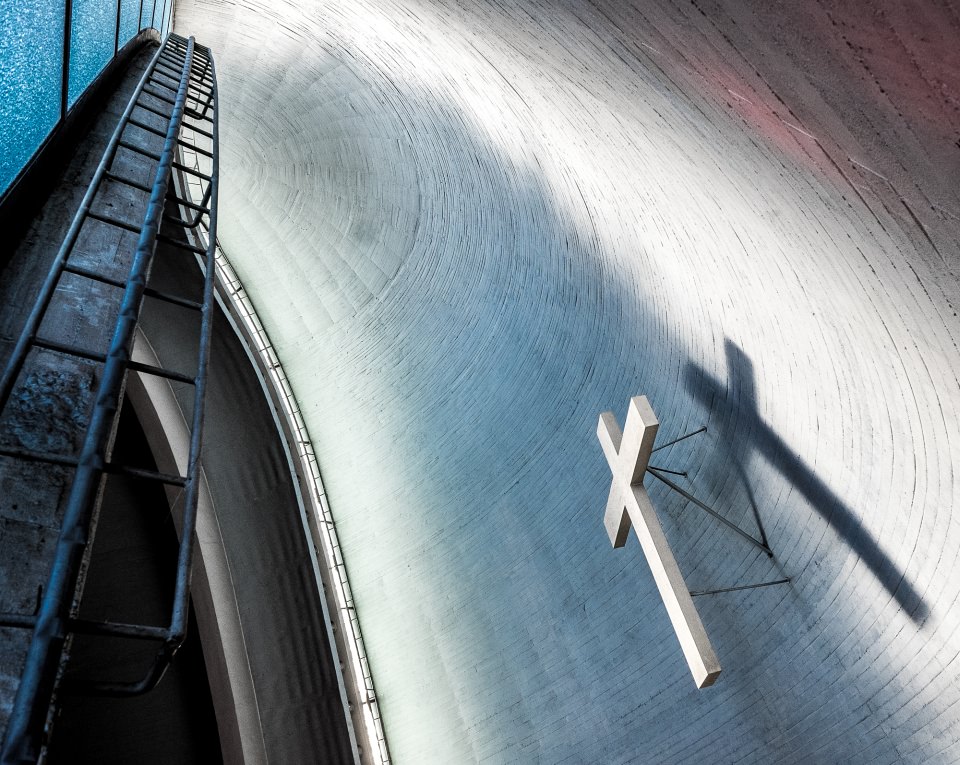
    Holy Spirit © Lambda_X

    Im Ausblick ist der Heilige Geist per Leiter erreichbar.
    kwerfeldein – Fotografie Magazin | Fotocommunity

  • Review: Flash Disc Lighting Modifier by Fstoppers

    The more you experiment with off-camera flash, the more you realize that many lighting modifiers are pretty large in size. From softboxes to beauty dishes to umbrellas, many take up space not only in your camera equipment bags, but also on site at a photo shoot. This may be a small price to pay for the dramatic impact these modifiers can have on the resulting image, but sometimes you just want a really compact lighting modifier that can produce great results. One of the answers to this problem is the new Flash Disc by Fstoppers.

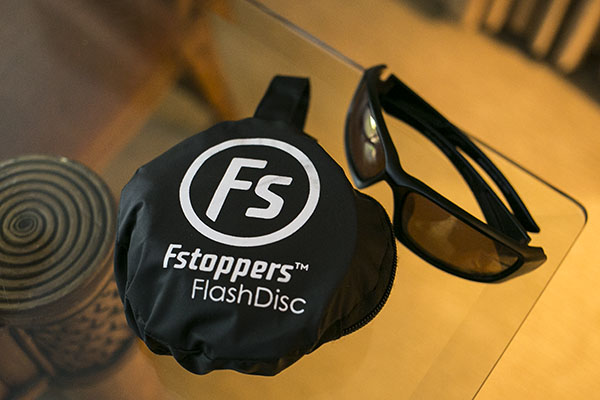
    Flash Disc Product 02

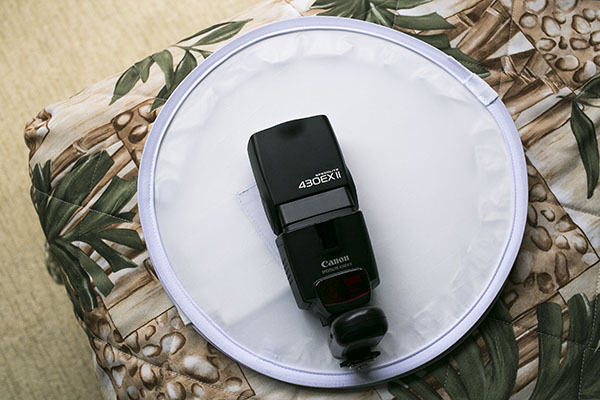
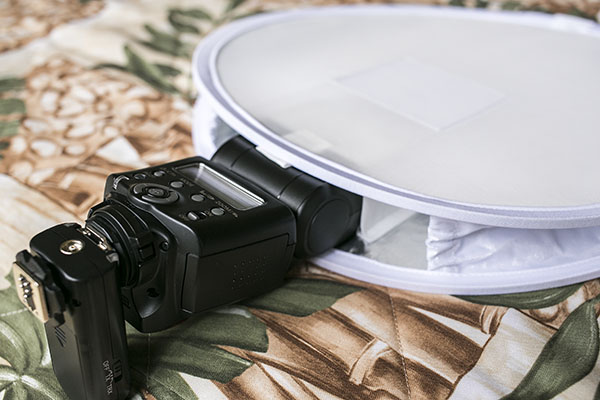
    A handy little device made to fit speedlights, the Flash Disc was created by Lee Morris of Fstoppers with the intent of being a portable softbox. It appears at first to be a little white reflector, as it folds up like one into a compact size that can fit into a large pocket or small bag. However, the Flash Disc is actually more like two reflectors that sandwich your speedlight. When a flash is fired, the light bounces between the two reflectors, creating a softer spread of light. Available for purchase online at a price of $ 49.99, the first batch of Flash Discs were so popular they sold out and supplies were only recently replenished.

    Flash Disc Product

    As a food, portrait, and event photographer, who travels a lot for photo shoots, the main features I’m looking for in a lighting kit are portability and functionality. I generally travel with one Speedlite flash (Canon 430 EXII) and a pair of wireless flash triggers (Yongnuo RF-603 II) for on-location portraits, candid event shots, and food photos in varied lighting conditions. When I have the luxury of space, I’ll bring an octabox softbox or shoot-through umbrella as a lighting modifier, although these devices take up both space in my photography kit as well as setup time while on location. I recently got my hands on the Fstoppers Flash Disc and was very impressed by its compact form, as well as big impact in helping diffuse and bounce my off-camera flash lighting.

    Without a lighting modifier, off-camera Speedlight flash tends to be way too harsh.

    Without a lighting modifier, off-camera flash tends to be way too harsh and overpowering.

    Pro: Small and low-profile

    The first big plus about the Flash Disc is that it is incredibly tiny when it folds up like a reflector and is put into its little black carrying case. Dimensions-wise, the Flash Disc is 12 inches in diameter when open, and 4 inches in diameter when closed. It’s very lightweight at less than 1 pound, and it is compatible with most external flash units. It really can fit into a jacket pocket, or be clipped (via a carabiner) to a loop on your belt or camera bag.

    Flash Disc 05

    Con: Very tight when collapsed

    A possible drawback to having two reflectors folded into each other is that the Flash Disc can literally pop opened. I had a close call once when I opened the Flash Disc with my hands right next to an open bottle of water, resulting in said bottle being knocked over and spilled. Be sure not to open it close to your body or camera as it could possibly knock something over.

    Pro: Includes a grey card

    One side of the Flash Disc is translucent white and the other has built-in strips of white, black, and 18% grey. This is helpful for setting your white balance in post-processing (or doing custom white balance in the field)

    Con: Sometimes the lighting is too harsh

    Considering the 12″” diameter of the Flash Disc, sometimes the light it emits isn’t the softest, especially when compared to light from a 30″” softbox or umbrella. It’s a size trade-off that can sometimes result in the Flash Disc light still being a tad too harsh, although there are certain situations and photography styles that can benefit from this look.

    Best uses

    I tested out the Flash Disc during a recent tropical vacation-  using it on food, portrait, and product photography – and was pleased with the overall results. In the below product photo of a carry-on suitcase, the Flash Disc on a Canon 430 EXII was positioned camera right. The flash was in manual mode, dialled down to 1/64 power, and the result is a soft fill light on the bottom of the suitcase.

    Flash Disc

    For food photography, the Flash Disc’s compact size was crucial as many food photos are taken in restaurants or tight kitchens where there isn’t the space or time to indulge in more elaborate lighting setups. In the image below of a fish taco plate, natural lighting was illuminating most of the dish. The Flash Disc was camera right, fired at 1/64 power to fill in the shadow areas of the dish.

    Flash Disc 02

    The Flash Disc also came in extremely handy while doing casual location-based outdoor portraits, another scenario in which lugging around a large umbrella or reflector wouldn’t be convenient without an assistant. The portrait below was taken just after sunset, and my subject is lit by the Flash Disc fired at 1/64 power from camera left. This is an example of when the Flash Disc’s light quality is arguably on the harsher side, especially if you’re working as a lone “run and gun” photographer without an assistant, meaning you can only place the Flash Disc as near or far from your subject as your arm can stretch.

    Flash Disc Portrait

    Has anyone else tested out the Flash Disc? I’d love to hear your thoughts on how useful (or not) you find it.

    googletag.cmd.push(function() {
    tablet_slots.push( googletag.defineSlot( “/1005424/_dPSv4_tab-all-article-bottom_(300×250)”, [300, 250], “pb-ad-78623” ).addService( googletag.pubads() ) ); } );

    googletag.cmd.push(function() {
    mobile_slots.push( googletag.defineSlot( “/1005424/_dPSv4_mob-all-article-bottom_(300×250)”, [300, 250], “pb-ad-78158” ).addService( googletag.pubads() ) ); } );

    The post Review: Flash Disc Lighting Modifier by Fstoppers by Suzi Pratt appeared first on Digital Photography School.


    Digital Photography School

  • Readers’ Showcase: Raymond Pang

    ‘Whales made me do it’ isn’t exactly what we expected to hear when we asked DPR reader Raymond Pang how he got started in photography. Then again, he’s not really your typical photographer. When he couldn’t find an app to help him plan out shoots in advance, he learned iOS app development and created one. Take a look at some of his images and read more in our Q&A. See gallery

    Articles: Digital Photography Review (dpreview.com)

  • Von Wüsten, Bergen und Meeren Kolumbiens

    © Regina Röder

    Ein Beitrag von: Regina Röder

    „Kolumbien, als Mädchen und alleine?“ Diese Frage wurde mir häufig gestellt, als ich Freunden und Familie davon erzählte, dass ich meinen Job in Kanada gekündigt hatte, um nach Südamerika zu gehen.
    kwerfeldein – Fotografie Magazin | Fotocommunity

  • 25 Photographs of the Moon with Peace and Tranquility

    The moon and night sky is a mysterious thing. Photographs of the moon can be tricky, but done well can convey an overwhelming sense of peacefulness and calm. I love doing night photography and when you can get the stars, moon or the Milky Way it’s even better.

    Enjoy these images of the moon and allow yourself to star gaze and be inspired:

    Photograph Moonlight shadows by Otto Hütter on 500px

    Moonlight shadows by Otto Hütter on 500px

    Photograph Bats under the moonlight by Weerapong Chaipuck on 500px

    Bats under the moonlight by Weerapong Chaipuck on 500px

    Photograph Winter Night by Arild Heitmann on 500px

    Winter Night by Arild Heitmann on 500px

    Photograph Looks like a Vulcano by Gianmaria Veronese on 500px

    Looks like a Vulcano by Gianmaria Veronese on 500px

    Photograph Lunar Eclipse Over Mt Shasta Revisited by Sean Bagshaw on 500px

    Lunar Eclipse Over Mt Shasta Revisited by Sean Bagshaw on 500px

    Photograph Dying Earth by Michael  Goh on 500px

    Dying Earth by Michael Goh on 500px

    Photograph El Matadors View by Ted Gore on 500px

    El Matadors View by Ted Gore on 500px

    Photograph The Blood Moon by Timothy Green on 500px

    The Blood Moon by Timothy Green on 500px

    Photograph Road to Nowhere - Supermoon by Aaron J. Groen on 500px

    Road to Nowhere – Supermoon by Aaron J. Groen on 500px

    Photograph Golden Bay: When Night Falls by Yan Zhang on 500px

    Golden Bay: When Night Falls by Yan Zhang on 500px

    Photograph Winding Owens by Nagesh Mahadev on 500px

    Winding Owens by Nagesh Mahadev on 500px

    Photograph BY THE LIGHT OF THE MOON by Michelle Cobble on 500px

    BY THE LIGHT OF THE MOON by Michelle Cobble on 500px

    Photograph Storybook by Jeff Lewis on 500px

    Storybook by Jeff Lewis on 500px

    Photograph Pearly Gates to Nirvana by Yuga Kurita on 500px

    Pearly Gates to Nirvana by Yuga Kurita on 500px

    Photograph The Polarizer by Miles Morgan on 500px

    The Polarizer by Miles Morgan on 500px

    Photograph Moon by Uccio78 on 500px

    Moon by Uccio78 on 500px

    (Okay that was a sneaky one – it’s not the moon but I think the image is great so I shared it)

    Photograph Ancient Memories by Raza Durrani on 500px

    Ancient Memories by Raza Durrani on 500px

    Photograph The Old Bridge by Mostafa Hamad on 500px

    The Old Bridge by Mostafa Hamad on 500px

    Photograph with filter by Kajo_Kamil_Sadlon on 500px

    with filter by Kajo_Kamil_Sadlon on 500px

    Photograph Paying Reverence To The Rising Moon by Jeff Deveau on 500px

    Paying Reverence To The Rising Moon by Jeff Deveau on 500px

    Photograph Good Night... by Ahmet Kizilhan on 500px

    Good Night… by Ahmet Kizilhan on 500px

    Photograph Halo by Michael Bollino on 500px

    Halo by Michael Bollino on 500px

    Photograph Flight from moon by Michael Priesch on 500px

    Flight from moon by Michael Priesch on 500px

    Photograph Illuminate my Heart by Sherry Akrami on 500px

    Illuminate my Heart by Sherry Akrami on 500px

    Photograph Pink Moon  by MO AOUN PHOTO on 500px

    Pink Moon by MO AOUN PHOTO on 500px

    googletag.cmd.push(function() {
    tablet_slots.push( googletag.defineSlot( “/1005424/_dPSv4_tab-all-article-bottom_(300×250)”, [300, 250], “pb-ad-78623” ).addService( googletag.pubads() ) ); } );

    googletag.cmd.push(function() {
    mobile_slots.push( googletag.defineSlot( “/1005424/_dPSv4_mob-all-article-bottom_(300×250)”, [300, 250], “pb-ad-78158” ).addService( googletag.pubads() ) ); } );

    The post 25 Photographs of the Moon with Peace and Tranquility by Darlene Hildebrandt appeared first on Digital Photography School.


    Digital Photography School
  • Weekly Photography Challenge – Shoot the Moon

    Luz Adriana Villa

    By Luz Adriana Villa

    The image above and these other 25 images of the moon might give you a hint as to your challenge this week.

    Night sky photography can be challenging and a lot of fun. Now’s the time to get out and try photographing the moon if you haven’t already.

    We have several articles on the topic here on dPS if you need assistance:

    • 20 Dos and Don’ts for Shooting the Moon
    • Beyond Full Moon Photography
    • Moon Photography: 6 Tips for Better Moon Photos
    • Moon Photography Made Simple
    Sam Javanrouh

    By Sam Javanrouh

    @lbyper

    By @lbyper

    Christian Ronnel

    By Christian Ronnel

    Dylan Toh

    By Dylan Toh

    Share your shoot the moon images here:

    Simply upload your shot into the comment field (look for the little camera icon in the Disqus comments section) and they’ll get embedded for us all to see or if you’d prefer upload them to your favourite photo sharing site and leave the link to them. Show me your best images in this week’s challenge. Sometimes it takes a while for an image to appear so be patient and try not to post the same image twice.

    googletag.cmd.push(function() {
    tablet_slots.push( googletag.defineSlot( “/1005424/_dPSv4_tab-all-article-bottom_(300×250)”, [300, 250], “pb-ad-78623” ).addService( googletag.pubads() ) ); } );

    googletag.cmd.push(function() {
    mobile_slots.push( googletag.defineSlot( “/1005424/_dPSv4_mob-all-article-bottom_(300×250)”, [300, 250], “pb-ad-78158” ).addService( googletag.pubads() ) ); } );

    The post Weekly Photography Challenge – Shoot the Moon by Darlene Hildebrandt appeared first on Digital Photography School.


    Digital Photography School

  • 27. März 2015

    Das Bild des Tages von: Andreas Jurgenowski

    gestapelt-auf-blau-©-Andreas-Jurgenowski-16253318844

    Im Ausblick: Liebe in Zeiten des Krieges, unbegrenzter Fotospeicher und eine unbegründete Löschung auf Instagram
    kwerfeldein – Fotografie Magazin | Fotocommunity