Month: December 2013

  • Firmware update gives Sony QX-series cameras more manual control

    Unknown.png

    Sony has announced firmware upgrades that enhance the features of its QX-series ‘lens-style’ cameras, which clip on to the front of your smartphone. The update adds Full HD video recording and an expanded ISO range for both the QX10 and QX100, while the latter also receives a shutter priority mode. Sony’s latest PlayMemories Mobile app has more seamless photo browsing and dramatically improved performance on iOS devices. Click through for more.

    News: Digital Photography Review (dpreview.com)

  • Sizing it up: Our Panasonic Lumix DMC-GM1 Review

    gm1_2.jpg

    We’ve just posted our full review of the Panasonic Lumix DMC-GM1. It underscores the ‘Micro’ in Micro Four Thirds as the smallest model in that class, with a 16MP Four Thirds sensor and a collapsible 12-32mm F3.5-5.6 kit lens. It offers many features that its bigger Lumix GX7 sibling does, starting with the sensor, but in a much smaller package. See how it measures up. Read the full review

    News: Digital Photography Review (dpreview.com)

  • Grab Our Best Selling Landscape Photography eBook for $7 – Today Only

    On the seventh day of Christmas dPS gave to me …

    The biggest discount on the sale on our biggest-selling eBook of the year!

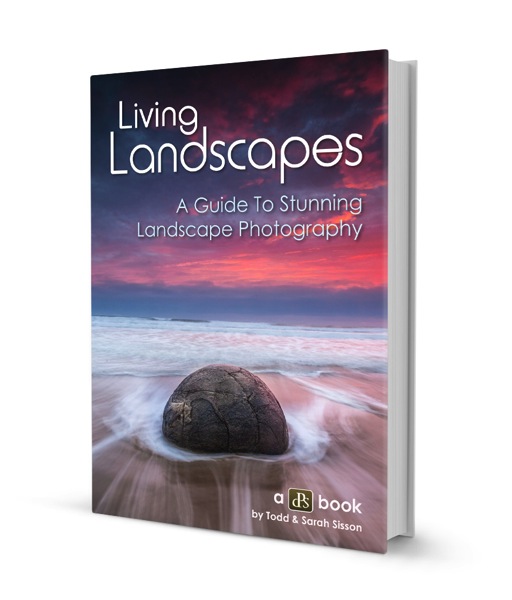
    Living Landscapes today is yours for just $ 7. Grab it here.

    Landscapes cover

    When we released it earlier this year Living Landscapes sold like hotcakes.

    Not only that – the feedback we’ve received from readers and reviewers has been phenomenal.

    We’re going to let this eBook and price stand for itself and simply say … If you like taking landscape photos – Don’t miss this one!

    Get It by itself or Bundle it With 4 More Great eBooks from Jay Patel

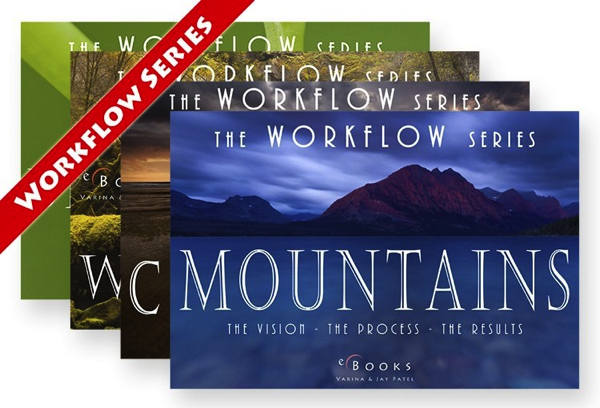
    Now if you’re really wanting to take your outdoor photography to the next level then you’ll want to check out this 2nd deal today because you can also get Living Landscapes bundled together with world renowned photographer Jay Patels’ workflow series.

    NewImage

    This collection of 5 books will transform your outdoor photography.

    In this bundle you get Living Landscapes plus:

    • The Workflow Series: Coastlines
    • The Workflow Series: Waterfalls
    • The Workflow Series: Mountains
    • The Workflow Series: Details and Macro

    All for just $ 24.99 — that’s $ 5 a book!

    Day 7 of the dPS 12 days of Christmas is going to be big. Do not miss out.

    Whether you’re just getting Living Landscapes or you want the full bundle of 5 eBooks – Grab them here fast because this deal is available today only.

    The post Grab Our Best Selling Landscape Photography eBook for $ 7 – Today Only by Darren Rowse appeared first on Digital Photography School.


    Digital Photography School

  • 19. Türchen: Cinebook

    19. Türchen

    Die Anzahl von Fotobuchanbietern ist riesig und schwer überschaubar. Einer davon, der uns im Test absolut überzeugt hat, ist Cinebook, weshalb wir uns sehr freuen, dass sich die Cinebook-Fotobücher heute in diesem Türchen verstecken.

    Unseren ausführlichen Test könnt Ihr hier nachlesen. Für unsere Verlosung aber noch einmal in Kurzform, was uns besonders überzeugt:

    Zum einen ist das Fotobuch komplett werbefrei. Erstellen lässt es sich mit der kostenlosen Cinebook-Software. Für Grafiker und begabte Fotofrafen ist es auch möglich, eigene PDFs nach den Cinebookvorgaben hochzuladen. Die Qualität des Buches ist großartig, dank des 16 mm dicken Fuji Crystal Echtfotopapier. Dank der Leporello-Bindung ist der Mittelfalz fast nicht zu sehen und lässt es so zu, Bilder auch quer über eine Doppelseite zu platzieren.

    Cinebook

    Momentan kann man zwischen vier verschiedenen Formaten sowie einer seidenmatten Softskin- und der glatt glänzenden ColourProtect-Oberfläche wählen.

    In unserem Kalendertürchen liegen gleich zwei Gutscheine von jeweils maximal 185,95 €. Mit diesem Gutschein könnt Ihr Euch ein Buch Eurer Wahl selbst gestalten und drucken lassen.

    Um einen der Gutscheine zu gewinnen, schreibe einen Kommentar unter bürgerlichem Namen und gültiger E-Mail-Adresse bis heute um 24 Uhr. Danach verlosen wir sie per Zufallsgenerator unter allen Kommentatoren. Die genauen Gewinnspielregeln findest Du hier. Viel Glück!


    kwerfeldein – Fotografie Magazin

  • Der richtige Abstand

    Ein Beitrag von: Marina Arienzale

    Die Daten des Italienischen Nationalinstitus für Statistiken zeigen, dass getrennt oder geschieden lebende Menschen im Durchschnitt 50 Jahre alt sind und im nördlichen Zentrum des Landes leben.

    Nach der Trennung leben die meisten Männer allein, während die Frauen, die das Sorgerecht für die Kinder erhalten, meistens der alleinerziehende Kopf einer Kernfamilie sind. Diese Menschen, insbesondere die Männer, sind sozial ziemlich aktiv, geben aber an, vollkommen unzufrieden mit ihrem Privatleben zu sein.

    © Marina Arienzale

    © Marina Arienzale

    Innerhalb dieser allgemeinen Umstände richtet sich mein Interesse besonders auf die Veränderungen, denen ein Mensch unterworfen ist, der es jahrelang gewohnt war, ein verheiratetes Leben zu führen.

    Die Studien betrachten geschiedene und getrennte Paare, aber auch solche, die verwitwet sind. Also kurzgesagt solche, die das Opfer einer Trennung geworden sind, die die Umstände ihrer Gewohnheiten radikal geändert hat.

    © Marina Arienzale

    © Marina Arienzale

    Meine Bilder konzentrieren sich auch daher vor allem auf Objekte sowie Gesten und weniger auf die Person selbst. Ich habe mir die alltäglichen Routinen der Menschen angesehen, um die Intimität einzufangen, die einen einsamen Pfad prägt.

    Auf diesem suchen sie notwendigerweise eine neue emotionale Verbindung, um den Verlust einer langanhaltenden Beziehung zu verarbeiten. Alle Fotos meiner Arbeit wurden am selben Platz aufgenommen: Dem Zuhause.

    © Marina Arienzale

    © Marina Arienzale

    Meine Entscheidung, sie nicht zu portraitieren, sondern ihre Wohnungen zu fotografieren, um ihr Leben zu zeigen, hat nicht ihren Ursprung darin, dass ich Einsamkeit thematisieren möchte. Ich stellte ihre Wohnungen in den Mittelpunkt, weil das der Ort ist, an dem jeder ganz ungezwungen ist und wo sich Gewohnheiten besonders deutlich zeigen.

    Für die Serie „The Right Distance“ habe ich Männer besucht, die das erste Mal in ihrem Leben allein leben und als ich ihre Wohnungen besuchte, entdeckte ich dort oft sehr ähnliche Geschichten. Um diese Orte wirklich ehrlich beschreiben zu können, habe ich entschieden, selbst ganz in diese Erfahrung einzutauchen.

    © Marina Arienzale

    © Marina Arienzale

    Ich wollte den wirklichen Anblick ihrer Leben aufdecken und habe aus diesem Grund ihre Gastfreundschaft angenommen und für die Umsetzung der Reportage eine Weile bei ihnen gelebt.

    Einer dieser Männer ist mein eigener Vater. Er war der Ausgangspunkt des Projektes für mich. Ich war sehr neugierig auf die Räume, die sich ganz klar aus dem ergeben, was in der Vergangenheit einmal war.

    © Marina Arienzale

    © Marina Arienzale

    Die meisten Menschen, die ich besucht und bei denen ich fotografiert habe, waren Männer, die ich getroffen habe, als ich in Bars und Clubs gearbeitet habe. Der Barkeeperin oder Kellnerin erzählen sie von ihrem Leben.

    Dieser Artikel wurde von Aileen für Euch aus dem Englischen ins Deutsche übersetzt.


    kwerfeldein – Fotografie Magazin

  • Free Shipping Deadline *Extended*

    Only a few hours left for FREE SHIPPING for Christmas delivery!

    USPS’s reindeer are packing up their very last sleighfuls.

    We’ve EXTENDED our free shipping ’till 11am PST/2pm ESt, but then it’s really over.

    Ready? Set! SHOP NOW →

    Sony QX Smart Lens Cams

    Amazing optics, a huge sensor and yr phone as a vewfinder. → More

    Polarizing Smartphone Lens

    Pros’ secret weapon! Cut down on glare for brighter colors. → More

    Automatic Life-logging Cam

    Autographer takes photos for you. Limited Time! $ 100 off → More

    The Pro Phone Filter Stack

    Warm, cool and rainbow your pix with a trio of glass filters. → More

    Instant Photo Lab

    Make Polaroid-like prints from your iPhone pix, instantly. → More

    Eye-fi Wireless SD Card

    Photos go from DSLR to a phone or compy, wirelessly. → More

    Polaroid Z340 Camera

    A digital camera that prints photos too. ON SALE! $ 50 off → More

    Snack Cap Lens Caps

    Give your camera and delicious and protective treat. → More

    Instax 90 Instant Cam

    The newest tiniest Fuji Camera gives you creative control. → More

    Photo App Pins

    Pin your favorite app’s icon to your bag, hat, corkboard or pal. → More

    Polaroid SX-70 Cameras

    Iconic polaroid cams in pristine working condition. → More

    Smartphone Film Scanner

    Scan 35mm film directly to your phone to edit and share. → More

    iPhone Adventure Suit

    Take photos underwater with a suit of armor on your iPhone. → More

    Instagram Necklaces

    Wearable #nofilter, #selfie and Instagram “Like” icons. → More

    The Kick iPhone Light Studio

    Dial up any color under the sun with app controlled LEDs. → More

    The Glass Diana DSLR Lens

    Get the lo-fi look w/ the clarity of glass on your DSLR. → More


    © laurel for Photojojo, 2013. |
    Permalink |
    No comment |
    Add to
    del.icio.us

    Post tags:


    Photojojo

  • Building for Billionaires: Luxury Tower with Car Elevators

    [ By Steph in Architecture & Houses & Residential. ]

    Porsche Design Tower 1

    If you’re rich enough to live in the Porsche Design Tower, you’re rich enough to have a mega-expensive car or two worth hauling up to your upper-floor penthouse each day in your very own car elevator. The 60-story oceanfront tower in Miami was designed for the mega-rich, with 132 suites offering 2-4 car garages on every level, with three car elevators available to residents as they arrive and depart.

    Porsche Design Tower 2

    Residents drive their cars out of the elevators and straight into their own glass-walled garages, giving them the ability to admire their expensive toys as they relax on their couches or enjoy a meal prepared by a team of personal chefs. The vehicles will be washed and maintained by an in-house concierge service.

    Porsche Design Tower 3

    Twenty-two billionaires (representing about 2% of the world’s richest people) have already secured units, though they won’t be able to move in until the tower is complete in 2016. Each residence includes a large balcony with a plunge pool and outdoor kitchen, and shared amenities include a spa, game room, movie theater and a ballroom with expansive ocean views.

    Porsche Design Tower 4

    The units cost between $ 4.8 million and $ 32.5 million each, with the whole building estimated to cost $ 214 million, the largest loan taken out for a commercial project since the recession.

    Share on Facebook


    [ By Steph in Architecture & Houses & Residential. ]

    [ WebUrbanist | Archives | Galleries | Privacy | TOS ]


    WebUrbanist

  • Have your say: Best Fixed-lens Compact Camera of 2013

    bestfixedlensmirrorless.jpg

    2013 saw the release of five cameras in a (relatively) new class, which we’re calling ‘fixed lens compact cameras’. Specifically, large-sensor fixed-lens compact cameras. Fujifilm’s X100S is one of our favorite cameras of the year, addressing many of the faults of its predecessor. Sony followed up on the RX1 from last year with the RX1R, which shares the same 24MP full-frame sensor but minus an AA filter for superior resolution. Meanwhile, both Nikon and Ricoh released APS-C 28mm equivalent cameras, while Sigma’s DP3 offers a 75mm equivalent lens. Click through for a chance to cast your vote and decide which is best. 

    News: Digital Photography Review (dpreview.com)

  • Have Your Say: Best DSLR / SLT of 2013

    bestDSLRs.jpg

    Several new DSLRs were announced in 2013, even as mirrorless cameras nipped at their heels in the entry-level and enthusiast segment of the market. Among the new DSLRs released this year were a handful of iterative updates to existing models, but also some all-new contenders, including Canon’s high-tech EOS 70D and Nikon’s entirely unconventional (or perhaps that should be entirely traditional) Df. Click through to check out the selection, and cast your vote. 

    News: Digital Photography Review (dpreview.com)

  • Five Minutes to Realistic HDR using Lightroom and a 32-Bit Plugin

    Easy Peazy HDR in Adobe Lightroom to make realistic HDR images!

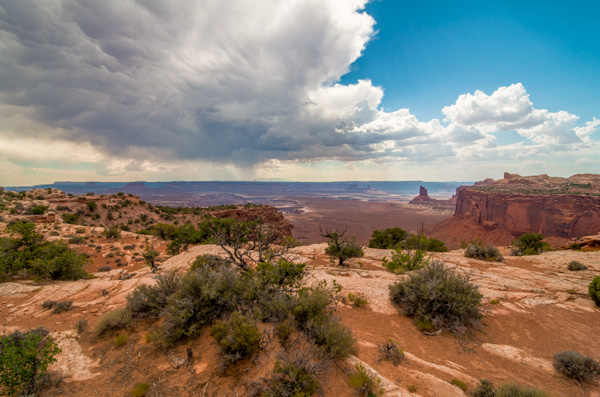
    HDR photography used to be time consuming, difficult to learn, and required expensive software. Recent new technology now allows anybody, even beginners, to make perfect HDR in less than 5 minutes – while eating a bowl of ice cream. It’s that easy!
    Cuddeback_DSC5809_10_1132-bit-HDR-2

    Using Adobe Lightroom for HDR

    Just wait until you see how awesome this is!

    The Perfect HDR Workflow takes place completely within Adobe Lightroom 4 or 5, a very robust, yet inexpensive, state of the art software. There is also an inexpensive plugin you will need. It’s made exclusively for Lightroom by the smart Photomatix people and is the secret sauce which makes this workflow possible and so elegant. It’s called “Merge to 32-bit HDR plugin” and is available for $ 29. They also have a trial version available so you can test it out first. These are the same people who make the world’s leading HDR tone mapping software, Photomatix Pro. So, take comfort, there’s no smoke & mirrors in this HDR workflow and you’ll be working with the best software available today. At the same time, your photography will now blow away 95% of the HDR images which are still being made using the old, harder to learn, HDR tone mapping process.

    Notice, you don’t need to own Photoshop or endure the pain & suffering of learning how to use Photoshop to do this method! This, in itself, is huge and a welcome departure from the way HDR photography is typically done.

    Advantages of 32-bit HDR Processing

    The process I’m going to show you is technically called 32-bit HDR processing. The Perfect HDR Workflow is just my name for the particular workflow I designed with the beginning photographer in mind. My criteria was that total cost be under $ 150 US, which immediately rules out Photoshop in the workflow. Another requirement was that it be so easy that even a beginner can learn to make extraordinary HDR photos in minutes.

    The advantages of the 32-bit process are:

    • It’s fast
    • It’s inexpensive
    • It yields realistic looking images
    • It’s very easy to learn

    HDR doesn’t have to be complicated anymore. In fact, the Perfect HDR Workflow obliterates the complex technical barriers of making outstanding HDR which used to exist. Now, anybody with a digital camera and the desire can play a much bigger game when it comes to HDR photography, can do this!

    Are you ready to see how it’s done?

    Five Minutes to Perfect HDR

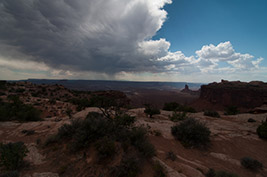
    Here we go. Start with the three bracketed RAW images right out of the camera (you can download these for free if you want to follow along):
    Easy realistic HDR in Lightroom

    -2 shot at: ISO 200, F8, 1/1500

    Easy realistic HDR in Lightroom

    0 exposure shot at: ISO 200, F8, 1/350

    Easy realistic HDR in Lightroom

    +2 exposure shot at: ISO 200, F8, 1/90

    In less than 5 minutes you’ll end up with an HDR photo looking like this:

    Cuddeback_DSC5809_10_1132-bit-HDR-2

    Start your stopwatch:

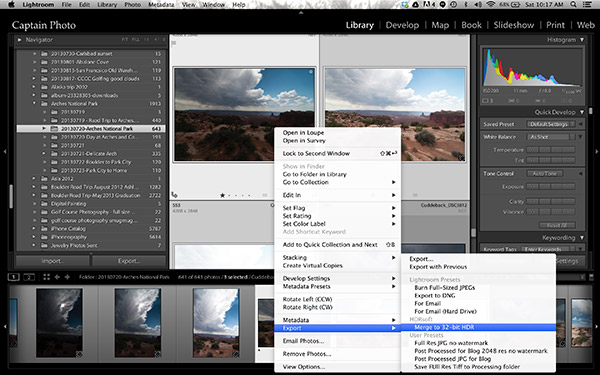
    The first thing you want to do is create the 32-bit image. With the three RAW files selected in Lightroom, right click and in the dialog box which appears, select “Export>Merge to 32-bit HDR” as shown below.
    Screen Shot 2013 11 23 at 10 17 57 AM

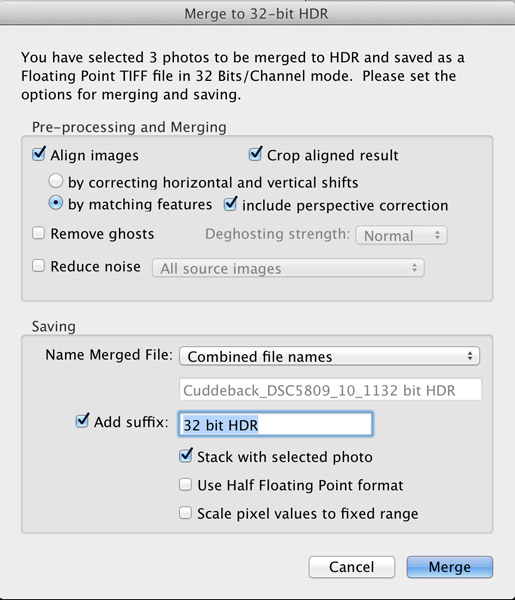
    A new dialog box opens up where you choose your options for merging the RAW files (see image below). Always choose to “Align Images” and then one of the alignment options. If your three photos were taken handheld, select the alignment option “by matching features”. When you shoot on a tripod, you would chose the other option, “by correcting horizontal and vertical shifts”.

    If there are moving objects in your scene such as: cars, people, clouds, trees, or anything else – select “Remove ghosts” and the software will usually do a great job of producing a non-blurry merged image, with no ghosts. For this landscape photo, nothing was moving so this option was not selected.

    Noise reduction is usually necessary in HDR photography, however, I recommend not using the “Reduce noise” option which the plugin offers up. Instead, you are better off using the noise reduction built into Lightroom. So, leave that unchecked, as well.

    Moving down to where you choose how the resulting 32-bit file is saved. I recommend simply combining the file names and adding a suffix like “32-bit HDR” so that, at a glance, you know that is the 32-bit file you want to work with in Lightroom.

    The final dialog box selection you want to make is; “Stack with selected photo.” It’s so easy and elegant how this plugin makes your HDR workflow when this is selected. After the 32-bit file is created, the plugin automatically imports it right back into Lightroom and places it neatly next to the original RAW files. This keeps my OCD mind happy. Leave the final two options unselected then click the “Merge” button.

    Here’s what the dialog box should look like
    Screen Shot 2013 11 23 at 10 18 08 AM

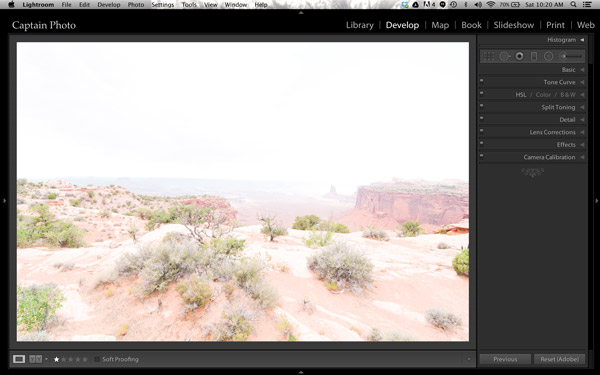
    In a few seconds, your newly created 32-bit file appears in Lightroom and looks something like this:
    Screen Shot 2013 11 23 at 10 20 14 AM

    Okay, well that’s not too pretty! That’s because this is a 32-bit file which your computer monitor can’t correctly display. But Lightroom 4 or 5 can process it, so let’s do that.

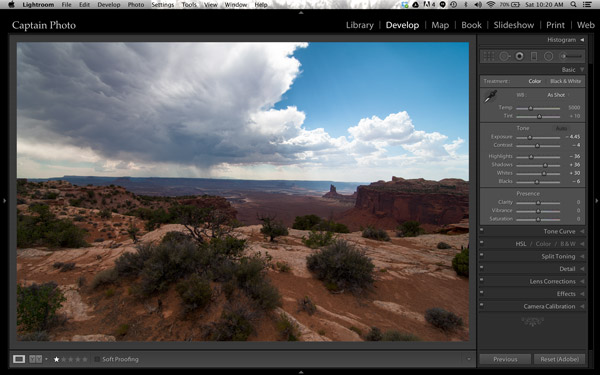
    We’ll be working mostly in the Basic panel of the Develop module in Lightroom. The first step is to simply click the “Auto” button which gives you Lightroom’s best guess at the right setting for the image:
    Screen Shot 2013 11 23 at 10 20 25 AM

    It’s already looking much better. But let’s take it a step further!

    Adding Your Artistic Touch

    Now it’s time to add your personal artistic mark on your photo! At this point, you take over the processing manually to create an HDR image that is most pleasing to you. There are no right or wrong settings. However, my 5 minute process to Perfect HDR does follow some general guidelines so let me show you how this image evolved for me.

    Working in the Basic panel, you first will reduce the “Highlights” (slide it left) and increase the “Shadows” (push it to the right) sliders until the image looks best to you. Then you might adjust the “Clarity” to a slight positive value, which adds local contrast between pixels. It makes the HDR photo “pop.” Please be careful not to push clarity too far right. My advice is to keep it below 30, for now anyway. Now let’s jump out of the Basic panel.

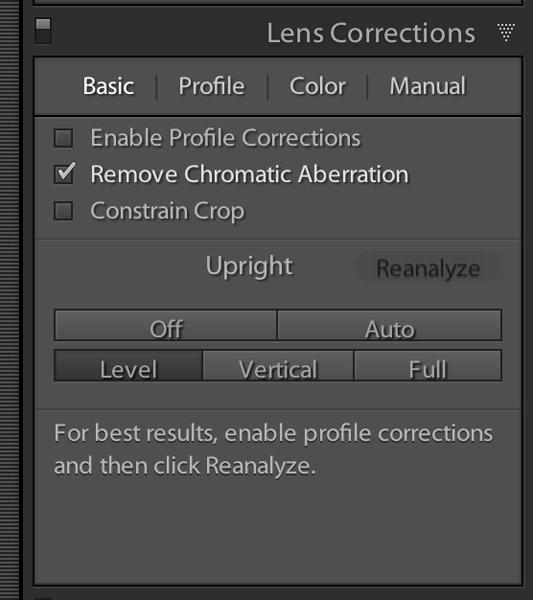
    For just a couple of quick automatic adjustments, open up the “Lens Correction” panel. I recommend that you always check the box to “Remove chromatic aberration.” Also, you may want to straighten your horizon and/or vertical lines using the “Upright” adjustment tool. Here is what the “Lens correction” panel looks like when you make these simple adjustments:
    Screen Shot 2013 11 23 at 10 24 24 AM

    Now, go back to the Basic panel to finish. Set the white and black points as shown in the video below. The other sliders in the Basic panel can then be fine tuned to your taste and that’s it! Woooo Hooooo, done in less than 5 minutes! You’ve just made your first Perfect HDR photo! Send it to Mom and your friends and be ready to receive their adoration!

    Watch The Full Perfect HDR Workflow Video

    In the video below, I show the complete processing of this image including how to set the white and black points correctly. It’s easier to show some of the steps in a video, rather than try to describe it all in written form.

    Try the Perfect HDR Workflow

    If you want to give the Perfect HDR Workflow a try yourself right now, you can download my RAW files of this image for free. Get the free trial download of the merge to 32-bit plugin from the Photomatix website. The plugin you want is the last item on the page. Install the plugin with your copy of Lightroom 4 or 5. Then follow along to get the hang of the Perfect HDR Workflow and find out for yourself how easy this really is! If questions come up, I hang out on Google+ every day and you are welcome to circle & chat with me there or on my blog.

    Become an HDR Wizard

    Next time, in Easy Peazy HDR in Lightroom Part II, we’ll take this image further using the other panels of the Develop module in Lightroom. I think you’ll be amazed at the power and control you have using Lightroom to process your HDR photos. It’ll be like you’ve evolved into this unstoppable HDR Wizard!

    The post Five Minutes to Realistic HDR using Lightroom and a 32-Bit Plugin by Keith Cuddeback appeared first on Digital Photography School.


    Digital Photography School