Category: Photography

  • Learning to See, Part VII

    Whereas photography is about vision, composition is about aesthetics.

    In our previous readings in this series we learned how colour,  contrast and tonal range have a dramatic effect on the overall result.  Some teachers may say the first important rule in making successful pictures is composition, and indeed that may be so.  However,  I also like my intrepid readers to be unique and true to themselves.  Therefore, let’s argue that colour impact is more important than composition  ( remember folks, this series is for the novice and beginner  so please let’s not start a raging debate and muddle the waters. I want our beginners to have fun and explore for themselves – they will figure it out.) 

                  I had the good fortune of being raised in the country, on a twisting gravel road that followed a meandering river. Not far from the family farm was one of those old-styled triangular framed bridges that crossed the river, and just beyond that was a drumlin where one could sit and breathe in the unfolding landscape below.  It was idyllic, and a magnet for artists’ easels.

    When my daily chores were finished I would often climb aboard the 28-inch hand-me-down bicycle, with worms in pocket and alder fishing pole, and peddle to my secret fishing hole. Sometimes I would arrive at my destination, other times I would be sidetracked by an artist standing atop the Lloyd Hill (as we called the drumlin), adorned in beret with brushes in hand.

    Invariably each artist would add the S-curve of the river leading in from the bottom right corner of the blank canvas following a diagonal until it exited in the upper left corner. The triangular bridge was always in the bottom right-hand corner of the canvas, our farm in the upper right hand corner.  The distant pine forests would create the far-off horizon line. One artist who often visited the same location would place an elm tree in the left foreground of the scene to add balance and colour, reflecting the season. Ironically, the elm was not in the vista lying before her eyes, but was a creation of her imagination.


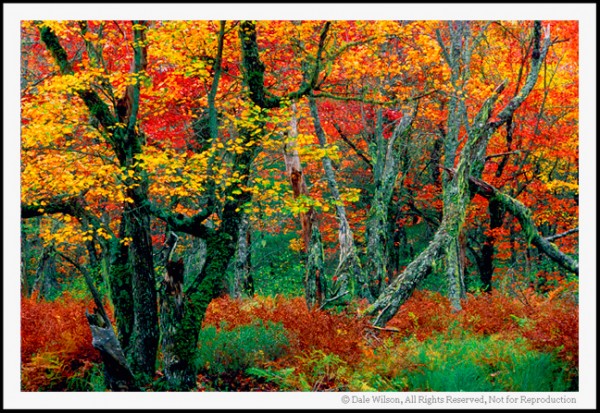
    Many of the elements of good composition can be found in this image. Can you locate the diagonal lines, the various "C" and "S" curves, and triangle forms in this image?
    Many of the elements of good composition can be found in this image. Can you locate the diagonal lines, the various “C” and “S” curves, and triangle forms in this image?

    I liked this artists work best; she was not only painting the scene as it lay before her, but she was also adding her own elements —the elm tree— and expressing her mood and thoughts at that particular time. By breaking the realist rules of the day, she was making a statement with her art.

    Some twenty-five years later I would often reflect on those early lessons that had registered by way of an artist tolerating the relentless gawking of a kid with worms escaping his shirt pocket.

    What I found particularly intriguing, however, was how the artist would start with a blank canvas and then add elements as their imagination desired. By comparison the photographer starts with a full canvas and eliminates those elements that are undesirable.  Consequently we can say that a painter’s art form is an additive one, whereas a photographer’s is subtractive.

    Over the next few issues let us explore some of the basic rules of composition by identifying the elements of pleasing aesthetics: the S-curve, the C-curve, how to create motion by using diagonals, forcing the viewer into the scene by way of using contrast and selective focus, how the use of triangles keep the eye moving within, and of course the time-honoured favourite of teachers everywhere … the Rule of Thirds.

    Once we have explored the possibilities these guidelines can bring to our photography, we will then become rebels and toss them aside. Only by understanding the “rules” can we then effectively break them.

    A newly hatched Blanding's Turtle, identified as a species-at-risk, is only about the size of the largest coin you have in your pocket. When taking portraits of just about all living creatures, a good rule-of-thumb is to position the camera at eye level of the subject.

    A newly hatched Blanding’s Turtle, identified as a species-at-risk, is only about the size of the largest coin you have in your pocket. When taking portraits of just about all living creatures, a good rule-of-thumb is to position the camera at eye level of the subject.


    In the interim, what I want you to do is start making pictures with an awareness of where you are placing your subject, and objectively pondering why you made that decision. There is no substitute for actually being out there enjoying the craft that made us acquire a camera in the first place. As you study your results ask if the image translates the message you were trying to make in the first place. This is not philosophical rhetoric – there really was a reason you made that picture in the first place.

    What was it?

    Study and analyse your picture, and learn from your exercises. First and foremost, keep your picture making fun.

    And remember, if you are having fun  you are doing it right.

    Post originally from: Digital Photography Tips.

    Check out our more Photography Tips at Photography Tips for Beginners, Portrait Photography Tips and Wedding Photography Tips.

    Learning to See, Part VII


    Digital Photography School

  • Snap Up this 50% Off Deal: 3 Captivating eBooks by Mitchell Kanashkevich

    NewImageOver at our sister site – SnapnDeals – this month there’s a great deal running on 3 of our most popular eBooks from travel photographer Mitchell Kanashkevich.

    Normally $ 59.99 this week you can grab the following 3 eBooks for just $ 29.95:

    • Natural Light: Mastering a Photographer’s Most Powerful Tool
    • Transcending Travel: A Guide to Captivating Travel Photography
    • Captivating Color: A Guide to Dramatic Color Photography

    All 3 eBooks are packed with practical information, inspirational images and lots of diagrams – and as usual they’re backed by our 60 day money back guarantee in case you find they don’t meet your needs.

    Learn more and snap up this bundle over at SnapnDeals here before it ends.

    Post originally from: Digital Photography Tips.

    Check out our more Photography Tips at Photography Tips for Beginners, Portrait Photography Tips and Wedding Photography Tips.

    Snap Up this 50% Off Deal: 3 Captivating eBooks by Mitchell Kanashkevich


    Digital Photography School

  • What Are Your Worst Habits As A Photographer?

    I was inspired to write this article after recently asking the question, “What are your worst habits as a photographer?” on social media.  Here are some of the most common responses followed by some suggestions.  Please share your own ‘bad habits,’ better yet, how you managed to correct them.  Everyone will benefit!

    Not taking your camera everywhere with you

    The best camera is the one you have with you. I may not always have my dslr with me, but I do have my iPhone. The quality is not the same, of course, but when I’m not shooting for a client it doesn’t really matter. Not everything you shoot has to be photo competition material. So, go ahead – use your phone when you have nothing else handy. Those ‘visual push-ups’ count just the same. Just a tip if you shoot with a dslr: Put a small lens on it such as a 50mm or the Canon 40mm pancake lens to make it more compact and light. Then there is no reason not to take it with you everywhere!

    Not every picture you take needs to be print worthy. Camera phones are a great way to exercise 'visual push-ups'  if you don't have your other camera with you.

    Not every picture you take needs to be print worthy. Camera phones are a great way to exercise ‘visual push-ups’ if you don’t have your other camera with you. (Shot with iPhone 4S)

    Sleeping late and missing that good early light

    This is a very common problem especially for those of us shooting in a cold climate. Try motivating yourself with commitments such as meeting other photographers early in the day. If you schedule it and others are counting on you to be there, you are more likely to get up for it!

    Getting lazy with WB settings

    Hey, at least you know that there is a white balance setting!  I’m amazed at how many photographers do not know the importance of white balance or how to use it. I adjust my WB settings throughout the day, but you can also adjust it in post processing. Two things to keep in mind:  It’s easier to adjust if you are shooting RAW, but you can also adjust the color temperature on JPEGs. And if you keep your setting in auto white balance (AWB), you will not be able to do batch adjustments.  The setting will automatically change depending on the ambient light. Auto white balance works well, but it is generally a bit cooler than the actually color temperature. If you think your pictures are a bit blue in the shade, the white balance is off.  Hope this helps!

    Letting dust get on the sensor

    Changing lenses out in the field requires some care to prevent dust getting on the sensor. I cringe when I see photographers take off the lens, then slowly unpack the replacing lens while leaving the camera body open, face up, to let as much dust get in as possible. I do it this way: I place the replacement lens on a flat surface with the back cap already unscrewed and ready to come off. Then I set the camera next to it, lens down and, with my back against the wind, I quickly switch lenses in about 2 seconds. Another way to prevent dust from entering inside your camera is to blow the back element of your lenses with a Giotto rocket blower before attaching it to the camera body. If you take these simple precautions, you won’t need to clean the sensor as often.

    Settling for the good shot and not looking for more

    You got the shot you came for? Great! Now look behind you. Another good shot? If you were shooting a sunset, the light on the landscape behind you is may be an even better shot, so go for that, too.  Work the scene. Try other angles. Get your camera off the tripod and lay on the ground with it. Many photographers tend to shoot everything at eye level which quickly becomes boring and static. For more dynamic images experiment with different angles and perspectives – tilt your camera, shoot tall, shoot wide, get on the ground, etc.

     Composing poorly or too quickly

    It pays to take time and care composing a shot just as it pays to shoot from multiple angles. Learn to compose in camera and stop relying on post processing for cropping. This option will make you a better photographer.  Train yourself to see distracting elements in your frame.  Move a few meters closer or zoom in a bit tighter. Scan the edges of your frame. Remember that the best time to shoot a vertical shot is right after you shoot a horizontal shot. Hey, it’s digital, so it’s free!  So, cover your basics because you never know which shot you will prefer once you get into the digital darkroom.

    Chimping

    Chimping is a common photography term to describe the action of reviewing pictures on the LCD. Okay, but how many shots do you miss because you are busy chimping? The LCD on the back of your camera is a great tool in achieving the best settings, but chimping is detrimental in some situations, such as street photography for example. Street activity changes quickly and in a split second you might miss capturing that great gesture or expression, or not getting the shot at all. If you shot film in the past, then you are less likely to chimp. But if you’re spending too much time now looking at your LCD, turn it off!  Added benefit – you may gain some confidence.

    Self Doubt and waiting for others to say it’s a good photo

    We all have self doubt! That’s just part of being a photographer. It comes with practicing the craft.  However, you can make self doubt serve you by turning it into a positive motivation and a learning process.

    If you are shooting for clients, naturally their preferences are your priority. Otherwise, please yourself first!  Feeling good about your own images is what really counts. Sure, there is always room for improvement, and constructive critiques are beneficial. Just make sure you get feedback from the right people.

    Experiencing sensory overload when traveling to a new place

    I’ve written quite a bit about this.  It’s something we’ve all experienced when visiting an exciting new place. It’s nice to stay open to everything that is happening around you when you are in a new environment  but that approach doesn’t work for everyone.  When you try to capture it all, you may end up with lots of mediocre shots of random things and clichés. Instead, give yourself an assignment.  This will help you focus and ‘see.’  Next time you’re feeling sensory overload, think outside the postcard, focus on your goal and create your own iconic images. And have fun!

    Post originally from: Digital Photography Tips.

    Check out our more Photography Tips at Photography Tips for Beginners, Portrait Photography Tips and Wedding Photography Tips.

    What Are Your Worst Habits As A Photographer?


    Digital Photography School

  • 7 Tips for Photographing at the Zoo

    Zoos … love ‘em or hate ‘em?

    I think it depends on the zoo. I much prefer open range zoos where the animals have tons of space to roam around and live almost as they would in the wild. I can’t stand to see animals in cages especially when they pace back and forth in frustration. But zoos do play an essential role in conservation and education.

    When it comes to photographing at the zoo it’s easy to get distracted by the sheer joy of seeing the animals and forget everything we have learned about photography. Try to remember that all the rules of good composition still apply such as balance, the rule of thirds and, most importantly, no cluttered (or unnatural looking) backgrounds.

    Here are some tips for your next zoo visit:

    1. Choose the right zoo

    The type of zoo you choose makes all the difference to your photography (and to the animals). Zoos with large open areas for the animals to roam tend to make better photographs because the images look more natural when you cannot see any fences.

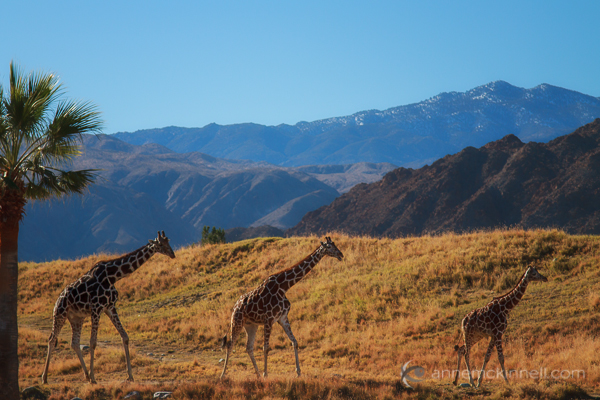
    Giraffes by Anne McKinnell

    Giraffes at The Living Desert, Palm Springs, California.

    2. Wait for a special moment

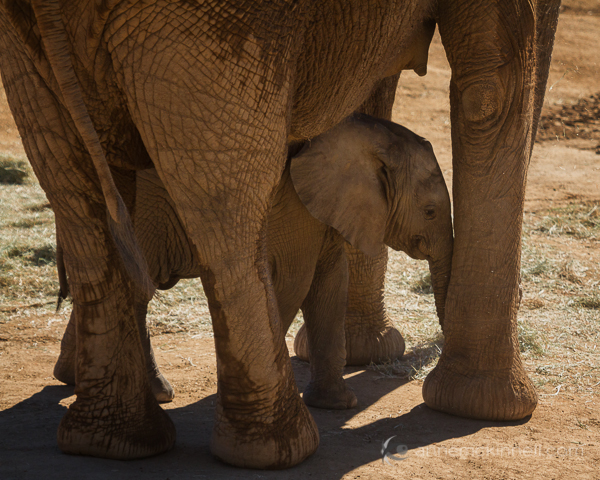
    When the animals are right there in front of you don’t just snap away because you can. When you have this opportunity to be so close to them try to be patient and wait for a special moment to make a unique image.

    Baby Elephant by Anne McKinnell

    Baby Elephant at the San Diego Safari Park, California.

    3. Dealing with fences and rails

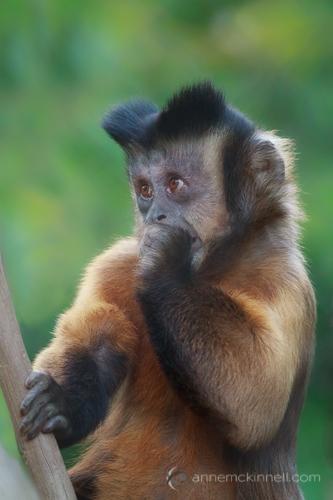
    Tufted Capuchin by Anne McKinnell

    Tufted Capuchin at the San Diego Zoo, California.

    If you are at the kind of zoo with fences, you can use a wide aperture to reduce the depth of field which should make any fences out-of-focus.

    This is easier to achieve if there is greater distance between the animal and the fence.

    It is also easier to make the fence disappear if it does not have direct light on it. Find a portion of the fence that is in the shade if it is in front of or behind your subject.

    When I made this image of a monkey there was netting both between me and the monkey and behind the monkey. With a 400mm lens at f/5.6 only the monkey is in focus.

    4. When to go

    If it’s a hot day the animals will often be in the shade where they are more difficult to photograph. Try to go as soon as the zoo opens in the morning when it’s cooler and the animals are more active. You will find fewer people and more animals in the morning.

    Overcast days are great for the zoo! Just keep the sky out of your image and enjoy the soft light with no harsh shadows.

    If it is a bright sunny day you can use a polarizing filter to remove glare from the animal’s skin or fur.

    5. Don’t forget the butterfly zoo

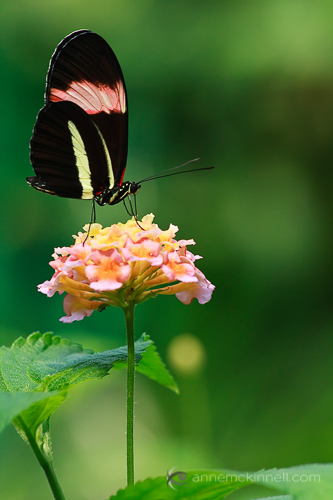
    Butterfly by Anne McKinnell.

    Butterfly at Butterfly Gardens, Victoria, British Columbia.

    One of my favourite types of zoo is a butterfly zoo.

    One thing to remember about a butterfly zoo is that they are very hot inside. If you live in a cold country like I do and you visit in winter remember that your lens will need to make the transition to the warmer climate. When your lens is exposed to the warm humid air condensation will form and it might take awhile for it to go away.

    One way to deal with this is to go in the restroom and put your lens under the warm air from the hand dryer for awhile to warm it up before you go inside.

    Another option is to put your camera and lens in a ziplock bag before you enter and then let it acclimate inside the bag. It will take about 20 minutes before you will be able to take your camera out of the bag without condensation appearing. I prefer the hand dryer method!

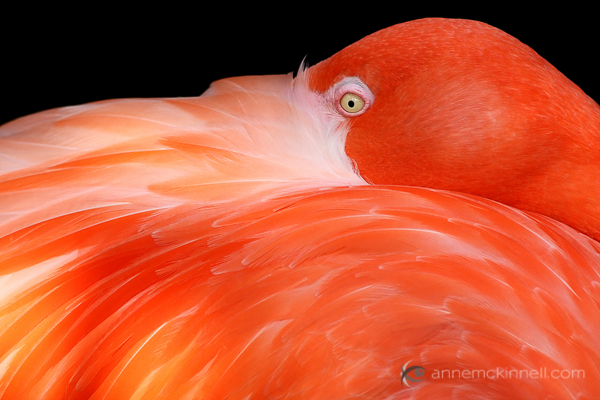
    Butterfly zoos tend to have beautiful light and often there are more than just butterflies. At Butterfly Gardens in Victoria, British Columbia, there are a number of birds as well and the light does wonders for the colour of the flamingos.

    Caribbean Flamingo by Anne McKinnell

    Caribbean Flamingo at Butterfly Gardens in Victoria, British Columbia.

    6. Equipment

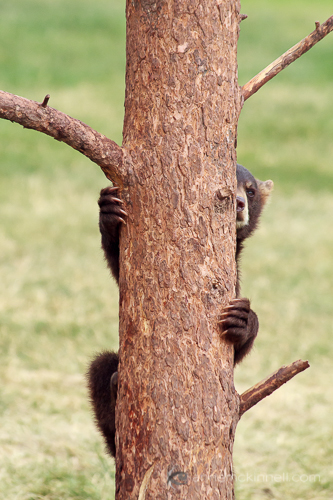
    Baby Bear by Anne McKinnell

    Baby Bear at Bear Country, Rapid City, South Dakota.

    You probably won’t need a huge lens because you can usually get fairly close to the animals in a zoo. I find most of my zoo images have a focal length between 100mm and 300mm.

    As far as a tripod goes, I think this is one occasion when it’s perfectly okay leave your tripod at home.

    The animals are moving so you are going to need a fast shutter speed anyway. Use at least 1/500 second shutter speed and image stabilization.

    When I go to a zoo I usually take my camera with only one lens and a polarizing filter. That’s it! It makes it much easier to move around to get the right angle and you’ll have less to carry on a long hot day.

    7. Focus

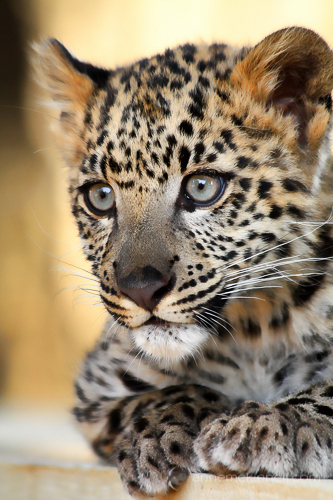
    Snow Leopard Kitten by Anne McKinnell.

    Snow Leopard Kitten at Westcoast Game Park, Bandon, Oregon.

    Always focus on the eyes.

    When you are using a shallow depth of field to remove background distractions part of your animal may be out-of-focus too.

    That’s okay as long as the eyes are in focus.

    In this image I made of a snow leopard kitten, with a 300mm lens and an aperture of f/5.6, only the nose and eyes are sharp.

    Zoos provide both opportunities and challenges for photographers. I hope these tips help you make better images during your next zoo visit.

    Post originally from: Digital Photography Tips.

    Check out our more Photography Tips at Photography Tips for Beginners, Portrait Photography Tips and Wedding Photography Tips.

    7 Tips for Photographing at the Zoo


    Digital Photography School

  • 8 Tips for Working with Models Every Photographer Should Know

    Photographing people often requires a completely different bag of tricks comparedto photographing landscapes or static objects. As someone who personally loves taking candid shots, it’s taken me a lot of practice to get used to working with models in such a way that I get the perfect look and feel I want for my photo shoots every time. If you’re Continue Reading

    The post 8 Tips for Working with Models Every Photographer Should Know appeared first on Photodoto.


    Photodoto

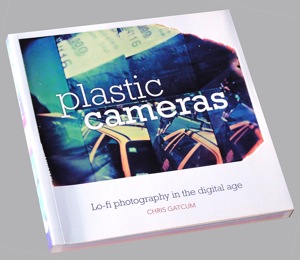
  • Plastic Cameras: Lo-Fi Photography in the Digital Age [Book Review]

    Plastic camerasYears ago a cinematographer friend told me of a dinner he once had in Paris with a Mr Cooke. Mr Cooke of the famed British optical firm Cooke, Taylor and Hobson.

    During the meal Mr Cooke explained that he spent most of his waking and working hours designing lenses to perform with maximum sharpness and minimum degrees of aberration to achieve the perfect capture of the photographic image. In spite of these heroic efforts he spoke with some level of bitterness that certain cinematographers persisted in covering his carefully crafted lenses with all sorts of rubbish, grease and diffusers to degrade, soften and generally muck up the performance of these precisely manufactured optics … all in the pursuit of artistic expression!

    Just as the plastic cameras described in this book do today!

    Author Gatcum is of the opinion that digital photography and the associated image editing software has made it so much easier to produce perfect shots … but there are many enthusiasts out there who don’t necessarily want ‘perfect shots’. It’s at this point in the argument that plastic cameras and their ‘lo-fi’ aesthetic enter the discussion.

    You have only to flip through the images in the book to enjoy the thrills and spills that plastic cameras can create! Images with severe vignetting, extreme aberrations, uneven sharpness across the frame, colour that shows that things are definitely not right in the lenses’ colour capture. For not right, read very right in the vocab of the adventurous photographer!

    From my own experiences with early Diana cameras and more recent LOMO replicas you have to take a chance, sometimes succeeding with a shot that stuns! Or that doesn’t! Perfection is not on the menu! Chance is the name of the game!

    Diana F front

    The story really starts with the original Diana, made by the Great Wall Plastics factory in Hong Kong in the 1960s and first sold for about a dollar. By the 1970s the resourceful and wise out there quickly saw the Diana’s potential and snapped them up from junk shops to began using them for creative photography. These days the original $ 1.00 Dianas sell on eBay for $ 50 plus.

    By 2007 the Lomography company saw an opportunity and cleverly re-manufactured the Diana and its sub models, selling them for prices approaching $ 100, complete with all their imperfections.

    These days we’re spoilt for choice. The book lists dozens of crazy models, all available from companies such as Lomo and the like.

    Like the magnificent 120 format Holga and its variations. These include the Holga 120 TLR, the Holgaroid, the Holga 120 3D, Holga PC pinhole camera. Also in 35mm: Holga 135 TLR.

    Lomo of course markets a wide variety of models: the 35mm based LC-A, the Lomo Smerna duet of models, with one sporting a flash socket. Plus many, many more.

    And a long list from other makers: Blackbird; Recesky TLR; Halina Panorama; Twinkle 2; Split-Cam; Robot 3; Action 4; Agat 18k; Ikinimo 110 … the list goes on.

    Then the game got clever: you can now buy Holga lenses that fit current DSLR models such as Olympus and Panasonic Four Thirds format models.

    There are even apps that digitally replicate the look and feel of plastic cameras!
    The book is a ball of fun and even if you never buy a plastic camera to pursue the path of erratic photographic capture you will enjoy the ride as you thumb through its pages.

    Footnote: these days the name Cooke appears on high level lenses used still in feature film and TV series photography. They’re highly regarded and no doubt are frequently plastered with layers of Vaseline, parachute silk, ripstop nylon etc!

    Author: G Gatcum.
    Publisher: Ammonite Press.
    Distributor: Capricorn Link.
    Length: 192 pages.
    ISBN: 978 1 90770 840 4.
    Price: “Get a price on Plastic Cameras at Amazon (currently 22% off)

    Post originally from: Digital Photography Tips.

    Check out our more Photography Tips at Photography Tips for Beginners, Portrait Photography Tips and Wedding Photography Tips.

    Plastic Cameras: Lo-Fi Photography in the Digital Age [Book Review]


    Digital Photography School

  • Tips For Choosing The Right Photographer For The Occasion

    Choosing the right photographer for your special day can be a real concern for some, you want to have beautiful photos of the day that you can treasure forever. So it makes sense to do your homework before deciding on a photographer.

    Here are some things you should be aware of before hiring your photographer to ensure your day goes as smoothly as possible.

    Digital Or Film?

    While the vast majority of photographers these days have made the switch to digital, there are some photographers who prefer to keep it traditional and use film. It is down to personal choice and budget as to which method you choose, bear in mind using film will be more expensive due to the process of developing the prints afterwards. The drawback of film is that it is not quite so easy to make changes to your prints, even switching a colour print to black and white. With digital, there is no danger of over-exposure and the photographer can literally take thousands of shots at no extra cost to you.

    Today’s digital photography offers sharp, clear, bright photographs with great clarity. What’s more, digital film allows the photographer to quickly and easily edit the photographs, put them onto DVD and email the shots to the client. This means you can share your photographs with family and friends without waiting weeks after the event.

    Choosing A Photographer

    No photographer is alike; they have their own individual style which reflects in their work. Depending on the occasion in which you want the photographer for, you need to check out their portfolio. For example, a wedding photographer should have an extensive range of photographs in different conditions, outside, indoor, candid, formal and more classic shots. Businesses and corporations may wish to use a commercial photographer. Make sure the photographer you select has adequate experience in photographing most events such as weddings, christenings and graduations etc. Check out their colour and black and white work as there can be variations on both styles.

    Personality

    A sign of a good photographer is one that is prepared to listen to what you want and work closely with you to get the best results, a good photographer will never dismiss your ideas and tell you that he/she knows best, they will want you to be happy with their work and though they may offer their opinion the final decision should always rest with the customer. Also evaluate how they work with other people. A family photographer, particularly working with children should be patient and accommodating.

    Experience

    How long have they been in the business for? Do they have experience in working at many different events? Make sure they have at least a few years’ experience under their belt before hiring them for an important event. This will ensure that there are no tears when looking at the images of the day. Check out testimonials and ask around for references of your chosen photographer.

    Pricing

    Before signing on the dotted line, make sure the photographer is upfront about all of the costs involved. And don’t be afraid to ask. Be wary of photographers that offer a very low fee initially as you can get caught out when purchasing the prints as they most likely charge extremely high prices to buy the prints.

    Get a full written and signed contract of what you are paying for, the hours, the location/s, the date/s of the event etc. Does the photographer have a cancellation policy? What about copyright?

    By following these guidelines will assure that you will have a permanent record of your special day for many years to come.

    This post was written by the team at Beck Photographic – the premier Northampton wedding photographers.

    dslrBlog

  • How We Got Here: Analog Photoshop

    There is nothing about flash in this post, except for "pre-flashing," and that is not what you think.

    Every time I adjust the exposure slider in a raw converter or tweak the tonal curve into a subtle S-shape, I think back to how we used to do some pretty insane stuff—very improbably—with film, subtle tweaks of light and a witches-brew of chemistry.

    If you are under 40, most of this is gonna be brand new. If you are older than that and used to shoot night sports for a newspaper, see how your experience matches up… Read more »
    Strobist

  • Getting Landscapes Sharp: Hyperfocal Distances and Aperture Selection

    An important element of landscape photography is ensuring that all of the key elements within your composition are sharp.  This can often include foreground objects that are a matter of meters from your camera as well as background elements that can be kilometres away.  Therefore, to achieve this, you need to ensure your depth of field is large enough to render everything of interest, suitably sharp.

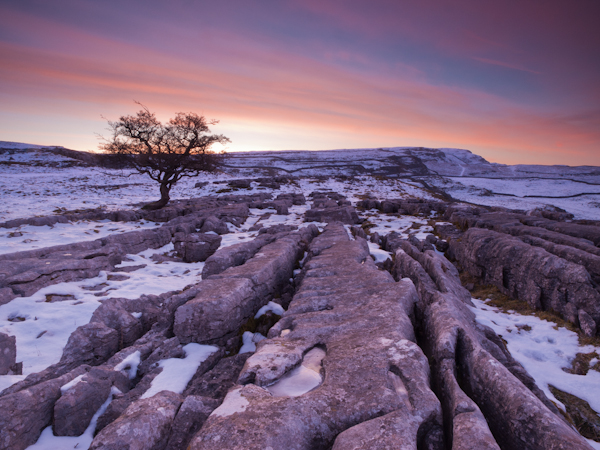
    Sunrise over the limestone pavement

    In this scene it was important to capture everything from the frozen puddle in the foreground, to the hills in the background, in sharp focus

    When you focus on an individual point within your landscape, you are in fact creating a plane of focus that lies parallel to the sensor.  Everything in front of, and behind, that plane is technically not in focus, however there is a region within which objects will appear acceptably sharp – that is the depth of field.  For instance, in the scene below the camera has been focussed on a rock.  Therefore, the plane of focus lies parallel to the sensor across that rock and the limits of acceptable sharpness, that form the bounds of the depth of field, lie in front of, and behind, that plane.

    Hyperfocal Distance Diagram 1

    A theoretical example showing the depth of field for a given focal length, aperture and point of focus. The depth of field will always extend one third of the distance in front of the focal plane, and two thirds of the distance behind it.

    In the diagram above, the depth of field is not sufficient to capture all of the trees within the range of acceptable sharpness, i.e. they will appear out of focus.  However, the depth of field can be easily manipulated to extend as far as you wish as it is controlled by a number of factors, namely: focal length, aperture and distance to the focal point. (I’m not going to include sensor size here as, after the purchase of your camera, it is not subject to user control; however it does not hurt to appreciate that the depth of field is inversely proportional to sensor size meaning that different cameras have different capabilities with respect to achievable depth of field).  The relationship that these factors have with depth of field is given below:

    • Focal length: Up first is focal length as, typically, your focal length will be determined by your composition.  Changing your focal length will alter your field of view and therefore your composition, meaning that you don’t often adjust your focal length to alter your depth of field but generally manipulate the other factors at your chosen focal length.  A short focal length, i.e. wide-angle, will give you a greater depth of field than a long focal length, i.e. telephoto.
    • Aperture: Probably the most obvious factor in depth of field control is aperture. A narrower aperture, i.e. larger f/ number, gives you a greater depth of field and vice-versa.  It is important to select the smallest, diffraction-limited aperture so to obtain the maximum depth of field without suffering from image degradation.
    • Distance to focal point: In combination with a given focal length and aperture, deciding where to place that plane of focus will impact the resulting depth of field.  The depth of field increases as the distance to the focal point from the camera increases.  Therefore, once a focal length has been chosen, it is generally the combination of the selected aperture and distance to the focal point that controls the depth of field.

    Hyperfocal Distance

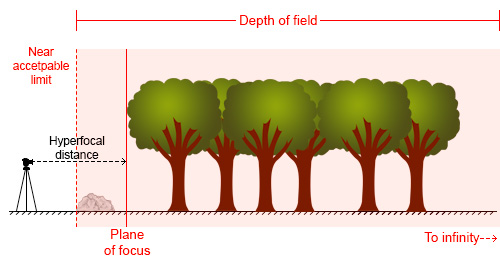
    One way to ensure that the entire frame is in focus (well, ‘acceptably sharp’) is to ensure that the depth of field extends from the foreground to infinity.  To do this, you need to focus at the ‘hyperfocal distance’: for a given focal length and aperture, there will be a distance where setting your point of focus will result in the entire scene being within the depth of field.

    Hyperfocal Distance Diagram 2

    By focussing at the hyperfocal distance, the entire scene (and more beyond) will fall within the depth of field

    So theoretically, by selecting the correct aperture and moving the point of focus to the hyperfocal distance (assuming the composition and therefore focal length remain unchanged) it would be possible to render the entire scene in focus.  A point worth noting is that when focussing at the hyperfocal distance, the near acceptable limit is always half of the hyperfocal distance.

    The calculation to determine the hyperfocal distance isn’t trivial, so there are numerous sites or apps to help you when out in the field.  However by frequent application, it isn’t long until you gain an appreciation of where to set your point of focus, for a given aperture at your commonly used focal lengths.

    Aperture Selection

    For any focal plane, the depth of field extends 1/3rd in front and 2/3rd behind the point of focus.  Therefore, an easy, but potentially flawed, application of hyperfocal focussing is to select a very small aperture, e.g. f/22 or f/18, and to focus 1/3rd of the way into the scene from the bottom of the frame.  It’s not a bad assumption, as often you will achieve the desired depth of field, however in choosing such a small aperture, you may well be losing any benefits of infinite focus due to decreased image sharpness as a result of diffraction.

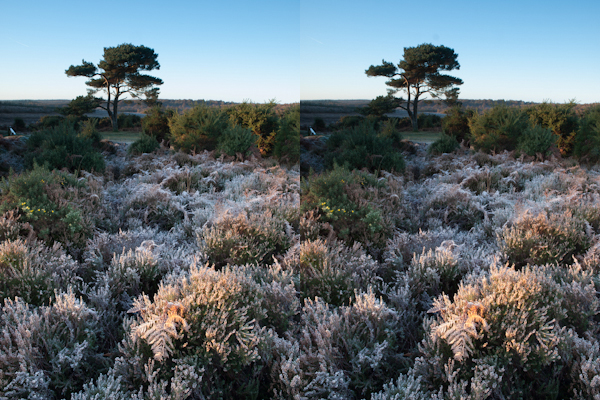
    For example, the image below shows a comparison of the same scene, shot at f/8 (left) and f/16 (right).

    Hyperfocal distance aperture selection 1

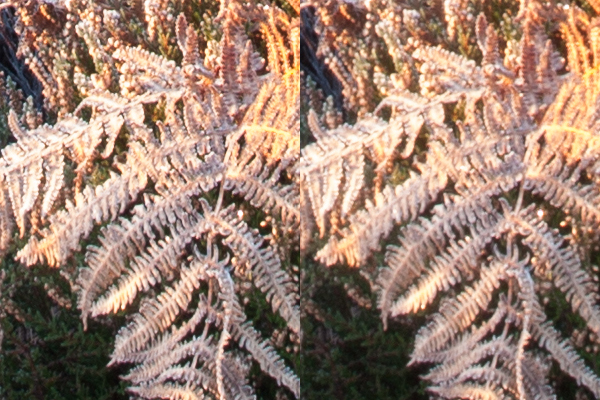
    The frosty fern leaf in the centre of the frame at the bottom of the image, was an important part of the foreground interest here.  Even though both images look perfectly sharp, the 100% zoom for each image below shows the difference in sharpness for between using f/8 and f/16, even though both apertures result in a depth of field that extends from before the fern leaf to infinity:

    Hyperfocal distance aperture selection 2

    The sharpness of the fern leaf at f/8 (left) vs. f/16 (right). Even though the lens was stopped down from f/22 to f/16, the resulting image could still be captured with greater sharpness throughout, by using a wider aperture of f/8, and focussing at the hyperfocal distance

    Diffraction becomes an issue all lenses as the aperture gets smaller, especially at the edges of the image, and will be more pronounced on inexpensive lenses.  Typically, the sweet spot, in terms of lens performance, will be somewhere between f/8 and f/11.  Therefore, use of the smallest  ‘diffraction limited’ aperture that can still achieve the required depth of field becomes important.

    So, hopefully, you will see that it is worth being aware of the hyperfocal distance for your commonly used focal lengths, especially for the apertures that result in optimum lens performance.  With the tools available to us today, it isn’t difficult to work it out, even when out in the field, so why not give it a go the next time you are out photographing landscapes.

    Post originally from: Digital Photography Tips.

    Check out our more Photography Tips at Photography Tips for Beginners, Portrait Photography Tips and Wedding Photography Tips.

    Getting Landscapes Sharp: Hyperfocal Distances and Aperture Selection


    Digital Photography School

  • Travel Photography Inspiration Project: Japan

    Not only will this be one of the longest Travel Photography Inspiration Project posts to date, it is one I am very excited to put together. All of the participants not only delivered high quality images, but they all also held true to my request to provide you, fellow DPS readers, with helpful tips, either about travel in Japan or about specific photos.

    Japan is on my list of places to visit and that’s just for the sushi. Putting together this post has opened my eyes to many of the beautiful areas of Japan as well as it backroads. I hope you enjoy this inspirational trip to Japan through the lenses of DPS readers.  If you have a moment, click through on the hyperlinks for each artists’ name to see more of their work.

    Let’s wander around Japan in today’s installment of the DPS Travel Photography Inspiration Project.

    And if you would like to be involved in the next country’s post, drop me a line here.
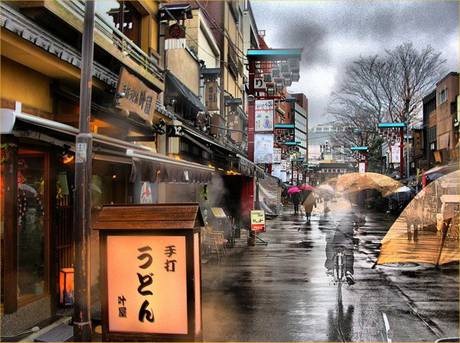
    image014

    Reflections in Time by Michael D.Keller

    A part of old Japan, waiting for you to explore. After a while discard your map and just walk.

    Hands of the Daibutsu

    Hands of the Great Buddha, Kamakura by Angus McIntyre

    Tip: Kamakura, just a short distance from Tokyo, has many beautiful temples.

    SaraHentschke602

    Sunset dreams by Pamela Oliveras

    One of the many fantastic year round sunsets.

    Tip: Okinawa is nearly 1,000 miles south of Tokyo and is known as the Hawaii of Japan for its sub-tropical climate and fantastic beaches. It is easy to reach from mainland via one of the domestic airlines.

    DPS Japan 05

    A-Bomb Dome, Hiroshima by Greg Knudsen

    Surrounded by peace lanterns made by children, the A-Bomb Dome in Hiroshima Peace Memorial Park was left partially standing after the nuclear blast that leveled Hiroshima on August 6, 1945, hastening an end to WWII. Travel tip: The whole of Hiroshima Peace Memorial Park is a reminder of the horrors of war, yet now conveys a spirit of hope and peace.

    We visited on the 59th anniversary of the bombing. Each anniversary and throughout the year, tens of thousands of origami cranes are delivered to the Children’s Peace Monument in memory of Sadako and her 1,000 cranes, whose story and some of her original cranes are among the displays in the haunting and moving museum.
    image

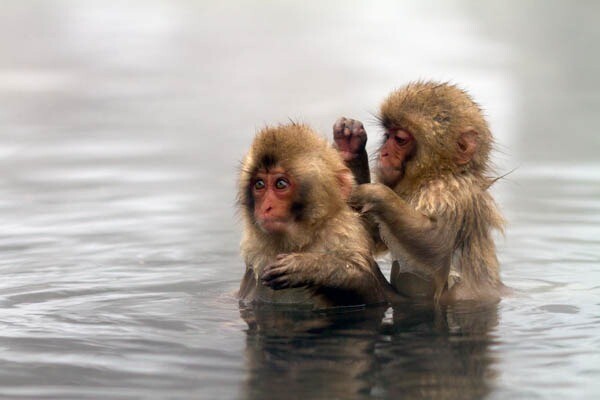
    Baby snow monkeys, Nagano Prefecture by Oscar Tarneberg

    I took this photo in the Jigokudani valley near a town called Yudanaka-Onsen in Nagano prefecture. The lighting conditions were challenging, being dimly lit and steamy due to the hot volcanic spring water, meaning the shot required the use of a fast prime (135mm F2.0) and a lot of post-processing to boost the contrast and sharpness.

    Political self-promotion

    Political Self-Promotion by Draycat

    A Japanese politician stands outside a station promoting himself.

    Tip. Use a wide aperture to blur out ugly backgrounds and make the subject stand out. Also try and capture a moment that contains some action to create a more interesting shot, which tells more of a story.

    Silent Prayers (Daisho-in, Miyajima)

    Silent Prayers (Daisho-in, Miyajima) by Beck

    There are hundreds and thousands of temples in Japan – you can try to go to them all, hit up just the most popular (or “touristy”) ones, or be a little more adventurous and visit some of the smaller, lesser known sites. Daisho-in turned out to be one of my favourites – high up on a hill on the island of Itsukushima (also known more popularly as Miyajima) and with very few tourists about, we had the grounds of the temple almost entirely to ourselves. This allowed us to wander for as long as wanted, without crowds of people getting in our way, and to get as close as possible to the thousands and thousands of different statues and relics that coat the area. This was a great opportunity to practice taking photos from different angles – getting down low, shooting from up high, looking for reflections in ponds, and practicing a variety of other techniques such as working in AV mode rather than snap-happy-tourist-AUTO-mode.

    Dragon of Izumo

    Dragon of Izumo by Khoa Dinh

    This is a statue of the mythical eight headed dragon that would terrorize the people of Izumo.

    Advice: Take public transportation, subways or trains, while you travel in Japan. Taxis are expensive and traffic in Japan is horrible.

    fhdbchgd

    ??????  (The Mikimoto Building) by Christopher Carlo Casilli

    Tokyo is filled with interesting small scale architecture and the Mikimoto building is a favorite of mine. Looking to set it off and show it unique windows and facade, I decided to shoot this up angle in late afternoon to bring out the slight pink tones of the building reflecting the setting sun.

    Sunset at Hakone

    Hakone by Kishan Harwalkar

    If you are visiting Tokyo on Business and have a spare day, then its best to book a day tour to Mount Fuji & Hakone or Nikku. Hop-on to one of the tourist buses and have a guided tour of your choice. You can go up to level 7 of Mount Fuji and also visit some beautiful regions in the area of Hakone. But beware, the traffic towards Tokyo in the evening (especially on weekends) is very heavy and expect delays.

    The Tokyo View

    Tokyo View by Simon Skipper

    Tokyo is one of the largest cities in the world with the centre housing more than 13 million people. It’s worthwhile finding one of these tall buildings for a magnificent view, even in clear weather it’s difficult to see beyond the houses growing into the horizon.

    the-candy-trail-JAPAN_1

    Women of Tokyo by Michael Robert Powell

    This juxtaposition of old and young was a lucky shot – I had my camera out just by chance. The out-of-focus background was softened futher by converting the image to black and white to give more attention to the older woman (as there was too much red around the young ladies).

    Nagano-House-Matt-Gibson

    Nagano House by Matt Gibson

    Shooting at sunrise and sunset is always a good idea, but doubly so for travel photography when nearly all your shots are lit by sunlight.  This shot turned out pretty much only because the sun was setting and the light was right.

    image015

    Ueno Temple Roof by Michael D.Keller

    This is from Ueno Park.  A must visit for any first timer to Tokyo. It is halfway between Asakusa and Akihabara,  on top of a few subway lines and the airport express. Keep your eye open for artifacts that spark interest.

    Moving prayer tablets

    Shinto priests, Hachiman-gu, Kamakura by Angus McIntyre

    Tip: Shinto shrines and Buddhist temples are rich in colors and textures.

    Eisa2012524

    Faces of Eisa by Pamela Oliveras

    10,000 Eisa dance festival. Naha, Okinawa

    DPS Japan 04

    Deer at 5-Story Kofuku-ji Pagoda, Nara by Greg Knudsen

    A day-trip out of Kyoto, Nara is filled with historic temples and pagodas, and hundreds of free-roaming deer.

    Travel tip: The deer are semi-tame, but I saw a couple of stags clashing antlers, so stay clear. Nara also includes the world’s largest wooden building, Todai-ji Temple, with a massive 15m bronze Buddha inside.

    2222

    Bamboo grove, Arashiyama, Kyoto Prefecture by Oscar Tarneberg

    Arashiyama makes a great detour from Kyoto, as it is close by but also contains many temples, as well as incredible walks through bamboo groves, but without the crowds. This shot was taken several years ago on a camera with poor high ISO capability, so the main challenge was holding the camera steady enough to stop down enough to get a deep enough depth of field to get the whole path in focus.

    Rush hour rush

    Rush Hour Rush by Dreycat

    A woman rushes to get to work during Tokyo morning rush hour.

    Tip. The key to getting a shot like this is to use panning, where the camera is set to a low shutter speed and you track the movement of the person with your camera. You’ll often need a few attempts to get a good shot.

    Kyoto Station

    Kyoto Station by Beck

    This shot was taken “from the hip” (literally) whilst I was waiting for a friend to join me at the station. I love people-watching but sometimes feel a little self-conscious doing it, especially as a foreigner who stands out in a country like Japan, and where traditional and personal values of the locals also make me hesitant to take photos of people. As such, I recently tried my hand at “shooting from the hip” and just waited to see what results I could achieve … I didn’t have my eye to the viewfinder nor could I see the LCD display – the camera was near my waist, I didn’t have a lens disrespectfully shoved in anybody’s face, and I simply clicked the shutter button. Sometimes it worked, sometimes it didn’t – but I’ve discovered it’s all about practice and having fun with it! You’ll be astounded at some of the shots you can achieve.

    Shibuya cross walk

    Shibuya cross walk by Khoa Dinh

    This is the busiest and most famous crosswalk in Japan.

    hggaigfd

    ??????????  (Crossing the Street in the Shinjuku Ward) by Christopher Carlo Casilli

    Just outside the busiest train station in the world (JR Shinjuku in Tokyo) is a good place to really see the crowds typically frequenting this area of shops and restaurants…here on a warm summer’s eve. A slow shutter speed at night gave me that sense of a sea of motion set against the towering rows of tall buildings glowing with their bright vertical signs.
    Streets of Shinjiku

    Shinjiku: Animation & Neon all around by Kishan Harwalkar

    Shinjiku is the main place of Tokyo housing Business centers on one side and bars & restaurants on the other. You get a glimpse of two shades of Tokyo from this place. A must visit place.
    Japan, is also a place were Animation is worshiped. You can see people engrossed in animation all around you. Be it the comic books, mobile phones or hoardings on the Road, everything is centered around Cartoon characters.

    The Mochi

    ‘Mochi’ is a traditional Japanese meal of rice especially eaten during winter by Simon Skipper

    Looking for someone making it the traditional way is highly recommended, as it takes up to six hours involving a huge hammer and numerous people.

    the-candy-trail-JAPAN_3

    Women-only train carriage by Michael Robert Powell

    Often ordinary things offer a great photo opportunity. A simple composition here with a vignette added, to partially shadow her face. (Note: the women-only rule is limited to rush-hour; so I was able to sit here).

    image003

    Japan Vending by Michael D.Keller

    Vending Machines are everywhere, in numbers.  Many today even let you pay by cell phone! Make use of them, they are convenient and relatively cheap.

    Frozen tuna

    Tuna, Tsukiji fish market by Angus McIntyre

    Tip: If you are able to visit Tokyo’s Tsukiji fish market, remember that it’s a working market; tourists were recently banned after one group behaved badly.

    okuma280

    Beach life: Northern Okinawa beaches in the summer by Pamela Oliveras

    A 50mm lens would be a great all round lens to bring. A wide angle would also be an added bonus to capture the beauty of the landscapes and seascapes.
    Summer is VERY VERY HOT and HUMID, but produces some thunderhead cloud phenomenal sunsets too. Nov it starts cooling down.

    DPS Japan 02

    Ryoan-ji Rock Garden, Kyoto by Greg Knudsen

    My wife and daughter “deep in meditation” at Ryoan-ji Rock Garden, a 500+ year-old zen temple and UNESCO World Heritage Site.

    Travel tip: Kyoto, which should not be missed, is best reached from Tokyo by Shinkansen (Bullet Train). We bought a 7-day Japan Rail Pass, which also took us to Hiroshima, Nara, around Tokyo on the JR Line, and back to Narita Airport. You must purchase the JR Pass before you arrive in Japan.

    image3

    Koya-san monks by Oscar Tarneberg

    High in the mountains of Okayama prefecture, Koya-san it is the site of many ancient and holy temples. This shot was taken in the Oku-no-in graveyard, which is a fascinating and eerie place, particularly photogenic later in the afternoon when shafts of light come down through the trees.

    Heavy Duty

    Heavy Duty – A Sumo Training Stable by Drewcat

    Sumo wrestlers training at a sumo stable in Tokyo.

    Tip: Don’t be afraid to change your viewpoint and experiment with shutter speeds when taking action shots. Often getting low and close can make a stronger image than just shooting at eye level, while changing the shutter speed can help to inject more drama into the shot.

    The Quiet Life (Asakusa, Tokyo)

    The Quiet Life (Asakusa, Tokyo) by Beck

    A simple snapshot of a simple life in a back street of Asakusa, Tokyo, taken early in the morning on my way to the train station. I love to get up early and go exploring whenever I’m travelling somewhere – and as many people in Asia, including Japan, like to rise early, this is a great time to start shooting! The light is also far less harsh in the early and late hours of daylight, rather than the hours around midday (when you probably want to be out of Japan’s heat and humidity any way!) – so don’t be afraid to get up early and go to bed early on one or two days if you want to find some great shots with softer lighting.

    Tokyo from Odaiba Island

    Odaiba Island by Kishan Harwalkar

    Odaiba, a manmade island claimed from sea is an ideal place to spend a day. It offers a nice view of Tokyo town and houses several interesting buildings. The Tokyo Museum of Engineering Science & Innovation, which houses Asimo, the famous Honda humanoid Robot, is worth a visit. After a visit to this museum during the day, you can explore the interesting places near the Fuji centre in the evening. There are several restaurants to have a drink and some good Japanese good. You should stay here when sun starts to set and the lights come up in Tokyo. It’s a beautiful sight and a treat to watch. If you are lucky you’ll also see Hannabis, the famous Fireworks which take place from time to time. You need to take a tripod to capture those lights n Fire works . For more details you can visit: http://www.japan-guide.com/e/e3008.html

    The Monkey

    The Monkey by Simon Skipper

    These Japanese Macaques are very unique to Japan, living in the area of Jigokudani where they enjoy the hot thermal springs in a very intriguing way, almost obsolete to the fact that thousands of tourists are around at almost all times.

    the-candy-trail-JAPAN_2

    Temple roof-tops at dusk by Michael Robert Powell

    Arriving before dusk at the Senso-ji Temple meant that flood-lights were already on – but it wasn’t dark yet, so the red paint glowed golden and orange. Using a telephoto lens and then later adding a digital vignette, I managed to get a somewhat surreal image.

    Horses in a landscape

    Horses in a landscape, Mt Aso by Angus McIntyre

    Tip: Despite the image of Japan as hugely urbanized, parts are surprisingly pastoral, offering opportunities to landscape photographers.

    DPS Japan 03

    Kiyomizu-dera, Kyoto by Greg Knudsen

    One of my favorite sites, Kiyomizu-dera is a nail-less wooden temple built in 1633 on a hillside along a waterfall and stream whose pure water is said to have wish-granting powers.

    Travel tip: Most visitors enter from the west up a long narrow street leading straight up to the temple. However, my preferred approach is from the north, starting near Shoren-in and Chion-in temples, through Maruyama Park, past the 24m Ryozen Kannon statue, through cobblestone village streets, then joining the upper climb to Kiyomizu.

    image4

    Mount Fuji, viewed from Kawaguchi-ko, Yamanashi prefecture by Oscar Tarneberg

    Mount Fuji is the classic symbol of Japan, but getting a clean shot of it is harder than you think! Kawaguchi-ko, just a short journey from central Tokyo, offers stunning views with a range of natural foregrounds, including a lake. This photo was taken from a nearby hilltop around dusk for the best lighting; in March the air was relatively clear and the peak was still capped with snow.

    Japanese School days

    Japanese School Days by Draycat

    Two schoolgirls walk through the entrance to a temple.

    Tip. This type of shot is all about patience; once you see the possibility for a shot you need to wait until all the elements are in place to get it. In this case it’s all about making sure the schoolgirls are in the right place and that there are no distracting factors, like other people, elsewhere in the image.

    Kamakura Fortunes

    Kamakura Fortunes by Beck

    These are hanging paper fortunes at one of the many temples in Kamakura, just south of Tokyo. The size of your aperture changes the depth of focus in your image, to create very different effects – but where exactly you make your point of focus (front, middle, distant) can also change the perception of the image. Mix it up occasionally to see what different results you can achieve – you may be quite pleasantly surprised!

    The Buddhist

    The Buddhist by Simon Skipper

    In Zenk?-ji, Nagano you find one of the oldest buddhist temples of Japan, built in the 7th century. The site remains one of the last religious pilgrimages of the country, and many of the locals are very interesting to photograph.

    Post originally from: Digital Photography Tips.

    Check out our more Photography Tips at Photography Tips for Beginners, Portrait Photography Tips and Wedding Photography Tips.

    Travel Photography Inspiration Project: Japan


    Digital Photography School