Category: Photography

  • Stills Spiced up with Magic: Cinemagraphs Free Pack

    Visuals are the focal point of any good design. People are known to be more image than text oriented, and appealing to their visual perception, you can quickly engage them. Stills, videos, gifs – any of them work great for grabbing attention, but all these are long-familiar and widely used. As online world is constantly changing, it strives for new Continue Reading

    The post Stills Spiced up with Magic: Cinemagraphs Free Pack appeared first on Photodoto.


    Photodoto

  • 7 Tips for a More Anonymous Approach to Street Photography

    ©Valerie Jardin

    ©Valerie Jardin

    Can you imagine a world without street photography? Think of the legacy that Doisneau, Cartier-Bresson, and lesser known pioneers of the genre left for us to enjoy for generations to come. We can all play a part in documenting the world around us, one photograph at a time.

    One of the most common reservations people have about shooting street photography is the feeling of invading their subjects’ privacy. It’s a legitimate concern and one that can be addressed by following simple rules of respect. I always urge my workshop students to refrain from photographing people in vulnerable or embarrassing situations. It’s a simple rule: You should be able to put yourself in your subject’s shoes and be okay with your photograph being shared on social media. Photographing a beautiful story in a public place should never be a concern, anywhere in the world, if it is done with respect.

    Unfortunately, as the genre gains more and more popularity, many photographers forget those essential rules of respect. That makes it even more difficult and intimidating for others to make their first steps in the exciting world of street photography.

    If you are still hesitant, there are ways to include the human element in your photography without revealing their identity. Those methods can be very rewarding and make for very artistic images. So here are a few tips to help you do more anonymous street photography.

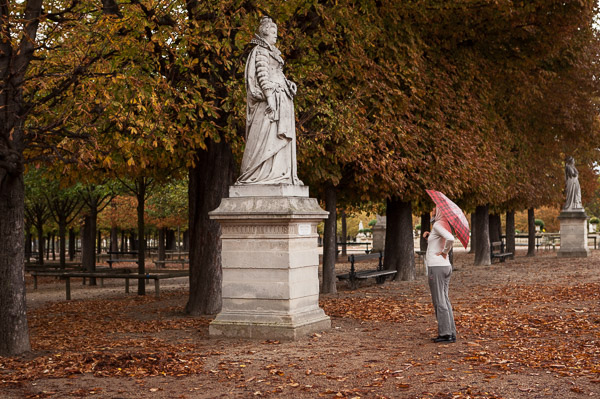
    1. Photograph the back of people

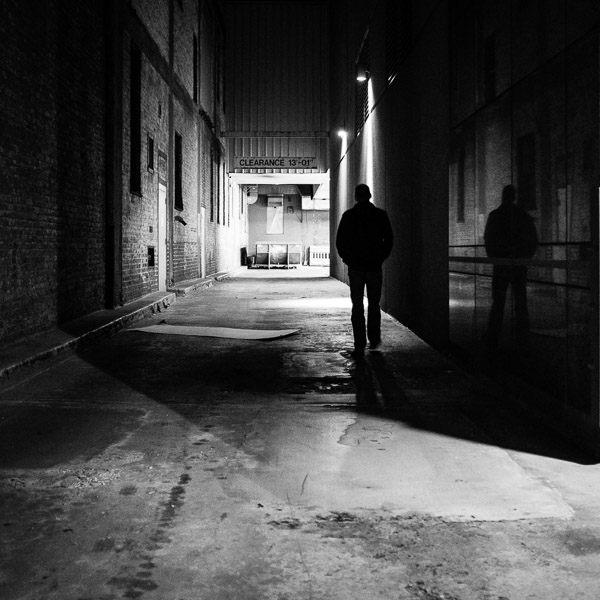
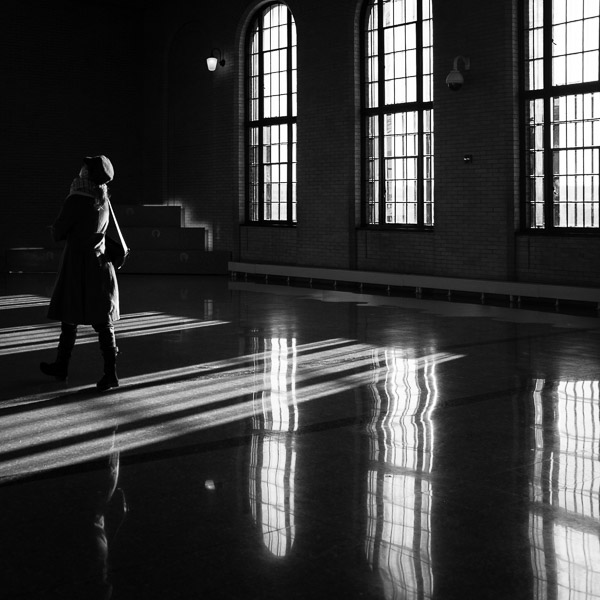
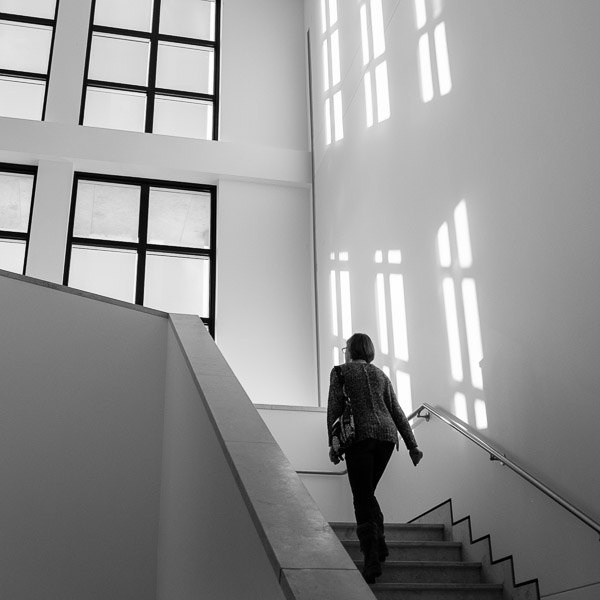
    Not every subject photographed from behind will make a strong image. Gesture will be the biggest factor to consider. Background and light are also strong elements. Basically, your image should be stronger shot from behind than if you had photographed the same subjects while facing them.

    ©Valerie Jardin

    ©Valerie Jardin

    ©Valerie Jardin

    ©Valerie Jardin

    2. Minimalist approach

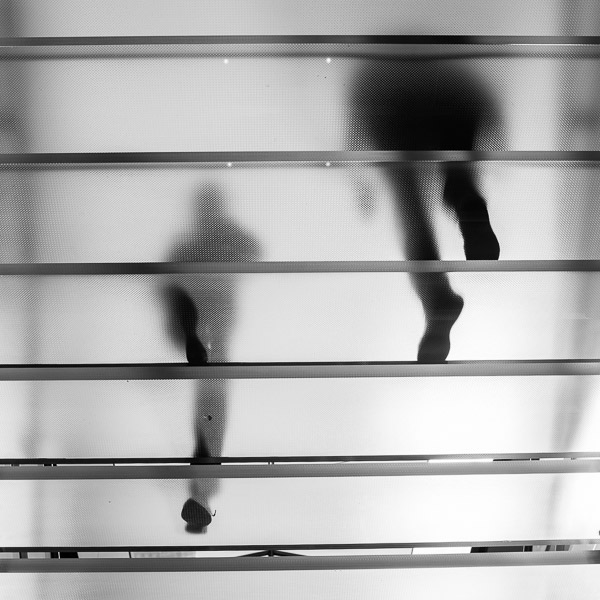
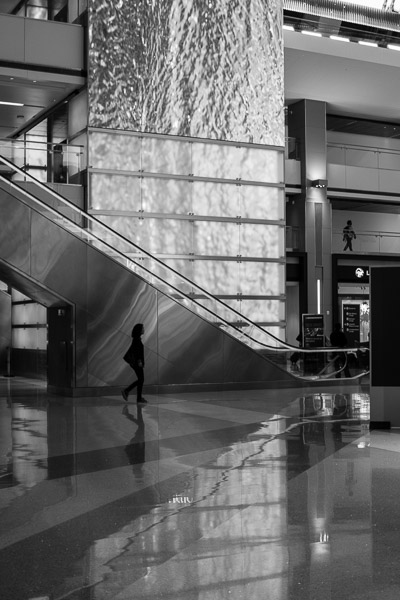
    In a minimalist approach to street photography, your subject is usually quite small but becomes the focal point in an interesting urban landscape. Look for interesting architecture, repeated patterns, geometrical shapes, etc. They all make for very interesting backgrounds. Wait for the right subject to enter your frame, et voilà!

    ©Valerie Jardin

    ©Valerie Jardin

    ©Valerie Jardin

    ©Valerie Jardin

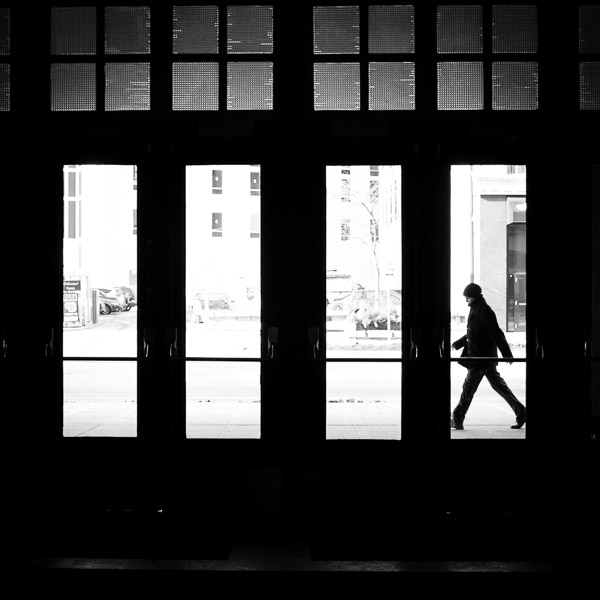
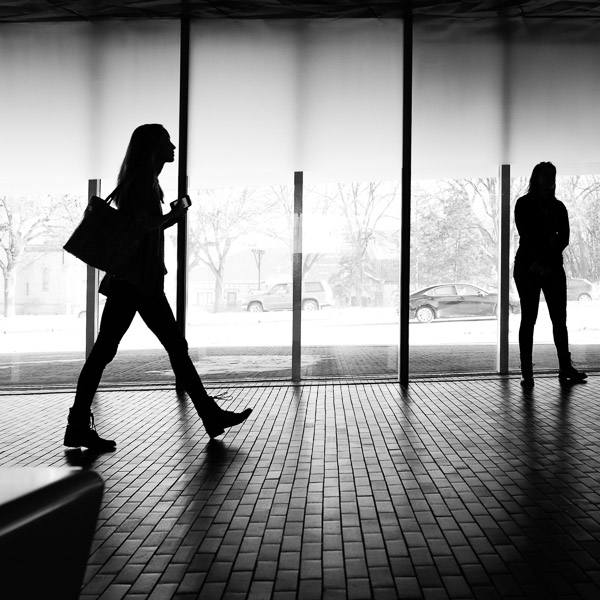
    3. Silhouettes

    Who doesn’t love to photograph silhouettes? Again, the subject has to be well defined. There should be as few distracting elements in front of your subject as possible. Don’t hesitate to blow out the highlights for a more dramatic silhouette. The less distinguishable the background, the better! Photographing the right gesture or step are the key to a successful silhouette.

    ©Valerie Jardin

    ©Valerie Jardin

    ©Valerie Jardin

    ©Valerie Jardin

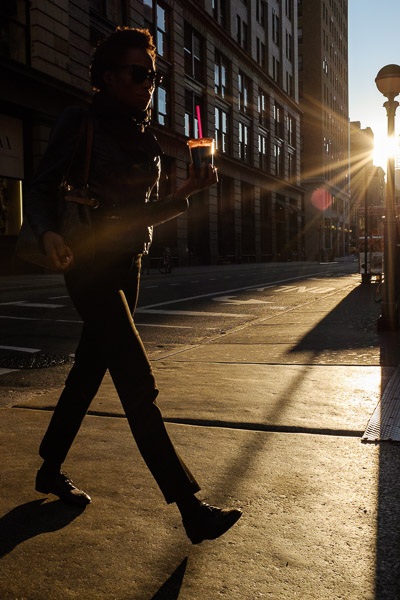
    Shooting into the sun is also a great way to create a dramatic effect while maintaining the anonymity of your subject.

    ©Valerie Jardin

    ©Valerie Jardin

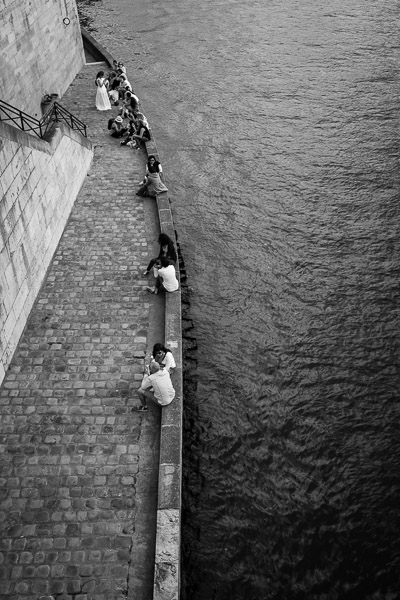
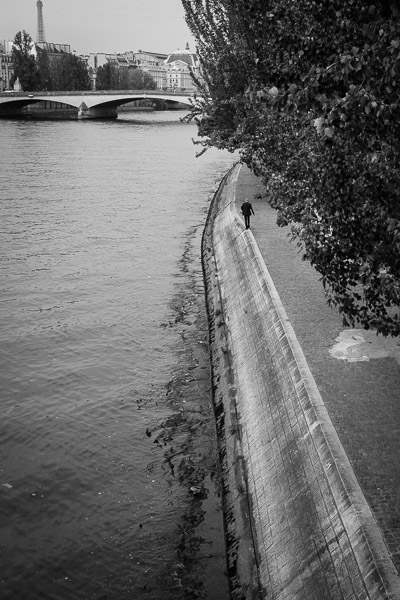
    4. Far away subjects

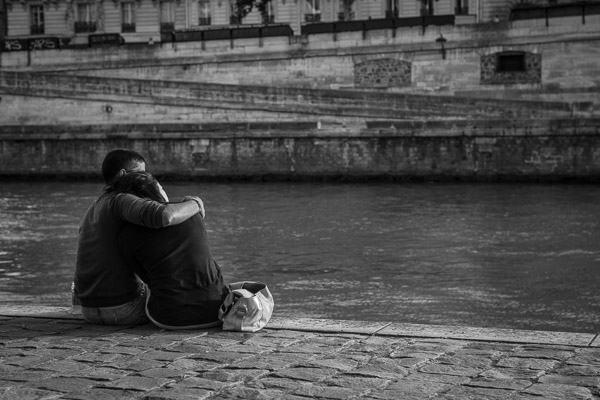
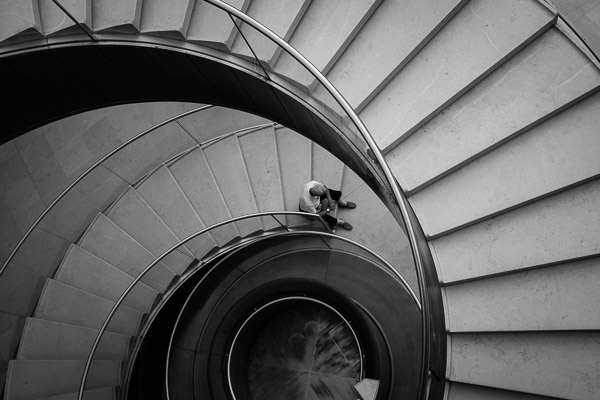
    Street photography is best done up close for a more intimate image, but shooting from above or far away can make interesting photographs as well. The human elements, even small, draw the eye of the viewer without revealing their identity.

    ©Valerie Jardin

    ©Valerie Jardin

    ©Valerie Jardin

    ©Valerie Jardin

    ©Valerie Jardin

    ©Valerie Jardin

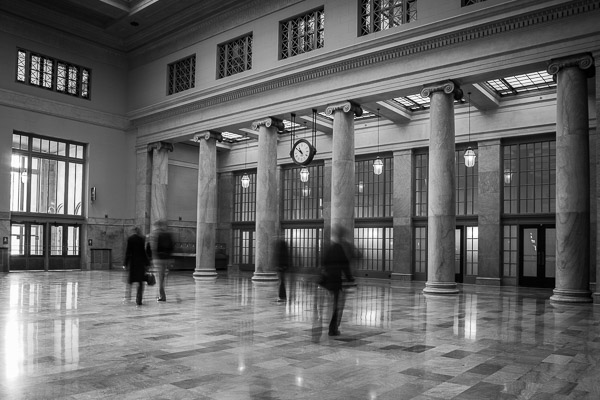
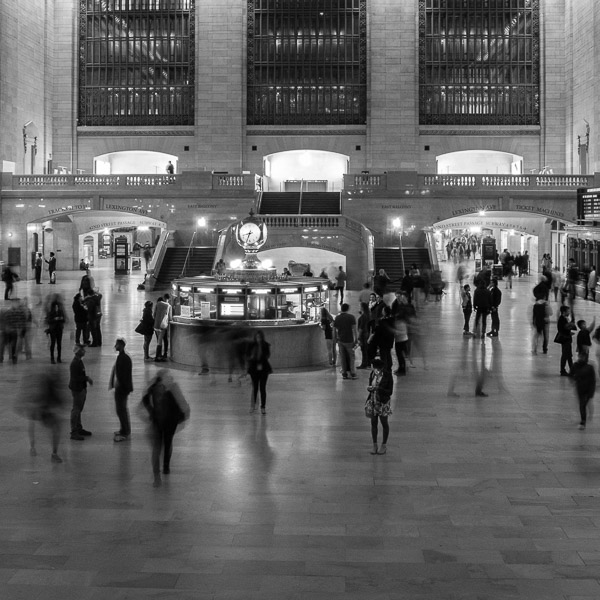
    5. Motion

    Long exposure to create some motion blur is also a really fun way to photograph people. This works well in busy places, such as train stations. The architecture has to be interesting as it will become the highlight of the image by being the sharpest element.

    ©Valerie Jardin

    ©Valerie Jardin

    ©Valerie Jardin

    ©Valerie Jardin

    6. Darkness

    Crank up that ISO! Night street photography can be so much fun. Use your best judgement and stay safe!

    ©Valerie Jardin

    ©Valerie Jardin

    7. Abstract

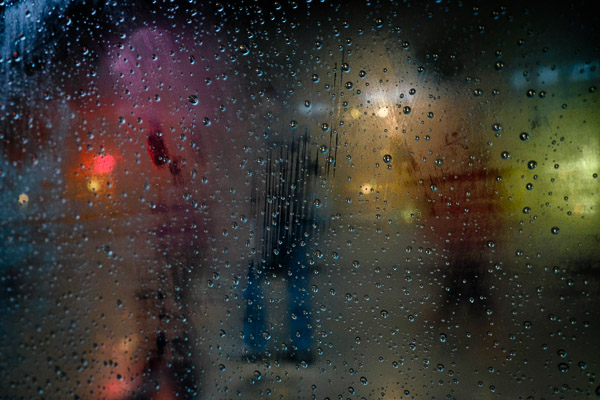
    Think outside the box. Street photography doesn’t have to be about faces. Find more abstract ways to photograph strangers.

    ©Valerie Jardin

    ©Valerie Jardin

    ©Valerie Jardin

    ©Valerie Jardin

    How do you approach candid street photography? Please share your experience with the dPS readers.

    googletag.cmd.push(function() {
    tablet_slots.push( googletag.defineSlot( “/1005424/_dPSv4_tab-all-article-bottom_(300×250)”, [300, 250], “pb-ad-78623” ).addService( googletag.pubads() ) ); } );

    googletag.cmd.push(function() {
    mobile_slots.push( googletag.defineSlot( “/1005424/_dPSv4_mob-all-article-bottom_(300×250)”, [300, 250], “pb-ad-78158” ).addService( googletag.pubads() ) ); } );

    The post 7 Tips for a More Anonymous Approach to Street Photography by Valerie Jardin appeared first on Digital Photography School.


    Digital Photography School

  • 15 Tips for Protecting Your Images While Traveling

    You have saved and saved and spent a large investment to go on a trip, on your photography gear, to photograph what matters to you, and to create lasting memories and images. Losing your images is not an option. Have you thought about the precautions to help make sure your images are safe after the shutter is pressed?

    Many people cringe at the thought of losing their images while traveling or any other time for that matter, and rarely do they think it will happen to them. Yet, unfortunately the reality is that people lose their precious images.

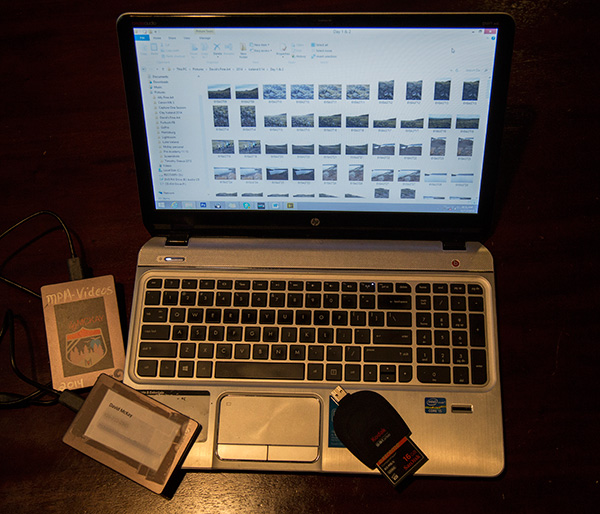
    Clearly mark all memory laptops gear 600px

    Has your memory card ever suddenly decided to give you the dreaded “error” notice? Maybe your new back-up hard drive failed or maybe you simply lost your camera bag by leaving it in the over-head bin of the airplane? Sound familiar? Maybe one of these situations has happened to you, or one of the many other possibilities that can occur to ruin all of your dream trip photography has taken place.

    No you say? It hasn’t happened to you yet? GREAT! This means up until this point you have been fortunate or hopefully properly prepared. The saying “Those that back-up and those that will” comes to mind. Having lead photographic tours all around the world, the amount of times images I have seen lost by photographers, is truly staggering. Don’t let it happen to you! After all, some would argue that the most important part of their trip is their images. So why do people not take more time to properly protect the fruit of all their investment and labor, their images?

    Here are some helpful tips and hints to keep your most precious commodity of your travels, your images, safe.

    #1 Get into a system

    Create an organized system and do not waiver from it! Follow the hints below, set up a system, and be consistent.

    Consistent system 600px

    #2 Keep non-downloaded cards unique

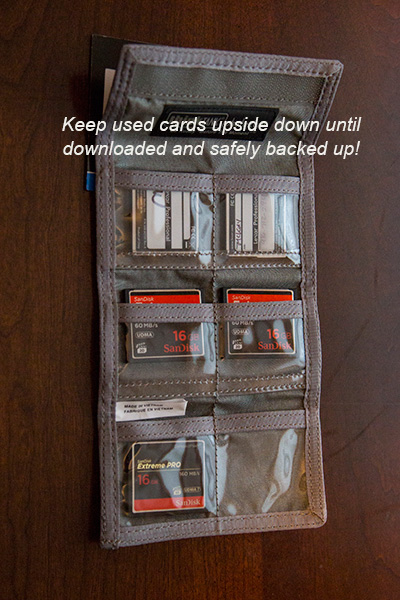
    In your card carrier case, keep all non-downloaded memory cards upside down. In this way, you know the card is not ready for use. When you have downloaded AND backed up, at that time place the card right side up again. It is now ready to use.

    Keep used cards upside down 600px

    #3 Format your memory cards

    Before each use, format and make sure your card is clean before using. This makes sure the card is completely ready to go. Of course, only do this if all of your current images on the card are downloaded AND backed up!

    #4 Don’t put all your eggs(images) in one basket

    Simply put, do not buy the largest memory card money can buy and shoot your entire trip on one card. Buy smaller ones, then if you lose a card or one goes bad, you at least have a portion of your trip images still.

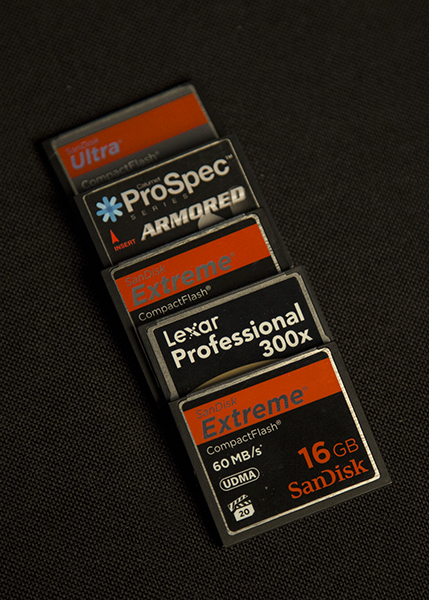
    #5 Bring PLENTY of high quality memory cards

    Memory cards have come down in price drastically. In order to have all your images on many different cards, invest in plenty of memory. It makes no sense to spend thousands of dollars on a trip, gear, and more only to skimp a few dollars on what holds the memories!

    Diversify your shootng on several cards

    #6 Download and backup every day

    Once you return to the hotel room, you may be tired, but your images are worth the little extra effort to download immediately and then backup to a secondary device.

    #7 Always carry an external hard drive

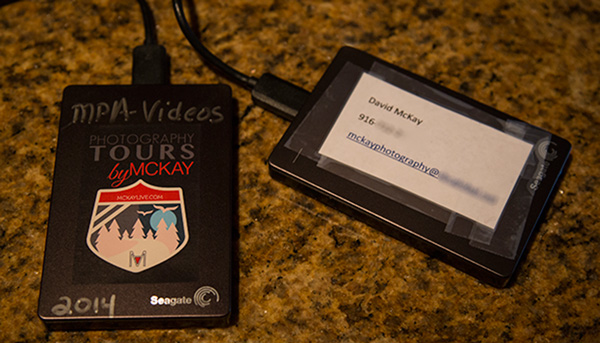
    As soon as you download to your laptop, be sure to immediately backup to an external hard drive as well. The price of memory is so inexpensive; there is absolutely no reason to not be carrying a lightweight external hard drive.

    External light weight hard drives are inexpensive and easy to carry 600px

    #8 Carry your used memory cards on you physically

    This reduces this risk of loss due to theft of your gear, leaving your gear accidentally, or in case you must check your gear for any reason either on a flight or gate check.

    #9 Don’t erase your images

    Unless you are out of cards to use and it is absolutely needed, do not erase the images. If you are downloading and backing up, now you have them in three locations. If you follow the hint about having plenty of memory, this should not be a problem.

    #10 Use the dual card slot on your camera

    Some cameras have dual card slots. The Canon 5d Mk3 as an example allows you to use a CF card in one and an SD in the other. When you shoot, the system can be set to automatically write to both cards. This is great, yet it does take longer to save as it requires longer write time. This is no excuse for NOT following the other hints.

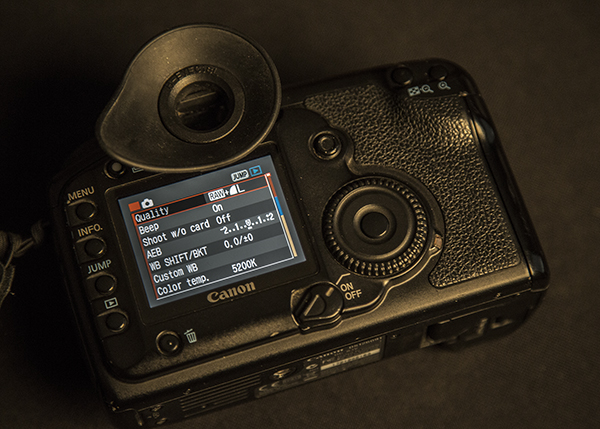
    #11 Shoot RAW and large Jpeg files

    Recovery software available cannot recover RAW data as easily as a Jpeg. For this reason, if you shoot with both RAW and Jpeg, you have a higher likelihood of being able to recover images if a card goes bad. You may not have the best image if you lost your RAW data, but at the very least you will have a high quality Jpeg which as we all know, is still great quality. This of course requires more usage of memory, so once again, see #5 above and carry plenty of cards!

    Shoot RAW PLUS Large Jpeg

    #12 Partner up

    If traveling with another person or group, buddy up with a partner to carry your external hard drive of backup images and you carry theirs. In this way, your images are on you physically on your memory cards and laptop, and then in case something happens, another set is with another person.

    #13 Contact info

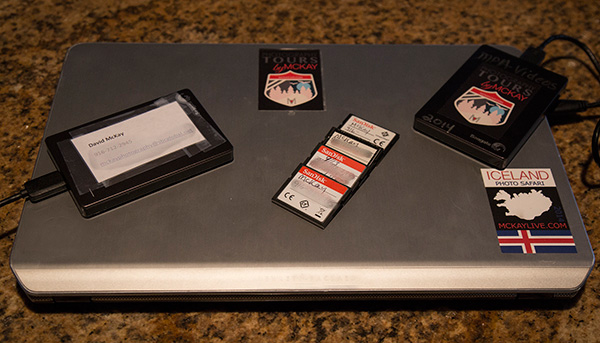
    Be sure to write your phone number and email address on all your memory cards, hard drives, laptop, card carrying case, and camera bag.

    Clearly mark all memory laptops gear 600px

    #14 Store a backup of your images from home

    Answer this question: If you were away and your home had a fire, would you possibly lose your images? If the answer is yes, you have some work to do. Carry a back-up of your home computer hard drive with you or have one at another location. Also, keep hard drives in fire-proof safes.

    #15 Use online storage

    Many companies such as Dropbox, Carbonite, Amazon, and more offer excellent, inexpensive online storage solutions. The issue is that while traveling, you may not have good internet connections and it can take forever to load your RAW images or large files.

    Do you have any other methods or tips for keeping your images safe when you travel? Please share in the comments below.

    googletag.cmd.push(function() {
    tablet_slots.push( googletag.defineSlot( “/1005424/_dPSv4_tab-all-article-bottom_(300×250)”, [300, 250], “pb-ad-78623” ).addService( googletag.pubads() ) ); } );

    googletag.cmd.push(function() {
    mobile_slots.push( googletag.defineSlot( “/1005424/_dPSv4_mob-all-article-bottom_(300×250)”, [300, 250], “pb-ad-78158” ).addService( googletag.pubads() ) ); } );

    The post 15 Tips for Protecting Your Images While Traveling by David McKay appeared first on Digital Photography School.


    Digital Photography School

  • Gear Envy: Five Things to Consider Before Buying Your First Camera

    GearEnvy 1

    1. The Ol’ Gear versus Photographer Chestnut

    What’s the best camera and lens you can buy when you’re starting out?

    • Anything by Nikon
    • Anything by Canon
    • Nikon and Canon are overrated; Pentax is what all the cool kids are using
    • Do the best you can with what you can afford right now

    A photographer went to a socialite party in New York. As he entered the front door, the host said “I love your pictures – they’re wonderful; you must have a fantastic camera.” He said nothing until dinner was finished, then: “That was a wonderful dinner; you must have a terrific stove.” – Sam Haskins

    Believing a great camera will make you a great photographer is like thinking Roger Federer’s tennis racquet will make you a world champion tennis player. Um, it won’t – I’ve tried. I’ve also worn the same jeans as Gisele Bundchen and they didn’t make me a supermodel. Cooking with Wolfgang Puck’s saucepans didn’t make me a master chef either.

    Great gear won’t make you a great photographer. Great lenses, however, can improve the sharpness of your images, and great lights and accessories can improve their quality. But all of that can be undone with poorly executed or sloppily composed images.

    Just because something’s technically perfect doesn’t necessarily make it great or even good. A good photo should inspire an emotional reaction, and no camera or lens available today can achieve that for you.

    I’m blown away daily by evocative photos on Instagram, 500px, and Flickr. Eighty percent or more of these images are taken with smart phones or entry-level cameras with kit lenses. When I share my images online, I get just as big a response from images taken with my iPhone as I do from images taken with pro gear. Because of the Internet, there’s never been a greater time in history to have your work seen and loved, or to inspire a reaction.

    The best first camera you can buy is the one you can afford right now.

    2. What are you shooting?
    GearEnvy 2

    Next, you should ask yourself what your your gear is for? Where will you use it and how often?

    1. I only take my camera to church on Sundays.
    2. I’m going to document my trek to the summit of Mount Everest, rodeo rides and my next Tough Mudder event.
    3. I photograph sixty weddings a year.
    4. I’m still learning, but I love to take photographs every opportunity I get.

    Are you planning on taking your camera to rugged subzero locations? Will you be shooting thousands of images a day or only taking photos on special occasions? This is the first question to consider before purchasing any new gear – what will you use it for?

    If your answer is #2 or similar, you may want to consider a heavy duty pro body that’s built to take rough and tumble handling and extreme weather conditions; a cheaper lightweight camera may not withstand the wear and tear or hold up to the elements.

    If you plan on taking thousands of frames daily or weekly, it may be more cost effective to invest in a mid-range camera that’s built to shoot more frames. The shutter on a cheap camera usually rolls over and dies after about 100,000 frames, so spending a few hundred extra may give you more longevity.

    The subject matter you’ll be shooting will also influence your choice of lens. For example, if you’re planning on shooting a lot of portraits and head shots, many fashion and portrait photographers use long fixed focal lenses or zoom lenses. If you’ll be doing a lot of weddings, professionals stock their kits with wide and long lenses and lenses that are somewhere in-between. If you’ll be shooting a lot of scenery, landscape photographers get more use out of wider lenses. And lastly, if you plan on shooting a lot of food or products, you may want to consider adding a macro lens to your kit.

    3. Brand loyalty. Which brand should you buy and why?

    With cameras there’s no definitive answer to this question. Nikon appears to have a slight edge over all the other SLR brands, but there are advantages and disadvantages to each.

    I spent the first 15 years of my career shooting with Nikon because both my brother and my first mentor used them. I loved my Nikon and never dreamt of swapping over. I initially invested in secondhand bodies and prime lenses and after I had saved enough coin to buy new, I stayed loyal to Nikon. Later when I switched over to digital, I continued my Nikon love affair.

    The decision to convert to Canon was made for me by the lack of decent Nikon upgrades on the market in 2004-2005 and by the fact that Canon’s 1DS MKII blew anything Nikon made that year out of the water. I switched to Canon and invested in two new camera bodies, new lenses, speedlights and accessories.

    Fast forward 10 years and you could argue that Nikon now makes better bodies than Canon, and that Canon makes slightly better lenses. For better or worse, I’ve made a commitment to Canon, and I’m sticking to that – for now. I still suffer the occasional bout of gear envy, but hey, I’m only human.

    My advice is to test out each camera on offer in your price range. You’ll find that some cameras are more comfortable to use than others. Also factor in the warranty, general after-sales service, and how easy it is to have the brand you’re looking at serviced or repaired in your area. Another good indication of quality is the camera’s resale value. If your potential camera is flooding the low-end of the secondhand market, it may be a good indication you’re about to buy a lemon. Finally, check out camera reviews and look up discussions about the model you want to buy on forums. The photography community is incredibly thorough and generous with information.

    4. Holy crop! Does size matter?

    GearEnvy 3

    I bought my first digital Nikon 13 years ago and paid $ 17,000 AUD (approx. $ 14,000 USD) just for the body. It took 256 MB memory cards and produced raw image files that were around 6 MB. I used that camera to shoot hundreds of covers, poster shots, magazine spreads and advertising campaigns, and nobody ever questioned the file size.

    Today my iPhone takes 8 MB photos. So, does that mean my iPhone camera is better? Umm – no. It’s not the quantity of the megapixels that count; it’s the quality of the megapixels and the size of the sensor. Cramming lots of megapixels onto a tiny sensor decreases image quality, making grainier looking files.

    So how big are the sensors in the various cameras on the market today? A camera phone sensor is the size of a tic tac, a compact camera sensor is the size of an M&M, an entry-level SLR sensor is the size of postage stamp, and a pro level camera sensor is the size of a 35mm film frame.

    So how many megapixels are enough and what’s the best size sensor for you? Well again, the answer comes down to what the output is going to be.

    If you plan on shooting images that are going to end up on billboards or really large wall prints, then a full frame sensor that produces raw image files that are larger than 20 MB is ideal. An entry-level camera can produce large enough files to create billboard size images; they just won’t look anywhere near as good.

    If you plan on printing midsize images — A4 (8.5×11″) or smaller — then an entry-level to mid-range camera will achieve really good results.

    Finally, if you’re mostly going to share your images online, you can get away with a smart phone or compact camera, but any of the above will do the job, as well.

    5. Physical size and weight
    GearEnvy 4

    Does this camera make my bum look big?

    This factor is often overlooked until you get home and pull your new camera out of the box and use it a few times. You may think you want the biggest, heaviest camera and the longest lens, but four hours into an eight-hour mountain hike, you may change your mind.

    I currently use two different bodies: the 1DS MKIII and the 5D MKIII. My 1DSIII weighs twice as much as my 5D and produces better quality images, but I’m prepared to take a hit in quality when I’m travelling because I know I’ll shoot more if I’m carrying a lighter camera. Having to schlepp a heavy camera around makes me think twice about bringing it out in the first place.

    A good camera should feel comfortable and be like a natural extension of your body. Test out how easy it is to change settings with one hand; believe me, this will get frustrating if it’s a difficult process.

    Have I missed anything you feel is worth considering? Do you have anything to add to the discussion or have any questions? I’d love to hear from you.

    googletag.cmd.push(function() {
    tablet_slots.push( googletag.defineSlot( “/1005424/_dPSv4_tab-all-article-bottom_(300×250)”, [300, 250], “pb-ad-78623” ).addService( googletag.pubads() ) ); } );

    googletag.cmd.push(function() {
    mobile_slots.push( googletag.defineSlot( “/1005424/_dPSv4_mob-all-article-bottom_(300×250)”, [300, 250], “pb-ad-78158” ).addService( googletag.pubads() ) ); } );

    The post Gear Envy: Five Things to Consider Before Buying Your First Camera by Gina Milicia appeared first on Digital Photography School.


    Digital Photography School
  • 3…2…1…Actions!! A Guide to Using Photoshop Actions to Speed-Up Your Workflow

    Do you find yourself doing the same processes in Photoshop over and over again? Do you wish you knew a way to quickly do amazing things to your photos without going through a bunch of steps? If you haven’t entered the world of ACTIONS yet, let me be your guide! I’m going to teach you how to install Photoshop Actions that you purchase or download on the web, and even better, how to create your very own Actions.

    197

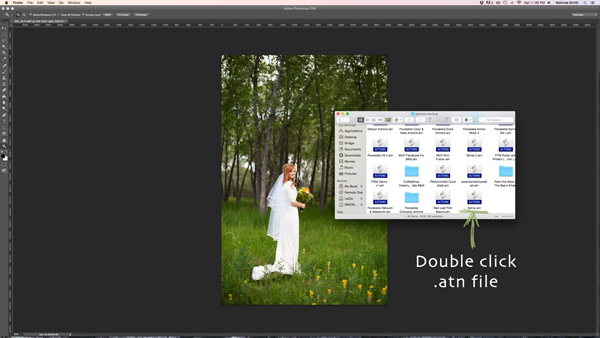
    Find the “.atn” file and double-click it.

    There are tons of places to find Actions on the web. Some cost a lot, some are free. There are a lot of great ones, and a lot that aren’t really worth using. I look for Actions that fit my style, and are fully adjustable. Which means that I can turn every layer off or on, adjust the opacity of each layer, and customize to fit my style and each individual photo.

    Installing Photoshop Actions

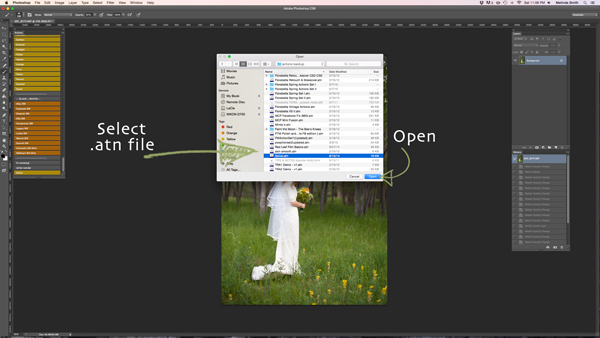
    Once you’ve purchased and downloaded your Action, make a backup file somewhere, just in case. Then, open the folder, find your Action (it will be a file with .atn extension), and double click it.

    (You do not need to have a photo of a gorgeous bride open in Photoshop as you do this, but it never hurts!)

    198

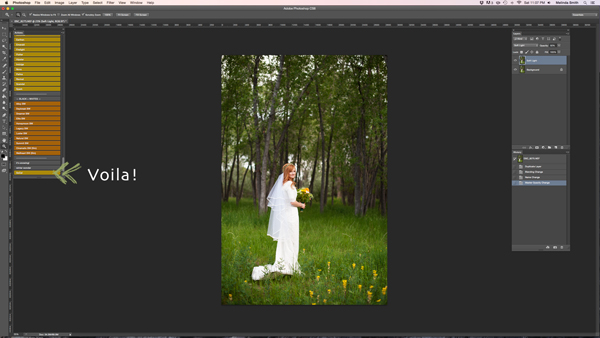
    This might seem too easy to be true, but most of the time this works. It’s automatically installed into Photoshop when you double click. Easy as that! If for some reason that doesn’t work, or you like to do things the hard way, you can use the following method.

    199

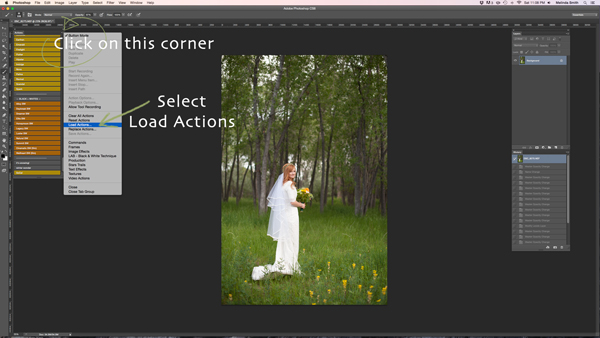
    Make sure your Actions Palette is open. You can do this by clicking “Window” at the top of Photoshop, and making sure the check mark next to “Actions” is on. If you don’t see a check mark, just click on “Actions” and your Action Window will appear.

    Click on the upper right hand corner of your Actions palette, and a drop down menu will appear. Select “Load Actions”.

    200

    Then, you’ll navigate to find and select that .atn file, click “Open”, and it will be installed. Now your Action is ready to be used. All you have to do is open a photo, click on your Action, and it will run through a bunch of steps in a very short amount of time (running times may vary based on the number of steps in the Action and the speed of your computer). Be aware that not every Action will look great on every photo, and many times Actions need to be adjusted before they look right. Be careful not to overuse Actions. They are great tools, but can ruin a photo quickly if you don’t practice adjusting and learning what Actions work with different types of photos.

    How to create Photoshop Actions

    Now that you know how to install someone else’s Actions, I want to teach you how to be a Photoshop rock star and create an Action of your own. You can create Actions for so many different things, from a simple sharpening Action, to a complex multi-step stylized Action.

    184

    For this demonstration I’m going to show you how to make a simple “soft light” layer to add a boost to your photos. Go ahead and open Photoshop and make this Action along with me. Once you see how the steps work, you can experiment with making more Actions for all the things that you find yourself doing over and over again. You will need to have a photo open when creating your Action, so choose a beautiful bride, or any photo you’d like.

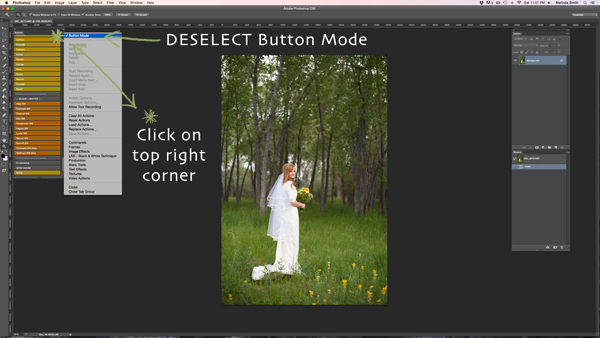
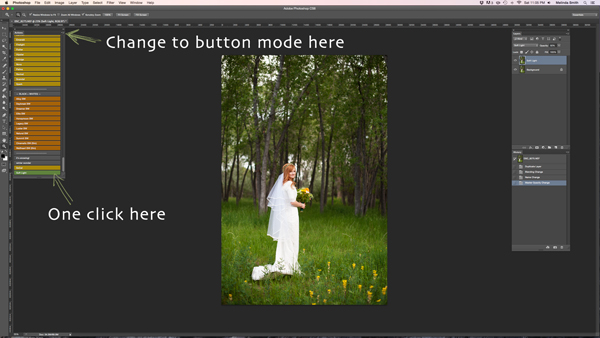
    Your Actions palette may be in button mode, or it may not. I like mine in button mode for normal use, but you have to change out of button mode to create Actions. Click on the top right corner in your Actions palette, and make sure that the check mark next to “Button Mode” is deselected.

    185

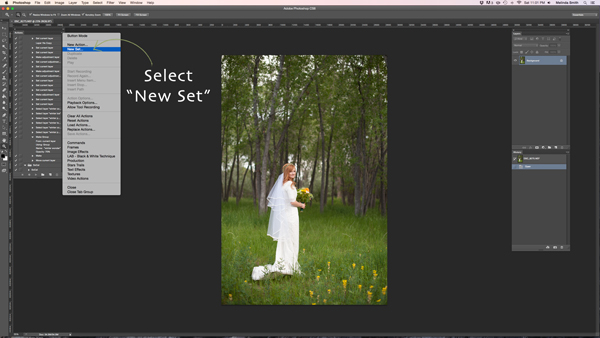
    Before you create an Action, you will want to make your own Action folder set, so that everything stays organized. Select “New Set” from your drop-down menu.

    186

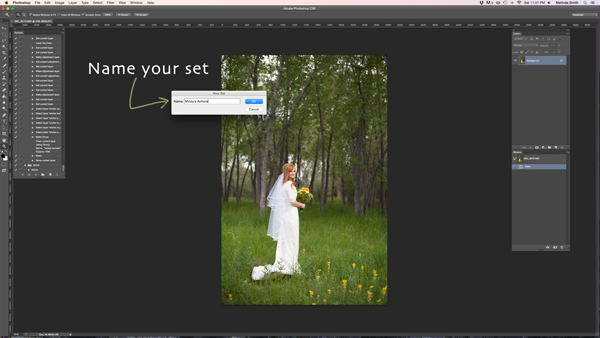
    You can name your set anything you’d like. A great set to start with would be a simple “My Actions”, so you will know which ones you created. Later you can divide them into multiple categories if you’d like.

    187

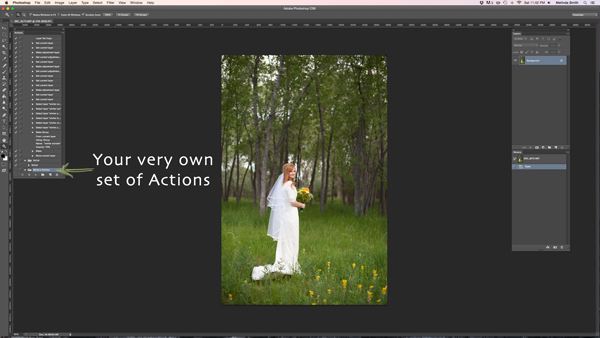
    Right in the Actions palette is your very own set of Actions. You are now that much closer to Photoshop rock star status! Make sure your set is selected for the next step. If it’s highlighted, you’re ready to go.

    188

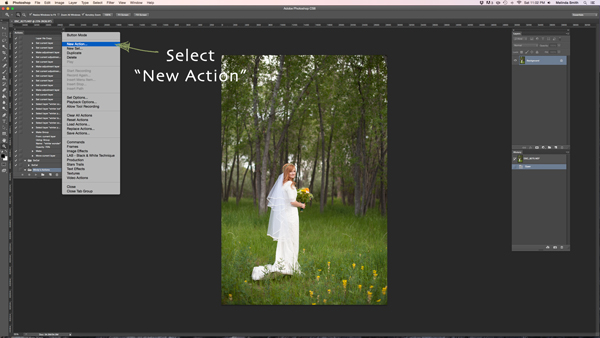
    Select “New Action” from the menu. We are going to create an Action inside your Action set.

    189

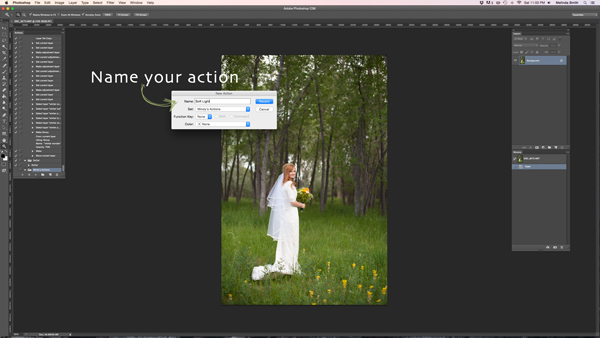
    Now you’re going to name your Action. It’s good to pick a name that lets you know exactly what it does, or describes the results of the Action well, so you won’t be wondering later. Since this Action will be a “Soft Light” layer, I just named it “Soft Light”.

    190

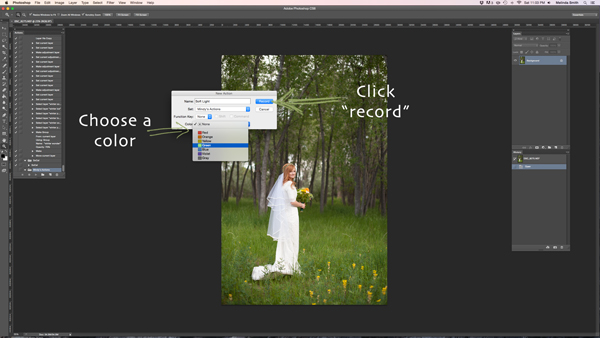
    If you’d like to, you can also choose a color for your Action, this only applies if you are in Button Mode. This helps with Action organization. You can make all of your Actions within your set the same color, so you can easily find different sets of Actions, or you could only choose a color for your frequently used actions, so they are quick to find. Now you’re ready to start recording. Just click record. Don’t worry, you can go as slow as you need to. It just records the process that you are going through, but doesn’t record the time it takes you to do it. It will play much faster than it takes you to record it.

    191

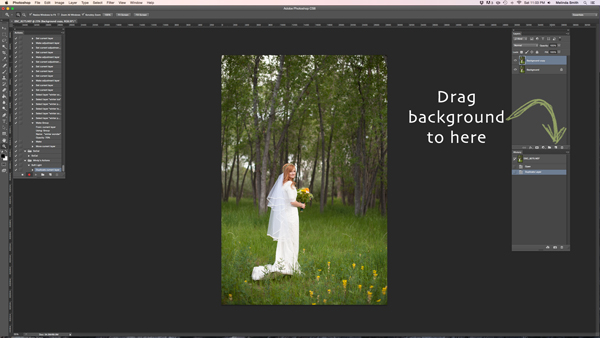
    We are going through the steps of making a Soft Light layer right now. It’s super simple, but it’s a great one to make for your very first Action. Just drag your background to the “create a new layer” icon (the square with a corner folded over), and it will make a duplicate of your background.

    192

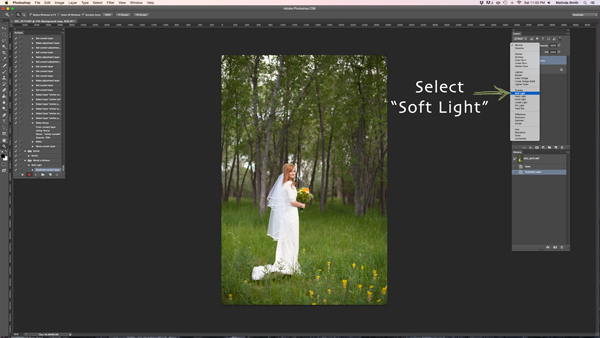
    Make sure your “background copy” layer is selected, then click on the Blending Mode menu. (It will say “normal” on the button. It’s at the top left of your Layers Palette.) Find “Soft Light” and select that blending mode.

    193

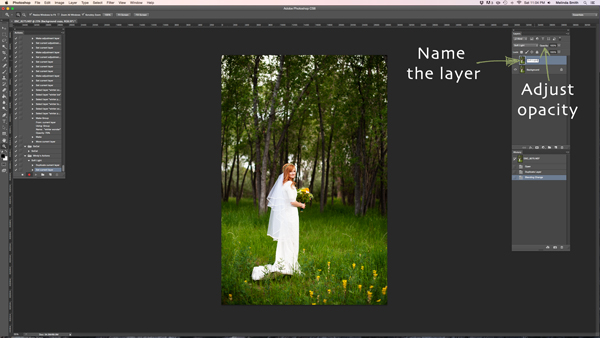
    I like to name the layer when I make Actions, so that I can easily know what each layer does when I run the Action later. Just double click on the name of that background copy and type in a new name for that layer. I went with “Soft Light” because I’m very original and creative.

    I also adjusted the opacity to around 50%, just because I know that on most photos I won’t want it 100% strong (adjust to your own taste and style). When you run the Action, you can always adjust the opacity to suit the individual photo, but I suggest you put the opacity at a level that you use most, because often that will save a step when you run it later.

    194

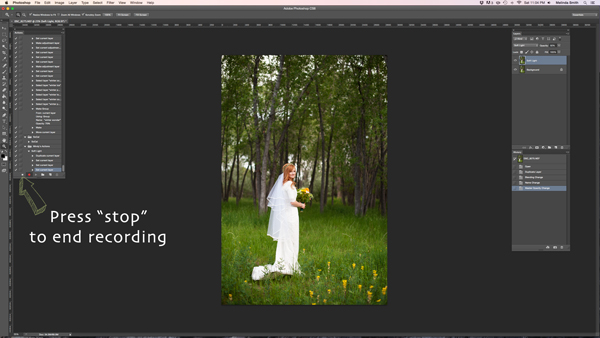
    Now we are done with our Action and we just need to press “stop” to end the recording. It is the square just to the left of the red recording button.

    195

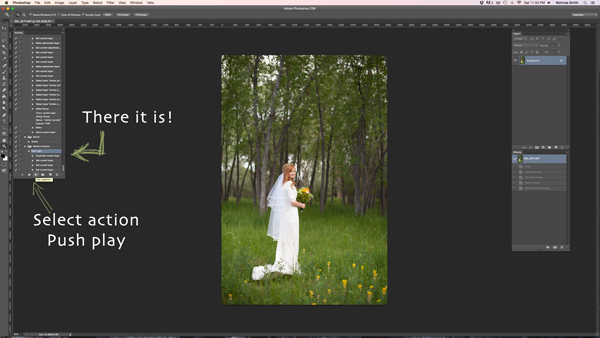
    There’s your Action. Pretty exciting, isn’t it? You can try it out by making sure your Action is selected, and pushing “play” at the bottom of the actions palette. You’ll be amazed how quickly your “soft light” action goes through those steps. It doesn’t take long to do all those steps without an Action, but it’s almost instantaneous with one. Once you get a lot of your regular go-to steps turned into Actions, you’ll find that it takes a lot less time to edit each photo.

    196

    If you want to change back to button mode, it will really streamline things. All you have to do is click once on the Action. You don’t have to push play, or scroll a lot through open steps to find your Action. Give it a try.

    Let me know how you did creating your first Action along with me. If you’re an Action-creating enthusiast, I’d love to hear what Actions you have made, and which Actions have been most helpful to your workflow.

    googletag.cmd.push(function() {
    tablet_slots.push( googletag.defineSlot( “/1005424/_dPSv4_tab-all-article-bottom_(300×250)”, [300, 250], “pb-ad-78623” ).addService( googletag.pubads() ) ); } );

    googletag.cmd.push(function() {
    mobile_slots.push( googletag.defineSlot( “/1005424/_dPSv4_mob-all-article-bottom_(300×250)”, [300, 250], “pb-ad-78158” ).addService( googletag.pubads() ) ); } );

    The post 3…2…1…Actions!! A Guide to Using Photoshop Actions to Speed-Up Your Workflow by Melinda Smith appeared first on Digital Photography School.


    Digital Photography School
  • 5 Tips for Goal Setting for You and Your Photography Business

    Last December, no doubt thanks to data driven marketing, a little red ad with festive fireworks graphics kept popping up in my Facebook feed asking me: “WILL YOUR PHOTOGRAPHY BUSINESS SUCCEED OR FAIL IN 2014?” Over and over it found its way to my eyeballs and dared me to click, and apparently peek into my very own crystal ball, yet I couldn’t bring myself to do it. In all caps screaming at me, it seemed to suggest more seriousness than I can handle this time of year.

    And the fireworks secretly conveyed what it really was saying: “WILL YOU BE CELEBRATING OR GOING DOWN IN A BURNING VORTEX OF SHAME AND REGRET?”. For all I know, it was a dead link. Or when I click on it, I end up on that site for an indoor cycling class that Facebook seems to think I will enjoy even though taking an indoor cycling class sounds slightly less interesting than performing my own root canal with pliers and whiskey on my kitchen floor.

    lynseymattingly7

    I’m not one for New Year resolutions, and not just because they often involve exercise. I have found that they easily end up being nothing more than petty promises you make to yourself that turn into guilt once it becomes evident they were unrealistic and therefore, unachievable. What I do love though, is goal setting and fresh starts; a new year is perfect for both. Specific goal setting is a very personal thing – one that no one, or any “How To” article, can help you write. I can however offer you some tips for what the most successful goal setting includes.

    Tips for goal setting for your business

    lynseymattingly2

    1) Be realistic

    I know – realistic is boring. Realistic lacks that exotic appeal, that wild and crazy offer. But setting yourself up for disappointment and ending up in that burning vortex of shame and regret scenario, isn’t appealing either. I’m not likely to photograph a cover for Time Magazine this year. I’m not even likely to have a photograph on the front page of my local newspaper. Partly because I don’t work for either publication. Last year I had photographs published in one international magazine, two US-based publications, and a few images featured in a large gallery show. Every single one of those was a surprise – random opportunities that fell in my lap which I couldn’t have set as a goal because I didn’t know they were possibilities.

    Practical goal setting should be flexible enough to accommodate opportunities you couldn’t have imagined and able to adapt and change as your business and your style does. Goals do not need to be small to be realistic. Shoot for the moon, but keep in mind that the idea of building a space shuttle sounds like a lot more fun on January 1st than it will in mid-July.

    lynseymattingly5

    2) Treat it like a business

    This is a goal I have every year; to not let it get so personal. I want to be able to hear constructive feedback about my images without feeling personally attacked, to not allow negative energy to kill my buzz, to not give away the farm, to keep office hours, to not edit with one hand and make dinner for my kids with the other. It’s a struggle. Possibly my biggest. Partly because it is personal.

    I don’t know a single professional photographer who became one because they needed a job and photography was there and was easy. We get into this business because we love taking pictures. What a dreamy situation – to take an art, a hobby, and turn it into your career. It’s easy to keep dodging and burning the midnight Photoshop oil when you are having success doing something you love. To avoid burn-out and keep your basic love of photography intact, work at maintaining a life/work balance. If taking pictures is how you make a living, do the tasks that aren’t as fun creating images, during actual normal working hours. Commit to not taking on too much, or doing jobs for free or cheap just to be nice. Build your portfolio with intention so you are not just shooting everything that comes your way for no personal purpose. Hire out the tasks that keep you from being able to focus on the parts of your business only you can do.

    lynseymattingly6

    3) Clean up your work space

    Several years ago I was in a terrible funk and I couldn’t figure out exactly why. I was telling a close friend that every time I came home, I felt defeated and just wanted to crawl into my bed and ignore the world. She walked into my laundry room – the room I usually use to enter my house connecting my garage to my kitchen and said, “Of course you do. I imagine this being the first thing you see when you get home is very, very depressing.” My laundry room was a sad beige disaster of papers and junk, not to mention laundry for days. If you managed to shove the door all the way open, you were rewarded by something falling on you or having to do a complicated dance routine to step over whatever was on the floor. It took a candid friend to see that being welcomed home by that was enough to make me want to run away. It was the push I needed to organized the junk, paint the walls a cheery yellow, put in happy lighting, and install a shiny new floor. This was life changing and made coming home something I looked forward to, instead of dreading.

    lynseymattingly1If I could, I would visit each of your work spaces and clean off your desk, dust your computer screen and throw away all of those scraps of paper you are saving in your top drawer that you just don’t need. I would make sure your chair was adjusted for optimal comfort and productivity, then place your favorite picture in a beautiful frame right next to you to make you smile and give you a little extra motivation when you need it most. I would untangle your electric cords and label your business folders and toss all of the nagging Post-It notes that remind you of what you haven’t done. I would go through your computer where I would first check out your music collection and judge you completely based on it and then send unneeded files, shortcuts, and applications to the trash bin. I would reformat all of your memory cards, charge all of your batteries, and carefully wipe down all of your lenses. I would send in the little elves to magically clean your camera sensor and careful wipe all of the grime and grunge off the viewfinder and buttons with the most gentle precision. I would even get you a big glass of ice water with a crazy straw and place it next to you so you could work productively for hours on end and never have to be thirsty.

    Obviously, I can’t do any of these things for you – but you can. Give yourself the gift of working in a space that works for you. Whether it’s an office, a studio or tiny corner of a closet – take the time to make it a place where you actually want to spend time.

    4) Focus on one topic at a time

    lynseymattingly3

    There is so much information out there for photographers. Some of it good, some of it opinion, some of it completely unnecessary. As a person who gets overwhelmed easily, I have to remember to not overindulge in the information I allow my brain to soak up. I like to pick one topic or area that I want to learn more about or focus on at a time. This way I read anything I find interesting, but if it’s not something I need to look into and not about my dedicated topic, I can let it go. Last year I learned as much as I could about copyright. If an article popped up about copyright, I would read it immediately. I spent time researching and finding ways to change and better my photography practices based on copyright laws. This year, I want to work on indoor natural light photography. This keeps me from overindulging in tips and ideas that will only drown me with information I’m not likely to need or use right now.

    lynseymattingly4

    5) Invest in your business, your brand, and yourself

    Starting any business takes time and money. The first couple of years are often about keeping afloat, and it’s easy to see basic needs as expenses that can be saved for later. Looking back, I wish I would have built a few things stronger the first time.

    I wish I would have purchased a better camera body right from the get-go instead of trying to skimp where I thought I could save some money, only to end up needing a new one much sooner. I wish I would have taken the time to have my computer professionally fixed to accommodate running a large program like Photoshop all of the time. Then my editing would have been faster and I would have wasted less time waiting for large images to load. I wish I would have done my portfolio building based on the pictures I wanted to take, not the ones that people seemed to demand.

    The little things I could have invested in would have saved me a lot of trouble, time, and often cash, down the line. Having the tools you need, the resources to use, and the abilities and desire to put it all together and work hard, is the difference between flirting with photography and making it a business.

    lynseymattingly9

    Every January I have no idea what the year will bring, and every December I find myself in a place I couldn’t have even predicted, but often in a place I had hoped for. Goal setting is the closest you can come to actually (please forgive the corniness) writing your own destiny. This year I want to work on my personal photography project, write more, update my websites and blogs, and never, ever find myself in an indoor cycling class.

    What do you hope to achieve this year in your photography?

    googletag.cmd.push(function() {
    tablet_slots.push( googletag.defineSlot( “/1005424/_dPSv4_tab-all-article-bottom_(300×250)”, [300, 250], “pb-ad-78623” ).addService( googletag.pubads() ) ); } );

    googletag.cmd.push(function() {
    mobile_slots.push( googletag.defineSlot( “/1005424/_dPSv4_mob-all-article-bottom_(300×250)”, [300, 250], “pb-ad-78158” ).addService( googletag.pubads() ) ); } );

    The post 5 Tips for Goal Setting for You and Your Photography Business by Lynsey Mattingly appeared first on Digital Photography School.


    Digital Photography School
  • Create More Unique Travel Photos by Adding a Model

    Creative travel photography is becoming increasingly difficult as world travelers have easier access than ever to stellar cameras. In fact, travel photography can at times seem uninspiring when you arrive at a tourist spot and see that everyone around you is taking the exact same shots. There are many ways to reframe your perspective to capture unique angles of a tourist attraction, but there is also another way that seems to be overlooked: turn travel photography into a series of creative portrait sessions with a model.

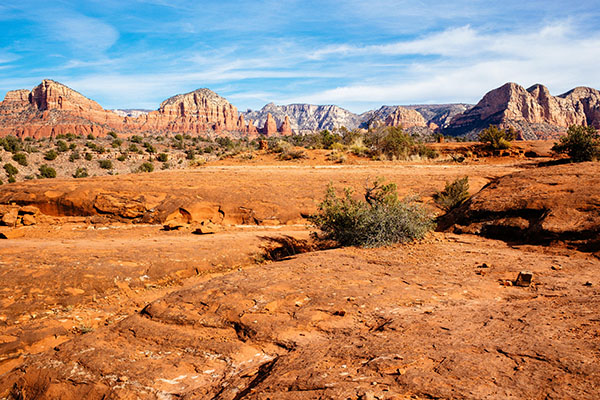
    Sedona creative travel photography

    You may have noticed a trend among some of your amateur photographer friends who take an object like a Lego figurine toy and place it in a unique location as a way to maintaining some continuity between travel photography images, or tell a visual story. Using a consistent model is actually a great way to exercise creativity and tell a compelling, unique story, with imagery. While it’s definitely easy to use an inanimate object, why not exercise your portrait skills by adding a human model? This was the way of thinking my photo companion and I assumed during a recent long weekend escape to Sedona, Arizona.

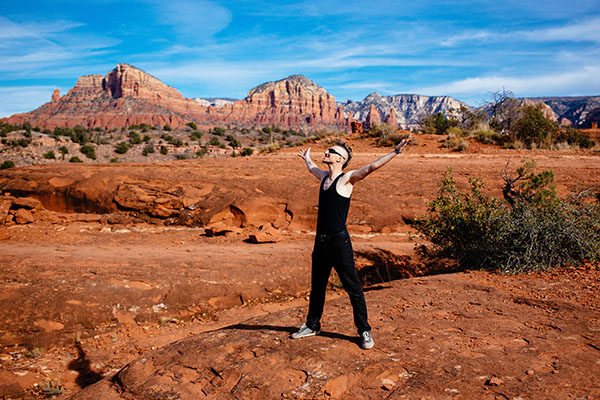
    Sedona creative travel photography

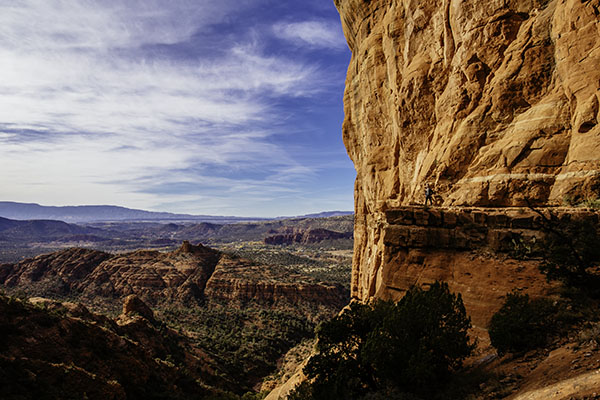
    Before: landscape without a model, or the shot that everyone else was getting.

    Famous for its natural red rock formations, Sedona is one of those areas that has already been widely photographed from a landscape perspective. In fact, the hotel we stayed at gifted us with a set of six postcards. Each one is a striking landscape photo of a notable attraction in Sedona taken during the perfect time of day, and from a high altitude, likely from a helicopter or high hiking spot. That immediately began to deter our ambitions for capturing stunning images of Sedona, as I’m not inspired by capturing the same images that others have already taken and widely publicized. Immediately, the idea of placing a unique model in the middle of a popular landscape came to mind as a way of crafting one-of-a-kind images.

    Sedona creative travel photography

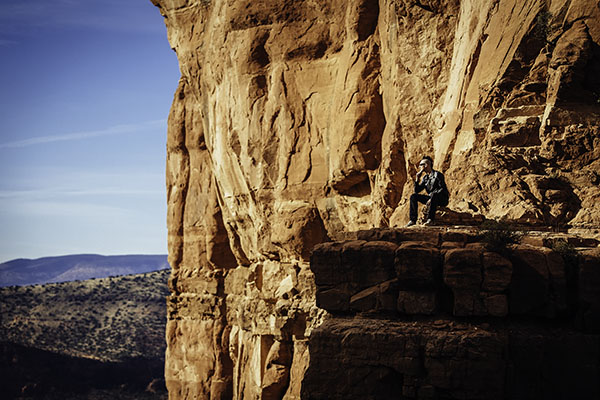
    After: landscape with a model.

    Background

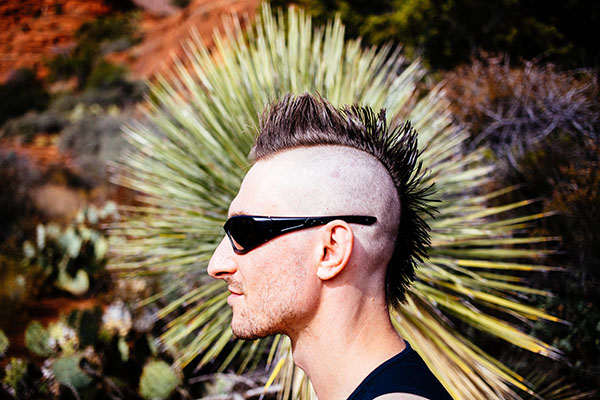
    Luckily, my travel companion loves having his photo taken and isn’t afraid of drastically altering his appearance for the sake of a photo shoot. As we began mapping our trip around Sedona, he decided that assuming a character identity similar to that of Mad Max would make a perfect visual theme for our travel photo sessions. The result? He went and shaved his full head of hair into a mohawk and donned an outfit of black pants and black leather jacket, which he wore throughout our entire trip to Sedona. A bit out of place for a hot desert? Indeed, and appropriately so, as a mohawk can be seen as an emblem of nonconformity, in our case, against the typical tourist photos everyone around us was taking. We were met with many stares and raised eyebrows throughout the entire trip, but, we walked away with a unique series of images that not only showcase the beauty of Sedona, but also add some intrigue by inserting a seemingly out of the ordinary character into these landscapes.

    Sedona creative travel photography

    Executing the Photo Shoots

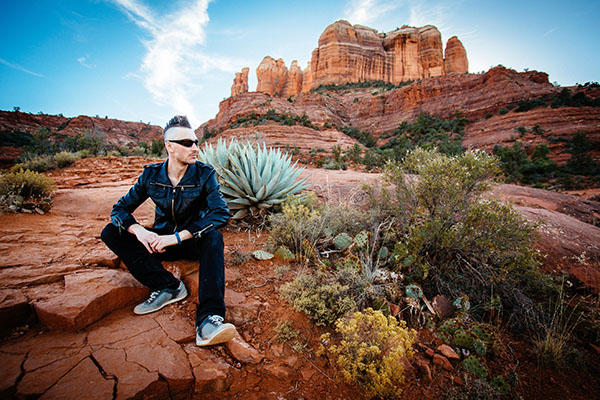
    As mentioned earlier, Sedona is very popular among camera-wielding tourists, making it tough to find clearings for taking portraits. The best method we found was setting up the scene as best as we could and waiting for a quick, often one second, gap when people passed by. The gear was simple: a Canon 6D camera, a 24-70mm f/2.8 lens, and a 70-200mm f/2.8 lens. No external lighting was used, just the sun in all of its glory. As the photographer, it was a fun challenge to figure out the best way to photograph someone with a mohawk. In fact, the only way to capture the full effect of the mohawk is from a profile view, so the real trick was to get creative with the backgrounds, perspectives, and angles to make each portrait unique.

    Sedona creative travel photography

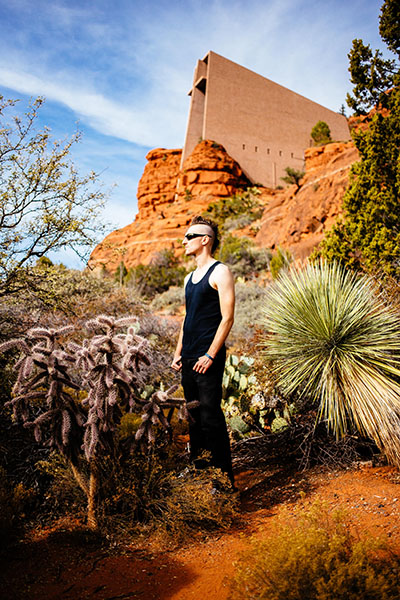
    This portrait was taken at the Chapel of the Holy Cross, one of the most visited and easily accessible tourist spots in Sedona. While this would be a pretty common shot of the chapel, inserting a model into the scene makes for a more dynamic image. A wide angle shot like the one above sets the scene, whereas the telephoto shot below takes essentially the same pose and turns it into an entirely new image.

    Sedona creative travel photography

    Another way to add flair to landscape portraits was to use the 70-200 f/2.8 telephoto zoomed in to 200mm

    Sedona creative travel photography

    Same principle with these images: in the one above, I started off with a wide shot at the vista of the popular Cathedral Rock Trail, and then zoomed way in with a telephoto lens below.

    Sedona creative travel photography

    Any other creative landscape portrait artists out there? Show off your images and the stories behind them!

    googletag.cmd.push(function() {
    tablet_slots.push( googletag.defineSlot( “/1005424/_dPSv4_tab-all-article-bottom_(300×250)”, [300, 250], “pb-ad-78623” ).addService( googletag.pubads() ) ); } );

    googletag.cmd.push(function() {
    mobile_slots.push( googletag.defineSlot( “/1005424/_dPSv4_mob-all-article-bottom_(300×250)”, [300, 250], “pb-ad-78158” ).addService( googletag.pubads() ) ); } );

    The post Create More Unique Travel Photos by Adding a Model by Suzi Pratt appeared first on Digital Photography School.


    Digital Photography School
  • Start a New Great Year – How To Develop Ideas More Creatively

    As a photographer, coming up with ideas and visualizing what you imagined in an image, is an essential progress. Coming up with those (hopefully) great ideas isn’t an easy task though because of the sheer flood of pictures that everyone sees everyday. Here are my strategies for coming up with ideas that help you stand out from the masses. According Continue Reading

    The post Start a New Great Year – How To Develop Ideas More Creatively appeared first on Photodoto.


    Photodoto

  • 8 Tips to Push You and Your Photography Business out of a Rut

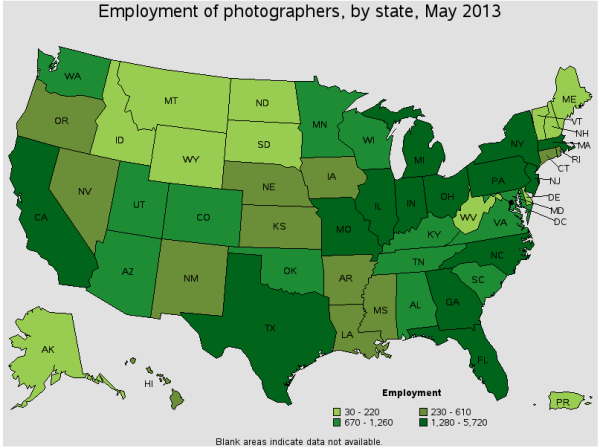
    For many people, choosing to become a photographer is as easy as buying a good DSLR camera, taking pictures of their family and friends, creating a free website and/or social media accounts and announcing to the world that they are ready for business. There are some very interesting statistics from the US Department of Labor on the number of photographers in the US broken down on a state by state basis. Larger metro areas have more photographers than rural countryside communities. Keep in mind, this data is only for the US. There is similar statistics available for the photographic industry for most other countries as well.
    Employment of Photographers by State according to the US Department of Labor Statistics

    Per US Department of Labor Statistics, May 2013

    The same report, US Department of Labor Statistics, May 2013, states that the mean hourly wage is $ 17.88 and mean annual salary in 2013 was $ 37,190 – a good chunk of change for the above average hobbyist as well.

    Becoming a photographer has low cost of entry (entry level DSLRs with a kit lens are around $ 1000-$ 1500), low barriers to entry, (home studios or outdoor sessions) and in most cases an education or a photography related degree is not required. Often times, as with most other professions, it is not what you know but who you know. If you happen to have a huge social circle or attract clients who have huge social circles, word-of-mouth and viral social media posts makes you famous almost overnight.

    Unfortunately, the same social media and online marketing can also have a detrimental effect on photographers. It is very easy for a new photographer, or even a seasoned one, to feel overwhelmed and demotivated. Feelings of jealously, lack of confidence or even self doubt are very common and occur often. However with a few simple but effective steps, you can get out of your photographic rut, end your pity party of one, and get back to the profession you fell in love with. These steps will help you invest time in yourself, invest time in your community, and invest time in your craft to differentiate yourself from your competition and get noticed by clients, both present and future ones.

    #1 Start personal projects

    Personal projects are a great way to fall back in love with the art of photography. Personal projects can be something within your genre of photography, or completely different. It doesn’t really matter, as long as it is something that peeks your interest and keeps you motivated. Be realistic in the time and cost commitment required for your personal projects. You may decide that you want to keep this personal and not share it with your friends and clients. That’s perfectly fine. If you choose to keep it private, take notes and keep a log. It will help you stay on track. If you share it with your online audience, make it interactive, ask for advice or even suggestions of topics from your friends and fans. There is no right or wrong as long as you are committed.
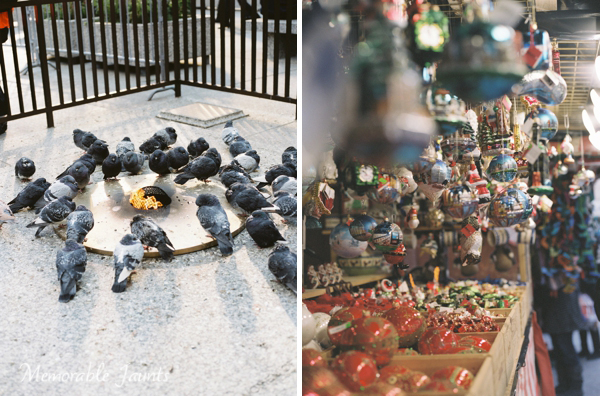
    Medium Format Film Mamiya Christmas Market in Downtown Chicago by Memorable Jaunts

    One of my personal projects is photographing with film – medium format and 35mm from a recent photowalk in Downtown Chicago

    #2 Re-examine your portfolio

    Do a through examination of your portfolio and see what areas need attention. Make sure your portfolio and website reflect your best work. If you feel you are lacking in areas that you want to specialize in, take note. Make specific goals and work toward filling those gaps. You know the age old saying – by acknowledging your weaknesses, you are one step closer to fixing them.

    #3 Make friends in the industry

    Reach out to other photographers in your area and invite them for a cup of coffee. Make friends. Remember to keep conversations light and general. Don’t be a ‘Debbie Downer‘ in the your very first meeting. Be genuine and show interest in their business as well. Be honest and ask them for advice on how they got over a photography rut. Organize photo walks or photo excursions with your new friends. Often times, just being able to talk shop with another person in the same industry is motivating enough to help you get out of your rut.
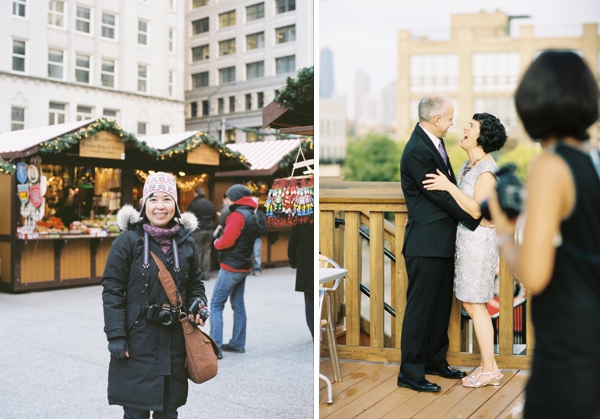
    Making Friends with Fellow Photographers Memorable Jaunts

    My talented friends – lifestyle film photographer Sachiko Eubanks Photography and wedding photographer Aparna of Photography by Aparna Paul Jain

    #4 Rebuild your portfolio

    Do you still have the contact information for those people who first helped launch your career. Reach out and ask them if they would be willing to help you update your portfolio. Chances are your style has evolved and changed. These friends and followers helped you before, perhaps they are willing to do it again. But definitely make it worth their time; either offer a free session or a discount – whatever makes more sense for your current situation.

    #5 Attend workshops, seminars, and online events

    Like most other professions, the photography industry is continually evolving and changing. There are numerous workshops, seminars, and even free online events and tutorials to keep you busy during the slow season. Keeping abreast of the latest in any business is a good thing. It shows your clients, both present and future ones, that you value your business enough to invest in it.
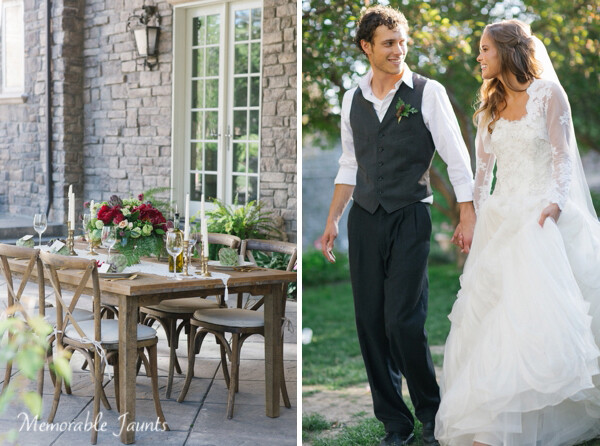
    Denver Colorado Wedding Photographer Memorable Jaunts Wedding BrideGroom Portraits

    Attending workshops provides a platform to learn new techniques, network with other photographers and updated photos for your portfolio

    #6 Volunteer your services

    There are many great organizations and services out there. Find a few that you are passionate about and reach out to see if they need a volunteer photographer. Remember to be honest about your time commitment. If you can only volunteer your services during the slow season, let them know so they can plan accordingly. Remember if you are genuine and true, your images will reflect that passion and people will respect you more for wanting to contribute to the community.

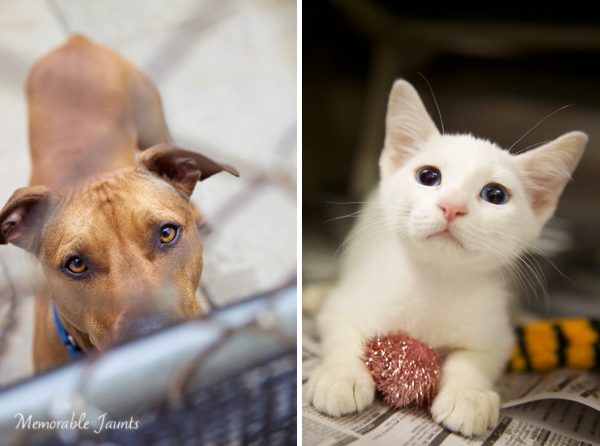
    Downers Grove Humane Society Volunteer Photographer Memorable Jaunts

    My time volunteering at the local humane society has been one of the most rewarding experiences to date – I would adopt all of them if I could!

    #7 Join photography clubs and groups

    There are many great online and local community resources for photographers. Meetup.com is one very popular site that has many different photography clubs. There are generally a wide range of photography enthusiasts in every club and it is likely that you will have a good time. Go with an open mind and not with the attitude of, “What’s in it for me?”.

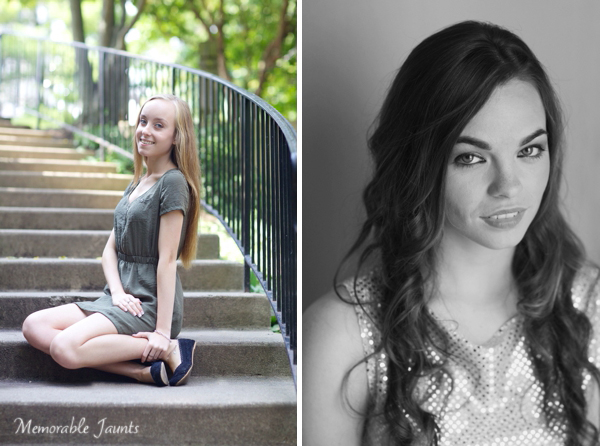
    Naperville Illinois High School Seniors Glamour Portrait Photographer Memorable Jaunts

    Participating in photowalks and shoot outs with other photographers has given me the experience of photographing a variety of subjects like high school seniors

    #8 Honesty really is the best policy

    Don’t just give the elusion of staying busy – actually get busy. Be honest and upfront with your clients. It is perfectly okay to say you are experimenting with black and white, dabbling with newborn photography, or working on landscape photos. Prospective clients will research and find all everything they want to know about you via social media, so be truthful.

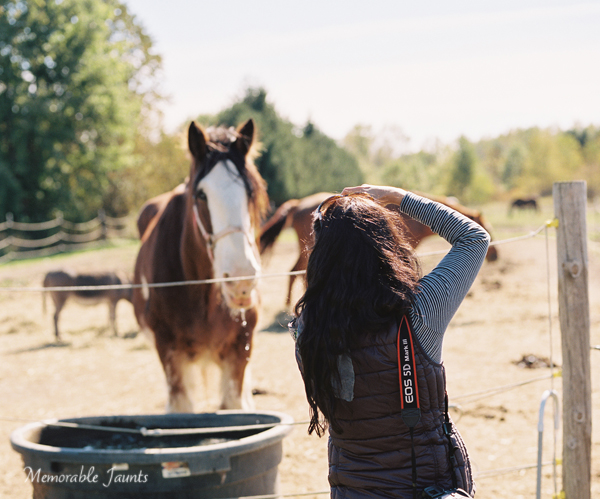
    Photographing Horses on film during the slow season Memorable Jaunts

    Equestrian photos on film – photo credit Sachiko Eubanks Photography during one of our photography excursions

    Lastly, keep your chin up and roll with the punches. Everyone goes through tough times in their lives and businesses at some point or the other. The key is to recognize that this is just a phase and it too shall pass.

    googletag.cmd.push(function() {
    tablet_slots.push( googletag.defineSlot( “/1005424/_dPSv4_tab-all-article-bottom_(300×250)”, [300, 250], “pb-ad-78623” ).addService( googletag.pubads() ) ); } );

    googletag.cmd.push(function() {
    mobile_slots.push( googletag.defineSlot( “/1005424/_dPSv4_mob-all-article-bottom_(300×250)”, [300, 250], “pb-ad-78158” ).addService( googletag.pubads() ) ); } );

    The post 8 Tips to Push You and Your Photography Business out of a Rut by Karthika Gupta appeared first on Digital Photography School.


    Digital Photography School
  • Small Flash Portraits on Location with Adorama TV
    How to light portraits with a small flash or speedlight is a common topic request from our readers here at dPS.

    In this video tutorial Daniel at Adorama goes over how to use a speedlight both on-camera and off-camera to take quick and easy portraits on location. He shows tips for modifying the light, balancing with the ambient or available light in the scene, and even using a gel for color balance.

    Get some great tips from this video:

    Have you tried these techniques before? Had any success? Share any tips you have in the comments below.

    googletag.cmd.push(function() {
    tablet_slots.push( googletag.defineSlot( “/1005424/_dPSv4_tab-all-article-bottom_(300×250)”, [300, 250], “pb-ad-78623” ).addService( googletag.pubads() ) ); } );

    googletag.cmd.push(function() {
    mobile_slots.push( googletag.defineSlot( “/1005424/_dPSv4_mob-all-article-bottom_(300×250)”, [300, 250], “pb-ad-78158” ).addService( googletag.pubads() ) ); } );

    The post Small Flash Portraits on Location with Adorama TV by Darlene Hildebrandt appeared first on Digital Photography School.


    Digital Photography School