Category: Photography

  • 10 Fundamental Tips for Newbies in the Wedding Photography Business

    So, you’ve decided you want to enter the wonderful world of wedding photography. Now it’s time to get prepared and arm yourself with as much know-how as possible. After all, you are going to be responsible for capturing the magic of this once-in-a-lifetime event – no pressure!

    Here are the top 10 things I have learned on my journey, that are valuable to anybody breaking in to the wedding photography business.
    DSC 2518

    1) Experience and second shooting

    You’re new to the scene, and may not have any experience photographing a wedding, other than that time you used your point-and-shoot camera at your cousin’s wedding. So, how do you get experience photographing a wedding, in a professional setting? Offer your services as a second shooter!

    There are a few reasons why this is a highly valuable experience if you’re thinking of becoming a wedding photographer. The most obvious being that you will gain on the job experience, as well as building a wedding photography portfolio. By becoming a second shooter, you will also meet established wedding photographers, and begin to network with other pros. A great way to begin second shooting is to research wedding photographers in your area, and contact three to five that you like the most. You can also use Facebook and search for photographer groups to advertise yourself. Offer your services for free to start, and you should hopefully land yourself a job pretty fast.

    When you secure a gig with a photographer, be punctual and polite on the big day. Observe the photographer’s behaviour, and the way they have structured the big day. This will help you get a feel for how you will one day operate your own business. If there is anything you are unsure of, or want to know more about, asking the photographer once the rush of the wedding is over, is a great way to get a better insight.
    DSC 2680

    2) Compare and prepare

    You’ve assisted a few photographers at a number of weddings, and now you want to take the reins. Good job! At this stage, there is a lot to think about, and begin preparing. You need a presentable portfolio to show prospective clients, as well as prices, packages, and a solid contract. A great way to roll two of those things together is to create your own website.

    This will allow you to have an online gallery of your images, along with a page outlining all pricing and further information. If you’re not a HTML whizz or web designer, don’t fret – you can sign up to a website that will offer you pre-made themes, designs, and layouts. Wix is a great place to start, you can select a yearly plan, which will give you a domain name, and eliminate all of their advertisements from your website. Plus – their website editing tool is super straight-forward and will allow you to customize your website easily. Another low cost option is Squarespace, starting at $ 8/month.

    When you are designing your packages and conjuring up your pricing, comparison is key. Take some time to think about all the expenses involved in your business and compare this to the rate you wish to charge. Depending on your expenses, it might work in your favour to price yourself slightly higher or lower. Things to consider are: your overhead costs (rent, telephone, utilities, web fees, etc.), equipment, price of goods including wedding photography albums and/or prints, and you should also think about your own salary and how much business you hope to accumulate during the year. Remember, you are a novice – clients will not be choosing you because of your years of experience, but because of your passion and artistic flair!

    You will also need to think about having a contract ready to go should a client ask to see a copy. There are loads of great wedding photography contract templates online, find one you like and do some adjusting. Important things to consider when writing a contract are: model release, image copyright, illness or injury, pricing and deposits/retainers, sizing/format of images, etc. Always have a lawyer take a look at your contract. Laws vary from place to place, and sometimes it is not my place legal guidance to others. Remember, we are photographers – not lawyers.
    DSC 2716

    Read these related dPS articles for more on contracts:

    • The Biggest Legal Mistake Photographers Make
    • Wedding Photography Agreement (Contract) Tips

    3) Sell yourself

    You’ve compared, you’re prepared – now it’s time to don the marketing hat, and get your name out there. There are a few avenues you can explore, but something that always goes down well, is running a promotion or special offer. For example, you could offer a special bonus (such as 20 free 5×7 prints, or a free 16×20 wall print) on your wedding services for the first five people who make a booking. This will cost you a little to produce, but it will benefit you massively and almost guarantee you five weddings.

    A great way to utilize social media (again) is to search Facebook for wedding groups in your area, and advertise yourself there. Be sure to read the rules of the group and make sure you’re allowed to advertise your services in the group, some don’t allow it and you will be blocked. Have your website ready to go, so that as soon as you get some interest, you can fire through a quick message with a link to your work and pricing.
    DSC 7202

    4) Communicate

    By now you should have a few people enquiring about your services and wanting to know more. At this stage, quick, friendly, and professional communication is your best friend. Have a script ready, so that as soon as you receive a message, email, or phone call you have a short and informative response ready to go. Remember, this is a script – NOT a sales pitch! Keep it short, sweet, and straight to the point.

    My normal script goes along the line of, “Hello! Thanks for the message. Of course, I would be interested in photographing your wedding – please feel free to head on over to my website to see more of my work and pricing (insert website here). Do you mind me asking what is the date of your big day?” By asking for the date of the wedding, you are opening a conversation which is a hugely important part of the process. Once you have had a brief conversation regarding the details of their wedding, say to them that you will be in touch in a couple of days. This leaves the ball in their court so that they do not feel pressured, but also allows you to follow up with a friendly message and hopefully secure a consultation.
    DSC 7742

    5) Meetings

    You’ve secured a consultation with your first potential client – yay! Turn up 5-10 minutes before the scheduled time, this is your only chance to make a first impression, and being late is a BIG no-no. Once you have greeted your clients with a smile on your face, ask them a few things about themselves. This initial meeting is a chance for them to get to know you (and vice versa) and your process, so go in there with a clear mind and plan of action.

    Spend five minutes briefly explaining a run-down of how their big day will work from your perspective, and also explain your pricing, packages, and deposit payments. Take a copy of the contract and give it to them to take home and look over, let them know if they have any questions to contact you.

    After this initial meeting, follow up with them three days later, and ask if they want to secure a spot. Make it clear that in order for them to secure their date in your diary, the deposit needs to be paid. If the clients liked you, and books you as their photographer, well done! You should always have a follow up meeting at their wedding venue, so that you can explore the grounds together, talk about potential photographic opportunities, and let those creative idea juices flow.

    DSC 3417

    6) The Essential List

    You’ve got your first official booking, the deposit is paid, and the ball is well and truly rolling. Good on ya! Now you need to make a list of the absolute essentials that you need for the big day. These things include:

    • Family and group shot list
    • Bridal party shot list
    • Full itinerary of the day
    • Your own photographic equipment
    • Any post-wedding preparations

    Contact the bride and groom and ask them to send you a list of all the must-have group portraits that they want, and also ask them for a full itinerary of the day. Ask them to allow an hour for photos between the ceremony and reception, in order to ensure that they get all the photographs that they want. Make a list of the equipment you will be taking including SD cards, spare batteries and chargers. If you are including prints or albums as part of your package, take some time to do the research and find a reputable, quality printing agency.
    DSC 4113

    7) Itinerary and planning

    The big day is getting closer and you’re getting nervous – use the itinerary of the wedding day to start scheduling your own plan of action. Decide which shots you want, and when is the best time of day to take them. Be mindful of the time of day and position of the sun if you are shooting outdoors. You don’t want the subjects to appear silhouetted – but you also don’t want to blind your clients with the sun, as this will make for very squinty pictures.

    Be sure to also schedule your own breaks – after all, this is a job and you will need a break. I find the best time to have a break is during the lunch or dinner, when everybody is busy with the food. Nobody likes being photographed with their mouth full of food, so this is a great time for you to sit down and enjoy a well deserved break and bite to eat as well. In most cases, the bride and groom will feed you (if this is really important, you can even put it in your contract).

    DSC 7929

    8) Recruit the best man and maid of honour

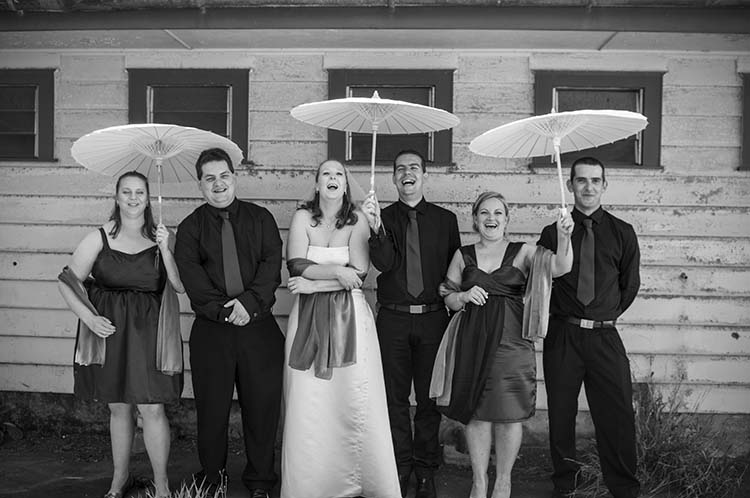
    This will make your life so much easier, and will also enhance the experience of shooting family portraits. The best man or maid of honour are usually familiar with the family members, and will help herd the groups to make sure that everyone is ready for their portrait with the bride and groom. Let the bride and groom know that you intend to do this at your second meeting, and ask for a contact phone number or email address for the maid of honour and the best man. You can then drop them a line and introduce yourself before the big day, and ask them ever so nicely if they would be willing to stick around for family portraits to help you organize the herds of family members. Hopefully, they will see you operating like a well-oiled machine and the whole experience will not be too stressful on anybody. No one likes a stressed out photographer. This will also help you get to know them a bit better before the bridal party photographs, which is a major advantage in getting more natural, down-to-earth photos of the group.
    DSC 3917

    9) Have a perfectly balanced attitude on the big day

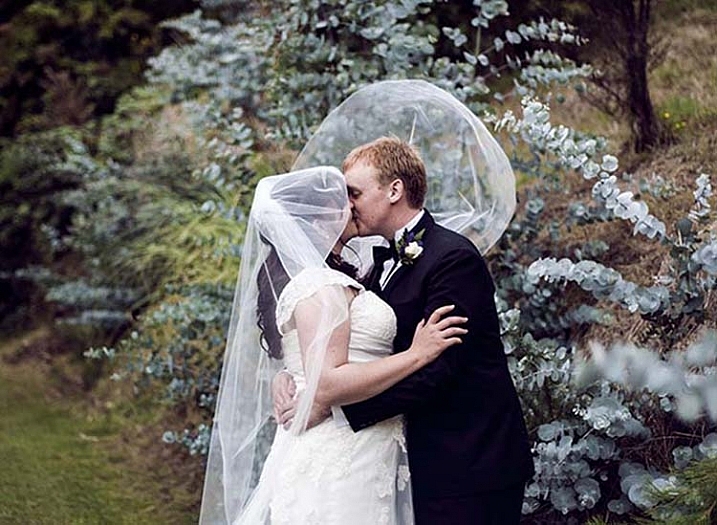
    The big day is here – don’t panic! Refer to your equipment check list to double, triple, and quadruple check that you have not forgotten anything. When you turn up to the first location and start shooting, you need to be prepared to wear an infectious smile for the whole day. This will help all of your subjects relax and smile during their photos. Remember – it’s fine to direct people during the staged family portraits, but do it as kindly as you can. Find the perfect balance between friendly and assertive for this part of the day.

    Self-check for professionalism, there are a few things that I think of which are absolutely unacceptable. This includes: showing signs of stress, smoking (even if the bride/groom are doing it), chewing gum, spitting, or excessive drinking. Sometimes photographing a wedding can seem a bit like a party, but this is a job and it needs to be treated as such. Be approachable, and just a generally delightful person to be around. People will remember this, and you may even find another engaged couple at that very wedding who like you so much that they decide to make a booking. Word of mouth is truly the best marketing tool ever!
    DSC_8003-1

    10) Follow up

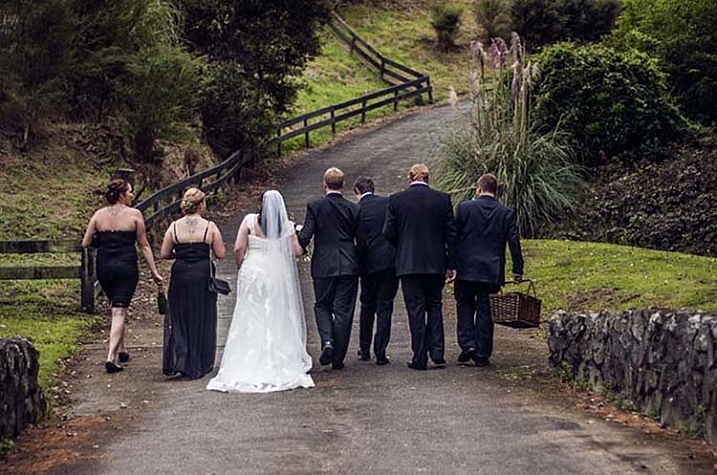
    The big day is over, phew – you survived! Now it’s time to knuckle down and do some editing, you’ve got a whole bunch of beautiful photos that you need to begin post-processing. I use Photos on my MacBook to sort through the images, and add all my best shots to a different album – I then go through that album and spend time editing those images.

    How you should follow up as communication is critical, even at this point of the process. Text or email your clients the next day, and let them know you had an awesome time photographing their big day, and that you’ve got some stunning photographs. Some people take a couple of days to edit and send their images, other people take weeks. I tend to give a timeframe of 14 days, although they are usually done within five to seven days. If the photographs are not done in seven days, drop them a line and keep them updated on your progress, something along the lines of, “Hey guys! Just to let you know I have edited around 500 of your images and only have 100 to go. As soon as these are done I will be in touch to schedule a viewing.”
    DSC_8089-1

    Once your edits are done, schedule a viewing time so that they can choose their favourites, and any potential prints. The final step is simple – once all is said and done, ask the client to provide you with an honest testimonial. This will give you more content to add to your website, and is also a great way for future clients to read about someone else’s experience with you.

    From start to finish, the process of starting a wedding photography business takes hard work and determination, but you got there with (hopefully) no hiccups. Nice work!

    Want more on similar topics? Check out these dPS articles:

    • 6 Things to Consider Before Becoming a Professional Photographer
    • What Defines an Amateur versus a Professional Photographer?
    • 4 Things You Must do BEFORE Becoming a Professional Photographer
    • 3 Questions to Ask Yourself When Starting a Photography Business

    googletag.cmd.push(function() {
    tablet_slots.push( googletag.defineSlot( “/1005424/_dPSv4_tab-all-article-bottom_(300×250)”, [300, 250], “pb-ad-78623” ).addService( googletag.pubads() ) ); } );

    googletag.cmd.push(function() {
    mobile_slots.push( googletag.defineSlot( “/1005424/_dPSv4_mob-all-article-bottom_(300×250)”, [300, 250], “pb-ad-78158” ).addService( googletag.pubads() ) ); } );

    The post 10 Fundamental Tips for Newbies in the Wedding Photography Business by Jasmine Monrouxe appeared first on Digital Photography School.

    Digital Photography School

  • How to Make a Little Planet Using Photoshop

    Photography doesn’t always have to be serious, sometimes it is nice to do something just for fun. Making a landscape look like it is a little planet is one of those things. There aren’t any uses for it, and you wouldn’t spend your photography career doing this. It is, however, one of those photography tricks that a lot of people like to try.

    LeanneCole-landscape-sphere-done-0033-dps717px

    A Landscape turned into a sphere or little planet.

    Landscape images work best. The photo should have a foreground, a horizon, and a sky. If you have trees or buidings in the image that go out the top of the image it may not work as well. It is all experimental, so you should try images like that, but it does seem to work best with images that look like the one below.

    LeanneCole-landscape-sphere-done-0035-dps717px

    This image was chosen because it has all of those elements; the river is in the foreground, there are buildings along the horizon, and there is a sky. There is also nothing going out the top of the image. As the photo is going to connect from one end to another, it has to be an image that has similar ends.

    How to create a Little Planet

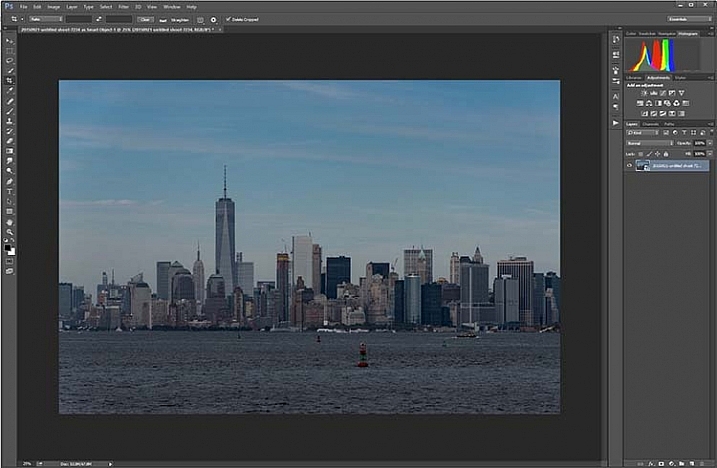
    Open the photo you want to use in Photoshop.

    1-leannecole-tutoria-photo-sphere

    Open photo in Photoshop.

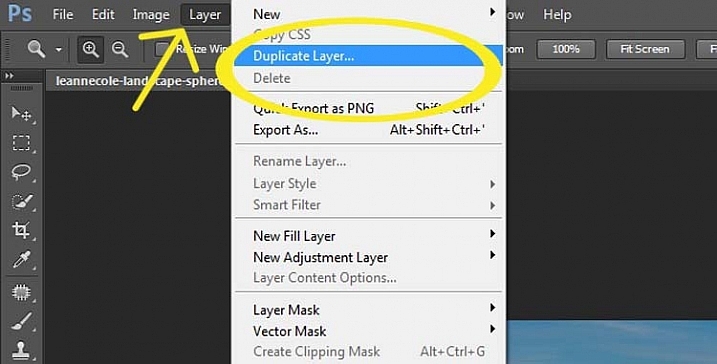
    The first thing to do is to duplicate the layer by pressing Ctrl+J (CMD+J on Mac). It can also be done by going up the main menu, clicking Layers > Duplicate Layer.

    16-leannecole-tutoria-photo-sphere

    Duplicate Layer

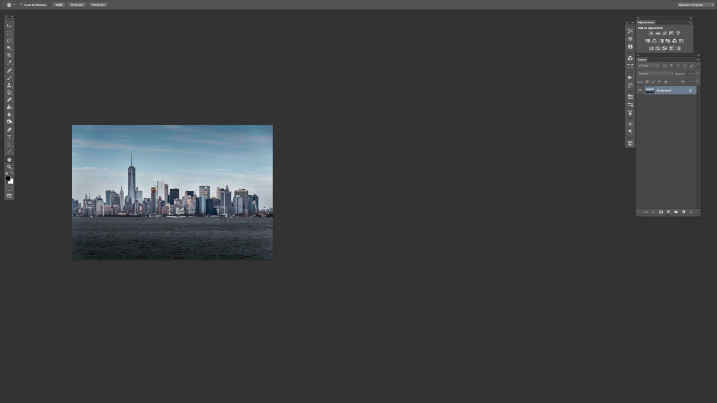
    You may need to make the image smaller on the screen using the magnifying tool. Make it small enough to only fill part of your current view, like so:

    Screen Shot 2015-12-21 at 1.18.59 PM (2)

    Turn on your rulers (Cmd+R on Mac, or Control+R on PC). Once they appear, right click on one and select percent to display on the rulers.

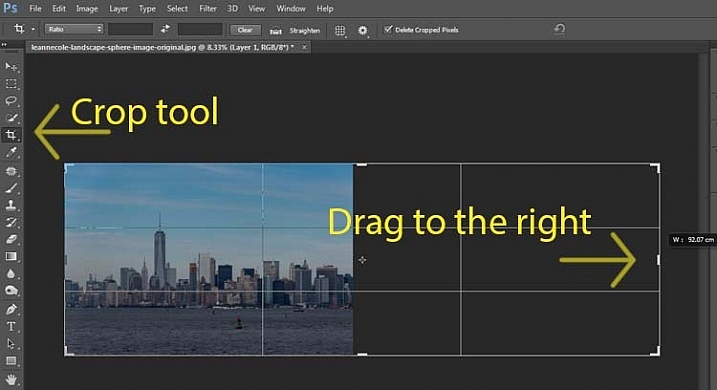
    Make sure you are on the Background Layer, and select the crop tool (keyboard shortcut is C). Click on the image to bring up the cropping frame. Grab the right edge marker, and drag it it to the right to enlarge the frame to twice the size of the image (watch the number as you drag, go until you get to 200%). Look at the following image.

    17-leannecole-tutoria-photo-sphere

    Extending the Image

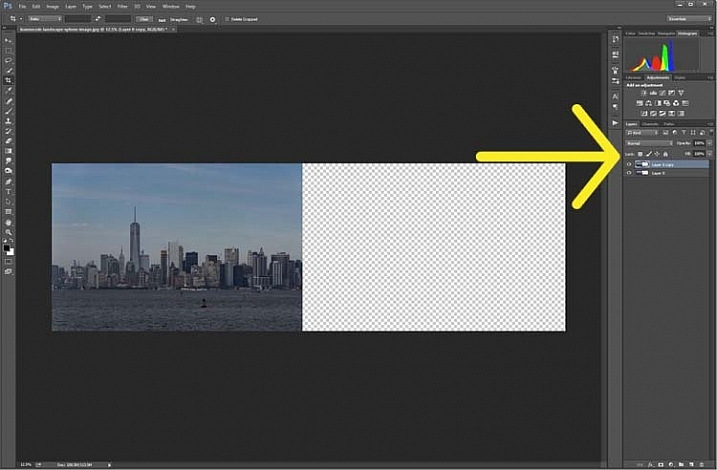
    Next, highlight the duplicated layer in the Layers panel, by clicking on that layer.

    4-leannecole-tutoria-photo-sphere

    Select the duplicate layer

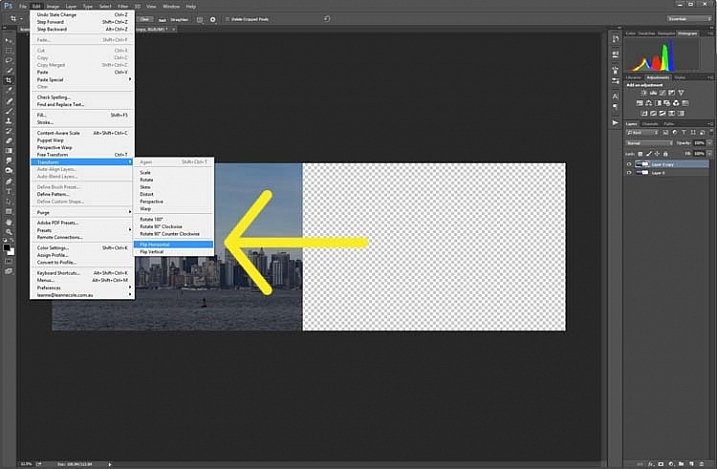
    This duplicated layer needs to be flipped horizontally. Go to: Edit > Transform > Flip Horizontal.

    5-leannecole-tutoria-photo-sphere

    Use Transform to flip the duplicate layer.

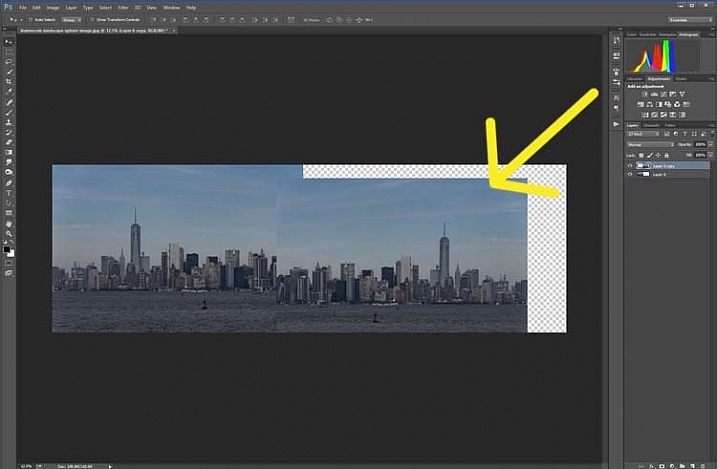
    Select the move tool (keyboard shortcut is: V) and move the duplicated image over to the right side until you have the two images touching in the middle.

    6-leannecole-tutoria-photo-sphere

    Use the move tool to put the duplicated, flipped image, into place.

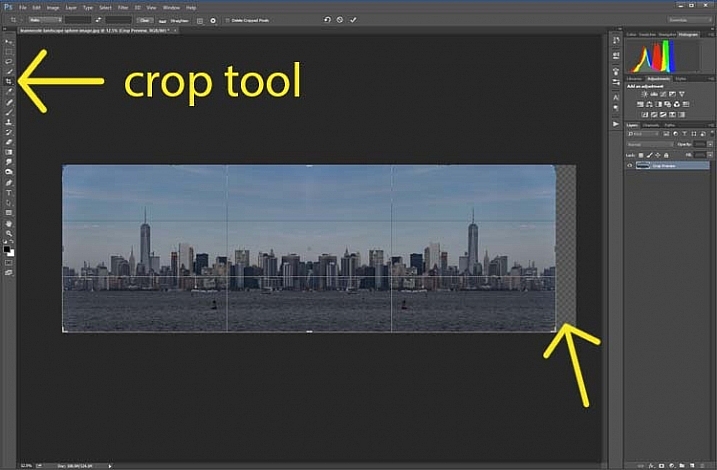
    Figure out where you want the images to meet in the middle. Sometimes overlapping them can make it look a little better. You will need to crop the image to remove some of the extra area that you created earlier.

    7-leannecole-tutoria-photo-sphere

    Crop the image to the edges of the image.

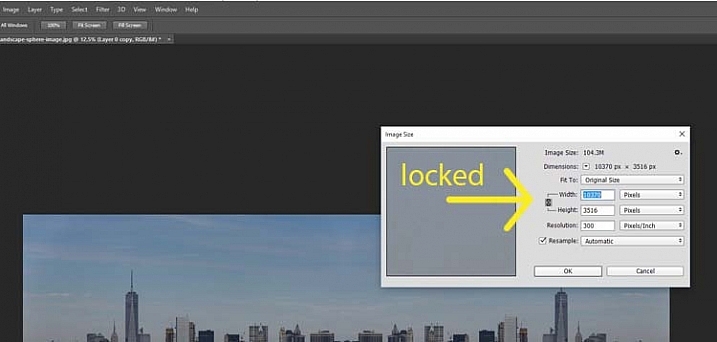
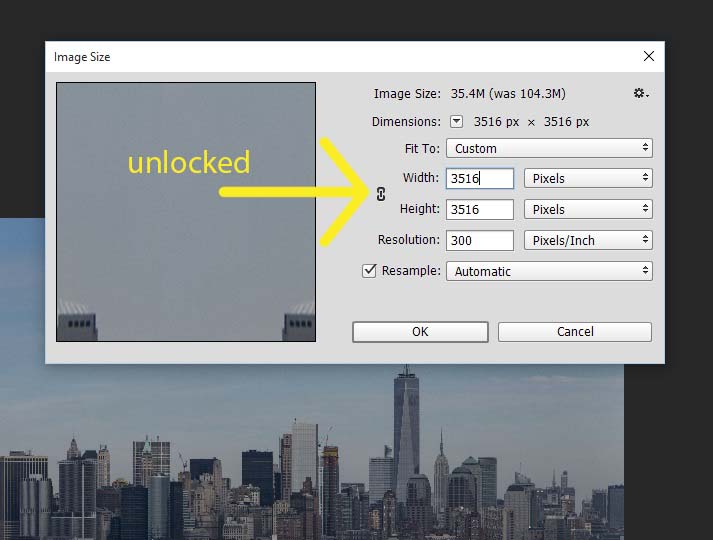
    To make the sphere, the image needs to be square, so go to the top menu and click Image > Image Size. When the window pops up, you need to unlock the part that automatically changes the height when you change the width (maintains the proportions). Click the lock (chain) icon to unlock it. Make the width the same as the height, and press okay.

    8-leannecole-tutoria-photo-sphere

    In the Image Size window the height and width are locked.

    9-leannecole-tutoria-photo-sphere

    Click on the lock to unlock image to make width the same as height.

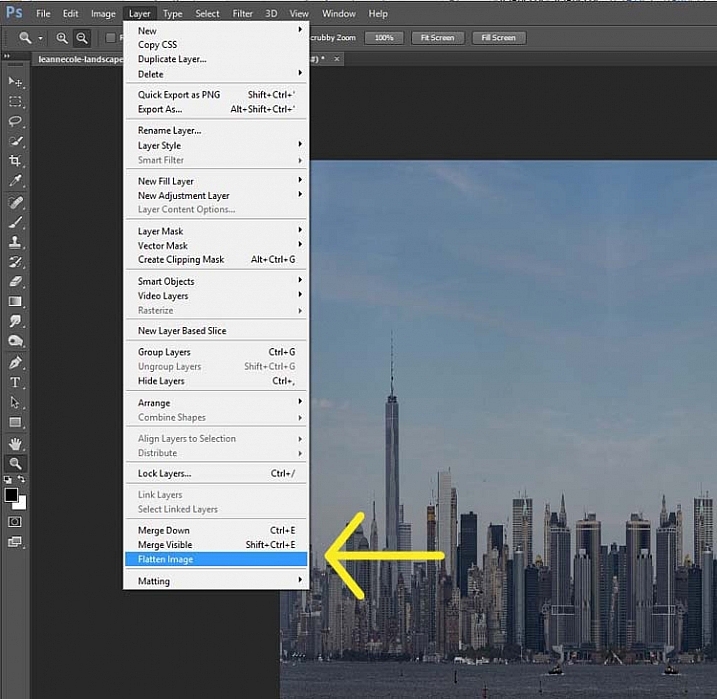
    Before you can make the sphere you should combine the layers. Go up to: Layers > Flatten Image. An easier way is to press Shift+Ctrl+E (Shift+Cmd+E on Mac), this will make them one layer (it merges all visible layers).

    10-leannecole-tutoria-photo-sphere

    Combine the layers.

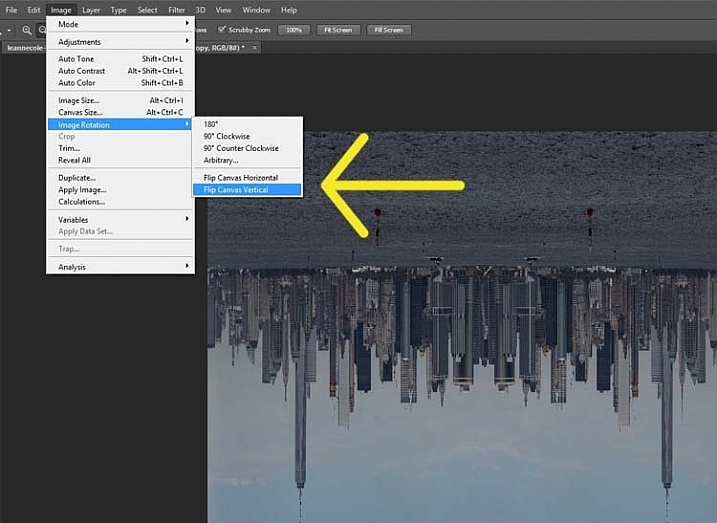
    You will also need to flip the image vertically. Go back to the main menu, select Image > Image Rotation > Flip Canvas Vertical.

    12-leannecole-tutoria-photo-sphere

    Flip image vertically.

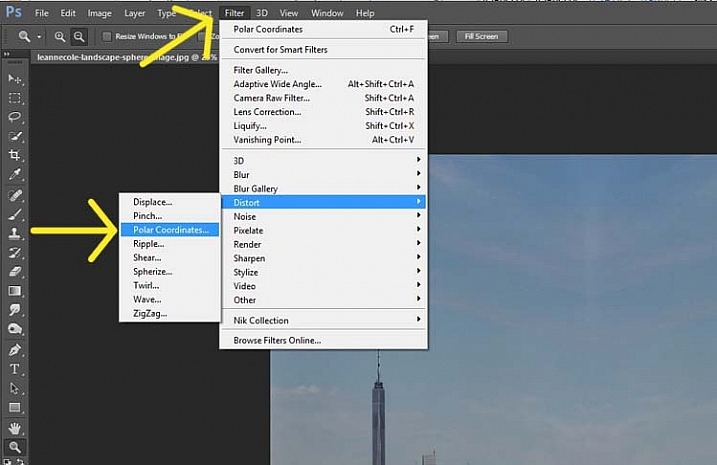
    Next, go to Filter >Distort > Polar Coordinates….

    11-leannecole-tutoria-photo-sphere

    Select Polar Coordinates in the Filter, Distort menu.

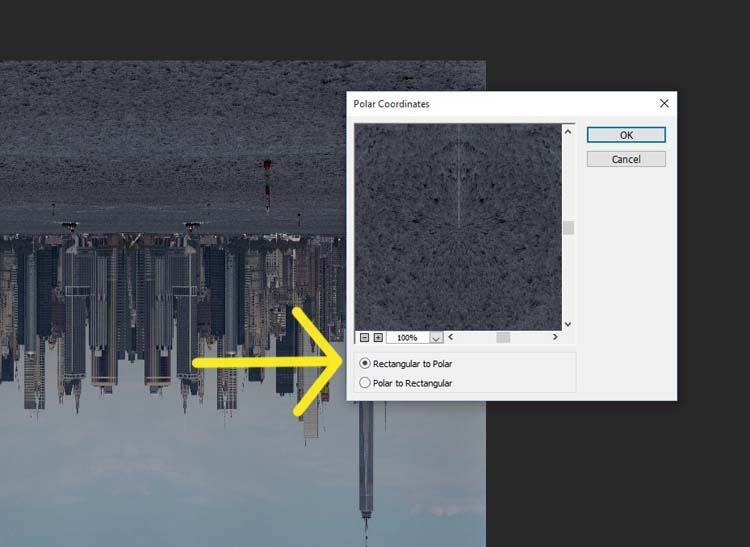
    When the popup window appears, select the option: Rectangular to Polar. Press OK.

    13-leannecole-tutoria-photo-sphere

    Choose rectangular to polar.

    Voila, your landscape sphere, which now looks like a little planet.

    14-leannecole-tutoria-photo-sphere-dps717px

    The world turned around.

    But, there is a gap where the images meet. This can easily be fixed with the Spot Healing Brush Tool. It is in the toolbox on the left side of the windows panel. Run the tool along where the images don’t quite connect.

    LeanneCole-landscape-sphere-done-0033-dps717px

    Landscape turned into a sphere or little planet.

    There you have your landscape sphere, or little planet image.

    You may want to crop it a little to make the planet bigger in the image, and to remove any things that have happened in the corners. You may also want to rotate it to get the view you want.

    You can do this with other types of images as well. You could try it with a panorama, then you don’t have to do the part where you copy the layer. However, you need to be aware that it may not come out as you expect, it can come out distorted.

    If you don’t flip the image vertically before applying the filter it will do the image in reverse. The image that I used for this article would then have the river on the outside, and the sky in the center (see image below).

    LeanneCole-landscape-sphere-done-0034-dps717px

    Result done the other way.

    As you can see there are no real uses for this except as a fun project. Try it and see what you can come up with, and please share your images in the comments below.

    googletag.cmd.push(function() {
    tablet_slots.push( googletag.defineSlot( “/1005424/_dPSv4_tab-all-article-bottom_(300×250)”, [300, 250], “pb-ad-78623” ).addService( googletag.pubads() ) ); } );

    googletag.cmd.push(function() {
    mobile_slots.push( googletag.defineSlot( “/1005424/_dPSv4_mob-all-article-bottom_(300×250)”, [300, 250], “pb-ad-78158” ).addService( googletag.pubads() ) ); } );

    The post How to Make a Little Planet Using Photoshop by Leanne Cole appeared first on Digital Photography School.

    Digital Photography School

  • Photograph Close to Home to Improve Your Photography

    Think about the most interesting place that you could possibly go to take an incredible photograph. What comes to mind?

    Maybe it’s Machu Picchu, New Zealand, Yosemite, a safari in Africa, a city like New York or Paris, or wherever is featured in the latest National Geographic Magazine. These locations are very special occasions for travel and photography. However, they are usually once in a lifetime trips, and once you are there, you often have a very limited amount of time for photographing, along with everything else planned.

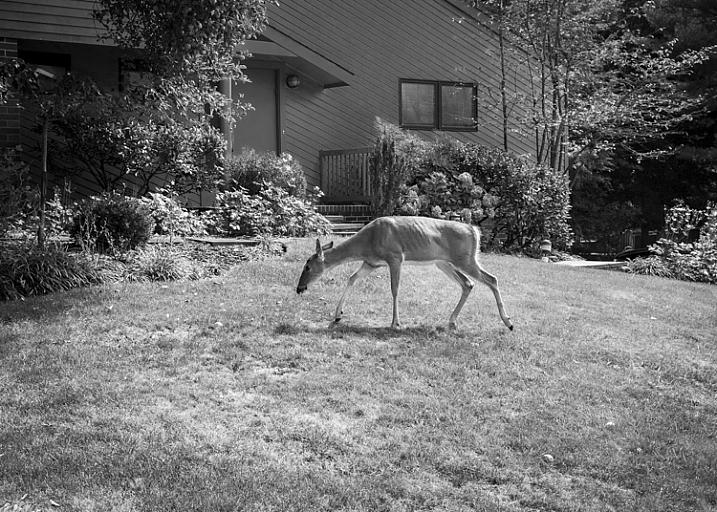
    Deer, Backyard, New Jersey by Neil Persh

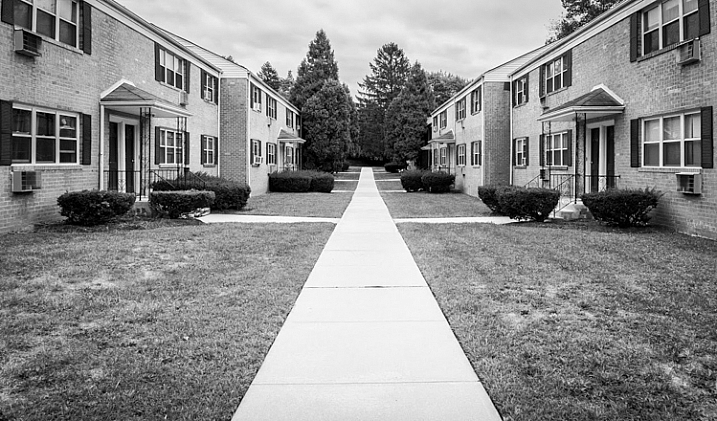
    All images in this article courtesy of my student, Neil Persh. Here is his backyard.

    So what if I told you that the most interesting place you could photograph is much easier to get to? It’s in your own neighborhood, and its surrounding locations.

    I am told fairly frequently by photographers and students that they cannot, or do not feel like, photographing where they live. “It’s too boring” they say, or “There’s nothing interesting to photograph. I only do my photography when I travel.”

    This is great of course, as passion for travel and photography go hand in hand, and it’s often when people do their best work. But, thinking that way can also make you miss the whole point of photography.

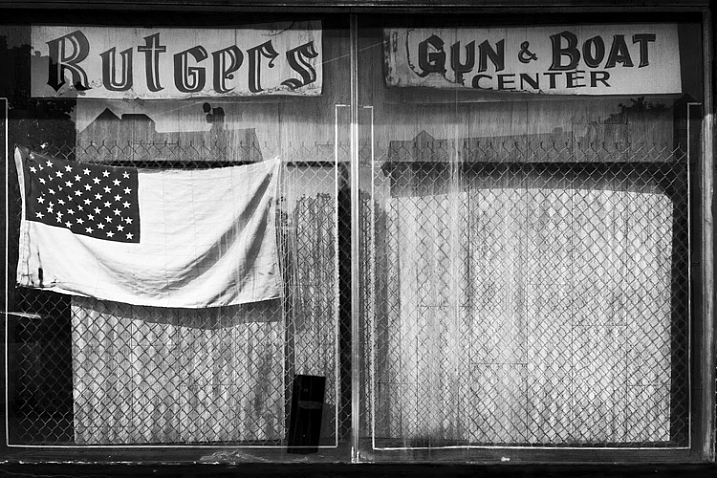
    Shop Window, Rutgers, New Jersey by Neil Persh

    Shop Window, Rutgers, New Jersey by Neil Persh.

    When students mention this to me, I get them to do a specific exercise, I suggest that you try it as well. Spend a few weeks photographing areas within close proximity to your house. Leave your home and go for a long walk in any random direction. Take it even further by thinking about the most uninteresting area that you can imagine photographing, and go there. Maybe it’s a mall parking lot, an empty street corner, or behind a convenience store. Stay there, and figure out how to take an interesting photograph.

    Many people tend to take their own location for granted. Your surroundings may seem routine and banal to you, but they’re not. If you were to take someone from a different part of the world, or from a different time period, and park them right where you are – they would probably find things very weird and fascinating. They would probably photograph so many things that you may currently be overlooking.

    Step outside, and try to see these areas in that way. What makes this area interesting? How are these scenes going to look as the world changes? How can you make these everyday things beautiful and interesting? Figure out why you might find an area uninspiring, and then photograph that. That is an fascinating idea in itself.

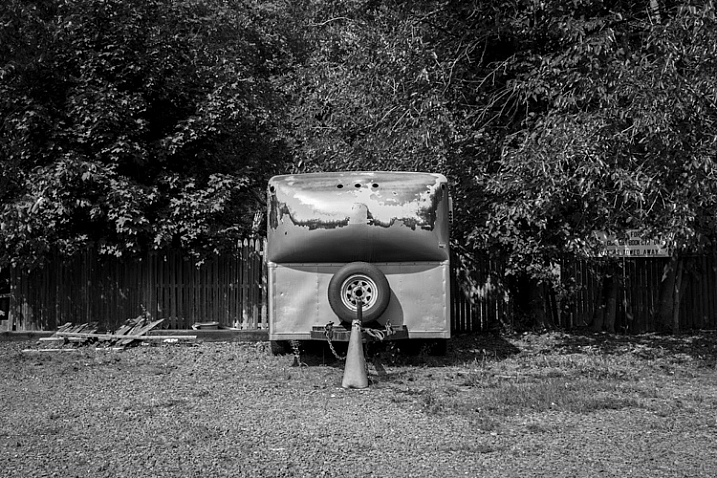
    Road, New Jersey by Neil Persh

    Road, New Jersey by Neil Persh.

    The most experienced photographers have learned how to take unique and interesting photographs anywhere. They usually do not take anything for granted. I think this is a skill that you can practice and learn, and it goes to the heart of what being a good photographer is all about. On a practical note, these areas are right outside your door, so you don’t have to pack up all your equipment and plan a lengthy trip. You can walk outside three times a week for 30 minutes with your camera, altering the times of day and the route. If you are a once or twice a month photographer, this will have you practicing much more often. This alone will make you a much better photographer, over the longterm.

    Photography is an exciting past-time. I first got into it for the simple fact that I liked to walk and daydream. As you improve and learn more about photography, as you eye better gear, as you think about creating grander images, and as you look at the work of well-traveled photographers on a daily basis, it can pull you away from this simple idea. One of most powerful aspects of photography is that it is a reason in itself to go and take an enjoyable walk. It is a reason to relax and daydream; it is an excuse to wander. It is also a great ice-breaker for meeting other people.

    Subdivision, New Jersey by Neil Persh

    Subdivision, New Jersey by Neil Persh.

    Take a look at the work of William Eggleston, Lee Friedlander, or Alec Soth. Look at some of the areas where they photographed. The places probably did not feel that special, or inspiring, to the photographers on the surface. But these photographers were able to see past it, and show in their images how the areas were unique.

    Any time that doubt creeps in, and you think that it is impossible to take a good photograph somewhere, I want you to stop yourself and slowly look around. Figure out how to take the best possible image that you can right there, and then go explore another block. Something new will be around the corner.

    New Jersey by Neil Persh

    New Jersey by Neil Persh.

    The work of one of my students, Neil Persh is shown throughout this article. Neil frequently takes day trips into New York City, along with traveling to many interesting places to capture wonderful images. His work in these areas has gotten very good, and he clearly has an enthusiasm and passion for photography that is contagious. However, when he had to go photograph his neighborhood for an assignment, he struggled with the idea for a while. Then, when he finally commit to it, he began to get over his trepidation, and started to photograph his area more frequently. I was blown away by the images. The work shown here was taken over months, not years, and I find them to be much different from what you normally see.

    You can do the same. Go for a walk this week!

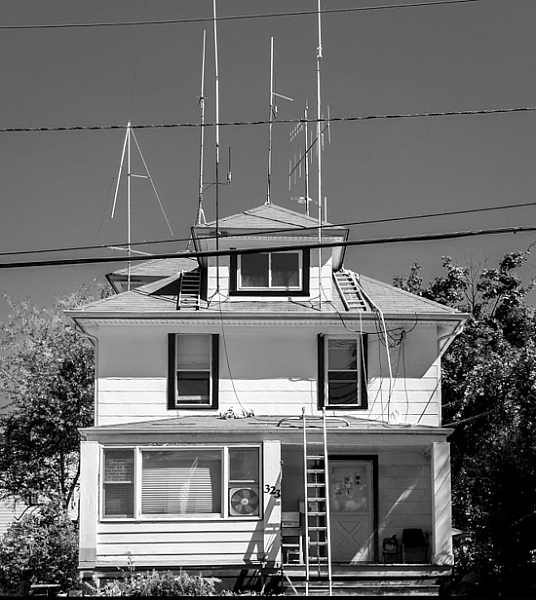
    Ham Radio Operator's House, New Jersey by Neil Persh

    Ham Radio Operator’s House, New Jersey by Neil Persh.

    googletag.cmd.push(function() {
    tablet_slots.push( googletag.defineSlot( “/1005424/_dPSv4_tab-all-article-bottom_(300×250)”, [300, 250], “pb-ad-78623” ).addService( googletag.pubads() ) ); } );

    googletag.cmd.push(function() {
    mobile_slots.push( googletag.defineSlot( “/1005424/_dPSv4_mob-all-article-bottom_(300×250)”, [300, 250], “pb-ad-78158” ).addService( googletag.pubads() ) ); } );

    The post Photograph Close to Home to Improve Your Photography by James Maher appeared first on Digital Photography School.

    Digital Photography School

  • 6 Tips for Doing a Successful 365 Photo Project

    Happy 2016, welcome to the start of a new year. This is a great time to start new projects – be it losing weight, getting fit by regularly exercising, committing to eating right, or improving and growing your photography knowledge and skill.

    We all have many different goals when it comes to our passion for photography. A great way to get started is by working on personal and professional photography projects. One simple yet effective way to work on your photography skills is to participate in a 365 Photo Project. Quite simply, a 365, as it is most often called, is a commitment to take a photo a day for 365 days straight. You can get as specific or as general as you like in terms of what you photograph, when you photograph, or even how you photograph. There are no set rules – the only requirement being you must take at least one photo each day, that counts towards your 365.

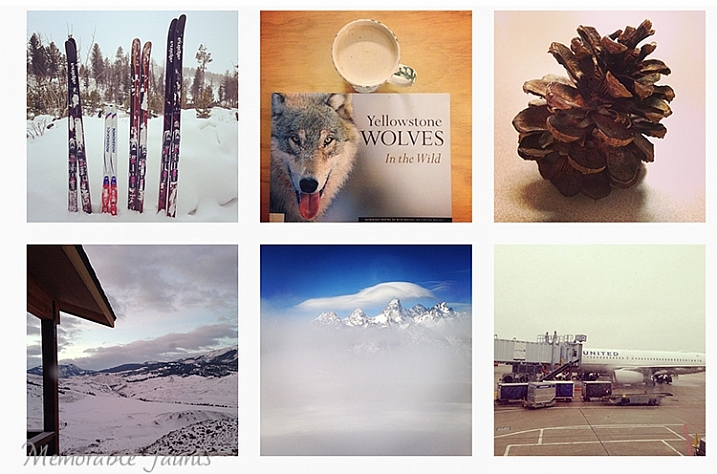
    365 Photo Collage

    A small collage from my 365 project done in 2014.

    That being said, there are some basic guidelines to successfully complete a 365 – a sort of dos and don’ts list, if you will.

    #1 Be honest about why you want to do a 365

    Talk to anyone, and you are bound to hear many different reasons why you should do a 365 photo project. Some people feel it improves your photography because you are consistently taking at least one picture a day. Others feel it is a fun way to document and record a year in your life. It is also a great way to experiment and learn about light, composition, subject, equipment, and develop and hone in on your observation skills.

    Since you know you have to take at least one photo every day, you are constantly looking for good photo opportunities everywhere, and tend to become more observant of your environment. No matter what your reason, be very clear on exactly why you want to start a 365, and document that as part of the process. This will help clarify your goals, and make the process more enjoyable.

    Processed with VSCOcam with t1 preset Memorable Jaunts DPS Article 365 Photo a day article 03

    #2 Create a routine for your 365

    Just like anything else in life, having a routine provides a sense of organization. Figure out when is your best time to photograph, and stick to that routine. For me, the best time is around 9:00-10:30 a.m. It is early enough in the morning when my brain is quite active, there are no distractions, and the morning light is quite clean and bright. Of course that is not to say that I don’t photograph at other times of the day, but when I am working on a project, or an assignment, that’s my go-to time. And yes, I do treat my 365 as an assignment. The only difference is that I am my own client!

    Memorable-Jaunts-365-Example

    My general task list for my 365 -generally, all it takes is 10 minutes of my time:

    • Shoot 365 photo – five minutes
    • Edit photo – two minutes
    • Load to Dropbox – 30 seconds
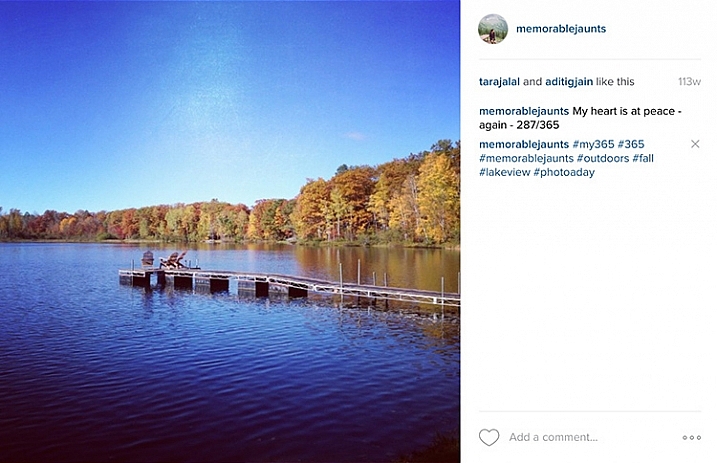
    • Post on Instagram – 30 seconds
    • Write a caption and one line description for the image – one minute
    • Add hashtags – one minute
    • Total – 10 minutes approximately

    #3 Set your own prompts or join a 365 group

    In my opinion, this is the hardest part of doing a 365. The proverbial, “What do I photograph?”. Luckily there are so many of us doing 365 projects, that there are online groups you can join to get daily or weekly prompts sent to your inbox. Here are a few:

    • Project 365 Flickr group
    • 365 Project website
    • The 365 Make 1 shot per day, for 1 year – Flickr group

    The other option is to completely customize the project, and work from your own prompts, or inspirational triggers. You might only want to photograph your breakfast, your pet, or your children. You may want to focus on modes of transportation. No matter what the prompt, I recommend creating a list or a journal to document them. That way you know what you have already photographed, and what comes next.

    Memorable Jaunts DPS Article 365 Photo a day article 07

    I try to follow this general prompt weekly for my 365. Sometimes, I deviate from it, and for me that’s okay!

    • Monday – Inspire
    • Tuesday – Food
    • Wednesday – Nature of the outdoors
    • Thursday – Indoors
    • Friday – Family
    • Saturday – Personal
    • Sunday – Fun day (anything goes)

    Memorable Jaunts DPS Article on 365 photo series 05

    #4 Choose the tools of the trade

    Choose a camera – any camera! If you want to improve on your mobile camera skills go for it. Did you get a new camera for Christmas? Use a 365 photo project as a great way to learn the workings of your new toy. After all, practice makes perfect, and there is nothing like practicing everyday to get you comfortable with using that new camera.

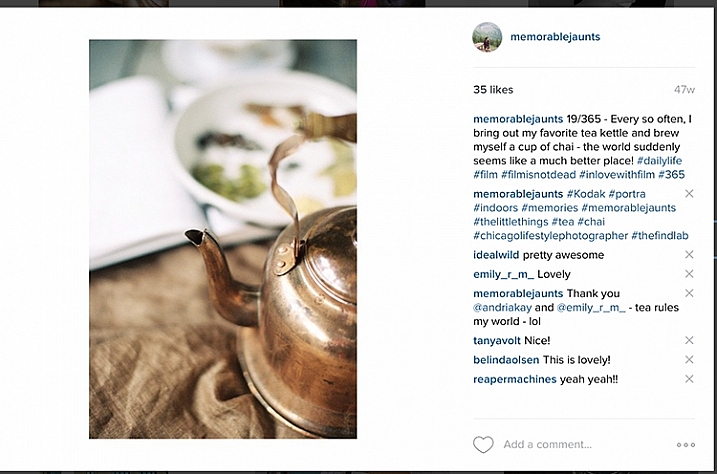
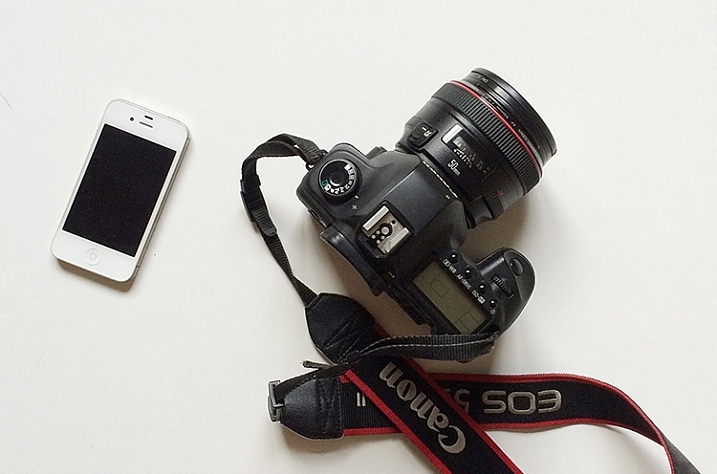
    Regardless of what tool you use, makes sure that it is something achievable. I find my DSLR to be cumbersome at times, and not easy to carry around with me for smaller errands in town. So instead, for my 365 photo project, I use a combination of iPhone and DSLR, which gives me the flexibility I need.

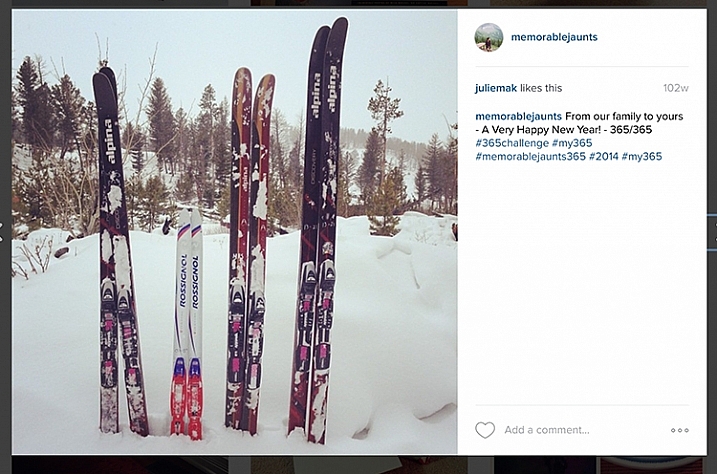
    The other common question that most people want to know is how to document the project. My 365 medium of choice is Instagram. I love this platform, as it brings forth a great sense of community and creativity. By posting my images, and using the #365 hashtag, I am instantly part of a large group of people who are in the same project. It keeps me motivated and on track. I know a lot of people who post a collage of images on their social media channels, rather than a picture a day. This does not mean they don’t photograph one picture a day, but rather they just share their images once a week, or a month at a time.

    Memorable Jaunts Gear for executing a 365 photo a day series article for DPS

    These are the only two tools I use for my 365. When an image is from my DSLR, I can use the #dslr365 in Instagram to separate the two (not a required step but I like to do it just for my reference).

    #5 Learn to forgive and move on

    Who knew that doing a 365 can also be a great way to learn basic life lessons! The age old adage to forgive and forget is very relevant while participating in a 365. Sometimes things happen and you end up missing a day, or several days in a row. It is not the end of the world. Acknowledge it, accept it and move on. Either you can catch up, and post more than one picture the next day, or just mark it off as missed and go forward. The key here is to keep moving forward. Otherwise days turn into weeks, that turn into months, and before you know it, the 365 has long been forgotten and abandoned.

    Memorable Jaunts Photo a day 365 example article for DPS

    One of my favorites from my last 365. I did miss a few days here and there but the memories that I was able to capture still make me smile to this day!

    #6 Success, completion, and what’s next

    A 365 photo project is definitely a commitment. One that takes time and effort on your part, but the rewards are quite satisfying. To me, completing a 365 photo project provides a sense of achievement and accomplishment. In my mind it’s not an easy task, and I do celebrate my success!

    Print all, or some of your best images, and create a collage of photos. Create a photo book specific to your 365. The possibilities are endless. My 365 photo project lives on my Instagram feed only, and I like printing my favorites. There are several companies that also provide the option of printing Instagram images. I have used Artifact Uprising in the past, but Blurb and Shutterfly are a few other companies that come to mind.

    Memorable Jaunts DPS Article 365 Photo a day article 08 Memorable Jaunts DPS Article 365 Photo a day article 05

    Note: If you use Lightroom you can create a Blurb book and order it directly from within the software, all right from your original camera files.

    Once you have completed your 365 photo series, my recommendation would be to take a break. Jumping right in to another 365 can be a bit much. That’s not to say that people don’t do it, and be successful. Many people absolutely love doing 365 photo projects, and have consistently done it for several years at a stretch.

    Personally, I like a variety of challenges in my photographic journey. After completing a 365 photo project in 2014, I took a break and focused on other things. Now I am ready to get back into the game and will be starting a 365 photo series in 2016 on my Instagram. Join me if you want to and lets motivate each other to take a photo a day for 365 days!

    googletag.cmd.push(function() {
    tablet_slots.push( googletag.defineSlot( “/1005424/_dPSv4_tab-all-article-bottom_(300×250)”, [300, 250], “pb-ad-78623” ).addService( googletag.pubads() ) ); } );

    googletag.cmd.push(function() {
    mobile_slots.push( googletag.defineSlot( “/1005424/_dPSv4_mob-all-article-bottom_(300×250)”, [300, 250], “pb-ad-78158” ).addService( googletag.pubads() ) ); } );

    The post 6 Tips for Doing a Successful 365 Photo Project by Karthika Gupta appeared first on Digital Photography School.

    Digital Photography School

  • 50 Photoshop & Lightroom Photo Editing Tutorials to Enhance Your Images

    Photoshop and Lightroom are awesome tools for photographers, professionals and amateurs alike. While Lightroom is considered the most comprehensive tool to do some basic image editing, such as fixing exposure, white balance, and contrast, Photoshop is often chosen by photographers for further creative processing. Without a doubt, Photoshop is a powerful program with huge possibilities. However, once you really dig Continue Reading

    The post 50 Photoshop & Lightroom Photo Editing Tutorials to Enhance Your Images appeared first on Photodoto.


    Photodoto

  • How to Build an LED Light and Make an Orb

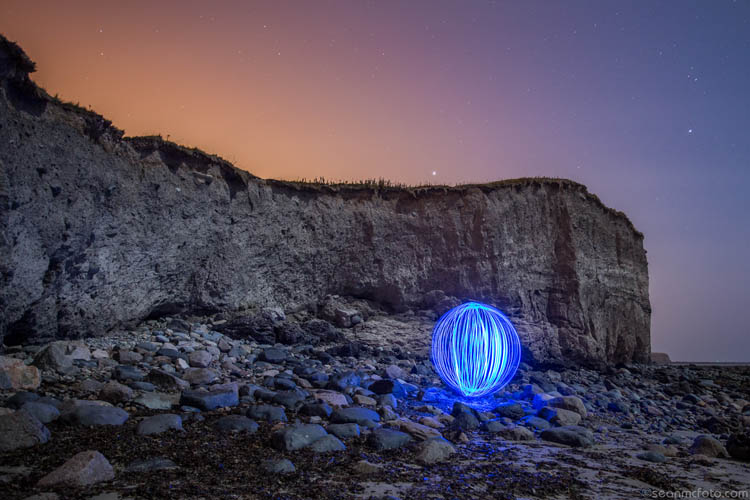
    Orb15

    This article will tell you all about the what, where and when of orbs. Let’s start by defining them.

    What’s an orb?

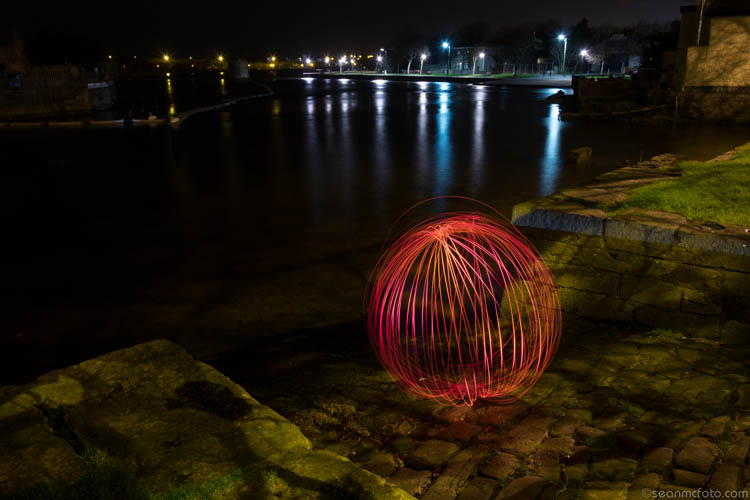
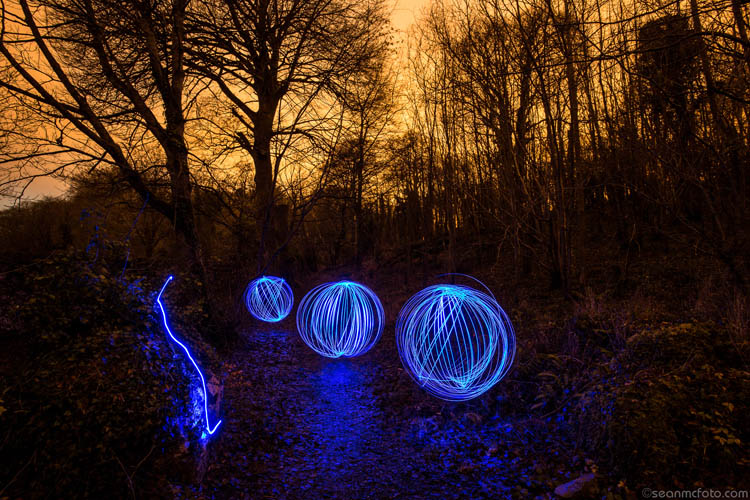
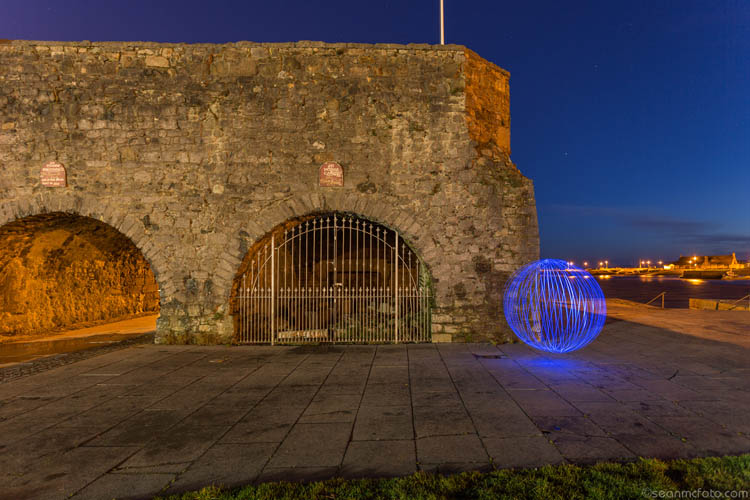
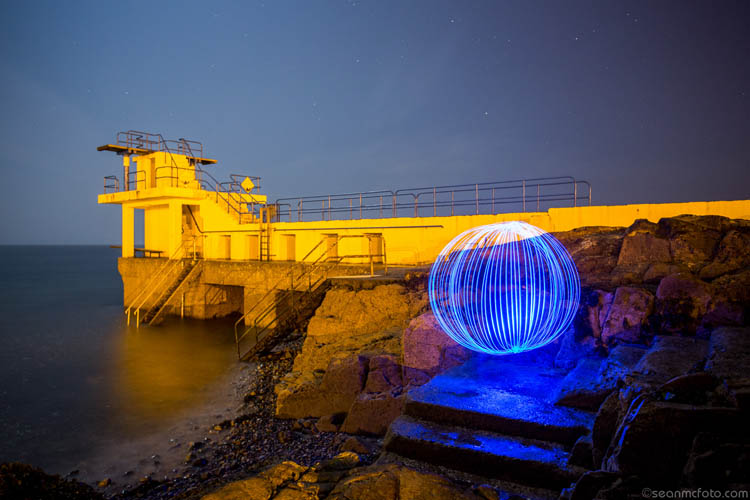
    Well it’s both a cool, and fun, method of light painting that anyone can do. Basically you make a circuit with some LEDs (light emitting diodes), a battery, some wire, and a switch. You weight the LEDs, and then spin these in a circle as you move around a fixed point. Shot outside in the evening using a long exposure, this spinning creates a really cool looking sphere. By using different LEDs, you can make these spheres (called orbs) in different colors. There’s a small bit of tech involved in building them, but it’s not super hard. It’s also a project you can very definitely do with your preteen or early teen child.

    Orb01

    Equipment needed

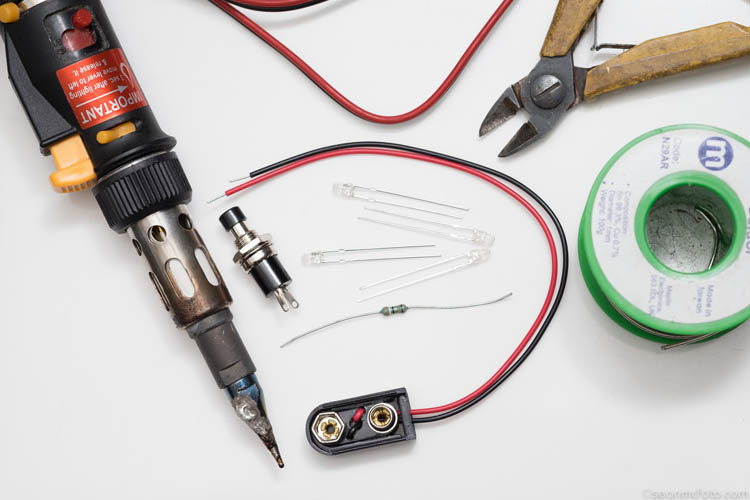
    The minimum you need to make an orb is:

    • An LED (or a few LEDs to make it brighter)
    • Battery
    • Battery Clip
    • Push button to make a switch
    • Wire
    • A weight: literally anything to make the LED at the end of the wire heavy, so it spins easily
    • Resistor(s): The value depends on the type and number of LEDs you use
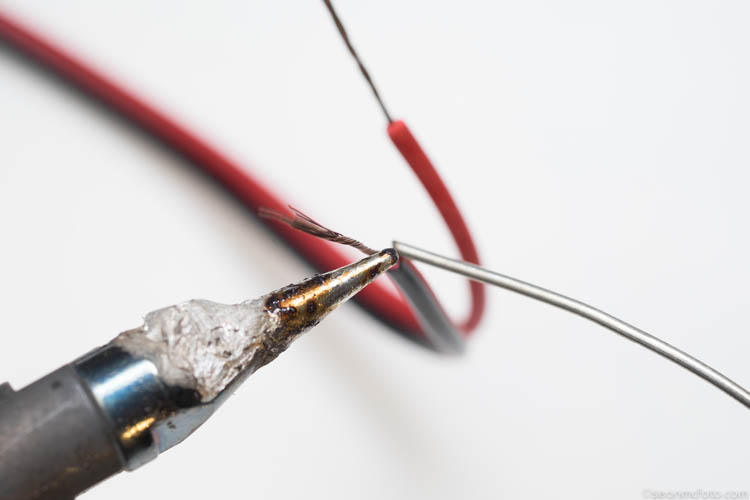
    • Soldering iron, solder, wire cutters, and PVC tape

    Orb02

    Building your LED light

    Note from the Editor: Please take extreme safety precautions if you attempt this yourself. If you are not familiar with electronics get help from a friend or someone who is an expert.

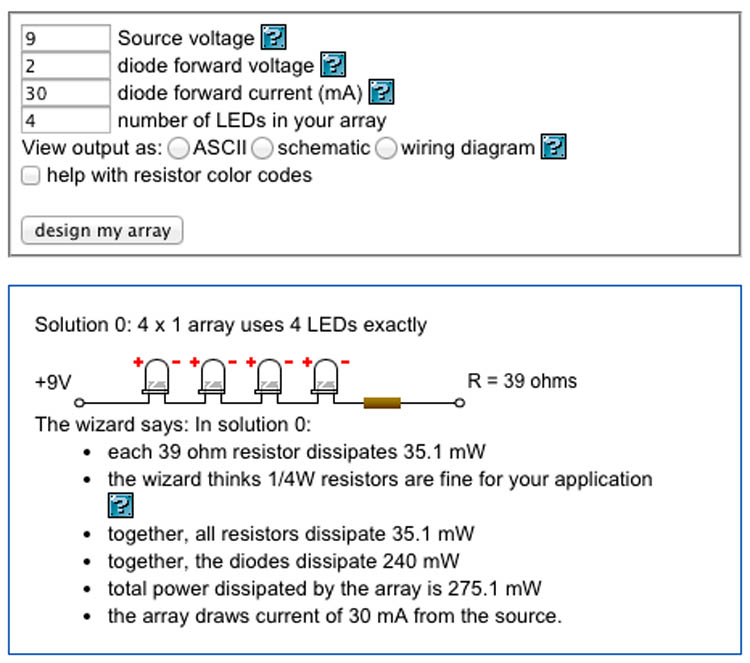
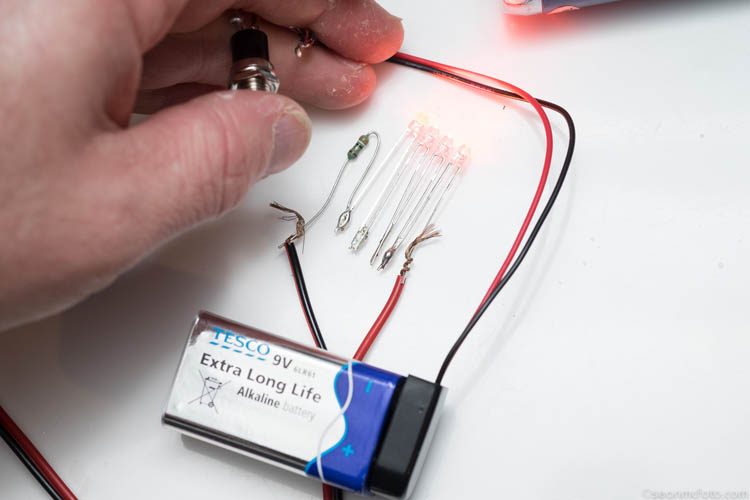
    Now for the tech bit. Attaching an LED to a battery can fry the LED. So to protect it, you need to use a resistor. You may need more than one if you use an array of LEDs. Use this LED Array Wizard, and finding the values is painless. You can enter in information about the LEDs into the wizard and get both the circuit, and the resistor values.

    I bought the parts for this orb locally from a Maplin store (UK based), but you can get them from any electronics components store . Make sure to find the LED Forward Voltage (often 2-3.3 volts) and the current (often 20-30mA) for the LED Array. For this project I got four orange super-bright LEDs, with a forward voltage of 2v and current of 30mA. The wizard suggested I wire them in series and use a 39ohm resistor. (As it turned out, I had two red and two orange LEDs).

    Orb03

    Soldering this together takes a little skill. The trick is to tin the wires, LED Legs, etc., before bringing them together to solder the connection. Pay attention to the connections.

    Orb04

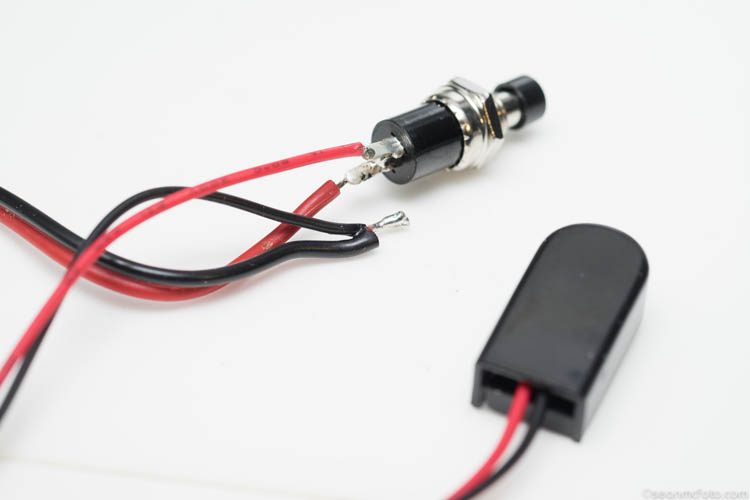
    The red wire from the battery clip should go to the switch, and the black wire should go (via the other wire) to the negative legs of the LED Array (or resistor in this case). From the other side of the switch, the wire should go the the positive side of the LED Array.

    Orb05

    For the array, make sure to connect the LEDs correctly, as they only work in one direction. Generally one leg is longer than the other, indicating the positive terminal. Follow the wizard circuit to be safe. The resistor can be wired in any direction. Wire the array, then connect the wires from the switch, and test the circuit before committing to the final solder.

    Orb06

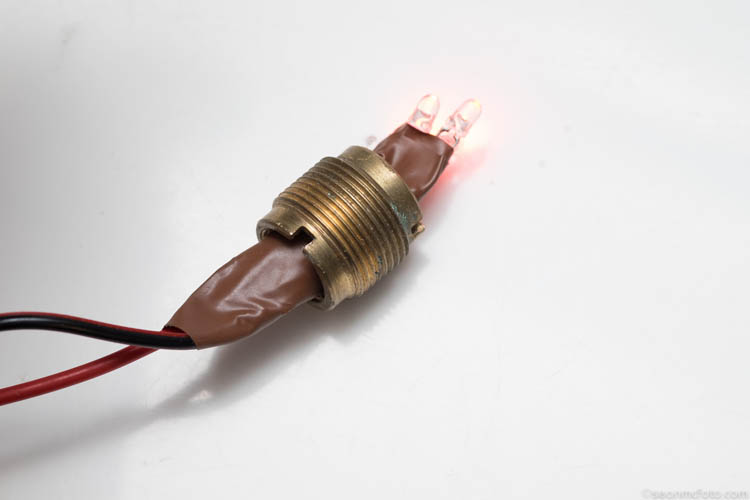
    I’ve used an old adaptor nut as a weight. Even if your weight might fit over the LEDs, put it on the cable before the final solder, just in case. Once you’ve done the soldering, test again, and then use insulation tape (PVC tape) to wrap around each LED leg and the resistors, making sure none of them can touch any other. A short here could prevent the orb from working.

    Orb07

    Use the tape to secure your weight. Give it a test spin. You should be able to hold the battery and switch in one hand, and spin with the other. Practice getting the spin right, before pressing the switch.

    Spinning technique to make the orb

    You’re nearly ready for the real deal, your first orb shot! But first, you need to master a key technique – centering the orb. The first thought is to spin the orb around yourself, but this won’t actually make an orb, it just makes a mess. I mean it looks okay, but it’s not an orb. To get an orb, the center of the spin must be static. Essentially you need to shuffle around your spinning hand to make it work. A great tip is to put something on the ground – a coin helps because you can see the light hit it – and spin above it.

    It takes practice to get perfect, and plenty of my orbs are not perfect, but they still look okay. They are loads of fun either way! Some people shuffle forwards, I tend to shuffle backwards. See which one suits you best.

    Camera settings

    Next you need to know how to set the camera. Here’s the exact setting to use: er… there is none. It depends on what you want in the photo. You need the exposure to capture the LEDs, and your surrounding area, at night or somewhere dark usually. This means a minimum of 30 seconds, but generally longer. So, you need to use Bulb mode on your camera, along with a remote cable. It may be obvious, but you’ll need a tripod to hold the camera steady during the exposure.

    Bulb mode means the camera will record the image, as long as the shutter button is held down. If you use a remote cable with a button lock, you can set the remote, walk off, do your orb, come back to the camera, and then release the lock to end the exposure. As long as the button is held, the camera will continue exposing.

    Orb08

    Take an initial test shot of your location with settings of about 30 seconds at f/8, ISO 100 (see image above). You’re checking that the location will expose correctly first. Change the settings to get the exposure you need. If you’re on your own, use the 10 second timer on the camera to allow yourself enough time to get to your start position. Swing the orb, and once it’s moving, press the switch to light it up. Spin around a fixed point as recommended. That’s it. Go check your camera at the end and then refine your exposure.

    Orb09

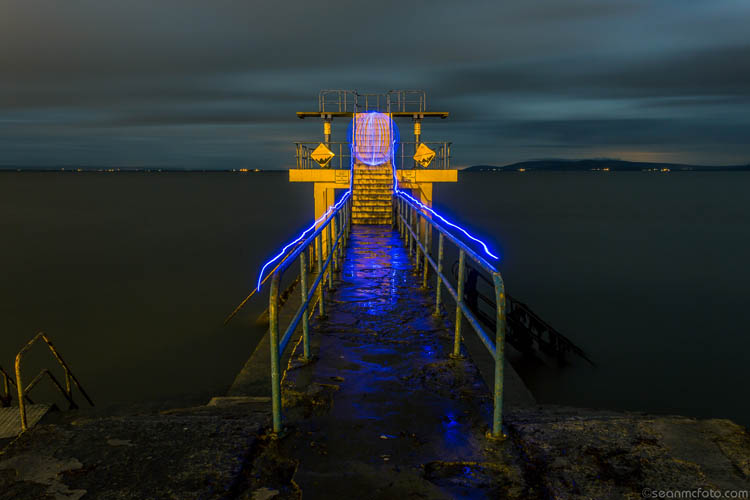
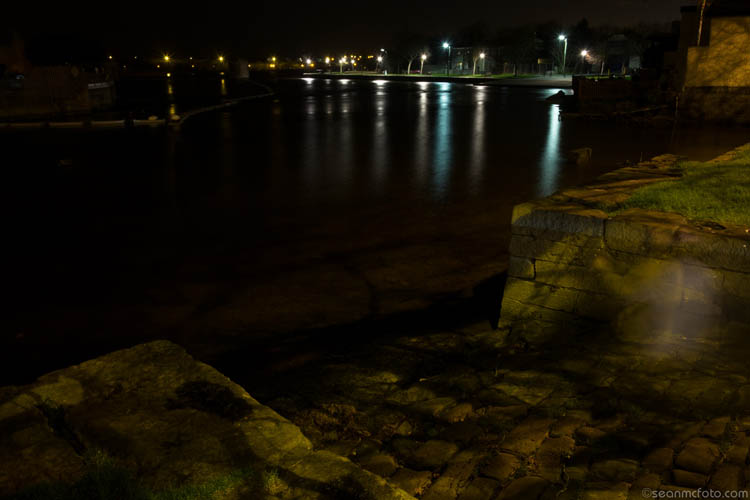
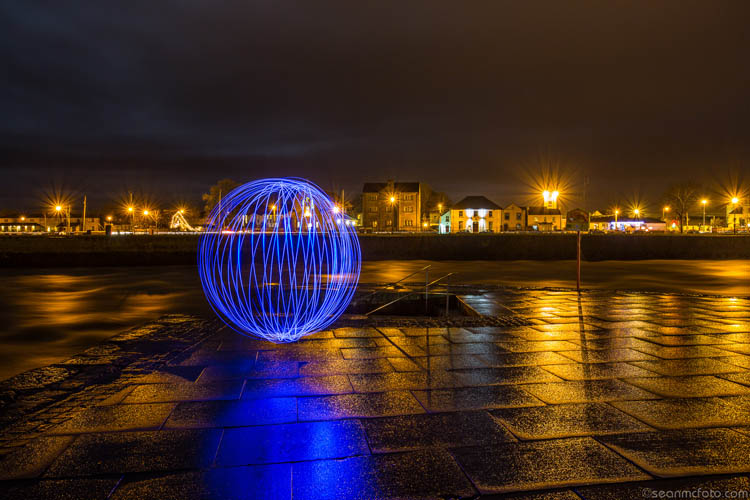
    Anywhere that the orb looks out of place makes for a great shot. Also wet ground or still water is great, as you get reflections of the orb as well.

    Orb10

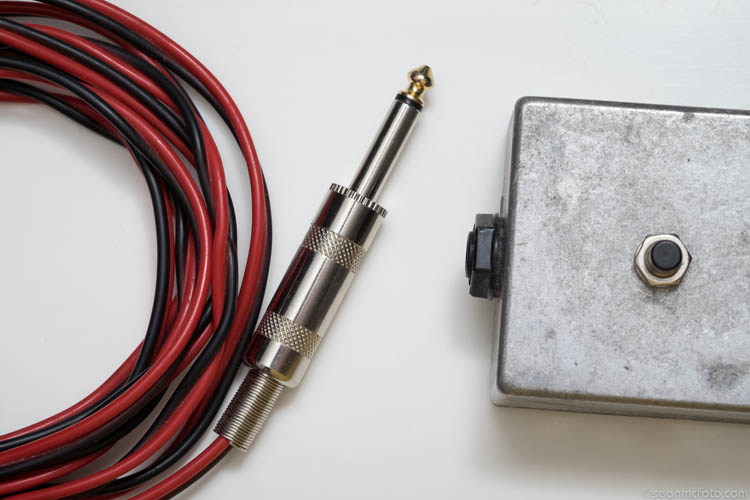
    Once you’ve gotten the bug, you’ll realize that the battery area is a bit flimsy and needs something more solid. For my own orbs, I put the battery and switch into a metal box with a 1/4 inch jack socket. I added a matching jack plug to the cable, replacing the battery and switch. That way I can use one box with a number of different coloured orbs. That’s a project for another day. Have fun making your orbs!

    Orb11

    Orb12

    Orb13

    Orb14

    Have you ever tried this technique before? Or are you itching to try this? If you do – please share your images, and any questions, in the comments below.

    googletag.cmd.push(function() {
    tablet_slots.push( googletag.defineSlot( “/1005424/_dPSv4_tab-all-article-bottom_(300×250)”, [300, 250], “pb-ad-78623” ).addService( googletag.pubads() ) ); } );

    googletag.cmd.push(function() {
    mobile_slots.push( googletag.defineSlot( “/1005424/_dPSv4_mob-all-article-bottom_(300×250)”, [300, 250], “pb-ad-78158” ).addService( googletag.pubads() ) ); } );

    The post How to Build an LED Light and Make an Orb by Sean McCormack appeared first on Digital Photography School.

    Digital Photography School

  • Overview of Several New Sony Cameras

    Sony has released several new cameras over the last few months including:

    • The Sony Cyber-shot RX10 Mark II all-in-one camera
    • The Sony A7RII mirrorless camera
    • The Sony A7SII mirrorless camera
    • The Sony Cyber-shot RX1R Mark II full frame fixed lens camera

    In these two videos you can get an overview of these cameras’ features and get an idea of which one might be right for you if you’re in the market for a camera:

    First up the Cyber-shot RX10 Mark II:

    B&H Photo does a good job going over the features of this camera and some of its strengths, including 4K video.

    More Sony options – by Adorama TV

    Adorama interviews Sony rep, Mike, about some of their A7 line-up.

    Have you tried any of these cameras? Still want more info?  Try this pages:

    • The 19 Most Popular Compact System and Mirrorless Cameras with Our Readers
    • The 20 Most Popular DSLRs Among our Readers

    Add your comments below if you’ve given any of these a test drive.

    googletag.cmd.push(function() {
    tablet_slots.push( googletag.defineSlot( “/1005424/_dPSv4_tab-all-article-bottom_(300×250)”, [300, 250], “pb-ad-78623” ).addService( googletag.pubads() ) ); } );

    googletag.cmd.push(function() {
    mobile_slots.push( googletag.defineSlot( “/1005424/_dPSv4_mob-all-article-bottom_(300×250)”, [300, 250], “pb-ad-78158” ).addService( googletag.pubads() ) ); } );

    The post Overview of Several New Sony Cameras by Darlene Hildebrandt appeared first on Digital Photography School.

    Digital Photography School

  • How well do you know the Lightroom interface? Take this quiz and find out

    lightroom interface quiz lead image

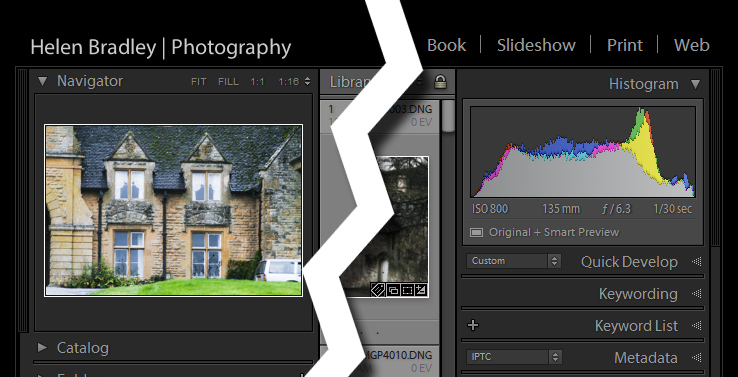
    When you’re new to Lightroom there are lots of things about the Lightroom interface that contribute to its steep learning curve. Most Lightroom users can tell you a story or two of being caught by items appearing, or disappearing, without warning. With experience these are minor inconveniences, but when you are new to Lightroom, they can be overwhelming. So, just how much do you know about the Lightroom interface? Take this quiz and find out:

    Question #1

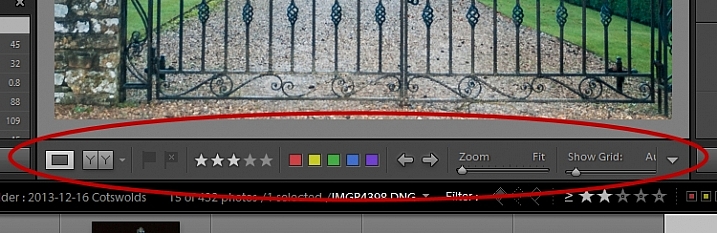
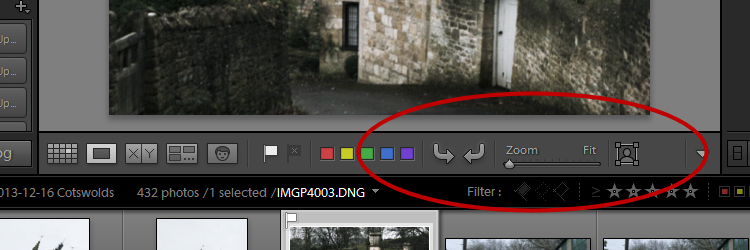
    What is this and how do you get it back if it disappears?
    Lightroom Interface Quiz - image for question 1

    Answer:

    That is the Toolbar, and you can display or hide it by pressing the letter T on your keyboard. You can also choose View > Hide Toolbar or View > Show Toolbar depending on whether it is currently visible or not. There is a toolbar in every module in Lightroom.

    Question #2

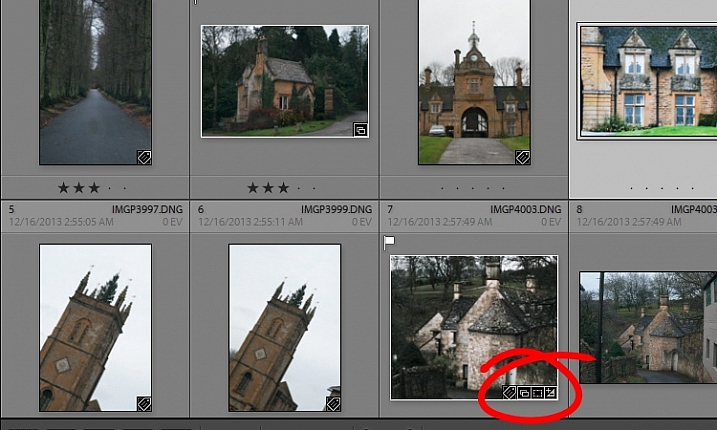
    When you used Lightroom recently, you recall seeing small indicators like this in the bottom right corner of some of your images. What are they and how do you get them back if they’re not showing in grid view?

    Lightroom Interface Quiz - image for question 2

    Answer:

    These are Thumbnail Badges, and they indicate whether or not an image has been cropped, has develop presets, keywords added, and so on. In the Library module pressing the letter J will toggle through a number of options for your grid view, two of which include thumbnail badges.

    Question #3

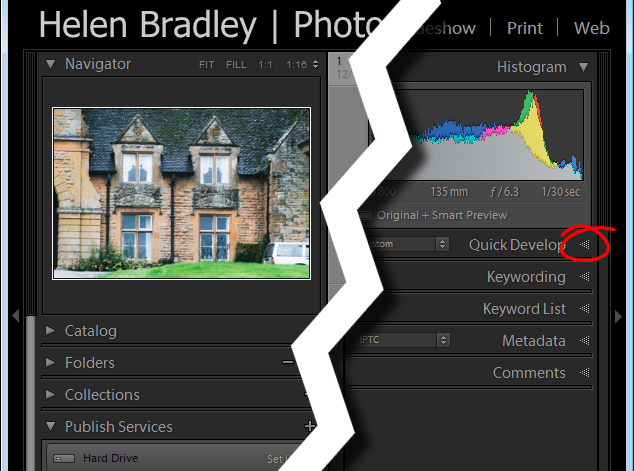
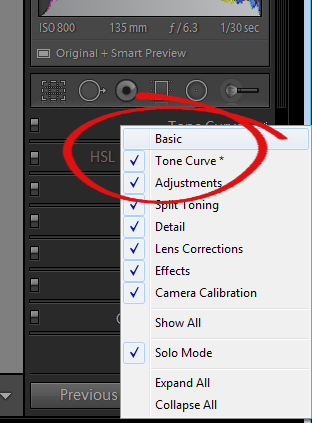
    Most panels show filled in triangles like the one on the left (below), but one of the panels has a triangles like the one on the right (also below). Why is it different?

    Lightroom interface quiz - image for question 3

    Answer:

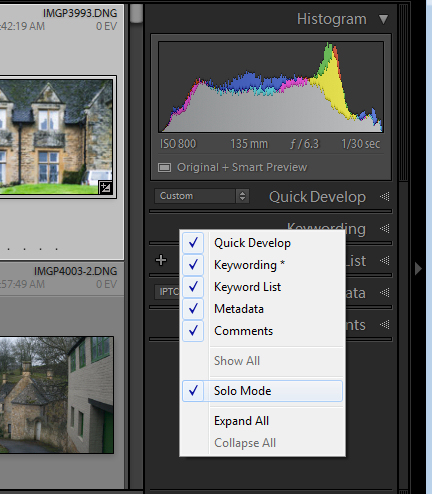
    The second panel on the right is set to what is called Solo Mode. When this option is enabled, and you click to open any of the panels, all other panels will close automatically (essentially leaving only one opened at a time). The Navigator and the Histogram are exceptions to this rule and they operate independently of Solo Mode. To enable or disable Solo Mode, right click on the name of any panel (the actual word not the triangle) and choose Solo Mode from the options given (see below).

    Lightroom interface quiz - image for question 3

    Question #4

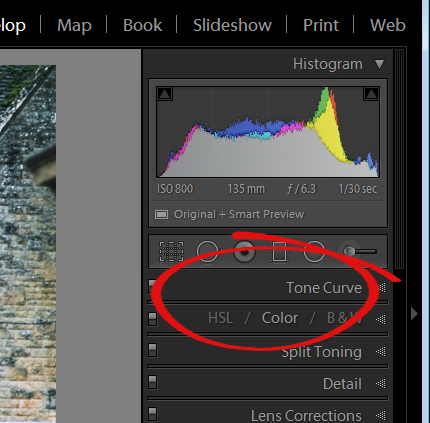
    This is the Develop module and the Basic panel is missing. What has happened and how do you get it back?

    Lightroom interface quiz - image for question 4

    Answer:

    Any panel can be enabled or disabled in Lightroom. If you’re missing a panel, right click another panel in that same sidebar to display the panel list. Any panel name without a checkmark isn’t visible, so to make it visible, just click the panel name.

    Lightroom interface quiz - image for question 4

    Question #5

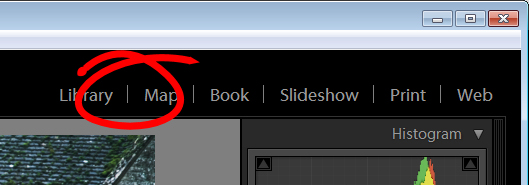
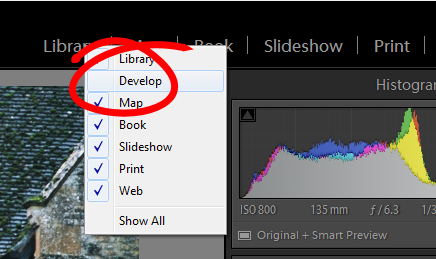
    This is the list of Lightroom modules. A module is missing, what is it and how do you get it back?

    Lightroom interface quiz - image for question 5

    Answer:

    The Develop module is missing. You get it back the same way as you would a missing panel, right click any of the module names to show a list of modules. Any that do not have checkmarks beside them are not visible. Select that one to display it.

    Lightroom interface quiz - image for question 5

    Question #6

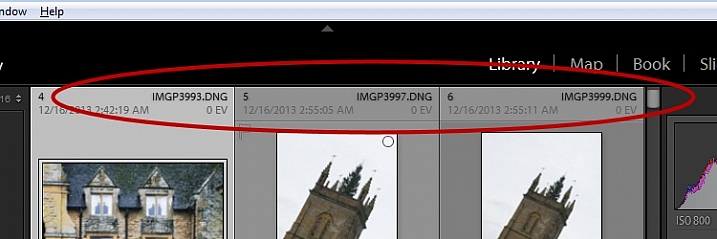
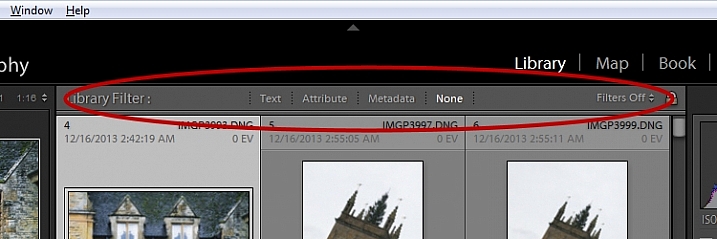
    There used to be a panel here in Lightroom just above the thumbnails in grid view in the Library module. It’s disappeared. What is it, and how would you get it back?

    Lightroom interface quiz - image for question 6

    Answer:

    This is the Filter bar, and you can display or hide it by pressing the Backslash key (\). You can also display or hide it by choosing View > Show Filter Bar.

    Lightroom interface quiz - image for question 6

    Question #7

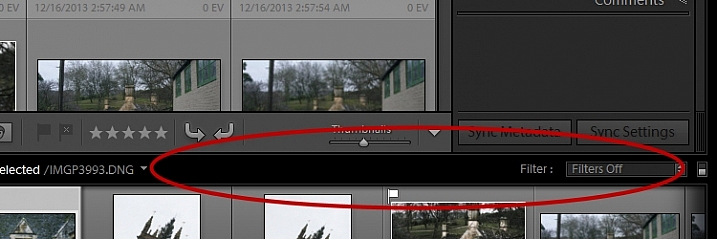
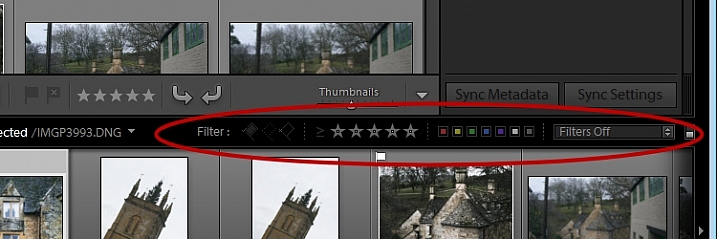
    Here just above the filmstrip you recall that at one stage you saw Star, Flag and Color options, but they now seem to be missing. How do you get them back?

    Lightroom interface quiz - image for question 7

    Answer:

    Click the word Filter and the filters will reappear. Click Filter again and they will disappear.

    Lightroom interface quiz - image for question 7

    Question #8

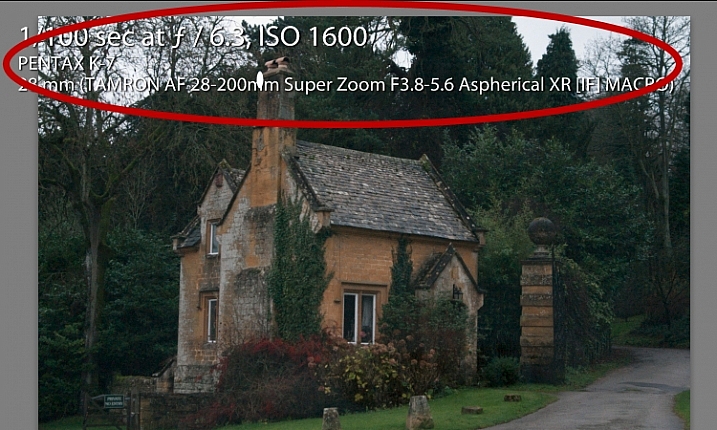
    What is this called and how can you get rid of it or choose what information is showing?

    Lightroom interface quiz - image for question 8

    Answer:

    This is the Loupe Info Overlay and you can display and hide it by pressing the I key on your keyboard. There are three states for this: Info Overlay 1, Info Overlay 2, and turning it off entirely. To edit what information is displayed click CMD+J (Control+J on a PC) or go to:  View > View Options.

    Question #9

    This is the right hand corner of the Lightroom screen and the controls for Maximize, Minimize and Close are all missing, as are all the Lightroom menus on the left of the window. How do you get them back?

    Lightroom interface quiz - image for question 9

    Answer:

    To redisplay the Lightroom menu and the Windows controls press Shift + F. This is a toggle switch which displays and hides full screen mode. There are three states for full screen mode so press Shift + F repeatedly until the Lightroom menu and the Window controls reappear.

    Question #10

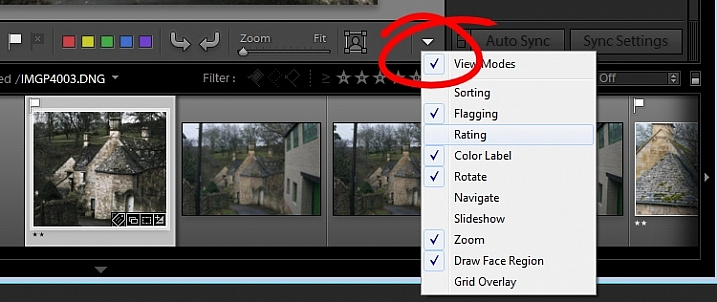
    Here, in the Develop module, you don’t see any stars on the toolbar when you are viewing this image at full size. The stars only appear on the toolbar when you are in Grid view. Where did they go and how can you get them back?

    Lightroom interface quiz - image for question 10

    Answer:

    The toolbar in the Develop module has two states, one for the Grid View, and one for the Loupe (single image) View. To display and hide the various options on either toolbar, switch to that view, and click the arrow in the far right of the toolbar to display the options available in that view. Click any unchecked option to display it on that toolbar, likewise you can click any checked options that you want to hide.

    Lightroom interface quiz - image for question 10

    If you got 10 out of 10 on this quiz, well done! You have a good understanding of the basics of the Lightroom interface.

    If you missed any of these questions, hopefully you’ve learned something about using Lightroom that you did not know before.

    googletag.cmd.push(function() {
    tablet_slots.push( googletag.defineSlot( “/1005424/_dPSv4_tab-all-article-bottom_(300×250)”, [300, 250], “pb-ad-78623” ).addService( googletag.pubads() ) ); } );

    googletag.cmd.push(function() {
    mobile_slots.push( googletag.defineSlot( “/1005424/_dPSv4_mob-all-article-bottom_(300×250)”, [300, 250], “pb-ad-78158” ).addService( googletag.pubads() ) ); } );

    The post How well do you know the Lightroom interface? Take this quiz and find out by Helen Bradley appeared first on Digital Photography School.

    Digital Photography School

  • Cream of the Crop of Specialty Photography Genres in 2015

    In the past week I’ve rounded up some of the most popular and most read articles on various topics here on dPS over the last year including:

    • Most Popular Landscape Photography Articles on dPS in 2015
    • The Top Gear Related Articles from 2015
    • 12 of the Best Portrait Articles of 2015
    • Beginners Photography Tips – Best of 2015
    • Post-Processing Tips of the Year 2015 on dPS
    • The Tip Top Travel Topics of 2015

    But there are many more narrow focused topics that slip between those cracks. Let’s take a look at a few that you might be interested in and see what we can learn from these.

    Philippe Rouzet

    By Philippe Rouzet

    Macro Photography

    • 5 Tips for Getting Fresh Ideas for Macro Photography
    • 5 Macro Photography Tricks to Make Your Images Stand Out
    • 5 Creative Macro Photography Ideas that Really Work
    • How to Give Your Macro Photography a Fine Art Touch in Post-Processing
    • Macro Photography Tips – Video Tutorials
    • Lighting for Macro Photography

    Street Photography

    street-photography-tips-02

    From my own trip to Cuba January 2014 (by the time you read this I’ll be preparing to head there for my third time)

    • 39 Street Photography Images That Have Common Threads
    • 7 Tips for a More Anonymous Approach to Street Photography
    • 7 Street Photography Rules That Should Be Broken
    • There is No Bad Light for Street Photography
    • The Importance of Capturing Gesture and Emotion in Street Photography
    • 7 Steps to Create Street Photography Silhouettes

    Night and Long Exposure Photography

    Andi Campbell-Jones

    By Andi Campbell-Jones

    • Tips for Getting Proper Exposure for Night Photography
    • 10 Items You Need for Your Night Photography Kit
    • 13 Great Subjects for Urban Night Photography
    • Tips for Enhancing Night Sky Photography in Photoshop
    • 5 Tips for Geting Sharper Images When Doing Long Exposures
    • 10 Common Mistakes in Long Exposure photography
    • Long Exposure Photography Without a Tripod
    • 5 Reasons You Should Learn Long Exposure Photography
    • How to Improve Your Long Exposure Photography with Photo Stacking
    • How to Shoot a Star Trails Selfie
    • Two Methods for Shooting Star Trails Made Easy
    Howard Ignatius

    By Howard Ignatius

    Business of Photography

    1. 10 Quick Photography Business Tips to Kickstart 2015
    2. 10 Low-Cost Marketing Strategies for Your Photography Business
    3. How to Break Into the Photography Business with dPS Writer Gina Milicia
    4. 3 Questions to Ask Yourself When Starting a Photography Business
    5. 5 Trends to Take Your Photography Business to the Future
    6. 8 Creative Ways to Make Money with Your Photography
    7. The Top 5 Sales Mistakes Costing You Money Right Now

    googletag.cmd.push(function() {
    tablet_slots.push( googletag.defineSlot( “/1005424/_dPSv4_tab-all-article-bottom_(300×250)”, [300, 250], “pb-ad-78623” ).addService( googletag.pubads() ) ); } );

    googletag.cmd.push(function() {
    mobile_slots.push( googletag.defineSlot( “/1005424/_dPSv4_mob-all-article-bottom_(300×250)”, [300, 250], “pb-ad-78158” ).addService( googletag.pubads() ) ); } );

    The post Cream of the Crop of Specialty Photography Genres in 2015 by Darlene Hildebrandt appeared first on Digital Photography School.

    Digital Photography School

  • Happy Paddling in 2016 New Year!

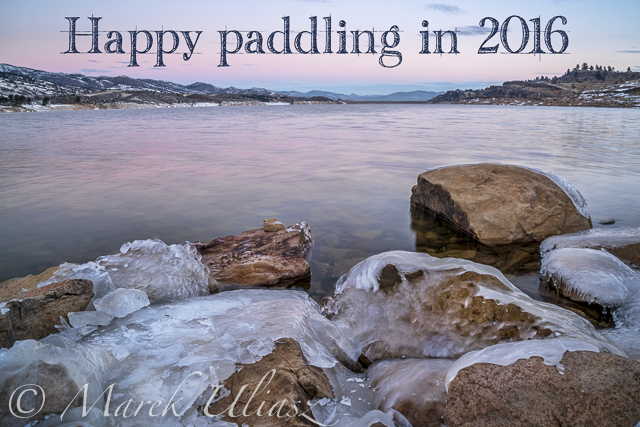
    Horsetooth Reservoir in winter

    Happy Paddling in New Year 2016!

    Happy New Year everybody! In the picture above: partially frozen Horsetooth Reservoir just before sunrise on December 29, 2015. Camera: Sony Alpha II with Sony/Zeiss FE 24-70mm lens on a tripod. That was a cold morning! During recent winter days in Colorado I am doing more hiking than paddling.

    paddling with a camera