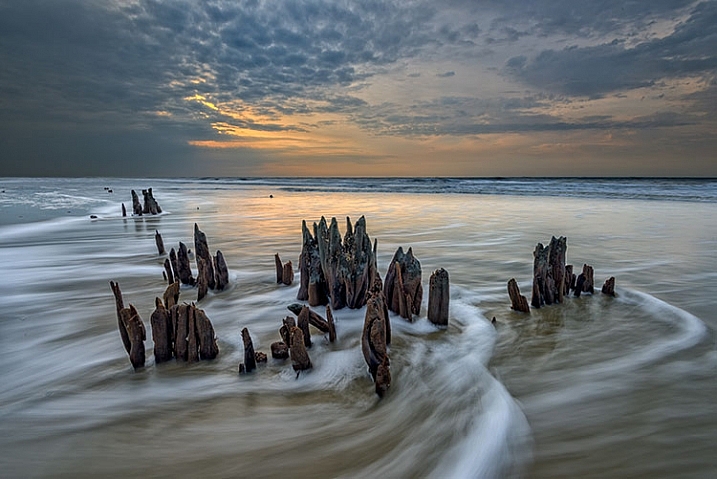
Category: Photography

  • 4 Batch Processing Techniques to Speed Up Your Workflow in Lightroom

    0 copy

    Lightroom is a fantastic program for keeping your photos organized, but it also provides many tools to speed up your editing workflow. You can even process many photos at once with batch editing. These techniques are by far the biggest time savers Lightroom provides. Once you start using them you’ll wonder how you ever edited each image individually.

    Technique 1: Applying presets on import

    Presets are hugely popular, and for good reason. They allow you to apply frequently used edits and adjustments to photos, instead of having to manually adjust the settings for each new image. But did you know you can apply your favorite preset during import and cut out a lot of steps?

    1 copy

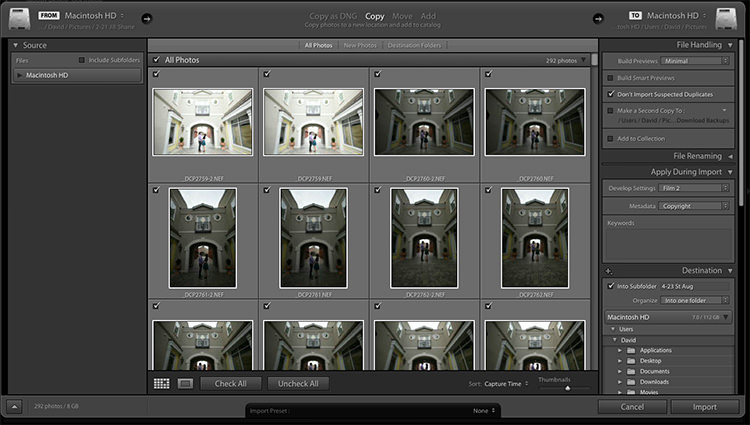
    Step 1: Start an import in the library module

    2 copy

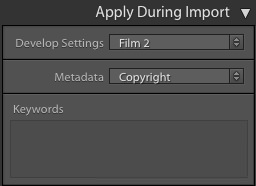
    Step 2: On the right panel in the import dialog you’ll see the “Apply During Import” module.

    Step 3: If you have a base preset, or a most commonly used one, select it here and click import to have it automatically applied to all of the photos as they are imported into Lightroom.

    This not only skips a lot of clicks for you, but it applies them faster than selecting them individually in the develop module later.

    Technique 2: Apply presets in the Library module

    Applying presets on import is great if all the photos are similar, but you may need to use different presets on varying scenes, poses, etc. Instead of applying these one image at a time, you can select them in the library module and apply them in a group. This trick is great for weddings, or similar shoots where you may be inside then outside, or have constantly changing light conditions.

    3 copy

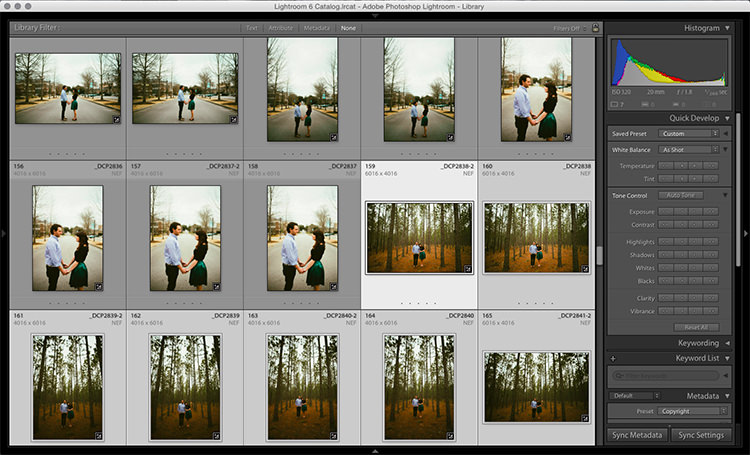
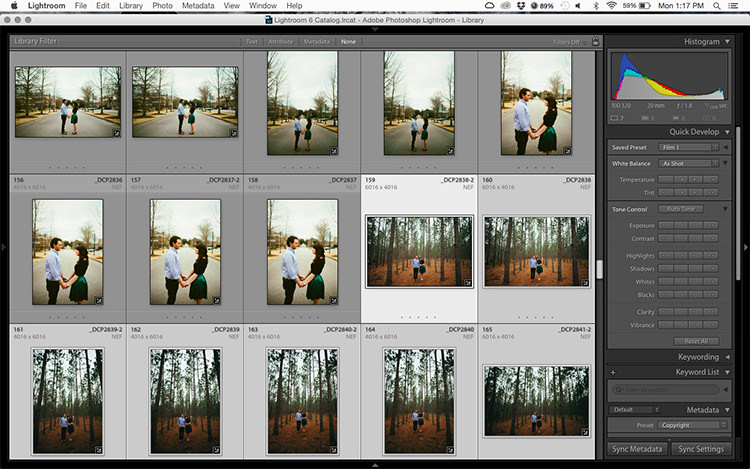
    Step 1: Click the first image in the set, then hold down the Control button and click any others to which you want to apply the same preset.

    4 copy

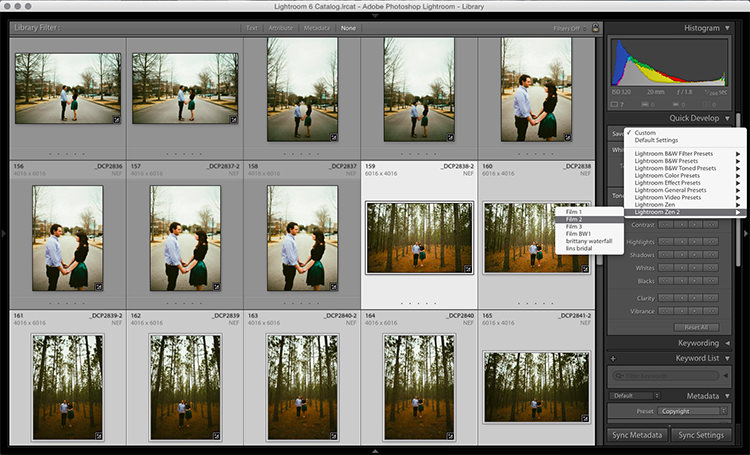
    Step 2: At the top of the Quick Develop panel, click the drop down menu under “Saved Preset” and select the new preset. It will update the settings from that preset to all the selected photos.

    5 copy

    Step 3: Repeat for each changing scene as needed.

    Technique 3: Edit in the Library module

    The Library module runs much smoother, and processes changes faster than the Develop module. Since you have already applied your presets to the images, you will mostly need to make broad adjustments to your photos now. The Library module can edit the major adjustments like white balance, exposure, contrast, and more. Even better, you can apply these adjustments to multiple photos at once, making them more consistent, and saving you a lot of time.

    6 copy

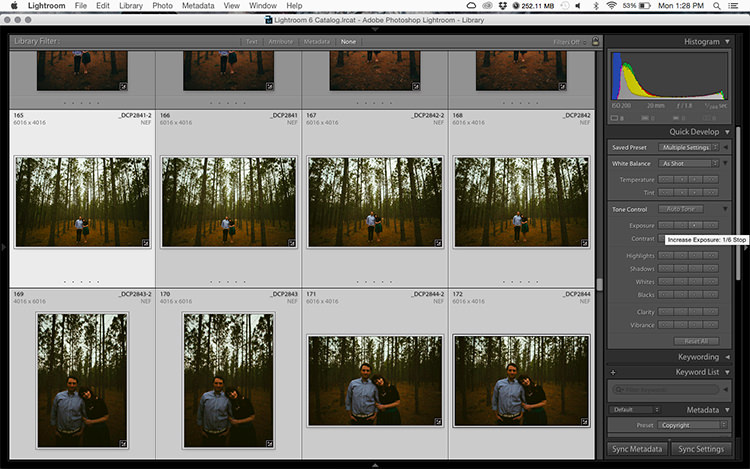
    Step 1: Select a group of images as above (CTRL + click to add to your selection) in the Library module.

    7 copy

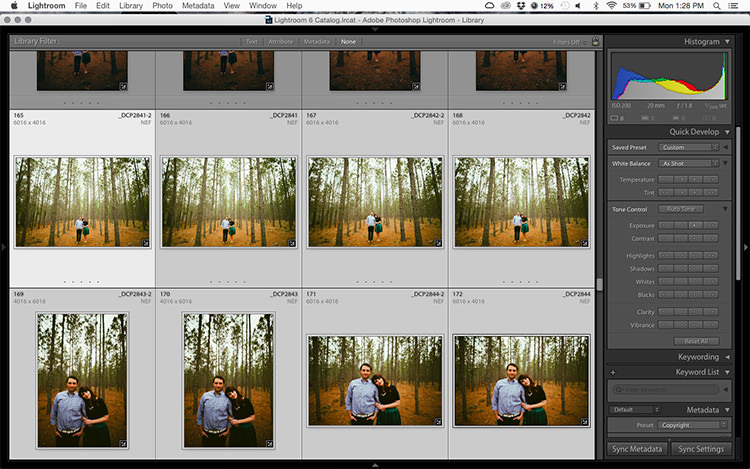
    Step 2: In the Quick Develop panel on the right, click the arrows under Exposure, Contrast, and any other applicable options, to apply the changes to all selected photos at once.

    Step 3: You can use the + and – key to enlarge or minimize the library view, allowing you to get a better view of the adjustments you are applying.

    Technique 4: Sync adjustments across multiple photos in the Develop module

    After applying the broad adjustments, you may need to fine-tune a few things in your images. These may include changes like a curve adjustment, add a gradient filter to fine tune a bright sky, etc. These are changes you have to make in the Develop module, but you can still apply them in batches, instead of doing them one photo at a time.

    8 copy

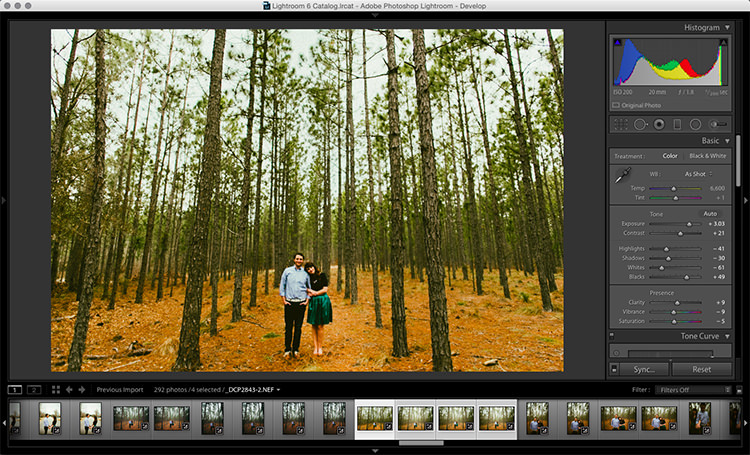
    Step 1: In the Develop module, apply the adjustments to a single photo.

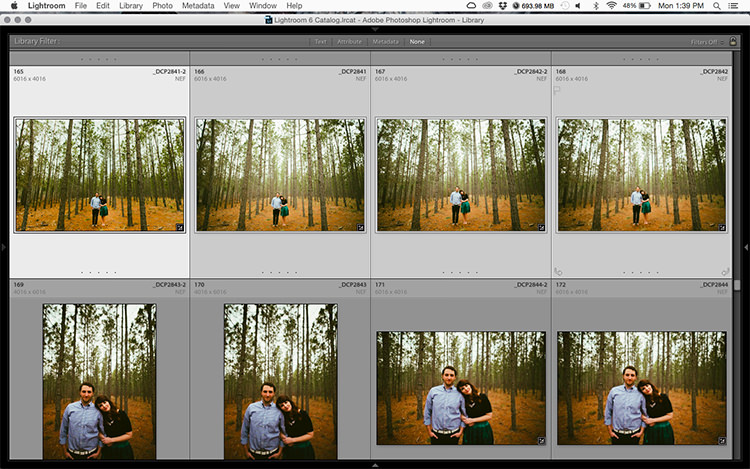
    Step 2: In the Develop filmstrip or Library grid view, select multiple photos (CTRL + click).

    Step 3: At the bottom of the right hand panel, select “Sync”, it will be the left button beside “Reset”

    9 copy

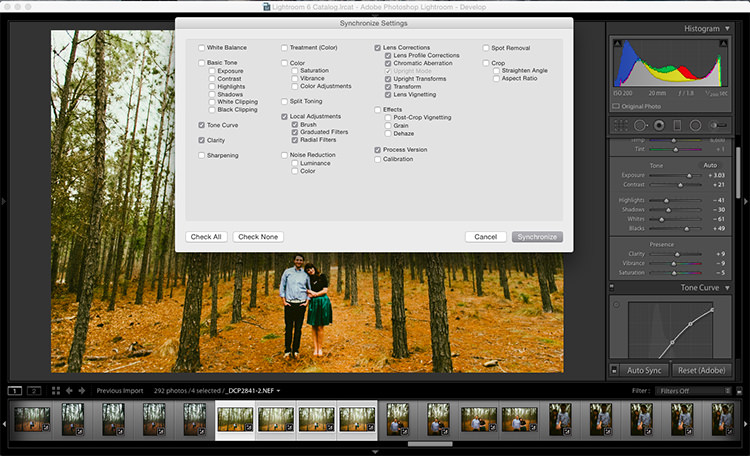
    Step 4: Check the options that you want to sync with all the selected photos. These should include any adjustments you just made in the Develop module.

    10 copy

    Keep in mind

    When batch editing, be careful you don’t sync anything that you don’t want applied to all of the selected images. If you use the adjustment brush on skin in one photo and sync that to another photo, chances are that the subject has moved slightly, and the brush will be applied to the wrong part of the image.

    Stick with it!

    Do you think these batch editing techniques have a spot in your workflow? For me, learning to batch edit allowed me to cut my wedding editing time down to a fraction of what it was before. You can focus on the big picture and style of each shoot, and not get lost spending 10-15 minutes on every image. Batch editing lets you get more work done in less time, and that is fantastic!

    Do you have any additional tips to add? Please do so in the comments below.

    googletag.cmd.push(function() {
    tablet_slots.push( googletag.defineSlot( “/1005424/_dPSv4_tab-all-article-bottom_(300×250)”, [300, 250], “pb-ad-78623” ).addService( googletag.pubads() ) ); } );

    googletag.cmd.push(function() {
    mobile_slots.push( googletag.defineSlot( “/1005424/_dPSv4_mob-all-article-bottom_(300×250)”, [300, 250], “pb-ad-78158” ).addService( googletag.pubads() ) ); } );

    The post 4 Batch Processing Techniques to Speed Up Your Workflow in Lightroom by David Childers appeared first on Digital Photography School.


    Digital Photography School

  • Everything you Always Wanted to know about a Career in Photography but were Afraid to Ask

    Before I get into this article, I want to set the stage by saying that the objective here is not to diminish or make light of the concerns and questions that novice photographers have. In fact, at some point in our careers, we have all asked similar questions – sometimes out loud, and sometimes just in the solitude of our own minds. There is no wrong or silly question, and there are no right or wrong answers. These are in no particular order, and the views expressed here are solely based on my own experiences.

    Memorable Jaunts DPS Article What you want to know - Beach sunset photos

    One of my favorite images to date happened by pure accident – I saw the image in my mind even before I took a single frame.

    Where can I learn about everything related to photography for FREE?

    We are both lucky and unlucky to live in the era of the Internet. Any google search, on average, yields thousands of pages, articles, and YouTube videos. If you have a burning question about anything and everything, the easiest way to learn is via the Internet.

    Sites like our own Digital Photography School are a great resource for almost any topic related to photography, from a beginner to an experienced photographer. Other sites like Creative Live offer many classes on various aspects of photography, as well as other creative genres. While most sites provide a great overview of a particular topic, any in-depth research requires time and money. There are number of virtual, as well as live workshops, all over the world covering all aspects of photography. A few that come to mind are The Design School and Clickinmoms (I have used both services and am very happy with the level of instruction provided there – this is just my personal experience).

    You could also check out our dPS ebooks and online courses.

    Memorable Jaunts DPS Article What you want to know - Chicago Wedding Photos

    I learn a lot online, in the comfort of my own home, but every once in while, I like to take a live workshop – not just to update my portfolio, but also to learn from and meet others in the industry!

    How do I shoot in manual mode?

    Shooting in manual mode is one of the most intimidating things that most amateur photographers face. If you have a DSLR camera that has a manual mode, it is really not that hard once you get the hang of it. The best thing you can do in learning to shoot in manual, is to understand the exposure triangle and how the three key components of photography – shutter speed, ISO and aperture work – independently and with each other. Here is a good article that digs deeper into photographing in manual mode. Remember this too take time and practice. There is another interesting article here in the Digital Photography School archives that explains all three shooting modes and is worth a read.

    Memorable Jaunts DPS Article What you want to know - Understanding backlight

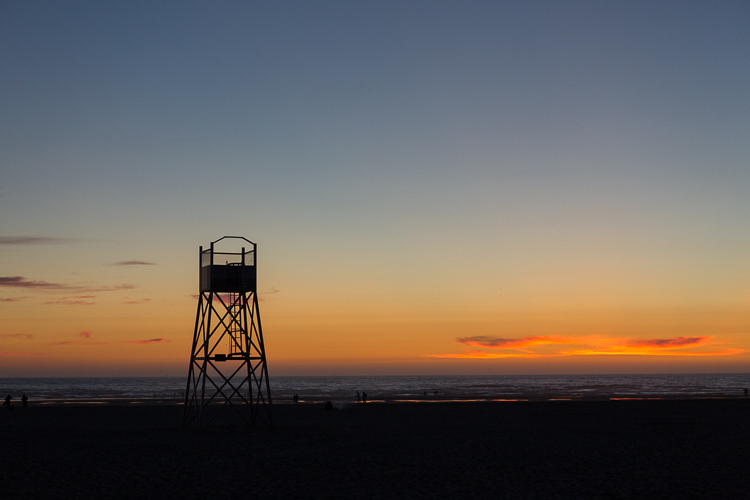
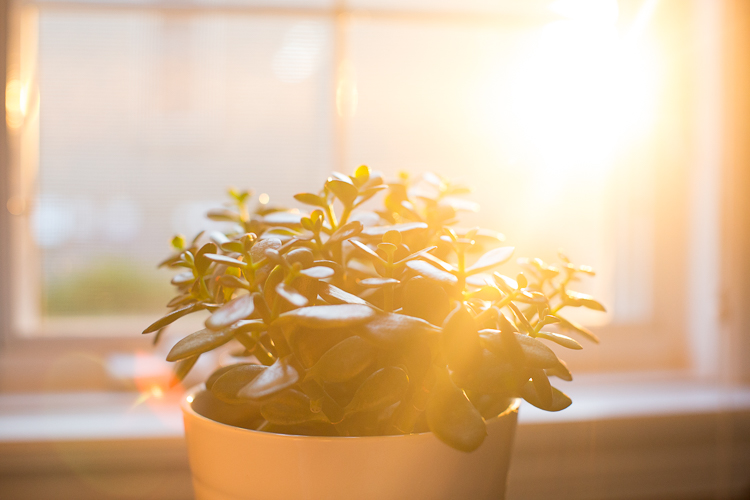
    Mastering manual mode is important, especially for images like this – backlit golden hour images…this is SOOC (straight out of the camera).

    What lens will give me a blurry background?

    If I had a penny for the number of times that I get asked this question from other photographers, as well as my clients who are looking to upgrade their DSLR cameras, I would have an overflowing piggy bank! Blurry backgrounds, or bokeh as it is know in the photography space, is actually a function of aperture (i.e. f-stop), focal length, and distance of the subject from the background. Check out How To Achieve Nice Bokeh [In Plain English] from the dPS archives that addresses this issue specifically.

    Memorable Jaunts DPS Article What you want to know - Lilacs in the rain-1

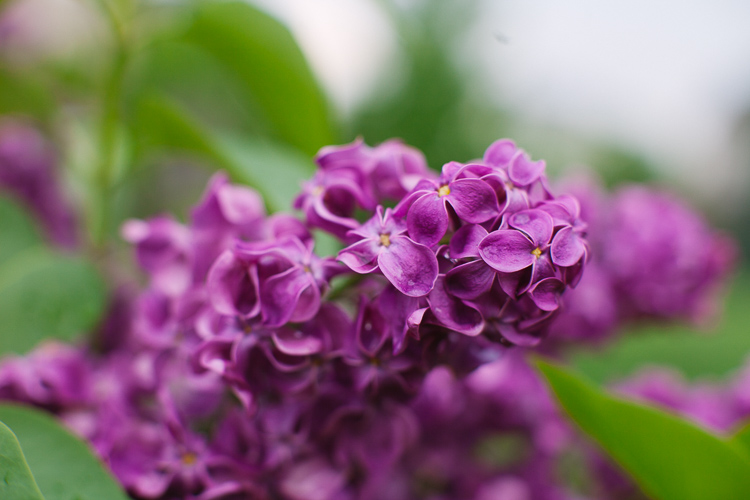
    A wide aperture on 50mm lens gives a shallow depth of field where most of the background is blurry.

    How much money do I need to spend to get started with a photography business?

    There are again any different ways to answer this question. You can essentially spend as much, or as little as you want, to get started. At a bare minimum you will need a good camera system (good is a very relative term here, there are several prosumer cameras on the market today, at various price levels). In many places in the world, particularly in the US, there are several rental companies that offer various cameras and lenses for rent. Borrow Lens, Lensrental and LensProToGo are a few that come to mind. You can also check with your local camera shop to see if they offer rental services.

    You do not need the latest and greatest camera system to be a professional photographer. While gear is definitely a plus, skill and the ability to work with what you have to get the results you need are far more important, especially when you are just starting out. Once you develop your own shooting style as well as what you want to focus on, you can slowly build up your gear by adding equipment based on your current needs.

    How can I make money from my photography, and do it fast?

    401(K) 2012

    By 401(K) 2012

    Sorry to burst your bubble, but the short answer here is that you cannot make money in anything fast. Everything takes time, practice, and patience. Just like any other career, the more time and effort you invest in your photography, the more experience you will gain. With experience comes confidence and recognition. So if your end goal is to be a internationally recognized photographer, treat it like a career and a business and invest in yourself, your education, and your experience. Don’t be afraid to roll up your sleeves and do the hard work – and in time, you will reap the benefits.

    How much should I charge for my photography?

    This is again something that is very subjective. What you charge for your services depends on many factors like your skill level, the value of photography in the area that you live in, and the buying capacity of the clients that you are targeting. Another thing to understand is the monetary value of your time. Remember your time is not just the amount of time you spend photographing the client – also take into account any travel to and from the location, editing time, and backend work like backing up photos, uploading galleries, and other administrative tasks. Once you have a handle on all these factors as it relates to your situation, charge an amount that makes it worth your while to photograph your clients. If you are looking to earn a living through your photography, then treat it like a business and not just a hobby. Read: 7 Things That Keep You From Charging What You’re Worth (and how to get over them).

    What kind of photography should I focus on?

    The easiest way to answer this question is to ask yourself what you enjoy photographing. Write down all the genres of photography that interest you, and try them all out if possible. Ask family and friends to model for you, if you are interested in portraits. Photograph different locations at different times of day if you are interested in landscape photography. Experiment with different types of food and styling if you are interested in food photography. Once you have a reasonable amount of experience in these categories, pick one or two to focus on, and give it your best. Don’t be afraid to experiment once in awhile in other genres, just to flex your creative muscles.

    Memorable Jaunts DPS Article What you want to know - Bridal Portraits

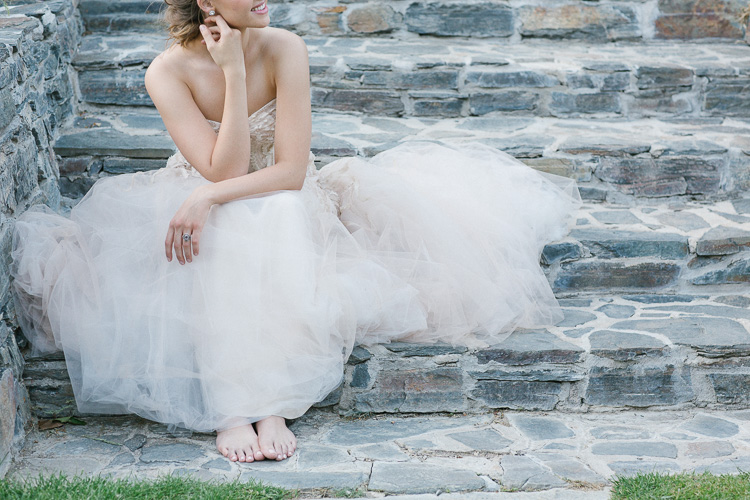
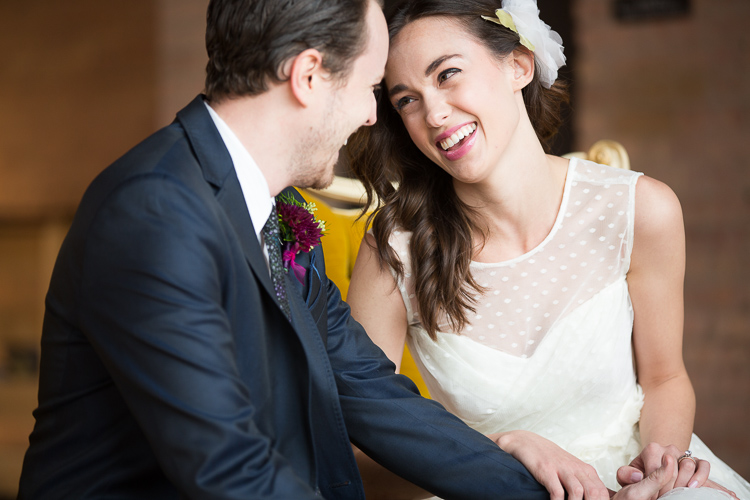
    I am a wedding and lifestyle photographer – that is what I enjoy doing the most. But mixed in my portfolio will be a bit of travel and editorial images that help me flex my creative muscles.

    How can I get clients?

    This is another big one that I get asked a lot, and I wish there was an easy answer. In fact, this is something that even I still struggle with, six years into my business. Getting new clients, and keeping a steady stream of clients is hard work. You have to constantly market yourself and your services at every opportunity you get. When you meet new people, don’t be afraid to say what you do. It took me a long time to introduce myself as a professional photographer, but once I said it often enough, I realized that I got more confident in not only my photography skills, but also in my business skills. Network and connect with your competitors, as well as other businesses in your area. Do a trade for images if appropriate, and remember not everyone you meet will be interested in getting pictures taken, and that is totally okay.

    Memorable Jaunts DPS Article What you want to know - Lifestyle Portraits

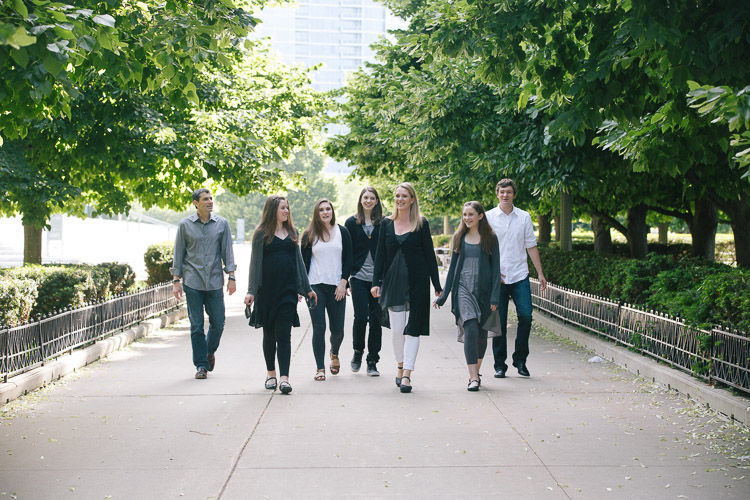
    A casual conversation at a networking meeting led to an epic family photoshoot and I gained a good friend too.

    How can I build a portfolio of my work?

    The length of time you invest in yourself and your photography skills is directly proportional to how long you will take to build your portfolio of work. If you constantly focus on learning and improving yourself, the more confident you will become, and the more opportunities you will find to create work that you are proud of. I have a few general rules that I follow in my photography journey

    • Photograph something every week if not every day – the objective here is to learn new techniques and perfect things I already know with respect to my gear.
    • 10:1 ratio – for every 10 minutes I shoot, I want to produce at least one image that I am proud of.
    • Spend time on personal projects – my mantra here is create for the sake of creation.

    For me, this is an easy way to constantly update my portfolio with work that I am proud of, and which also represents my creative style.

    Memorable Jaunts DPS Article What you want to know - Wedding Styled Shoot

    Creating for the sake of creation is a great way to update your portfolio as well as connect with other vendors and creatives in your space.

    This is just a small set of questions that I found helpful when I was starting off on my career in photography. If you have others that have helped you navigate the photography waters, feel free to list them in the comments so others can benefit as well.

    If you have different questions that you’ve been wanting to ask, this is the place to do it. Let’s see if we can’t get them answered for you as well.


    Editor’s Note: This is one of a series of articles this week that are Open for Discussion. We want to get the conversation going, hear your voice and opinions, and talk about some possibly controversial topics in photography.

    Give us your thoughts below on the article above and watch for more discussion topics.

    See all the recent discussion topics here:

    • 7 Commonly Accepted Photography Beliefs Debunked
    • Is HDR dead? Some dPS Writer’s Thoughts on this Controversial Topic
    • How to Find your Personal Photographic Style
    • Why You May be Failing to Reach Your Potential as a Photographer
    • To Process or Not To Process? Let’s Discuss
    • How much do you process your images? – a dPS POLL
    • Does the Camera Matter? SLR versus Mirrorless versus Smartphone
    • Natural Light Versus Artificial Light: Which is Better?
    • How Limitations Can Help You Grow as a Photographer
    • Brand Name Versus Third-Party Photography Gear: Which is better?

    googletag.cmd.push(function() {
    tablet_slots.push( googletag.defineSlot( “/1005424/_dPSv4_tab-all-article-bottom_(300×250)”, [300, 250], “pb-ad-78623” ).addService( googletag.pubads() ) ); } );

    googletag.cmd.push(function() {
    mobile_slots.push( googletag.defineSlot( “/1005424/_dPSv4_mob-all-article-bottom_(300×250)”, [300, 250], “pb-ad-78158” ).addService( googletag.pubads() ) ); } );

    The post Everything you Always Wanted to know about a Career in Photography but were Afraid to Ask by Karthika Gupta appeared first on Digital Photography School.


    Digital Photography School

  • Brand Name Versus Third-Party Photography Gear: Which is better?

    Not long ago, there were two types of camera accessories to buy: brand items designed by known manufacturers such as Canon and Nikon, OR third-party items of questionable quality that you’d likely buy only if you were on a tight budget. Today, this situation has changed, with third-party manufacturers such as Sigma and Tamron stepping up their game and producing alternatives that even serious professionals have begun using.

    Still, the question remains: does the brand name truly matter when it comes to camera accessories?

    Let’s explore some of the pros and cons of each side. Keep in mind that this is a highly debatable topic, and this is just a short list of general pros and cons for using brand name and third-party items. If you have any other points to add, please mention them in the comments below.

    third party camera lenses

    Why brand names matter

    Brand name items are almost always going to be more expensive than third-party ones, but as most photographers say, “you get what you pay for.” Some reasons for the premium pricing on brand name items include:

    Better build quality and dependability

    This can be extremely important if you belong to any professional organizations such as Canon or Nikon Pro Services, as cleaning and repair of brand name gear is generally included in your membership. While most third-party manufacturers have begun adding their own repair services, they’re not known to be as fast and consistent as name brands, and guaranteed compatibility with your brand name camera of choice.

    third party camera lenses

    Guaranteed compatibility

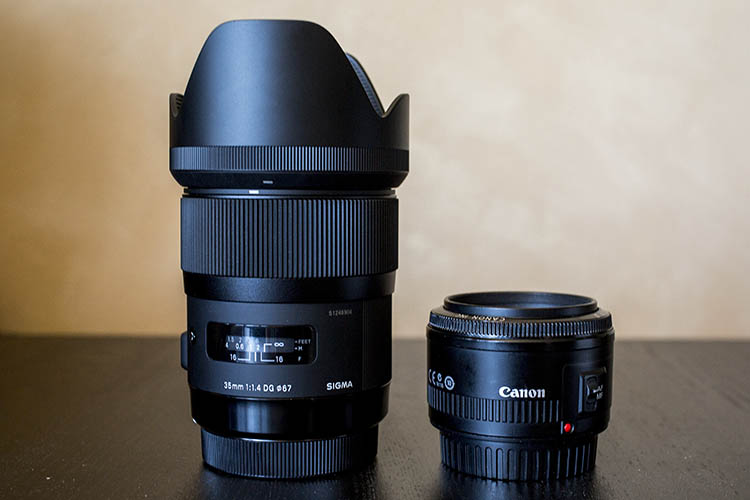
    Third-party vendors thrive on the ability to produce accessories and items that are compatible with many major brand name cameras. If you buy say a Sigma 35mm f/1.4 lens, there will be both a Nikon and Canon mount option. This means you have to be ultra diligent to make sure a third-party item will work with your camera model. However, if you buy a 35mm f/1.4 lens from Nikon (for example), you know for sure that lens will work your Nikon camera.

    Respect from other photographers

    When you shoot with a brand name accessory, you’re more likely to get nods of respect from other photographers who recognize the value of that authentic, name brand lens (the coveted red ringed lenses from Canon and gold ring on Nikon lenses). This is becoming more of a debatable point lately with the rise of high-quality third-party gear options, but there’s still something to be said about acknowledging the real deal over a third-party brand.

    Why third-party brands are coming up

    Unique innovations

    third party camera lenses

    As mentioned earlier, the scene for third-party brands has shifted to the point where Sigma and Tamron are no longer necessarily viewed as compromises, just for the budget-minded photographer. Instead, these brands are focusing not only on improving old designs perfected by established name-brands, but they’re innovating alternatives that even Canon and Nikon haven’t come up with. Consider the Sigma 120-300 f/2.8, which is already in its third incarnation, or the Sigma 18-35mm f/1.8 lens, the first zoom lens for DSLRs that holds a consistent f/1.8 aperture throughout its entire zoom range. These are lenses with features that even Canon and Nikon have yet to offer. Quality and consistency of these Sigma lenses might be questionable depending on your photography standards, but the fact that a third-party brand is innovating and selling unique lenses speaks to how third-party brands are shifting in the overall industry. (Read this to see why one dPS writer uses the Sigma 150-600mm for wildlife photography.)

    The price is right

    Every photographer knows that camera gear isn’t cheap, and while brand name items may be ideal, sometimes they just aren’t realistic price points for what is affordable. This is where third-party items can help beginners, or photographers on a budget, can get their hands on some quality equipment. If the gear is kept in good shape, resale value should still be pretty decent, if and when they decide to upgrade to a brand name alternative down the road.

    third party camera lenses

    One item you probably shouldn’t buy third-party

    When it comes to third-party accessories, there’s one in particular that you may want to make sure is brand name authentic: your camera batteries. Personally, I’ve had mixed experiences using third-party batteries on both my DSLR and mirrorless cameras. Most of the time they work, but every once and a while, there’s a battery that just won’t hold a charge, or fails for some mysterious reason. That battery is always from a third-party brand. A simple way to work around this would be to stock your camera battery arsenal with some brand name batteries, and some third-party ones to make sure you’re covered. There’s nothing worse than having a battery fail when you need it the most.

    Over to you

    What has been your experience using brand names and third-party brands? Are you partial to one over the other? Do you go for brand name camera bodies and lenses, and opt for third-party accessories like filters, tripods, and batteries?

    What has your experience been, let us know in the comments below.


    Editor’s Note: This is one of a series of articles this week that are Open for Discussion. We want to get the conversation going, hear your voice and opinions, and talk about some possibly controversial topics in photography.

    Give us your thoughts below on the article above and watch for more discussion topics.

    See all the recent discussion topics here:

    • 7 Commonly Accepted Photography Beliefs Debunked
    • Is HDR dead? Some dPS Writer’s Thoughts on this Controversial Topic
    • How to Find your Personal Photographic Style
    • Why You May be Failing to Reach Your Potential as a Photographer
    • To Process or Not To Process? Let’s Discuss
    • How much do you process your images? – a dPS POLL
    • Does the Camera Matter? SLR versus Mirrorless versus Smartphone
    • Natural Light Versus Artificial Light: Which is Better?
    • How Limitations Can Help You Grow as a Photographer

    googletag.cmd.push(function() {
    tablet_slots.push( googletag.defineSlot( “/1005424/_dPSv4_tab-all-article-bottom_(300×250)”, [300, 250], “pb-ad-78623” ).addService( googletag.pubads() ) ); } );

    googletag.cmd.push(function() {
    mobile_slots.push( googletag.defineSlot( “/1005424/_dPSv4_mob-all-article-bottom_(300×250)”, [300, 250], “pb-ad-78158” ).addService( googletag.pubads() ) ); } );

    The post Brand Name Versus Third-Party Photography Gear: Which is better? by Suzi Pratt appeared first on Digital Photography School.


    Digital Photography School

  • The Secret to Getting Tack Sharp Images for the Web

    Do your images end up looking soft when you resize them and export them for the web? When you resize an image, it loses some sharpness. With a 24 MP image measuring 6000 px you need to resize quite a lot to downsize it for optimal web use which is often around 800 px wide. That is why a set-once-and-forget Continue Reading

    The post The Secret to Getting Tack Sharp Images for the Web appeared first on Photodoto.


    Photodoto

  • How Limitations Can Help You Grow as a Photographer

    142

    Have you ever said to yourself, “If only I had that lens, or this camera I’d be an amazing photographer”? Or maybe you’ve thought that if only you had more time or money, your dreams of being the photographer you want to be, would finally be realized. Many times as photographers we will have limitations put on us. Sometimes we may set those limits on ourselves, and sometimes they are limits that can’t be helped. Either way, we can use those limitations to our advantage and become better photographers because of them.

    Set aside those “if only” thoughts. Push away those feelings of inadequacy. Don’t let those limitations hinder your progress as a photographer. Once we have gone through some of those limitations that can help you grow, you might even decide to limit yourself on purpose sometimes, just for the challenge.

    185

    I don’t have an expensive camera

    Do expensive cameras make a difference? Of course they do. There’s a reason some cameras cost more than others. However, the person behind the camera matters a whole lot more. If you’re looking at your favorite photographer’s work and thinking that their camera is amazing, you may be right. Their camera is possibly amazing, but the reason you love their photos isn’t because of their camera, it’s because of what they do with that camera.

    If you constantly think that you can’t do what you want to because your camera isn’t fancy enough, then you’re probably right. With that kind of thinking, you’ll always be waiting for the next purchase before you even try to get better. If you can convince yourself that your camera is good enough, smart enough, and doggone it, people like it, then your photos will change with your perspective. Find out what your camera CAN do, instead of lamenting about what it can’t do. Pull out your camera’s user manual, and practice until you’ve truly worn out your camera. You might decide to get the next big thing then, or you might have fallen in love with your camera so much that you wouldn’t dream of trading it in for a newer model.

    143

    I don’t have the right lens

    Want to know a secret? For a long time I used my kit lens, and a 50mm f/1.8 on my first camera body. That’s it. I made those lenses work for me, and I learned how to get the most out of them. Want to know another secret? Now I use a 50mm f/1.4 and 85mm f/1.4, and that’s it. Nothing else, ever. I’ve looked at other lenses, and thought about them a lot, but when it comes down to it, I really feel like I don’t want any other lenses.

    I’ll often go through an entire session with only one lens on my camera body. I feel more free to concentrate on what’s going on in front of me, and capturing what I want. I’m completely comfortable and familiar with my lenses, and I know exactly what they can do. I don’t waste time switching to another lens, and risk getting dirt on my sensor. Your lens of choice may be different from mine, and that’s okay. If you are photographing other things besides portraits, you may very well need a different lens from what I have.

    However, you don’t need EVERY lens. Figure out how to make the lens (es) you have work for you. Challenge yourself to work with the constraints of a 50mm prime, or even a kit lens. You might realize that you don’t need that expensive new lens after all.

    1202

    I don’t have ALL the equipment

    It’s exciting to dream about all the photography equipment you could buy. All the different flashes, reflectors, tripods, timers, camera bags, diffusers, and straps are calling to your wallet, begging you to buy them all. Money is a real issue for me, and likely for many of you, too. If it’s not something that you are going to use on a regular basis, see if there are ways that you can work without it.

    There are many DIY ideas that will stretch your creativity. You might find that you can make beautiful photos, even without all the extra equipment. Sometimes having a limit to what you are able to purchase can make your creativity grow, because creativity is free. You can use it abundantly without hurting your budget one bit. Cameras don’t care if they’re stored in a bag you’ve had for years, that is worn on the corners (at least that’s what my camera tells me).

    194

    I don’t have any pretty locations available nearby

    Wouldn’t it be great if we always had beautiful waterfalls and trees and majestic mountains right there to photograph? Unfortunately life doesn’t work that way. I live in a place that is actually truly spectacular, but when I first moved here, I was quite underwhelmed. It’s one of those places that takes time to appreciate, and sometimes certain camera angles to hide the parts that aren’t so photogenic. Look at your surroundings with new eyes, and you might find that you actually have a lot of gorgeous views. You’ll not only be able to make some beautiful photos, but you’ll be happier with your life and surroundings.

    Sometimes you might be at a location that you must shoot then and there, and there’s not much to choose from. A back deck at high noon can work in a pinch. This is where your creativity and resourcefulness can come in handy. Hone those skills, and you will find that you are never at a loss for great locations.

    169

    I don’t have enough training or knowledge

    Every photographer has had to say this at some point, we all have to start somewhere. If you are turning down opportunities to take photos, or scared to try something new because you’re afraid you don’t know enough, you’re selling yourself short. The worst that could happen is that you could learn what not to do.

    Find every opportunity to practice and learn. Don’t let a lack of knowledge stop you from trying, instead, let it motivate you to learn more. While you are in the process of learning, remember the saying, “Fake it until you make it”. If you pretend that you know what you are doing, that fake confidence can pull you through, and you’ll gain more real confidence for the future.

    ***However, I must insert a warning here. Don’t agree to be the sole photographer for a very important once in a lifetime event, like a wedding, if you aren’t knowledgeable and prepared enough. You’re welcome.

    293

    I don’t have good weather today

    Suck it up and get out there. That may sound harsh, but unless the weather is going to ruin your camera, give it a try. Some of my favorite sessions have been in the wind, in light rain or snow, or in freezing temperatures. If you always seek out comfortable conditions, you won’t stretch yourself to find new ways to deal with things. You’ll miss out on some very compelling shots, because you won’t be forced to make something less than ideal work to your advantage. You might get dirty, cold, wet, hot, or sunburned. Don’t limit yourself when conditions aren’t perfect.

    158

    I don’t have time

    Quality over quantity will help you here. Instead of thinking you have to take 1000 frames at a time, challenge yourself to capture something great in 10 frames. Instead of spending two hours on one session, see if you can get a handful of truly great images in fifteen minutes. Sometimes when we have more time, we don’t end up with more great photos, we just end up with a whole lot of mediocre photos. Use your time constraints to help you focus on capturing exactly what you want, and not wasting time with thoughtless clicking. Use the little time you have to your advantage, and make every click count. Read: 6 Tips on How to Make More Time for Photography

    Summary – let’s hear from you

    What limits do you think are holding you back? Could you find a way to make those limits benefit you and make you a stronger photographer? Change your perspective on your limits, and see if you can make your photography growth limitless.

    How have you found limitations have helped, rather than hindered your own growth as a photographer? Have you tried any limitation exercises on purpose? If so please share your actions and results in the comments below.


    Editor’s Note: This is one of a series of articles this week that are Open for Discussion. We want to get the conversation going, hear your voice and opinions, and talk about some possibly controversial topics in photography.

    Give us your thoughts below on the article above on limitations and watch for more discussion topics this week.

    See all the recent discussion topics here:

    • 7 Commonly Accepted Photography Beliefs Debunked
    • Is HDR dead? Some dPS Writer’s Thoughts on this Controversial Topic
    • How to Find your Personal Photographic Style
    • Why You May be Failing to Reach Your Potential as a Photographer
    • To Process or Not To Process? Let’s Discuss
    • How much do you process your images? – a dPS POLL
    • Does the Camera Matter? SLR versus Mirrorless versus Smartphone
    • Natural Light Versus Artificial Light: Which is Better?

    googletag.cmd.push(function() {
    tablet_slots.push( googletag.defineSlot( “/1005424/_dPSv4_tab-all-article-bottom_(300×250)”, [300, 250], “pb-ad-78623” ).addService( googletag.pubads() ) ); } );

    googletag.cmd.push(function() {
    mobile_slots.push( googletag.defineSlot( “/1005424/_dPSv4_mob-all-article-bottom_(300×250)”, [300, 250], “pb-ad-78158” ).addService( googletag.pubads() ) ); } );

    The post How Limitations Can Help You Grow as a Photographer by Melinda Smith appeared first on Digital Photography School.


    Digital Photography School

  • How to Straighten Crooked Images Fast Using Lightroom

    If you’re like me, it’s so easy to get focused on trying to take great shots that you forgot to make sure your images are straight, and not crooked. Not some crazy tilt, mind you – just a slight tilt. So slight that when you notice it in your images, it just looks weird. A more dramatic tilt and we’ll just call it art. But this slight tilt is just enough to drive you crazy and cost us a lot of extra time editing your images.

    Well I am here to report that I have found a quick and easy way to fix this tilt fast using Lightroom. So easy, that you can even automate it so that Lightroom fixes it for you.

    So if this tip interests you, keep reading to find out how:

    Image01

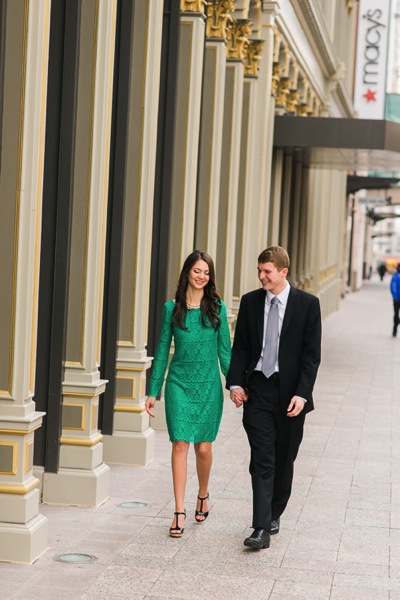
    Take a look at the image above. Good shot, right? Photographically I think I did well with the image, but it’s crooked! I can’t give this image to my client like this, it needs to be straightened first.

    Lens Corrections Panel

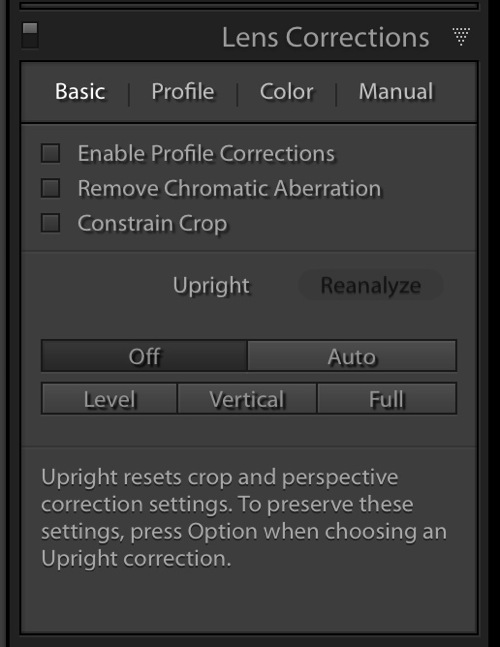
    Beginning with Lightroom version 5 the Basic tab was introduced inside of the Lens Corrections panel. This tab gives you the easy to use Upright Mode buttons, which are powerful tools used to fix perspective issues with your images. The perspective issue that I always seem to be dealing with is crooked images.

    Image02

    There are several Upright Mode buttons, but the one I want to show you in this article is the Level button. When clicked, this button works to straighten your images based on the lines present inside them. Obviously if there are no strong vertical or horizontal lines in the image, this button won’t work. But if there aren’t strong lines, who’s to say it’s crooked in the first place, right?

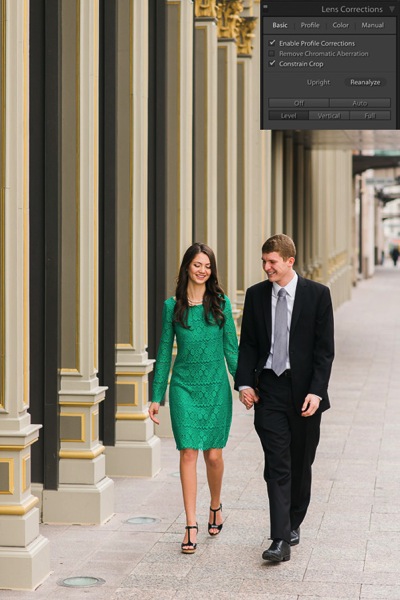
    Images appear crooked to our eyes because of the strong lines within an image, therefore the Level button works great at straightening those images quickly, without much difficulty. Instead of going into the crop tool and manually rotating the image slightly to straighten it, I can go to the Lens Corrections Panel instead and click the level button to straighten this image very quickly.

    I also like to have the Enable Profile Corrections check box checked as well as the Constrain Crop check box. These make sure Lightroom is straightening with as much information as possible.

    Image03

    Automating Your Upright Adjustments

    Now here is the trick. When done properly, you can create a Lightroom preset, or sync your Level adjustment across any number of images, and have Lightroom analyze and adjust each image independently based on each image’s needs and requirements.

    What this means is you can have Lightroom straighten all of your crooked images with the click of a couple of buttons!

    Syncing

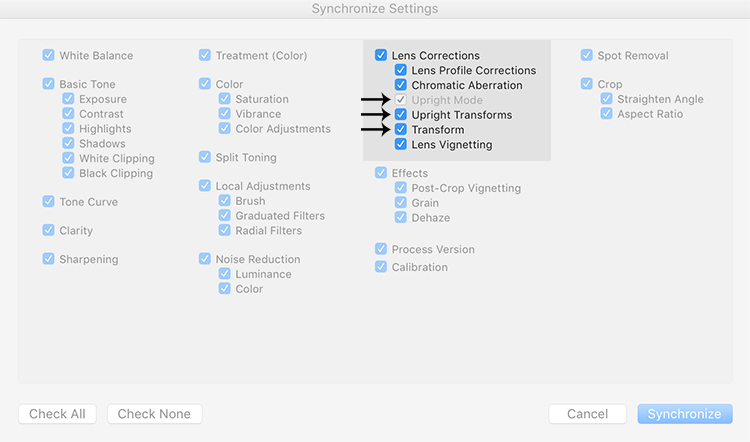
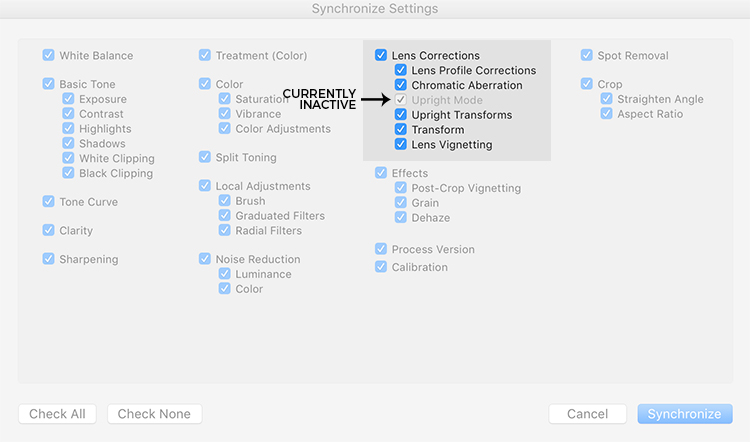
    In the Sync dialog box under Lens Corrections check box, there are three check boxes you want to be concerned with: Upright Mode, Upright Transforms and Transform.

    Image04

    These three boxes determine how Lightroom is going to handle your straightening – whether to analyze each image independently or simply copy the same settings from one image to the next.

    If all three are checked, Lightroom will simply apply the same setting to all of the images, something you do not want because each image requires specific straightening based on its own lines. You’ll notice that Upright Mode is grayed out, telling you that it isn’t active.

    Image05

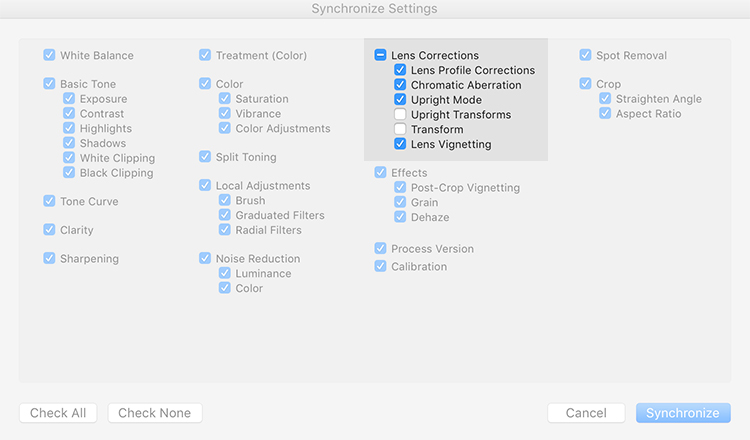
    To do what you want, which is to have Lightroom analyze each image independently and straighten it based in its own needs, you want to ONLY have a check mark in the Upright Mode box. The other two are left blank (see below).

    Image06

    By doing it this way, Lightroom will fix your crooked images, according to the amount of straightening that each image specifically needs.

    How cool is that?

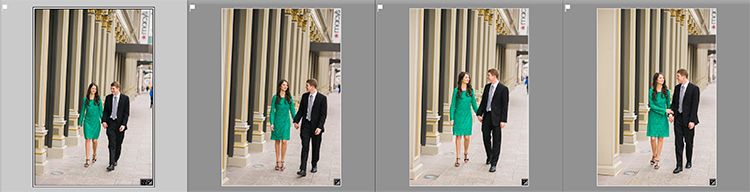
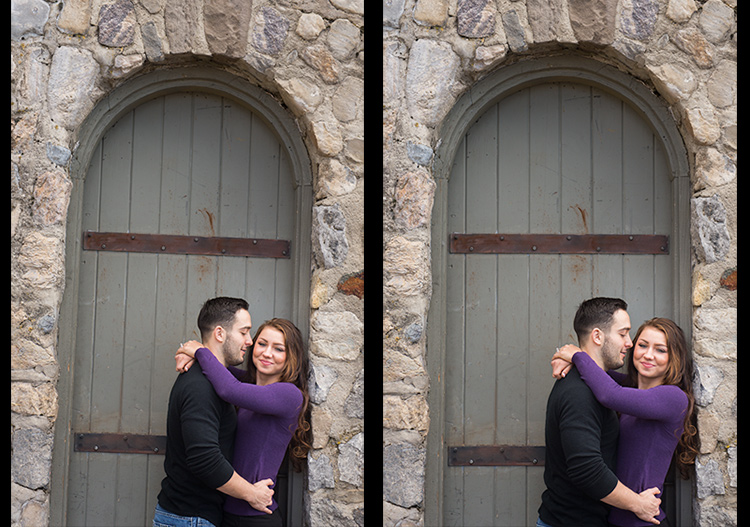
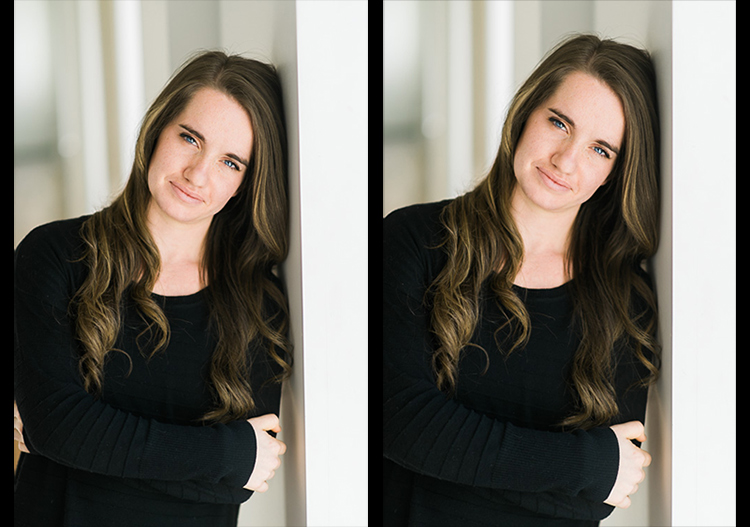
    Take a look at the images below. I took many shots in a sequence of the couple walking, and I want to straighten each one individually. Before learning this technique, I had to straighten each image individually – but not anymore.

    Image07

    Once I fix the first image using the Level button in the Lens Corrections panel, I can then sync the Upright Mode across all of the other crooked images, and each will be analyzed and fixed according to what it needs (even if they are all different amounts).

    Image08

    Look at that. All of my images were fixed with a few clicks. I don’t want to belabor the point here, but I constantly shoot crooked and this little trick saves me hours of tedious straightening over the course of a year.

    Making a LR Preset

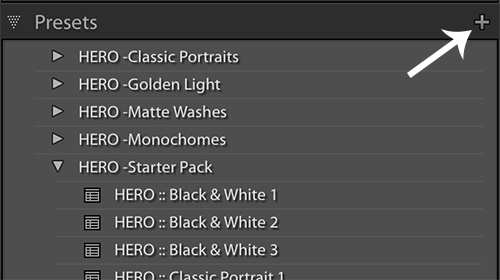
    You can also automate this process by creating preset. You do this by first straightening an image with the Level button found in the Lens Corrections panel of the Develop Module.

    Then, at the top of Presets panel clicking the (+) plus button to create a new LR preset.

    Image09

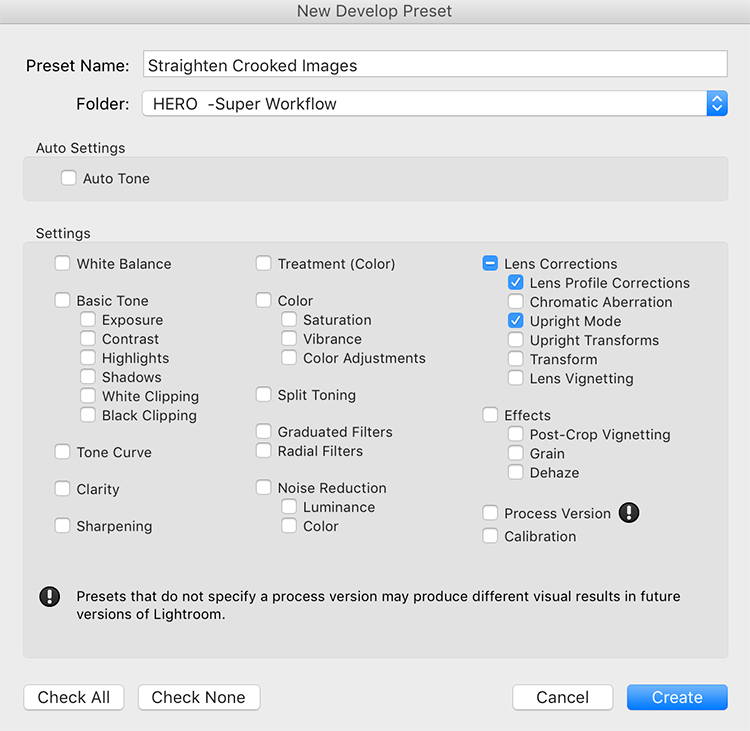
    This will bring up the New Develop Preset dialog box where you choose which settings you want in your preset, the folder you want to store it in, and what name you want to give it. Name your preset something that you will remember, put checkmarks in the Upright Mode checkbox and the Lens Profile Corrections checkbox and hit Create.

    Image10

    Now, when you have crooked images you can hit this preset and almost magically, your images will be straightened compared to the strong lines in the image.

    Image11

    Give it a shot, I think you will find yourself using this technique quite often to straighten your images quickly.

    Image012

    Image013

    googletag.cmd.push(function() {
    tablet_slots.push( googletag.defineSlot( “/1005424/_dPSv4_tab-all-article-bottom_(300×250)”, [300, 250], “pb-ad-78623” ).addService( googletag.pubads() ) ); } );

    googletag.cmd.push(function() {
    mobile_slots.push( googletag.defineSlot( “/1005424/_dPSv4_mob-all-article-bottom_(300×250)”, [300, 250], “pb-ad-78158” ).addService( googletag.pubads() ) ); } );

    The post How to Straighten Crooked Images Fast Using Lightroom by Kelly David Sansom appeared first on Digital Photography School.


    Digital Photography School

  • Natural Light Versus Artificial Light: Which is Better?

    Light is the backbone of photography. Without light, there are no photos. After all, the word photo means light. However, which type of lighting is best: natural or artificial? There are a lot of proponents for either camp, but this article will try and dissect the argument from both perspectives, and give you a chance to add your opinion at the end.

    Natural Light

    natural-light-versus-artificial-light-2689

    The arguments in favor of natural light are many, which means it’s not difficult to see why it is attractive to many photographers.

    The pros of natural light

    Cost

    Natural light costs nothing to make use of; there are plenty of gadgets and accessories available, such as reflectors and diffusers, that do help to maximize results, but even without them, it is easy enough to get beautiful results using natural light, without spending any money. This apparent lack of a financial entry barrier makes it much easier for most photographers to immediately assume a preference for natural lighting.

    Learning Curve

    natural-light-versus-artificial-light-0729

    Learning how to see, manipulate and utilize light, whether natural or artificial, is the most critical skill set for a photographer to learn. Fortunately, these break down into many individual skills that can be learned one at a time. In terms of natural light, a lot of these skills are easy to learn and put into practice. For example, you can read a tutorial on using an area open shade to diffuse and soften the light, then put it into immediate practice ten minutes later.

    Another thing to keep in mind here is that cameras are designed for use in natural light first. So, a new photographer working their way through the technical basics of their camera, such as metering, aperture and shutter speed, is almost certainly learning with natural light, thereby improving both their camera and lighting skills simultaneously.

    Semantics

    This point may seem a bit strange, but I have seen it crop up in various conversations, and it does affect some people’s perceptions. We live in a world that is currently obsessed with the word natural. It seems difficult to go more than five minutes without seeing words like organic, all-natural and free from. Of course, most of this applies to food and health products, but the mindset and lifestyle that go with it have become so expansive, that it has seeped into all manner of other aspects in our lives. Whether or not you buy into that sort of thing, try to ask yourself what sounds better and more appealing: natural or artificial? This may not seem rational in terms of photography (an inorganic, mechanical medium), but the appeal is more of an emotional one, and more often than not, emotion trumps rationale.

    The biggest concern here is one of marketing. A photographer who refers to themselves as a natural light photographer may very well simply be attempting to appeal to the quite large demographic that holds value over that kind of thing.

    The cons of natural light

    natural-light-versus-artificial-light-0962While natural light has its advantages, it is not without its own set of shortcomings.

    Unpredictability

    While the sun is a near constant during daylight hours, the availability of light is only one factor that needs to be taken into account. Clouds and other weather conditions are just a couple examples of things that will alter specific qualities of the light you are trying to work with. Softness, intensity, and color can all change in a split second at the whim of mother nature. If you are attempting to work towards a specific goal, these changes can be a nightmare.

    Night

    After sunset, what do you do if you’re in a situation where you still want (or need) to take photographs. If you’re relying solely on natural light, the answer is: not a whole lot. Many photographers have no problem with this limitation; however, try to imagine what you can achieve with just another hour or two a day working towards your photography.

    Environment

    natural-light-versus-artificial-light-2691

    Aside from its effect on light, shooting outdoors means you are at the constant mercy of the weather. Cold temperatures, rain, snow, and wind can all make for some uncomfortable experiences for both you and your subjects or clients.

    If you’re photographing in areas open to the public, you may be subject to the whims of passers-by. This can lead to an unwelcome audience, or even worse, hecklers. Believe me when I relate, that nothing kills the general mood of a session for both the subject and the photographer faster than excessive and undue attention from strangers.

    These environmental problems can often be solved by finding an indoor location and using window light. While the effects of weather and other people are gone, this solution is not without its own limitations. Window light, while often beautiful for photography, can be quite dim and may require slower shutter speeds than you might like for portrait photography. A lack of space is also a common problem when shooting indoors.

    Artificial light

    natural-light-versus-artificial-light-3213

    Like natural light, artificial light, whether strobes, flashguns or continuous lighting, has its own set of advantages and shortcomings.

    The pros of artificial light

    Convenience

    By owning an artificial lighting solution, you have the means to take photographs at any time day or night, indoors or out, and the weather has no effect on you. If for some reason you want to do food photography at midnight, by all means, go for it.

    If you own a set of flashguns (speedlights), they are not only convenient, but portable as well, and can be taken just about anywhere and set up with ease.

    Versatility

    With studio strobes and the like, the sheer number of ways that they can be used for a vast array of creative results is their strongest selling point. These range from simple one light setups that mimic natural light, to complicated setups with seven or more lights.

    Control

    Another great strength of studio lighting is the control it offers you over your final photograph. By controlling every bit of light in your scene, artificial lighting negates the unpredictability that you get with natural light. If you want a particular look or mood, all that you have to do is set up the lights, and take photos until you have your results. There’s no worry that a cloud will move in and block your light.

    Reliability

    natural-light-versus-artificial-light-4689

    Apart from removing the environmental issues associated with natural light, studio strobes and flashguns are quite reliable. Most models in the moderate price range, and above, are very well made. This means that the power output, as well as color output, is consistent every time it fires. This a huge advantage over the fast changing conditions of natural light.

    The cons of artificial light

    Cost

    natural-light-versus-artificial-light-4563Probably the most off-putting aspect of studio lighting is cost. It doesn’t matter whether you choose studio strobes, flashguns (speedlights), or continuous lighting; decent quality lighting equipment does not come cheap and a good set, along with modifiers, can easily cost over $ 1000. With natural light being a free and capable resource, it’s easy to understand why so many photographers steer clear of artificial lighting.

    Learning Curve

    Another initial disadvantage of studio lighting is the amount of knowledge you have to gain, in order to start using it. It’s very possible to accidentally take a beautifully lit photo in natural light. With artificial light, that’s next to impossible.

    A lot of photographers, me included, would probably gladly tell you how atrocious their first attempts with studio lighting were. To get good results, you have to spend an enormous amount of time reading and practicing. This involves things like new aspects of aperture and shutter speed in relation to flash, qualities of light, effects of modifiers and the dreaded inverse square law.

    So, which is better?

    In my opinion? Neither and both are better.

    It depends on the job at hand. Both are just tools to be used at each photographer’s discretion. After all, nobody walks into a newly built house and waxes lyrical about the type of hammers that were used. Good photography is good photography, no matter how it was made. If something screams out to be lit with natural light, then natural light is better. Likewise with artificial light.

    Each method is capable of stunning results and I would rather have a full toolkit to use for every opportunity, than miss out on something because I restricted myself from using the right tool for the job.


    Editor’s Note: This is one of a series of articles this week that are Open for Discussion. We want to get the conversation going, hear your voice and opinions, and talk about some possibly controversial topics in photography.

    Give us your thoughts below on the article above on natural versus artificial, and watch for more discussion topics this week.

    See all the recent discussion topics here:

    • 7 Commonly Accepted Photography Beliefs Debunked
    • Is HDR dead? Some dPS Writer’s Thoughts on this Controversial Topic
    • How to Find your Personal Photographic Style
    • Why You May be Failing to Reach Your Potential as a Photographer
    • To Process or Not To Process? Let’s Discuss
    • How much do you process your images? – a dPS POLL
    • Does the Camera Matter? SLR versus Mirrorless versus Smartphone

    googletag.cmd.push(function() {
    tablet_slots.push( googletag.defineSlot( “/1005424/_dPSv4_tab-all-article-bottom_(300×250)”, [300, 250], “pb-ad-78623” ).addService( googletag.pubads() ) ); } );

    googletag.cmd.push(function() {
    mobile_slots.push( googletag.defineSlot( “/1005424/_dPSv4_mob-all-article-bottom_(300×250)”, [300, 250], “pb-ad-78158” ).addService( googletag.pubads() ) ); } );

    The post Natural Light Versus Artificial Light: Which is Better? by John McIntire appeared first on Digital Photography School.


    Digital Photography School

  • Does the Camera Matter? SLR versus Mirrorless versus Smartphone

    Camera comparisons

    When our wonderful editor Darlene asked me to write an article comparing camera types my first thought was to show you a series of photos just like the following, and ask you to guess which ones were taken, with which cameras. It’s a fun idea, so let’s do it.

    This is the list of cameras.

    1. Olympus D345 (5 megapixel compact, purchased 2006)
    2. EOS Digital Rebel XT (8 megapixels APS-C dSLR, purchased 2006)
    3. EOS 40D (10 megapixel APS-C dSLR, purchased 2007)
    4. EOS 5D Mark II (21 megapixel full-frame dSLR, purchased 2010)
    5. iPhone 5
    6. Fujifilm X-T1 (16 megapixel APS-C mirrorless, purchased 2014)

    Here are the photos:

    camera-comparisons-2

    camera-comparisons-3

    camera-comparisons-4

    camera-comparisons-5

    camera-comparisons-6

    Camera comparisons

    How did you do? Here are the answers.

    A. EOS 5D Mark II
    B. Olympus D345
    C. Fujifilm X-T1
    D. EOS 40D
    E. EOS Digital Rebel XT
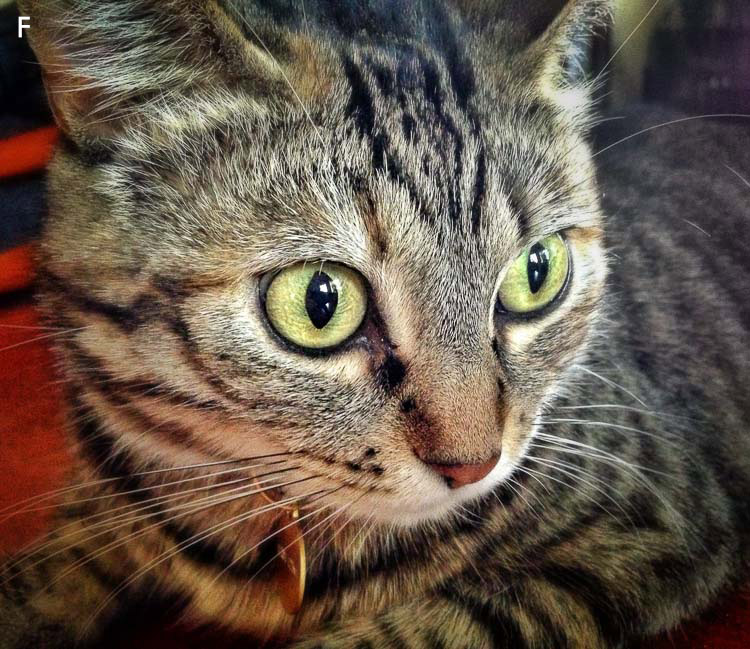
    F. iPhone 5

    Now, this isn’t a fair comparison, for several reasons. One is that these photos are reproduced here at 750 pixels wide. You really need to see them uncropped to appreciate the difference in quality and size (for example, the photo taken with the 5D Mark II is four times the size of the one taken with the Olympus D345).

    Also, these photos don’t tell you much about the dynamic range capability of each camera, or how well they perform at high ISO settings. The Olympus D345 doesn’t even have a high ISO setting – all photos are taken at a fixed ISO of 50 (something I didn’t realize until after I bought it).

    Then there’s the variable of lens choice, which also affects image quality, plus post-processing (clarity and sharpness adjustments in particular can make a big difference to the apparent sharpness of an image).

    All this exercise does, is tell you that if all you want to do is post photos online, then just about any camera will suffice. John Lennon is quoted (probably apocryphally) as saying:

    “When I went to school, they asked me what I wanted to be when I grew up. I wrote down ‘happy’. They told me I didn’t understand the assignment, and I told them they didn’t understand life.”

    To paraphrase, anybody who asks what camera you took a photo with probably doesn’t understand photography. Okay, that’s a bit harsh, but it’s a question that misses the point. Nobody who matters cares what camera you you used to take the photo.

    If you submit a photo to a magazine, a photography competition, or a gallery, unless there’s a specific reason they need to know (good luck sending a photo taken with a Canon camera to Nikon Photo magazine) they don’t care.

    All that matters is the strength of the photo – did you capture an interesting subject? Is the composition strong? Is the lighting beautiful? Does your photo move people, inspire emotion? None of this has anything to do with the camera, and everything to do with the photographer.

    So, why do we have this endless discussion about cameras? Well, for most of us photography is a hobby and discussing gear and lenses is all part of the fun.

    But sometimes the discussion is more purposeful. Cameras are tools, and good photographers learn to either adapt to the tool at hand, or choose the best one for the job. The question is not what camera is best, but which camera is best for you, and the purpose you have in mind. Discussions about what cameras are best for what subject can go on a long time!

    So, bearing in mind I’ve been asked to write about SLRs vs mirrorless cameras vs smartphone cameras, let’s take a look at which each of these tools does.

    The Digital SLR

    SLR cameras replaced rangefinders sometime in the 1960’s, as the camera style of choice for most photographers. The main advantages of SLRs is that, unlike rangefinders, the viewfinder shows you exactly what the lens sees (or 95% or so, of it anyway).

    Until about six years ago the digital SLR was the undisputed king of 35mm and crop sensor camera designs. You get an optical viewfinder that shows you what the lens sees, no matter which lens you use on the camera, and fast and reasonably accurate autofocus in an ergonomic body. Sizes range from small (such as the EOS 100D/Rebel SL1) to massive (the Nikon D5) and the specifications range from entry level, to high-performance professional.

    Where digital SLRs excel (high-end ones at least) is with autofocus tracking of moving objects. That, plus the wide range of available super-telephoto lenses, makes them the camera of choice for most professional sport and nature photographers.

    Camera comparisons

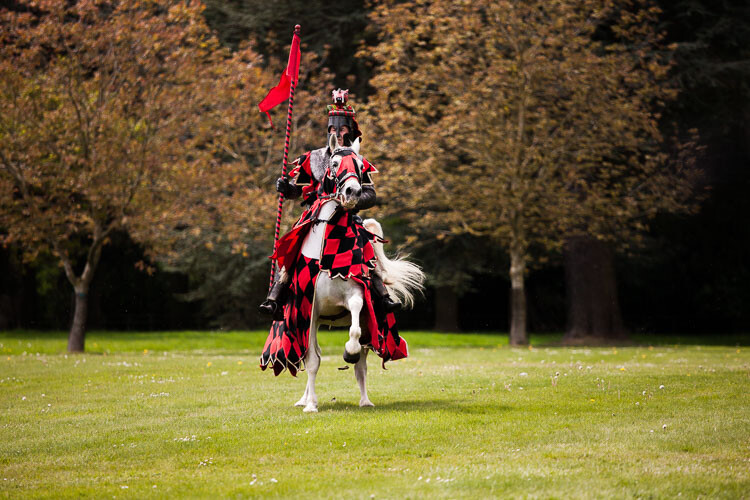
    Digital SLRs are good for capturing photos of fast moving subjects like this knight on horseback.

    The Smartphone

    Apple more or less invented the modern smartphone with its first iPhone back in 2007. Since then smartphones and their cameras have improved immensely. The appeal of the smartphone camera is fairly obvious – most people carry their phone just about everywhere.

    An antidote to the large, heavy SLR, smartphones bring a degree of freedom that photographers hadn’t experienced before. When I asked a friend once how she was going with her EOS 40D (she bought one about the same time as me) she replied that she was “sick of lugging that thing about” and just used her iPhone now.

    Throw in apps like Instagram and Snapseed, and the ability to share photos instantly, and you can see why smartphone cameras are popular. If you’ve seen Apple’s iPhone posters you’ll also know they are capable of creating insanely good images in the right hands.

    The Mirrorless Camera

    The mirrorless camera fills the gap between smartphone and digital SLR that was previously occupied by high end compacts. The best mirrorless cameras have the lens choice, image quality, and functionality of professional digital SLRs in a lighter, cheaper, and smaller body. The biggest difference between the two, in terms of performance, is accurate autofocus tracking of moving subjects, and the gap is getting smaller (whether it will ever be reduced to zero is something we will see in the future).

    Mirrorless cameras appeal to photographers who want high performance cameras in a small body. They are great for street and travel photographers.

    Camera comparisons

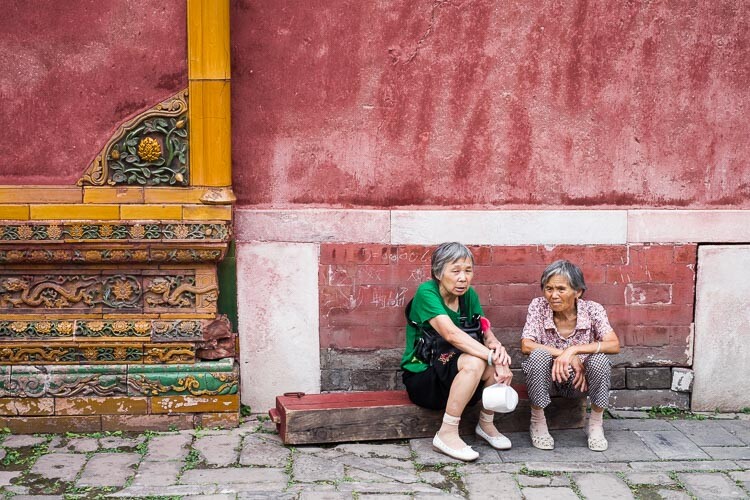
    Mirrorless cameras are great for street and travel photography, helping you take photos like this.

    So, here’s my answer to the question “Does the camera matter?” No it doesn’t. Most people don’t care what camera you took a photo with. You may be curious – for example, if you see someone creating beautiful landscape photos, it’s natural to wonder if buying the same camera and lens will help you do so as well (the answer is that it may help, but it probably won’t – you’d be better off asking how they mastered their craft and how hard they work to get their images). But ultimately, nobody cares. They only care about the photo.

    Should you care what camera you use? Yes, you should, because it is your job as photographer to make sure your tools are up to the job at hand. You need a camera that suits you and your way of working, that fits into your budget, and has all the features you need for the types of photography you do.

    Agree? Disagree? Let us know in the comments!

    If you’d like to learn more about the basics of photography, then please check out my ebook Mastering Photography: A Beginner’s Guide to Using Digital Cameras.


    Editor’s Note: This is one of a series of articles this week that are Open for Discussion. We want to get the conversation going, hear your voice and opinions, and talk about some possibly controversial topics in photography.

    Give us your thoughts below, and watch for more discussion topics each day this week.

    See all the recent discussion topics here:

    • 7 Commonly Accepted Photography Beliefs Debunked
    • Is HDR dead? Some dPS Writer’s Thoughts on this Controversial Topic
    • How to Find your Personal Photographic Style
    • Why You May be Failing to Reach Your Potential as a Photographer
    • To Process or Not To Process? Let’s Discuss
    • How much do you process your images? – a dPS POLL

    googletag.cmd.push(function() {
    tablet_slots.push( googletag.defineSlot( “/1005424/_dPSv4_tab-all-article-bottom_(300×250)”, [300, 250], “pb-ad-78623” ).addService( googletag.pubads() ) ); } );

    googletag.cmd.push(function() {
    mobile_slots.push( googletag.defineSlot( “/1005424/_dPSv4_mob-all-article-bottom_(300×250)”, [300, 250], “pb-ad-78158” ).addService( googletag.pubads() ) ); } );

    The post Does the Camera Matter? SLR versus Mirrorless versus Smartphone by Andrew S. Gibson appeared first on Digital Photography School.


    Digital Photography School

  • To Process or Not To Process? Let’s Discuss

    Processing a RAW file.

    Processing a RAW file can allow a photographer to bring out the full range of tones in an image.

    Often when I’m looking at photos in forums online, or interacting with photographers in person, inevitably someone will proudly claim that the image in questions is “Straight out of the camera”. Almost without fail, this leads to a huge discussion as to the merits of post-processing images, with those on the side of straight-out-of-the-camera images acting as if those photographers who process their images are somehow in the wrong, or are being deceptive.

    There are merits to both sides, to be sure, but what’s amazing is how staunchly both sides defend their positions. At times the discussion becomes more heated than “Mac versus PC” or “Canon versus Nikon”. Having been on both sides of the debate, due to the nature of the work I’ve done in the past, I can understand both sides. However, I can also say that both sides can be somewhat misguided in their arguments at times.

    Processing? NO!
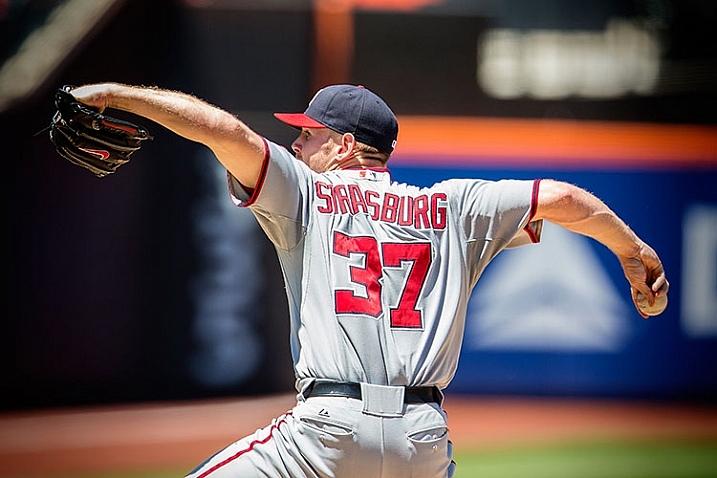
    Unprocessed sports image

    Photojournalists covering sports or other news are often advised not to process images, and some news agencies outright forbid it.

    Those who oppose any post-processing sometimes argue that it is a crutch, that they don’t need post-production to fix their images, because they get it right in camera. That said, there are plenty of reasons why you might not want to process your images, purity of the image aside.

    In the photojournalism world, image manipulation beyond dodging and burning, contrast, and color correction, is a big no-no. Every few months a story shows up in the photo industry news websites that tell the sad tale of another photojournalist who lost his job or a contest because he or she removed or added an element from an image. In the photojournalism arena, this is understandable. Your job is to tell the story visually, and removing or adding elements in an image changes that story. So in that case, it’s best to keep the manipulation to a minimum. Some news agencies have forbidden their photographers from using the RAW format at this point, to reduce the chances that the images have been drastically altered. The goal here is truth, and while the photographer has already added their spin to it by making important compositional and exposure decisions at the time of capture, that’s where it should end.

    Editor’s note: long time National Geographic and Magnum photographer Steve McCurry is under fire for this very issue right now. What are your thoughts on that, is he in the wrong or is it a witch hunt? 

    Event Photography

    Event photographers who shoot thousands of images in the course of a few hours often choose not to process images due to the amount of time it takes.

    Another time where processing images is probably not a great idea is when you are covering large events. For instance, in a past life, I owned a studio that specialized in covering youth sports events, such as soccer and baseball tournaments. On the average Saturday afternoon, it was quite common for me to capture several thousand images on my own, and I often had a team of three or more photographers working for me! Speed is the key at these events, so it’s important that the images be sellable to the participants and their parents as soon as they are shot. This means exposure, white balance, contrast, and saturation must all be good straight from the camera. As soon as a game ended, those images were loaded immediately onto our server to be previewed by customers and participants. There was no time to adjust that many images individually.

    Finally, there are those who simply prefer not to do that much work on a computer with their images. The act of capture satisfies their creative urges, and they are happy with their images.  There is nothing wrong with that. Some might say that working in this manner ensures their exposures are correct in every way when the image is made, which is certainly an admirable way of practicing the art of photography. This philosophy of course, also allows you to go out and do more photography, and spend less time on a computer.

    Those who choose not to process get their images correct in camera, because to them there is no post-processing option. It helps them be better photographers at the time of capture, because they must pay attention to the details of the exposure, check their histogram, adjust white balance, and apply the correct picture style.

    Post-Processing is Part of the Photographic Process
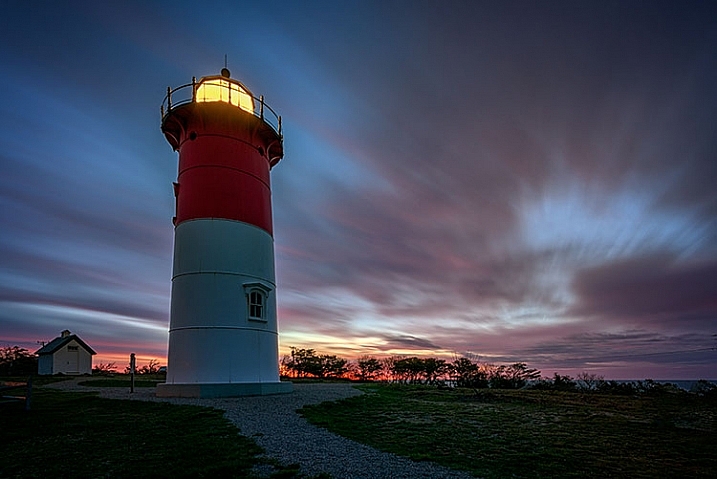
    Processed Landscape Image.

    Landscape photographers process RAW files in order to pull as many tones as possible out of the image, preserving shadow and highlight detail.

    Often, when I hear the words “I get it right in camera,” it often sounds to me like “I don’t know how to use Photoshop.” True or not, for those on the side of post-processing, the photographic process doesn’t end at the press of the shutter button, in the same way it didn’t end for those of us who once shot film, then ventured into the darkroom to develop film and make prints. Those who have never been in the darkroom will likely never understand exactly how much manipulation could be achieved in the darkroom, from color and contrast adjustments, dodging and burning, to masking and photo compositing.

    The truth is, there has NEVER been such a  thing as a “straight out of the camera” image.

    (With possibly the exception of slides, but they can still be altered in the printing stage.)

    Even for those today, who choose to not use Photoshop or other image processing applications, the image is far from being straight out of the camera. You’re simply letting your camera do the processing for you. When you choose a picture style, you’re telling your camera how to handle color, contrast, tone, and sharpness. You can create your own styles as well, manipulating color and contrast in camera to your own liking. Simply because the image wasn’t touched on a computer doesn’t mean it wasn’t processed, or manipulated. Knowing all of this, doesn’t it sound foolish to say that an image straight from the camera hasn’t been processed?

    Let’s get this out of the way quickly: Post-processing is not a crutch. If I look at an image on the back of my camera and say “I’ll fix it later”, then it’s already a bad image, and no amount of processing is going to correct it. I am a staunch proponent of shooting RAW, for many reasons. As an avid landscape photographer, I know full well that the camera can have problems handling a scene with a lot of dynamic range, such as a sunset. I use optical filters on my lens to help with that, but there are still times when the image out of the camera fails to capture the image I saw with my eyes.

    Close attention to the histogram is essential, ensuring that I have all of the tones I need to work with, careful not to clip highlights and shadows. This is very similar to Ansel Adams’ zone system. I know where objects in my scene should register on the histogram, and I adjust my exposure to ensure that’s what I get when I open Photoshop. As Ansel Adams once said, “Dodging and burning are steps to take care of mistakes God made in establishing tonal relationships.” The same is true for color correction.
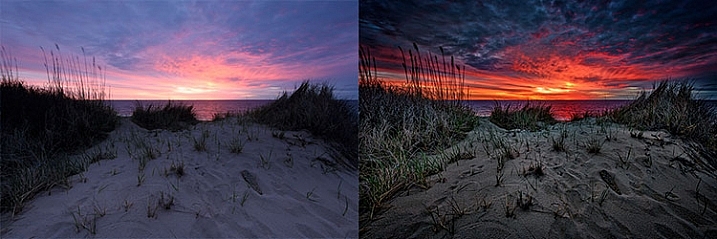
    This side-by-side comparison shows what is possible when processing a RAW file. On the left is the image straight from the camera, using the Standard picture style. On the right, the same image processed in Adobe Camera RAW.

    This side-by-side comparison shows what is possible when processing a RAW file. On the left is the image straight from the camera, using the Standard picture style. On the right, the same image processed in Adobe Camera RAW.

    As a landscape photo artist, I do not consider myself a documentarian. While I’m not personally a fan of compositing images together to create the finished piece, I do believe that all darkroom tools are on the table. This starts with RAW processing, and continues into Photoshop, where I will use adjustment layers, filters, and masks to bring the most out of my image. My intent is to bring out what I felt when I was at the scene, capturing the image. Very rarely, for me, does a camera do that without a little help from me.
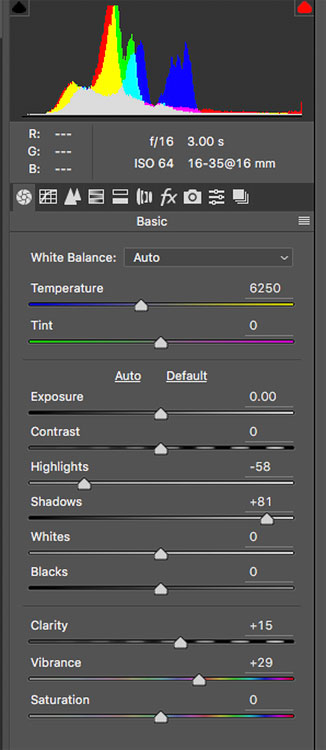
    Adobe Camera RAW

    This is the tool palette in Adobe Camera RAW. Each slider is a separate control over the image, and each tab across the top represents another set of controls, enabling you to get the most out of the image.

    Finally, and this is my biggest reason for shooting RAW when it is feasible, is the purity of the data. If you are capturing JPEGs straight out of the camera, the camera has already decided to throw away a good portion of the data you’ve captured. JPEGs are 8-bit files, across three color channels. For each of the three color channels (RGB) the camera is converting your image, at the time of capture, to 256 shades of gray per color, leaving your image with 16.7 million total possible colors. In addition, the image is compressed, and redundant data is discarded. This compression is lossy compression, and every time you open and do anything to your image, such as removing a dust spot, and then save it again, you are throwing away more data. Eventually, artifacts will appear in the image, ruining it and making it unusable.

    Today’s RAW files are 14-bit files, meaning each color channel contains 16,384 shades of gray. This means 4 trillion total colors are available in the image. Issues such as banding and artifacting, which can arise when using JPEGS, are nearly nonexistent issues when editing a RAW file. I’ve seen JPEG banding in portraits where the skin tones change, and I’ve seen it happen in landscape images where the sky transitions from a vibrant blue to a pale orange at sunset. It can happen to any image. So even if I plan to do nothing to my image but remove a dust spot, it’s worth starting with a RAW file that requires some processing. Even if you oppose post-processing, it’s quite easy to apply a picture style the same way the camera does, and export a JPEG.
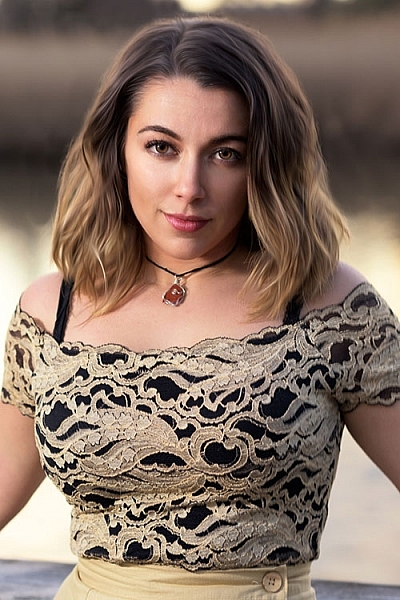
    Processed Portrait

    Portrait photographers often choose to process images to allow them to create a feeling about their subject, in addition to allowing them to retouch the image, and make their subject look their best.

    Conclusions

    Honestly, there’s no right or wrong way to work with your images. After all, a photographer’s work is very personal to them, and everyone chooses to work in their own way. When I can, I prefer processing my images and getting the most from the file. When the situation calls for it, I will shoot JPEG, knowing full well I won’t be able to make adjustments later, so I make sure it’s right when I push the shutter button.

    What do you prefer, and why? Do you process or not?


    Editor’s Note: This is one of a series of articles this week that are Open for Discussion. We want to get the conversation going, hear your voice and opinions and talk about some possibly controversial topics in photography. Let’s get it started here – do you agree or disagree with the points above? Do you have any others to add? Give us your thoughts below, and watch for more discussion topics each day this week.

    See all the recent discussion topics here:

    • 7 Commonly Accepted Photography Beliefs Debunked
    • Is HDR dead? Some dPS Writer’s Thoughts on this Controversial Topic
    • How to Find your Personal Photographic Style
    • Why You May be Failing to Reach Your Potential as a Photographer

    googletag.cmd.push(function() {
    tablet_slots.push( googletag.defineSlot( “/1005424/_dPSv4_tab-all-article-bottom_(300×250)”, [300, 250], “pb-ad-78623” ).addService( googletag.pubads() ) ); } );

    googletag.cmd.push(function() {
    mobile_slots.push( googletag.defineSlot( “/1005424/_dPSv4_mob-all-article-bottom_(300×250)”, [300, 250], “pb-ad-78158” ).addService( googletag.pubads() ) ); } );

    The post To Process or Not To Process? Let’s Discuss by Rick Berk appeared first on Digital Photography School.


    Digital Photography School
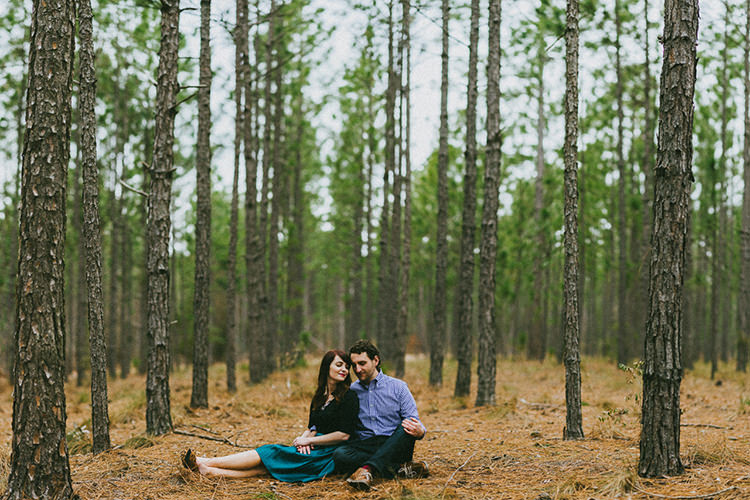
  • How much do you process your images? – a dPS POLL

    This week on dPS it’s all about things that are debatable and open for discussion. One thing that’s always a hot item is post-processing. Do you do it or not? If so how much? If you want to get in on that discussion head over to:  To Process or Not To Process? Let’s Discuss
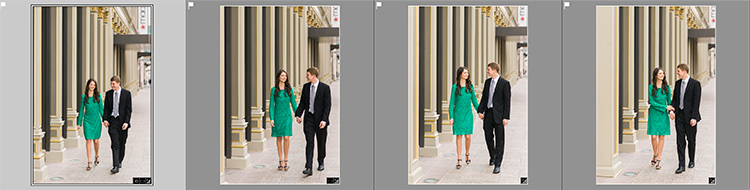
    How much do youprocess your images_

    Then fill in this poll and tell us – how much do you process? Are you a minimalist or do you take your time and make art with each image?

    Note: There is a poll embedded within this post, please visit the site to participate in this post’s poll.


    Editor’s Note: This is one of a series of articles this week that are Open for Discussion. We want to get the conversation going, hear your voice and opinions, and talk about some possibly controversial topics in photography.

    Give us your thoughts below, and watch for more discussion topics each day this week.

    See all the recent discussion topics here:

    • 7 Commonly Accepted Photography Beliefs Debunked
    • Is HDR dead? Some dPS Writer’s Thoughts on this Controversial Topic
    • How to Find your Personal Photographic Style
    • Why You May be Failing to Reach Your Potential as a Photographer
    • To Process or Not To Process? Let’s Discuss

    googletag.cmd.push(function() {
    tablet_slots.push( googletag.defineSlot( “/1005424/_dPSv4_tab-all-article-bottom_(300×250)”, [300, 250], “pb-ad-78623” ).addService( googletag.pubads() ) ); } );

    googletag.cmd.push(function() {
    mobile_slots.push( googletag.defineSlot( “/1005424/_dPSv4_mob-all-article-bottom_(300×250)”, [300, 250], “pb-ad-78158” ).addService( googletag.pubads() ) ); } );

    The post How much do you process your images? – a dPS POLL by Darlene Hildebrandt appeared first on Digital Photography School.


    Digital Photography School