Blog

  • Think Tank Signature 13 Camera Shoulder Bag Review

    There are certain features most people would expect to find in any camera bag, such as spacious areas for holding gear, a shoulder strap, and pockets in and around the bag for carrying smaller items like memory cards, a flash, or even car keys. Judged by those standards, the Think Tank Signature 13 Shoulder Bag excels admirably. But handing out that kind of compliment for a camera bag is like giving kudos to a car company for including seats and a steering wheel on one of their latest sedans.

    Pick nearly any camera bag on the market and you’ll find options and features similar to what you might see in Think Tank’s latest creation. But evaluating a bag like this by talking about a bulleted list of features kind of misses the point. This is one case in which the whole truly is much more than the sum of its parts, and the result is a capable and refined camera bag that will suit the needs of most photographers quite well.

    Think Tank Signature 13 Camera Shoulder Bag Review

    The Think Tank Signature 13 Camera Shoulder Bag

    I have owned and used many camera bags over the years, from freebies that were included with a camera to expensive models uniquely suited to specific purposes. In my closet right now I’ve got backpack-style bags, messenger-style bags, over-the-shoulder bags, sling-style bags, and even one small little oddity whose purpose I can’t even articulate clearly. The Think Tank Signature 13 easily rests at or near the top of this relatively crowded consortium. Not necessarily because it has one single standout feature, but because it does many things so well and with a level of craftsmanship and refinement that I don’t often see especially on less expensive bags.

    Design and appearance of the Think Tank Signature 13

    The first thing I noticed when I got this bag, which held true for everyone to whom I showed it, is that the Signature 13 looks fantastic. Not that a nice-looking bag will help you take better photos or protect your gear, but if you value style then the Signature series is definitely worth a look. I have the Slate Gray version. It also comes in a greenish color called Dusty Olive, which I didn’t see in person although online it seemed a little too dull for my taste.

    Bold leather accents and thick metal clasps made some heads turn when I brought the bag to my office. But these flourishes could also send a message to would-be camera pilferers that inside the bag is a lot of gear worth stealing. It’s not a drawback of the Signature 13 per se but is a reality of using a nice-looking camera bag. It’s also one of the reasons my father continues to keep his camera gear in what’s basically an old padded lunch sack. I do think even he would be tempted by the Signature 13 though, and it’s certainly a cut above some of the black and gray monochromatic nylon bags in my closet.

    Details

    Small, but significant, design touches abound, and you’re not likely to find a zipper, clasp, or velcro that isn’t a cut above what you’re used to seeing. The material from which the bag is made feels quite soft and yet surprisingly durable. My wife remarked that it felt a little bit like wool even though it’s actually a blend of nylon and polyester. In terms of overall appearance I like the way the fabric is accented with thick leather trim, hefty and durable clasps, and a generously-padded shoulder strap that distributes weight quite nicely. One of my coworkers stated that this bag would easily be suited to a professional environment such as business travel or public presentations, even though its primary function is to hold camera gear.

    Think Tank Signature 13 Camera Shoulder Bag Review

    Detail of the Think Tank Signature 13

    Size

    The Signature series comes in two sizes. A smaller Signature 10 is designed for mirrorless systems or those without a lot of camera gear, and the larger Signature 13 which can accommodate more equipment and even a 13″ laptop. I have the latter version which I found more than adequate for my camera kit on any given day of shooting. Although if I wanted to put all my gear inside it probably wouldn’t fit.

    A bag like this is not really comparable to something like my Everyday Backpack 30L whose cavernous compartments can swallow up cameras, lenses, laptops, batteries, and a myriad of other accessories all at the same time. The Signature series takes a more measured and thoughtful approach to gear transportation. Instead of lugging everything you own, it’s ideally suited for the times when you want a bag that is small enough to hold the essentials, yet large enough that you can take what you need without having to worry about trade-offs.

    Think Tank Signature 13 Camera Shoulder Bag Review

    Practicalities of the Signature 13

    In terms of regular daily usage there are lots of little details that make the Signature 13 bag pleasant to carry, with a couple of small nagging items that cast a shadow on an otherwise outstanding product.

    Shoulder strap is a cut above

    The main shoulder strap is, and I hope I don’t come across as overly effusive, exceedingly comfortable and ideally suited to carry a bag of this size with whatever gear you choose to put in it. Plenty of the bags in my collection seem to treat the shoulder strap as an afterthought, with basic nylon construction and perhaps a small sliding pad to keep your shoulder from hurting too much. The shoulder strap on the Signature 13 bag is almost worth the price alone, with thick luxurious (I’m serious, it’s really nice) padding running a full 20 inches throughout the length of the strap and a classy leather accent to boot. It’s a huge improvement over most other shoulder straps and makes carrying the bag an easy and pleasant experience.

    There’s also a traditional handle for times when you want to grab the bag with one hand. While that isn’t generally how I use my camera bags I did find it to be sturdy and comfortable.

    Think Tank Signature 13 Camera Shoulder Bag Review

    These clasps fasten securely but I did sometimes have trouble opening them quickly.

    Bag flaps

    Inside the bag are other equally thoughtful considerations that are quite well suited to the needs of photographers. The main protective flap closes securely with two metal clasps on the front of the bag. They work just fine but did leave me frustrated a few times when I needed to open the bag quickly or close it without looking down.

    The flap opens to reveal a front pouch with a dual-position strap to hold it shut, and an additional zipper pouch behind it for thin items like a cell phone, memory cards, shot list, etc. I did find myself fishing around in both of these front pouches a bit more than I thought I would, but it’s not really a design flaw so much as it’s a result of the pockets being so deep. There’s also a zippered top for the main storage compartment that acts as a second layer of protection if you’re a bit nervous at the thought of only using the main flap to keep your gear from tumbling out. But fortunately, this flap can be either buttoned to the top flap or tucked away altogether so it stays out of your way unless you really need it.

    Signature 13 interior

    The main cavity of the Signature 13 bag is, in many respects, standard fare for this type of storage device. Look inside and you will see a deep and well-padded chamber with plenty of velcro-style dividers that you can customize and reposition to your heart’s content. Some people like this style of bag and others don’t, so I can’t say whether this will specifically work for every photographer. But if you are the kind of person who likes to use velcro dividers to separate your gear then the Signature 13 will certainly work very well for you.

    It’s not so much the functionality of this bag that differentiates it from others on the market, but the thoughtful construction and design choices made when creating it. One example is the quilted nature of the inner pocket and dividers which help them feel strong, sturdy, and quite durable. I found the dividers just as easy to use and reposition as any bag of this type, but they did have a more solid, confident feel than most others.

    Detail inside the Signature 13

    Detail inside the Signature 13

    Bottom of the Signature 13

    Rounding out the design of the Signature 13 is a massive leather base that extends the length of the bag and wraps about an inch up on either side as well. I don’t know if it’s because of this leather base or the sidewall construction, but I never had issues with the bag tipping over when I set it down regardless of whether it was empty or stuffed with cameras and lenses. Combine this with the nicely padded exterior and I would feel quite comfortable taking this bag on an extended trip, knowing my gear would be safe whether tossed in an overhead luggage bin or sitting among suitcases in the trunk of my car.

    The Verdict

    It probably sounds like I’m heaping compliments on this bag and to some extent that’s true. But I feel like praise is best given when it is well earned and that is certainly the case here. Still, I do have a few issues with the Signature 13 and would be remiss in not pointing them out for other buyers.

    Con – the bag is not waterproof

    For one, the bag is not entirely waterproof which could be a major drawback for some photographers who carry their gear in all kinds of weather. I do believe it would keep things dry well enough (though I must admit I am loathed to take it out in a rainstorm to test this out) but even so, the copious amounts of leather accents would likely get damaged or at least discolored in heavy amounts of rainfall. According to Think Tank the polyester/nylon shell is water resistant, so in theory, it should keep your gear safe and dry. It also comes with a collapsible nylon shell if you do find yourself caught in a downpour.

    Think Tank Signature 13 Camera Shoulder Bag Review

    The Signature 13 easily accommodates a DSLR body, 70-200 f/2.8 lens, external speedlight, and an iPad with some room to spare.

    Con – clasps can be a bit clunky to use

    I also think the dual front clasps are a bit impractical, and at times I found myself getting a little frustrated when trying to release or secure them in a hurry. They work just fine for what they are, but I tend to prefer magnetic or snap-based closure mechanisms that are easier to use with one hand or without looking.

    Con  – large price tag

    One other potential drawback is the price which, at $ 249 for the Signature 10 and $ 279 for the Signature 13, is not exactly cheap. For that price, you are certainly getting a high level of quality, but you are also paying for some of the appearance and design elements that just might not matter to some photographers. If the price is your primary consideration you might want to look elsewhere as there are certainly less expensive bags which perform most of the same functions as the Signature series. But you are also not likely to get a bag with such pleasantly pervasive flourishes and design touches.

    Think Tank Signature 13 Camera Shoulder Bag Review

    A sturdy leather base helps the bag sit upright whether empty or stuffed with gear.

    Overall I have found the Think Tank Signature 13 Shoulder Bag to be outstanding and a fine addition to my carrying collection. It’s not revolutionary in any one single way, but it takes the concept of a shoulder-style bag with velcro dividers and enhances it to a level of refinement and craftsmanship that I don’t see in a lot of other bags. If you’re the kind of photographer who likes this type of bag, I heartily recommend the Think Tank Signature 13.

    Rating (out of five stars)

    • Design: 5
    • Ease of Use: 4.5
    • Comfort: 5
    • Durability: 4.5
    • Functionality: 5
    • Overall: 4.5/5

    The post Think Tank Signature 13 Camera Shoulder Bag Review by Simon Ringsmuth appeared first on Digital Photography School.


    Digital Photography School

  • NanGuang releases compact LED panels and accessories for studio use

    Chinese lighting and accessory manufacturer NanGuang has revealed a new compact LED light panel for studio use, as well as a wall arm and a background support kit. The Combo 40C LED flat panel light comes with a built-in soft diffuser and features 0-100% dimming control. Stepless color temperature adjustments are possible from from 5600-3200K.

    The light measures 230 x 400 x 60mm and comes with 400 LEDs that in total produce 40W of power and 2115 LM at 5600K. According to the manufacturer the average LED life is 50,000 hours.

    Also new is the NanGuang wall arm which is designed to support most manufacturers’ light heads up to 5kg in weight. The arm folds out for use and can be pushed flat against the wall when not needed. It can also achieve a full range of lateral horizontal and vertical movement and features a 2-section, extendable arm (93-180cm), a reversible lighting spigot and a 1/4in tripod screw.

    The new Background Support Kit can be dismantled for easy transport to location shoots and comes with two tripod-style support stands and three locking cross bars of 100cm length each. It can be used with full or half-length rolls of background paper or any other type of background material that requires a simple pole support. The maximum width is 300cm and the height can be adjusted up to 286cm.

    All new NanGuang products are available through distributor Kenro in the UK. The Combo 40C is £179.94 ($ 232), the wall arm will set you back £99.96 ($ 129) and the background kit has a price tag of £77.94 ($ 100). No US pricing information has been released yet.

    Articles: Digital Photography Review (dpreview.com)

  • Mike Olbinski releases stunning sunset time-lapse featuring unusual cloud formations

    ‘Tis the season for dramatic weather in the middle parts of the US, and as such, it’s also the season for incredible time-lapse videos. If you thought we reached peak weather time-lapse just last week when we posted Chad Cowan’s excellent Fractal, well, see what you think after watching Mike Oblinski’s latest.

    He captured unusual cloud formations called Undulatus Asperatus rolling across the plains of North Dakota at sunset. As always, we recommend going full screen and cranking the resolution up.

    Articles: Digital Photography Review (dpreview.com)

  • Flickr’s Redesigned Profile Page

    Following on the successful redesign of the Flickr homepage last Fall, today Flickr is announcing the redesign of the photographer profile page. As far back as I can remember the Flickr profile page has remained the same — probably at least over the past decade or so — complete with the odd request for your airport code, even though that information never seemed to actually appear anywhere on your profile.

    The new redesign is much more photocentric and offers a beautiful showcase of your most popular photos published to Flickr. Tiny little square thumbnails on the profile page have been replaced by much bigger, bolder versions of your own most popular images in an attractive mosaic format.

    The new profile page will start rolling out to users over the next few days so if you don’t already have it, don’t fret, it’s on the way.

    The redesign makes several changes in terms of what and how the information on your profile page is presented. Some information has been added, some removed and some streamlined.

    Your Most Favorited, Interesting, Commented, and Viewed Photos on the New Flickr Profile Page
    Flickr’s new profile page shows your most favorited photos on Flickr.

    1. Most dramatically, by default the new Flickr profile page has a beautiful mosaic of large sized photos showcasing your 25 most favorited photos on Flickr. Additionally your profile visitors can use a pull down menu to look at your 25 most interesting (as rated by Flickr’s algorithm) photos, along with your most viewed and commented photos. This is a super helpful way to get a quick impression of the type of photographer you are looking at when you find someone new that you might want to follow on Flickr. Personally this is my favorite feature of the new profile page.

    Your Custom Photo Showcase on the New Flickr Profile Page
    Flickr’s new profile page lets you customize 25 photos on your page.

    2. Because some people would rather show off other photos than their most favorited, popular, commented or viewed, Flickr now also allows you to add a custom collection of 25 photos as chosen by you manually from your stream. So you can showcase up to 50 total photos now on the profile page between your own chosen photos and Flickr’s selections. The organizer used to build your custom mosaic is super intuitive and allows you to review your albums or search for specific photos you want to add. You can change what photos appear here whenever you want. I’m looking forward to the creative ways that users come up with using this mosaic.

    Links to Your Other Social Networks on the New Flickr Profile Page
    Flickr now makes user view counts public.

    3. With the new profile page Flickr now shows you how many views a user has racked up on Flickr. If there is anything even mildly controversial about the new page design it would probably be this. In the past your total view count was available to you and you only through the stats page if you were a paid Pro account. Now your view count is posted publicly on your profile page for the entire world to see. So for the first time we can see that the Obama White House page has racked up an impressive 303 million views on Flickr, while alas, the current Trump White House has only racked up only a mere 2.1 million views on Flickr thus far.

    Not that anyone’s keeping track or cares about these type of things though, am I right? ?

    4. On the old profile page Flickr allowed you a single website link. On the new profile you can include a link to your website and also additional links to your pages on Facebook, Twitter, Instagram, Pinterest and Tumblr.

    Testimonials Make the Cut in the New Flickr Profile Page
    Testimonials make the cut for the new Flickr profile page.

    5. Testimonials are still included in the new Flickr profile page. I think it’s been several years since I’ve actually written someone a testimonial, but they were a lot of fun to get and give back in the old school days of Flickr. I’m glad they made the cut on the new page.

    6. The old profile page prominently featured a link to everyone you were following on Flickr and featured the avatars of the last 16 people you had followed. This section has now been reduced to a small link at the top of the page linking to everyone you follow listed alphabetically.

    7. The old profile page had a link to your favorites from other Flickr members including thumbnails of the last 12 photos that you’d favorited. The new page has a smaller link that just takes people directly to your favorites page.

    8. Hometown and current location information has been retained and is still shown on the new profile page, but gender and relationship status has been removed.

    9. Additional links on the new profile page include links to a photographer’s tags (listed alphabetically), geotagged photos (shown on a cool interactive map), links to your favorites and your groups.

    Large Photos You are Tagged in on the New Flickr Profile Page
    Photos you are tagged in are larger.

    10. Photos of a user are featured in much larger format with a link to all of the photos you are tagged in on Flickr.

    Overall I think the new Flickr profile page is a terrific refresh to the site. It is good to see that Flickr continues to innovate finding fresh new ways to share photos. Although not the largest photo sharing site on the web today, Flickr is still my personal favorite and where I keep my primary archive of images. As a paid pro account (old skool) I am provided an unlimited amount storage for full high res photos at $ 49.99/year — a huge bargain. New Pro users get 1TB instead of unlimited storage so if you are old skool Pro *don’t* let that subscription expire. I also get detailed stats and an ad free browsing experience both for myself and for people who view my photo pages. If you are not Pro on Flickr already you should definitely consider it. It’s a wonderful community of photographers on the web where I personally interact on a daily basis.

    Anyways, nice job to team Flickr on another big improvement to the site. Keep up the good work! More details in the help forum on the new page here.

    You can follow my own photography on Flickr here. ?


    Thomas Hawk Digital Connection

  • Photographer captures Miami Beach air show with Nikon 800mm and custom rig

    Jim Winters with his TRIAXEZ rig. Photo by Pete Boden

    The AF-S Nikkor 800mm F5.6 VR is an absolute beast of a lens. Shooting handheld with it for more than a few seconds is pretty much unbearable unless you’re a champion bodybuilder. Wanting it utilize it for aviation photography, Jim Winters built a rig to accommodate the lens and a camera body that he can use for hours.

    His ‘triple axis’ TRIAXEZ rig includes a counterweight and 12V battery. The battery provides additional counterweight to balance the rig – an earlier evolution used lead pellets as counterweights – and also provides charge to the camera for long shooting sessions. Winters says he can even use it to charge his phone. The whole thing is easily transported to and from shooting locations thanks to a pair of wheels.

    It’s a pretty clever piece of engineering, and the proof is in the images below, shot at the National Salute to America’s Heroes in Miami Beach over Memorial weekend.

    Photo by Jim Winters
    Photo by Jim Winters
    Photo by Jim Winters

    It looks like the rig is working well for Winters, but he’s envisioning ways to improve it. ‘Due to the weight of the rig assembled with lens and counterweight, I was experimenting with a single shoulder mounted rig. You would look through a POV set of glasses so that you don’t have to look through the camera body, nullifying the need for a counterweight.’ That’s a pretty enticing solution, but in the meantime, we think he’s done an excellent job of adapting his equipment to his needs.

    See all of his photos from the Miami Beach show at his Team Nikon Miami website.

    Articles: Digital Photography Review (dpreview.com)

  • Aromatic Art: Empty NYC Trash Bins Turned into Beautiful Floral Bouquets

    [ By WebUrbanist in Art & Street Art & Graffiti. ]

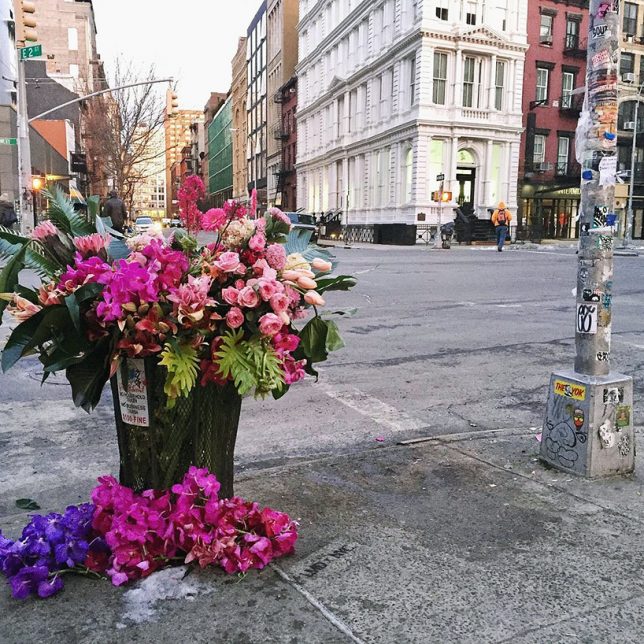
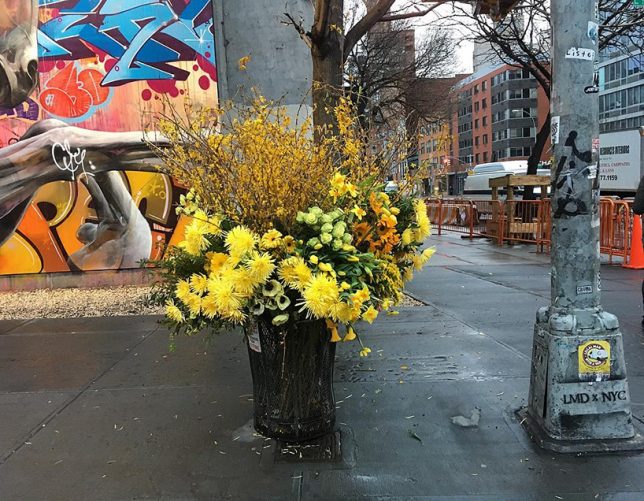
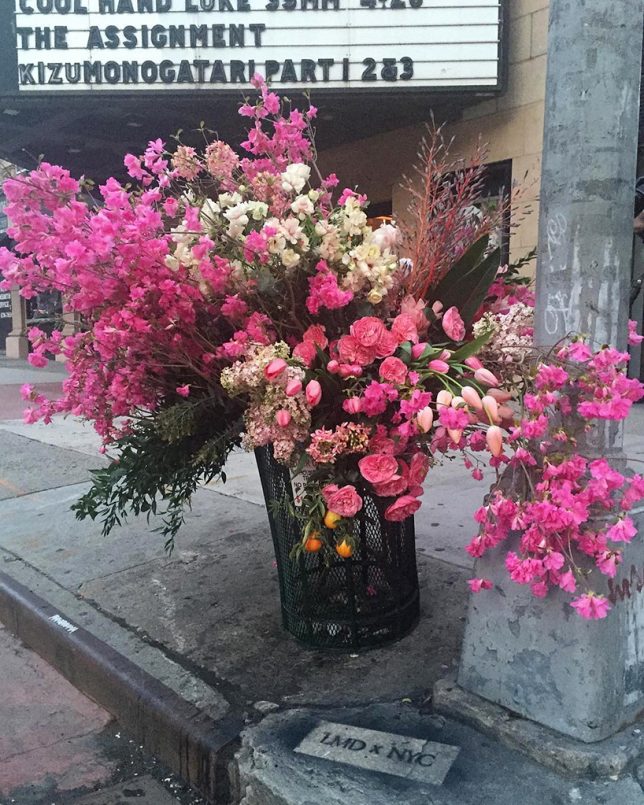
    Sprouting up alongside the streets of New York City, garbage cans packed with colorful flowers are turning repelled waste receptacles into attractive centers of attention for garbage-weary pedestrians.

    Floral designer Lewis Miller has been turning heads — passersby are quite literally stopping to smell the roses (and other plants) appearing in his carefully arranged bouquets, each unique and site-specific.

    His ongoing project takes empty bins and uses them as blank canvasses, creating botanical art through sunflowers, azaleas, and other more exotic species. Something about the juxtaposition with beat-up wire-mesh containers makes them all the more stunning, too.

    “We are storytellers through the art of floral design, transforming an arrangement into a love song and an event into an indelible experience,” says the artist. Different arrangements also pick up patterns and colors from their context, be it stickers, signs, architecture or other street art.

    The temporary installations may not be a permanent solution for bad-smelling trash in a city well known for its street-side waste, but at least they offer a colorful (if passing) reprieve from the normal contents of these containers.

    Share on Facebook


    [ By WebUrbanist in Art & Street Art & Graffiti. ]

    [ WebUrbanist | Archives | Galleries | Privacy | TOS ]


    WebUrbanist

  • Lee Filters introduces Solar Eclipse filter and new filter wash fluid

    Lee Filters has announced it has a new filter aimed at those wanting to capture the phases of a solar eclipse. The Solar Eclipse Filter is a deep blue and cuts twenty stops of light to make brightness levels more manageable for regular cameras.

    The company says it uses a blue coloration to remove damaging infrared from the sun’s rays, so users should expect to perform some color correction in post-production. As a starting point, Lee recommends bracketing around an exposure of F8 at 1/800sec and ISO 800, and points out that the filter is designed for the stages in which the sun is in partial eclipse so it needs to be removed to record the totality stages.

    The Lee Solar Eclipse filter will be available for each of Lee’s three systems.

    As we all know, aiming into the light shows up dust and dirty on our lenses and filters, so it is timely that Lee has also introduced a new filter cleaning fluid. ClearLee Filter Wash comes in a spray bottle of 50ml or 300ml and is formulated to remove grease from glass and resin filters.

    For more information see the Lee Filters website. http://www.leefilters.com

    Pricing exclusive of tax
    Solar Eclipse Filter (Seven5 System) – £60.50/$ 95
    Solar Eclipse Filter (100mm System) – £89.10/$ 150
    Solar Eclipse Filter (SW150 System) – £113.30/$ 200
    ClearLee Filter Wash 50ml Bottle – £7.00
    ClearLee Filter Wash 300ml Bottle – £20.00

    Press release

    Solar Eclipse Filter

    Solar eclipse photography is becoming increasingly popular, and achieving good results can be surprisingly straightforward. However, without the right sort of filter, results will be blown out and overexposed – even at the lowest ISOs and fastest shutter speeds.

    In response to the needs of those who often travel the world to witness this fascinating phenomenon, LEE Filters has introduced the Solar Eclipse Filter. Available for the Seven5, 100mm and SW150 systems, the Solar Eclipse Filter is capable of reducing the intensity of light by 20 stops, bringing the exposure range down to a manageable level. It is designed to allow the user to capture the partial phases of an eclipse (the stages before and after total eclipse) with accuracy and consistency. The filter should be removed when photographing totality.

    The filter simply slots into the standard LEE Filters holder, and features a foam seal at the rear, to ensure a snug fit and to avoid light leaks.

    It should be noted that the Solar Eclipse Filter is suitable only for photography of eclipses, and is not recommended for general, long-exposure landscape photography. This is because it is designed to filter out some of the sun’s harmful infrared rays, and is therefore very blue in colour. Any colour cast affecting eclipse images can be corrected in postproduction, or the images converted to black and white.

    Pricing
    Solar Eclipse Filter (Seven5 System) – £60.50 (Excl VAT)
    Solar Eclipse Filter (100mm System) – £89.10 (Excl VAT)
    Solar Eclipse Filter (SW150 System) – £113.30 (Excl VAT)

    ClearLEE Filter Wash

    In the course of the average photographic day, filters can be exposed to all sorts of potentially damaging conditions – from rain to sand to salt spray from the sea – not to mention grubby fingerprints from being handled.

    Keeping filters clean not only increases their lifespan, it also means images retain their clarity and sharpness, as the sort of softness that arises from a dirty filter can be almost impossible to correct in postproduction.

    ClearLEE Filter Wash has been specially formulated to cut through dirt and grease quickly, efficiently and above all, safely, and is suitable for use on both resin and glass filters.

    Supplied in an aluminium bottle with a spray top, ClearLEE Filter Wash is available in 300ml and a smaller 50ml size, which is ideal for dropping into a camera bag when heading out on a shoot.

    To use, simply spray directly on to the filter, then wipe with a clean microfibre or lint-free cloth. For best results, buff the filter with a fresh cloth or tissue.

    Pricing
    50ml Bottle – £7.00 (Excl VAT)
    300ml Bottle – £20.00 (Excl VAT)

    For further information, contact LEE Filters www.leefilters.com

    Articles: Digital Photography Review (dpreview.com)

  • Canon demonstrates its cameras’ low light capabilities in two new videos

    Canon US has published two new videos that show off the low-light capabilities of several of its camera models. The company says “See Beyond Darkness and See the Light showcase the capabilities of Canon imaging technology which enables researchers, professional photographers, cinematographers and enthusiasts to shoot impactful clear and crisp imagery, even when masked in darkness due to extremely low-light conditions.”

    In “See Beyond Darkness” Director of Photography Andy Casagrande records images of a rare biofluorescent turtle found only in the remote, unspoiled reefs of the Solomon Islands, using the Canon ME20F-SH Multipurpose Camera and EOS-1D X DSLR. In “See the Light” Canon cameras were used to capture the beauty of bioluminescent creatures under the sea, the grandeur of the extremely difficult-to-photograph Aurora Borealis (Northern Lights), and the wonder of the earth from far above it. Canon’s EOS C300 Mark II, ME20F-SH, and EOS C500 were used to capture all of the imagery in this video.

    In addition to the videos you can view a gallery of still images and behind-the-scenes videos for See Beyond Darkness and See the Light on the Canon US website.

    Articles: Digital Photography Review (dpreview.com)

  • Five Tips for Fun Family Photos

    It’s family photo time!

    Grab a tripod for your phone or DSLR, a shutter remote (if you don’t want to mess with the self timer) and some candy to bribe the kiddos.

    We’ve got just a few tips from arranging your pretty faces, to going totally nuts, that’ll ensure a fun time taking the pics and an even funner time enjoying them forever.

    p.s. Family photos make perfect Father’s Day gifts for dads and grandpas. Save 20% on all photo prints at Parabo Press through 6/7 with the coupon PJDAD.
    (…)
    Read the rest of Five Tips for Fun Family Photos (433 words)


    © laurel for Photojojo, 2017. |
    Permalink |
    No comment |
    Add to
    del.icio.us

    Post tags:

    The post Five Tips for Fun Family Photos appeared first on Photojojo.


    Photojojo

  • Opinion: 6 reasons why VR isn’t ready to succeed, and 1 reason why it will

    Virtual reality*, or VR, has the potential to break one of the basic tenets of photography: that it’s fundamentally a medium based on looking at an image, rather than being immersed in, or part of, an image. However, despite years of technology development, VR has never quite gained traction beyond tech enthusiasts.

    The problem certainly isn’t a lack of innovation or investment. In the consumer market, companies like Samsung, Ricoh, and Nikon have all introduced 360º cameras at reasonable price points, and while they’re fun, none has come up with a product that rocked the world.

    At the professional level, companies like Google and Nokia have put a lot of R&D into platforms and products, and while they’ve achieved some level commercial success, VR remains a somewhat niche market. Meanwhile, media organizations such as The New York Times and USA Today have created good content, but the masses aren’t exactly rushing to it.

    In late 2015 and 2016, The New York Times sent Google Cardboard to all their subscribers in preparation for watching VR content.

    At a personal level, I’m excited about VR technology and its potential change the way we experience imaging. I’m even the guy that came back from NAB2016 so enthusiastic about VR that I wrote an article to tell you why it would succeed. While I still think I’m right – at least in the long run – I’ve now had a couple years to analyze the industry, poke and prod dozens of products, and talk with experts ranging from camera designers to Hollywood studio executives. And here’s what I’ve found:

    VR isn’t ready to succeed.

    Note that I didn’t say it won’t succeed, but that it’s not ready yet. I’m convinced VR will see its day as a transformational technology, but you’re going to have to wait. With that in mind, here are six reasons why VR isn’t ready to succeed, and one reason why it will, in the end.

    Six reasons why VR isn’t ready to succeed:

    1. The viewing hardware is too cumbersome

    I almost don’t need to point this out because it’s the most obvious factor, but the way we currently view VR content sucks. It generally requires large, bulky headgear that straps to your skull like a helmet, as well as whatever headphones you need for sound. In short order, it becomes uncomfortable enough that your desire to remove the hardware exceeds your desire to see whatever is coming out of it. That’s not a recipe for consumer success.

    I loosely equate today’s VR headsets to 1981’s Osborne 1 portable computer. Sure, you could take it with you, but portable computers never achieved any type of critical mass until the advent of what we know today as the laptop. Similarly, VR viewing devices won’t see wide adoption until they are small, comfortable, and unobtrusive. They need to get to the point where it’s like putting on a pair of sunglasses.

    The Osborne 1 computer (1981). Image by Wikimedia user Bilby, released under Creative Commons license.

    2. The display technology isn’t good enough

    Anyone who has tried a VR headset, even one of the better ones, knows how pixelated the image looks. Unfortunately for VR, high resolution displays that appear as sharp as a printed magazine page have become the norm, and have raised the bar of consumer expectations. Until consumers can look into a VR headset and see an image that achieves this level of clarity, or at least something close to it, it’s a no-go. After all, it’s virtual reality. To be convincing it must look real.

    3. It doesn’t ‘just work’

    Let’s say you can get past the cumbersome headgear that makes you look like a spaceman from a 1978 home movie, and that you don’t mind a screen that looks like it has a chain-linked fence in front of it. You still have to get it to work. Admittedly, there’s been progress in this area, but using VR often requires some level of technical know-how and a willingness to tinker. We often talk about technology that ‘just works,’ but until it’s simple enough that the least tech savvy among us can set it up, VR will remain in the realm of tech enthusiasts.

    4. VR capture technology needs to get better

    Assuming you can solve the problems mentioned above, you still need to fill a virtual space with a lot of data for it to be convincing. That means you either need cameras with lots of resolution, or simply a lot of cameras (which is the current approach). To keep costs down, most VR camera setups rely on small sensors, which come with their own set of tradeoffs.

    Even with professionally-oriented cameras such as the Nokia OZO, most of the content I’ve seen has mediocre dynamic range with crushed blacks and clipped highlights, as well as occasional stitching errors. Consumers have been trained to expect higher quality, and their tastes reflect that. Sure, you could build a cage to hold ten Arri Alexas, but that’s not an accessible option for most content producers.

    The Nokia OZO is arguably one of the better VR cameras on the market today, and one that has achieved some level of commercial success. However, the imagery it produces is still below the standards consumers have become accustomed to. You can order it online for $ 40,000.

    5. Nobody has agreed on common conventions for VR content

    This one’s a bit more nebulous, but it’s actually pretty important. VR is new enough that conventions for things like how to film a scene, how to tell a story, or the best way to present information are still being invented. That’s a huge opportunity for content creators, but it also creates a disconnect with viewers. Until there’s a consistent expectation for what VR is, and how it’s experienced, it will be challenged to reach a broad consumer audience.

    6. You’re stuck in place:

    Most VR experiences today simply place you at the center of a spherical space. Although you can choose where to look, that’s generally the limit of your engagement with the scene. It’s certainly possible to create compelling VR content within this constraint, and I’ve seen great examples of VR films that do so, but for the average person who’s going to post a VR video on social media, their friends will get tired of it quickly. The really important leap will come when viewers can move around a scene.

    I never thought I’d say this, but Facebook to the rescue! The video below shows off some technology that begins to address this problem. (In fairness, other companies are working on this type of technology as well, but Facebook wins because the video was easy to find…)

    The one reason why VR will succeed:

    VR content can be very compelling

    Despite all these challenges, VR will eventually succeed for the simple reason that VR content can be extremely compelling. Even within the limitations of current technology, I’ve seen VR films, experiences, and news stories that were far more powerful and engaging than they would have been on a flat screen. In my post-NAB2016 article I called out two examples, Notes on Blindness: Into Darkness and Witness 360: 7/7, neither of which could have delivered the same impact without an immersive medium.

    VR will need to overcome the limitations I’ve outlined above to expand beyond early adopters and enthusiasts, but once it does it has the potential to change the way we interact with digital imagery in very fundamental ways. Imagine being in the middle of a documentary film instead of watching it from across the room. Or, for still photo enthusiasts, imagine visiting someone’s online photo gallery and moving through 360º images with all the resolution and color fidelity one might expect from a Nikon D810. I don’t know how long it will take, but technology has a remarkable way of working these things out given enough time.

    I’ll end by posing two questions, and I’m genuinely curious what the DPReview audience thinks about them. 1) Have I missed anything important in my list above?, and 2) Assuming we can get past the technology challenges and VR becomes insanely good, and unobtrusive to use, would you use it? Let me know what you think.


    * For the purpose of this article, I’m focused on VR as a technology for digital imaging, and excluding applications like computer gaming (which has a very different target audience and requirements)

    Articles: Digital Photography Review (dpreview.com)