Blog

  • Lytro Immerge 2.0 is a HUGE light-field camera rig for high-end VR production

    Lytro has unveiled the Immerge 2.0, a massive light-field camera rig that looks improves upon the similarly-massive Immerge camera Lytro first introduced in November of 2015.

    As with the original Immerge, Lytro’s new Immerge 2.0 is designed for high-end VR production, but it utilizes “a few smart tweaks” to boost quality and increase production efficiency. But lets you think “a few small tweaks” is nothing major, Lytro is describing the Immerge 2.0 as “a major update” to the original… so there’s that.

    Unlike with the original Immerge camera, Immerge 2.0 is designed with alternating rows of cameras that are pointed in the opposite directions (yes, those are all cameras, not lights). The design enables Immerge 2.0 to capture 120-degrees of content rather than the previous 90-degrees, reducing the number of camera rotations from five to three when capturing 360-degree content. And operators of the original Immerge will be thrilled to know that the calibration process is now automated.

    In addition to its hardware update, Lytro has also been working on improving its software, enabling it to extract higher quality images from the light-field content.

    According to Road to VR, which was given an exclusive look at the Immerge 2.0, Lytro has remastered its previously released video Hallelujah with a higher resolution of 5K per eye (when viewed with a VR headset)—a significant increase over the previous 3.5K. But they didn’t stop there…

    In fact, with this new hardware and software update, Lytro is ready to offer a 10K-per-eye resolution once VR headsets that can handle that kind of resolution are developed.

    Articles: Digital Photography Review (dpreview.com)

  • Zoner Photo Studio X brings support for the HEIF image format to Windows

    Apple introduced the HEIF (High Efficiency Image File Format) image format with its latest iPhone models 8, 8 Plus and X. Essentially, the new format is more efficient than current standards at compressing image data—images with the same size and level of detail occupy up to 50% less space on your device storage or hard drive—while also offering additional features like the ability to store burst photos, focal stacks, and exposure stacks in a single file.

    In the long term, HEIF is meant to replace JPG as a the most common image standard, but until now the format could only be viewed or edited on iOS 11 devices or an Apple Mac… not exactly universal. That all changes today with the latest release of Zoner Photo Studio.

    Zoner Studio X is officially the first software package to bring HEIF support to the Windows platform. Its makers still call the feature “experimental” and recommend keeping a backup of your HEIF photos in a separate format (just in case), but this is a big deal if you’re an iPhone user who uses a PC instead of a Mac. No need to sacrifice image quality to save space or visa versa.

    Zoner Studio X offers more than HEIF support, of course, and is a potent image editor in its own right. The feature set includes: image organization, layers, non-destructive RAW editing, retouching, and automatic adjustments.

    To learn more or download a 30 day trial, visit the Zoner website. The full version will cost you $ 49.

    Articles: Digital Photography Review (dpreview.com)

  • The dPS Ultimate Guide to Fine Art Photography

    Daring to be Different

    One of the contentious topics in the world of photography these days seems to be what exactly is fine art photography. Ultimately it is what the photographer deems it to be, but in the world of art, there is a lot more to it. If you want to get recognition as an artist that uses the medium of photography, then there are certain expectations of what your body of work should be like and how you go about executing it.

    Galleries and collectors are not going to collect work or invest in art when there isn’t a lot of consistency within that body of work. One fine art image is not enough to make you a fine art photographer. The work needs to be done with intention, with a direction, and have a consistency over all the images. A style is developed that is recognizable in all the images.

    It is important to look at other famous artists, not just photographers, but painters and sculptures, to see how their work has evolved. See how you can do something similar with your photography. Photography is no different to those other mediums and the same definitions that apply to them are also applicable to fine art photography.

    Who can be a fine art photographer?

    01 leannecole fine art photography

    A long exposure that was taken during the day, but the light in the image has been manipulated to make it look like it was taken at a different time.

    Anyone can be a fine art photographer; there are no hard and fast rules about it. Though it does demand a fair amount of dedication. There are no rules or special qualifications that a person needs to follow or have before they call themselves a fine art photographer.

    Some of the things that help define a fine art photographer

    Perhaps the best way to describe how you can be a fine art photographer is to look at how they work. There is a lot more to it than simply creating beautiful images. We can all do that, but an artist works towards something. Their work is done with intention, and they have a direction they are following. Finally, there is a consistency to their work. Let’s take a look at each of these points individually.

    Intention

    Often when you go out to take photos, you pick a place because you think you might get nice images at that location. That is most likely never going to be a problem for you. But if you want to be considered more of a fine art photographer then you need to go to places that you know will help you create images that will further your work, and build your portfolio. There has to be some intention behind why you photograph things.

    2420 leannecole fine art photography

    The cityscape that has some differences, but it is quite effective and if I was short of images for an exhibition this one would be included.

    For example, a fine art portrait photographer who does images of people in certain scenes, like dark moody beach scenes, is not going to go and take photos of a baby in a park. Well, they might for a friend, but they wouldn’t include that work in their portfolio.

    Artists are always trying to take photos that work with what they already have. They go out with the intention of photographing subjects that follow the direction of their work.

    Direction

    This is a lot like intention, but it means the photographer has direction. If they are taking photos somewhere, they are being directed by their previous work. This helps them to get images that will continue to follow that style.

    06 leannecole fine art photography

    Before processing.

    07 leannecole fine art photography

    After processing to give it my signature style.

    Consistency

    For the same reasons as intention, that same portrait photographer is not going to photograph a baby because it won’t give their workflow any consistency. For a fine art photographer, you need to have work that is fairly consistent and looks like it all belongs together.

    That doesn’t mean it has to be the same subject all the time, it can also be a similar processing style. All the images are processed in a similar way so they look consistent when a gallery or investor is looking at the portfolio.

    The more consistent you are the more galleries and investors will be interested in your work.

    Consistency is important and making sure the images all have the same feel and look is important in creating a body of work.

    This is definitely the case. I asked the curator for Stills Gallery in Sydney, Josephine Skinner, about how important it is that there be consistency in a body of work. This is what she had to say:

    It’s very important. If an artist were contacting us, I would hope to view a resolved body of work, both conceptually and materially. Of course, we’re used to working with artists as they develop new work for an exhibition, but a cold submission won’t pique my interest unless you establish your capacity to deliver.

    What is a body of work and how do you create it?

    A body of work is where you have several pieces that show the consistency and intention that was spoken about earlier. When you have a body of work it should have a similar style and look as though one person created it all.

    The subject matter should be all the same or very similar. There needs to be a number of images in the body of work so you can have an exhibition. The actual amount will depend on where you are exhibiting and how many are needed.

    This is a selection of my work, notice the similar processing style, subject matter, and mood across all the images.

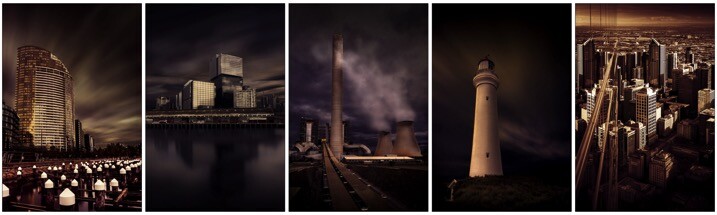
    Contact sheet 02

    Contact sheet 01

    Artist Statement

    Whether you want to believe it or not, an artist statement is very important. It doesn’t have to be an essay, but putting what you are trying to achieve with your photography down on paper is a great way to help with those areas that we just discussed; intention, direction, and consistency.

    When writing one you want to be clear about why you are doing what you are doing. What is important about it and why you have chosen the medium of photography?

    Here is what Josephine had to say about artist statements:

    An artist statement is helpful: be brief, clear and use accessible language.

    Some statements can waffle on and not make much sense. It is good to sound professional, but it should be concise and leave the audience of your work with a very clear understanding of what you are trying to achieve.

    This image was taken with the intention of being able to change the mood and make it look different.

    03 leannecole fine art photography

    The final image. Many aspects were changed so this image would look like it was taken at night with just one light shining.

    Look at some fine art photographers that are practicing now

    Have you ever been told that if you want to be a good writer that you should study and read the writing of those in the same field? The same can be said for fine art.

    If you want to be an artist then you should study and look at the work of other great artists, in this case, fine art photographers. Though, you should include a wide range of artists as photographers can also learn a lot from painters, drawers, printmakers, and sculptors.

    08 leannecole fine art photography

    This image of the 12 Apostles doesn’t really belong with most of the work, but it still has the same. The light has been manipulated, so it almost belongs. But, the different subject matter would make mean it would probably not be included in an exhibition.

    You really need to look at what your work is and find similar photographers. There is such a large number of photographers working at the moment, that it’s hard for me to tell you who to study. But here is a list of a few fine art photographers to give you a starting point.

    • Julia Anna Gospordarou
    • Bill Henson
    • Tracey Moffat
    • Cindy Sherman
    • Brook Shaden – artist statement and gallery of work.
    • Andreas Gursky
    • Joel Grimes
    • Art Wolfe
    • Annie Leibovitz

    What is an Artist CV?

    15 leannecole fine art photography

    A cityscape image before processing.

    16 leannecole fine art photography

    The final image showing how the light has been changed to create this look.

    This is very similar to a work CV (curriculum vitae) or resume. But instead of listing all the jobs you have had, you list everything that galleries and other people in the art world might want to know about you.

    They usually start with your education, where you have studied and when. Then you list what solo exhibitions you have had if you have had any. The goal is to end up with a massive list of those. Then you follow those with the group exhibitions in which you have been involved. Then you might add what prizes you have won.

    Finally, comes a list of places where your work has been published. For example, if you have had work published in a magazine. You can also include collections and in this section, you will mention if you have sold work to important places like a major public gallery, for instance.

    09 leannecole fine art photography

    Another image that has the same look and processing, but doesn’t belong. It does belong more than the image of the 12 Apostles though.

    Every time you approach a gallery you will be asked for your Artist’s CV. If you don’t have one, it is time to start working on it. They are usually one page.

    Here is a link to my CV as an example.

    Do you need to study Fine Art at a Tertiary Level?

    The simple answer to this is no, you don’t have to study at a tertiary level to be a fine art photographer. But the long answer is that if you do, you will gain a greater understanding of the many aspects of being an artist. The really good places also give you studio space and impose the need to work in that space like a professional artist would.

    10 leannecole fine art photography

    Another one of the power stations, that could work, but wouldn’t be included in an exhibition.

    There are so many other things you learn as well, for example, how to develop your style or your body of work. Or, how to create the consistency we talked about earlier. You begin to understand how the gallery system operates and how to approach them. Often you are given opportunities to exhibit your work so you can get an idea of what it is like. These can help you to get a start on your artist’s CV.

    The lecturers are usually artists themselves, so they can guide and mentor you. They understand what you are going through and their advice can be invaluable.

    Getting a Bachelor of Fine Art is never a bad thing. Many other artists and galleries will take you more seriously because you have shown a commitment to your practice.

    12 leannecole fine art photography

    This one is a little different, but it still fits the artist statement.

    Where to study it if you so choose

    There are places all around the world and where you study will depend on where you live, the cost, and if you are accepted. Look at other artists and see where they studied. Do your research to find out what is available near you. Find out how many graduates of that institution have had successful careers when they finished.

    Not all art schools are equal. Some have very good reputations, while others will get you the degree, but not necessarily the prestige. For example, in Melbourne, you can get a Fine Arts Degree from many places, but two are more sought after, University of Melbourne, Faculty VCA, and RMIT University. People take more notice if you have attended and graduated from those schools.

    14 leannecole fine art photography

    This image appears as though it would work, but since the rest of the images are more cityscapes and not close-ups of anything, it would not be included. If more similar images were made, I may have to reconsider that decision.

    Keep in mind that this type of degree will not lead to a paying job, and you are being trained to be an artist. It is expected that you will work at it full-time when you finish. Of course, most artists end up doing other jobs to supplement their income until they are making enough from their art. Though this appears to only happen for a few. Nearly all teach or have other jobs to pay the bills.

    I had a lecturer once that told us if we were still doing art and exhibiting our work 10 years after graduation we would make money from it. Unknown if this is true, but it is a nice sentiment.

    Visit galleries and see what others exhibit

    2220 leannecole fine art photography

    This was taken near a marina, but it is too different and I couldn’t make it look like the other images, so it would never be included in an exhibition.

    To get a great understanding of what fine art photography is one of the best things you can do is visit art galleries, both public and commercial. You can see how the artist works, look at the consistency and also how the work all looks when it’s put together in an exhibition.

    Look for commercial galleries that are exhibiting photography works, or better still find ones that specialize in fine art photography. If you can’t visit them in person, then look on the internet. They all have websites and usually show the works of the artists they represent.

    Study the work and the artist. If you find some whose work you really like, pay a lot more attention to them. Find out what motivates the artist, look at their artist CV, and see if you can find an artist statement. That will really help you to understand their intention, direction, and the consistency.

    Public galleries often have some of their collection online, but you are usually required to go and look. Don’t be disappointed if the photography section if very small, other artworks often get more wall space. You can look for galleries that specialize in photography, for example in Victoria, Australia there is a place called Centre for Contemporary Photography and that is all they show. It’s a great way to see what other photographers are doing.

    18 leannecole fine art photography

    Like the ocean image, this has the same look and feel, but the subject matter doesn’t match.

    Here are a few others:

    • International Center of Photography in New York City
    • A Gallery for Fine Photography in New Orleans – they carry prints by many famous and iconic photographers including Ansel Adams, Julia Margaret Cameron, Henri Cartier-Bresson, W. Eugene Smith, Edward Steichen, Elliott Erwitt, and many others.
    • Center for Creative Photography in Tucson, Arizona. They house a large collection of photography archives including many of Ansel Adams original negatives.
    • Maison Européenne de la Photographie in Paris dedicated entirely to photography.
    • Torch Gallery in Amsterdam
    • Galleria Carla Sozzani in Milan
    • Magnum Photos and Gallery – they represent several iconic photographers’ work and have a gallery in Paris, as well as events in many cities worldwide and a great online gallery for viewing.
    • The Photographers’ Gallery in London, England.
    • Camera Work in Berlin.

    Study about all art, its history and what is happening now

    Part of being an artist is keeping yourself informed. As previously stated, you should be going to galleries and seeing other exhibitions. It is so important to read and study other artists. It can help you understand what their lives were like and what drove them to create their art.

    It is also good to keep up to date with what is happening in the world of art. Who is winning awards, what work is really popular right now, and how you could fit in. Look at who is being exhibited and which galleries are showing their work.

    Look at painters, sculptures, and other mediums

    Don’t limit your photography study to just photographers. You should also look at painters, sculptures, printmakers, and drawers. You can learn a lot from them as well.

    Rembrandt lighting is a type of lighting pattern that portrait photographers strive to create. It involves a triangular spot of light on the cheek of the portrait subject. Photographers have been trying to replicate that style for years, but it came from a painter – Rembrandt.

    13 leannecole fine art photography

    The image is similar, but it probably wouldn’t be included in an exhibition. It doesn’t quite fit.

    In some ways, painters were our earliest photographers as they tried to paint what they saw. Looking at their work is very important. You can learn a lot about subject-matter and more importantly, about composition. For those artists, the composition was key and they would have spent a great deal of time working on that element of their craft. Study how they put their paintings together and learn.

    Sculptors create compositions and often work conceptually. If you are interested in conceptual photography then looking at how these artists work can help you find direction. See what lengths they go to in creating their sculptures.

    Living an artist’s life and what that means

    There is a myth that many creatives were “suffering artists”. That to be an artist you had to be in some kind of struggle. The other myth is about being the “starving artist”, so if you are going to be an artist you have to also be very poor.

    An image that would be part of the body of work. It follows the theme of the rest of the images.

    The first is a myth, you don’t have to be on some internal struggle to be an artist. It has been said that you have to go through disasters in your own life in order to help you create masterpieces. It isn’t true, of course. Very normal people create the most amazing artworks. There is a lot more to it than some emotional suffering.

    In the past, many artists were starving. Even in today’s world, making money as an artist is incredibly hard. There are more people wanting to be artists than there are people wanting to buy the work. The reference to starving was more to do with making no money and not having enough to buy food.

    The reality is that most artists live very normal lives. They often work part-time jobs to survive and live in ordinary houses. They are often very normal people. There are some eccentric artists, but they are more the exception to the rule. Many have studios and workspaces, and every free moment they get, they work in their art practice.

    11 leannecole fine art photography

    A cityscape that would work in an exhibition, it has the same feeling as the others.

    Exhibiting your work

    There are various different kinds of galleries and if you want to exhibit your work then you need to start studying them. Find out which ones are the best for you to approach first of the several different types (large public and private).
    First, you need to find out what the galleries are looking for. Once again, Josephine has some advice for those wanting to approach galleries:

    The first piece of advice I would have is to do proper research into which galleries you approach and be selective with those you do. We get submissions from painters, for instance, who haven’t even looked on our website to find out we exhibit photomedia and video. In the process of narrowing it down, bear in mind that if a gallery has an emphasis on photomedia that doesn’t mean that all forms of photography will fit with their broader aesthetic and focus. Also, be conscious that each artist brings something unique to a gallery so diversity is desired – they probably won’t want someone whose practice mirrors an existing represented artist. Lastly, each gallery has a different policy for receiving submissions, so a good idea is to call and ask what they prefer. Don’t just show up and expect to sit down with the Director!

    17 leannecole fine art photography

    A cityscape taken from an observation deck. While it is a cityscape it also would not be included. It really does not have the same look at the others.

    That is great advice and a good idea for all artists. Do your research and study the galleries you are interested in to see if they are a good fit for you. You can also ask questions to see what they have to say. They will often be more than happy to talk to you about what type of work they are looking for, and how to submit your work.

    Josephine has provided some information on how they find new artists:

    Our focus is contemporary photomedia and video, so we tend to look at art prizes that are often interdisciplinary, such as the Hatched Graduate exhibition at PICA, and keep an eye on what’s happening in ARI (Artist Run Initiatives) spaces. These platforms provide an initial filter because the work has already undergone a process of competitive selection. Galleries with a more traditional or commercial aesthetic would probably look elsewhere.

    Most galleries will have information and guidelines about how to send in proposals for exhibitions; you need to follow those closely. They get a lot of submissions and if you don’t do what they ask then you could be eliminated straight away. Do everything you can to get them to look at your artwork.

    Preparing your work to exhibit

    2320 leannecole fine art photography

    The subject matter fits with much of what the fine art work is about, but it’s the wrong colors and sends a different message than the others.

    Having an exhibition of their work is the ultimate goal for most artists. It is where they develop a name and reputation. If you want that too, then you have to make sure your work is good enough to show.

    There are so many decisions to be made before you do a show. You have to decide who will print your work and how it will be printed. Part of the reason for exhibiting is to sell your work and if it doesn’t look good then people won’t buy it.

    Before the work is sent to be printed you need to make sure that there aren’t any defects in the images. When they are blown up, sensor spots or other unwanted items in your scenes will be enlarged as well. They could end up standing out so much that they take over the image. Magnify the image on your computer (view at 100% or 1:1 size) and look very closely for any mistakes or faults.

    20 leannecole fine art photography

    Work in an exhibition.

    19 leannecole fine art photography

    Work that is packaged and ready to be sent to an exhibition.

    Find a professional printer who will work with you. Look for one that you can rely on, and who knows their business. They should be able to help you figure out the best way to present your work. There are so many options for photographs these days. You can do canvas prints, put images on fine art paper, and even have them on metal, which is very popular right now.
    Then you are faced with the option of framing or not. Most galleries will answer that question for you.

    Read my article: How to Prepare a Photography Exhibit of Your Work for more on this topic.

    Editioning your work

    This is not compulsory, but one thing that many photographers do is edition their work. This means they will only sell a certain number of that image or a limited edition. The artist sets the edition to what they think they might sell.

    2520 leannecole fine art photography

    A cityscape that is very similar to many I do, but I wouldn’t include this image as it doesn’t have the impact that many of the others do.

    For many artists starting out, the number of editions is usually small, around 10 or 20. The more successful an artist becomes, the more expensive the images get, and often the edition number increases as. Some will do editions of up to 200 photos.

    For most of us though, especially starting out, it isn’t necessary to do editions. You may only sell one or two copies of an image. As sales pick up and you begin to make a name for yourself it is good to consider putting out editions of your work.

    If you die your work will double in price

    This is probably the biggest myth out there about fine art photography and art in general. While it is true that when some artists die their work becomes a lot more valuable, it isn’t the same for everyone. If the artist had a successful career and was being collected by a lot of people then there is some truth in this.

    2120 leannecole fine art photography

    Image with similar colors and a long exposure, but it is not an image I would include in an exhibition.

    When they die their work gains in value because it becomes rare. As no new work will be produced, all of their previous work becomes more valuable. That’s all there is, a finite amount, so it will increase in value.

    For most artists, our death will only matter to those around us and our artwork will only increase in sentimental value. It’s sad, but you dying likely isn’t going to cause an increase in the value of your work.

    Being a fine art photographer

    There are many steps you can take that will make you a fine art photographer. There are many different paths and it is up to you to decide which ones you will take. In the end, being an artist is about doing work with intention, having a direction and working consistently.

    2620 leannecole fine art photography

    This would very definitely be included. The light has been changed and it works with the artist statement.

    Artists usually exhibit their work with the idea of gaining a reputation so collectors will purchase it. This, in turn, leads to their work increasing in value and they can sell more. Being an artist is a noble profession and one that dates back hundreds of years, who doesn’t want to belong to that group?

    The post The dPS Ultimate Guide to Fine Art Photography by Leanne Cole appeared first on Digital Photography School.


    Digital Photography School

  • Cameraman injures OSU football player during pregame warm-up

    Photo by Paula R. Lively. CC-BY-2.0

    Ohio State quarterback J.T. Barrett allegedly suffered an injury after being hit in the knee by a cameraman during pregame warm-ups. Barrett went on to play during the first-half of the game, but left during the second-half due to the knee injury.

    The claim that an unidentified cameraman was responsible was initially made by OSU coach Urban Meyer during the post-game press conference. “A guy with a camera hit [Barrett] in the knee…” explained a visibly angry Meyer, going on to call for an “all-out” investigation into who was responsible, though ESPN later reported that OSU Athletic Director Gene Smith said such a probe wouldn’t happen.

    “We’re not doing a full-blown investigation to find the photographer,” Smith said. “We’re looking at what things led up to that.”

    Details about how the incident happened are unclear, and despite there being a stadium full of cameras, no footage of the actual ‘collision’ has been released. TMZ has obtained some footage of the immediate aftermath from a fan who pulled out his smartphone to record what was happening, which shows Barrett limping off and gives you an idea of just how crowded the sidelines were during warm-up:

    Despite Meyer’s anger at the specific cameraman, the incident will probably have a broader impact rather than individual punishment. Smith stresses that the focus will be on making changes so that something like this doesn’t ever happen again.

    According to ESPN, Smith said:

    The conference office is gathering data. That’s the extent of it. The outcome of it will ultimately be improved operations. There’s no attempt to try and find a person. The attempt is to find out what happened, what corrective measures we need to put in place.

    So it sounds like the individual cameraman is off the hook… unless of course this ‘collision’ translates into strict new rules and limited access for sports photographers. Then he’ll have have some very upset colleagues to answer to.

    Articles: Digital Photography Review (dpreview.com)

  • 4 Tips for Better Nightscape Photography

    4 Tips for Better Nightscape Photography

    A nightscape is a representation of any place or scene at night. If you are venturing into this area of photography, you will quickly realize that there are some other things to consider along with getting your exposure right. Here are a few tips to help you.

    1. Settings and Gear

    Shooting nightscapes is a very cool way to teach yourself shooting in low-light conditions. The location and conditions will vary your settings, but there are a few things you can keep in mind. For example, digital noise is detected easily in darker areas. So, while newer cameras are handling noise better, it is a good practice to keep your ISO setting as low as possible.

    4 Tips for Better Nightscape Photography
    Since light is at a premium at night, it is a good time as any to work with more open apertures (smaller f-number), to let in more light. At night, sometimes your background details are lost anyway, so there are few added benefits of having a large depth of field. Star effects are a nice exception to this (created when shooting point light sources with a smaller aperture like f/11).

    It’s also a great time to experiment with longer shutter speeds. During the day, keeping your shutter open means you need to add filters to cut the light. At night you need to add light and can use shutter speed to be more creative.

    4 Tips for Better Nightscape Photography

    Before you frown on High Dynamic Range (HDR) images, consider what value it adds. Bracketing is a good way to deal with the very contrasty reality of night photography.

    Note: Long exposures also add noise as your sensor heats up (known as thermal noise). This makes it a good time to check that Long Exposure Noise Reduction box on your camera menu.

    2. Location Scouting

    As with other genres of photography, your location is important. Start with a plan of what you want to capture. Maybe it’s the city at night, that elusive Milky Way; exciting light trails left by cars or some sort of nightlife action. While some of these coexist, most times they are independent of each other and require their own unique conditions.

    4 Tips for Better Nightscape Photography

    Since photography means thinking about your light source(s) at all time, night photography needs added consideration for obvious reasons. What are the light sources in your location? Is it a street lamp, the moon, building lights, traffic or do you have to walk into the scene with your own light (light painting)?

    When shooting landscape images at night, you could get there before nightfall and observe how the light changes. If you do not have the luxury of time, there are phone apps that help you figure out the light direction of your location. Scouting for a location can be as simple as a google search, someone’s recommendation or making an actual trip to understand the environment. Familiarizing yourself with your destination in advance gives you a photographic advantage and even keeps you safer.

    Bonus Tip: Water can be an asset to night photography especially where there are light reflections.

    4 Tips for Better Nightscape Photography

    3. Moonwatching

    The moon is a fascinating subject. Since it is a light source, you need to take it into consideration when scouting and planning your nightscape shots.

    If it is your subject, then you may want it at its peak for drama (full moon, supermoon, or harvest moon) and shoot on a clear night to capture as much detail as possible. After you have worked out the correct exposure for shooting the moon, try composing it into a scene.

    4 Tips for Better Nightscape Photography
    On the other hand, if you are shooting other celestial objects (e.g. the Milky Way, meteors, or star trails), it might be preferable if the moon is barely there or not so dominant (new moon to the first quarter). Like sunrise and tides, there are many apps that can help you figure out moon phases and direction in relation to your location.

    4 Tips for Better Nightscape Photography

    4. Other Environmental Notes

    Condition your gear!

    Since temperatures usually drop at night, you need to be aware of moving your camera from warmer to colder conditions (the reverse is also true). Any seasoned night photographer can attest that “lens fog” is a nuisance as it blocks/cuts the light passing through your lens. Lens hoods help a little with reducing moisture build-up on your glass.

    So another bonus of arriving at your location a little earlier is giving your gear time to acclimate to your shooting conditions.

    4 Tips for Better Nightscape Photography

    Walk with a flashlight

    A flashlight is an asset for several reasons. You can use it to ensure proper footing for yourself or your tripod. It also helps when you need to make changes to your camera settings (knowing your controls off-hand is very useful in the dark).

    More than these practical uses, it can play a part in your night photography as well. Use it to light paint areas in your image or even create a light spot to help with focusing.

    4 Tips for Better Nightscape Photography

    Conclusion

    Night photography provides a great learning environment and gives you the opportunity to play around with your settings. Depends on what you are shooting, your available light is not changing quickly (if at all) and this gives you more time to experiment and get it right. You can take advantage of less traffic around or use it to your advantage (shooting nightlife).

    Be safe while you’re out there and scout beforehand if possible. If you are an avid night photographer, share with us some of your night photography tips in the comments below.

    The post 4 Tips for Better Nightscape Photography by Nisha Ramroop appeared first on Digital Photography School.


    Digital Photography School

  • Leica unveils Noctilux-M 75mm F1.25 ASPH lens with ‘hair-thin depth of focus’

    $ (document).ready(function() { SampleGalleryV2({“containerId”:”embeddedSampleGallery_2468863494″,”galleryId”:”2468863494″,”isEmbeddedWidget”:true,”standalone”:false,”selectedImageIndex”:0,”startInCommentsView”:false,”isMobile”:false}) });

    Leica unveiled a new low-light monster of a lens today, adding to the ‘Noctilux legacy’ with the Leica Noctilux-M 75mm F1.25 ASPH. According to Leica, the new lens boasts ‘impeccable speed’ and ‘exceptional imaging performance’ as well as “hair-thin depth of focus [that] isolates subjects with extreme precision.”

    This is the fourth Noctilux lens ever created and only the second released this century, this lens follows in the footsteps of the Noctilux-M 50mm F0.95 ASPH released in 2008. But while Leica is calling this the “co-founder of a new family of lenses,” the company is also quick to point out that the new Noctilux-M 75mm F1.25 boasts some advantages over its older brother:

    The upgraded features of the Noctilux-M 75 mm f/1.25 ASPH. open up entirely new opportunities in portrait and close-up photography, including a shallower depth of focus than that of the Noctilux-M 50 mm f/0.95 APSH. and a close focusing distance of 0.85m, making for a reproduction ratio of 1:8.8 for even more precise isolation of subjects. Additionally, the eleven blades of its iris ensure a soft and harmonious bokeh in out-of-focus areas.

    Inside, you’ll find six groups made up of nine lens elements that have been manufactured from glasses with “high anomalous partial dispersion and low chromatic dispersion.” Two of those elements are aspherical, and the lens uses a floating element with what Leica describes as a “complex focusing mechanism” (aren’t they all?) that promises high-quality performance all the way from minimum focus distance to infinity.

    You can read more about the Noctilux-M 75mm F1.25 in the full press release and tech specs below, but if you like what you read, be ready to drop some serious cash. According to Leica, the lens will retail for $ 12,795 when it shows up at Leica stores, boutiques and dealers in the beginning of 2018.

    Press Release

    Leica Camera Pushes Photographic Boundaries With the New Leica Noctilux-M 75 mm f/1.25 ASPH Lens

    True to the Noctilux legacy, the new lens boasts impeccable speed and exceptional imaging performance

    November 29, 2017 – For more than 50 years, the name ‘Noctilux’ has been synonymous with exceptional speed and outstanding optical design. Today, Leica Camera announces the newest addition to their lens portfolio – the Leica Noctilux-M 75 mm f/1.25 ASPH. Coupled with exceptional imaging performance and unique bokeh, its hair-thin depth of focus isolates subjects with extreme precision, ideal for portraits with an unmistakable “Leica look”.

    A legacy of excellence

    The first lens of the Noctilux family, the Leica Noctilux 50 mm f/1.2, was announced at photokina in 1966. While the original lens innovated with revolutionary optical properties, ongoing developments led to the launch of two additional generations of the Noctilux in 1975 and 2008. The additional lenses were developed under the premise of further pushing the envelope for imaging performance, each with a faster aperture than its predecessor. All Noctilux-M lenses to this day are special for their rendering and aesthetic when shot wide-open, yielding a three-dimensional “pop” that separates its subjects from the background like no other lenses. The out-of-focus areas behind the subject is smooth and pleasing to the eye, giving a lovely soft background even in the darkest of lighting scenarios.

    Together with the Leica Noctilux-M 50 mm f/0.95 ASPH., the Leica Noctilux-M 75 mm f/1.25 ASPH. is the co-founder of a new family of lenses. The two current members of this family are both distinguished by their extreme maximum aperture and exceptionally high performance at all apertures, even wide open, and lend themselves to the creation of timeless images marked by a distinctive and revered Leica aesthetic.

    Superior imaging performance

    The upgraded features of the Noctilux-M 75 mm f/1.25 ASPH. open up entirely new opportunities in portrait and close-up photography, including a shallower depth of focus than that of the Noctilux-M 50 mm f/0.95 APSH. and a close focusing distance of 0.85m, making for a reproduction ratio of 1:8.8 for even more precise isolation of subjects. Additionally, the eleven blades of its iris ensure a soft and harmonious bokeh in out-of-focus areas.

    To guarantee this extraordinary imaging performance, the nine elements in six groups that make up its optical design are manufactured from glasses with high anomalous partial dispersion and low chromatic dispersion. Two of the elements are aspherical, and reduce other potential aberrations to a hardly detectable minimum. The use of a floating element within the complex focusing mechanism guarantees a constantly high level of imaging performance throughout the entire focusing range of the lens – from its minimum focus distance to infinity.

    When shooting at maximum aperture, the exceptionally shallow depth of field of the Noctilux-M 75 mm f/1.25 APSH. can be easily focused in when an electronic viewfinder such as the Leica Visoflex. Additionally, the Leica M-Adapter L transforms the Noctilux-M into an excellent lens to use in conjunction with the Leica SL. When the lens is mounted on the Leica SL, the 4.4 megapixel resolution of the camera’s EyeRes® electronic viewfinder enables particularly comfortable and extremely precise focusing.

    The Noctilux-M 75mm f/1.25 ASPH. features the convenience of an integrated lens hood, which can be extended or retracted in one simple twist. The lens is complemented by a tripod adapter for safe and secure mounting of the lens on a tripod.

    The Leica Noctilux-M 75 mm f/1.25 ASPH will be available at Leica Stores, Boutiques and Dealers at the beginning of 2018.

    Technical Data

    Angle of view
    (diagonal, horizontal, vertical)

    For 35 mm format (24 x 36 mm):

    ~ 32°, 27°, 18°

    For Leica M8 models (18 x 27 mm):

    ~ 24°, 20°, 14°, equivalent to FL of ~ 100 mm in 35 mm format1

    Optical design

    Number of elements/groups

    Aspherical surfaces

    Position of entrance pupil

    (at infinity)

    9/6

    2

    26.9 mm (in front of the bayonet)

    Focusing

    Working range

    Scales

    Smallest object field/

    largest reproduction ratio

    0.85 m to ?

    Combined metre/feet graduation

    For 35 mm format: ~ 212 x 318 mm / 1:8.8,
    For Leica M8 models: ~ 159 x 238 mm / 1:8.8

    Aperture

    Settings/functions

    Smallest aperture

    With click stops, half-stop detents

    16

    Bayonet

    Leica M quick-change bayonet with 6-bit bar coding for Leica M digital cameras2

    Filter mount

    Inner thread for E67 screw-mount filters, non-rotating

    Lens hood

    Integrated, with twist-out function

    Viewfinder

    Camera viewfinder3

    Finish

    Black anodised

    Dimensions and weight

    Length to bayonet flange

    Largest diameter

    Weight

    ~ 91 mm

    ~ 74 mm

    ~ 1055 g

    Compatible cameras

    All Leica M-Cameras3, 4, Leica SL-Cameras with Leica M-Adapter L

    1 The nominal focal lengths of the Leica M-Lenses relate to 35 mm format, i.e. original image frame dimensions of 24 x 36 mm. However, with dimensions of 18 x 27 mm, the sensor of the Leica M8 models is a little smaller, by a factor of 0.75. For this reason, the angle of view of this lens when mounted on a Leica M8 model corresponds to that of a lens with a focal length that is longer by a factor of 1.33 (1.33 = reciprocal of 0.75).

    2 The 6-bit coding on the lens bayonet (7) enables Leica M8 digital models to identify the lens type mounted on the camera. The cameras utilise this information for the optimisation of exposure parameters and image data.

    3 With the exception of the Leica M3 and the former version of the Leica MP ( professional version of the M3), all Leica M-Cameras without a 75 mm bright line frame can be retrofitted with this frame by the Customer Care department of Leica Camera AG (it then appears in the viewfinder together with the frame for 50 mm lenses).

    4 This is independent of the image frame format of the respective camera – whether 18 x 27 mm (sensor size) for the Leica M8 models or 24 x 36 mm for all other Leica M models.

    Articles: Digital Photography Review (dpreview.com)

  • 2017 Buying Guide: Best pocketable enthusiast cameras

    If you want a compact camera that produces great quality photos without the hassle of changing lenses, there are plenty of choices available for every budget. Read on to find out which portable enthusiast compacts are our favorites.

    Articles: Digital Photography Review (dpreview.com)

  • Sony will start making CFast memory cards: 510MB/s cards coming in 2018

    Sony has announced that it will introduce the CFast memory card format to its professional range in the first quarter of next year, and odd and exciting move when you consider that CFast 2.0 competes directly with the XQD card format Sony helped pioneer.

    The series will launch with three memory cards that boast maximum read and write speeds of 530MB/s and 510MB/s, respectively. These G-series cards will be aimed at cinematographers and those shooting high bit-rate video, as well as stills photographers working with high frame rate cameras like the Canon 1DX Mark II.

    As mentioned above, the cards boast a maximum write speed of 510MB/s, but more importantly they also guarantee a minimum sustained write speed of 130MB/s under the Video Performance Guarantee. This helps to ensure cards do not force cameras to stop recording during lengthy sequences.

    And since pros need their cards to be sturdy as well as fast, Sony says the new CFast cards have been carefully tested for drop, vibration, shock resistance and rigidity, and states that they work in a wide range of temperatures and are highly resistant to static.

    The cards will be available in 32GB, 64GB and 128GB capacities for $ 120, $ 200, and $ 350, respectively. For more information, read the full release below or visit the Sony website.

    Press Release

    Sony completes Pro memory card line-up with new CFast range

    November 28, 2017 – Sony is launching a range of high performance CFast memory cards, which are designed to meet the needs of professional photographers and videographers. The G Series CFast 2.0 memory cards will be available in 32GB (CAT-G32), 64GB (CAT-G64) and 128GB (CAT-G128) capacities, responding to the ever increasing capabilities of high-end DSLR and 4K cinema-grade broadcast cameras. The cards offer lightning-fast write speeds of up to 510MB/s and read speeds of up to 530MB/s and join an established range of media that includes Professional internal SSDs, XQD and SxS cards, as well as the world’s fastest SD card, while strengthening Sony’s position as a leader in professional memory solutions.

    Step up to industry-leading write speeds

    Professional photographers demand faster speed for continuous burst shooting of higher resolution images including RAW. With up to 510MB/s write speed, far outperforming the capabilities of existing CFast cards, Sony’s G Series supports high-speed burst shooting of high resolution RAW, maximizing the capability of high-end DSLR cameras like the Canon 1DX Mark 2.

    Super-fast read speed for ultra-effective workflow

    Efficient workflow is essential for professional photographers and videographers working in challenging environments on tight deadlines. With a blazing fast read speed of 530MB/s, Sony’s G Series CFast dramatically reduces the time it takes to transfer RAW files, long 4K video footage and high-resolution images to a PC.

    Reliable 4K video recording with VPG130 support

    As well as ultra-fast read and write speeds, the new CFast cards support VPG130 for reliable recording of Cinema-grade or high-bitrate 4K video. A minimum sustained write speed of 130MB/s is guaranteed, making the new media ideal for stable recording of professional grade 4K video, such as Cinema RAW light mode with Canon C200 video cameras.

    Designed for strength and reliability

    The new CFast cards have passed a variety of stringent drop, vibration, shock and rigidity tests, making them perfect for shooting in many different locations. They work reliably across a wide range of temperatures and are highly resistant to static. With a hard case and Sony File Rescue software, which is available when used with a card reader in a Removable Disk configuration, the cards can recover accidentally deleted photos such as RAW images and videos, allowing professionals to shoot with confidence in the toughest conditions.

    Pricing and Availability

    Sony’s G Series CFast cards are planned to be available in early 2018 for a suggested retail price of $ 119.99 for 32GB, $ 199.99 for 64GB and $ 349.99 for 128GB.

    Articles: Digital Photography Review (dpreview.com)

  • 7 Tips for Business Cards for Photographers

    Having a proper business card is the first step towards establishing branding as well as earning potential customers, regardless of whether you are a freelance photographer or engaged within photography agencies. Not only do they serve to boost the reputation of an individual or corporation, they are also an opportunity to showcase the many good qualities one has to offer. Continue Reading

    The post 7 Tips for Business Cards for Photographers appeared first on Photodoto.


    Photodoto

  • Google finally activates ‘Visual Core’ imaging chip inside Pixel 2 smartphone

    The finalized version of Google’s Android 8.1 operating system is expected to be released in December, but today the company has announced the availability of the last Developer Preview which, among other things, activates the formerly dormant Visual Core chipset in the Pixel 2 and Pixel 2 XL smartphones.

    The custom-built system-on-a-chip (SOC) is designed to power and accelerate the Pixel 2 phones’ HDR+ function that achieves better dynamic range and reduced noise levels through computational imaging. The feature is already incredibly powerful, so we can’t wait to see how it gets even better with this additional hardware boost applied.

    HDR+ photo captured with the Pixel 2 for our Sample Gallery. Credit: Allison Johnson

    The latest Pixel smartphone generation comes with the chip built in, but it appears Google ran out of time before the Pixel 2 launch to fully optimize Visual Core implementation in the device, and therefore decided to not activate it. With the new software version, Visual Core can can now be turned on through an option in the Developer menu.

    In addition to souping up the Pixel 2’s native camera app, this update also allows third-party apps using Android Camera API to capture HDR+ shots. Previously, this function has been exclusive to the Google Camera app.

    There is a wide selection of third-party apps for all types of mobile photographers available in the Google Play Store. It’s no doubt a positive move by Google to make the capability of using HDR+ available to all of them. To install the Android Developer Preview, your Pixel 2 device needs to be registered in the Android Beta Program. Or you could just wait for the official Android 8.1 launch in December.

    Articles: Digital Photography Review (dpreview.com)