Blog

  • Video: Shooting the Milky Way hand-held with the Sigma 14mm F1.8 Art

    More than once, we’ve called the Sigma 14mm F1.8 DG HSM | Art lens an astrophotographer’s dream lens. From the moment it was announced, we were dying to get our hands on it; and once we did, it did not disappoint. But what’s the big deal? Why pay $ 1,600 for this lens when the very capable Samyang/Rokinon 14mm F2.4 will cost you half as much and resolve nearly as much detail (if not more)?

    Light… that’s why. A point explained beautifully by photographer Alyn Wallace, who recently took the 14mm F1.8 Art out for a spin in the night. After managing to take a hand-held photograph of the Milky Way—an insane and somewhat-pointless but also kind-of-fun experiment to see what F1.8 can really do—he pops the lens onto a tripod for some proper astrophotography and is immediately blown away.

    “This lens is a light vacuum,” he says. “It’s like I’ve stuck a black hole on the front of my camera.”

    DPReview’s Dale Baskin felt similarly after shooting the Aurora with the Sigma 14mm F1.8 Art, writing in his Gear of The Year post, “Once I tried the Sigma 14mm F1.8 it was game over. I knew I had found the one.”

    Of course, the lens isn’t perfect, and Wallace gets into that as well, looking closely at the corners and revealing where pushing this lens to F1.8 is going to cost you. To see his results and drool a bit over a piece of glass that may make its way onto your very own “treat yourself” list this holiday season, check out the full video up top.

    Articles: Digital Photography Review (dpreview.com)

  • 10 Tips for Photographing Moms and Their Kids

    Creating gorgeous photographs of moms with their kids can be a daunting task. But with a little planning, responding well to the family dynamic, and paying attention to whether or not you’re selecting flattering angles you can create lovely portraits that they’ll treasure for years.

    Women can be harsh critics of themselves, so it’s well worth spending some time thinking about how to make moms happy with their portraits. Both in terms of helping moms relax beforehand and on the day, and paying attention to choosing flattering angles as you photograph them. I’ve learned lots through my experience over the years – here are 10 tips to help you photograph moms.

    Clothing

    Suggest avoiding sleeveless tops so underarms aren’t exposed, as well as avoiding graphics on clothing so that the focus is on faces and not on clothing. For new moms, a loose t-shirt or a shirt is more flattering than tightly fitted breastfeeding tops.

    Clothing 10 Tips for Photographing moms and Their Kids

    Makeup

    Here you can suggest using a face powder to minimize shine, an under eye concealer to minimize shadows, and a pale eye shadow to brighten the face.

    Relaxing Mom

    Spend some time chatting to Mom before you meet her, and before you start photographing. The more relaxed she feels, the better your photographs of her will be.

    Find flattering angles

    If you’re providing any posing guidance, suggest Mom leans her weight on her back foot for the most flattering angle. Suggest she thinks about bringing her forehead in space to minimize any double chins – Peter Hurley has a great video demonstrating this technique (see below). The best place to hold a toddler is generally on Mom’s hip, rather than holding them squashed across or into her body.

    Angles for new moms

    Be careful that the weight of their baby isn’t creating bulges, as new moms are often sensitive about remaining baby weight and won’t want it emphasized. Holding the baby in the crook of their arm works well to minimize this. Or if Mom is very conscious of baby weight, have Dad hold the baby and encourage Mom to snuggle in from behind, bringing her arm round Dad’s so everyone’s involved.

    Another good option is to have Mom lie on her side, near her baby. This brings her head nice and close to the baby for an intimate portrait, and is also a flattering angle for those conscious of baby weight.

    New mums - 10 Tips for Photographing moms and Their Kids

    Games and laughter

    Find out which games the children are particularly enjoying at the Moment, and have Mom instigate those games. Peek-a-boo, spinning on the spot, aeroplanes, lifting babies up in the air (safely!) and tickles are surefire hits for some lovely giggles.

    Games - 10 Tips for Photographing moms and Their Kids

    Games air - 10 Tips for Photographing moms and Their Kids

    Cuddles and kisses

    This is one of the most highly prized photographs for moms, so encourage the children to give Mom a lovely cuddle. If they’re not feeling like dispensing kisses on demand, ask them if they know how to kiss Mom’s nose. Often the challenge of proving they can will get the kids to oblige!

    With newborns, encourage Mom to place a gentle kiss on the newborn’s face – you may need to point to the spot that you’ll be able to see in shot.

    Newborn kiss - 10 Tips for Photographing moms and Their Kids

    On the move

    moms will want to remember the feeling of holding a little hand in theirs. So remember to photograph moms walking with their children, hand in hand. Having Mom run towards the camera with her children can also be a great way of helping more camera shy mothers to relax and have fun.

    On the move - 10 Tips for Photographing moms and Their Kids

    Quiet moments

    Keep an eye out for the tender moments between moms and their children – these are very emotive and can be very powerful photographs for mothers. Capturing the strength of that bond is such a privilege, and the gentle oments of calming a baby or young child can be a great opportunity to do just that.

    Quiet moments - 10 Tips for Photographing moms and Their Kids

    Shy moms

    For shy moms, try to incorporate details such as their arms holding the baby – you don’t need a face-on portrait if it makes her feel uncomfortable. Having these kind of details will mean a lot to the baby when he/she is grown up, to see themselves lying in their mother’s arms.

    And if their mom is camera shy, all the more reason to make sure the child gets some photographs with Mom in shot!

    Arms - 10 Tips for Photographing moms and Their Kids

    Conclusion

    For one reason or another, it so often ends up being the mother who takes snaps at home and on holidays – with the unfortunate result that moms are often absent from most home photographs.

    Making sure to incorporate beautiful photographs of Mom with her kids is a lovely gift to level the playing field here and make sure that Mom features in their photo albums too!

    Do you have any other tips for photos of moms with their kids? Please share them and your images of moms and kids below.

    The post 10 Tips for Photographing Moms and Their Kids by Louise Downham appeared first on Digital Photography School.


    Digital Photography School

  • This 32-inch QHD Philips monitor with 99% Adobe RGB only costs $500

    Bargain hunters looking for a high quality monitor for designer work or photo editing, there’s a new panel in town that you will want to consider. Meet the Philips 328P6AUBREB P-line display, a 32-inch Quad HD (2560 x 1440) monitor with 100% sRGB coverage, 99% Adobe RGB coverage, and HDR technology.

    This monitor is essentially Philips response to BenQ’s 27-inch SW2700PT, which retails for $ 600 and features nearly identical specs, albeit in a slightly smaller screen. Depending on your needs, you might actually prefer the higher PPI of the smaller BenQ monitor, but the ability to get a slightly higher contrast ratio—1,200:1 on the Philips vs 1,000:1 on the BenQ—and a bit more screen real estate for $ 100 less is definitely tempting.

    Regarding the ‘HDR technology’ mentioned above, HDR viewing will definitely benefit from the relatively bright (for computer monitors, anyway) 450 nits typical brightness, and the wide color gamut support. However, the low contrast typically associated with IPS displays means you won’t want to use this as a primary HDR viewing or grading monitor.

    Finally, before you put it on your wish list, there is one more thing to consider. Despite diving into the user manual, we couldn’t find any mention of direct access to the 12-bit internal LUTs for color calibration on the Philips monitor.

    The BenQ monitors, by comparison, come with calibration software that directly addresses the 14-bit internal LUTs to calibrate your monitor without sacrificing the overall bit-depth of the display, minimizing the risk of banding. The color calibration solution BenQ provides, while of course requiring the purchase of a separate colorimeter or spectrophotometer, is definitely an advantage of its lineup.

    The Philips 328P6AUBREB P-line display will officially go on sale in January for £439 / 499 EUR/ 499 USD, and if you’re like some of the folks at our office, you’re seriously tempted by this display… at this price.

    Press Release

    New Philips Adobe RGB, QHD, docking USB-C monitor

    • USB-C docking for simplicity and single-cable peripherals docking
    • Designed for professionals whose work demands a maximum of quality

    Amsterdam, 30 November 2017 – MMD, the leading technology company and brand license partner for Philips monitors, is rolling out a new Philips Brilliance QHD docking USB-C monitor with High Dynamic Range (HDR). The 32-inch 328P6AUBREB delivers great image quality and one-cable docking for enhanced productivity and effortless convenience.

    Connectivity made simple

    The 328P6AUBREB is equipped with the extremely versatile connectivity of the latest-generation USB 3.1 Type C technology. Featuring a slim, reversible connector, USB-C enables users to charge, transfer audio and video signal, and connect to the Internet – all with one single cable. Hence, the monitor instantly becomes a hub and serves as a docking station, just without using that extra space on the desk. It also enables easy linking of multiple monitors, which is useful for graphic designers for example. Consequently, USB-C extends the limited connectivity of notebooks and allows users to transfer data securely at ultra-fast speeds. USB 3.1 is 20 times faster than USB 2.0, making data transfer a breeze. And, for those whose devices seem to always be running low on battery, USB-C with power delivery can even charge notebooks.

    An unparalleled visual experience

    Explaining the display’s positioning, Artem Khomenko, Product Manager Philips Monitors Europe at MMD, says: “The P-line monitors are designed to deliver precise, accurate and colour-critical colour performance. We are proud to bring this new model to the market, and to meet the high standards of professionals. This model is the perfect fit for graphic designers, CAD engineers, photographers, video editors and other professionals who rely on an outstanding on-screen reproduction of fine details.”

    With Quad HD, you will enjoy an excellent viewing experience with high-resolution visuals. HDR technology ensures exceptional brightness and contrast, as well as a rich palette of captivating new colours never before seen on a display. The 10-bit display offers 1.074 billion of them, supported by 12-bit internal processing for natural colours and smooth gradients. With 99% Adobe RGB and 100% sRGB (CIE 1973), the 328P6AUBREB offers professional colour standards and 2560 x 1440 pixels deliver crystal-clear images and make graphics come alive. Thanks to IPS technology, the monitor can be viewed from an angle of 178° without losing any of the colour accuracy or consistent brightness that professional applications demand.

    An extra dose of convenience

    Beyond its connectivity and stunning visuals, this 32-inch QHD display boasts many of the standout features that have earned Philips monitors their reputation: the SmartErgoBase ergonomic adjustable stand enables users to tilt, swivel and raise the display for maximum viewing comfort. It also features Philips LowBlue Mode which reduces potentially harmful shortwave blue light. Flicker-free technology regulates brightness and reduces flicker for even more comfortable viewing; built-in stereo speakers provide excellent audio reproduction while eliminating the need for peripheral speakers; and what is more, with 65% post-consumer recycled plastics, this monitor is a good choice for eco-friendly users.

    The Philips 328P6AUBREB P-line display, with an RRP of £439, will be available in January 2018.

    Technical Specifications:

    Specification

    • Philips 328P6AUBREB P-line display

    LCD panel type

    • IPS technology

    Backlighting technology

    • W-LED

    Panel size

    • 31.5 inch / 80.1 cm

    Aspect ratio

    • 16:9

    Optimum resolution

    • 2560 x 1440 @ 60Hz

    Effective viewing area

    • 698.11 (H) x 392.69 (V)

    Viewing angle

    • 178° (H) / 178° (V), @ C/R > 10

    Brightness

    • 450 cd/m²

    Display colours

    • 1.07 billion

    Colour gamut

    • 99% Adobe RGB (CIE 1973); HDR400

    SmartContrast

    • 50,000,000 :1

    USB Connectivity

    • USB-C (upstream), USB 3.0×2 (downstream, w/fast charging)

    Connectivity

    • Signal Input: VGA (Analog ), DisplayPort 1.2, HDMI 2.0 x 1, USB-C (DP Alt mode, PD, data)
    • Sync Input: Separate Sync, Sync on Green
    • Audio (In/Out): PC audio-in, Headphone out
    • RJ45

    Convenience

    • Built-in speakers: 3 W x 2
    • SmartImage, Input, Brightness Menu, Power On/Off
    • Control Software: Smart Control
    • Kensington lock, VESA mount (100 x 100 mm)
    • Plug & Play Compatibility: DDC/CI, Mac OS X, sRGB, Windows 10 / 8.1 / 8 / 7

    Stand

    • Height adjustment: 180 mm
    • Pivot: 90 degree
    • Swivel: -170/170 degree
    • Tilt: -5/20 degree

    Sustainability

    • Environmental and energy: EnergyStar 7.0, EPEAT Gold, RoHS
    • Recyclable packaging material: 100 %
    • Post-consumer recycled plastic: 65%
    • Specific Substances: PVC / BFR free housing, Mercury free, Lead free

    Compliance and standards

    Regulatory Approvals: CE Mark, FCC Class B,
    VCCI, RDM, BSMI, ICES-003, J-MOSS, cETLus, EPA, PSB, CU-EAC, SEMKO, SASO, KUCAS, UKRAINIAN, PSE, CECP, WEEE, TUV Ergo, TUV/GS

    Cabinet

    • Front bezel, rear cover and foot: Black
    • Finish: Texture

    What’s in the box

    • Monitor with stand
    • Cables: D-Sub cable, DP cable, HDMI cable, USB-C to USB-C cable, USB-C to USB-A cable, Power cable, Audio cable
    • User Documentation

    Articles: Digital Photography Review (dpreview.com)

  • CIPA figures show disappointing October sales, but mirrorless continues to rise

    Graph: CIPA

    The Camera & Imaging Products Association (CIPA) has released its statistics for October 2017, and in contrast to previous years, we did not see the Black Friday/Thanksgiving induced spike we’re used to seeing, with month-to-month shipments remaining fairly flat (read: disappointing).

    In fact, year-on-year total camera shipments in October are down a whopping 13 percent, although we did see an overall year-over-year increase of 11 percent in the digital camera market for the January-to-October timeframe, and 6 percent for ILCs. Part of this development could be due to production coming back online after the Kumamoto earthquake; however, this trend is likely to continue for another couple of CIPA reporting periods or so.

    Compared to October 2016, only 78 percent of DSLRs were shipped globally, but 112 percent for mirrorless, indicating that mirrorless is continuing its rise while simultaneously cannibalizing market share from its DSLR cousins. Most of the mirrorless shipments are going to the Asia region, though, which still accounts for more than 50 percent of all mirrorless cameras shipped. Globally, mirrorless is now 36 percent of the total market for ILC.

    With smartphones fulfilling most consumer imaging needs and a big manufacturer like Nikon thinking about re-entering the mirrorless segment, we’ll be watching closely to see how those numbers develop over the coming months into 2018.

    Articles: Digital Photography Review (dpreview.com)

  • Have your say! 2017 Readers’ Choice Awards open for voting

    It’s time: make your voice heard and vote for your favorite photography products of the year. Polls are currently open in all seven categories but don’t deliberate too long – they close December 18th.

    Articles: Digital Photography Review (dpreview.com)

  • How to Take the Pain Out and Put Personality Into Assembly-Line Photos

    Taking the Pain Out and Putting the Personality Into Assembly-Line Photos

    Assembly-line photos are a whirlwind of craziness and fun. These can include school dance photos, team sports, drill team, preschool, business headshots, and anything else that involves a whole lot of people that you have to photograph the same way in a short period of time.

    These sessions can be a nightmare if you aren’t prepared, and can be boring if you aren’t creative. I’m going to share some of my secrets for making these sessions some of your favorites and delivering photos that will please moms, coaches, teachers, and kids alike.

    Taking the Pain Out and Putting the Personality Into Assembly-Line Photos

    1. Make a List

    Before the day of your big assembly-line session, write out a list of exactly what you need to capture that day. Do not deviate from this list, especially if you have a large group. If you are working with teens especially, you’ll get requests for “just one more” picture, or requests to see what they look like in their photo. You might get requests to take photos not on your list, like best friends, or for a clothing change. If you want to keep your sanity, you have to smile, express how sorry you are, but give them a firm, “No”.

    Taking the Pain Out and Putting the Personality Into Assembly-Line Photos

    My lists might look something like the following. You can use this list as a starting point, and adapt it to your needs.

    PRESCHOOL FALL

    • Close-up face, horizontal
    • Reading a book, vertical
    • Holding an apple, vertical
    • Entire class – with teachers and without

    PRESCHOOL SPRING

    • Close-up face, horizontal
    • Name o a chalkboard, vertical
    • Graduation gown, vertical
    • Entire class with teachers and without

    Taking the Pain Out and Putting the Personality Into Assembly-Line Photos

    PROM

    • Individual couples; up close, full length, something fun (they choose)
    • Group photos; smiles, serious, silly
    • All girls together, all boys together

    Taking the Pain Out and Putting the Personality Into Assembly-Line Photos

    SWIM TEAM

    • An individual photo in team jacket on the “blocks”
    • Entire team smiling, hugging, serious, silly
    • Each class (seniors, juniors, etc.) smiling, silly
    • All girls together, all boys together
    • Coaches together and individually
    • Individual fun photo (off the diving board, in pool, they choose ONE)

    Taking the Pain Out and Putting the Personality Into Assembly-Line Photos

    DRILL TEAM

    • Individual horizontal, vertical, and something fun (they choose)
    • Shots of “big sister” and “little sister” together
    • Entire team smiling, hugging, “model pose” with coaches and without
    • Each class (seniors, juniors, etc.) smiling, one more their choice

    Taking the Pain Out and Putting the Personality Into Assembly-Line Photos

    2. Stay Professional and Organized

    Let everyone know right at the beginning how things will go, and keep everyone moving through quickly. It’s always good to have an assistant helping you line everyone up, and get the next in line prepared before they get in front of your camera. I usually use one of the coaches or teachers to help guide their kids, but you could bring a friend along too.

    Taking the Pain Out and Putting the Personality Into Assembly-Line Photos

    Things can become chaotic quickly, especially with kids and teens. Be firm, decisive, and even a little bit loud if necessary. Let everyone know what is coming up next, and have them line up and wait for their turn so you aren’t trying to gather people every time you need to do the next photo.

    If there’s something they need to decide (like what their class “silly” pose will be) warn them ahead of time, so they have time to prepare and think of something before it’s their turn.

    Taking the Pain Out and Putting the Personality Into Assembly-Line Photos

    3. Give them a Chance to Show their Personality

    Whether I am photographing the entire class, a team, a group together, or photographing each individual, I like to give them a chance to show a little bit of who they are.

    If it’s a younger group, like preschool, the teacher and I collaborate to have something fun for at least one of the photos. We’ve done holding apples, writing their name on a chalkboard, graduation caps and gowns, reading a cute children’s book, sitting on a stack of books, etc.

    Taking the Pain Out and Putting the Personality Into Assembly-Line Photos

    For organized team photos, I let them know that after we do all of the basic photos, I will let them each do one fun photo. For example, for the swim team, I give them two location options, either jumping off the diving board or in the water at the end of the pool.

    Everyone who wants the diving board option lines up there, and everyone who wants in the pool lines up at that location. I don’t let them do both because if you start that, they all want to do both, and there’s just no time for it. Once they are at their location I let them do whatever they’d like to do, but they only have one chance, and only a few seconds to set it up.

    Taking the Pain Out and Putting the Personality Into Assembly-Line Photos

    When school dance couples start to arrive, I let them know that they will be doing one “fun” pose together, and to start thinking of what to do. Many of them are “regulars”, and know that’s what I’ll be doing, so they come ready with ideas. If they can’t think of something, I give them a few ideas. They might go back-to-back, or make serious faces. Maybe one wants to pick the other one up. They could dance together, or make silly faces.

    When I do the group silly pose, I don’t give them time to plan. There are too many kids, and they’d be there all day trying to agree on something. Instead, I take the regular smiling photo first, then a serious face photo, then I say, okay, on the count of three, something crazy! Then, I count to three as they hurry and do their thing, and then I snap about 10 photos or so and choose the best one later.

    Taking the Pain Out and Putting the Personality Into Assembly-Line Photos

    4. Relax and Have Fun

    It’s easy to forget to breathe, let alone remember to have fun when you are photographing 60 kids at the same time. However, it’s important that you don’t get too robotic with your assembly-line photos. If you can have a little bit of fun interaction with each person, you’ll get much better photos.

    Help them relax, and you’ll get some genuine smiles that will be much better than those old school photos we used to get, where half of the time you were mid-blink, looking away, or not smiling. Assembly-line photos are a great way to get to know a whole bunch of wonderful people at once. Smile at them, and forget about the cheese.

    Taking the Pain Out and Putting the Personality Into Assembly-Line Photos

    The post How to Take the Pain Out and Put Personality Into Assembly-Line Photos by Melinda Smith appeared first on Digital Photography School.


    Digital Photography School

  • 2017 Buying Guide: Best cameras under $2000

    As you approach the $ 2000 price point you’ll find flagship APS-C and Four Thirds cameras, built for speed and durability. You’ll also find a handful of full-frame ILCs and DSLRs, with their own unique selling points. Find out which cameras are best-in-class in this price range.

    Articles: Digital Photography Review (dpreview.com)

  • Review of the Lensbaby Velvet 85

    Lensbaby has been producing lenses that create interesting effects since 2004. During that time people have been experimenting and trying out different ways of using them. In the spring of 2015, they introduced the Velvet 56 to the joy of many photographers, especially those doing macro. This year, their newest lens in the line-up was released, the Lensbaby Velvet 85.

    leannecole-review-lensbaby-velvet85-

    The Lensbaby Velvet 85

    The Velvet 85 promises to be a great lens for portraiture creating impressionist-like portraits of people. It does indeed do that, but you can use it for so much more. It is a great lens for photographers who like images with mood and which concentrate more on the subject with a lot of bokeh.

    First Impressions

    The lens is very well made and when you hold it in your hand you can feel the coolness of the metal it is made from. It is not an overly heavy lens, but it’s also not light. It is bigger than the Velvet 56, which is to be expected, though not a lot heavier. They are both very well made, high-quality lenses.

    Using the Lensbaby Velvet 85

    Like most lenses that are available on the market today, the Velvet 85 can be used for many different types of photography. I use it mainly for macro photography and find it really good. However, you can also use it for portraiture, city photography, and landscapes. It doesn’t work the same as other lenses as you get a really soft-focus effect with it, but for most people, that is exactly why they buy it.

    Review of the Lensbaby Velvet 85

    A macro image that was taken with the Lensbaby Velvet 85.

    Manual Lens

    The lens is completely manual and you cannot use your camera to control it, as you can with other lenses. You need to change the aperture and focus it yourself. You will not be able to see what aperture you used when you download the images to your computer either.

    Manual Focus

    Focusing is also manual and you need to adjust it as you take your photos. It does turn a long way and you have to twist the focusing ring a lot. Some cameras can tell you when the image is in focus, for example, Nikon does. When you are at that spot of good clarification, then the round dot in the viewfinder appears. However, as you get used to the lens you will need to rely on that less.

    Review of the Lensbaby Velvet 85

    Opening up the aperture gives you images with a lot of soft-focus.

    For macro photography, most people tend to use manual focus anyway and it is easier with this lens. You can focus where you want and then move yourself and the camera to a spot where the image will be in focus.

    For landscape photography, you can set it to infinity and you should get images that are sharp, depending on your aperture. For objects in between macro and infinity, you will have to practice and see it goes. That is probably the area I found the hardest, though as I did it more, it became easier.

    Controlling the Lens

    With many lenses now you can change the aperture with the camera, however, the Velvet 85 is more like a vintage lens from older style cameras. It does not communicate with your camera and you need to control the aperture yourself. To change it there is an aperture ring on the lens which you turn to adjust it to the setting you want.

    Aperture

    Unlike other sorts of dedicated macro lenses, the Velvet 85 doesn’t use aperture in the same way. You can take photos of flowers at f/2.8 and get a fairly decent image. If you tried doing that with, say a Nikon macro lens, you will find the photo would almost be an abstract version of the flower with very little in focus.

    The aperture starts at f/1.8 on the Velvet 85 and goes up to f/16. At the latter, you will get the greatest depth of field and if using the lens for landscape photography it is a good one to choose. If you are taking macro images of flowers then the wider end is much better.

    Review of the Lensbaby Velvet 85

    Using a smaller aperture such as f/11 gives less soft-focus and you get more of a natural looking image.

    One thing the lens is really good for is the soft-focus effect that is possible. You can control how much of it you want by using different apertures. The wider it is the more of the effect appears, and the opposite happens as you close it down.

    Interesting effects

    If you like to get different effects with your lens then the Velvet 85 will be fantastic for you. You can get interesting results for portraits, though I don’t do them if you go to the Lensbaby website you can see some good examples. If you want to give your clients images that are not the same as what others are doing then you should consider adding this lens to your kit. Click here for images.

    Bokeh Effect

    Without a doubt one of the most special and addictive aspects of the Velvet lenses, and perhaps more so with the 85, is the blurring you can do with it. You won’t find any other lenses available that will give you the same effects. You can play around with the aperture to change how much blur you achieve in your images.

    Review of the Lensbaby Velvet 85

    Creating a bokeh effect with a poppy flower and bee.

    Whether you are photographing a landscape or a macro image you can use the aperture and blurring effect to highlight your subject. The Velvet 85 is fantastic for this. You can change the aperture to different widths and that will determine how much blur you will get. From that, you can decide what level of blurring you want in your image.

    Tilt-Shift Effect

    This was a popular effect a few years ago, though, there is no reason it can’t be again. This is where you use blurring effects to make objects in your image look like they are miniature or toy-like. By controlling the aperture and giving the images a lot more of the blur you can get images that look as though your subject is miniature. The lens does not do it all, but it gives you a good starting point.

    Review of the Lensbaby Velvet 85

    The soft-focus is a good start to creating tilt-shift images.

    Moody Images

    Using blurring effects is a great tool for giving your images a moody feel. You can apply it to most types of photography and get those sorts of images that people love. You can use it for most types of photography, try it out if you can.

    Review of the Lensbaby Velvet 85

    Playing with the aperture you can create a mood in your image.

    Comparing the Velvet 85 with the Velvet 56

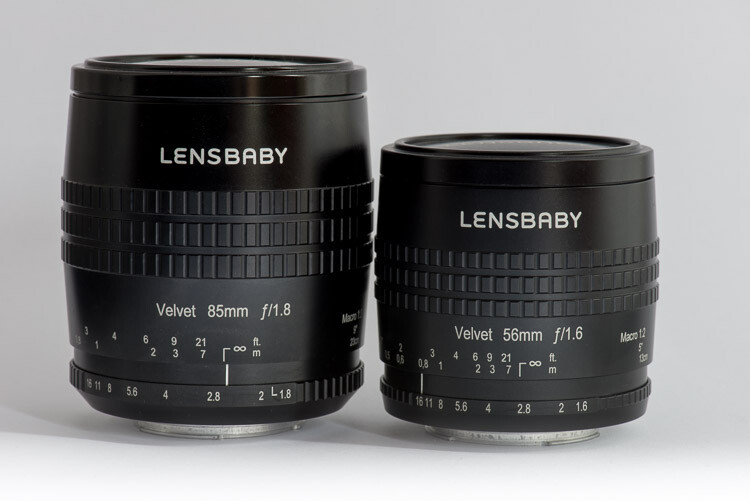
    There is an obvious difference between the size of the two lenses, which you can see in the image below. However, you will find the same with most fixed or prime lenses.
    Review of the Lensbaby Velvet 85

    The Lensbaby Velvet 85 next to the Velvet 56.

    If you change the focus to point so that you can get as close as you can to what you are photographing, they both seem to capture the same image.

    Review of the Lensbaby Velvet 85

    How close you can get with each lens, the Velvet 85 on the left and the Velvet 56 on the right.

    However, if you are trying to photograph something from a fixed point, then the Velvet 85 will allow you to get closer images. This is great if you are taking photos in a location like a garden, you can photograph those flowers that are at the back and harder to get to.

    Review of the Lensbaby Velvet 85

    Standing in the same place, the difference can be seen with the Velvet 85 on the left, and the Velvet 56 on the right.

    If I had to choose between the two lenses, I think I would want the Velvet 85. The longer reach is appealing, and the soft-focus effect is really interesting. There isn’t a great deal of difference in the price, so it would be my choice.

    Adding the lens to your kit

    It is not an overly expensive lens, Lensbaby sells the Velvet 85 for $ 499. It is available for most cameras on the market today. You can get a full list on the website.

    If you are looking for a lens that is capable of macro photography, then this is a good alternative to the more expensive macro lenses that many companies make. It would also suit a portrait photographer, however, don’t forget street photography and landscape. It is a versatile lens which you will enjoy, but don’t expect to get the same results that you’d achieve with normal lenses.


    The post Review of the Lensbaby Velvet 85 by Leanne Cole appeared first on Digital Photography School.


    Digital Photography School

  • How to Avoid Being Overwhelmed When Learning Photography

    Likely, you are working hard to improve your photography. You are trying to master all the settings on your camera, trying to control things like depth of field while trying to improve your focus and the sharpness of your photos. And then there are all those rules of composition to think about as well. That is a lot to remember, and it can be overwhelming. Frankly, it is enough to make you nostalgic for the good old days when you put your camera in Auto mode and fired off snapshots.

    How to Avoid Being Overwhelmed When Learning Photography

    Before you revert to that, however, let’s take a look at a few ways you can avoid that feeling of overwhelm, and continue to grow as a photographer.

    #1 – Use Swing Keys

    First, you can take a page from other areas of life that subject people to being overwhelmed. Perhaps no activity involves a feeling of overwhelm for the beginner more so than golf. When you are learning a golf swing, it is not uncommon for there to be 12 to 15 different thoughts going through your mind. If you try to do them all at once, the result is inevitably a disaster.

    Therefore it is common to hear golfers talk about “swing keys.” This is about limiting your thoughts to one thing that you want to do in that particular swing. The physical nature of the swing key will vary from golfer to golfer. For one it might be to keep the wrist straight, for another, it might be to follow through. It just depends on their swing and weaknesses. It just gives the golfer something to think about to improve their swings and also keeps them from being overwhelmed.

    Works for photography as well

    I find this a useful analogy for photographers as well. When you are out in the field getting ready to shoot, you may have a thousand different thoughts going through your head. You might be worried about the overall exposure level, setting the right depth of field, avoiding digital noise, watching the focus point, keeping the picture sharp, placing the subject in the right part of the frame, creating an interesting foreground, looking for leading lines, trying to create some emotion, and so on. All this can lead to overload. Having one or two swing keys in your mind can help add some clarity.

    How to Avoid Being Overwhelmed When Learning Photography

    Personally, I am always thinking about the foreground. Doing so helps me keep my thoughts together. It also specifically addresses issues of focus, depth of field, subject, and overall composition. For you, it might be something different. It doesn’t matter what it is – and it can evolve over time – just try to simplify things. Remember that often the best photos are the simplest. Further, as we’ll see in a moment, you can add more things later.

    Create a Checklist

    Another way to keep from worrying about all the things you want to accomplish is to create a checklist. When I was starting out, I found that I would get home from a shoot and kick myself for all the things I forgot to do. I would look at a series of shots I took and wonder why I didn’t bracket some of them, or zoom in on something, or add a neutral density filter in a certain spot, and so on.

    Having a checklist will keep you from forgetting these things. At the same time, it will allow you to relax and not worry about missing anything when you are in the field. The checklist can be as simple or elaborate as you want. It can be a folded up sheet of paper or a laminated page – it doesn’t matter. Once you have gotten the shots you want, just consult your checklist and make sure you didn’t overlook anything.

    How to Avoid Being Overwhelmed When Learning Photography

    Having a checklist can remind you to do things like adding a shot using a neutral density filter.

    Use a Building Process

    Another way to keep from being overwhelmed is to avoid attempting to do too much at once. Instead, use a building process to create your pictures step-by-step. You’ll be amazed at how simple photography can be when you use this process.

    What do I mean by that? Let’s start with an example of a dramatically lit portrait. Trying to create the whole thing in one shot could result in failure and frustration. Therefore, break the final picture down into steps. You might start with a few shots that get the background lighting correct. Once you have that right, then add your flash or strobe, but even then don’t try to control or shape the light yet. Spend a few shots getting the quantity of light the way you want it, and only then move the light off to the side and start working on shape and directions.

    In this way, you’ll find that what seems overwhelming at first, actually becomes pretty simple. I have been to enough photography workshops and seminars to confidently state that many masters of photography work this way.

    How to Avoid Being Overwhelmed When Learning Photography

    In night sky photos, I find it works best to start by just getting the sky right and then worrying about the foreground elements later.

    Build a landscape the same way

    It works in other contexts as well. A landscaper photographer might find a great background and work on setting that part of their shot up before they start looking for a foreground. Once they have built that part of the picture they might look for additional aspects to use as a subject or center of interest. After that, they might wait for something to happen to add interest to the picture. As a result, the final picture looks very complicated, but it was built step-by-step.

    In fact, the famous street photographer Henri Cartier-Bresson worked this way. You may know him as the master of the “decisive moment,” but he was always building to that moment. He would find a great spot to use as a background, set everything up, and then wait for something to happen. That way when the decisive moment happened he was ready for it and created an overall wonderful picture. It didn’t just come together in an instant as it might otherwise appear.

    The point of all this is to show you that if you start simple, you can avoid being overwhelmed. Once you have established one building block of your picture, add another one. This will not only improve your pictures but will result in you having more fun – and certainly fewer feelings of being overwhelmed – while you are doing it.

    Ideas for How to Avoid Overwhelm When Doing Photography

    This started as a simple shot of a barn. We added lights as we went. The white streamers were ultimately lit by a person with a flashlight.

    Take Advantage of Digital Technology

    Finally, as you take your photos, keep one thing in your mind.  Remember the magic of digital photography is that you get to take as many exposures as you want and it costs nothing. There should not be any pressure!

    Not only that, but you are getting instant feedback on what you just did via your LCD screen. You can just delete the bad ones (and we all have bad ones) and move on. No one is going to look at your SD card and judge you on the pictures that don’t work out. They’ll only see the ones you show them.

    Ideas for How to Avoid Overwhelm When Doing Photography

    Similarly, don’t worry about any sort of “hit rate.” Frankly, if you end up with a high hit rate, that probably just means you need to take additional pictures and experiment more.

    A Never Ending Quest

    Done correctly, photography always involves learning and experimentation. Therefore, while I have aimed these comments at those just starting out, these things really apply to everybody. The feeling of overwhelm never really goes away.

    Once you master the controls on your camera you will add other elements to your pictures. Ultimately, you have to find your own way to relax and keep everything fun. Hopefully, these tips will help a little in that regard though.

    The post How to Avoid Being Overwhelmed When Learning Photography by Jim Hamel appeared first on Digital Photography School.


    Digital Photography School

  • These are the best cameras you can buy right now

    Best cameras you can buy right now

    Suppose you’re the kind of person who reads movie spoilers online, or unwraps all of your presents on Christmas Eve. Does that make you a monster? Sure, but we’re not here to judge. You’d probably also like to know which are the very best cameras on the market right now without reading our meticulously prepared and exhaustively researched buying guides. That’s fine. You can cut right to the chase and find out which cameras we picked as category winners right here, you utter fiend.

    Canon EOS M6

    It’s light, offers a healthy dose of direct controls and includes Canon’s excellent Dual Pixel autofocus technology. It’s our pick for parents, but it’s a great option for someone who wants DSLR-like capabilities and controls in a compact package.

    Read more about the Canon EOS M6

    Canon EOS M100

    It’s an incarnation of the M6 with less direct control, but it’s also several hundred dollars cheaper. We think it’s an ideal lightweight point-and-shoot and it’s our top pick if you’re looking to spend around $ 500 on a new camera.

    Read more about the Canon EOS M100

    Canon EOS Rebel SL2

    Beginners looking for an unfussy DSLR to get started will feel right at home with the SL2. We think its Feature Assistant is useful, and it offers all of the same guts of the M6 in a more approachable form.

    Read more about the Canon SL2

    Fujifilm X100F

    You love it. We love it. Everyone loves the X100F. It’s truly the photography press’s darling, and it’s our pick in the fixed prime lens category thanks to its excellent JPEG processing and dreamy form factor. To a large chunk of the photo-taking population it’s an impractical novelty, but it sure is nice if you just want to enjoy the heck out of making photos.

    Read more about Fujifilm X100F

    Nikon D5600

    The D5600 is our pick for both photography students and anyone looking to spend less than $ 1000. It’s not sexy, but it’s reliable, versatile, and offers modern refinements like a touchscreen and Wi-Fi with Bluetooth.

    Read more about the Nikon D5600

    Nikon D7500

    We recommend the D7500 in the sub-$ 1500 category for many of the reasons we picked the D5600 in the category below it: it’s just an extremely well-rounded camera. Impressive subject tracking, good AF, and a proven 20.9MP sensor all contribute to making this the best buy in its price category.

    Read more about the Nikon D7500

    Nikon D750

    Speaking of cameras that just don’t quit, the D750 is over three years old but it’s still competitive – and is attractively priced lately. Despite its age we think it’s the best you can do for under $ 2000 thanks to reliable autofocus and excellent image quality.

    Read more about the Nikon D750

    Nikon D850

    The D850 shares a spot with the Sony a7R III as a top pick for landscape photographers and cameras over $ 2000. ISO 64 gives it a slight edge for photographers who need the ultimate in dynamic range, and it inherits a highly capable autofocus system from the D5. It comes up a little short in terms of pro video capabilities, but outside of that it’s simply one of the best all-around performers you can buy now.

    Read more about the Nikon D850

    Nikon D5

    For sports, the D5 is hands-down the most capable camera out there. It’s ultra-tough and couples 14 fps shooting with the best phase-detection AF on the market. Plenty of shooters would find its smaller sibling, the D500 to be more than enough to suit their needs, but for the pro who needs the absolute best, there’s nothing to top it at the moment.

    Read more about the Nikon D5

    Panasonic Lumix GH5

    If you’re serious about video and you want the best hybrid camera money can buy, get the GH5. It’s outfitted with pro-level tools and boasts excellent stabilization for handheld shots. Oh, and it’s a pretty darn good stills camera too.

    Read more about the Panasonic GH5

    Sony a7R III

    The a7R III ranks as one of the very best cameras we tested this year, tying the equally impressive Nikon D850 as winner in the best for landscape photography and $ 2000 and up category. It’s also our top pick for event photography, thanks to incredibly fast and accurate Eye-AF.

    Read more about the Sony a7R III

    Sony Cyber-shot RX10 III

    Our top pick for travelers is the previous-generation RX10, which saves you several hundred dollars off the price of the Mark IV if you can live without a touchscreen and state-of-the-art autofocus. You’ll still get that generous 24-600mm equiv. zoom range and top notch 4K video capture for all of those vacation memories.

    Read more about the Sony RX10 III

    Sony Cyber-shot RX10 IV

    If we’re going to talk about the very best cameras available now, we do need to mention the latest and greatest in the RX10 series. If there’s a superzoom that can convince us we’re shooting with a pro sports camera, this is it. It’s incredibly pricey but its hybrid AF, 24 fps shooting and oversampled 4K are unparalleled in its class.

    Read more about the Sony RX10 IV

    Sony Cyber-shot RX100 V

    Ten years ago, if you’d told us that a camera that fits in your pocket can record incredible 4K video, shoot 24 fps, and offer 315 point phase detection AF we’d have laughed in your face. Yet here we are in the year 2017, and the RX100 V has made fools of us all. Do you pay handsomely for all of that cutting edge technology? Of course. But if you’re looking for the best of the best, look no further.

    Read more about the Sony RX100 V

    Articles: Digital Photography Review (dpreview.com)