Blog

  • Google’s long-awaited Clips Camera hits stores, will cost you $250

    If you’ve been desperately waiting for Google’s artificial intelligence-driven Clips camera to go on sale now is your moment. The company has added the video clip shooting device to its store for US customers at the expected $ 250 price tag, with delivery expected between the end of February and the beginning of March.

    The lifelogging camera was first revealed at the Pixel 2 event in October. It’s designed to recognize the best moments and composition, and to shoot automatically when it ‘thinks’ the occasion is right. The aptly named Clips camera shoots short ‘clips’ of video which can be reviewed in a Google Clips app. In the app, clips can be saved or deleted, and still images can be extracted from the clips as well.

    The 12MP camera has a shutter button too for human driven activation, but the main idea is that it is placed somewhere it can see what’s going on, and it does all the work for you. The main idea is that using Clips in its automatic ‘intelligent’ mode allows the user to be in the pictures instead of having to be behind the camera.

    Below is a sample clip posted to the Google blog, with the video captured by the camera on the left and the still extracted from the video on the right. Stills are extracted using the Google Clips app.

    The camera can record at 15fps, and uses a lens with a 130° angle of view. Images are stored in the 16GB internal memory, and the camera can run for three hours on a single charge. Connection is via USB-C, Wi-Fi or Bluetooth.

    As reported before, professional photographers were consulted to help the company understand what makes a good or a bad picture, so the after analyzing what’s happening and where the elements are in the frame, the device’s brain decides whether to record or not. The camera also learns about the people you mix with, and will take more clips of people it sees often, as it will assume they are closer to you. Thankfully, it will also get to know your cat, to save you the bother of photographing it yourself.

    For more information, visit the Google webstore.

    Articles: Digital Photography Review (dpreview.com)

  • Michael Christopher Brown on war, trauma and bearing witness

    Photographer Michael Christopher Brown’s work has taken him all over the world, from conflict zones in the middle east to post-Castro Cuba. Often shooting with just a smartphone, Brown’s work is characterized by an intimacy and immediacy that in some cases, makes it difficult viewing.

    Getting close to the action has its risks, as he found out in 2011 in Libya, where he was seriously injured in an attack that killed fellow photographers Tim Hetherington and Chris Hondros.

    Michael’s ‘Native America’ project focuses on the people and cultures of native American reservations across the USA

    In the years since he returned from Libya, Michael has traveled all over the globe, but his latest commission brought him all the way back home. Starting in his home state of Washington, Michael’s ‘Native America’ project focuses on the people and cultures of native American reservations across the USA.

    Funded by a grant from Sony in 2017, the project has taken him to 16 reservations in seven states. Despite the challenges faced by the native populations inside the reservations, Brown describes the project – which was shot using the Sony a9 – as a ‘celebration of life’.

    We sat down with Michael recently to talk to him about his career up to and including the ‘Native America’ project.

    $ (document).ready(function() { SampleGalleryV2({“containerId”:”embeddedSampleGallery_5336979579″,”galleryId”:”5336979579″,”isEmbeddedWidget”:true,”selectedImageIndex”:0,”isMobile”:false}) });


    Sponsored content, supported by Sony. What does this mean?

    Articles: Digital Photography Review (dpreview.com)

  • How to Know if You Should Upgrade Your Equipment or if You Just Have Gear Lust

    Gear lust – it’s out there and is bound to bite you sooner or later. Whether photography is a business or a hobby for you, gear lust is a natural part of the consumer cycle. But there is a sane way to approach your desires and check if they are ruling you or you are ruling them. So here are some tips to help you know if you should upgrade or it’s just gear lust.

    How to Know if You Should Upgrade Your Equipment or if You Just Have Gear Lust

    New Photo Equipment Flowchart

    Follow this flowchart to see where you land. Only if you end up at a green bubble should you consider upgrading or buying more camera gear.

    How to Know if You Should Upgrade Your Equipment or if You Just Have Gear Lust - infographic

    Click to view the chart in a new tab or print it out.

    Do you shoot for profit?

    The first question on the chart is the most defining, “Are you going to make money from this lens?” Whether photography is a hobby or profession for you makes a big difference in the purchase decision. I believe both groups should look at the choice through different eyes, so let’s start down the hobby side of things first.

    Skip down to below the hobby section to find the questions for profitable shooters.

    How to Know if You Should Upgrade Your Equipment or if You Just Have Gear Lust

    Hobby: What can’t you currently do with your gear?

    If you can’t answer this question truthfully, then you have textbook gear lust. If you answer it and that answer is, “Nothing,” you too have gear lust. That’s not a bad thing! I just want to help you recognize it so you can make your choice with a little more clarity.

    But, if there is a technique or style you have tried to replicate over and over again with your current equipment, such as parallel lines in architectural photography or a ten-minute exposure when your camera has no Blub mode, you’re one step closer to justifying an outlay of cash. So let’s take a look at your next question.

    Hobby: Should you buy pro equipment?

    This question is usually related to lenses but can be adapted to camera bodies, lighting equipment, printers, and more.

    If you’re in this photography game for the long haul, it’s in your best interest to purchase higher quality equipment. Lenses specifically will last through a number of camera bodies over the years, while camera bodies tend to make reasonable improvements every 3-5 years.

    How to Know if You Should Upgrade Your Equipment or if You Just Have Gear Lust

    I usually suggest intermediate or pro-quality equipment to anyone who has been using their gear for a couple of years and continually hits the limit for its abilities. Then we need to ask the next critical question…

    Hobby: Can you afford it?

    If you can’t afford the higher quality equipment, and you can still justify the need to upgrade, I would suggest looking for used equipment in the style you want or possibly renting it for a short-term project. This is an excellent idea for trips abroad, for instance.

    If you have come this far and can afford the purchase without going broke, hungry or breaking up a relationship to do so, I say go for it! It might be wise to do a quick cost/benefit analysis (e.g. I’d rather spend $ 1500 on travel than on a new lens). That might point you to a cheaper option to balance the scales, which tends to be a wise choice for hobbies. Or you might find bliss in your Gear Lust (this time) and will revel in the joy of new shooting opportunities.

    Profit: Should you get pro equipment?

    How to Know if You Should Upgrade Your Equipment or if You Just Have Gear Lust

    If you are making a profit or looking to do so with your equipment, you’re going to want to look at this decision through money-making glasses. That equipment won’t do you any good if it just sits on a shelf. It needs to be making you money!

    To answer the pro equipment question for profit-seekers, let’s look at how this lens will be used. Make no mistake; it’s easy for pros to justify business-related purchases right away when they are really just gear lust in disguise.

    Real Life Lesson: I bought a drone on the chance that I’d get a gig where I’d use it heavily. The client ended up canceling the project, but I bought the drone before the contract was signed, because of my gear lust. I made up a reason to justify it when I had no concrete payback schedule. Now I use the drone mostly as a hobby and it dented my pocketbook unnecessarily.

    Should you get pro equipment? Let’s ask first if the photos are mission critical.

    Profit: Are your photos mission critical?

    Relating another analogy from my recent past, I bought a nice Sigma 150-600mm Sport Lens because I recently got into birding. I ‘”needed” (heavy emphasis on the quotes) a longer lens to capture those small or far away birds. That’s bad, expensive gear lust and I didn’t ask myself the “Mission Critical” question.

    On the other side of the coin, I also shoot weddings and portraits, so buying a new 24-105mm lens would easily be justified, because the lens will pay for itself over time. Those photos are mission critical and pay my bills. Photos of bird, currently, do not. “Maybe I’ll sell some photos in the future,” is not the best business decision to make and the purchase of said item should be put off until it can be afforded as a hobby.

    Profit: Will the equipment increase profits?

    These new photos you will take with this new equipment, will those photos increase your profits? Really?

    How to Know if You Should Upgrade Your Equipment or if You Just Have Gear Lust

    Dig deep with this one, because you need to look at this as a business decision. Do you have work lined up that will pay for most, if not all, of the new equipment purchase? If so, skip to the last question. If not, continue.

    Profit: Is the new equipment replacing old equipment?

    If you’ve answered no this far, this no is your last. It’s gear lust, plain and simple.

    How to Know if You Should Upgrade Your Equipment or if You Just Have Gear Lust

    If you are replacing old gear, the purchase can likely be justified. Especially if you can offload your old equipment or use it as a much-needed backup. But I have one last question for you before you click the “Buy Now” button.

    Profit: Can your old equipment be repaired?

    I felt gear lust strong and clear when my 28-300mm L lens started having problems. A new one, not all scratched up, would be so nice. Then I asked Canon about fixing it. They said it would cost me $ 300. Once I compared that to the $ 2700 cost of buying a new lens, my decision was clear.

    This choice can be made more difficult if the manufacturer has upgraded your camera or lens to a Mark II or III version. If your old equipment is simply aged beyond your capabilities, or it can’t be repaired, it’s time to buy new gear. But if it can be repaired and you can get a few more years of use out of it, then save your profits for expanding your business rather than giving in to gear lust.

    Profit: At what photo business stage are you?

    You’ve made your way through the chart and are going to buy that new piece of equipment. Congratulations on being clearheaded!

    There is one last thing to consider: What stage are you at in your business development?

    Beginner

    How to Know if You Should Upgrade Your Equipment or if You Just Have Gear Lust

    If you’re just beginning, I would consider some lower cost options for equipment. This might mean getting a mid-level camera body instead of the $ 8000 pro-version that gear lust is drawing you toward. Spending $ 6500 more than you need to on a camera body won’t make you that much more profit. Investing it in advertising has a better chance of bringing in more clients and hence more profits.

    If you have a specific project to shoot for a client and you’re not sure if you’ll use that equipment afterward, renting can be a viable option to keep your profits up.

    You’re getting some paid gigs

    If the money is coming in steady enough, but it’s not your main source of income yet, then it’s likely a good time to upgrade to better gear. Especially if you have made a case for how you can increase profits or ease workflow (e.g. replacing a 6-year old computer will vastly improve your editing speed and leave more time for finding and shooting new gigs).

    Be honest with yourself here. If paid work is sporadic and you can do other types of jobs to make cash, hold off on spending profits until the volume is up and more regular.

    Also, I highly suggest upgrading your lenses before your bodies, all things being equal. While getting a new body that has GPS or one extra frame per second in high-speed mode might seem tempting, a faster and sharper lens will improve your end product in a more profitable way.

    You make regular income with photography

    If the dough is rolling in regularly and you can see the next three years being this way, pull the trigger and buy that new gear. You’re in this for the long-haul and can write off the new equipment as a business expense over its useful life.

    Hint: If a new purchase would put your balance sheet far into the red for the year, you’re not making enough regular income.

    How to Know if You Should Upgrade Your Equipment or if You Just Have Gear Lust

    Conclusion

    Gear lust happens to us all and it can be a struggle. I’ve suffered from it more than once and made bad choices more than once – thus the reason for this flowchart.

    I hope it helps you find your way to photo-taking bliss. Remember, that’s why we own all this stuff: to take amazing photos. Don’t let the gear lust pull you away from that goal.

    The post How to Know if You Should Upgrade Your Equipment or if You Just Have Gear Lust by Peter West Carey appeared first on Digital Photography School.


    Digital Photography School

  • 8 Ideas of What To Do With Your Vacation Photos

    Going on vacation is one of the best opportunities to practice travel photography. But the problem persists that more often than not, those boatloads of vacation photos that you snapped end up going nowhere other than maybe scattered about on Facebook.

    Vacation photos

    Sound familiar? You’re definitely not alone! If you’re looking for ways to actually use your vacation photos, here are 8 ideas to get you started.

    1. Make a blog post

    One of the best ways to recap your vacation is to make a blog post, combining photos with stories and words to give it more context. Don’t have a blog? No worries! It’s very easy to create a free blog on sites like WordPress. If making a blog sounds like too much, Adobe Spark offers a free, very intuitive format for quickly creating a travel blog of words and photos.

    Vacation photos

    Creating a quick, easy, and free “blog” on Adobe Spark. This is s snapshot from the one I created for our trip to Italy ad our wedding.

    2. Create an online slideshow

    If you’d rather not go through the hassle of putting a blog together, an online slideshow is another way to make a digital presentation of your photos. Simply upload your photos to an online slideshow maker such as Pholody, select background music, and share or download the slideshow.

    Alternatively, you can also turn your favorite vacation photos into screensaver slideshows or desktop backgrounds for your laptop or cell phone. How to Create a Simple Slideshow in Lightroom is another way to do it.

    3. Strategically post to social media for the most traction

    This is probably the most obvious use of vacation photos that may not seem worthy of even being mentioned, but hear me out.

    If you aspire to have your photos viewed by more than just your current followers, you’ll have to be more strategic in how you post your images. This means adding hashtags and tagging tourism-related businesses that relate to your photos. Think airlines, tourism boards, local Instagram communities…the list goes on.

    Research hashtags and businesses ahead of time and keep a list handy in Evernote so you can easily copy and paste them into your Instagram posts.

    Vacation photos

    4. Print a photo book, scrapbook, or photo album

    Some photos simply pop and look better when they’re physically printed in book form. Consider putting together your top vacation photos and getting them printed via a service.

    I recently used Zno and was impressed with their high-quality printing and the fact that the images lay flat without the book gutter running through them. Another service called ChatBooks is a little more automated and can sync your Instagram or Facebook photos into a book design for printing. If you’re more DIY-inclined, you can also opt for making batch photo prints and sticking them in an album or scrapbook.

    See also: How to Create a Simple Blurb Photo Book in Lightroom

    Vacation photos

    A Lay Flat photo book by Zno.

    5. Make postcards or thank you cards

    More often than not, your vacation will fall between occasions when you might receive gifts from friends or family. This is the perfect opportunity to create unique thank you cards using your own vacation photos. Also, consider creating fun postcards to send to friends and family as a recap of your trip.

    If you’re a professional or aspiring photographer, you can even use these postcards as a form of a business card, handing them out to curious passersby who want to know where to find more of your work.

    6. Create your own custom postage stamps

    Before you send off that custom postcard or thank you card, make sure you include a custom postage stamp. You can use any of your own photos or use a pre-made design. These postage stamps are real and are licensed for use by the United States Postal Service.

    Vacation photos

    7. Transform your photos into wall art

    It’s not unusual to capture some of your very best travel photos while on vacation. Whether it’s a great family photo or a stunning landscape, there’s almost always a photo or two in your albums that are print-worthy. So why not turn them into actual photo prints?

    Making prints is incredibly easy to do via online ordering. You also have a plethora of print material options including traditional photo prints, canvas, metal prints, and even wood.

    For more on printing, see these dPS articles:

    • Digital Photography – Is it the Death of Prints?
    • How to Size and Export Images from Lightroom for Facebook and Print
    • How to Prepare Your Images for Print and Display
    • 5 Steps to Creating a Printed Photo Collection as Wall Art
    • 5 Tips for Going from Pixels to Print Quality

    Vacation photos

    8. Print your photos on…just about anything!

    Thanks to printing companies such as Zazzle, you can print your photos on a wide range of objects. T-shirts, magnets, and mugs might seem like traditional items on which you tend to find custom printed photos. But did you know that your photo can be printed on an iPhone case, blanket, pillow, bath mat, Zippo lighter, playing cards, and even a skateboard?

    Vacation photos

    Over to You

    What are some creative ways that you have utilized your vacation photos? Share your thoughts and ideas in the comments below. And show us the photos!

    The post 8 Ideas of What To Do With Your Vacation Photos by Suzi Pratt appeared first on Digital Photography School.


    Digital Photography School

  • Gallery and impressions: The Tamron 100-400mm F4.5-6.3 is light, sharp and stabilized

    Shot on the Canon EOS 80D.
    ISO 800 | 154mm | 1/200 sec | F5.6

    The Tamron 100-400mm F4.5-6.3 Di VC USD is a well-priced ($ 800) telephoto lens with a useful zoom range. Available in both Canon EF and Nikon F mount, this lens is useful on both full-frame and crop bodies, offering a 150-600mm equiv. field of view on the latter. We first saw it at PPE 2017 and were impressed by its reasonable size and weight given its reach – at 1.11 kg / 2.45 lb – it is the lightest lens in its class.

    See our Tamron 100-400mm F4.5-6.3 sample gallery Optically, the 100-400mm is constructed of 17 elements arranged in 11 groups, including low-dispersion elements to correct for aberrations. It also features multiple coatings to reduce ghosting and flare, as well as a protective fluorine coating on the front element. Image stabilization is crucial when it comes to long zoom lenses and Tamron’s optical Vibration Correction system offers the equivalent of 4 stops of correction (CIPA rated).

    Shown with the optional tripod collar attached, sold separately for $ 130.

    Key Specifications:

    • 100-400mm zoom range
    • 150-600mm equiv. field of view on APS-C
    • F4.5-6.3 maximum aperture
    • VC Image stablization
    • Dust and moisture resistant
    • Silent AF
    • Florine coating on front element
    • Minimum focus distance: 1.5m
    • Maximum magnification ratio: 1:3.6
    • Filter thread: 67mm
    • Available in Canon EF and Nikon F mount

    Wildlife and outdoor sports shooters can take solace in the fact that this lens is moisture resistant, with eight rubber gaskets, including one at the base of the lens mount. It’s compatible with Tamron’s TAP-in Console, allowing users to update firmware and/or fine-tune AF. It can also be used with the company’s 1.4X and 2X teleconverters. An A035TM accessory tripod collar is sold separately for $ 130.

    Shot on the Canon EOS 5DS R.
    ISO 200 | 100mm | 1/1600 sec | F4.5

    Design and Handling

    According to Tamron the lightweight design of this lens is mostly due to its magnesium alloy internal construction, though it is worth noting the outer shell of the lens is plastic (the lens mount is metal). The lens telescopes when zoomed, increasing in length about 50%. At its most compact it is about 20 cm / 7.8 in long.

    Well-constructed, solid feeling and well-balanced, nothing rattles around inside the lens when shaken (my favorite test). Zooming from 100mm to 400mm requires a one quarter turn of the large rubberized zoom ring (located at the front of the lens).

    Zooming from 100mm to 400mm requires a one quarter turn of the large rubberized zoom ring

    ‘Lens creep’ is an annoying fact of life when using telescoping lenses, fortunately it was not an issue during field testing. Just in case, there is a lock on the lens barrel (which can only be used when the zoom is retracted in to 100mm).

    Toward the base of the lens barrel you’ll find an AF/MF switch as well as as a controller for selecting one’s VC (vibration compensation) mode: Mode 1 is for normal stabilization, Mode 2 is for use when panning. Users can also turn off VC completely, which useful if you’re on a tripod. Just below the focus ring is the focus distance scale window.

    Performance

    Hand-held at 400mm, shot using a 1/125 sec shutter because I live in Seattle and it is always dark outside. Shot on the Canon EOS 80D
    ISO 800 | 400mm | 1/125 sec | F6.3

    Tamron is pitching this lens as appropriate for sports and wildlife shooters, two groups that require reliable AF and effective stabilization. Fortunately, our real world usage shows the 100-400mm excelling in both areas.

    The image stabilization system proved effective at helping to eliminate camera shake at shutter speeds I’d ordinarily not feel comfortable using, given the focal length used. The moment you engage AF the IS system kicks in – with one’s eye to the finder the effectiveness of the compensation is immediately apparent.

    Autofocus is both silent (hello ultrasonic drive) and fast (powered by two processors). Acquisition is nearly instant in AF-S and it’s equally fast and impressive in AF-C. Users can expect it to maintain focus on the moving subjects they point it at, assuming their camera body is up to the challenge.

    Image Quality

    The lens is sharp through the zoom range, out of focus areas are also inoffensive. Shot on the Canon EOS 5DS R.
    ISO 400 | 400mm | 1/500 sec | F6.3

    Though this lens has a slow maximum aperture and is best used for daylight shooting, all signs point to it being optically very good. Our copy of the 100-400mm was well-centered and universally sharp across the frame at all focal lengths we shot. Ghosting and flare are rare.

    [It is] universally sharp across the frame at all focal lengths we shot

    Chromatic aberration is also really well controlled, though it does appears in some images. Lateral CA is easy to correct in Adobe Camera Raw and other Raw processing programs.However axial CA, which you can see in this shot, is much more difficult to correct for. We also noted some vignetting when used on full-frame, but that is also fairly easy to correct in post.

    Bokeh is about what we would expect for a complex telephoto lens. It can look nice toward the longer end, when there’s good subject separation, but closer to 100mm, it can look a little busy, as is the case in this shot.

    Conclusion

    For travel photographers looking for a casual, lightweight telephoto lens to explore with, the Tamron 100-400 F4.5-6.3 is a solid choice. Shot on the EOS 5DS R.
    ISO 400 | 143mm | 1/1250 sec | F5

    The Tamron 100-400mm F4.5-6.3 is a great telephoto lens for daylight photography, whether your subjects are moving or not. It offers fast, silent autofocus, good stabilization and is optically impressive at all focal lengths. All that comes in a weather-resistant package that also happens to be the lightest in its class.

    We feel comfortable giving it our recommendation

    Priced the same as the Sigma 100-400mm F5-6.3 DG OS HSM, the most obvious difference between the two is the Tamron is faster on the wide end, F4.5 vs F5 (and it’s also a hair lighter). That aside, the two offer very similar features like image stabilization, multi layer coatings and special elements for dealing with CA. We’ll have to revisit the Sigma to see just how well the two compare. But having spent a good amount of time with the Tamron, we feel comfortable giving it our recommendation.

    What we like:

    • Sharp, versatile zoom range on both APS-C and full-frame
    • Lightest lens in its class
    • Moisture and dust resistant
    • Impressive image stablization
    • Silent AF is fast and accurate

    What we don’t:

    • Slow aperture range
    • Pricey tripod collar sold separately
    • Vignettes on full-frame (though easy to correct)

    $ (document).ready(function() { SampleGalleryV2({“containerId”:”embeddedSampleGallery_6541892592″,”galleryId”:”6541892592″,”isEmbeddedWidget”:true,”selectedImageIndex”:0,”isMobile”:false}) });
    Articles: Digital Photography Review (dpreview.com)

  • How to Make and Fold a Little Photographic Zine

    Basically, a zine (pronounced “zeen”) is a low-budget DIY booklet. The word stems from the shortening of the word magazine and was developed as a rejection of commercialism and mainstream publications. In stark contrast to the mass media industry, zine artists don’t seek to make a profit. Instead, they are designed to share ideas, stories, and artistic work.

    Due to the fact that they haven’t gained much of a corporate backing, creators of zines pay homage to their own creative roots, carving an organic niche in visual arts for themselves. Originally churned out by hand, the prospect of a potential zine is an exciting one, with an endless amount of technology, media, and materials readily available.

    The constant evolution of technology mixed with older, more traditional techniques means that zines continue to intrigue with highly individual and versatile methodology.

    How to Make and Fold a Little Photographic Zine

    The contemporary zine emerged alongside technology like the photocopier. The interest and creation of zines grew in popularity during the punk movement of the 70’s and quickly spread from the United Kingdom to Australia and America. Marginalized creatives sought a medium that wouldn’t leave them broke. Graffiti was one solution to the problem, and one of the others was zine-making.

    Authors of zines soon developed the DIY magazines to incorporate new ideas, personal observations, poetry, concepts, and artworks within their limited pages. Let’s have a look at one of the predominant zine styles today – and how you can make simple and effective photography books with a printer and a bit of low-grade origami!

    How to create your own zine

    You will need

    • A few blank pieces of A4 paper
    • Photo editing and printing technology
    • A craft knife
    • A marker, pen, or pencil

    Method

    Zines are designed as a simple, accessible and low-cost project. With a couple of folds, a simple piece of paper can become a comprehensive creative space.

    First, we’ll build a scaffold to get a hold on the zine’s layout. It’s important to visualize the construction of a zine to understand the folding process. The layout will also guide your images later.  Practicing the process will allow you to create work quicker, but also with greater efficacy.

    For this project, I’ll be using a blank, A4 sheet of paper –  but different sizes and colors work well too! Let’s get started.

    How to Make and Fold a Little Photographic Zine

    Folding the paper

    Step 1 – Folding

    Fold your original paper (1) so the short edges touch and press down on the crease with a finger to create a neat line in the center of the page (2). Always fold the two smaller edges of paper together. Folding length-ways results in a paper fan instead. Fold 2 in half so that the shorter sides of the folded paper intersect. Press down along the center line to make a crisp edge on stage three. The next stage is…you guessed it! Double stage three over and crease at the fold to make stage four.

    How to Make and Fold a Little Photographic Zine

    Unfold the paper.

    Now, open your paper. You’ll see 8 evenly divided rectangles.

    How to Make and Fold a Little Photographic Zine

    Labeling each of the sections of the paper.

    Step 2 – Labeling

    The next step is labeling each of the sections of your paper. Looking at the image above, you’ll notice that half of the pages are marked upside down. Folding the final stages of the zine can be tricky. Each image needs to be oriented in a specific way. The end result of the zine will be made up of different orientations of your paper, due to the final folding process. If you want all your images to be one size and right-side up, mapping our the zine’s final orientation like this is invaluable.

    How to Make and Fold a Little Photographic Zine

    Mark one line and make a cut.

    Step 3 – Cutting

    Next, you’ll need to put a neat horizontal line in the inner two pages of the layout. Mark a continuous line between page 1 and page 4 and between page 5 and the front cover (as shown above). With a sharp craft knife, cut along the mark you made. Just be sure the knife is sharp, otherwise, it will leave nasty edges all the way up and down your cut.

    How to Make and Fold a Little Photographic Zine

    Once you have finished cutting the marked horizontal line, you will have a result like this. with a pointed gap in the center of your paper.

    Step 4 – Refolding into the zine

    Hold onto the outer layers of the paper with your fingers and gently push the outer pages toward the middle slit, so that the slice opens up to accommodate the pages (see below).

    How to Make and Fold a Little Photographic Zine

    How to Make and Fold a Little Photographic Zine

    As you push the push the outside layers of the paper, it will form together like a star.

    How to Make and Fold a Little Photographic Zine

    As you press the ends together, the other pages will form around the folded slit. Be sure to check that the front and back pages are in the right place with a little bit of fiddling.

    How to Make and Fold a Little Photographic Zine

    How to Make and Fold a Little Photographic Zine

    Your complete layout has folded down into a neat zine. So what’s next?

    Photographic Zines

    Photographic books are one of the best ways to share your photography. But producing professional-grade art books is a seriously costly undertaking. They may be small, but zines are a powerful and fun way to present your work and build networks.

    The DIY nature of zines adds an extra layer of physicality to a body of work. They emphasize tactility, size, and detail. As they are handmade, each zine is a personal, tailored body of work, with the care that can only be imbued by hand. Because they take on an informal appearance, people will be much more inclined to touch and interact with your work. The price of the copies doesn’t hurt the viewer’s hip pocket either. They can take your work and revisit it again later – at minimal cost to creator and viewer.

    Making a photographic zine

    Because we will be working on the computer, grab a template like the one below and open it in a new document in Photoshop. You can copy mine if you like. Open up a new document and paste the layout onto the page.How to Make and Fold a Little Photographic Zine

    How to Make and Fold a Little Photographic Zine

    Carefully transpose each of your images to the corresponding page on the layout. Refer to your test dummy zine to visualize each page in the booklet. Remember, each image has to be orientated in the same way as the layout. Otherwise, you will end up with upside down images on your final zine.

    For the cover of this zine, I’ve decided to use a joint image that spans over both the back and front page so that the pages will correspond.

    How to Make and Fold a Little Photographic Zine

    Here is the final layout before I print my zine. I took the time to experiment before sending it off to the printer. Then,  printed in a matter of seconds, I have my zine layout ready for folding!

    How to Make and Fold a Little Photographic Zine

    Following through the folding instructions above, you’ll have your finished product! Now that you’ve made one, are you tempted to get started on a few more?

    Here are a few examples of some recent zines I’ve made.

    How to Make and Fold a Little Photographic Zine

    This little character is a blood mascot tasked with recruiting more blood donors in Japan. I took a photo of her one day, and it was so cute I upped the contrast and used her as the front cover of a zine.

    How to Make and Fold a Little Photographic Zine

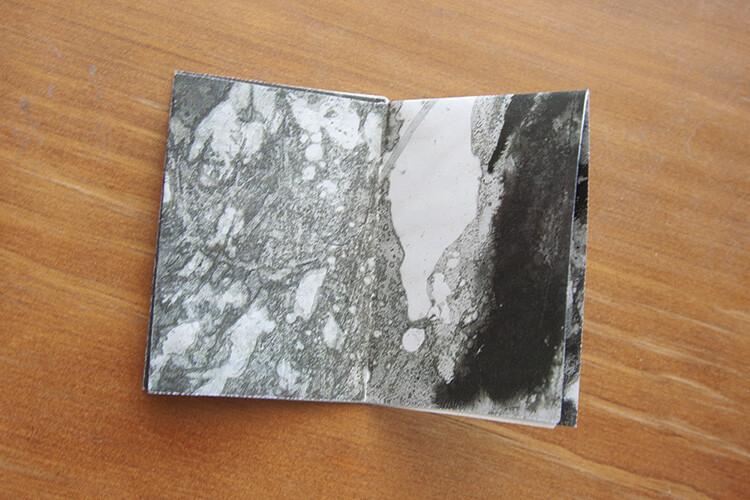
    To create this zine, I simply recycled an image I printed by mistake

    How to Make and Fold a Little Photographic Zine

    How to Make and Fold a Little Photographic Zine

    I printed this photo which is a scan of an inky painting. I also added a blank white square to the back page section, for a little message to a reader.

    How to Make and Fold a Little Photographic Zine

    How to Make and Fold a Little Photographic Zine

    How to Make and Fold a Little Photographic Zine

    To make this zine I incorporated a few film photographs I took one night. Film makes great material for zines. Note that there is a white strip in the layout, due to a film end. I decided to leave it in the design as a testament to the original image.

    Conclusion

    Zines are all about sharing art and creativity, founding trades and friendships across the world. Please share your photographic zines below, I would love to see them. Perhaps we could set up a trade!

    The post How to Make and Fold a Little Photographic Zine by Megan Kennedy appeared first on Digital Photography School.


    Digital Photography School

  • Sunset, golf and a fake nuclear missile: How I spent four days taking pictures in Hawaii

    Sony a6500 | 18-135mm F3.5-5.6 OSS @ 95mm | ISO 100 | F6.3

    Being a child of the Midwest a hike, in my mind, is more or less walking across land that is mostly flat. There are trees, usually a dirt path, and maybe the occasional hill. A hike in Hawaii, I came to learn recently, can mean something vastly different.

    I was in Hawaii on a Sony-sponsored trip along with a handful of other photography journalists, on Oahu for two vastly different shooting experiences: shooting pro golf with the a9, and trying out a new 18-135mm F3.5-5.6 zoom for the a6000-series. I was armed with a TSA-approved 3.4 ounces of sunscreen, a handful of memory cards and a pair of running shoes that prove to be woefully outmatched by the “hike” we’re about to embark on.

    My first clue should have been when one member of our party put some spiky, chainmail-type overshoes on top of her street shoes. We walked across a parking lot toward the “trailhead,” a rocky slope where a faint suggestion of a path disappeared into some trees. What followed was 30 minutes of scrambling up a steep incline, grabbing at roots, tree branches and rocks for support. Oh, and did I mention I have a slightly weird thing about heights?

    Suddenly, I was quite grateful for the a6500 and the lens’ small size. The whole kit fit easily into a low profile backpack and didn’t provide an extra physical challenge to overcome. Along the way we found a couple of points to stop off, breathe, and take a few photos. Every time we stopped I considered chickening out on the rest of the climb. Nobody would judge me, and I’d get perfectly nice photos from halfway up.

    Sony a6500 | 18-135mm F3.5-5.6 OSS @ 18mm | ISO 100 | F4.5

    Maybe the morning’s events made me feel bolder (more on that later). Maybe being the only lady journalist on the trip made me hungrier to prove my grit. Maybe it was just the beer I had at lunch giving me some extra courage. I kept going whatever the reason, and I’m pretty darn glad that I did.

    Insert your favorite inspirational quote / rap lyric about making it to the top here.

    Sony a6500 | 18-135mm F3.5-5.6 OSS @ 18mm | ISO 200 | F5.6

    I wouldn’t have wanted to carry a lens/camera combo much bigger than the a6500 and 18-135mm on that hike. For its size, it proved to be a pretty versatile kit. The lens was wide enough for a sweeping view of sunset in the valley, but long enough for a quick shot of a helicopter in the distance when it swooped by unexpectedly. Your standard kit zoom wouldn’t have provided quite as many options.

    Did you instinctively start humming the Jurassic Park theme when you saw this image? No? You’re a liar.

    Sony a6500 | 18-135mm F3.5-5.6 OSS @ 90mm | ISO 100 | F5.6

    I tend to gravitate toward wide lenses and like the convenience of carrying lightweight primes, but I was very happy to have the variety that the telezoom offered. When you’re standing on one 3′ x 3′ rock scared to move left or right for fear of falling to your death, you don’t have too many composition options with a 24mm prime.

    As it turns out, that hike wasn’t the only time I contemplated my own mortality that day. Let me tell you about the events of that morning.

    We all know now what happened, but when you’re woken up by your phone buzzing with this message (special attention to the part that says THIS IS NOT A DRILL) it makes for a very strange start to the day. The short version of my story is that I spent about 15 minutes in a semi-panic, and having only the tornado drills of my youth to call on for guidance, huddled in my hotel bathroom with a single bottle of water. Not exactly your best shot at surviving a nuclear attack.

    I wish I could say I had some kind of profound experience when I found out it was all a mistake. In reality, I just put on some shoes and went downstairs for coffee and a yogurt, and more or less just went about my day. I made time to get into the ocean. That was nice.

    A couple of days before the threat of nuclear warfare appeared on my phone, I found myself in a very different state of mind as I tried to photograph professional golf.

    Sony a9 | FE 100-400mm F4.5-5.6 GM OSS @ 121mm | ISO 100 | F5.6

    Golf is a mysterious game. As opposed to the tennis tournaments and baseball games I’m familiar with, the action happens all around you. I’ve thought of it as a game with a leisurely pace, but trying to photograph it for the first time, I’m amazed at how quickly the action unfolds. You have to get into position, pray that a caddy doesn’t step into your way at the last moment, and you only have a few seconds to get your shot before it’s all over. Oh, and you have to keep in mind the direction of the sun, ugly things like trash cans creeping into your backgrounds, and woe betide you if you make even a peep as a golfer prepares to swing a club – you’ll be swiftly escorted off the grounds.

    “Game changer” has become sort of a joke around the office since it’s a phrase that’s been used to death and rarely lives up to its meaning. But if you’re a golf photographer, you really could consider the a9 to be a game changer. Plenty of resolution, 20 fps and silent shutter – particularly that last bit – is huge for a sport where silence isn’t just golden, it’s mandatory. Jeannette Moses noted this revelation when she photographed the Presidents Cup last year with the a9. I’ve seen it firsthand too, and it really is strange to be so close to a professional golfer raising his club to strike the ball while firing away at 20 fps.

    Sony a9 | FE 100-400mm F4.5-5.6 GM OSS @ 100mm | ISO 100 | F5.6

    Sony’s making a clear appeal to pro sports photographers with the a9, and before we set foot on the golf course we got a primer on the company’s efforts to bolster its offerings with Pro Support. If you aren’t familiar, this is a program for working photographers that aims to put Sony on even footing with Canon and Nikon.

    Sony Pro Support members pay a $ 100 annual fee that entitles them to 24/7 phone and email support and access to service centers in Los Angeles and New York. If you need to send a product in for a fix, Sony claims a three-day turnaround with free loaner gear to cover repairs that take longer. To qualify, photographers must own at least two full-frame Sony bodies, three lenses and must be actively earning income from their photography.

    For comparison, Nikon uses a point system and requires at least two camera bodies and two lenses. The system is tiered, but all levels include priority repairs, repair loans and discounts on repairs. Canon also uses a point-based tiered system, but doesn’t require a certain number of lenses or bodies.

    I’m by no means a pro, and shooting golf proves to be a much more challenging experience than I was anticipating. An afternoon carrying two camera bodies, one of them with a sizable 100-400mm lens attached, was a fairly taxing endeavor. I also put my finger on the shutter too gingerly a few times, and with 20 fps silent shutter it’s easy to end up with hundreds of photos you didn’t mean to take. From over 3000 (!) images, I managed to scrape together a handful I feel comfortable putting my name next to. Not exactly a stellar hit rate.

    Sony Open gallery

    $ (document).ready(function() { SampleGalleryV2({“containerId”:”embeddedSampleGallery_8041997224″,”galleryId”:”8041997224″,”isEmbeddedWidget”:true,”selectedImageIndex”:0,”isMobile”:false}) });

    I have a renewed appreciation for the tough job pro sports photographers have, and a respect for Hawaii’s lovely-yet-dizzying hiking trails. I also jump out of my seat now when my phone buzzes too loudly and I’m finally getting serious about putting together an earthquake preparedness kit. But my feeling of having stretched myself as a photographer, and I suppose as a hiker, outweighs my sense of distress over the whole thing. And if you’re going to survive a fake nuclear missile attack, there are worse places to experience it than Hawaii.

    Sony 18-135mm F3.5-5.6 OSS sample gallery

    $ (document).ready(function() { SampleGalleryV2({“containerId”:”embeddedSampleGallery_3207546459″,”galleryId”:”3207546459″,”isEmbeddedWidget”:true,”selectedImageIndex”:0,”isMobile”:false}) });
    Articles: Digital Photography Review (dpreview.com)

  • How to Take Control of Color in Lightroom

    Back when everybody used film cameras, photographers had to match the film type to their subject. For example, landscape photographers liked Fuji Velvia 50 because it produced deeply saturated slides. But portrait photographers liked films like Fuji Reala which rendered good skin tones. Today, as long as you use the Raw format, you can take the same approach in Lightroom.

    It doesn’t matter what camera you have, Lightroom gives you a great deal of power when it comes to adjusting the colors of your photos. To give you an idea of Lightroom’s potential, take a look at the different versions of the photo below. The first is more or less straight out of the camera. I developed the others with customized Lightroom Develop Presets.

    Color in Lightroom

    Now let’s look at some of the tools Lightroom has for altering color.

    Vibrance and Saturation

    The Vibrance and Saturation sliders are located at the bottom of the Basic panel. They alter the intensity of the colors in the photo in different ways.

    • The Saturation slider changes the intensity level of all colors in the photo equally.
    • The Vibrance slider affects the most deeply saturated colors in the photo the most. It evens out the saturation levels and is a more subtle adjustment than Saturation.

    I prefer to reduce Saturation and Vibrance rather than increase them as desaturated colors are more subtle and atmospheric than saturated ones. These photos illustrate the difference between Vibrance and Saturation.

    Color in Lightroom

    Camera profiles

    Most digital cameras come with a set of color profiles. Every manufacturer gives their color profiles a different name. For instance, Canon uses Picture Style and Fujifilm uses Film Simulation. Check your camera’s user manual if you’re unsure. Regardless of your camera maker’s terminology, the color profiles all appear in the Camera Calibration panel in Lightroom.

    Color profiles are the digital equivalent of the idea of using different films for different subjects. Most cameras have profile names like Landscape, Portrait, and Monochrome. The exception to this is Fujifilm, which names its profiles after real Fuji films, such as Velvia, Provia, and Astia. You’ll find most of these in Lightroom as well, ready for you to use.

    The color profile setting is important as it sets both the color and contrast. You need to select the best profile before adjusting other Develop module sliders. For example, if you apply a preset intended for landscapes to a portrait then it’s unlikely you will get good skin tones.

    This photo shows three different color profiles. I made the photo with a Fujifilm camera and the color profiles are specific to that model.

    Color in Lightroom

    HSL / Color / B&W panel

    The HSL / Color / B&W panel contains a set of powerful tools for adjusting colors in Lightroom. The HSL and Color tabs both contain the same sliders, just arranged in a different order.

    I prefer to use the HSL tab, so let’s look at that. It lets you adjust Hue, Saturation, and Luminance individually.

    Color in Lightroom

    Hue

    The Hue sliders let you change the colors in your photos. The colors on the sliders (see above) tell you how they work. For example, if you move the Red slider to the left you will turn anything that is colored red in your photo to magenta. If you move the slider right then red colored objects become orange.

    In the example below, you can see that I moved the Red, Aqua, and Blue sliders to change some of the hues (colors) in the photo.

    Color in Lightroom

    Saturation

    The Saturation sliders let you change the intensity levels of the colors in your photo individually. This is different from the Saturation and Vibrance sliders, which change the color saturation levels across the entire frame.

    The photo below shows how it works.

    Color in Lightroom

    Luminance

    The Luminance sliders let you adjust the brightness levels of individual colors in your photos. In turn, this affects the apparent saturation. If you make a color darker (by moving the corresponding slider left) the color appears to be more deeply saturated. If you make it lighter (by moving the slider right) the color appears to be less saturated.

    The example below shows it in action.

    Color in Lightroom

    Putting it all together

    Now it’s time to look at how you can put these techniques into action. We’ll do that by looking at the portrait I showed you at the beginning of the article.

    Here is the before version and one of the after versions.

    Color in Lightroom

    These are some of the settings I adjusted that affected the colors.

    Camera profile

    I set the Camera Profile to Adobe Standard. This is a standardized setting created by Adobe specifically for your camera. The idea is that if you take a photo of the same scene with two different cameras, then apply the Adobe Standard Profile to each one, the colors will look the same in each.

    The benefit of using Adobe Standard is that it lets you create a Develop Preset that you can apply to photos made with any camera with consistent results. If you don’t want to do this, then you can use one of Lightroom’s camera specific profiles instead.

    Color in Lightroom

    Saturation

    Next, I reduced the overall Saturation using the Vibrance slider.

    Color in Lightroom

    I reduced the Saturation of specific colors using the sliders in the HSL tab.

    Color in Lightroom

    Luminance

    Then, I increased the brightness of some of the colors using the Luminance sliders.

    Color in Lightroom

    Tone Curve

    Next, this isn’t related to the color, I made a Tone Curve adjustment to create the faded effect. The result of this Tone Curve Adjustment is that there are no true blacks in the photo.

    Color in Lightroom

    The techniques in this article don’t cover all the color adjustment tools in Lightroom as there are too many for one article. But these are the main ones and they will get you started. Let us know in the comments if you have any questions about any of them.


    Faded Glory Presets for Lightroom

    Want to get a head start with creative colors in Lightroom? Take a look at my Faded Glory Presets for Lightroom, created to help photographers like you apply powerful creative color fade effects to your photos.

    The post How to Take Control of Color in Lightroom by Andrew S. Gibson appeared first on Digital Photography School.


    Digital Photography School

  • PowerShot Shootout: Canon’s G1 X III vs G7 X II

    G1 X III versus G7 X II shootout

    Introduction

    In our review of the Canon PowerShot G1 X Mark III, we made some pretty bold claims. Namely, that the lens on the G1 X III makes such a compromise in terms of maximum aperture in an effort to keep the size of the camera down, that much of the theoretical advantage of the large APS-C sensor is basically moot.

    Specifically, the lenses on cameras with smaller 1″-type sensors are so much faster in some cases that they have the potential to offer both better control over depth of field, as well as better noise performance in low light. The specs do tell us, though, that the G1 X III should offer better dynamic range at base ISO.

    LensEquivalentApertures([“Equivalent focal length (mm)”,”Canon G7 X II”,”Canon G1 X III”], [[24,4.90909090909091,”Canon G7 X II at 24mm: F4.9″,4.5170606663860564,”Canon G1 X III at 24mm: F4.5″],[26,null,””,5.1623550472983508,”Canon G1 X III at 26mm: F5.2″],[29,null,””,5.646325832982571,”Canon G1 X III at 29mm: F5.6″],[32,6.0000000000000009,”Canon G7 X II at 32mm: F6.0″,6.4529438091229379,”Canon G1 X III at 32mm: F6.5″],[37,null,””,7.2595617852633048,”Canon G1 X III at 37mm: F7.3″],[39,6.8181818181818183,”Canon G7 X II at 39mm: F6.8″,null,””],[45,null,””,8.0661797614036725,”Canon G1 X III at 45mm: F8.1″],[54,7.6363636363636367,”Canon G7 X II at 54mm: F7.6″,null,””],[57,null,””,9.0341213327721128,”Canon G1 X III at 57mm: F9.0″],[72,null,””,9.0341213327721128,”Canon G1 X III at 72mm: F9.0″],[100,7.6363636363636367,”Canon G7 X II at 100mm: F7.6″,null,””]], {“isMobile”:false})

    At 24mm, the G1 X III has a slight advantage over depth of field control compared to the the G7 X II, but either matches it or falls behind its smaller-sensored sibling elsewhere in the zoom range.

    This is a pretty big deal. After all, the G1 X III is Canon’s flagship compact, and is the only camera currently on the market with an APS-C sensor and a zoom lens (it also fits in your pocket). On the other hand, the G7 X II is nearly half the price, is more compact, and its smaller 1″-type sensor is potentially offset by a much faster zoom lens with greater reach.

    Of course, this discussion is so far based on specification alone, and those specifications can’t necessarily take into account real-world sensor and lens performance. So, let’s check our theory, and see how these two cameras compare.

    Bright landscape

    This is the main situation in which you’d expect the G1X III to have an advantage. Assuming comparable sensor performance, we’d expect the G1X III’s larger sensor to have greater dynamic range advantage, tolerating more light before clipping and thus allowing more exposure, which should give slightly cleaner tones throughout the image.

    G1 X Mark III
    ISO 100
    F7.1 (F11.5 equiv)
    1/320th
    G7 X Mark II
    ISO 125
    F4 (F10.9 equiv)
    1/1250th

    For this scene, we set both cameras on the same tripod, and exposed the scene to just barely clip the highlights of the sun’s reflection on the building at center; though the exposure settings differ, both cameras received roughly the same amount of light at each of their respective base ISO values.

    It’s clear to see that in this sort of scene, the G1 X III exhibits less noise in the lifted shadow areas than its smaller-sensored sibling, and there are areas, particularly in the trees, where fine detail is rendered a tad better.

    We should note that these sorts of bright daylight scenes (where you’re not light-limited and can use base ISO), are where the G1 X III will really pull ahead of the G7 X II. In scenes with even more contrast than this, the difference will become even more apparent.

    Close-range indoors

    By 28mm equiv, the graph shows that both cameras sensor/lens combinations are offering the same equivalent focal length and roughly the same equivalent aperture. Which means, in principle, that they should receive the same amount of total light, when shot wide open at the same shutter speed (and whatever ISO is necessary). The only differences should stem from differences in sensor performance and lens characteristics.

    G1 X Mark III
    ISO 500
    F3.2 (F5.2 equiv)
    1/30th
    G7 X Mark II
    ISO 160
    F2 (F5.5 equiv)
    1/30th

    Click through to see for yourself how each camera renders the background highlights – there is a bit of an ‘onion-ring’ effect from the G7 X II, though the G1 X III image looks just slightly noisier. This is indicative of a slightly less efficient sensor design compared to the backside-illuminated (BSI) unit in the G7 X II.

    Low light, casual portrait

    This sort of situation is usually where people expect to see the benefits of a larger sensor, but this is only true if you can give it enough light. Here’s a shot from the long end of the G1X III’s lens in a situation where you’d need to shoot wide-open. As can be seen from the graph at the top of the page, the G7 X II has a wider equivalent aperture at this point. Let’s see what that means.

    G1 X Mark III
    ISO 12,800
    F5.6 (F9.3 equiv)
    1/60th
    G7 X Mark II
    ISO 5000
    F2.8 (F7.6 equiv)
    1/60th

    Both cameras were zoomed to ~72mm, and I kept my shutter speed at 1/60 sec to account for any slight subject movement. Because the G1 X III’s lens only opens to F5.6 at its maximum zoom, the ISO value hit the maximum value I’d chosen of 12800, while the G7 X II, at F2.8, called for an ISO value of 5000.

    After checking the difference in exposure value for both cameras, the G1 X III required an additional 0.64 EV boost in Adobe Camera Raw, which is effectively like shooting at ISO 20000. So in this situation, the G7 X II’s image is cleaner and offers slightly blurrier out-of-focus highlights in the background. Overall, the advantage of the larger sensor is essentially canceled out by the slower lens.

    Maximum zoom portrait

    So that’s how the two cameras compare within the range that both lenses cover. But now, let’s look at how the G7 X II at 100mm of equivalent reach compares to the G1 X III at its maximum of 72mm.

    G1 X Mark III
    ISO 400
    F5.6 (F9.3 equiv)
    1/125th
    G7 X Mark II
    ISO 125
    F2.8 (F7.6 equiv)
    1/125th

    Here, you can see just how much of a difference the extra reach on the G7 X II’s lens can make. Both images were taken from the same location moments apart, with each lens shot wide open.

    To us, this really exemplifies that, though the 24-72mm focal range of the G1 X III is indeed quite versatile, the extra zoom range on the G7 X II can really be a big advantage for those looking for a small camera for casual portraiture. Of course, if you’re into artificial lighting, the G1 X III’s hot-shoe will allow you far more creative options than the G7 X II, which has a built-in flash and no other flash synchronization options.

    Takeaways

    This comparison is, of course, purposely limited to the image quality impact of the lenses and sensors on these two cameras. There’s a lot of other features that separate the G1 X III and G7 X II, including that the former offers better dynamic range, weather sealing, an electronic viewfinder, a flash hot shoe, a fully articulating screen, and Dual Pixel AF (and, disappointingly, Canon hasn’t updated its G5 X model, which would have been a closer match to the G7 X II in the first place).

    If all those other aspects of the G1 X III are worth the price premium to you, by all means, pick up a G1 X III. It’s a lovely camera, with excellent handling and is capable of great image quality under a wide variety of scenarios.

    Here comes the ‘but’ though… if you’re looking for (in our opinion) a better value, or you’re looking for an even smaller camera, or you shoot in low or marginal light more often than bright daylight, the G7 X II is almost certain to be a better fit, at a cheaper price. And this is why we just weren’t blown away by the G1 X III in our review; you greatly reduce the benefits of such a large and expensive sensor if you restrict its access to light to squeeze it into such a compact body.

    But what about you? Have you used one or both of these cameras? Let us know what you think of our comparisons in the comments.

    Articles: Digital Photography Review (dpreview.com)

  • Preset Brewery drag-and-drop tool converts Lightroom presets for Photoshop

    An application for macOS 10.10+ called Preset Brewery makes it possible to convert Lightroom presets into Camera Raw presets for use in Photoshop by simply dragging and dropping them—it really doesn’t get any simpler than that.

    Preset Brewery was recently updated to version 1.1, which adds support for exporting the presets directly into Camera Raw so that they’re immediately available; however, the option remains to save the converted presets into the folder where the Lightroom presets are located.

    Preset Brewery was created by developer Adam Bardon, who tells Fstoppers that a future update will add support for batch processing presets. Unfortunately, the application is not available for Windows, but Mac users can purchase Preset Brewery through the company’s website for $ 7.90 USD.

    Articles: Digital Photography Review (dpreview.com)