Blog

  • How to Make a Dramatic Portrait with Light Painting Using Items Found in Your Home

    In this article, I’ll show you how to do a fun project you can do with friends and a little light painting. You can do this, using things you likely already have in the house.

    It’s always fun to experiment with different and creative ways of using light in photographs. It’s also a lot of fun to take some risks and experiment with a technique that may or may not produce good results. The reality is you can learn from every photographic experience. It doesn’t matter if the results are perfect or not. Each time you pull out a camera you create something that adds to your knowledge base and helps you to grow as a photographer.

    Learning lessons

    In the case of a project I did recently with light painting and live models, several lessons were learned. The first was the importance of finding enthusiastic people to assist with my projects. The second was the importance of a reflector in adding light to a photograph.

    Lastly, the third lesson involved pushing the limits of human abilities. I asked my friends to hold very still for these images, sometimes in some slightly awkward poses. How much was too much for my models?

    How to Make Dramatic Light Painting Effects with Items Found in Your Home

    This was our final image of the evening. It took a lot of trial and error to reach this point.


    The light painting project

    The whole concept for the photo project was inspired by the light painting of Eric Pare. He creates dramatic images in stunning locations with the help of dancer Kim Henry. Eric uses an easily created light tube and a strong flashlight. It’s winter here in Canada, and at -30c it’s not reasonable to ask a friend to pose outside in a landscape while wearing skimpy clothing.

    So using his idea of long shutter speeds, it was time to craft a different project. The goal was to create dramatic images that you could easily reproduce within your home at a fairly low cost.

    The following images were created in my kitchen using a large piece of black velvet (a black sheet will also work) draped across my portable backdrop stand, a reflector, an extension cord, and a string of Christmas lights. Of course, three friends were also recruited to assist with the project. They were more than willing to participate in the fun. In the end, there were a lot of laughs, and everyone was quite dedicated to the effort to get the images correct.

    How to Make Dramatic Light Painting Effects with Items Found in Your Home

    A terrible grainy image but my friend was having so much fun she needed to take a quick selfie.

    The Setup

    Setting up was very easy. A backdrop was attached to the narrow walls of my kitchen. Black velvet is a lovely fabric for absorbing light and creating true black in photographs. I love black velvet and I’ve used it to create some very dramatic still life images and portraits in the past.

    Wait until the fabric is on sale or pick remnants. The only trick to black velvet is to use a lint brush to remove white fuzzy bits. These show up quite easily in images, and it’s a pain to clone out all those little white spots.

    How to Make Dramatic Light Painting Effects with Items Found in Your Home

    Here we set the lights and the background. The kitchen is pretty narrow so it was a challenge to set up the backdrop. In the end, part of the backdrop was taped to the wall.

    How to Make Dramatic Light Painting Effects with Items Found in Your Home

    A shot from above. My friend stood on the countertop to spin the lights. As you can see they were loosely draped over the fan.

    How to Make Dramatic Light Painting Effects with Items Found in Your Home

    The reflector was placed just below the model’s belly button and the light was directed up towards the face.

    After setting up the backdrop using tape and the cross piece from my backdrop kit, we then hung the Christmas lights from the ceiling fan.

    In the original plan, we intended to turn on the fan and let it spin. It’s a good thing we realized that the lights would tangle around the fan and cause an issue. So it then became the job of one person to spin the fan 340 degrees during the exposure manually.

    The Camera Gear

    We used a Canon 5D Mark III mounted on a tripod and the 2-second self-timer. That allowed the person manning the fan to begin spinning the lights.

    How to Make Dramatic Light Painting Effects with Items Found in Your Home

    This image is getting better. It’s still soft. My exposure time wasn’t quite correct yet here.

    The Procedure

    It was time to establish the proper exposure for the whole project.  The trick here was to balance the exposure so that there was a long enough shutter speed (exposure time) to blur the lights but we also needed to keep the models in focus.

    It’s awfully hard to stay still for even just a few seconds. In fact, it’s almost impossible. After several experiments and through trial and error the final exposure used was 0.8 of a second at f/3.2 with an ISO of 100. We also used a large reflector to bounce the light back up towards the models face.

    How to Make Dramatic Light Painting Effects with Items Found in Your Home

    This one is a little better. I ran it through a sharpening editor to help. It’s not perfect but I love the way the lights curved around their hair.

    The whole experiment required us to use two people to create the photo and one or two people as models in each shot. The photographer triggered the camera timer as well as held the reflector, while the fan operator stood on the countertop and spun the fan at the proper moment.

    How to Make Dramatic Light Painting Effects with Items Found in Your Home

    This image didn’t turn out as planned. You can see how important timing and communication are to this kind of project.

    The Keys to Success

    The keys to a successful photograph were quite simply communication and timing. The lights had to be spun at exactly the right moment, and the photographer needed to communicate timing to everyone else.

    It took a lot of tries to get the whole thing correct, but in the end, we were able to produce the desired images.

    How to Make Dramatic Light Painting Effects with Items Found in Your Home

    The creative person in me is able to ignore the slight ghosting from motion because I love how the lights spin above and below her eyes.

    The goal was to create dramatic images with a neat light painting effect. I wanted to encircle the model with light, almost as if she were standing within a light tube. There were many failed attempts.

    Sometimes our timing was off, and the lights did not spin around the model or got caught in her hair. Other times the lights moved too slowly and didn’t make it all the way through the image. Other times the issue was the lights themselves. Sometimes the lights spun right across the model’s eyes. I like a few of these images, but at the same time, some ran across the face in a way that was not attractive.

    Have fun with it

    The whole experiment was a lot of fun. It made for a great night out and some fun pics to post on social media. My friends were happy to post the pics to show their friends. As an artist and a professional photographer I also wanted to see if I could use the technique for other purposes.

    Is it possible to use this technique to create some interesting fine art images or perhaps for some interesting portraits? The answer is yes! There’s a lot that can be done with this technique. It’s well worth experimenting with and seeing what kind of results can be created.

    How to Make Dramatic Light Painting Effects with Items Found in Your Home

    In this one, we achieved exactly what I was hoping to do. She is standing in a circle of lights.

    The post How to Make a Dramatic Portrait with Light Painting Using Items Found in Your Home by Erin Fitzgibbon appeared first on Digital Photography School.


    Digital Photography School

  • Sigma introduces 70mm F2.8, first Art series macro

    Gearing up for CP+ 2018, Sigma has announced two all-new lenses including the 70mm F2.8 DG Macro. It’s the first macro lens in the Art-series line, offering true 1:1 reproduction and a dust- and splash-proof design. Full-time manual focus is available even in autofocus shooting, and focus ring’s angle of rotation is tuned to the needs of macro shooting. Sigma gives no pricing or availability information for the 70mm F2.8 Macro.

    SIGMA 70mm F2.8 DG MACRO

    Stunning resolution and clarity for a breathtaking visual experience—a razor-sharp macro lens joins the Art line

    1. Design prioritizing optical performance

    2. Focus-by-wire system for comfortable and precise focusing

    3. Compatible with Sony E-mount cameras with full-size sensors

    4. Compatible with Canon Lens Aberration Correction

    5. Compatible with SIGMA ELECTRONIC FLASH MACRO EM-140 DG (adapter required)

    6. Compatible with SIGMA TELE CONVERTERS (Not available for Sony E-mount lens) Launch: TBD Accessory: Case, Hood (LH708-01) Available AF mounts: SIGMA, Canon, Sony E-mount Note: Appearance and specifications are subject to change without notice.

    The long-awaited first macro lens in the Art line In recent years, macro lenses in the standard range have tended to employ inner focusing with the goal of maximizing autofocus speed. In contrast, the new SIGMA 70mm F2.8 DG MACRO | Art lens is designed to prioritize optical performance, fulfilling the demanding image quality requirements that define the Art line. In the standard to mid-telephoto range, it delivers stunning resolution and incredible clarity that greatly exceed expectations for a macro lens. The coreless DC motor further enhances image quality, while an optimized algorithm helps offer extremely smooth autofocus performance for a weightier, high-performance lens. Photography enthusiasts will recall a certain legendary, razor-sharp macro lens—the SIGMA MACRO 70mm F2.8 EX DG—and be glad to learn it is available in a new form, updated with outstanding Art line quality.

    Key features
    1. Design prioritizing optical performance In order to realize top-level performance at every shooting distance, the lens features an extending, floating, two-group focus mechanism. This configuration minimizes aberration to produce optimal results at any focus distance. To minimize axial chromatic aberration, the optical system incorporates two FLD glass elements, two SLD glass elements, and one element with a high rate of anomalous partial dispersion and a high index of refraction. In addition, two aspherical lens elements help increase resolution at close shooting distances. This optical system makes possible a razor-sharp in-focus area contrasted with a bokeh area free of color streaking.

    2. Focus-by-wire system for comfortable and precise focusing The focus-by-wire system eliminates the direct mechanical connection between the focus ring and the focus drive system. Controlled by SIGMA’s latest algorithm, a newly developed coreless DC motor adjusts focus with optimal speed and low noise. Full-time manual focus is available even during autofocus, allowing the photographer to make minute focus adjustments simply by turning the focus ring. In addition, the focus ring’s large angle of rotation helps the photographer achieve the extremely precise focusing required for effective macro photography.

    3. Compatible with full-frame Sony E-mount cameras The version of this lens compatible with Sony E-mount mirrorless cameras contains the same optical system as for SLRs. SIGMA MOUNT CONVERTER MC-11 is not required, as the lens performs the same functions as the converter, including in-camera image stabilization and in-camera lens aberration correction. In addition, the lens is compatible with Sony’s Continuous AF, which is not addressed by MOUNT CONVERTER MC-11. SIGMA plans to offer over time Sony E-mount versions of every full-frame prime lens currently available in the Art line, from 14mm to 135mm.

    Note: This product is developed, manufactured and sold based on the specifications of E-mount which was disclosed by Sony Corporation under the license agreement with Sony Corporation.

    4. Compatible with Canon Lens Aberration Correction The Canon mount lens is compatible with the Canon Lens Aberration Correction function.* Matching the optical characteristics of the lens, this function performs in-camera corrections of peripheral illumination, chromatic aberrations, distortion, and more, further enhancing image quality. *Function not available on all Canon cameras. Further, available corrections may vary by Canon camera model.

    5. Compatible with ELECTRONIC FLASH MACRO EM-140 DG (adapter required) Exclusively for SIGMA 70mm F2.8 DG MACRO | Art, the 65mm MACRO FLASH ADAPTER makes the lens compatible with ELECTRONIC FLASH MACRO EM-140 DG (both accessories sold separately). Thanks to the 72mm filter thread, a 72mm MACRO FLASH ADAPTER can also be added so as to accommodate 72mm macro flash products and accessories, including macro flashes other than EM-140 DG as well as ring lights.

    6. Compatible with SIGMA TELE CONVERTERS The lens is compatible with SIGMA TELE CONVERTERS (sold separately) designed for the company’s new lens lines. SIGMA TELE CONVERTER TC-1401 allows the lens to be used as a 98mm F4 mid-telephoto macro with autofocus functionality,* while SIGMA TELE CONVERTER TC-2001 allows the lens to be used as a 140mm F5.6 mid-telephoto macro with manual focus.
    *Autofocus available at 0.5m to infinity.
    *Not available for Sony E-mount lens

    Other features

    • Mount with dust- and splash-proof design*
      *SIGMA mount lens does not include sealing, since sealing is present on compatible SIGMA cameras.
    • Rounded diaphragm
    • Fast AF with full-time manual override*
      * The operation of full-time MF may vary based on mount type.
    • Compatible with SIGMA MOUNT CONVERTER MC-11*
      *SIGMA and Canon mount lenses
    • Available SIGMA USB DOCK makes customization and flexible adjustment possible*
      *Not available for Sony E-mount lens
    • Available Mount Conversion Service
    • Brass bayonet mount
    • Evaluation with SIGMA’s own MTF measuring system: A1
    • “Made in Japan” with outstanding craftsmanship

    For more information about the SIGMA GLOBAL VISION lineup of fine products, please visit the official SIGMA global website: SIGMA GLOBAL VISION: http://www.sigma-global.com

    Specifications
    All figures calculated for SIGMA

    Lens Construction: 13 elements in 10 groups | Angle of view (35mm): 34.3° | Number of diaphragm blades: 9 (rounded diaphragm) | Minimum aperture: F22 | Minimum focusing distance: 25.8cm/10.2in. | Maximum magnification ratio: 1:1 | Filter size: ø 49mm| Dimensions (diameter x length): ø70.8mm x 105.8mm/2.8in. x 4.2in. | Weight: 515g/18.2oz.

    Articles: Digital Photography Review (dpreview.com)

  • 7 Tips for Creating Natural-Looking HDR Landscapes Using Aurora HDR

    Aurora HDR is one of the best and easiest photo editing programs available for quickly creating HDR images. With that said, it has a wide range of tools and filters to help you achieve your HDR goals. To help you sort through them all, this article will highlight seven tips for creating natural-looking HDR landscapes in Aurora HDR 2018.

    1. Keep HDR editing of sunsets and sunrises to a minimum

    Everyone knows that sunrise and sunset provide optimal landscape photography opportunities. Golden hour bathes everything in a beautiful, often colorful natural light. As a result, it’s best to take a more subdued editing approach to keep the scene as natural looking as possible, especially when dealing with HDR. Otherwise, you risk over-processing your image.

    7 Tips for Creating Natural-Looking HDR Landscapes Using Aurora HDR

    Original starting image (the middle exposure of a 5-image bracketed set). Image courtesy dPS Managing Editor, Darlene Hildebrandt.

    NOTE: On that note, many of the tips below will include editing tools and sliders that have been pushed to their extremes. This is meant as a demonstration to show what you could do by using these tools at their maximum, but it’s not suggesting you should do this.

    2. Intelligently bump contrast and color with HDR Enhance

    7 Tips for Creating Natural-Looking HDR Landscapes Using Aurora HDR

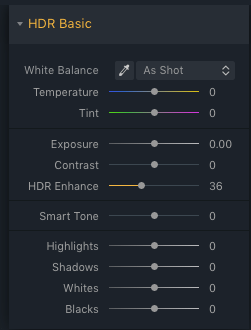
    One of the first tools you should utilize is called HDR Enhance. Found in the HDR Basic panel, it’s a newer feature available in Aurora HDR 2018 and it serves as a replacement for the clarity slider. When activated, HDR Enhance brings out the details and textures in your image while minimizing any residual artifacts such as image noise that might be introduced in the process.

    In the example below, the HDR Enhance slider has been pulled to the extreme for demonstration purposes. Notice how the contrast in the foreground and the distant rocks have increased significantly, and the color in the sky really pops.

    7 Tips for Creating Natural-Looking HDR Landscapes Using Aurora HDR

    HDR Enhance at 100.

    7 Tips for Creating Natural-Looking HDR Landscapes Using Aurora HDR

    But adding too much HDR Enhance is like adding too much clarity. The rocks and sand in the foreground have so much contrast and clarity that they look unreal, and the rocks and hills in the background now have a halo effect (generally considered undesirable).

    To reduce these effects and thus make your landscape appear more realistic, tone down HDR Enhance significantly (or use the masking brush to apply or erase the effect wherever you choose). By having the slider at 36 as opposed to 100, there’s still a nice pop of details and color.

    7 Tips for Creating Natural-Looking HDR Landscapes Using Aurora HDR

    HDR Enhance scaled back to 36.

    3. Bump up the contrast

    To make your image appear less flat, bump up the contrast. Going to extremes results in lots of shadows, reducing details in any dark areas. It also saturates color in the sky and in the reflection on the water.

    7 Tips for Creating Natural-Looking HDR Landscapes Using Aurora HDR

    Contrast at 100.

    By lessening contrast to about 20, shadows are still enhanced, but the details are better preserved. Note that the trees on the hill are still visible.

    7 Tips for Creating Natural-Looking HDR Landscapes Using Aurora HDR

    Contrast scaled back to 20.

    4. Use Smart Tone to brighten up an image

    7 Tips for Creating Natural-Looking HDR Landscapes Using Aurora HDR

    Since increasing the contrast introduced more shadows to the image, brighten it up again by using the Smart Tone filter. Dragging the slider to the right brings more light to areas of the image that are dark, without dramatically affecting parts of your image that are already bright.

    Below, you can see an extreme version of the Smart Tone slider in action. Notice how the shadowed areas are brightened, revealing lots of detail, particularly in the hill on the right. This is what you can do with Smart Tone, but it’s not necessarily what you should do since the image now appears very flat without any shadows or contrast, and the dreaded halo has appeared again.

    7 Tips for Creating Natural-Looking HDR Landscapes Using Aurora HDR

    Smart Tone at 100.

    To appear more realistic, pull back Smart Tone to about 22. This gives a hint of detail to the trees in the right, similar to what a reflection on the water might cause. It also brightens that patch of sand to the right.

    7 Tips for Creating Natural-Looking HDR Landscapes Using Aurora HDR

    7 Tips for Creating Natural-Looking HDR Landscapes Using Aurora HDR

    Smart Tone dialed back to 22.

    5. Enhance Saturation, Vibrance, and Color Contrast

    At this point, let’s turn our attention to the colors. Play with the Temperature slider in the HDR Basics panel to add some warmth to images like this sunset. Then scroll down to the Color panel and tweak the Saturation and the Vibrance sliders.

    7 Tips for Creating Natural-Looking HDR Landscapes Using Aurora HDR

    Depending on your image, you may need to bump these either up or down. Just avoid taking them to their extremes; generally, somewhere between 5-20 will be a good range. You can also bump up the Color Contrast slider, which controls the contrast between primary and secondary colors.

    7 Tips for Creating Natural-Looking HDR Landscapes Using Aurora HDR

    Saturation, Vibrance and Color Contrast boosted.

    6. Use Image Radiance for an ethereal effect

    7 Tips for Creating Natural-Looking HDR Landscapes Using Aurora HDR

    Now we’re looking at a few finishing touches that you can add to your HDR landscape shots, and one option is Image Radiance. This adds a soft, dreamy glow to your photo, and it is best used on sunset or sunrise images. In this particular scenario, Image Radiance seems particularly important since it can contribute a soft, hazy effect typical of ocean shots.

    Increase the Image Radiance slider to about 37. Doing this will introduce some shadows to your image, but that can easily be fixed with the Brightness and Shadows slider in the same panel. You can also adjust Vividness and Warmth here too if you see fit.

    7 Tips for Creating Natural-Looking HDR Landscapes Using Aurora HDR

    7. Add a subtle Vignette

    7 Tips for Creating Natural-Looking HDR Landscapes Using Aurora HDR

    The final edit that you might do to an HDR landscape image is to add a vignette. In the case of a sunrise or sunset, a vignette can be particularly helpful to add a subtle frame around the subject, drawing more attention to the focal part of the scene, the setting sun.

    Within Aurora HDR, the Vignette panel is at the very bottom. You can control not only the size, amount, roundness, and feathering of the vignette, but also the inner brightness. As well you can adjust the placement of the vignette, meaning you can easily create a vignette that is not centered on the image – very handy if your subject is following the rule of thirds and is off-center.

    When adding a vignette, note that the amount is a negative number for a dark (black) vignette and a positive number for a bright (white) one.

    7 Tips for Creating Natural-Looking HDR Landscapes Using Aurora HDR

    Final image with the vignette added.

    Bonus tips

    In addition, Aurora HDR also has tools for correcting Chromatic Aberration and Lens Distortion. It also comes loaded with several “Realistic HDR” presets that you can use to get started, and then just tweak the settings to your liking.

    Over to you

    There you have it, seven tips for processing landscape HDR photos in Skylum’s Aurora HDR. If you were inspired to create your own HDR landscapes, please share them in the comments below along with your post-processing tips and tricks.

    Disclaimer: Skylum (formerly Macphun) is a dPS advertising partner.

    The post 7 Tips for Creating Natural-Looking HDR Landscapes Using Aurora HDR by Suzi Pratt appeared first on Digital Photography School.


    Digital Photography School

  • Sony a7 III sample gallery

    $ (document).ready(function() { SampleGalleryV2({“containerId”:”embeddedSampleGallery_6769434587″,”galleryId”:”6769434587″,”isEmbeddedWidget”:true,”selectedImageIndex”:0,”isMobile”:false}) });

    Sony’s much-anticipated a7 III full-frame mirrorless camera is built around a 24MP BSI sensor, and includes many of the features and improvements found in the company’s a7R III and a9. We had a chance to shoot with the a7 III at Sony’s launch event last night in Las Vegas, and can share our initial impressions.

    The samples in this gallery are preliminary JPEG images, though it’s worth noting that Sony’s JPEG engine is well-evolved. Raw support is not yet available, but we plan to add Raw images to the gallery as soon as that changes.

    The Sony a7 III is certainly capable of delivering sharp, crisp images; however, we continue to notice issues with backlit scenes, wherein flare can introduce striping behind images due to the phase detect autofocus pixels (particularly obvious in our models’s face here and in the lights above and to the right of her face here). This might be a concern to those shooting portraits or concerts where backlighting may be integral to a composition.

    We’ll share more impressions of the camera as we continue to shoot with it this week, but for now, click through to see our first samples.

    See our Sony a7 III sample gallery

    Articles: Digital Photography Review (dpreview.com)

  • Sigma unveils 105mm F1.4 Art ‘bokeh master’

    The Sigma 105mm F1.4 DG HSM is the longest F1.4 lens in the Art series to date, comprising 17 elements in 12 groups. It is, of course, dust- and splash-resistant, and includes an Arca-Swiss tripod collar. Sigma boasts that the 105mm delivers ‘unsurpassed F1.4 performance’ and ‘exceptional peripheral brightness.’ No pricing or availability is given at announcement.

    SIGMA 105mm F1.4 DG HSM

    Introducing the “bokeh master”—featuring incredible resolution and designed for full-frame sensors, this is the longest focal length of the Art line’s F1.4 lenses

    1. Optical system delivering unsurpassed F1.4 performance

    2. Exceptional peripheral brightness

    3. Professional specifications

    4. Ease-of-use specifications

    5. Compatible with full-frame Sony E-mount cameras

    6. Compatible with Canon Lens Aberration Correction Launch: TBD Accessory: Case, Cover Hood (LH1113-01), tripod socket (TS-111), protective cover (PT-21) Available AF mounts: SIGMA, Nikon, Canon, and Sony E-mount Note: Appearance and specifications are subject to change without notice.

    Leading the way in F1.4 brightness
    Since introducing its first SIGMA Global Vision F1.4 lens in 2012, the 35mm F1.4 DG HSM | Art, SIGMA has been adding wide-aperture F1.4 options to the lineup. Now, with the introduction of the new 105mm F1.4 DG HSM | Art, SIGMA offers a total of nine lenses with F1.4 brightness, including six for full-frame cameras and three for APS-C cameras. SIGMA has designed all of these lenses to offer minimal optical aberration and deliver incredible resolution and stunning contrast. Boasting the longest focal length of the F1.4 Art line lenses, the new lens combines outstanding resolution with a beautiful bokeh effect. Designed with great care to ensure that both the in-focus and out-of-focus areas of the photograph are equally satisfying to the eye, this lens is truly a “bokeh master.” The SIGMA 105mm F1.4 DG HSM | Art has earned its place as the flagship of the F1.4 Art line lenses, prioritizing image quality above all to fulfill the promise of the line, delivering truly amazing optical performance.

    Key features

    1. Optical system delivering unsurpassed F1.4 performance
    In order to combine outstanding wide-aperture, mid-telephoto performance with F1.4 brightness at maximum aperture, this lens incorporates 17 optical elements in 12 groups—an uncommonly large number of elements for a prime lens. By including three FLD glass elements, two SLD glass elements, and one aspherical lens element, the optical system minimizes axial chromatic aberration to deliver extremely high resolution along with ample peripheral light volume. The area in focus is extremely sharp, while the area out of focus features a beautiful bokeh effect with highly natural colors, making this lens a powerful choice for portrait photography. The optical system also minimizes sagittal coma flare, making this lens excellent for capturing starry skies.

    2. Exceptional peripheral brightness
    The most effective method of ensuring ample light is to maximize the diameter of the first element of the optical system. With its large filter diameter of 105mm, the SIGMA 105mm F1.4 DG HSM | Art delivers a significantly greater volume of peripheral light than other lenses in its class. Minimizing vignetting while offering a beautiful bokeh effect, this lens is ideal for portrait photography.

    3. Professional specifications
    Like SIGMA’s Sports line lenses, the 105mm F1.4 DG HSM | Art features a highly effective dust- and splash-proof structure with special sealing at the mount connection*, manual focus ring, cover connection, and other areas, allowing photographers to work in all types of weather. In addition, the front of the lens is protected by a water- and oil-repellent coating that makes cleaning easy. The high-speed, high-accuracy autofocus helps photographers react in an instant to get those special shots.
    *SIGMA mount lens does not include sealing, since sealing is present on compatible SIGMA cameras.

    4. Ease-of-use specifications
    Instead of conventional ABS plastic, the exclusive lens hood features CFRP (carbon fiber reinforced plastic), a light but strong material used in the interior and exterior fittings of aircraft, among many other applications. The removable Arca-Swiss tripod socket is compatible with Arca-Swiss platforms and clamps, and its exclusive protective cover makes the lens easier to carry and use when shooting hand-held.

    5. Compatible with full-frame Sony E-mount cameras The Sony E-mount version of this lens is compatible with Sony mirrorless cameras and contains the same optical system as the versions for other mounts. SIGMA MOUNT CONVERTER MC-11 is not required, as the lens performs the same functions as the converter, including in-camera image stabilization and in-camera lens aberration correction. In addition, the lens is compatible with Sony’s Continuous AF, which is not available via MOUNT CONVERTER MC-11. SIGMA plans eventually to offer Sony E-mount versions of every full-frame prime lens currently available in the Art line, from 14mm to 135mm.
    Note: This product is developed, manufactured and sold based on the specifications of E-mount which was disclosed by Sony Corporation under the license agreement with Sony Corporation.

    6. Compatible with Canon Lens Aberration Correction
    The Canon mount version of this lens is compatible with the Canon Lens Aberration Correction function.* Matching the optical characteristics of the lens, this function performs in-camera corrections of peripheral illumination, chromatic aberrations, distortion, and more, to further enhance image quality.
    *Function not available on all Canon cameras. Available corrections may vary depending on the Canon camera model.

    Other features

    • Rounded diaphragm
    • Fast AF with full-time manual override*
      *The operation of full-time MF may vary based on mount type.
    • Compatible with SIGMA Mount Converter MC-11 Note: SIGMA and Canon mount lens
    • Available SIGMA USB DOCK makes customization and flexible adjustment possible* *Not available for Sony E-mount lens
    • Available Mount Conversion Service
    • Brass bayonet mount
    • Evaluation with SIGMA’s own MTF measuring system: A1
    • “Made in Japan” with outstanding craftsmanship

    For more information about the SIGMA GLOBAL VISION lineup of fine products, please visit the official SIGMA global website: SIGMA GLOBAL VISION: http://www.sigma-global.com

    Specifications All figures calculated for SIGMA

    Lens Construction: 17 elements in 12 groups | Angle of view (35mm): 23.3° | Number of diaphragm blades: 9 (rounded diaphragm) | Minimum aperture: F16 | Minimum focusing distance: 100cm/39.4in. | Maximum magnification ratio: 1:8.3 | Filter size: ø105mm | Dimensions (diameter x length): ø115.9mm x 131.5mm/4.6in. x 5.2in. | Weight: 1645g/58.0oz.

    Articles: Digital Photography Review (dpreview.com)

  • Sony launches a7 III: sub-$2000 24MP full frame mirrorless with a7R III’s advances

    Sony has announced the a7 III, a sub-$ 2000 image-stabilized 24MP full frame mirrorless camera that incorporates many of the features and improvements brought in with the a7R III. Primary among these are the introduction of a BSI sensor, along with the larger capacity ‘Z’ battery, AF joystick and the EyeAF feature that impressed us so much on the 42MP model.

    The company says the AF system is derived from the one in the a9 and performs twice as fast as the one on the a7 II. Its 693 AF points offer 93% frame coverage and are supported by 425 contrast-detection AF points.

    $ (document).ready(function() { SampleGalleryV2({“containerId”:”embeddedSampleGallery_0896959303″,”galleryId”:”0896959303″,”isEmbeddedWidget”:true,”selectedImageIndex”:0,”isMobile”:false}) });

    The a7 III gains the same ‘Front End LSI’ pre-processor that enabled many of the feature and speed improvements in the a7R III. This includes 10 frame per second shooting that can be combined with continuous AF and a buffer of up to 177 JPEG images.

    24p 4K video capture is taken from a 6K region of the sensor, while 30p shooting comes from a roughly 5K region with a 1.2x crop. The camera offers both S-Log2 and S-Log3 gamma curves for shooting wide dynamic range scenes or Hybrid Log Gamma for playing back directly on high dynamic range displays without the need for post-processing.

    Both internal video capture and HDMI output remain limited to 8-bit, which can limit the degree of processing flexibility for Log footage. Internal recording is up to 100 Mbps 8-bit 4:2:0, while HDMI out is 8-bit 4:2:2, meaning twice the color resolution. It can also shoot 1080/120p, which can be output either as normal-speed video or conformed down as slow-motion footage.

    As with the a7R III, the a7 III inherits the same body shape and battery first introduced in the sports-orientated a9. This not only means a more comfortable hand grip but also the NP-FZ100 battery that gave a 2.2x increase in battery life on the high-res model. The Z-type battery allows the camera to offer 610 shots per charge (710 using the rear screen). This is a little more than double that of its predecessor an the most of any mirrorless camera yet.

    The larger body also means the a7 III gains the AF joystick and button layout from the a7R III, including dedicated AF-On and Protect/Rate buttons. These, along with the revised menus, made the a7R III easier than ever to configure and work with, so should be a similarly big step forward for the basic a7 series. The a7 III also gains touchscreen control.

    The a7 III uses the same 2.36m dot OLED viewfinder as its predecessor, giving a 1024 x 768 pixel view, rather than the higher-res version in the a7R III. However, updated optics mean the panel now provides a larger view with 0.78x magnification, up from 0.71x on the previous camera.

    In keeping with recent Sony models, there is no support for the in-camera ‘Playmemories Camera Apps.’

    The camera will be available from April at a cost of $ 1999, body-only or will be available in a kit with a 28-70mm lens.

    $ (document).ready(function() { SampleGalleryV2({“containerId”:”embeddedSampleGallery_4145978292″,”galleryId”:”4145978292″,”isEmbeddedWidget”:true,”selectedImageIndex”:0,”isMobile”:false}) });

    Press Release:

    Sony Expands Full-frame Mirrorless Lineup with Introduction of New ?7 III Camera

    Versatile New Model Combines all the Latest Imaging Technologies into a Compact Package

    • Newly Developed Full-frame 24.2MP[i] Back-Illuminated Exmor R™ CMOS Image Sensor with Evolved Image Processing
    • Wide ISO range of 100 – 51200 (expandable to ISO 50 – 204800 for still images) and 15-Stop[ii] Dynamic Range at low sensitivities
    • World Class AF system featuring 693 phase-detection AF points covering 93% of image area, 425 contrast AF points and fast and reliable Eye AF
    • Continuous Shooting at up to 10 fps[iii] with either Mechanical Shutter or Silent Shooting[iv] and full Auto Focus/Auto Exposure tracking
    • 5-axis optical in-body image stabilization with a 5.0 step[v] shutter speed advantage
    • High Resolution 4K[vi] Movie Shooting with full pixel readout and no pixel binning across full-width of full-frame sensor
    • The longest rated battery life of any Mirrorless camera[vii] at 710 shots[viii] per charge
    • Upgraded operability and functionality including addition of joystick for adjusting focus points, Dual SD Card Slots, SuperSpeed USB (USB 3.1 Gen 1) USB Type-C™ Terminal and more

    LAS VEGAS, Feb. 26, 2018 – Sony Electronics, a worldwide leader in digital imaging and the world’s largest image sensor manufacturer, has today introduced yet another impressive addition to their full-frame mirrorless camera lineup, the ?7 III (model ILCE-7M3).

    Sony’s unmatched innovation within the image sensor space is at the forefront of the new ?7 III, as it features a brand new 24.2MPi back-illuminated Exmor R CMOS image sensor with increased sensitivity, outstanding resolution and an impressive 15 stopsii of dynamic range at low sensitivities. By combining this sensor with a variety of impressive features including extreme AF coverage of 93%, fast shooting at up to 10 fpsiii with either mechanical shutter or silent shootingiv, diverse 4Kvi video capabilities and more, Sony has created a new tool that gives all types of creators – from enthusiast to professional – the ability to capture content in new and different ways than they ever have before.

    “We are continually pushing to deliver more for our customers – more versatility, more functionality and most importantly, more innovation,” said Neal Manowitz, Vice President of Digital Imaging for Sony Electronics. “With the new ?7 III, we’ve taken many of our newest and most advanced imaging technologies from the acclaimed ?9 and ?7R III models and paired them with an all-new 24.2 MP back-illuminated sensor to deliver the ultimate full-frame camera for enthusiasts, hobbyists and professionals alike. It’s a camera that punches far above its weight class in every capacity. Combined with our impressive selection of 26 native full-frame E-mount lenses, it provides a level of performance that is simply unmatched in the industry.”

    Spectacular Full-frame Image Quality

    The newly developed 24.2MPi back-illuminated Exmor R CMOS image sensor is paired with a front-end LSI that effectively doubles the readout speed of the image sensor, as well as an updated BIONZ X™ processing-engine that boosts processing speed by approximately 1.8 times compared to the ?7 II. These powerful components work together to allow the camera to shoot at faster speeds while also enabling its impressive ISO range of 100 – 51200 (expandable to ISO 50 – 204800 for still images) and an overall 1.5 stopix improvement in image quality. The camera also features a massive 15-stopii dynamic range at low sensitivity settings, ensuring outstanding overall performance at all settings and in all shooting conditions, with significant advancements in accurate color reproductions of skin tones and the vibrant colors of nature.

    This new full-frame model can also output 14 bit RAW format[ix] even in silent and continuous shooting modes, and is equipped with a 5-axis optical image stabilization system that results in a 5.0 stepv shutter speed advantage.

    Significant Advances in AF Speed and Performance

    The innovative new ?7 III full-frame mirrorless camera features a level of AF performance that has been largely improved over the ?7 II, including the addition of 4D FOCUS™ capabilities. The new camera has 425 contrast AF points that work with a 693-point focal-plane phase-detection AF system inherited from the acclaimed ?9 model. This innovative AF system covers approximately 93% of the frame, ensuring reliable focusing and tracking for even the most difficult to capture subjects.

    AF response and tracking has also been greatly improved in the new camera, with almost 2xii the focusing speed in low-light condition and 2xii the tracking speed compared to the previous model as a result of the faster image sensor readout. This allows complex and unpredictable motion to be captured with far greater precision and accuracy.

    The acclaimed Eye AF feature is also available in the new camera, even in AF-C mode, which is extremely useful for situations where the subject is turning around, looking down or otherwise obstructed. It also works when the ?7 III is being used with Sony’s A-mount lenses with an optional LA-EA3 adaptor[x]. Additional improvements in focusing flexibility include the addition of a multi-selector or ‘joystick’ for moving focusing points quickly, the addition of touch focusing capability, AF availability in Focus Magnifier mode, an ‘AF On’ button and much more.

    Speed to Capture Every Decisive Moment

    The new ?7 III is equipped with an updated image processing system that allows it to shoot full resolution images at up to 10 fpsiii with continuous, accurate AF/AE tracking for up to 177 Standard JPEG images, 89 compressed RAW images or 40 uncompressed RAW images[xi]. This high speed mode is available with either a mechanical shutter or a completely silent shootingiv, adding to the immense flexibility of the camera. The camera can also shoot continuously at up to 8 fpsiii in live view mode with minimal lag in the viewfinder or LCD screen.

    For added convenience, while large groups of burst images are being written to the memory card, many of the cameras key functions are operable, including access to the ‘Fn’ (Function) and ‘Menu’ buttons, image playback and several other menus and parameters including image rating and other functions that facilitate on-location image sorting.

    Additionally, if there is fluorescent or artificial lighting present in a shooting environment, users can activate the Anti-flicker[xii] function to allow the ?7 III to automatically detect frequency of the lighting and time the shutter to minimize its effect on images being captured. This minimizes any exposure or color anomalies that can sometimes occur at the top and bottom of images shot at high shutter speeds.

    High Quality 4K Video

    The new ?7 III is an outstanding video camera as well, offering 4Kvi (3840×2160 pixels) video recording across the full width of the full-frame image sensor. In video mode, the camera uses full pixel readout without pixel binning to collect about 2.4x[xiii] the amount of data required for 4K movies, and then oversamples it to produce high quality 4K footage with exceptional detail and depth.

    An HLG (Hybrid Log-Gamma)[xiv] picture profile is available on the ?7 III as well, which supports an Instant HDR workflow, allowing HDR (HLG) compatible TV’s to playback beautiful, true-to-life 4K HDR imagery. Further, both S-Log2 and S-Log3 are available for increased color grading flexibility, as well as Zebra functionality, Gamma Display assist and proxy recording. The camera can also record Full HD at 120 fps at up to 100 Mbpsvi, allowing footage to be reviewed and eventually edited into 4x or 5x slow motion video files in Full HD resolution with AF tracking.

    Upgraded Build, Design and Customization

    Sony’s newest full-frame camera is equipped with a variety of enhanced capabilities that were first implemented in the ?9 and then again in the ?7R III. These include dual media slots, with support in one slot for UHS-II type SD memory cards. Users have a variety of options for storing their content in each of the cards, including separate JPEG / RAW recording, separate still image / movie recording, relay recording and more. Battery life has been greatly extended as well – with a CIPA measurement of up to 710 shots per chargeviii, it offers the world’s longestvii battery life of any Mirrorless camera, as the new camera utilizes Sony’s Z series battery NP-FZ100 that have approximately 2.2 times the capacity of the W series battery NP-FW50 utilized in the ?7 II.

    The new camera features “My Menu” functionality which allows up to 30 menu items to be registered for instant recall when needed. Users can also apply star ratings to their still images through the camera controls for easier image playback and review, and edit the first three characters of all still image files. Additionally, there is a total of 81 functions that are assignable to 11 custom buttons, and the camera is both dust and moisture resistant.[xv]

    The ?7 III features high-resolution, high-contrast, fast-start XGA OLED Tru-Finder™ with approximately 2.3 million dots for extremely accurate, true-to-life detail reproduction. “Standard” or “High” display quality settings are also available for both the viewfinder and monitor as well. It also is capable of seamlessly transferring files to a smartphone, tablet, computer or FTP server via Wi-Fi®, while also offering a SuperSpeed USB (USB 3.1 Gen 1) USB Type-C™ Terminal for increased flexibility in power supply and faster image transfer speed during tethered shooting.

    The ?7 III model also comes with Sony’s new software suite “Imaging Edge”, which extends the creative capabilities of the entire shooting process – from pre-processing to post-processing. “Imaging Edge” provides three PC applications called ‘Remote’, ‘Viewer’ and ‘Edit’, available for free download, which support live-view PC remote shooting and RAW development. In the latest Version 1.1, several improvements have been implemented including about 10%[xvi] faster data transfer speed for remote shooting from PC (PC tether shooting) and about 65%[xvii] improvement in the response speed for RAW image editing. For more information, please visit Imaging Edge support page. www.sony.net/disoft/d/.

    The camera is also compatible with a wide variety of Sony E-mount accessories including the BC-QZ1 Battery Chargerxviii, VG-C3EM Vertical Grip.

    Pricing and Availability

    The Sony ?7 III Full-frame Interchangeable Lens Camera will ship this April for about $ 2000 US for the body and $ 2200 in a kit with the FE 28?70 mm F3.5?5.6 kit lens. In Canada, it will be sold for $ 2600 CA for the body and $ 2800 in a kit with the FE 28?70 mm F3.5?5.6 lens. The camera and kits will be sold at a variety of Sony authorized dealers throughout North America.

    A variety of exclusive stories and exciting new content shot with the new ?7 III camera and other Sony ? products can be found at www.alphauniverse.com, a site built to educate and inspire all fans and customers of the Sony ? brand.

    The new content will also be posted directly at the Sony Photo Gallery and the Sony Camera Channel on YouTube. Detailed information pages within Sony.com for the new products can be found at:

    • (US) – LINK
    • (CA) – LINK

    [i] Approximate, effective
    [ii] Sony test conditions
    [iii] In continuous “Hi+” mode. Max. fps depends on camera settings.
    [iv] Some distortion may occur with fast-moving subjects.
    [v] CIPA standards. Pitch/yaw shake only. Planar T* FE 50mm F1.4 ZA lens. Long exposure NR off.
    [vi] Class 10 or higher SDHC/SDXC card required for XAVC S movie recording, UHS speed class 3 or higher for 100 Mbps recording.
    [vii] Among non-reflex interchangeable lens digital camera equipped with auto focus function as of February 2017, based on Sony research.
    [viii] CIPA standards. When using the LCD monitor. 610 images when using the viewfinder.
    [ix] Limited to 12 bits during compressed RAW continuous shooting, BULB exposure, or when Long Exposure NR is ON.
    [x] With SSM or SAM lenses only. With the LA-EA3 mount adaptor. Eye AF not supported for movie recording. AF-C can only be used when the “Phase detection” AF system is selected, but focus is fixed at the first frame during continuous shooting in any mode other than “Continuous: Lo” (Hi+, Hi, Mid).
    [xi] Continuous “Hi+” mode. UHS-II compatible SDXC memory card required. Sony test conditions.
    [xii] Only 100 Hz and 120 Hz flicker is detected. Continuous shooting speed may decrease. Flicker-free shooting is not available during silent shooting, BULB exposure, or movie recording.
    [xiii] 24p recording. Approx. 1.6x at 30p.
    [xiv] Connect to an HDR (HLG) compatible Sony TV via a USB cable to view HDR (HLG) movies.?
    [xv] Not guaranteed to be 100% dust and moisture proof.
    [xvi] The transfer speed has been measured with multiple images using ?7R III, SuperSpeed USB (USB 3.1 Gen 1), and Uncompressed RAW ( L: 7952 x 5304)?JPEG Extra fine.
    [xvii] Measured with: CPU Intel® Core™ i7-6700 Processor 3.40GHz, Memory 8GB, OS Windows® 7 Professional, and Uncompressed RAW (?7R III ?L: 7952 x 5304)
    [xviii] Not supplied in box

    Sony a7 III specifications

    Price
    MSRP $ 2000
    Body type
    Body type SLR-style mirrorless
    Body material Magnesium alloy
    Sensor
    Max resolution 6000 x 4000
    Other resolutions 6000 x 3376, 3936 x 2624, 3936 x 2216, 3008 x 1688, 3008 x 2000
    Image ratio w:h 3:2, 16:9
    Effective pixels 24 megapixels
    Sensor photo detectors 25 megapixels
    Sensor size Full frame (35.8 x 23.8 mm)
    Sensor type BSI-CMOS
    Processor Bionz X
    Color space sRGB, AdobeRGB
    Color filter array Primary color filter
    Image
    ISO 100-25600
    Boosted ISO (minimum) 50
    Boosted ISO (maximum) 204800
    White balance presets 11
    Custom white balance Yes
    Image stabilization Sensor-shift
    CIPA image stabilization rating 5 stop(s)
    Uncompressed format RAW
    JPEG quality levels Extra fine, fine, standard
    File format
    • JPEG (DCF 2.0, EXIF 2.3)
    • RAW (ARW 2.3)
    Image parameters
    • Standard, Vivid, Neutral, Clear, Deep, Light, Portrait, Landscape, Sunset, Night Scene, Autumn Leaves, Black & White, Sepia, Style Box (1-6), (Contrast (-3 to +3 steps), Saturation (-3 to +3 steps), Sharpness (-3 to +3 steps))
    Optics & Focus
    Autofocus
    • Contrast Detect (sensor)
    • Phase Detect
    • Multi-area
    • Center
    • Selective single-point
    • Tracking
    • Single
    • Continuous
    • Touch
    • Face Detection
    • Live View
    Autofocus assist lamp Yes
    Digital zoom Yes (4)
    Manual focus Yes
    Number of focus points 693
    Lens mount Sony E
    Focal length multiplier 1×
    Screen / viewfinder
    Articulated LCD Tilting
    Screen size 3
    Screen dots 921,600
    Touch screen Yes
    Live view Yes
    Viewfinder type Electronic
    Viewfinder coverage 100%
    Viewfinder magnification 0.78×
    Viewfinder resolution 2,359,296
    Photography features
    Minimum shutter speed 30 sec
    Maximum shutter speed 1/8000 sec
    Exposure modes
    • Auto
    • Program
    • Aperture priority
    • Shutter priority
    • Manual
    • Scene Selection
    • Slow & Quick Motion
    • Movie
    Scene modes
    • Portrait, Landscape, Macro, Sports Action, Sunset, Night Portrait, Night Scene
    Built-in flash No
    External flash Yes (via Multi Interface shoe)
    Flash X sync speed 1/250 sec
    Drive modes
    • Single, continuous, speed priority continuous, self-timer, bracketing (AE, white balance, DRO)
    Continuous drive 10.0 fps
    Self-timer Yes (2 or 10 sec; continuous (3 or 5 exposures))
    Metering modes
    • Multi
    • Center-weighted
    • Highlight-weighted
    • Average
    • Spot
    Exposure compensation ±5 (at 1/3 EV, 1/2 EV steps)
    AE Bracketing ±5 (3, 5 frames at 1/3 EV, 1/2 EV, 2/3 EV, 1 EV, 2 EV steps)
    WB Bracketing Yes
    Videography features
    Resolutions 3840 x 2160 (30p, 24p) 1920 x 1080 (120p, 60p, 60i, 24p), 1440 x 1080 (30p), 640 x 480 (30p)
    Format MPEG-4, AVCHD, XAVC S, H.264
    Videography notes Supports XAVC S codec (100Mbps), S-Log2 and S-Log3, and HLG
    Modes
    • 3840 x 2160 @ 30p / 100 Mbps, XAVC S, MP4, H.264, Linear PCM
    • 3840 x 2160 @ 24p / 100 Mbps, XAVC S, MP4, H.264, Linear PCM
    • 3840 x 2160 @ 30p / 60 Mbps, XAVC S, MP4, H.264, Linear PCM
    • 3840 x 2160 @ 24p / 60 Mbps, XAVC S, MP4, H.264, Linear PCM
    • 1920 x 1080 @ 120p / 100 Mbps, XAVC S, MP4, H.264, Linear PCM
    • 1920 x 1080 @ 120p / 60 Mbps, XAVC S, MP4, H.264, Linear PCM
    • 1920 x 1080 @ 60p / 50 Mbps, XAVC S, MP4, H.264, Linear PCM
    • 1920 x 1080 @ 30p / 50 Mbps, XAVC S, MP4, H.264, Linear PCM
    • 1920 x 1080 @ 24p / 50 Mbps, XAVC S, MP4, H.264, Linear PCM
    • 1920 x 1080 @ 60p / 25 Mbps, XAVC S, MP4, H.264, Linear PCM
    • 1920 x 1080 @ 30p / 16 Mbps, XAVC S, MP4, H.264, Linear PCM
    • 1920 x 1080 @ 60i / 24 Mbps, AVCHD, MTS, H.264, Linear PCM
    • 1920 x 1080 @ 60i / 17 Mbps, AVCHD, MTS, H.264, Linear PCM
    Microphone Stereo
    Speaker Mono
    Storage
    Storage types SD/SDHC/SDXC, Memory Stick Duo/Pro Duo/Pro-HG Duo
    Connectivity
    USB USB 3.1 Gen 1 (5 GBit/sec)
    HDMI Yes (micro-HDMI port with 4K still, uncompressed video output)
    Microphone port Yes
    Headphone port Yes
    Wireless Built-In
    Wireless notes with NFC and wireless control via PlayMemories Mobile app
    Remote control Yes (wired)
    Physical
    Environmentally sealed Yes
    Battery Battery Pack
    Battery description NP-FZ100 lithium-ion battery and charger
    Battery Life (CIPA) 610
    Weight (inc. batteries) 650 g (1.43 lb / 22.93 oz)
    Dimensions 127 x 96 x 74 mm (5 x 3.78 x 2.91)
    Other features
    Orientation sensor Yes
    Timelapse recording No
    GPS None

    Articles: Digital Photography Review (dpreview.com)

  • Hands-on with the Samsung Galaxy S9 and S9+

    Hands-on with the Samsung Galaxy S9+

    Samsung has announced its new flagship smartphones, the Galaxy S9 and S9+, at the Mobile World Congress in Barcelona. While changes on the surface are pretty subtle, under the hood the new models offer a range of interesting features and functions.

    With its dual-camera setup, the S9+ looks like the more appealing S9 model to mobile photographers. We’ve had the chance to take a closer look at the device during the launch event. Here’s what you should know.

    Subtle design changes

    The S9 generation’s design language is very similar to its predecessors, and with its rounded edges the new models are comfortable to hold. However, Samsung has made some refinements to refresh the devices’ visual appeal and improve handling and operation.

    Most importantly, the fingerprint sensor has been moved from next to the the camera lens to below the camera module, preventing any accidental touching and fingerprint-smearing of the latter.

    In addition, the S9+’s 6.2-inch Super AMOLED display has been reinforced with thicker Corning Gorilla Glass 5, and both bezels and the screen itself come in a deeper black color to better conceal the iris sensor at the front and create a more minimalist look. Both S9 models are available in four colors: Midnight Black, Titanium Gray, Coral Blue, and Lilac Purple.

    Dual-camera with tele-lens

    While the S9 comes with a “traditional” single-lens camera, the S9+ is the first Samsung Galaxy S model to feature a dual-camera for improved zoom performance and a background-blurring portrait mode. Both cameras come with a 12MP pixel count and optical image stabilization.

    The big news has to do with the wide angle lens on the main camera, which features a variable F1.5/F2.4 aperture and dual-pixel AF. The 2x tele-lens comes with a slower F2.4 aperture and has to make do without dual-pixel technology.

    Super-slow motion video

    Thanks to an integrated DRAM buffer in the imaging chip, the S9 models are capable of recording HD-resolution slow-motion footage at 960 frames per second for 0.2 seconds. When played back at 30 frames per second that translates into 6-second slow-motion clips.

    Slow-motion clips can be saved as gif files and set as a background animation on the home screen. You can also “embed” up to 20 slow-motion segments into standard speed footage, creating much longer clips that only use the slow-motion effect at key moments.

    Variable aperture

    The aperture on the main camera automatically switches between a very fast F1.5 and a slower F2.4 value, depending on light conditions. In lower light, the large aperture is used in order to maximize light capture; in brighter conditions, the slightly slower F2.4 aperture can produce sharper images and a wider depth-of-field.

    We suspect that, in very bright light, it is also used to underexpose individual frames that are then merged with brighter frames to generate HDR images through a computational imaging algorithm. This has not been confirmed by Samsung, however.

    AR Emojis

    The new AR Emoji function isn’t about serious photography, but can be fun to play with regardless. In AR Emoji mode, your face is turned into a cartoon-style emoji as soon as it is detected by the front camera’s face detection. Taking off any eyewear or headgear tends to help.

    Your emoji can then be animated using facial expressions. Once you are happy with the result, you can save up to 18 personalized animated emojis and use them in the usual way in apps such as Whatsapp or Facebook Messenger. The good news is that they can be shared with users of any smartphone, not just Samsung Galaxy models.

    Articles: Digital Photography Review (dpreview.com)

  • The Canon EOS 4000D might be the cheapest DSLR ever launched

    Canon Europe has launched the EOS 4000D, a still more cut-down version of the EOS 2000D/T7 announced earlier today. The entry-level model will launch for around £330/€380 body only, which would equate to somewhere around $ 385 without tax. That’s the lowest launch price of any DSLR we can remember.

    Canon’s four-digit-D series cameras, from the 1000D (Rebel XS) onwards, have always hit aggressive price points in the market by recycling existing components and features—we called the original 1000D a “reheated” 400D/Rebel XT at the time. But the EOS 4000D takes this to a new level.

    The 4000D shares its body and viewfinder with its more expensive sibling (and previous cameras of this series), but relies on a version of the 18MP sensor first introduced nine years ago in the EOS 7D, and the Digic 4+ processor that made its debut in Canon’s 2014 model-year compacts. The camera’s rear display is a 2.7-inch LCD that we last encountered in 2011’s EOS 1100D/Rebel T3.

    Finally, some kits of the camera will include the unstabilized 18-55mm F3.5-5.6 III first announced in February of 2011, although we’re pretty sure the plastic lens mount is a first for a digital EOS.

    That’s not to say that Canon has just launched a DSLR from five years ago’s parts bin. Although it loses the NFC feature of the 2000D, it does retain Wi-Fi connectivity. This feature, a more modern version of Canon’s Auto modes, and its much-loved JPEG engine means the EOS 4000D is likely to be a pretty credible super-budget DSLR.

    Still, we’ve not seen such aggressive corner cutting unit cost optimization since Sony’s a3000 (which was seemingly made from upcycled yogurt containers), and can’t think of a DSLR that has ever launched at a lower price.

    Is there one we’ve overlooked? And what do you make of the EOS 4000D? Let us know in the comments.


    Note: While the Canon EOS 4000D has only been launched in Europe thus far, don’t rule out seeing a wall of them at your local BestBuy just as soon as Canon US has worked out which random letters to call it.

    Step up to effortless DSLR storytelling with Canon’s new EOS 2000D and EOS 4000D cameras

    London, UK, 26th February 2018 – Canon Europe today unveils the launch of the EOS 2000D and EOS 4000D, Canon’s latest entry-level DSLR cameras. With a wide range of practical and easy to use features, these new cameras cater to the storytelling needs of individuals taking their first steps into interchangeable lens photography and those wanting to create superbly detailed DSLR quality pictures and cinematic Full HD movies with ease.

    The newest additions to Canon’s entry-level DSLR range, the EOS 2000D and EOS 4000D have been designed for people who seek out new experiences and want to share their adventures seamlessly to social media. The cameras’ powerful combination of APS-C sensor technology, DIGIC 4+ image processor, seamless Wi-Fi connectivity and straightforward in-camera feature guides enable stories to be captured and shared with highly detailed photos and Full HD movies.

    With the EOS 2000D featuring a new 24.1 Megapixel APS-C sensor, and the EOS 4000D using an 18 Megapixel APS-C sensor, each camera allows for compelling storytelling with superb control over depth of field for beautifully blurred image backgrounds. Shooting rich, atmospheric photos during night-time adventures is also made possible with both models capable of low light shooting up to ISO 6400, expandable to ISO 12800.

    The DIGIC 4+ image processor, used in both models, powers Canon’s Scene Intelligent Auto mode, enabling simple point and shoot photography with superb image results, as it automatically optimises every shot. The fast and responsive DIGIC 4+ image processor enables the Full HD video capabilities in both models, breathing cinematic life into captured memories.

    In addition to a rear mounted LCD screen (7.5 cm on the EOS 2000D and 6.8 cm on the EOS 4000D), both cameras feature a centrally mounted optical viewfinder, providing a distinctly authentic photography experience and allowing stories to be told just as they were experienced with the naked eye. Decisive moments in unfolding stories can be captured with responsive and precise nine point auto focus and continuous shooting at 3.0 frames per second.

    Both cameras are Wi-Fi enabled for seamless smartphone connectivity via the Canon Camera Connect app (iOS and Android), enabling adventurers to rapidly shoot and share their content on social media whilst on the move. New images can be conveniently backed up to Canon’s cloud storage service, irista, via a Wi-Fi connection, ensuring stories and memories shared are never lost.

    These processes are made even easier for the EOS 2000D with the inclusion of Near Field Communication (NFC), which can establish a Wi-Fi connection to a smartphone by simply tapping the device on the camera (available on compatible Android devices).

    Both models include simple in-camera feature guides, perfect for those looking to improve their storytelling potential as they upgrade from a smartphone. Both cameras include six image settings outside of basic auto modes and a variety of creative filters, enabling experimentation with manual control and the artistic freedom to tell dynamic and vibrant stories. Those embarking on their first DSLR adventure will also benefit from the Canon Photo Companion app, which provides the necessary tips on getting the best out of the cameras.

    The EOS 2000D and EOS 4000D’s excellent battery life delivers approximately 500 pictures, or one hour 30 minutes and one hour 15 minutes of HD video respectively, allowing for peace of mind during extended outdoor adventures and the freedom to explore.

    Both DSLR models are compatible with over 80 Canon EF and EF-S lenses and range of accessories, giving beginners the greatest choice of systems as they grow and develop their photography skills. The new cameras will be sold as a body only option or with a selection of lens kit options, including an 18-55mm f/3.5-5.6 IS II lens.

    Canon’s latest entry-level DSLR cameras offer a fantastic gateway to the joys of interchangeable lens photography. The Canon EOS 2000D and Canon EOS 4000D provide an easy and reliable shooting experience that enable users to capture detailed images and sharp Full HD video. As people step-up from their smartphone and expand their creativity, Canon’s new DSLR cameras will intuitively capture superbly detailed professional-looking images, time after time.

    The Canon EOS 2000D is available to pre-order from Canon’s online store from 26th February 2018.

    For more information, please visit: Canon EOS 2000D and Canon EOS 4000D

    Articles: Digital Photography Review (dpreview.com)

  • How to Make Brilliant Black and White Photos with Dramatic Composition

    It’s hard to beat the power and drama of good black and white photography. There’s a reason that monochrome has survived and prospered as an artistic medium despite the arrival of color photos. But how do you harness the power of black and white for yourself? The key is in your composition.

    The problem with composition is that it’s such a vast topic it’s easy to lose track of the various principles and the ways you can put them into the practice. So let’s keep it simple – I’m going to give you three things you can concentrate on. Put these into practice and you’ll see a dramatic improvement in the composition of your black and white photos!

    #1 – Simplicity

    Simplified composition helps give your black and white photos more power by focusing attention on the main subject.

    How to Make Brilliant Black and White Photos with Dramatic Composition

    The above landscape photo is a great example. The composition is about as simple as you can get. It works because I used a neutral density filter and a long shutter speed of 90 seconds to blur the water and clouds. The result is a black and white landscape photo with a minimalist style composition.

    This principle also applies to portraiture. Keep the composition simple to focus attention on your model. An easy way to do this is to use a short telephoto lens with an aperture of around f/2.8. Get in close and make sure there are no distractions in the background to pull attention away from the person you’re photographing.

    How to Make Brilliant Black and White Photos with Dramatic Composition

    #2 – Texture

    One of the interesting things about black and white is that it brings out the interesting textures in your subject. You can use this characteristic to make your black and white photos more interesting.

    This photo of some old wooden boxes is a good example.

    How to Make Brilliant Black and White Photos with Dramatic Composition

    There are two interesting things about the composition of this image. First is the pattern created by the repeating shapes of the boxes. Second is the texture of the wood.

    The absence of color in black and white helps emphasize texture. You can take it further in post-processing by applying Clarity or other tools designed to bring out texture (such as the Structure sliders in Silver Efex Pro 2).

    Texture and contrast

    You can take this idea further by using the contrast between smooth and rough surfaces. Some objects are more tactile than others and have lots of texture. Others have very little.

    You’ll see this technique used a lot in long exposure photography, where you can take advantage of the juxtaposition between a subject with lots of texture, such as a concrete jetty, and one that has very little, like water blurred by using a neutral density filter and a long exposure. The earlier photo of two rocks is a good example.

    Here’s another. I used a shutter speed of 3-minutes to blur the clouds and the water. As a result, there’s a strong contrast between the concrete in the foreground, the jetty in the distance, and the surrounding water and clouds.

    How to Make Brilliant Black and White Photos with Dramatic Composition

    #3 – Tonal Contrast

    Tonal contrast is where you have light tones and dark tones next to each other. Now we’re getting to the heart of black and white photography! This technique is not nearly as effective in color because of the way that colors that are similar in tone, such as red and green, still create a powerful contrast. Tonal contrast is the main factor that separates black and white photography from color.

    The easiest way to explain how tonal contrast works is with some examples.

    In the first (below) there’s a strong tonal contrast between the white and black stones. Your eyes go to the white stones because they are in the center of the frame and because they provide a strong contrast against the black stones underneath them.

    How to Make Brilliant Black and White Photos with Dramatic Composition

    Another subject where tonal contrast is used to good effect is portraiture. In the portrait below the model’s light-toned skin contrasts with the dark background. The key to making this technique work is to make sure the background is in shade and that it contains no distracting highlights.

    How to Make Brilliant Black and White Photos with Dramatic Composition

    So far both examples have shown a light toned subject against a dark background. But you can turn it around by placing a dark subject against a white background.

    That’s the technique I used in the following portrait. I photographed the man during carnival in Spain. He was dressed for the occasion and had even painted his face. I placed him against a bright, sunlit building to take advantage of the tonal contrast between his dark skin and the white wall.

    How to Make Brilliant Black and White Photos with Dramatic Composition

    Conclusion

    There are many factors that make up a good black and white photo, but the composition is one of the most important. If you want to make a strong black and white photo, then focusing on these three key factors – simplicity, texture, and tonal contrast – is a great place to start.


    Mastering Composition Book Two

    Want to learn more about composition? Then check out my wildly popular ebook Mastering Composition Book Two. It contains 20 lessons that will help you get better at composition, no matter what your skill level!

    The post How to Make Brilliant Black and White Photos with Dramatic Composition by Andrew S. Gibson appeared first on Digital Photography School.


    Digital Photography School

  • 4 Tips for Nature Photography Beginners

    4 Tips for Nature Photography Beginners - bear

    Nature photography encompasses a range of outdoor photography genres. This includes, but is not limited to, landscapes, weather phenomena, astrophotography, birds, and wildlife. Each of these categories has their respective specialized skills and can be expanded further.

    If you are just starting your quest as a nature photographer, here are a few things to consider:

    4 Tips for Nature Photography Beginners - seascape

    1) What do you want to capture?

    Since nature photography is so vast, you can spend a lot of time in each sub-genre. So an important question to ask yourself is what do you want to capture? Do you want to photograph close-ups of plants and insects? Is your love that of the micro natural world or are you more enthralled by magnificent mountain ranges and lakes?

    4 Tips for Nature Photography Beginners - birds

    Maybe birds and larger animals are more interesting to you than sunsets and sunrises. Knowing what you like and what you want to capture is a great first step.

    2) What equipment do you need?

    When you know what you want to capture, this feeds into the decision of what gear you require. If you are shooting landscapes, you will go for wider lenses as opposed to wildlife and birds, which need more “zoom” or telephoto lenses.

    4 Tips for Nature Photography Beginners - fox sleeping
    A tripod is great for landscapes and astrophotography, but if you are trying to get a bird in flight or an animal in motion, knowing how to use your camera is your best asset.

    3) Location and planning

    What you want to capture drives your choice of location and time of day and season of the year. Scout your landscapes beforehand to see the direction of the sun, any potential safety issues, or terrain considerations. Then return to shoot during a more flattering time of day.

    4 Tips for Nature Photography Beginners - fall trees

    If you are shooting flowers, note the time of year they bloom. With birds, you need to understand a bit about their habitat and the times of day that they are active. If you want to shoot more dangerous wildlife, it is best to go with someone experienced.

    4 Tips for Nature Photography Beginners

    A National Park is a great location for both landscapes and wildlife. Make note that you may need to apply for special permits for some parks and that they also have seasonal or time restrictions in some areas. This will impact your planning if those restrictions include your anticipated shooting times.

    4) Reading the light

    As in the previous tip, the direction of the light can be determined by scouting your location prior. You can also do online research on the area or decipher it from other photos taken there.

    4 Tips for Nature Photography Beginners

    If you are shooting landscapes, arrive about an hour prior to your sunrise/sunset and position yourself. This way you can focus on your composition and maybe even do some test shots. Play around with your white balance, exposures, and different camera angles.

    4 Tips for Nature Photography Beginners - sunset

    If you are waiting for wildlife to show up, use the time to work out what settings you need. When the animal shows up, you will find yourself photographing almost continuously trying to nail that perfect moment.

    Closer shots and flowers give you more time to experiment, but you don’t want your light to be flat. Walk with a reflector or try to find angles that give you shadow, shape, and form.

    4 Tips for Nature Photography Beginners - white flower

    Conclusion

    Nature photography is not only vast but filled with interesting sub-genres and subjects to shoot. As a beginner, most times research precedes shooting. As you learn more about your intended subject and how to capture it, you will become better with time.

    With wildlife, patience is a great asset as you spend more time waiting for a sighting. If you love the outdoors, it’s a great way to explore and preserve those fleeting moments. Determine what you want to capture. Take the gear you need when you scout. Research, plan and try to find the best light. Most of all have fun!

    The post 4 Tips for Nature Photography Beginners by Nisha Ramroop appeared first on Digital Photography School.


    Digital Photography School