Blog

  • Meizu unveils the 15 Plus smartphone with stabilized tele-camera

    Chinese smartphone manufacturer Meizu has launched a new high-end model, the Meizu 15 Plus. And based on specs alone, the 15 Plus could be well-worth a closer look for mobile photographers who are open to the idea of buying from a less established brand.

    In the camera department, a 12MP 1/2.3″ main sensor is combined with a 20MP secondary camera that features a 2x zoom factor. On the main camera, light is captured through a F1.8 lens while the tele-lens has to make do with a slower F2.8 aperture. Both lenses are equipped with optical image stabilization, though.

    As with most similar systems, the optical zoom is enhanced with computational methods and Meizu promises a 3x “lossless” zoom, and the cameras features multi-frame noise reduction and HDR as well. To view and edit those images, the phone is equipped with a 5.95-inch AMOLED screen with QHD resolution and a notch-less 16:9 aspect ratio.

    In the processing department, the Meizu deploys the Exynos 8895 chipset from last year’s Samsung flagship models, and users can choose between 64 or 128GB storage—unfortunately, there is no expansion slot. All components are housed in a body made of a stainless steel aluminum composite material.

    The Meizu 15 Plus costs CNY 3,000 (approximately US$ 475) for the 64GB version and CNY 3,300 (approximately US$ 525) for the 128GB model. This sounds like a very decent deal for a tele-camera equipped device with high-end specs, but unfortunately, no pricing information for outside China has been provided as of yet.

    Articles: Digital Photography Review (dpreview.com)

  • NVIDIA’s content-aware fill uses deep learning to produce incredible results

    Adobe Photoshop’s Content-Aware Fill is the current industry standard when it comes to removing unwanted artifacts and distracting objects, but that might not always be the case. Because while Adobe is currently working on an advanced deep learning-based “Deep Fill” feature, NVIDIA just demonstrated its own AI-powered spot healing tool, and the results are pretty incredible.

    As you can see from the two-minute demonstration above, the prototype tool can handle both basic tasks, like removing a wire from a scene, as well as more complicated tasks, such as reconstructing books and shelves inside an intricate library scene.

    The secret behind this tool is NVIDIA’s “state-of-the-art deep learning method” that the tool is built on. Not only does the tool use pixels from within the image to reconstruct an area—it actually analyzes the scene and figures out what it should look like when it’s finished. This helps to create a much more accurate and realistic result, even when the original image is an absolute disaster.

    The best examples of this can be seen in a paper NVIDIA team members published titled ‘Image Inpainting for Irregular Holes Using Partial Convolutions.’ As seen in the comparison images below, NVIDIA’s tool blows Photoshop out of the water when reconstructing portraits where much or most of the face is removed.

    From left to right: the corrupted image, Adobe’s Content-Aware results, NVIDIA’s results and the actual image.

    In the discussion section (section 5.1) of the aforementioned paper, NVIDIA says its “model can robustly handle holes of any shape, size location, or distance from the image borders. Further, our performance does not deteriorate catastrophically as holes increase in size.”

    NVIDIA does note, however, that “one limitation of our method is that it fails for some sparsely structured images such as the bars on the door,” as seen in the image comparison below.

    From left to right: the corrupted image, NVIDIA’s results and the original image.

    Current shortcomings aside, this particular tool—prototype or otherwise—appears to be leaps and bounds ahead of everyone else that’s currently on the market. Unsurprisingly, there’s no word on when, or if, we’ll ever see this hit the market, let alone in the consumer market, but we’ll keep our fingers and toes crossed.

    Articles: Digital Photography Review (dpreview.com)

  • This hacked Polaroid camera prints your photos onto thermal paper

    If you enjoy DIY projects and don’t mind diving deep into programming, soldering, and otherwise hacking apart old cameras, this weekend project is right up your alley. Meet the thermal paper Polaroid.

    Created by tinkerer Mitxela, this Frankenstein of a camera takes the shell of a Polaroid Sonar Autofocus 5000 and crams a webcam, thermal printer and Raspberry Pi Zero computer inside. The result is a digital instant camera that immediately prints your photographs onto thermal paper—the type of paper receipts are printed on.

    The project isn’t for the faint of heart. It involves a good bit of cutting, soldering, wiring and programming, as meticulously detailed in Mitxela’s step-by-step guide on how he built the thing. The entire process was filled with a healthy bit of trial and error, but when all was said and done, it worked. And not barely worked… flawlessly worked, as though that’s how the Polaroid camera was designed to operate all along.

    As explained in the above video, the camera uses a three-dollar webcam as the eye, catching the scene through the lens of the Polaroid. When the shutter of the Polaroid is pressed, a screenshot from the webcam is captured and processed by the Raspberry Pi Zero before being sent off to the thermal printer. As it prints, the paper is fed through the same area a normal Polaroid print would be expelled from.

    The amount of work that went into the project is evident in how clean the camera looks even after all of the hacking, soldering and glueing. From the outside, the camera still looks almost identical to how it did when Mitxela started. Everything is packed inside the frame of the original Polaroid Sonar—it can even be booted up externally through the clever positioning of the serial port. which is hidden beneath where flash bars are placed when shooting with instant film.

    To see the entire process and dozens of photos from throughout the building process, head on over to Mitxela’s site and check it out. And if you’re brave enough to take on this project yourself, be sure to share your results with us.

    Articles: Digital Photography Review (dpreview.com)

  • Sony a7 III Review

    Read our overall conclusion

    Despite its billing as a ‘basic’ model, the Sony a7 III is a supremely capable full frame camera. Though it doesn’t have the most megapixels or shoot the fastest bursts, its well-judged mix of resolution, speed, features and price point make it an easy recommendation for all kinds of photographers and all kinds of photography.

    Key Features:

    • 24MP full frame BSI CMOS sensor
    • 93% autofocus coverage (693 phase detection points, 425 for contrast detection)
    • Oversampled 4K/24p video taken from full width 6K (cropped-in 5K for 30p)
    • In-body image stabilization
    • 10 fps continuous shooting
    • 2.36m dot OLED viewfinder, 0.78x magnification
    • AF joystick
    • Touchscreen
    • Larger, ‘Z-type’ battery (CIPA rated to 710 shots)
    • Dual SD memory card slots
    • USB 3.1 Type C

    Compared to its predecessor, the Sony a7 III has been updated in almost every way; when compared to other similarly priced full frame options, the a7 III looks to be a cut above in many respects. For generalist photographers, wedding and event shooters and even sports specialists, the a7 III gets an awful lot of things just right. But as with previous Sony mirrorless full-frame cameras, there are some foibles that persist with this new model.

    We’ve now spent dozens of hours shooting the a7 III in our studio and out in the real world – read on to see how it performs.


    What’s new and how it compares

    Take a look at the key spec differences between the Sony a7 III and its predecessor and how it compares to existing models from other companies.

    Read more

    Body and design

    Most of Sony’s (positive) ergo changes in other recent cameras have found their way to the a7 III, but there’s been some cost-cutting along the way.

    Read more

    What’s it like to use

    We’ve gone beyond the spec sheet to discuss how the Sony a7 III performs in a wide variety of situations, from landscapes to weddings.

    Read more

    Image Quality

    From our lab and real-world testing, we’ve found the Sony a7 III is capable of excellent image quality – with one or two exceptions.

    Read more

    Autofocus

    The autofocus system in the Sony a7 III is lifted from the company’s advanced a9 pro sports model, and in short, it rocks.

    Read more

    Video

    Despite its relatively affordable price point, the Sony a7 III is one of Sony’s most capable interchangeable lens cameras for video to date.

    Read more

    Articles: Digital Photography Review (dpreview.com)

  • Five Budget Portrait Photography Hacks to Save You Money

    We all love some good photography hacks, and what better than some for portraits. Photography is such a great and fun artistic journey and there is always something new to try, or rather, buy. However, taking great portraits can be done with these five hacks that won’t break the bank. Most of these hacks can be made using household items or you can find them at your local craft stores for a quarter of the price.

    Background Portrait Photography Hack - Five Budget Portrait Photography Hacks to Save You Money

    Use a plain, solid painted wall on location as a background for your portraits to add a different look.

    #1 – Reflectors

    Reflectors are a great tool, especially for both studio and on-location setups. They help fill in the shadows with light, bounce light back onto your subject, and can create cool effects. They can even help block out the sun or light falling on either on you or your subject. A reflector is great all around tool.

    There are many great reflectors available, like the very popular 5-in-1. But you can definitely make one yourself that will give you the same results and enhance your portrait photography. The great thing here is that your handmade reflectors can be large or small depending on your portrait needs. Small, perhaps for the studio, and large for outdoors or on location portraits. Or make one of each, as it really is so simple to do!

    Reflector portrait photography hack - Five Budget Portrait Photography Hacks to Save You Money

    Use your handmade reflector to bounce light back onto your subject’s face.

    Making your reflector

    Grab a piece of cardboard and some aluminum foil (crinkle it up a bit first). Next, glue down the aluminum foil with the shiny side up with spray glue or double-sided tape. Make sure to smooth it out as best you can and cover one side of your board. Finally, paint the other side white. If you choose to go with white foam board, then you can skip the last step.

    What you will have is a very durable and effective two-in-one reflector! Use the silver side for maximum fill and use the white side for a softer look. This reflector can be used for both indoor and outdoor portraits. Make a few in different sizes to fit your needs.

    Aluminum foil glued to recycled box cut to lay flat.

    DIY reflector in use.

    Reflector bounce portrait photography hack - Five Budget Portrait Photography Hacks to Save You Money

    Use the white side of your DIY reflector to softly fill in light while photographing portraits on location.

    Don’t want to DIY it? You can head over to your nearest store and pick up a reflective car shield, the ones that help block the sun from heating up the inside of your car. Those also work great as reflectors and the best part is that you can simply fold it up when you’re finished using it.

    #2 – Diffusers

    Diffusers, like reflectors, are incredible tools especially for outdoor portraits and for newborn photography. They are simply a translucent material that you can use to soften hard lighting or to create soft light on your subject.

    I say newborn portraits because even window light can be hard for these little ones and a diffuser helps to soften it. You can also place the diffuser in front of off-camera speedlights to disperse the light over a larger area, effectively softening it.

    Newborn portrait photography hack - Five Budget Portrait Photography Hacks to Save You Money

    Use a diffuser to create soft light for your subject, especially great for newborns.

    You have the ability to create a diffuser just the right size for your portraits. Grab an embroidery ring and some translucent fabric at your local fabric or craft store. Place the fabric inside the embroidery ring, cut the remaining fabric so that you don’t have too much hanging out. You could hem the edges but the embroidery ring really does hold it pretty tightly.

    Once you cut the edges, you have a portable and easy to hold/mount diffuser. It’s lightweight and easy to carry. Use this indoors to soften window light or even a speedlight. Or use it on location to soften harsh sunlight and simply to shade your subject during the session.

    This scrim was made with a thiPVCvc pipe about 6 feet long to create a diameter of about 3 feet. I duct taped the ends together and hot glued the translucent fabric to the ring. A hula hoop would be perfect to use for this as well. I couldn’t find one big enough to use for this so I used PVC, both are inexpensive and quick to make.

    DIY lighting diffuser in action.

    You can also make a DIY large lighting panel – get instructions here.

    Editor’s Note: Make note that a ring, 12″ or so is still a relatively small light source and as such will produce fairly hard light. You need a large diffuser (larger than the subject’s face) to really soften the light.

    #3  Portrait stools

    There are many tools that are made specifically for portrait photography like the portrait stool. It’s basically a fancy hydraulic stool to sit your subject on while you make their portrait. There are also some made especially for children. You don’t have to invest in one of those, however, you simply have to go to your local hardware store and pick up a small two-step ladder, or if you photograph children, a two-step stool. Both of these options offer you the same functionality as a portrait stool.

    Use them during your session to pose your subject indoors or on location. Another advantage to using a ladder as a posing stool is that it gives you the option to use it yourself to get a higher camera angle. There are really no limits to the usefulness of the ladder, or small step stool, and it is easy to transport. If you are a beach photographer, use it as a tabletop to hold your gear and keep it from touching the sand.

    Portrait Photography Hack - Five Budget Portrait Photography Hacks to Save You Money

    Use a portrait stool to seat your subject.

    #4 – Phone Flashlight

    Sometimes the best tools are right in your pocket. Your phone is used for so much of your daily life and it can also be a great tool for photography. The flashlight on your phone can serve as a steady fill light in case you don’t have an off-camera flash or need a little boost of light.

    Turn your camera’s flashlight on and point it directly toward your subjects. You may need the help of a selfie-stick or a friend because although it’s powerful, you’ll still need to have the light pretty close to your subject. The mighty flash is perfect for portraits where you want to capture the light behind, but need a little fill on your subject. This is perfect for on-location photography, especially when the sun is setting behind your subject.

    A phone flashlight was used to create interesting lighting in a dark area.

    Use your handy smartphone’s flashlight to add drama to your portraits.

    Create a little drama using your phone’s flashlight and use it to manipulate the available light around you. This is also very easily done for indoor portraits and it works great to fill your subjects when there is beautiful warm light behind, like in the photo above. Get creative with this portable light that you always have with you. It’s quick and there’s no fussing with adjustments.

    #5 – Backgrounds

    One of the best photography hacks that you’ll learn is how to turn plain walls into beautiful portrait backgrounds. When you’re looking to do some headshots or just photograph so that it looks as though you were in a studio, this is the hack you can use every time.

    Choose a concrete wall that is plain. Pose your subject a good distance from the wall so that you can let the background blur a bit (use a wide aperture as well). Then, with your handmade reflector or phone flashlight, photograph your subject. What you will get is a beautiful seamless background just a tad out of focus to give it that studio look.

    Portrait photography hacks - Five Budget Portrait Photography Hacks to Save You Money

    Use your ladder and a plain wall to create studio-style portraits on location.

    You can also choose a more patterned wall to give your background added texture. Look for walls that are painted in a solid color or have a repeating texture like the brick wall below. Another great photography hack is to shoot from above and let the concrete stairs or asphalt blur out so that it creates a nice background.

    Portrait Photography background hack - Five Budget Portrait Photography Hacks to Save You Money

    Choose plain or patterned walls to give your on-location portraits more of a studio look.

    Conclusion

    These five portrait photography hacks will save you both time and money all while enhancing the portrait experience for both you and your subject while photographing on-location. Use them for your next portrait session to get new and different results!

    The post Five Budget Portrait Photography Hacks to Save You Money appeared first on Digital Photography School.


    Digital Photography School

  • Discuss: Better Equipment Versus Knowledge – Which Will Help You Improve Your Photography More?

    As a photographer, you always have the urge to buy new equipment thinking it will bring you better results. This might be true, but only up to a certain point, because if you don’t have the knowledge you can’t make the most out of your equipment. I started with a Nikon D3200 and I use it to this day because, in my opinion, it’s not the equipment that is going to help me take better photos.

    If you’re asking yourself, “What can I do with my entry-level camera?” then this is the article that’s going to prove that you can achieve great things and be a great photographer with your own camera. There are many photographers that took some amazing pictures with film cameras, photographers like; Andreas Feininger, Henri Cartier-Bresson, Eve Arnold, etc.

    What keeps you from taking better photos, your EQUIPMENT or your KNOWLEDGE? - portait in a field

    We cannot deny that their cameras were the best of their time. But my point is that even today they could compete with any owner of a fancy camera because having the latest camera is not going to guarantee a better vision.

    I’m going to give you some tips and tricks on how to take better photos and overcome the obstacle of not having the latest equipment.

    1. Read

    The most important thing you can do is to read. Many people skip this step and think that only by practicing will they improve. It is true that you have to practice, but unless you study the theory first there is no way of practicing in an efficient way.

    For example, if you read an article about shutter speed and aperture it’s easier the understand the mechanism and then apply it, than trying to figure it out all by yourself.

    Start here to get to many great dPS articles and find the topics that interest you the most.

    girl reading in the grass - What keeps you from taking better photos, your EQUIPMENT or your KNOWLEDGE?

    2. Know your equipment

    You just bought your first camera and you are stuck with your kit lens. But before buying a new lens you have to learn the basics. You can use your kit lens for numerous types of photos, from landscapes to portrait photography.

    I took more than 5,000 images with my kit lens before buying my second one, and I learned a lot of helpful things. If you’re shooting portraits, 35mm focal length can get a nice bokeh having an aperture of f/4.5. This focal length is perfect because it’s not wide so you’re not going to distort the face and you can have more light than shooting the same lens at 55mm, f/5.6.

    3. Know what to buy

    Buying equipment can be difficult when you can’t afford expensive things and you have to spend your money right. I am speaking from the perspective of a portrait photographer. My first portrait lens was (and still is my main lens) a 35mm f/1.8. If you want nice bokeh for a cheap price this is the right choice. I’m still exploring with this lens and I always find new perspectives.

    Knowledge Over Equipment

    Next, I’m going to present some arguments on why better equipment doesn’t necessarily make you a better photographer and on why knowledge can help you overcome your equipment struggles.

    Buying new equipment is always tempting, but you have to learn how to make the best of what you already have. The best thing you can do as an amateur is buying an entry-level camera and a prime lens. Stick with it and see if you can come up with a new vision every time you go out to take photos.

    At first, I didn’t know how to use manual mode. But do you think buying a better camera is going to help with that? No is the answer, you have to read and understand how the relationship between ISO, shutter speed and aperture affect everything in a photo.

    After learning that no picture is the same and the settings are going to change every time, you have to do a lot of trial and error. If you practice enough you can achieve great things. After learning how to use your equipment you have to learn how to process your pictures because it makes a big difference as well.

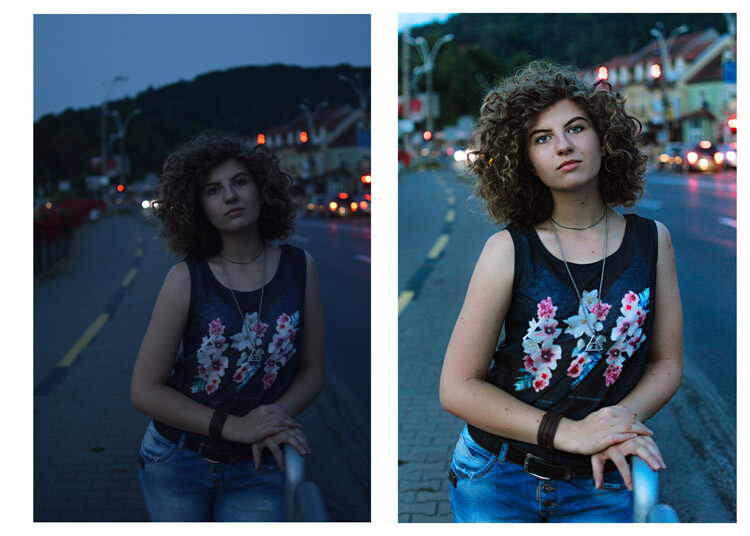
    What keeps you from taking better photos, your EQUIPMENT or your KNOWLEDGE? - before and after processing

    What keeps you from taking better photos, your EQUIPMENT or your KNOWLEDGE?

    The next thing you have to know is that light makes the difference in every picture, you have to learn how to manipulate and control the light. Once you know how light works you are going to love your equipment.

    lady and umbrella snowing - What keeps you from taking better photos, your EQUIPMENT or your KNOWLEDGE?

    lady in leaves - What keeps you from taking better photos, your EQUIPMENT or your KNOWLEDGE?

    When do you need better gear?

    There are a few situations where better equipment can be helpful. I’ll give you a few examples and some tips to overcome the difficulties.

    1. Shooting in low light conditions

    Having expensive equipment can help you here, you can have a higher ISO without a lot of digital noise. With my entry-level camera, I can raise the ISO to 400 and it already looks really noisy. With a full frame camera or even an expensive DX sensor you can raise the ISO to 1600, or 3200 and your image is still going to look fine.

    girl walking in the woods in winter - What keeps you from taking better photos, your EQUIPMENT or your KNOWLEDGE?

    2. Sports photography

    This is another hard thing to do with an amateur camera, you can still achieve great things. Your autofocus is going to play some tricks on you, so you have to work on your timing. Knowing where and when to press the trigger will help your autofocus a lot. Another thing you can do is to learn the panning technique.

    Conclusion

    So in summary, equipment is just a tool. It doesn’t help you to shape your vision and buying the latest gear as a beginner is not the best choice you can make. When you find that you have difficulty expressing your vision with your current equipment, then you can start thinking about upgrading.

    The post Discuss: Better Equipment Versus Knowledge – Which Will Help You Improve Your Photography More? appeared first on Digital Photography School.


    Digital Photography School

  • Video: Understanding the science of camera sensors

    When we see a technical video posted online, purporting to explain some scientific concept that has to do with photography, we typically brace ourselves. More often than not, they fall into two categories: (1) oversimplified, or (2) blatantly incorrect.

    That’s why this Filmmaker IQ episode on the science of camera sensors is such a breath of fresh air: not only is it factually solid, it goes into more detail and makes that detail easier to understand than just about any other technical breakdown of image sensor science we’ve seen… and they throw in a great explanation about how film works just to sweeten the pot.

    The 13 minute video explains:

    • How photographic film uses a thin coating of silver halide crystals to capture light.
    • The science behind the photodiode that converts light into electrical current for all digital image sensors
    • How a Charged Couple Device (or CCD) sensor works, and its pros and cons.
    • How a Complementary Metal Oxide Semiconductor (or CMOS) sensor works, and its pros and cons.

    If you’ve never bothered to dive into the science of image sensors or, every time you tried, the explanation was just too dense, give this video a look and let us know what you think in the comments below.

    Articles: Digital Photography Review (dpreview.com)

  • How to use Photoshop Droplets and Actions to Automate Your Workflow

    Most photographers who do any kind of event photography (including corporate or weddings) need to find ways to automate aspects of their photographic workflow. This is because events usually generate a lot of images. There are many ways to automate your workflow. This article will describe a technique for speeding up your workflow using Photoshop Droplets and Actions (rather than Lightroom).

    To understand this method you need to grasp a couple of Photoshop concepts: Actions and Droplets.

    Droplet Processing

    Created using an Action and the Droplet we’ll make below.

    Photoshop Actions

    What is a Photoshop Action? An Action is a powerful tool in Photoshop which is essentially is a recorded sequence of steps. By recording the repetitive individual steps as a group, the entire sequence can be repeated. Actions are really intended for global edits and not for image specific local edits.

    Conceptually, as you develop your editing skills as a photographer, regardless of whether you are using Lightroom or Photoshop, you will eventually develop a style or procedure that you like to do when you process your images. Using Actions will help automate these procedural edits.

    Beyond your own types of global edits, Photoshop comes with a small set of pre-configured Actions that are included in the installation of Photoshop.  In addition, there are many Photoshop Actions available either for free or for purchase on the internet.

    Many photographers try to engage their followers by selling Actions to achieve particular looks. Anyone purchasing Actions should know that they are just pre-recorded sequences that anyone can do within Photoshop to achieve the same look (they do take time to set up though). Regardless, Actions automate repetitive steps in Photoshop.

    Droplets

    Droplets are a great way to automate the use of Actions with Photoshop. Droplets are similar to Actions but can be used on many files and activated from outside of Photoshop. There are other ways to do batch processing, but Droplets are a neat and simple way to allow actions to be performed on multiple images.

    Sound confusing? Here it is in a nutshell: a Droplet is a small executable file that allows you to drop a folder full of images onto a file on your desktop that will run an action set and create final image results that are stored in another folder.

    Why do this?

    By using a Droplet, you can take a folder full of images and process them without having to open each one individually. It allows you to perform a long series of repetitive steps on images simply and cleanly. Just drop the folder on the Droplet and walk away to allow your computer to do all the work while you do something more fun, like make a sandwich or watch a Netflix show.

    Why not do all of this with batch processing in Lightroom? Lightroom allows for batch processing of images with Presets. But some Actions are too complex for Lightroom and Actions for Photoshop don’t work in Lightroom unless they are specifically built for Lightroom. Any event photographer or any photographer that has to take and process a lot of images needs to find a way to simplify their process to get images finalized.

    So how do you set up a Droplet?

    First, you need to either decide on an Action or sequence of Actions (you can use more than one) and decide where you want to put the edited files when they are done. To show how to use a Droplet, let’s create a simple action and then set it up as a Droplet.

    Step 1: Open an image

    Droplet Batch Processing Before - How to use Photoshop Droplets and Actions to Automate Your Workflow

    Image before processing

    Let’s make a simple action to apply the appearance of motion to an image by applying a radial blur.

    The first step is to open an image in Photoshop. You need to start with an image in order to be able to go through all the steps to save the Action and create the Droplet. You can use a pre-existing Action but to create the Droplet you need to modify the Action and that can get complicated.

    For this example, you are going to create an Action first, make sure it works, and then use it to create the Droplet.

    Droplet-Creating the Action - How to use Photoshop Droplets and Actions to Automate Your Workflow

    Launch the image into Photoshop

    Step 2: Create the Action

    Create an Action - How to use Photoshop Droplets and Actions to Automate Your Workflow

    Dialogue box for creating a new Action in Photoshop.

    If you already have an Action that you want to run, you can skip the process of recording a new one, but for this example, we are creating a new Action. First, you need to open the Actions panel. If yours is not visible, go to Window > Actions from the top menu.

    Once the Actions panel is open, you need to make sure you are not in button mode (button mode has colorful boxes).  If the list in the Actions panel is grey staggered boxes, you are in the right mode. At the top right corner, there is a small wing menu. Open that and choose New Action. You will then see the panel above.

    For this Action, we are creating a motion effect using a radial blur. Call the Action dPS Radial Blur (or whatever makes sense to you) and then press the Record button to start recording the Action. You are on your way and you should see a red dot at the bottom of the Actions panel.

    Step 3: Create the Radial Blur

    Duplicate the image by selecting Duplicate Layer from the pull-down menu at the top of the layer panel (or use the keyboard shortcut Cmd/Ctrl+J).

    Duplicate the image - How to use Photoshop Droplets and Actions to Automate Your Workflow

    Create a duplicate layer.

    The name of the duplicate layer is not important, but this is the layer to which you are going to apply the radial blur. Now, with the new layer selected go to the menu bar select Filter > Blur > Radial Blur. This will open the following dialogue box.

    Radial Blur Dialogue - How to use Photoshop Droplets and Actions to Automate Your Workflow

    Apply the radial blur.

    The default method is spin and the default quality is good. Change these to zoom and best (as seen above). You need to apply a fair bit of blur for this effect, so anything higher than 70% will work. Your dialogue box should look like the image above.

    Step 4: Create the Mask

    For this effect, you will only be applying it to the outside edges of the image. To do this you are going to use a layer mask. To create the mask, select the layer you just applied the radial blur effect to and then click on the icon with the white rectangle with a dark circle in the center (third from the bottom left). This should create a white square next to the thumbnail of your active layer, that is your mask. The white mask means that your effect is still being applied or showing across the entire image.

    Create the Mask - How to use Photoshop Droplets and Actions to Automate Your Workflow

    Create a layer mask on the layer with the blur effect you just created.

    Once you have created the mask you need to paint on it with black to selectively hide parts of the effect on this layer. Select the Brush Tool and choose a large brush with a soft edge to modify the mask. The size of the brush should be pretty big so that it covers a large portion of the center of your image. Use a really soft brush (hardness of about 15%).

    Paint on the mask with black (make sure the mask is selected not the layer itself – square white brackets should be around the mask) over the center of the image to reveal the sharp part you want showing. Use the softness of the brush to make the transition from blur to sharpness gradual. Your mask should now look mostly white with a black dot in the middle.

    The finished image - How to use Photoshop Droplets and Actions to Automate Your Workflow

    This is the image after the steps have been completed.

    Your image should look something like this effect. Your Actions panel has been recording all these steps in the background. Save your image in the format you want (JPG, PSD, TIF, etc.), the location should be your destination folder.

    Step 5: Finish recording the Action

    Go to your Actions panel and press the square box (stop button) at the bottom of the panel next to the red dot.

    Action panel still recording - How to use Photoshop Droplets and Actions to Automate Your Workflow

    Finishing the Action, press stop (square) next to the red dot

    This stops the action from taking further steps. Your Action is now complete. If you delete the layer with the blur on it, you can test your action on the same image.

    Simply go back to the Layer panel, delete the top layer with the mask.  Go to the Actions panel and find the new Action with the label dPS Radial Blur, highlight it, and click the triangle pointing to the right on the bottom line of the panel. This will activate or run the action. If you have done it correctly you will get the same image again. Yeah!

    Step 6: Making the Droplet

    Okay, we are almost ready to create the Droplet, there are only a couple more steps involved. To make sure the Action works properly you need a fresh instance of Photoshop. So the first thing to do is to close Photoshop and relaunch it.

    The steps to make the Droplet from this point on are quite simple. To create the Droplet, go to the menu bar to File > Automate > Create Droplet.

    Creating the Droplet - How to use Photoshop Droplets and Actions to Automate Your Workflow

    The Droplet dialogue box.

    This is the last set of steps but they are important. First, pick a good location for your Droplet. Usually, a great spot is on your desktop. Click the “Choose…” button, select the desktop and a name for your Droplet (give it a meaningful name for you).

    Under the Play heading, uncheck all the boxes (these will stop your droplet from processing) and select your new Action from the pull-down list. Set the destination as Folder and choose a destination for your images (it is usually convenient to put the folder on the desktop as well). Uncheck the Override Action “Save As” command.Press OK.   The last thing to do is to create an empty folder (this will be the source folder where you put your images to be processed) in the same location as you put your Droplet (e.g. the desktop). Close and exit Photoshop.

    I like having the source folder, Droplet and destination directory close to each other on the desktop. My arrangement looks like this:

    Source folder, Droplet and destination folder

    A typical layout for a Droplet on my desktop.

    Step 7: Using your Droplet

    You are now ready to use your Droplet. Simply put your images to be processed (try only a couple to test first) into the source folder (in this case it’s called To Be Processed). The images should be in the same format you chose previously. Make sure Photoshop is not running (sometimes this causes communication errors). From the desktop, highlight the source folder and drag it onto the Droplet.

    Here’s what should happen: the Droplet launches, Photoshop starts, runs your action, and saves your images in the destination folder. Using the test image, it should look like this.

    The finaished image

    The finished test image after processing

    Conclusion

    Sometimes droplets are finicky to set up but once they work, they work really well. Each image is processed separately one at a time, so you can take a number of images, put them in your source folder and then just drop the folder on the droplet. This allows you to walk away from your computer for a while, grab a coffee, update your Facebook status (#Workinghard!), have a short nap and come back to a finished set of images.

    Droplets can really help to simplify your workflow. The only word of caution is that if you are processing a large number of images with an Action that causes the finished image to get significantly larger, make sure you have sufficient hard disk space for the finished images. I have found if you run out of disk space, Photoshop will crash during a droplet operation.

    Happy workflow! If you have used Droplets before please share your experience in the comments below, as well as if you have any questions.

    The post How to use Photoshop Droplets and Actions to Automate Your Workflow appeared first on Digital Photography School.


    Digital Photography School

  • Creative Macro Photography – A Guide to Freelensing

    Freelensing is one of the strongest and most underutilized tricks in the macro photographer’s toolkit. It can add diversity to a portfolio, and—when used carefully—generates some truly stunning effects. In this article, I will cover the basics of freelensing, and discuss how it can be used to enhance your macro photographs.

    freelensing macro photography bokeh

    What is freelensing?

    Freelensing is a technique that can be used with any camera that accepts interchangeable lenses. You detach the lens from the camera and focus by tilting the lens in different directions, as well as by moving the lens closer and farther away from the camera body.

    How does this change the resultant image? The plane that is in focus is no longer parallel to the sensor. The overall effect is to get both near and far objects selectively in focus, as shown in the photographs below.

    freelensing macro bokeh autumn leaves

    By tilting my 50mm lens, I was able to selectively focus on these colorful leaves.

    How to do freelensing?

    First, equipment: I’ve found that macro freelensing works best with lenses in the 50mm range. Lenses much longer than that are going to be hard to focus accurately with, and lenses that are much shorter give a field of view and depth of field that is a bit too broad for macro purposes.

    Note: because freelensing involves holding the lens detached from the camera, there is always the risk that you might drop something. Therefore, I like to use lenses that are on the cheaper side; the Canon 50mm f/1.8 is my go-to lens in these situations.

    The camera model isn’t important, but I tend to use my backup body, as detaching the lens from the camera does increase the risk of dust and other debris getting inside and onto the sensor.

    freelensing flowers macro photography

    The freelensing process

    Begin by putting the lens on the camera as you normally would. Turn on the camera and set it to Manual Mode. Choose whatever aperture you like; when the lens is taken off the camera, the aperture setting will be rendered irrelevant (it will be wide opened). Focus the lens on a distant object.

    NOTE: With some camera makes and models, if you hold down the Depth of Field preview button while removing the lens it will lock the aperture closed to your desired setting. Test and see if your camera has this ability.

    Make sure that your camera is not using Live View (as this would increase the exposure of the sensor to the outside world). Then, turn off the camera. Detach the lens, and carefully hold it in front of the camera body, just in front of the sensor. Turn the camera back on.

    camera freelensing detach lens

    Example freelensing technique with a 50mm lens. The lens is pulled (slightly) away from the camera body.

    At this point, the fun begins! There are a few things to consider:

    First, the farther you move the lens away from your camera, the greater the magnification.

    Second, tilting the lens left, right, up, and down alters the parts of the scene that are in and out of focus. It takes a bit of experimentation to get the hang of this, so don’t be afraid to take many images while honing your freelensing skills.

    freelensing nature macro photography

    Third, any gaps between the lens and the camera allow for light leaks. This can result in very interesting effects (but be careful not to overdo it!). To minimize light leaks, cup your hand around the lens so as to block out the light.

    A note on exposure

    When it comes to freelensing, your camera’s metering system is going to be nearly useless. The proper exposure depends on the size of the gap between the camera and the lens, so you will always need to drastically underexpose if you use your camera’s meter. I often take a few experimental shots, incrementally increasing the shutter speed (and checking the image on the LCD), until I reach an exposure that I like.

    Freelensing for macro photographers

    I’ve given a basic overview of the freelensing process above. But how can freelensing be used by macro photographers?

    1. Use freelensing to create spectacular backgrounds

    One of my favorite things about freelensing is that it can generate stunning backgrounds. The shifted plane of focus causes greater subject/background separation, so the bokeh can be truly impressive.

    Try shooting into the light (with the subject backlit).

    freelensing macro photography bokeh backlit

    The setting sun (just to the right of the flower) offered some great opportunities for freelensing.

    You can also work with a shaded subject and a background lit by direct sunlight.

    freelensing poppy flower macro photography

    The poppy was shaded, but the background was lit by the setting sun.

    2. Find a point of focus

    Freelensing can be an exhilarating experience, as subjects that you’ve shot a hundred times will seem brand new. However, it’s important not to get too caught up in the uniqueness of freelensing, and focus on how the effect can be best used to create strong images.

    To this end, find a focal point. This might be a flower, an insect, or some leaves. Use this point of focus to anchor your shot. Ensure that you’re tilting the lens so as to render that point of focus sharp, and the rest of the scene out of focus.

    freelensing daisy macro photography

    3. Use freelensing to isolate a subject from clutter

    Adding onto tip number two, one of the advantages of freelensing is that you can order an apparently cluttered scene with a tilt of the lens. Look for the sort of image that would have previously felt too chaotic, then tilt the lens so that only a small part is rendered in focus.

    autumn leaves freelensed macro

    4. Use light leaks for artistic effects

    I mentioned light leaks above, and I want to emphasize their potential. When used right, light leaks can be beautiful.

    I like to create small light leaks along the sides of the image by shooting backlit subjects, and by allowing a significant gap between the camera and the lens.

    freelensing daisy macro photography

    The effect here was created entirely through light leaks; by pulling the lens away from my camera, I was able to give this daisy image a more ethereal feeling.

    5. Use freelensing for macro-level magnification

    As mentioned, pulling the lens away from the camera increases your magnification. This can allow for detail-oriented macro shots without a macro lens. So experiment by increasing the distance between the camera and lens.

    freelensing sunflower macro photography

    In conclusion

    Freelensing, while unconventional, can be an excellent addition to your toolkit. By detaching the lens from the camera body, you can create unique backgrounds and artistic light leaks while emphasizing the main subject.

    With spring flowers just around the corner (hopefully!), now would be an excellent time to start practicing!

    freelensing coneflower macro photography

    The post Creative Macro Photography – A Guide to Freelensing appeared first on Digital Photography School.


    Digital Photography School

  • You can own the world’s first single shot 8×10 digital camera for $106,000

    $ (document).ready(function() { SampleGalleryV2({“containerId”:”embeddedSampleGallery_1218001005″,”galleryId”:”1218001005″,”isEmbeddedWidget”:true,”selectedImageIndex”:0,”isMobile”:false}) });

    If you’re shooting digital, the largest image sensor you will find at your local camera store is the 53.4mm x 40.1mm medium format sensors inside something like the Phase One IQ3. But if that is just not enough for you… there is one, much larger option. Meet the $ 106,000 LargeSense LS911: a large format digital camera and purportedly the “world’s first 8×10 digital single shot camera for sale.”

    The LS911 is the passion project of Bill Charbonnet, who left his desk job in 2014 to start LargeSense LLC and built these large-format digital cameras. Four years later, the LS911 is his first shipping product.

    According to the press materials, LS911 features a 12-megapixel 9×11-inch monochrome CMOS sensor (that translates into massive 75 micron pixels), ISO that can be set at either 2100 or 6400, 900GB of internal storage, and the ability to output files to DNG, 16-bit TIFF, 32-bit TIFF, RAW and JPEG formats. There is no CFA, but the monochrome sensor can be used to produce color images (of non-moving subjects) using an in-built 3-shot system and color filters.

    Oh, and the thing can also apparently shoot 4K, 3840 × 2160 video at 26fps using its electronic shutter.

    Here is a video of the LS911 in action:

    And here is how the size of the LargeSense LS911 sensor compares to some of the other image sensors out there:

    Note: the LargeSense LS45 is a 4×5-inch digital back Charbonnet is working on, but has yet to release.

    If the LS911 seems a bit bonkers, honestly, that’s because it is. We’ve been discussing it in the office for the past couple of days, trying to figure out how to put this camera in context for our readers, and here’s our take: it’s cool, but having a sensor this large may not be as advantageous as you think.

    Science Editor Rishi Sanyal explains:

    One of the main benefits of going to a larger sensor is that you can get more resolution as the larger pixels place less of a burden on the resolving power of the lens, but this camera does not take advantage of that.

    What it does offer is the tilting, shifting and swinging ability large format cameras are known for, and if you can give the sensor enough light, the entire image has the potential for greater ‘tonality’ because the lower relative shot noise will yield very high signal-to-noise ratio for most tones. That makes the image more amenable to extreme sharpening without accentuating noise. That said, beyond a certain signal-to-noise ratio, tones are already clean enough – particularly with modern full-frame or medium format cameras – that it likely doesn’t matter.

    So, are you guaranteed a noticeable improvement in overall quality of the photos just because of the 9×11-inch sensor? Not necessarily. This is probably more about the feel of large format where you can throw most of the image largely out-of-focus by tilting the focus plane, or keep a large amount in focus without stopping down if you align the focus plane with your subject(s).

    If, after knowing all of this, you’re still interested in dropping $ 106K on the LS991 (hey – it’s guaranteed to be a conversation piece at parties if nothing else), head over to the LS911 product page on the LargeSense website or check out the full spec sheet at this link.

    And do let us know: what would you use it for?

    Press Release

    LargeSense launches the LS911

    It is the first full frame 8×10 digital single shot camera for sale!

    Medium format has thus far been the limit as far as sensor size because large sensors are difficult and expensive to produce. With the LS911, photographers now have an option for high quality large format images other than film. Available now. The USA price is US$ 106,000 Check www.largesense.com for more information.

    LS911 Specifications

    • Single shot 9×11 inch monochrome CMOS sensor
    • High base sensitivity of ISO 2100
    • Live view for focusing
    • Compatible with any large format lens with a sufficient image circle
    • Easy to use HTML-based WiFi control with any HTML5 browser
    • 4k Lossless video with audio up to 26fps
    • 900GB internal storage, CF cards and external USB 3.1 drives
    • User-generated curves to apply to the linear files
    • Integrated 3 shot tri-color images when using color filters
    • Designed for mounting on large tripods or custom camera stands

    LS911 product page: http://largesense.com/products/8×10-large-format-digital-back-ls911/

    LS911 spec and feature sheet: http://largesense.com/files/3415/2348/3451/LS911-Specs-And-Features-180411.pdf

    Upcoming Products

    A 4×5 inch digital back, the LS45, is expected at the end of 2018.

    The color version of the LS911 is expected in 2020.

    LargeSense was founded in 2014 by Bill Charbonnet to manufacture single shot, large format digital cameras. Inspiration was from Mitchell Feinberg’s 8×10 digital back. The issue for a business in this tiny market is keeping costs low while delivering a specialty product. After 3 years of development, we are proud to be the first to offer such camera, the LS911!

    Articles: Digital Photography Review (dpreview.com)