Blog

  • A Step-by-Step Guide to Achieving the Perfect Starburst Effect

    The post A Step-by-Step Guide to Achieving the Perfect Starburst Effect appeared first on Digital Photography School. It was authored by Simon Ringsmuth.

    Adding a starburst effect to your images is a great way to spice things up and really grab the attention of your viewers.

    Seeing rays of light slice through your photo is one of the most enjoyable tricks to pull off, especially if you haven’t really done this sort of thing before. While some software programs let you do this on your computer, the real magic comes when you do it by knowing how to use your camera.

    starburst on building

    Step 1: Find a light source

    Creating the starburst effect isn’t difficult. But it does require a bit of training and practice to pull off. You’ll need a few basics to get started:

    First, you’ll need a bright source of light, such as the sun. A street lamp or really powerful flashlight will work too, but the sun is nice because it’s always available and doesn’t cost money to use.

    If you don’t mind shooting pictures at night, you can get a starburst effect quite easily with a street lamp or other source of light. However, night photos might not look as interesting or visually compelling as shots of the sun.

    Ironically, you also need something to block most of the sun. This is because the sun itself is too large and bright to give you good starburst shots; just a sliver of its light is all you need. Buildings and trees work great, but whatever you use can’t be too far away. If the thing blocking the sun is separated from you by too great a distance, you won’t get the starburst effect.

    starburst effect on a building roof

    The effect isn’t as pronounced in this image, but it’s definitely there. Using a structure to block most of the sun is a great way to help you achieve a good starburst.

    Step 2: Choose a small aperture

    As far as your camera goes, the one setting that really matters is your aperture.

    To get a good starburst, your aperture should be small, such as f/11 or f/16. This means you will need a camera with aperture control, such as a DSLR or mirrorless system. Nearly all mobile phones use wide apertures and very few of them allow you to have any control over the aperture at all.

    So if you want to pull off a cool starburst effect in-camera, you’re going to need a dedicated camera and not just a phone.

    Step 3: Set up for your starburst shot

    The basic setup for a starburst effect photo is also fairly simple and works best when the sun is lower on the horizon during the morning or late afternoon. You can do it at other times of day, but it’s a little more difficult to find objects that obscure the sun when it’s directly overhead.

    starburst on a clock

    To achieve the starburst effect, position yourself so that the sun is off in the distance and the object obscuring it is not too close and not too far. Then set your aperture to f/11, point your camera in the direction of the light, and take a picture.

    Take care to not point your camera directly at the full sun, as it could damage your sensor or your eyes. Just a sliver of the sun and a small aperture is all you need.

    Step 4: Experiment with different setups

    If the object you use to block most of the sun is too far away, the starburst effect will be much more difficult to achieve. In the shot below, you can just barely see the points of light emanating from where the sun is peeking over the clouds. It’s subtle and can work if it suits your compositional goals for the image, but I don’t find shots like this to be nearly as fun as other starburst images.

    A Step-by-Step Guide to Achieving the Perfect Starburst Effect

    There’s a lot of creative things you can do when you start experimenting with starbursts. In the picture below, the sun was obscured just a bit too much by the tree branch. The cicada exoskeleton looks fine, but the photo lacks something in the way of a visual spark.

    A Step-by-Step Guide to Achieving the Perfect Starburst Effect

    I adjusted the position of my camera by mere millimeters so as to get the tiniest bit of the sun poking out below the branch. The result is a much more compelling photo:

    cicada with starburst

    The addition of a starburst adds a whole new dimension to the photograph and elevates it to a whole new level.

    Note: How aperture alters the starburst effect

    To see why a small aperture is important, look at the following photos, which were taken just a few seconds apart. The first used a large f/1.8 aperture, and as a result, the sun is a large yellow blob in the sky and not all that interesting. This is similar to the type of picture you could take on a mobile phone since most of those have large apertures ranging from f/1.8 to f/2.8.

    Image: I took this photo with an f/1.8 aperture at 50mm.

    I took this photo with an f/1.8 aperture at 50mm.

    Stopping down to f/11 changes the image dramatically. Not only is the foreground and background in focus, but the sun is now a brilliant star pattern. This is a direct result of the smaller aperture.

    fountain with starburst

    I took this photo with an f/11 aperture at 50mm.

    A similar effect is seen in the two photos below. Taken at different locations, they illustrate the effect quite clearly. The first shows a row of lights fading into the distance, and because I shot it at f/1.8, they appear as blurry orbs. This isn’t a bad thing, as my intent was for the viewer to focus on the light in the foreground.

    row of lights without starburst

    I took this photo with an f/1.8 aperture at 50mm.

    The next image shows a similar row of street lights, but the small aperture I used caused every point of light in the image to appear as a starburst.

    streetlights with starburst

    I took this photo with an f/13 aperture at 50mm.

    Even the green traffic lights far in the distance are starbursts. You can see how this dramatically alters the overall effect of the picture. If I had used a larger aperture, it would be an entirely different image.

    Conclusion

    My favorite part of shooting starburst photos is how easy it is once you get the hang of it. It’s also rather gratifying to know you can do it just by manipulating your camera.

    starburst at night

    Have you tried using the starburst effect in your images? What tips or tricks do you have for the DPS community, or for others who might not have done this type of photography before? Leave your thoughts in the comments below!


    perfect-starburst-effect-in-photography

    The post A Step-by-Step Guide to Achieving the Perfect Starburst Effect appeared first on Digital Photography School. It was authored by Simon Ringsmuth.


    Digital Photography School

  • Parrot announces the ANAFI FPV drone with 4K HDR video and 21MP stills

    French manufacturer Parrot may have recently exited the toy drone market by retiring their Bebop and Mambo models, but its time in the drone market is far from over. Today, Parrot announced the Anafi FPV, a portable, foldable drone, based on its regular ANAFI model.

    The ANAFI FPV features Parrot’s unique 180-degree tilting camera, 4K HDR video, a CMOS 1/2.4” 21-megapixel sensor and 3-axis stabilization with standard 3X zoom. The LD-ASPH lens boasts an F2.4 aperture and 26mm (35mm equivalent) focal length. The drone weighs 350 grams (0.77 pounds), has a maximum transmission distance of 2.5 miles, a flight time of 26 minutes, and a top speed of 34 miles per hour.

    Parrot has focused its efforts on creating a fully immersive experience with its Cockpit Glasses 3 and the continual development of its FreeFlight 6 app. Pilots can easily toggle between flight modes to fine-tune their imagery. Arcade Mode allows users to capture imagery by simply pointing their camera in their direction of choice. It can be combined with the Cinematic preset to simulate a ‘bird’s eye view.’

    Other built-in features include Autonomous Flight mode for cinematic selfies, Smart Return-to-Home and Geofencing for safety, Panorama modes including 360° Sphere, 180° panorama, and Little-planet, plus Slow-motion and Hyperlapse video modes. Parrot aims to make it easy for users to create unique, professional content with a portable set up that takes seconds to launch.

    At the beginning of last month, the world’s leading drone manufacturer, DJI, introduced its own FPV system. One main component missing was the drone, itself. Instead of expecting consumers to solder or source their own, Parrot has included everything in its ANAFI FPV All-In-One Pack. Parrot has designed the ANAFI backpack to double as a launching pad for the drone. Included are the Cockpit Glasses 3, Skycontroller 3, a battery, USB-C cable, 16GB memory card, and an additional set of propellers.

    The ANAFI FPV All-In-One Pack retails for $ 799 and is currently available to pre-order.


    Update (September 3, 2019): Edited the article and headline to clarify that the Anafi FPV is not specifically a racing drone.

    Articles: Digital Photography Review (dpreview.com)

  • Gimbal Tips And Advice – Why you Need to Invest in One

    A gimbal is a device that enables you to keep your camera stable while shooting video. It can also be useful when it comes to capturing high-quality still images. A combination of three gimbals will enable you to obtain a smooth movement of your handheld camera in three different directions, thanks to the three rotation axes. In this article I Continue Reading

    The post Gimbal Tips And Advice – Why you Need to Invest in One appeared first on Photodoto.


    Photodoto

  • Why Shooting Film Will Increase Your Digital Photography Skills

    In our current digital age the need for a quick turnaround in every discipline can be cut-throat and demanding. When it comes to the world of digital photography it’s not uncommon to sift through thousands of images after a session to narrow your edit down to a mere selection of 10-20 images. The peace of mind knowing you have an Continue Reading

    The post Why Shooting Film Will Increase Your Digital Photography Skills appeared first on Photodoto.


    Photodoto

  • Panasonic Lumix G95 sample gallery

    $ (document).ready(function() { SampleGalleryV2({“containerId”:”embeddedSampleGallery_7932302636″,”galleryId”:”7932302636″,”isEmbeddedWidget”:true,”selectedImageIndex”:0,”isMobile”:false}) });

    The Panasonic G95 earned a DPReview Silver Award for its very good image quality and overall likeability. Good build quality and weather-resistance also lend it well to travel photography – something we did plenty of during our testing of the camera. Our full sample gallery demonstrates what the camera is capable of in a wide range of environments – indoors and outdoors, on land and at sea. Take a look.

    See our Panasonic Lumix G95
    sample gallery

    Articles: Digital Photography Review (dpreview.com)

  • Cinematographer Newton Thomas Sigel shares his wisdom on focal length choices

    Vanity Fair has published an interview on its YouTube channel with American cinematographer Newton Thomas Sigel – who was director of photography for Bohemian Rhapsody, X-Men: Apocalypse and The Usual Suspects amoung many others. He talks about the way different focal lengths make people and objects in the scene feel closer together or further apart, and how the sense of perspective is altered depending on the camera position and the amount of background included in the shot.

    During the interview Sigel talks us through clips from Three Kings, Drive and Bohemian Rhapsody explaining what he hoped to achieve in that particular shot and the lenses he used to do it. It’s a fantastic watch with an experienced and well-spoken artist.

    Articles: Digital Photography Review (dpreview.com)

  • How to Use Pinterest to Grow Your Photo Business (Step-By-Step Guide)

    The post How to Use Pinterest to Grow Your Photo Business (Step-By-Step Guide) appeared first on Digital Photography School. It was authored by Darina Kopcok.

    Do you use Pinterest to market your photography services?

    You should.

    Because here’s the thing: Millions of potential clients use Pinterest. In fact, 250 million people around the world use Pinterest every month, and this number continues to grow. 

    Most people think of Pinterest as a social media platform, but it’s actually a search engine that’s driven by search and discovery. Statistics show that nearly half of online users search in Pinterest before turning to Google. It has an incredible power to drive traffic to your site and grow brand awareness. Visitors from Pinterest convert into leads or sales faster than those from social media networks.

    Why?

    One reason is that Pinterest has a much longer shelf life than social media. Once an image is uploaded to an Instagram or Facebook feed, it gets buried quickly. With Pinterest, your pins will have staying power and benefit you more the longer they’re around. 

    Now that you know why Pinterest is so great…

    …let me tell you how you can gain traction on Pinterest, fast.


    pinterest photography business profile page

    Step 1: Get a business account 

    In order to use Pinterest effectively for your photography business, you’ll need to sign up for a free Business account. A Business account will allow you to monitor your analytics from within Pinterest. This will give you important information about the boards and pins that are most popular with your audience.

    These insights can help you increase your engagement and pin more effectively.

    pinterest statistics

    Step 2: Create a succinct Pinterest profile

    Your Pinterest profile needs to be short and to the point. It needs to let people know what you do. Are you a wedding shooter? Do you specialize in personal branding portraits? Include it in your profile.

    For example, my main income comes from commercial and still-life photography, but I’m also a photography mentor. This third aspect of my business is the focus of my Pinterest account. Therefore, it’s the focus of my profile biography.

    Step 3: Organize your board for your viewers

    If you want to promote yourself as a photographer, you must always keep your target audience in mind. Your boards are not for you; they’re for your viewers, and so you need to speak to what they might be looking for when they log onto Pinterest.

    This doesn’t mean you can’t have boards on crafting and cooking. It just means that you need to hide these non-business boards from public view.

    Just remember, all of your visible boards must be relevant to potential clients.

    Since I’m a food photographer, most of my boards feature beautiful images of food, organized into topical boards such as Salads, Desserts, Main Dishes, etc., as well as themes such as food photography lighting and styling.

    And since I mentor food bloggers and emerging photographers, I also have boards such as Learn Food Photography as well as Blogging Tips. Use basic names for your boards that will be searchable and easy to find. 

    Your boards should be organized from most relevant to least relevant, not by alphabetical order. Have your first board feature your own photography only; you want to show potential clients what you can do. Clean up your own boards and create new ones.

    You’ll quickly see a big difference in your Pinterest traffic.

    pinterest business boards

    Step 4: Use keywords in your descriptions

    Pinterest works similarly to Google – users search for specific content they’re interested in by using keywords.

    In fact, keywords are the number-one tool for content discovery.

    That’s why each of your boards should have a description using keywords or using hashtags created from keywords. Also, use as many keywords as possible in your pin descriptions. General keywords make your content easier to discover.

    You can also use keywords to attract potential clients in your region. If you live in Portland and want to attract brides in your area, use keywords like “Portland Bride” or “Portland Weddings.” Add them to all of your descriptions and alt tags. Local keywords are underused and undervalued, especially in small markets, so they can make a big difference.

    pinterest keywording
    Step 5: Brand your pins

    When creating pins, you may want to add text (depending on your niche and your reason for pinning posts).

    If you’re just trying to share your stunning images, then this may not be relevant. But if you can think of a way to add text that will advertise your services, it’ll work in your favor. Surprisingly, pins with text get more attention than those without text.

    For example, the purpose of my Pinterest account is to attract people to my photography coaching services and products. I do this by driving traffic from Pinterest to my blog.

    How?

    I create pins for each blog post I write. The pins are simply designed, but they’re consistent. I use the same font and style for each pin, which creates a “brand” for my pin that is consistent and that viewers will easily recognize.

    Consider creating some pins with text in Photoshop or using an easy app like Canva. Canva offers a variety of free templates already sized for use on Pinterest. Test a few different styles and fonts and see how they perform. You may see that one style of pin gets repinned more than another. If so, then stick with that style.

    branded pins

    Examples of branded pins created on Canva.

    The bottom line is that you should try to keep a strong brand identity, one that highlights specific services and remains visually consistent. It might be a bit of extra work at first, but it’ll pay off in the end.

    Step 6: Join group boards selectively

    Group boards are like regular boards, except that the board owner can invite collaborators to add pins of their own.

    Group boards used to be a great way to generate traffic. Until Pinterest introduced the “Smart Feed,” which prioritizes and ranks pins based on their quality and engagement.

    This led to a big decline in the value of group boards. You see, group board collaborators often rarely look at the board, and therefore rarely repin other members’ content. Because no one interacts with the boards, Pinterest assumes the pins are not popular. So they don’t show up in the Smart Feed.

    How do you avoid this problem and use group boards to your advantage?

    Choose active, niche boards that focus on one topic and have less than 100 contributors. Too many contributors can mean low-quality content.

    The important thing to remember is that quality is much more important than quantity.

    A board that encourages mutual sharing is also crucial. For example, a policy stating that you need to repin two pins for every post you make can make a big difference.

    If you choose to join group boards, then keep these points in mind.

    Step 7: Use boards to collaborate with clients

    Visuals are a part of the communication that should take place between you and your clients before you start a job, especially if you’re in the commercial world. Pinterest can help you share images that serve as inspiration or a guideline for an upcoming shoot. If you work with commercial or editorial clients, you can collaborate on a mood board using Pinterest. This ensures that everyone involved in the shoot understands what the final results should be.

    If you work in a retail niche like weddings or portraiture, you can use Pinterest to get a sense of the mood and color your client is drawn to. After all, a picture is worth a thousand words, right? Light green might mean one thing to you and another to your customer, so images that demonstrate the feel and color treatment that is sought can go a long way in helping you get the right look.

    You can also use Pinterest boards to educate clients. If you do glamour or boudoir portraits, you can send your client a What to Wear board. This will provide inspiration and examples for choosing outfits for their shoot.

    chef portraits board

    Step 8: Schedule pins with the Tailwind app

    Tailwind is a Pinterest-approved scheduling tool. It’s a fantastic app to help you grow your audience like crazy.

    You see, pinning consistently is important growth strategy, but most people don’t have time to be pinning throughout the day. With Tailwind, you can sit down once a week to schedule your pins. They’ll automatically upload throughout the week at optimal times. Or, if you prefer, you can customize your pin schedule.

    Tailwind also offers powerful tools that analyze your pins and boards, as well as your Pinterest profile. You can see which pins are getting the most engagement and reschedule them right from the interface.

    Tailwind analytics

    Conclusion

    Pinterest is a great tool for generating visitors and leads.

    And if you follow the steps I’ve given above, your Pinterest account will start expanding, fast.

    So go set up your Pinterest account and start pinning!

    Do you have any other tips for using Pinterest? Share with us in the comments section!

    How-to-Use-Pinterest-to-grow-your-photography-business


    The post How to Use Pinterest to Grow Your Photo Business (Step-By-Step Guide) appeared first on Digital Photography School. It was authored by Darina Kopcok.


    Digital Photography School

  • An In-Depth Look at Kenko DG Auto Extension Tubes

    The post An In-Depth Look at Kenko DG Auto Extension Tubes appeared first on Digital Photography School. It was authored by Megan Kennedy.

    Extension tubes are neat little photographic accessories that allow you to create macro-like images without a macro lens. Are you considering getting into macro photography but don’t have the funds for a dedicated macro? Extension tubes could be the way to go.

    There are plenty of different makes and models of extension tubes. The variety we’ll be looking at here are by a Japanese company called Kenko, which produces some of the most popular extension accessories available, the DG Auto series.

    kenko extension tubes

    What are extension tubes?

    An extension tube is essentially a hollow spacer that locks between a lens and camera body. An extension tube adjusts the minimum focusing distance (the closest point a subject can be from the camera’s sensor while still being able to focus) by moving the lens further from the camera sensor.

    You can stack extension tubes for greater magnification. The thicker the stack of tubes, the closer you’re able to get to a subject and still achieve focus.

    comparison extension tubes with a coin

    A comparison reveals the different capabilities of the Kenko DG Auto extension tubes. Taken with a Canon 50mm f/1.8 II.

    Why use extension tubes?

    There are numerous benefits that extension tubes have over a conventional macro lens.

    Generally, extension tubes are much cheaper than a dedicated macro lens, making macro photography a lot more accessible.

    Another benefit is the lack of additional glass between the lens and the sensor. You won’t have to sweat about the quality of extra glass degrading your image. The lack of glass also means extension tubes are quite durable.

    Finally, extension tubes are light and easy to carry. So if you don’t want to lug around heavy lenses, extension tubes can be a great option.

    extension tubes on camera

    What are the drawbacks of extension tubes?

    Extension tubes are suited to lenses with small or medium focal lengths and generally work best with prime lenses.

    Extending the amount of space between the sensor and the front lens element results in a reduction of light reaching the sensor. This requires an adjustment in shutter speed, ISO, or aperture to compensate. But when aperture controls the fine depth of field balance in a macro image, your only real options are a longer exposure, more noise, or a combination of both.

    Also, because extension tubes increase the magnification of the lens, they magnify any flaws in a lens’s design.

    In addition, extension tubes require you to remove your lens from the camera body each time you want to adjust the lens extension. This increases the chance of dust settling on the camera sensor.

    While some extension tubes (like the Kenko DG Autos) offer autofocus compatibility, the results are generally mixed. Switching to manual focus is your best bet, and this isn’t entirely a bad thing, but it can slow you down in the field.

    flower abstract

    Not all macro photography has to be razor-sharp. For a softer effect, try adjusting your focus to just in front of your subject.

    How do the Kenko DG Auto extension tubes perform?

    Construction

    Available for Canon, Sony, and Nikon makes, Kenko DG Auto extension tubes usually come in a set of three: one 12mm tube, one 20mm tube, and one 36mm tube. These can be used individually or in a stack.

    extension tubes together

    Each tube has a diameter of approximately 62mm with clear alignment markings to show where you should connect the tube to the camera body and lens. Unlike some cheaper plastic varieties of extension tubes, the Kenko DG Autos all have metal mounting mechanisms.

    36mm extension tube with grip

    The 36mm Kenko DG Auto extension tube has a grip running around the outside of the tube.

    Out in the field

    For my close-up photography, I’ve been pairing my Kenko DG Auto extension tubes with my trusty Canon 50mm f/1.8 II. Without the added complications and weight of a zoom lens, the setup is simple and easy to assemble. The wide maximum aperture of the 50mm also helps compensate for the reduction in light that reaches the sensor as a consequence of the extension tubes.

    One thing I look out for with the Kenko DG Autos: I ensure each tube has clicked firmly into place. While I haven’t had any accidents (thankfully), the mounts can be a bit soft sometimes. The potential amount of switching between extension tubes during a single shoot makes the chance of a misalignment higher, so make sure you fully lock each component.

    bottle fly macro photo

    A beautiful and rather patient bottle fly. This image required my 12mm, 20mm, and 36mm extension tubes attached.

    Kenko DG Autos are designed with all the circuitry and mechanical coupling to maintain autofocus and TTL auto-exposure (provided there is enough light). However, as I mentioned before, the autofocus can still be a bit iffy. Plus, when taking an extreme close-up, there is such a small area of sharpness that any extra control over the focus of your composition is crucial. I still switch to manual focus 90% of the time for that degree of control.

    As with all close-up photography, I use a tripod in a lot of cases to reduce camera shake. In addition, because of the reduction in light reaching the sensor, I often have to compensate with a longer exposure – which makes the tripod a valuable piece of equipment to have on hand.

    Price

    The Kenko DG Auto set is markedly cheaper than offerings from Canon. While a Canon EF 25 II extension tube is about $ 150 USD on Amazon, the Kenko DG Auto set (the 12mm, 20mm, and 36mm) is priced at just over $ 100 USD. Given that the tubes contain no glass, they have no optical difference and are very similar in construction. The largest difference between the two brands online is the release levers. The Canon tube release lever is reportedly smoother to that of the levers on the Kenko tubes.

    gerbera flower macro

    A flower head photographed with a 36mm Kenko DG Auto extension tube

    Conclusion

    Extension tubes have made macro photography much more accessible. If you’re interested in macro photography, it may well be worth investing in the set offered by Kenko. For their price and utility, the Kenko DG Auto extension tubes are a definite staple in my photography kit.

    kenko-extension-tubes

    The post An In-Depth Look at Kenko DG Auto Extension Tubes appeared first on Digital Photography School. It was authored by Megan Kennedy.


    Digital Photography School

  • 5 Basic Post-Processing Tips to Instantly Improve Your Photos

    The post 5 Basic Post-Processing Tips to Instantly Improve Your Photos appeared first on Digital Photography School. It was authored by Nisha Ramroop.

    Are you a beginner looking to improve your post-processing skills?

    That’s what this article is all about. In it, you’ll discover five post-processing tips that will immediately take your photos to the next level. Best of all, these tips aren’t even difficult to follow, and they require nothing more than the most basic image-editing program.

    Let’s dive right in.

    post-processing tips boats on water edited

    1. Straighten your horizon for professional-looking photos

    When the horizon isn’t straight, even the untrained eye picks up that something is off. They might not know exactly what’s wrong, but they’ll be aware that the scene seems out of order.

    Which is why you absolutely must make sure your horizon is straight.

    Fortunately, it’s very easy to correct the horizon; you can do it in any post-processing program.

    Here are the instructions for straightening the horizon in Photoshop:

    Step 1: Select the Crop tool

    Step 2: Click the Straighten option at the top

    Step 3: Click one side of your horizon and drag across the horizon line before you release

    Your horizon will instantly straighten!

    straightening boats in photoshop

    2. Adjust the white balance for natural-looking images

    White balance is a setting used to balance the color of the light you shoot, in order to get it close to a neutral white.

    You see, when the color of your subject is distorted by the existing lighting conditions, you need to use the white balance setting to save the day.

    Now, one way to set the white balance correctly is to get it right in-camera. However, some photographers prefer to shoot in RAW with an auto white balance setting, and then adjust the white balance afterward.

    If that’s your preference, then you’ll need to choose your white balance in a post-processing program. It’s generally easy to select a white balance option that adjusts for the lighting of your shot. You’re also free to experiment with different white balance options so you can choose the one that most reflects your creative vision.

    For instance, the scene below has a Fluorescent white balance applied to it using Adobe Camera Raw.

    adobe camera raw white balance

    And here’s the same scene but with a Shade white balance applied:

    white balance adobe camera raw post-processing

    3. Boost your contrast to create images that pop

    Do your images look a little flat?

    One of the simplest ways to make your photos pop is to adjust the contrast. A contrast adjustment further separates the darkest and brightest areas of your image. In other words, it makes the dark tones darker and the light tones lighter.

    beach scene

    Increased contrast, therefore, makes tones stand out and gives your photos a more three-dimensional feel. Compare the image above to the image below; I added contrast to the second image, which gives it a subtle pop.

    beach scene with increased contrast

    Pretty much every image editor has a contrast slider. And boosting the contrast is often as simple as pushing the slider to the right.

    So just remember:

    If you’re struggling to make your photos more lively, try increasing the contrast. It’s a simple post-processing tip, but one that really works!

    4. Boost the saturation or vibrance sliders for better colors

    The saturation and vibrance adjustment sliders usually sit next to each other and can be confusing. Both of these add an extra color punch to your image, but they do so in different ways.

    You see, saturation adjusts the intensity of all the colors in your image at once. If you push the saturation slider, you’re going to see color saturation increase across the board. Therefore, it’s an adjustment you want to use sparingly.

    Vibrance, by comparison, is a “smarter” saturation tool, one that adjusts only the duller colors in your image. Increasing the vibrance will boost the less-saturated colors, but won’t affect colors that are already saturated.

    Look at these two photos:

    lighthouse with increased colors

    I boosted the saturation of the photo on the left, and I boosted the vibrance of the photo on the right.

    Note that when you lower the saturation of your colors, your image takes on a more muted effect, like this:

    reduced saturation lighthouse

    In general, boosting the vibrance or the saturation will instantly improve your images.

    5. Sharpen your photos for the best display on the web

    Your images are most likely going to be displayed on the internet.

    However, when you export your photos from most image-editing programs, you’re going to end up with blurry photos. Unless you sharpen for the web, that is.

    There are a few ways to sharpen in Photoshop. Here is one you can try:

    Step 1: Resize your image to the size you want it displayed. (If you sharpen your high resolution/original image and then resize it, the image will appear to lose its sharpness. Sharpening an image at your display resolution works better.)

    resizing images post-processing tips

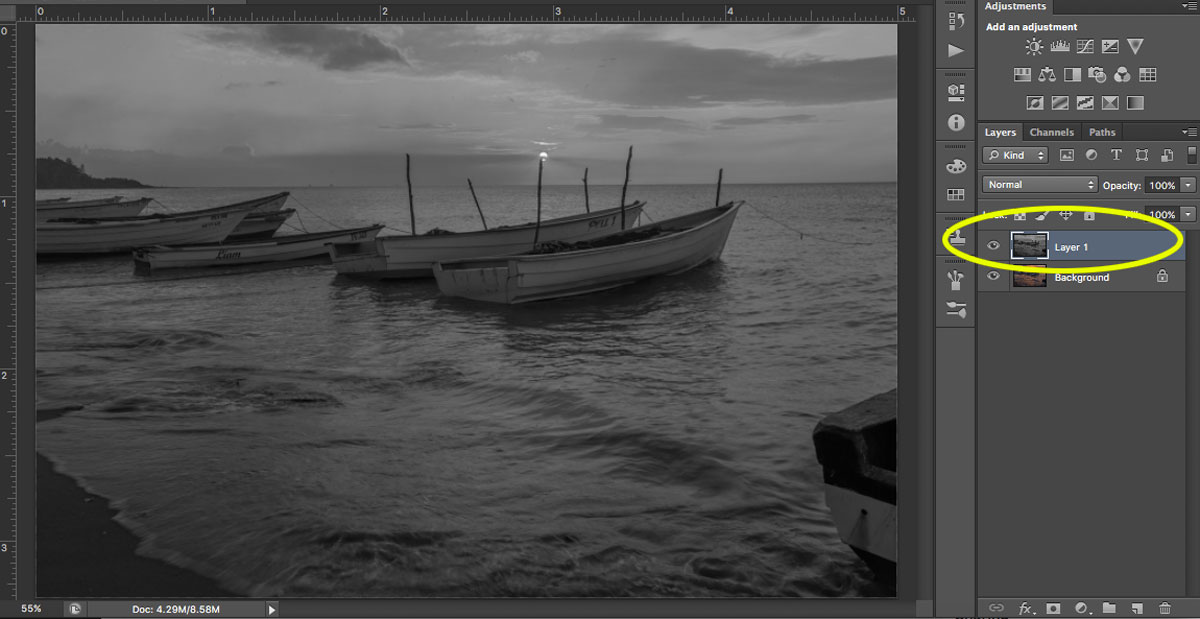
    Step 2: Duplicate your layer.

    Step 3: Desaturate your new layer (from Menu, Image > Adjustments > Desaturate).

    sharpening your images

    Step 4: Change your blend mode to Overlay. (Alternatively, you can use the Soft Light blend mode for a more subtle effect.)

    Step 5: Now apply a High-Pass filter (from Menu, Filter > Other > High Pass) and choose a radius around 2.0 for an image of 730 pixels (on the long side). The Overlay option you chose above allows you to see how the radius affects the image so you can play around with it.

    Note: The bigger your image, the larger your radius will be.

    If the sharpness doesn’t look good on the entire image, you can use a layer mask and paint black over the areas where you want to hide the effect.

    Step 6: Save for the web (from Menu, File > Save for Web). Check the Convert to sRGB box if unchecked.

    Conclusion

    If you’ve just begun your photography journey or if you’re looking to improve your basic editing skills, then these post-processing tips are a great place to start.

    In fact, basic editing is often all you need to dramatically improve your photos.

    So follow these tips, and watch as your images improve!

    The post 5 Basic Post-Processing Tips to Instantly Improve Your Photos appeared first on Digital Photography School. It was authored by Nisha Ramroop.


    Digital Photography School

  • 3 Tips for Becoming a Unique and Successful Photographer

    The post 3 Tips for Becoming a Unique and Successful Photographer appeared first on Digital Photography School. It was authored by Kevin Landwer-Johan.

    If you want to become a successful photographer, then there are a few things you absolutely must know.

    That’s what you’re going to learn in this article:

    Three key tips for becoming a truly masterful photographer.

    successful photographer two people with bright clothing

    © Kevin Landwer-Johan

    Will it be a fast journey? Probably not.

    But it doesn’t have to be difficult, either. If you enjoy photography, then you’ll have a ton of fun!

    So if you’re ready to become a unique and successful photographer…

    …then let’s get started.

    Tip 1: Don’t get hung up on what you ‘should’ do

    Many photographers read tutorials and watch videos. Then they try to mimic exactly what is being taught. They try to create the same photos the instructor is telling them to.

    But if you learn photography this way, you’ll end up having photos that look like everyone else’s. You won’t discover a unique style of your own.

    Sure, it’s good to study and learn from those who have more skill and understanding. But there is no formula for perfect photography. There is no absolutely correct way to make a picture.

    Whether you’re taking a senior portrait or photographing products for a catalog, there are no hard and fast rules. There are guidelines. If you follow some of them you’ll make sharp, well-exposed photos that are well-composed. But if you try to rigidly stick to a method, you will not make creative photos.

    Thai Model and Elephant

    © Kevin Landwer-Johan

    Every scene you photograph is different. Even if you photograph the same garden or building every day, things will change. The light will be different. It may be sunny one day and raining the next. Your subject may change over time.

    So you must take what you’ve learned and adapt it to the situation. Apply photography techniques that best suit your subject and the current circumstances.

    Inle Lake Fishermen

    © Kevin Landwer-Johan

    Obtain the skills and learn the rules. Know these things well, so your thoughts aren’t consumed by them each time you want to take a photograph.

    But don’t apply a set of rules to your photography. Doing this may bring technically correct results. But often photography which is only technically correct is rather dull and boring.

    You can find examples of very similar sets of images posted on social media and photo-sharing sites, and in all manner of ‘how to’ photography books. They all look repetitively similar because the photographer has only followed the rules.

    Instead, apply your own creative thinking. Consider the rules, but don’t apply them unless they enhance your photo the way you want them to.

    Tip 2: Put feeling into your photography for masterful images

    If you want to be a truly great photographer, learn how to infuse your photography with feeling. Put something of yourself into your pictures.

    This is what will make your photos unique. Nobody else has the same worldview you do.

    This is not an easy concept for many photographers to grasp, but all you need to do is look at some of the best photos. The ones which attract you the most.

    Ask yourself why you like them so much. Look at the greats. Admire the work of Irving Penn, Ansel Adams, Henri Cartier-Bresson, and the like. What is it about the way they have seen the world and photographed it that makes their photographs special?

    boys in sunbeams

    © Kevin Landwer-Johan

    Look at favorite photos you have taken. What’s special about them? Are they only technically correct, or is there more to them? Do they capture a unique moment? Do they include feeling?

    Photos which embody emotion are more powerful. Capturing the moment that conveys emotion, regardless of technical considerations, often results in the most compelling photographs.

    Technical imperfection can even enhance the feeling in a photograph. A moment of laughter mistakenly overexposed can add to the spirited feeling. An underexposed photo of someone feeling sad will add to the expression of their despair.

    portrait of a young girl

    © Kevin Landwer-Johan

    Here’s the bottom line:

    If you can include feeling in your photos, if you can communicate something to viewers about your perspective, then you’ll be well on your way to being a truly successful photographer.

    Tip 3: Study your craft and photograph often

    Here’s the great thing about photography:

    The more you pick up your camera, the faster you will develop as a photographer.

    Your technical skills will improve, and your ability to see what makes a great photo will improve, too.

    cultural abstract

    I suggest you commit yourself to learning a new photography technique every month, or even every week. Get the new technique ingrained into your subconscious mind so you don’t have to concentrate on what camera settings to use. Then the settings will come to you automatically, even when you do choose to use Manual mode.

    Reaching a high level of ability takes time. Like any artist, you have to start by mastering the essentials. Once you have, you will be free to express yourself.

    Learning to play the piano or to dance well involves hours and hours of patient, determined practice. Photography is the same! The more you study and practice with your camera, the more expressive you will become with it. The less you have to think about the adjustments you need to make, the more focus you can give to being creative.

    So engross yourself in your favorite genres of photography. Photograph often and with the desire to make improvements each time you do.

    Over time your photographic skills will advance.

    And, pretty soon, you’ll be a successful photographer.

    Laughing Lady with umbrella

    © Kevin Landwer-Johan

    Conclusion

    I believe we are all inherently creative. We are created to be creative.

    This means that every one of us has the potential to be a great photographer.

    You just have to work hard at your photography.

    Eventually, you’ll be creating stunning, unique photos.

    How to become a Unique and Successful Photographer Iron Bridge in Chiang Mai

    The post 3 Tips for Becoming a Unique and Successful Photographer appeared first on Digital Photography School. It was authored by Kevin Landwer-Johan.


    Digital Photography School