Blog

  • 14 August, 2012 – Tokina 300mm Mirror Lens for MFT – A Hands-On Review

    Mirror lenses have been around since the 1950’s. Some are better than others, but they never are really up to the quality of a good prime of comparable focal length, or even a decent zoom.

    But their small size and comparative low cost keep them popular among some photographers, and their unique "drawing" ability appeals to some.

    Lens maker Tokina had just released a 300mm F6.3 Macro Mirror lens for Micro Four Thirds, and I have just field tested this new lens on my Olympus OM-D E-M5. My review is now online.


     This Contest Ends August 15


    Sales always slow down in the summer. We wanted to do something to motivate you to spend a bit, here on your favourite web site.

    So, we’re doing a give-away. Every order for one of our download videos – tutorials as well as Video Journals, entitles you to a chance to win a new Olympus O-MD E-M5 camera, one of the hottest cameras of the year.

    This contest is open to anyone, anywhere in the world. All you need to do is purchase something. Come on. Don’t just sit there – make a purchase and become eligible to win!


    The Luminous Landscape – What’s New

  • 16 August, 2012 – Draw Winner Announced

    The winner of our Summer Madness Giveaway has been announced. It is Patrick Eozenou of Washington DC. Contratulations Patrick. Your Olympus OM-D E-M5 camera body will be on its way to you this week.


     "Every time I go back to a module I had already seen, I learn additional things.  I have never seen tutorials that have the excellent mix of what the features are, 
    how to use them, enough of the under-the-hood information 
    and concepts so that I can utilize the features creatively and efficiently, 
    and just enough humor to keep the motivation level high.  Wow!
    "


    The Luminous Landscape – What’s New

  • How to Photograph the Stars

    A guest post by John Davenport

    Photography in general is easy – right? You pick up your camera, point it in the direction of what interests you, and depress the shutter button. However, there are many levels of photography, and I’m sure many of you are aware of the basics.

    Today I’m going to focus on something a bit more advanced, photographing the star filled sky, also known as astrophotography.

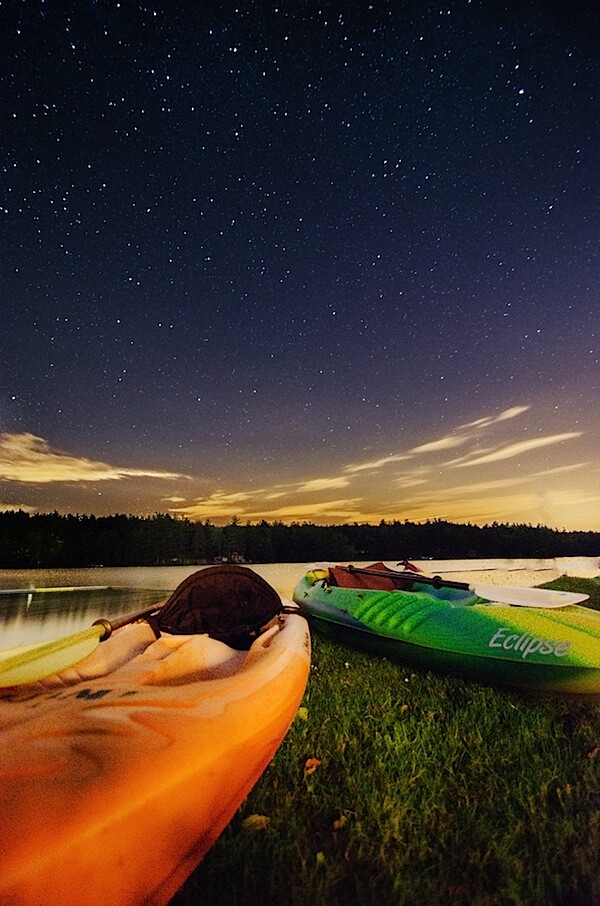
    kayak under the stars.jpg

    For astrophotography you will be delving a bit deeper into the use of some of the manual controls of your camera like shutter speed, aperture, and ISO control. I also highly recommend shooting in RAW for night photography, as it will allow more control when editing the final image. If you’re not sure what RAW is and why it is important I wrote a bit about RAW photography here.

    Let’s Start With What You’ll Need

    • Tripod – We’re going to be dealing with exposures in the tens of seconds and I don’t care who you are, you’re going to need something to stabilize your camera.
    • A Camera With Manual Controls – Manual control of your ISO and shutter speed are going to be essential for photographing the stars.
    • A Wide Aperture Lens – You’ll need a lot of light and f/2.8 seems to be the butter zone for astrophotography. Combine this with an ultra-wide lens and depth of field won’t be a problem.

    With these three pieces of gear you’ll be off to a great start, but of course, there’s a lot more out there that you could potentially add down the line, which I’m sure you can discuss in the comments below.

    Location, Location, Location

    Now, it’s not enough to just get all the gear, you need to find the right places to photograph the night sky as well. Light pollution is a serious problem for astrophotography and if you’re anywhere near a large city you’re going to have to travel at least an hour to get away from the lights.

    I live just outside of Boston MA and am pretty much locked into one of the most light polluted areas of the United States – southern New England.

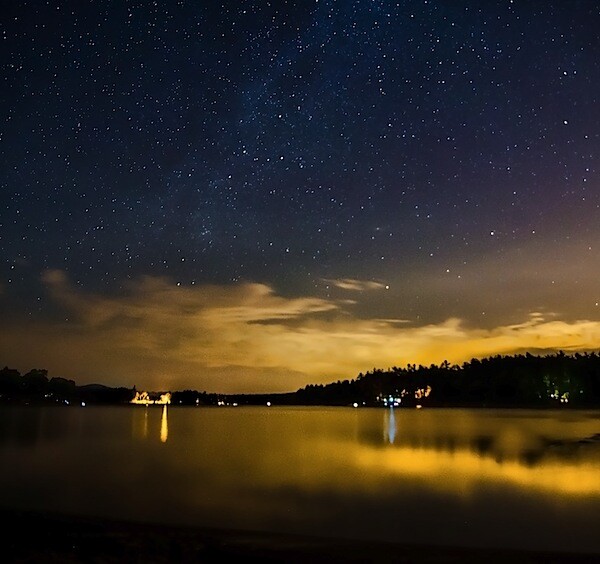
    However, as seen in this image below, even a town of only about 30,000 people and over ten miles away can still result in some obstructive light pollution.

    lightpollution.jpg

    On top of finding the right location on Earth, you’ll want to have some idea of the location of various stars and constellations for your photography. I use an app called Starwalk for my iPhone to track these down as well as locating the core of the Milky Way, which can be amazing when photographed.

    The Basic Set-up

    When photographing these tiny pinholes of light you will need as much light to hit your sensor as possible. Therefore it’s important to use combination of high ISO, wide apertures, and long shutter speeds.

    For the Kayaks Under the Stars photo above I used an ISO of 1250 an aperture of f/2.8 and an exposure of 30 seconds. As you’ll notice in the bottom right of the photograph there’s a bit of light pollution from a city about 30 minutes away.

    One thing to do to try and minimize the light pollution is to find out where it is in a timely manner. To do this I typically will fire off successive shots all around the horizon using an absurdly high ISO (typically the highest my camera will go) simply to limit the time it takes for each shot to expose. These shots won’t be used in the final process, but they are valuable in letting me know which parts of the horizon are off-limits.

    As far as exposure time goes, it’s better to keep it as short as possible, otherwise you’ll end up with movement in your stars as the Earth rotates. As an example, my kayak photograph was shot at 30 seconds, which was actually a bit long and if you look closely you can see some movement in the stars.

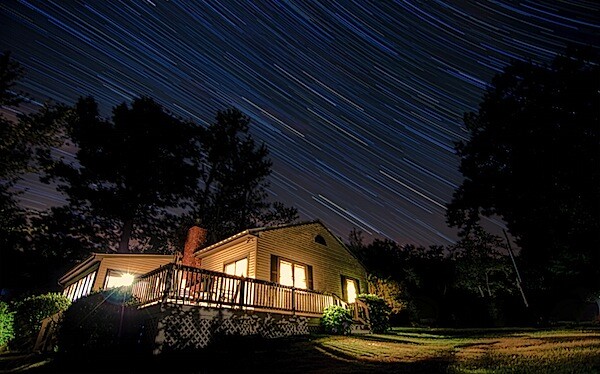
    Now, don’t get me wrong, this can be an extremely cool style of photography in and of itself, referred to most often as creating star-trails like this shot below.

    startrailphoto.jpg

    There’s a great post here on dPS about shooting star-trails, which you should check out for more information if you’re interesting in creating this kinds of photographs.

    Processing the Photo

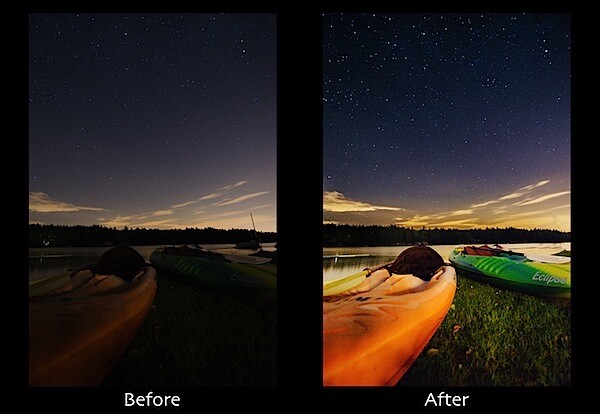
    Processing these night sky photographs can be a bit intimidating, as at first they won’t look like much. As I mentioned above, I’d highly recommend shooting in the RAW format if your camera offers it, as it will allow you to do a lot more when it comes to this step.

    BEFORE AND AFTER.jpg

    For the shot featured at the top of this post I broke up the photograph into two zones to process, the sky and the foreground. I used LR4′s adjustment tool to selectively tweak each region until I was satisfied with the end result. 

    For more on how I edited this photograph watch this quick video walkthrough I made of the process.

    John Davenport is an enthusiastic amateur photographer and blogger who shares daily photos on his site Phogropathy. You can also find him on Facebook and Twitter.

    Post originally from: Digital Photography Tips.

    Check out our more Photography Tips at Photography Tips for Beginners, Portrait Photography Tips and Wedding Photography Tips.

    How to Photograph the Stars


    Digital Photography School

  • 18 July, 2012 – Improbable Leviathan – The Kebler Pass Aspen Grove, by Miles Hecker

    Did you know that a grove of Aspen is a single organism? I didn’t – at least not until I read Mile’s Hecker’s latest geotagged location essay Improbable Leviathan – The Kebler Pass Aspen Grove. 


    "You and Jeff did it again!  A great series of videos.

    I’ve watched the earlier Camera to Print series as well as the LR 2 & 3 videos and as usual, I learned
    new technique and ideas even though I’ve been behind a camera for 45 years.

    Additionally, the rapport you two have is most engaging, enjoyable, and totally different than the sterile video tutorials from others (I’m afflicted with being a visual learner). 

    Again, a great series of videos that have helped me grow once again."


    The Luminous Landscape – What’s New

  • Windows 7 – Resize Columns in Explorer’s Details Mode

    A couple of ways to make more information visible when viewing file details via Windows 7 Explorer.

    These tips are for Windows 7 beginners – though some who have used the operating system for a while still may not know about them!

    When viewing file information in Explorer’s “Details” view (right-click an empty area in a folder and select “View” – “Details”), more information may be available than can fit on the screen without having to use the horizontal scroll bar. If a particular column is too large, move your mouse pointer to the column edge until the pointer turns into an arrow pointing to the left and right. Then double-click the left button to resize the column to the width of the widest item in the column. Or……

    Read more at MalekTips.
    New Computer and Technology Help and Tips – MalekTips.Com

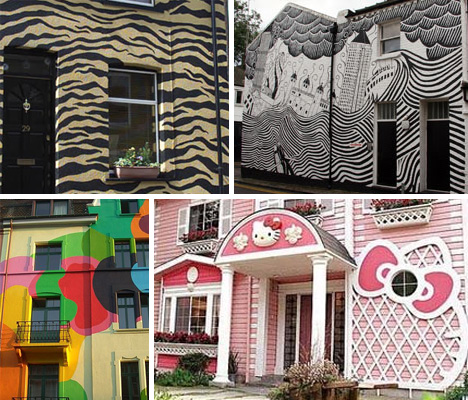
  • Tiger Stripes to Cow Spots: 13 Playful Home Paint Jobs

    What would your homeowners association say if you were to step way, way outside the bounds of normal home exteriors and do something way creative with your home’s appearance? These people did just that, and their homes have some of the wildest, weirdest paint jobs in the world.

    (image via: artofthestate)

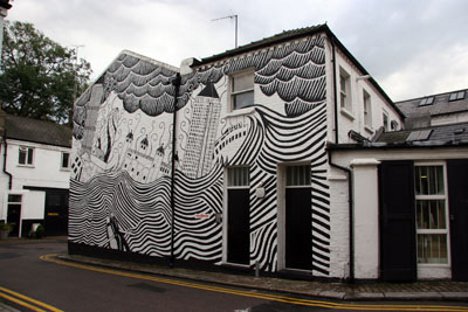
    Stanley Donwood, the artist behind some of the most iconic artwork associated with the band Radiohead, has a signature style that is replicated on the side of this home in Ladbroke Grove in England.

    (image via: FunkyDowntown)

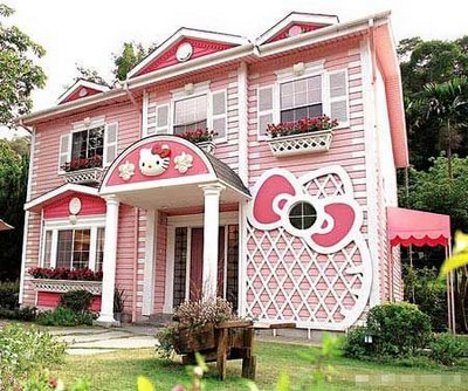
    Fans of the uber-cute Sanrio creation Hello Kitty know that the whiskered one can be found on literally every kind of merchandise. This incredible “castle” in Shanghai, China not only features the famous feline and an appropriately pink color scheme on the exterior; the interior is chock full of Hello Kitty accessories and furniture.

    (image via: nodigio)

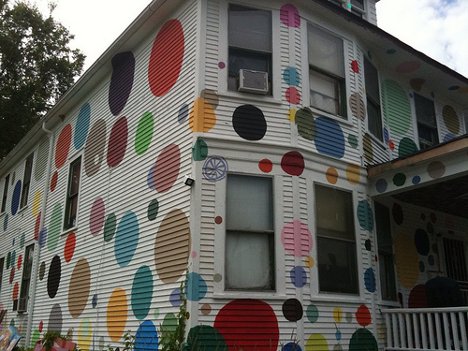
    This polka dotted home would be perfect for a resident with a bubbly personality. Its fun multi-colored pattern no doubt draws plenty of stares and smiles as people pass by.

    (image via: The Telegraph)

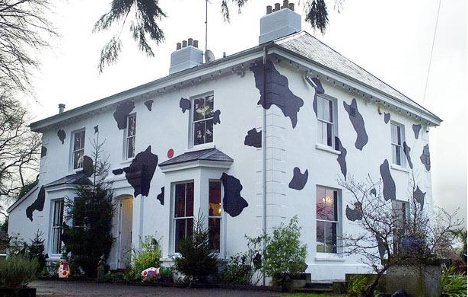
    In Usk, South Wales, a homeowner who was extremely fond of the movie 101 Dalmatians decided to create an unusual tribute to the black and white dogs by painting this house white with black spots. They look more like cow spots to us, but we aren’t picky – it’s still an excellently playful paint scheme.

    (image via: Apartment Therapy)

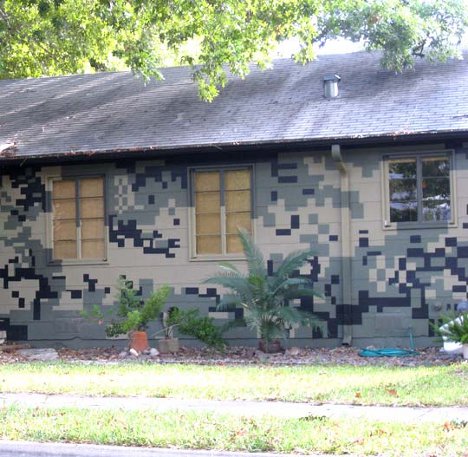
    Believe it or not, there is a house hiding in this photo. The Austin, Texas home was painted in the style of the US Army’s Universal Camouflage Pattern, resulting in a home that actually manages to stand out from its surroundings despite its best attempts to blend in.

    (images via: LA Weekly and Daily Mail)

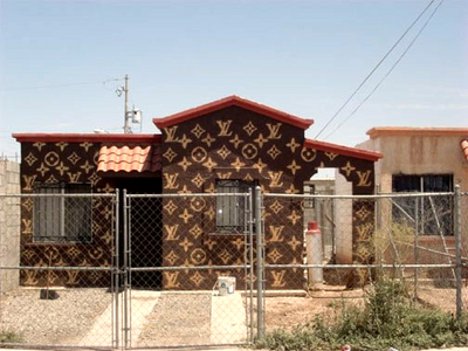
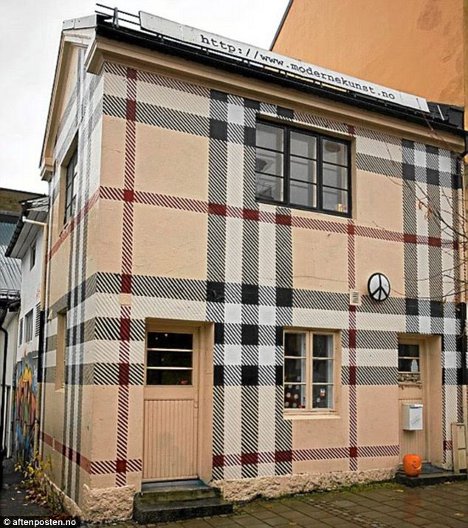
    Fans of fashion will immediately recognize these high-profile patterns. The first, a bungalow in Mexico, was painted to look like the logo of the famed French fashion house Louis Vuitton – and then appropriately hidden behind a tall security fence. The second is the home of artist Jans Werner, painted to look like the signature tartan pattern of UK fashion brand Burberry.

    (image via: The Telegraph)

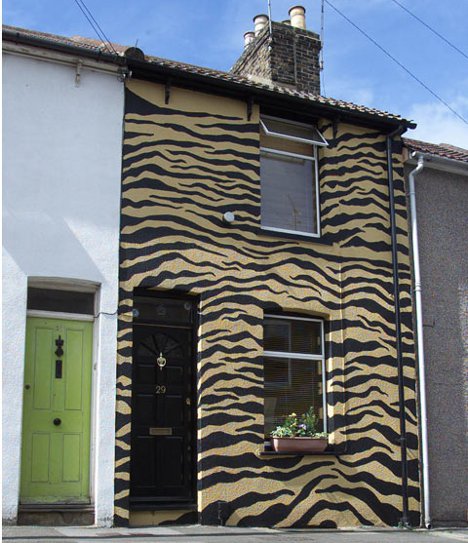
    People who paint their own homes in crazy colors or patterns are one thing…but this tiger-striped home was painted by the owners’ friends while the owners were away on their honeymoon. Would you be able to forgive your friends for a “gift” like this?

    (image via: Cat Rocketship)

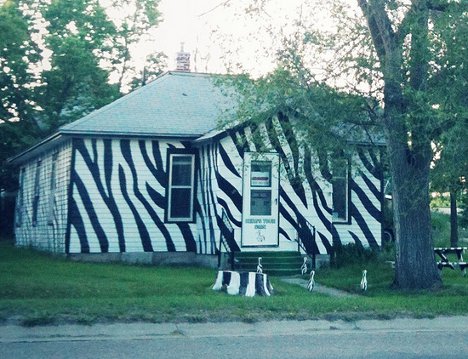
    Zebras have stripes in order to blend in with one another and deter predators from attacking what looks like one gigantic animal, but the same concept doesn’t quite work with this solitary house in Basset, Nebraska.

    (image via: ChicagoGeek)

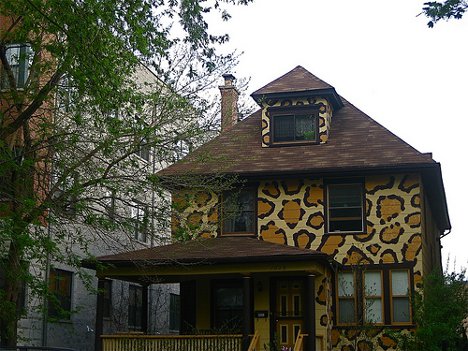
    The zebra house might want to steer clear of Chicago, which is where this leopard-spotted house spends its days, lounging in the sun and waiting for an unsuspecting antelope house to wander by.

    (image via: The Telegraph)

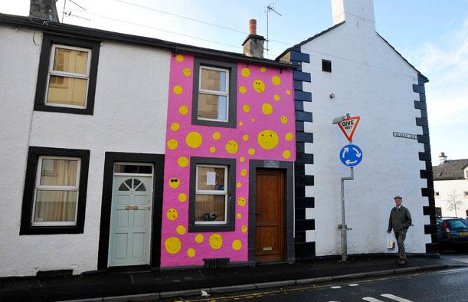
    This house in Penrith, Cumbria, England is surrounded by otherwise normal-looking row houses. Its bizarre pink background filled with smiling yellow happy faces sure is weird, but it probably causes a lot of smiles, so it’s hard to find fault with it – unless you live next door, of course.

    (image via: Dystopos)

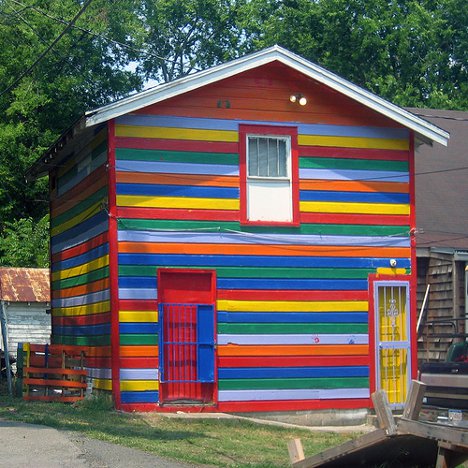
    This building in Birmingham, Alabama is technically a garage, not a house, but its beautiful rainbow exterior is so cheery that it warrants inclusion.

    (image via: m.a.r.c.)

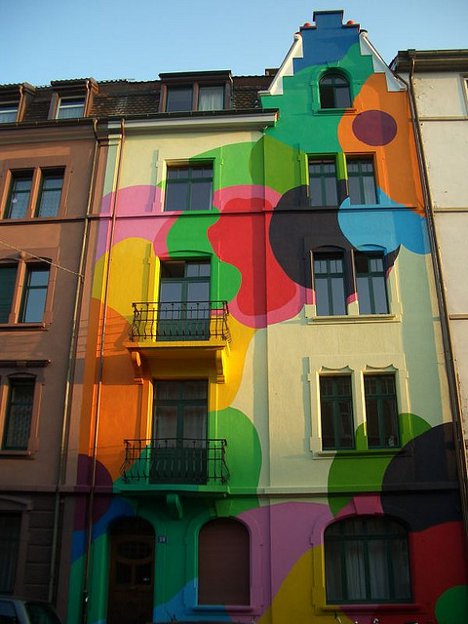
    Looking like a gigantic lava lamp, this townhouse in Basel, Switzerland calls to mind the psychedelic 60s – or maybe the carefree days of blowing bubbles in the backyard and watching them float toward the clouds.


    Want More? Click for Great Related Content on WebUrbanist:

    Bridging Home: House Wedged in an Alleyway by Do Ho Suh

    A tiny traditional Korean house is wedged between two more conventional buildings in Liverpool, England, in artist Do Ho Suh’s installation ‘Bridging Home.’
    1 Comment – Click Here to Read More
    »»


    Haunted House? The Abandoned Mansion of Steve Jobs

    Steve Jobs is known as the visionary head of Apple, but there were other facets to his life as well. This is the tale of his magnificent abandoned mansion.
    13 Comments – Click Here to Read More »»


    WebUrbanist

  • Kodak to exit consumer photography, while tech giants gang-up to buy patents

    PhotoPrinter.png

    Kodak has announced it will sell two of its business divisions, ending its role as a consumer-facing photographic company. The Personalized Imaging business includes print kiosks and consumer film, while the Document Imaging business includes scanners and commercial document management. Both businesses will be sold as going concerns. Meanwhile the Wall Street Journal has reported that many of the world’s biggest technology companies, including Samsung, Apple and Google, have formed a consortium to bid for Kodak’s digital imaging patents, significantly lowering the price the amount the sale is likely to raise.

    News: Digital Photography Review (dpreview.com)

  • Tipps zur Konzertfotografie mit Kitobjektiven

    Ein Beitrag von: Lothar Dornieden

    „Konzerfotos ohne lichtstarke Objektive sind nicht möglich.“ So lautet wohl die hinlänglich bekannte Meinung zum Thema Konzertfotografie. Doch auch mit üblichen Objektiven und Lichtstärken, die sich meist um Blende f/4 bis f/5.6 bewegen, lassen sich recht akzeptable Ergebnisse erzielen.


    110 mm, 1/250, f5.6, ISO 3200

    Probleme und Technik

    Beim Fotografieren von Konzerten gibt es im Allgemeinen zwei Hauptprobleme:

    • Wenig Licht mit stark wechselnden Lichtverhältnissen
    • Viel Bewegung auf der Bühne

    Hier sind dann in der Regel lichtstarke Objektive das erste Mittel der Wahl. Die sind aber aus unterschiedlichsten Gründen nicht immer zur Hand. Was jetzt? Auf den ersten Blick unterbelichtete oder verrauschte Fotos lassen sich im Nachinein durch gezielte digitale Nachbearbeitung zu einem guten Ergebnis korrigieren. Die digitale Nachbearbeitung der Fotos erledige ich fast ausschließlich mit Lightroom 3.


    55 mm, 1/160, f4.0, ISO 3200

    Meine eigene Ausrüstung

    • Nikon D5000
    • Objektive 18-55 mm (Blende f/3.5 – f/5.6)
    • 55-200 mm (Blende f/4 – f/5.6)

    Je nach Lichtsituation (Open Air mit Tageslicht, Hallenkonzert, Clubkonzert, etc.) und dem eigenen Standort (im Publikum oder im Fotograben) fange ich meistens mit ISO 800 an und erhöhe diesen Wert dann entsprechend der Lichtverhältnisse schrittweise weiter nach oben (1200, 1600 oder 3200). Im Extremfall gehe auch schon einmal auf ISO 6400, aber dann rauscht es meistens doch sehr stark.

    Die Blende habe ich normalerweise immer so weit wie eben möglich geöffnet. Wenn es das Licht erlaubt, blende ich aber trotzdem ein wenig ab. Somit besteht nicht die Gefahr, dass man die falschen Stellen fokussiert.


    110 mm, 1/200, f7.1, ISO 3200

    Die Kamera ist im manuellen Modus, sodass ich dann die Belichtungszeit während des Fotografierens wählen und kontrollieren kann. Dabei versuche ich, eine Verschlusszeit von 1/125 oder 1/100 Sekunde möglichst nicht zu unterschreiten. Ich habe aber auch schon mit Belichtungszeiten von 1/30 Sekunde recht akzeptable Ergebnisse erzielt. Es kommt nun einmal immer darauf an, wie ruhig das Motiv vor der Kamera ist. Allerdings braucht das ein wenig Übung und vor allem eine ruhige Hand.

    Die Belichtung darf auch, falls nicht anders möglich, schon einmal eine bis drei Belichtungsstufen unter dem vom Belichtungsmesser vorgeschlagenen Wert liegen. Da ich immer im Raw-Format fotografiere, lässt sich diese Unterbelichtung in der Nachbearbeitung zumeist in gewissem Maße recht gut wieder ausgleichen.


    165 mm, 1/30, f5.6, ISO 6400

    Nachbearbeitung mit Lightroom 3

    Nachdem ich die Fotos in Lightroom 3 importiert habe, geht es ans an die eigentliche digitale Nachbearbeitung. In der Regel verändere ich dann hier hauptsächlich die folgenden Werte, um einem Foto mehr Farbe und Ausdruckskraft zu geben, um Unterbelichtungen auszugleichen und um gegebenenfalls einen Grauschleier zu entfernen.

    • Belichtung
    • Aufhelllicht
    • Schwarz
    • Luminanz zur Rauschentfernung

    Bei Fotos mit einem sehr starken Orangestich, der meist dann entsteht, wenn das Foto zu stark unterbelichtet wurde, versuche ich, diesen durch Anpassung der Farbtemperatur im Bereich Grundeinstellungen im Entwicklungsmodul in Lightroom 3 auszugleichen. Bei Aufnahmen mit starkem Rauschen entferne ich dieses anschließend über die Luminanz im Bereich Details im Entwicklungsmodul von Lightroom 3. Hier ist aber Vorsicht geboten, damit das Foto dabei nicht zu sehr seinen natürlichen Charakter und Schärfe verliert.

    Ein Bearbeitungsbeispiel aus der Praxis

    Das Originalfoto öffne ich in Lightroom und wechsle in das Modul „Entwickeln“. Das hier gezeigte Foto ist mit den Einstellungen 82 mm, ISO 2500, 1/100 sek., f/4.2 entstanden.

    Zuerst habe ich die Farbtemperatur von 2950 auf 2092 reduziert, um den deutlich sichtbaren Orangestich zu reduzieren.

    Im nächsten Schritt habe ich nun die Belichtung für etwas mehr Helligkeit auf + 0,40 erhöht.

    Die Erhöhung des Schwarzwertes auf 24 bringt etwas kräftigere Farben und reduziert einen möglicherweise bestehenden Grauschleier. Das Aufhelllicht auf 43 hellt die durch den vorherigen Schritt zu sehr abgedunkelten Stellen wieder auf.

    Durch Erhöhung der Rauschreduzierung auf 24 in der Luminanz wird das Rauschen im Foto reduziert.

    Um den Blick mehr auf den Mittelpunkt des Fotos zu lenken und dabei den Musiker noch mehr in den Fokus des Interesses zu stellen, habe ich hier zum Schluss noch „Vignettierung nach Freistellen“ auf -43 eingestellt.


    82 mm, 1/100, f4.2, ISO 2500

    Die ausgewählten Werte der einzelnen Einstellungen sind keine festen Werte, die ich bei jedem Foto so verwende, sondern ich wähle diese individuell von Foto zu Foto immer wieder neu, frei nach Augenmaß. Der grundsätzliche Weg der Bearbeitungsschritte ist aber fast immer der oben gezeigte.

    In Fällen, bei denen die Beleuchtungsverhältnisse vor Ort sehr ungünstig sind – beispielsweise, wenn die Bühne dauerhaft in orange oder rot ausgeleuchtet wird oder wenn ich sehr hohe ISO-Werte verwendet habe – lässt sich durch Konvertierung nach Schwarzweiß auch aus diesem Material in vielen Fällen noch ein sehr ansprechendes Ergebnis machen. Hier gibt das Rauschen, das ich dann auch nicht versuchen würde, vollständig aus dem Foto zu entfernen, diesem zusätzlich noch einen gewissen künstlerischen Reiz.


    200 mm, 1/160, f5.6, ISO 6400

    Nehmt doch beim nächsten Konzert Eure Kamera mal mit und probiert das oben Gezeigte ein wenig aus. Mit etwas Geduld solltet Ihr dann recht schnell zu wirklich brauchbaren Ergebnissen kommen. Mit der Zeit findet man auch immer wieder neue kleine Tricks heraus, um aus den Fotos noch ein klein wenig mehr herauszuholen.

    Wenn Ihr zu dem Thema noch Fragen oder selbst weitere Tipps auf Lager habt, so würde ich mich freuen, wenn Ihr diese hier als Kommentar hinterlasst. Bei Interesse findet Ihr weitere Konzertfotos von mir auf meinem Fotoblog.

    Viel Spaß beim Bearbeiten Eurer Konzertfotos!


    kwerfeldein – Fotografie Magazin

  • Transforming Decor Reveals Secrets via Spills, Wear & Tear

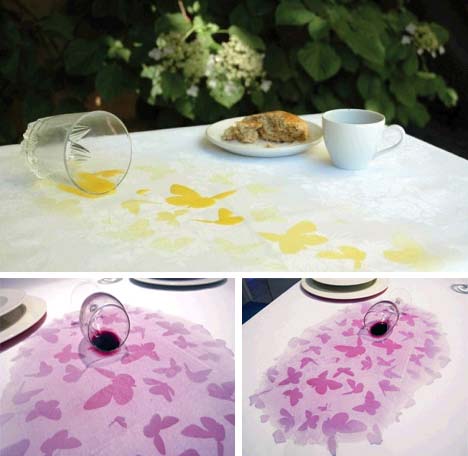
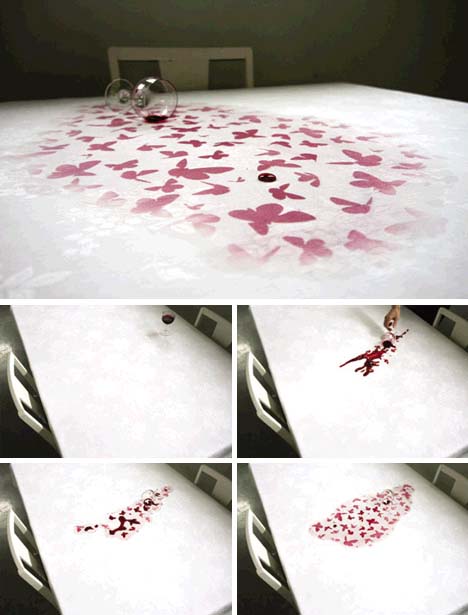
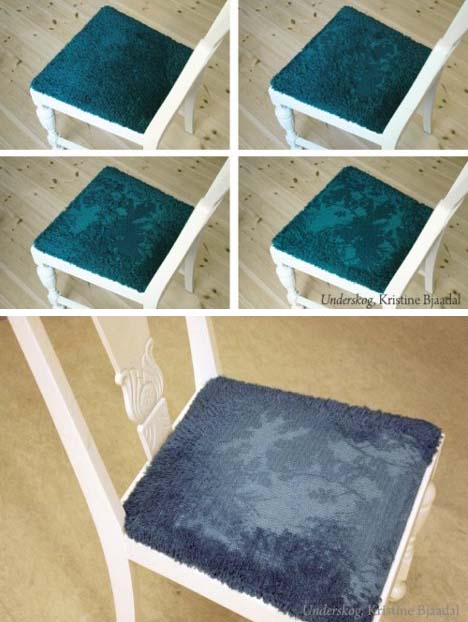
    Kristine Bjaadal creates objects with hidden stories to tell – everyday objects with secret tales shown only under strange circumstances, such as tabletop spills or time-worn seating.

    A small change making a big impact on the future is known as the butterfly effect. In this case, the accidental tipping of a glass reveals a flock of butterflies lying invisible but in wait right on your tablecloth, titled Underfull.

    Or consider the inevitability of fabric wearing thin on your favorite upholstered chair – what if that almost-invariably negative process were turned into something positive, via, say, a pattern that emerges as the surface material layer gets slowly stripped away, named Underskog.

    Along similar lines, but requiring less time (but perhaps some until you or your guest notices it), are these so-called Undertone dishes with out-of-sight rings of color below their raised edges. It is only when picked up – or better yet: spotted in reflection on the top of a table – that these tones become clearly visible.


    Want More? Click for Great Related Content on WebUrbanist:

    Wild Wallpaper: Interactive Decor You Can Rip & Color

    Hanging wallpaper is made much more fun when you get to paint and peel it, revealing intricate geometric patterns that won’t be found on any other wall.
    Click Here to Read More »»


    10 (More) Pieces of Clever Transforming Furniture: From Tetris Tables to Rooms in a Box

    Be sure to scroll all the way down: the best (pictured briefly above) has been saved for last!
    98 Comments – Click Here to Read More »»


    WebUrbanist

  • Wide Angle: Weekly Photography Challenge

    This week your photographic challenge is to take and share a picture taken with the widest available focal length to you.

    Wide-Angle-Lens-1-1Photo by WanderingtheWorld – 10mm

    This challenge builds upon our recent tutorial – 7 Ways to Get More out of a Wide-Angle Lens which gives some practical tips on shooting this way. While not everyone has a true wide-angle lens to shoot with we challenge you to use whatever you have available. If your camera has a zoom lens – resist the temptation to zoom in this week and shoot as much as you can at the wider end of the zoom.

    A few other posts that might help you tackle this wide angle challenge include:

    • Using Wide Angle Lens Distortion Creatively
    • 17 Amazing Wide Angle Images
    • 6 Winning Ways to Work Wide
    • How to Get the Best Results from Ultra-Wide Lenses
    • Wide, Wider, Widest – Wide Angle Photography

    Once you’ve taken and selected the ‘Wide Angle’ image that you’d like to share – upload it to your favourite photo sharing site or blog and either share a link to it or – embed them in the comments using the our new tool to do so.

    If you tag your photos on Flickr, Instagram, Twitter or other sites with Tagging tag them as #DPSWIDE to help others find them. Linking back to this page might also help others know what you’re doing so that they can share in the fun.

    Also – don’t forget to check out some of the great shots posted in last weeks challenge – Green challenge where there were some great shots submitted.

    I’m looking forward to seeing your shots!

    Post originally from: Digital Photography Tips.

    Check out our more Photography Tips at Photography Tips for Beginners, Portrait Photography Tips and Wedding Photography Tips.

    Wide Angle: Weekly Photography Challenge


    Digital Photography School