Why are Oranges … Orange ?
White balance can be a tricky subject to master and as a beginner I found both the concept and application difficult. Getting to grips with white balance was a landmark in my early learning, gone were the days of funky looking indoor shots and chilly looking portraits, from then on the world of warm sunsets and natural skin tones lay at my feet. It’s amazing how different an image can look with and without white balance correction applied and consequently the impact on your images can be profound. The basics of white balance adjustment are relatively simple, what takes more time is training your eye to know when you’ve got it right. In doing this you will not only improve the quality of your images but will also save a whole load of time. Here to help you is a basic run down of practical white balance.
What is White Balance?
Despite what we see the actual colour of light is hugely variable. The fact that we generally don’t perceive these shifts in daylight colour is testament to the incredible job the human eye and brain does in adjusting how we see. Our cameras on the other hand are at best dumb instruments and need to be told what colour the light we are shooting is. Ever take a shot of a landscape, but was disappointed to find that the final scene looked orange? Ever used some fill flash for a portrait only to discover the subject to has a blue cast? All of these problems can be fixed using good white balance correction.
Who is this Kelvin Dude?
The colour (sometimes called the ‘temperature’) of light is measured using the ‘Kelvin Scale’. The scale itself was discovered using clever physics experiments, which looked at the wavelengths of light produced by heating black objects to different temperatures. Its definitely useful to know that there is a scale for measuring white balance but all you really need to remember is that the lower numbers equal warmer or redder light with higher the numbers relating to cooler or blue light. Importantly you shouldn’t worry about remembering any of this, its useful knowledge to have but to date I have never needed to know the exact white balance setting of my camera so I doubt you will do either.
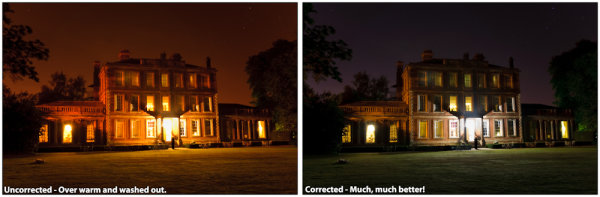
See the difference?
In Camera White Balance
The exact method for setting white balance varies from camera to camera but generally the fastest way to do this is by using one of the standard preset values. Simply dial in the white balance correction and hey presto your camera is instantly seeing in a different colour light.
You can pretty much set any specific white balance value you like however in the vast majority of situations the presets are more than adequate. Given that you can fix pretty much anything in post processing why bother doing anything in camera at all? You might be tempted to place your trust in your cameras ‘Auto White Balance’ feature and whilst its tempting, the applied white balance can shift noticeably from shot to shot and wont necessarily get it 100% right either. Imagine having to adjust the white balance on your whole set of holiday snaps, not great.
So now you’re convinced, here to help you is a run down of the major presets and when to use them:
- Auto White Balance – Basically handing over the white balance correction to the computer in your camera. In the main pretty good but is set each shot so can change from picture to picture. Good to use if you are in a hurry.
- Daylight – A nice mid temperature setting for use in normal daylight.
- Cloudy/Indoors – For use in slightly cooler conditions (e.g. an overcast day), has the effect of warming the image up just a bit.
- Shade – For coller light than the cloudy setting (e.g. dusk or early mornings), warms up the image much more than either daylight or cloudy. Can also be good for adding extra warmth to normal conditions.
- Incandescent – Great for indoor shots under artificial lights (e.g. from non flourescent bulbs which can be very warm). Cools down the image.
- Fluorescent – For use under strip light conditions, will warm up the image to compensate for the cold and slightly green light produced by these sources.
- Flash – Warms up light from flash guns which is cool but more blue than flourescent light.
Post Processing
The ability to accurately apply white balance correction is one the major advantages of shooting in RAW format. If you don’t know about or don’t shoot in RAW format, don’t worry you can still make adjustments to other image types albeit not with quite as much flexibility.
For RAW images you have the option to either select one of the available preset values (which will be the same as those available in your camera) or if you wish make a manual adjustment.
Manual White Balance Adjustments
Learning to manually adjust white balance is a great skill to practice as it’s probably the best way to train your eye to recognize the ‘right’ white balance value. The actual adjustment is fairly simple and uses only two controls (although the method for adjusting these will vary according to your post processing software):
- Temperature – How warm or cold the image is, think of this as adding orange or blue to the shot.
- Tint – Basically how much green or pink is in the image.
Here is a three step recommendation for manually adjusting white balance. Don’t forget you can select a preset value first and then ‘fine tune’ the result manually afterwards.
- Adjust the temperature of the shot, ask yourself is the image too warm or too cold and increase/decrease the temperature value accordingly.
- Adjust the image tint, does it look took green or too pink? Look for objects in the image to help you judge this. Good references are skin tones which can either look a bit flush or green round the gills if not corrected properly.
- Compare the before and after image (most software will let you turn the white balance correction on and off). Repeat if necessary.
Don’t forget there is no such thing as a right or wrong white balance, if the shot looks how you want it to then that’s good enough.
Generally white balance corrections can also be applied in batches so if you find a setting which works well and all the shots have been taken in the same light using the same settings you can save a lot of time by applying corrections in bulk.
Conclusion
No matter how you do it, making sure you pay attention and manage the final white balance of your shots is an incredibly powerful way to improve the feel and look of your photos. So much of the mood and drama of a photo is conveyed through the colour and quality of light captured and therefore taking those extra few moments to get it right is well worth the trouble. Despite what you may have been told you, getting this right either in camera or postproduction needn’t be a trauma. Hopefully the few hints and tips in this post should point you in the right direction and could make the difference between your next shot leaving you red faced or feeling blue.
Post originally from: Digital Photography Tips.
Check out our more Photography Tips at Photography Tips for Beginners, Portrait Photography Tips and Wedding Photography Tips.
Practical White Balance and Why You Should Learn It!


Digital Photography School