Blog

  • 6 Must-Have People Shots to Capture When Photographing Corporate Events

    Corporate events may not be every photographer’s dream, but they can certainly be interesting and maybe even fun depending on the assignment. As a freelance event photographer, about half of my shoots are corporate events, and they are among my favorite things to shoot. There’s always lots to learn from the speakers at these events, and they tend to be relatively easy gigs to shoot if you use a pre-planned shot list and know what to look for. This article details the six key people shots that you absolutely must focus on when photographing corporate events.

    #1: Posed shots of VIPs

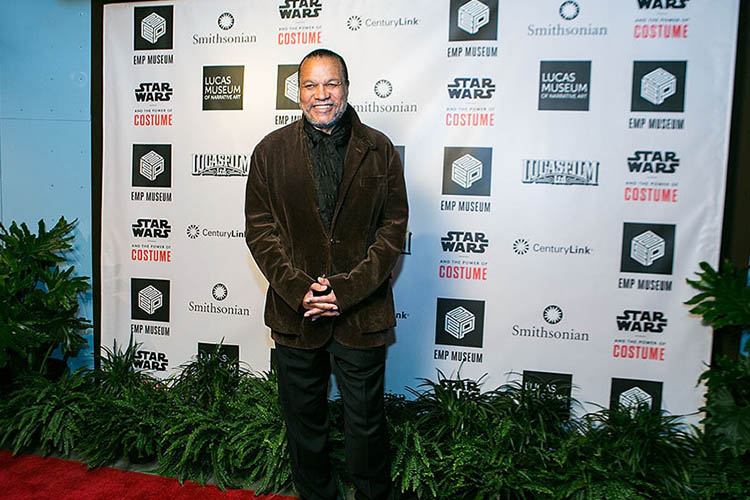
    Every corporate event will have its own form of VIPs, and your client will definitely want lots of images of them. Larger events will typically have recognizable local or national celebrities as their designated VIPs, while smaller events may have harder to recognize internal executives as their VIPs. Either way, it’s important to check with your client ahead of time to get a list of their VIPs in attendance, and ideally someone on-site who will help you identify them. Always make sure you understand the perimeters of photographing these VIPs as some, particularly celebrities, can be image-conscious. Whenever possible try to get posed shots of these VIPs with signage in the background that shows proof that they were present at your particular event.
    Seattle Corporate Event Photographer

    Actor Billy Dee Williams posing at a step-and-repeat.

    #2: Posed and action shots of keynote speakers

    Corporate events typically include keynote speakers who may or may not be the VIPs described above. Before you start shooting, grab ahold of the event program, and find out who are the keynote speakers. Work with your client to arrange posed shots of the keynote speakers both alone and posed with VIPs. Also, don’t forget to get plenty of shots of the keynote speaker, from a variety of angles, giving his or her speech.

    Sattle Corporate Event Photographer

    Actor and activist George Takei giving a keynote address.

    #3: Candid shots of VIPs and Keynote speakers

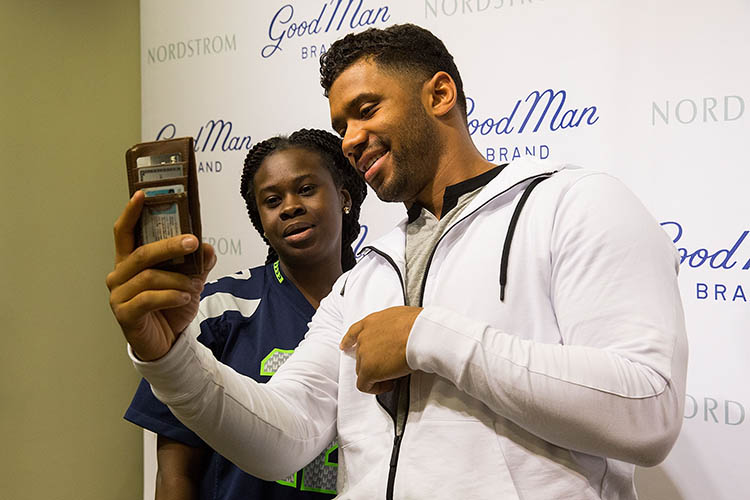
    In addition to getting posed shots of VIPs and keynote speakers, it’s also important to get candid shots of them interacting with each other, or event attendees. Depending on the nature of the event, these opportunities could include book signings, meet and greets in the green room, or an organized step-and-repeat photo booth. These days, many candid shots of VIPs will include selfies with guests, which can be a challenge to capture, so be prepared for that!
    Seattle Corporate Event Photographer

    Seattle Seahawks quarterback Russell Wilson posing for a selfie with a fan.

    #4: Posed shots of attendees

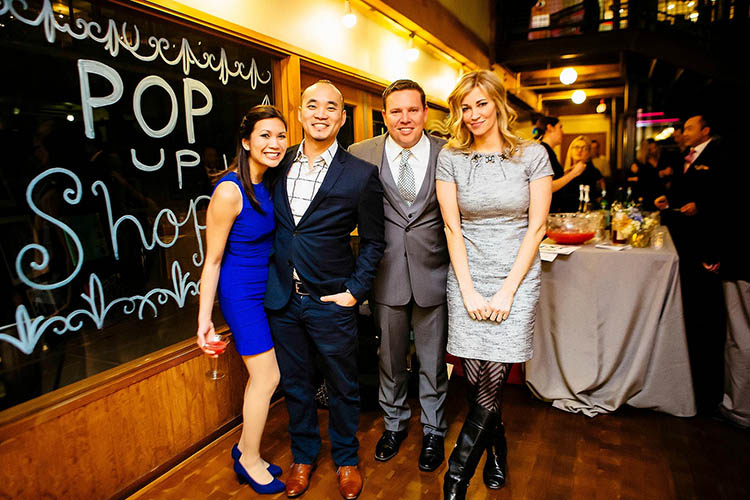
    Depending on the type of event you’re photographing, most attendees will be looking their absolute best and will want photos of themselves. Always be on the lookout for well-dressed and energetic event attendees, and don’t hesitate to approach them to ask for a posed photo. Along these lines, it’s also not unusual to have at least one event attendee who doesn’t want to be photographed. Sometimes, you’ll be made aware of this by your client, and other times the attendee will explicitly tell you themselves. Either way, respect the wishes of the attendees, and definitely do not photograph someone who doesn’t provide consent.
    Seattle Corporate Event Photographer

    Corporate event party attendees.

    #5: Candid shots of attendees interacting

    Most corporate events are held for two main reasons: to give keynote speakers chances to educate and address an audience, and to allow for networking among attendees. Always be on the lookout for attendees chatting or interacting with each other, and get their reactions while they are listening to keynote speakers. Ideally, make sure these shots incorporate some form of your client’s branding materials, such as a brochure or sign, to give the photos context.

    #6: Full room shots

    A final type of corporate event photo that almost every client will request are shots that show off how many attendees were present at an event. This can be tricky depending on the type of venue you are photographing at, and whether or not the event is actually well-attended. Addressing these two challenges can usually be solved in one of two ways:

    a) Get a bird’s eye view

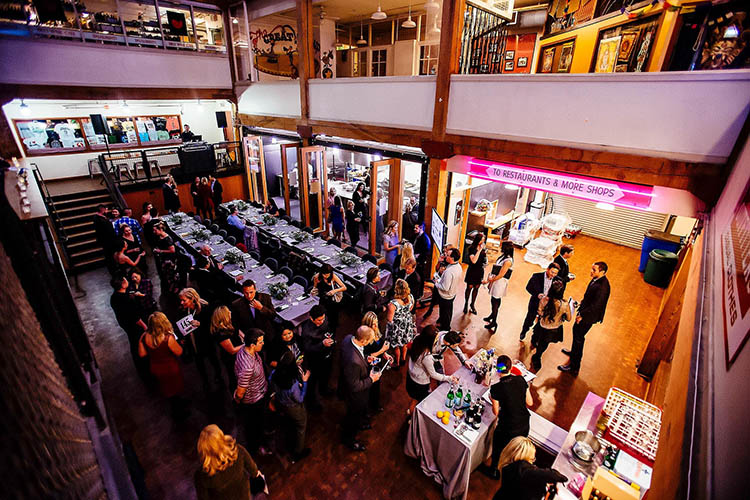
    Try to get access to a ladder, stool, balcony, or some vantage point within the venue that will let you shoot from overhead and capture wide-angle shots showing a full room. If the room isn’t really that full, try to find angles or special crops that still hint at a room being moderately full. Your client will appreciate the extra effort.
    Seattle Corporate Event Photographer

    Shooting from up high to show a different vantage point.

    b) Get up close and personal

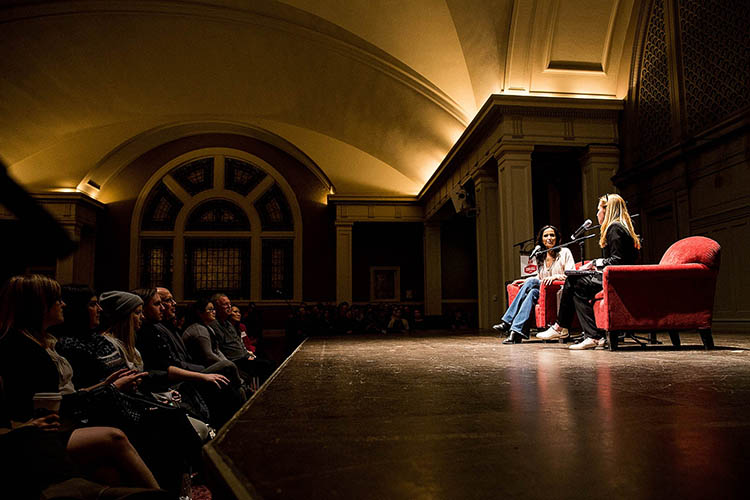
    Whenever possible, I always ask my client to make sure that the first several rows of seats or tables at an event are packed with as many people as possible. This way, I can always make an event feel well-attended, even when it’s not. The approach in this case is to avoid wide-angle shots and shoot as close to the stage or from wherever the keynote address is being made, including as many rows or tables of people as possible.
    Seattle Corporate Event Photographe

    This was actually a well-attended event, but an example of how to shoot up close with attendees in the frame.

    In Conclusion

    These are just several types of photos to always capture when photographing a corporate event. Above all, it’s important to understand why clients hire corporate event photographers in the first place. Typically, the reasons involve showing visual documentation of special people who were at the event, the fact that the event was well-attended, and the fact that event attendees were engaged and enjoyed themselves. Always keep these overall goals in mind when photographing an event and be sure to snap photos that help you and your client meet these overall objectives.

    People photography week

    This week on dPS we’re featuring articles all about different kinds of people photography including portrait, event and travel photography. See all the previous ones below, and watch for more people photography articles over the next few days.

    • How to Take Low Key Head-shots
    • How to Do a One Light Portrait Setup and Use it as Your Back-up Plan
    • Travel People Photography – Tips and Pitfalls
    • 8 Tips for Photographing Men
    • 24 Diverse Images That Showcase People Photography
    • Weekly Photography Challenge – People Photography
    • Tips for Getting Yourself to Relax as a Photographer and Have More Successful Portrait Sessions
    • 5 Good Reasons to Add People into Your Landscape Photography

    googletag.cmd.push(function() {
    tablet_slots.push( googletag.defineSlot( “/1005424/_dPSv4_tab-all-article-bottom_(300×250)”, [300, 250], “pb-ad-78623” ).addService( googletag.pubads() ) ); } );

    googletag.cmd.push(function() {
    mobile_slots.push( googletag.defineSlot( “/1005424/_dPSv4_mob-all-article-bottom_(300×250)”, [300, 250], “pb-ad-78158” ).addService( googletag.pubads() ) ); } );

    The post 6 Must-Have People Shots to Capture When Photographing Corporate Events by Suzi Pratt appeared first on Digital Photography School.
    Digital Photography School

  • Create a Photography Business Marketing Plan in 3 Days (+ Save $30 Instantly)

    Starting a photography business these days is quite a challenge. It takes courage. You need to push yourself constantly to go out of your comfort zone and learn a whole pack of new things. While there are no shortcuts to success, there are accelerated ways. Read on to learn about one of them and build a photography business marketing plan Continue Reading

    The post Create a Photography Business Marketing Plan in 3 Days (+ Save $ 30 Instantly) appeared first on Photodoto.


    Photodoto

  • 5 Good Reasons to Add People into Your Landscape Photography

    Are you looking for a way to spice up your landscape photography? Many times when we think of making great landscapes image,s we try not to include people. Sometimes we even wait for long periods of time for other sightseers (or other photographers) to exit our view. There are many times this is the best technique for shooting a landscape photo, but adding the human element to a scene can be just the extra touch needed to create a great image. Let’s take a look at 5 reasons to add people to your landscape images.

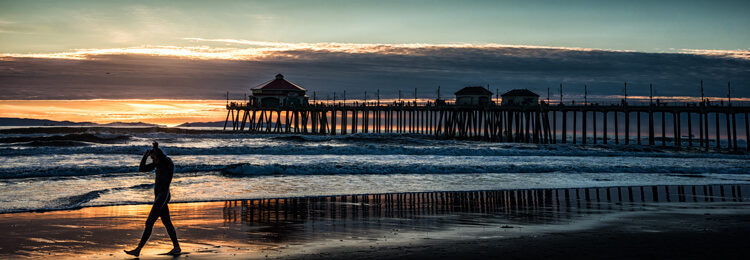
    Sometimes breaking the rules can work. Here the man walking out of the image seems to work with the image of the end of the day on the beach.

    This surfer is done for the day. Normally it is preferable that a person faces into the photo, but exceptions may work too.

    #1 Tell a Story

    Adding a person to your landscape can help your image tell a story. People, or even a single individual, may add mystery and adventure to your landscape, causing your viewers to wonder who, what, and why about the person in your image. When your viewers ask these questions, their eyes will stay engaged with your image, adding entertainment value to the photo. An image of a person standing in front of a grand mountain range may cause the viewer to wonder what that individual is doing there. If the person has a backpack and a walking stick, the viewer may imagine a hike in the mountains is about to commence. Or maybe the person in your shot is carrying a rifle and wearing camouflage, leading the viewer to imagine a hunter heading into the woods in search of adventure. A person can be the subject of the image or interact with the landscape of the image; but either way, if the person fits into the image’s story, your landscape will draw the viewer in and the photo will tell a successful tale.

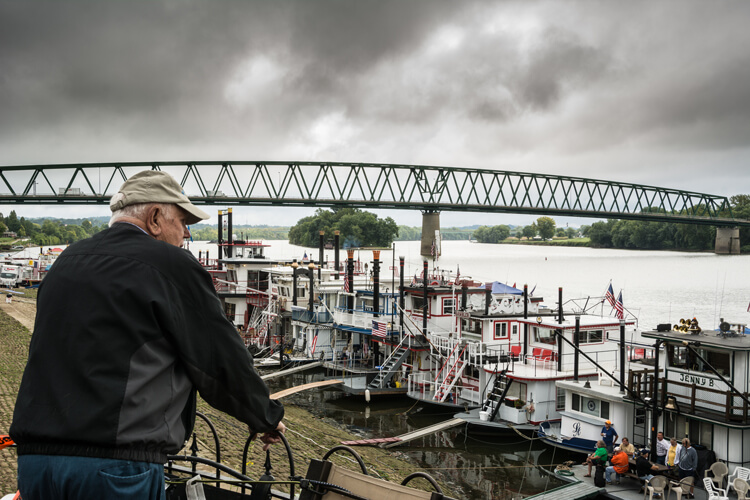
    This image seems to tell the story of a man thinking about the yester-years working on a river boat.

    This image tells the story of a man thinking about his former career working on a river boat.

    #2 Composition

    Placing a person or persons in an image in negative space can add balance to your landscape. A person in the foreground, or mid-way into your scene, will help create a sense of depth in the image. When you have the opportunity to position the person, take care to place them in the image in a way that draws the viewer into the image. Place your subject off to the side, preferably on a rule of thirds point, with them facing into the open space. It is almost never a good idea to have a person looking or facing out of your image, as this will cause a viewer’s eye to leave the image rather than explore the image fully. Nevertheless, with every rule of composition there are exceptions that will work. Knowing the rules of composition, when to use them, and when to break them, will help you when adding a person to your image.

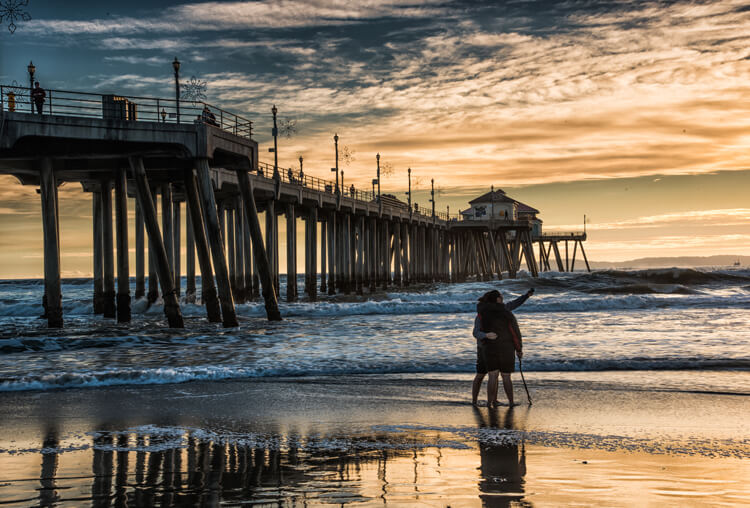
    The couple taking a selfie is placed in a rule of thirds position and fills a negative space on the beach.

    This couple taking a selfie is placed in a rule of thirds position, and fills a negative space on the beach.

    #3 Scale of Size

    Adding a human to an image is a great way to reveal the size and scale of objects in your image. Without the person in many images, objects like trees and rocks may lack a scene of scale. The addition of a person immediately gives your viewer a point of reference and scale to the landscape.

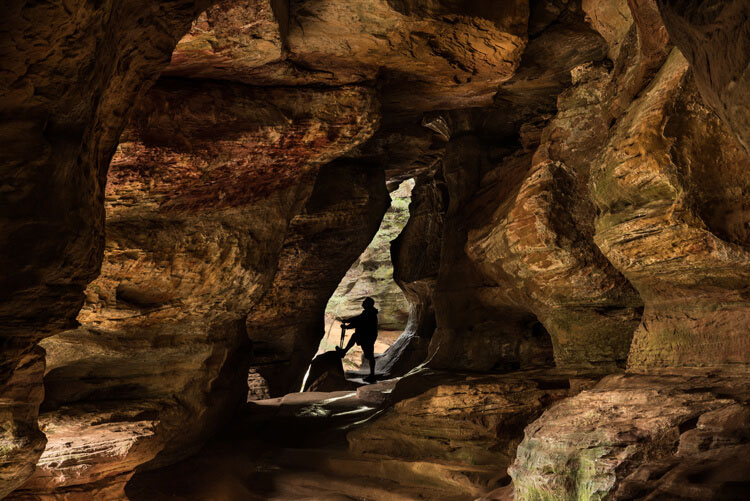
    In this image of Rock House in Hocking Hills State Park in Logan Ohio adding the Silhouetted figure at the end of the cave adds a sense of scale and also adds a focal point to the image.

    Adding the silhouetted figure at the end of the cave gives a sense of scale and also adds a focal point to the image.

    #4 Drama and Excitement

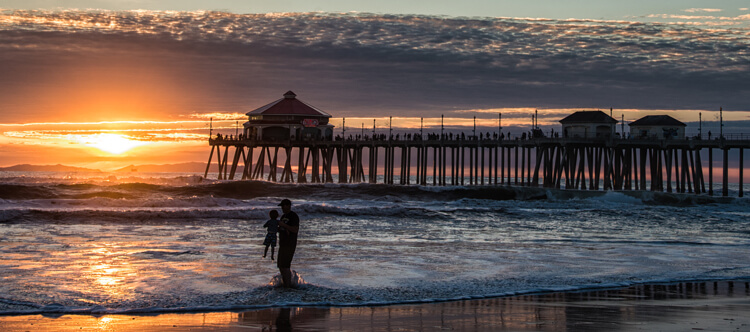
    Silhouetting someone against a sunset or other backlit view, is a perfect example of how a person can help create a more dramatic image. Even the simplest of landscapes can become more interesting and exciting by adding people within the image. Photographing a couple holding hands as they interact with the landscape can add the drama of romance to your image.

    This image tells a story of a Father and son playing in the surf at sunset. The sillouhetted figures add drama to an image that could just be another sunset at the beach.

    A silhouetted father and son playing in the surf at sunset add drama to an image that would otherwise be just another sunset along the shore.

    #5 Focal Point

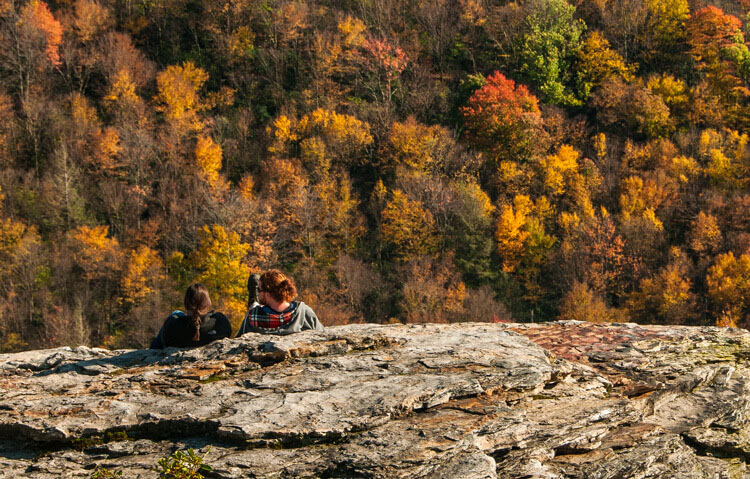
    A successful photo needs a focal point that gives the viewer’s eye a place to land to hold their attention, and adding people can achieve that. It is important to add a point of interest that will change a boring landscape into a striking one. Most landscapes have natural features or buildings as a point of focus, but adding a person can sometimes make for a much more interesting image. As mentioned earlier, at times you may have negative space in the foreground of your landscape, and by adding a person into your scene that negative space is filled, and your image will benefit from the balance. As a focal point, the person in your image can be the subject of the scene, or a complement to your landscape.

    A couple sitting on a rock enjoying the Autumn view adds a romantic drama to the fall colors of the West Virginia Mountains

    This couple sitting on a rock enjoying the fall color,s placed on the rule of thirds, creates romantic drama.

    Tip: When adding a person or persons to your landscape, try to keep their face (s) obscure. This will allow the viewer to imagine themselves as the participant in the image.

    Conclusion

    Many times adding a person to your landscape image can be as serendipitous as people just wandering into your viewfinder, especially if you are visiting a park or popular scenic area. But if you are out alone in an interesting area, use yourself as the person in the scene. Place your camera on a tripod, set the timer, then add yourself into the image. Next time you are engaged in a landscape photo shoot, look for opportunities to add one or more persons to one of your images, and see if you like the results. You may be surprised at the difference you see.

    Many landscape locations are powerful enough to stand on their own, but if your image needs a little spice, try adding a human. What other kinds of landscape scenarios do you think could benefit from adding a person to create a more interesting image? Leave your ideas in the comments below.

    People photography week

    This week on dPS we’re featuring articles all about different kinds of people photography including portrait, event and travel photography. See all the previous ones below, and watch for more people photography articles over the next few days.

    • How to Take Low Key Head-shots
    • How to Do a One Light Portrait Setup and Use it as Your Back-up Plan
    • Travel People Photography – Tips and Pitfalls
    • 8 Tips for Photographing Men
    • 24 Diverse Images That Showcase People Photography
    • Weekly Photography Challenge – People Photography
    • Tips for Getting Yourself to Relax as a Photographer and Have More Successful Portrait Sessions

    googletag.cmd.push(function() {
    tablet_slots.push( googletag.defineSlot( “/1005424/_dPSv4_tab-all-article-bottom_(300×250)”, [300, 250], “pb-ad-78623” ).addService( googletag.pubads() ) ); } );

    googletag.cmd.push(function() {
    mobile_slots.push( googletag.defineSlot( “/1005424/_dPSv4_mob-all-article-bottom_(300×250)”, [300, 250], “pb-ad-78158” ).addService( googletag.pubads() ) ); } );

    The post 5 Good Reasons to Add People into Your Landscape Photography by Bruce Wunderlich appeared first on Digital Photography School.

    Digital Photography School

  • Shunned Shine State: 10 More Abandoned Wonders Of Florida

    [ By Steve in Abandoned Places & Architecture. ]

    abandoned-florida-1a
    Florida may be America’s Sunshine State but these odd abandoned wonders reveal a darker side to the land of oranges, alligators and retirement communities.

    abandoned-florida-1b

    abandoned-florida-1d

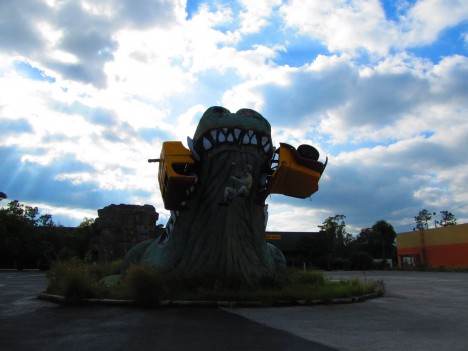
    Speaking of ‘gators, who ever thought that primeval, carnivorous reptilian monsters would make an alluring and enduring tourist trap? Lotsa folks, actually, though often as not their efforts were unsuccessful – more on that later. Jungleland Zoo in Kissimmee, Florida was one such failed alligator-themed attraction. Originally established in the 1970’s as “Alligator Safari Zoo”, the place changed both its name and its management in 1995.

    abandoned-florida-1c

    abandoned-florida-1e

    The more things change, the more they stay the same… such was the case with Jungleland. Criticism from state and federal wildlife and animal welfare agencies punctuated by the widely-publicized escape of a 450-lb lioness led the the place being shut down and abandoned in 2002. The 126-foot long alligator statue which stood in front of the on-site Gator Motel was demolished in October of 2014. Flickr user amysusanne’s photo set dating from August of 2012 allows us to recall the singular glory of an enormous artificial alligator eating a car.

    Heart Of Glass

    abandoned-florida-2a

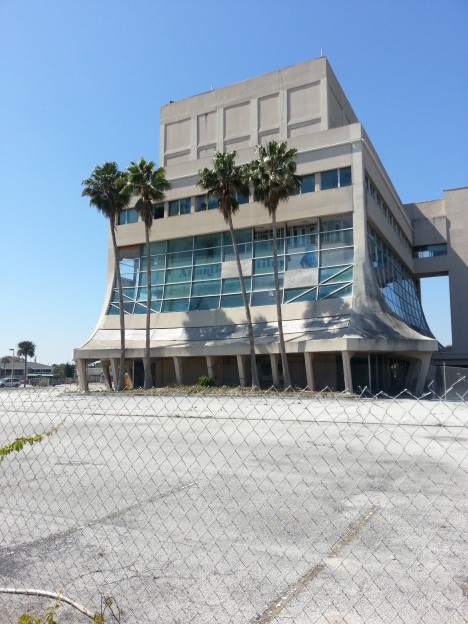
    Let the Space Age begin! The First Federal Savings and Loan Association of Cocoa, Cocoa Beach Branch opened in 1962 and featured the Sky Room restaurant – a likely hangout for Major Nelson and Jeannie.

    abandoned-florida-2b

    abandoned-florida-2c

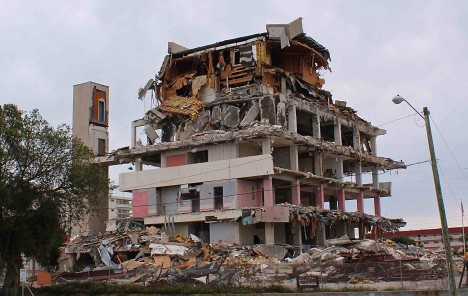
    Dreams must confront reality sometime, however, and in 2004 Hurricane Frances damaged the Glass Bank‘s lower floors so severely it never re-opened. Shattered windows enabled ingress by vandals and encouraged the spread of toxic mold. By 2014 the City had had enough: demolition (watch it here) was approved and within a year this iconic building was no more.

    Flying Saucerful Of Secrets

    abandoned-florida-3a

    abandoned-florida-3b

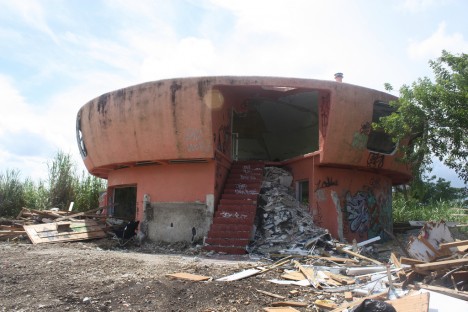
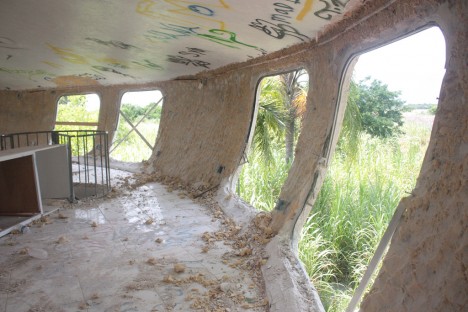
    The so-called “Alien House” in Homestead, Florida, was built in 1974 – purportedly by a big-time drug trafficker whose cover was being a big-cat exotic animal importer. Sounds legit!

    abandoned-florida-3c

    abandoned-florida-3d

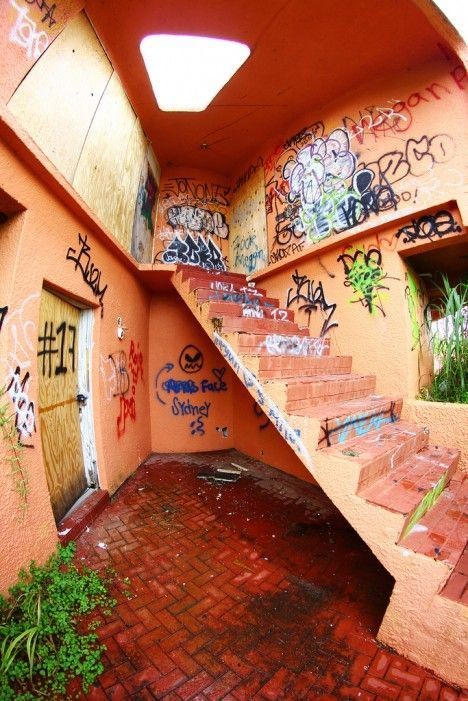
    The house was purchased by a doctor from New York shortly before Hurricane Andrew struck in 1992; the powerful storm rendered the unconventional abode uninhabitable by man or beast. The structure then sat abandoned, accumulating an abundance of graffiti, until late 2013 when it was finally demolished.

    To The Bat Tower!

    abandoned-florida-4a

    abandoned-florida-4c

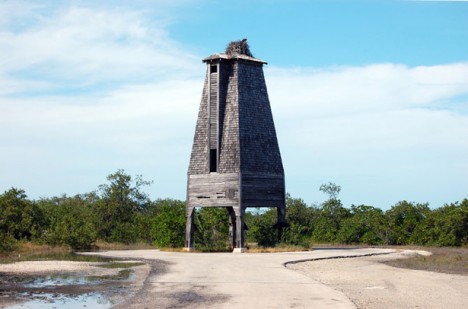
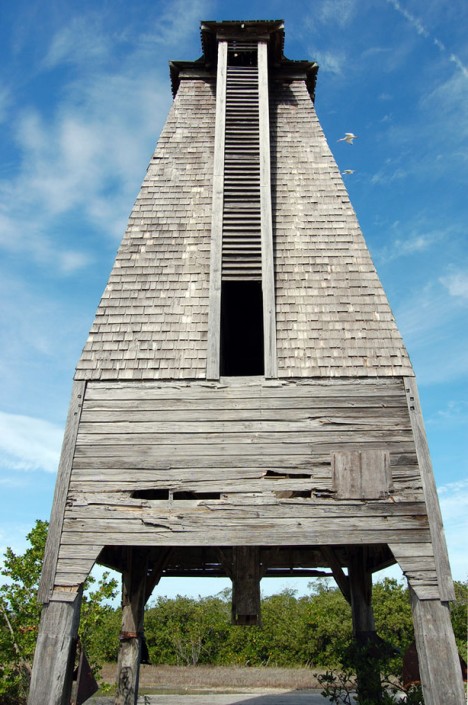
    When the late great Robert Burns wrote “the best laid schemes of Mice and Men oft go awry, leaving us nothing but grief and pain,” he could have been describing the sad saga of the Sugarloaf Key Bat Tower (also known as the Perky Bat Tower) in Monroe County, Florida.

    abandoned-florida-4b

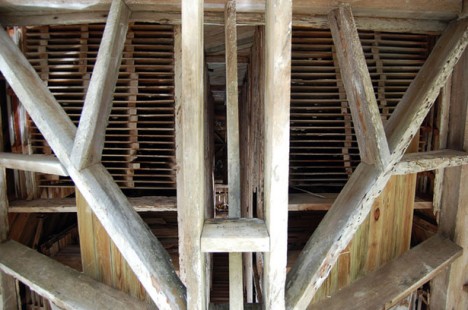
    Built in 1929 at a (for the time) staggering cost of $ 10,000 in a well-meaning effort to house mosquito-eating Mexican Free-Tailed bats, the 30-foot-tall tower was immediately abandoned by the hundreds of bats procured to stock it. Great depression then ensued – in more ways than one. Over 80 years later the still bat-less tower still stands on Sugarloaf Key, mocked by man and mosquito alike.

    Next Page – Click Below to Read More:
    Shunned Shine State 10 More Abandoned Wonders Of Florida

    Share on Facebook


    [ By Steve in Abandoned Places & Architecture. ]

    [ WebUrbanist | Archives | Galleries | Privacy | TOS ]


    WebUrbanist

  • Quick Intro to the New Sony Cyber-Shot RX10 Mark III

    At the end of March (2016) Sony released the new version of their Cyber-shot RX10 Mark III. The main difference between it and its predecessor, the Mark II, is the lens, which is a lot longer. Let’s take a quick look at its main features:

    • 24-600mm f/2.4-4 zoom lens with 3 control rings for focus, zoom and aperture
    • 4K video quality
    • Fast autofocus
    • Magnesium alloy body

    This video from B&H photo will show you what the new camera looks like, check it out.

    This video by Chakru shows some of the key features and specs:

    If you are a travel photographer and want to go light, this might be a good option for you. Or maybe even as a a backup camera to a heavy pro SLR. Perhaps an upgrade from a point and shoot camera is in order, give it a go and see if this is the right one for you.

    googletag.cmd.push(function() {
    tablet_slots.push( googletag.defineSlot( “/1005424/_dPSv4_tab-all-article-bottom_(300×250)”, [300, 250], “pb-ad-78623” ).addService( googletag.pubads() ) ); } );

    googletag.cmd.push(function() {
    mobile_slots.push( googletag.defineSlot( “/1005424/_dPSv4_mob-all-article-bottom_(300×250)”, [300, 250], “pb-ad-78158” ).addService( googletag.pubads() ) ); } );

    The post Quick Intro to the New Sony Cyber-Shot RX10 Mark III by Darlene Hildebrandt appeared first on Digital Photography School.

    Digital Photography School

  • Readers’ Showcase: Giulio Magnifico

    Readers’ Showcase: Giulio Magnifico

    Udine, Italy. 2/20/2014. Nikon D800E + Sigma 35mm F1.4 Art. This man was sitting on a bench waiting for his bus at the station in my hometown. I took the photo with a LED light mounted above my camera. Photo and caption by Giulio Magnifico

    Reportage photographer Giulio Magnifico wants to take people on a journey with him when they look at his photos. He captures street scenes and card nights in local osterias in his hometown of Udine, Italy, but over the past few years the focus of his work has been reporting on the refugee crisis in the Middle East and Europe. He discusses with us his experience reporting from refugee camps, how he got his start in photography and what his next move will be. See a sample of his work here and head to his website for more.

    Interested in having your work featured in an upcoming Readers’ Showcase? Let us know! Include your DPR user name a link to your online portfolio.

    Readers’ Showcase: Giulio Magnifico

    Udine, Italy. 11/24/2014. Nikon D800E + Sigma 35mm F1.4 Art. This is a typical scene inside an Italian osteria: a group of friends are playing a card game and drinking wine, inside the osteria ‘Pepata di Corte’ in my hometown. Photo and caption by Giulio Magnifico

    First, introduce yourself and let us know your history with photography.

    My name is Giulio Magnifico and I’m a 28 year old photographer. I was born and still live in northern Italy, in Udine. I studied photography in high school and I’ve been a photographer since. I concentrate on reportage photography, and have traveled a lot for it. In 2014 I went to Syria, Iraq, Sicily, Paris and in 2015 went again to the Syrian and Croatian borders.

    Readers’ Showcase: Giulio Magnifico

    Zakho, Iraq. 9/20/2015. Nikon D800E + Sigma 35mm F1.4 Art. A Yazidi woman is on the ground cooking dinner for her family inside a refugee camp. Photo and caption by Giulio Magnifico

    (cont.) I collaborated with the German newspaper ‘Der Spiegel’, and have exhibited my work in a gallery in London called Albumen Gallery as well as a photographic studio in Udine. In the last year I held a personal exposition in Tolmezzo (a city near Udine), sponsored by the culture department, with 70 of my photos and one video. This summer, I will have a personal exhibition at the MEDphotofest in Sicily. I hope to make photography my only job in the future.

    Readers’ Showcase: Giulio Magnifico

    Udine, Italy. 6/5/2014. Nikon 1 V1 + 1 Nikkor 10mm F2.8. A photo captured with my street camera, a little Nikon 1 V1, inside an underground passage when a man was walking out. Photo and caption by Giulio Magnifico

    What do you shoot with?

    I shoot with a Nikon D800E and two lenses, a Sigma 35mm F1.4 Art and a Nikkor 105mm AFS-G F2.8 Micro, but I can take almost all of my photos with just the 35mm. I love it. Additionally, I use a Nikon 1 V1 with 1 Nikkor 10mm F2.8 and a small video camera mounted on top of my D800E (the Polaroid Cube).

    Readers’ Showcase: Giulio Magnifico

    Trieste, Italy. 6/2/2015. Nikon D800E + Sigma 35mm F1.4 Art. This man was sitting on a bench in a Trieste park. He had one leg and may have lost the other because of disease, but he was a happy fellow anyway. Photo and caption by Giulio Magnifico

    Your portfolio contains a mix of street scenes and reportage, with a clear focus on the human element. What drives you to capture the stories of others?

    Life is made by humans. A beautiful landscape is beautiful because we perceive it that way. And that’s why I love to capture the human soul, because we make our own history. My goal is to transfer human emotions with my photos.

    Readers’ Showcase: Giulio Magnifico

    Augusta harbor, Italy. 8/7/2014. Nikon D800E + Nikkor 105mm Micro F2.8 AFS. I took this photo while reporting on migrants for the German magazine Der Spiegel. This is a Syrian girl inside an Italian marine boat, rescued from the sea during her trip from the Libyan coast to Sicily. Photo and caption by Giulio Magnifico

    You’ve photographed refugees in Iraq, Turkey, Slovenia and elsewhere. What has the experience been like?

    That’s a deep kind of experience. I found out that in the worst situations you can find the best people and emotions. At the beginning it was hard to do it, especially reporting in Sicily (where people land from Libya and Greece) and in Croatia (in the heart of the Balkan route), because I felt like a stranger, and the people seemed to be animals in a zoo. And I hated that.

    Readers’ Showcase: Giulio Magnifico

    Tal Abyad, Syria/Turkey border. 6/19/2015. Nikon D800E + Sigma 35mm F1.4 Art. A little syrian boy escaped from Tal Abyad when the ISIS seized his city, was searching in wastes and selling bottles of water for one turkish lira. Photo and caption by Giulio Magnifico

    (cont.) I hate to photograph people somewhere full of journalists and media reporters. I prefer to go alone with my camera into the heart of the situation, like in Iraq or the Syrian border. That way I can live with and like them, and I think my results/photos are better. People accept me as one of them and not as a journalist, or as someone who wants to make a profit off of them.

    Readers’ Showcase: Giulio Magnifico

    Adana, Turkey. 6/21/2015. Nikon D800E + Sigma 35mm F1.4 Art. A Syrian mother asking for charity on a street with her two sons in her arms. Photo and caption by Giulio Magnifico

    Your portraits of refugees are often accompanied by video clips as well. What can you capture through video that you can’t through stills?

    I can capture the whole background and environment behind a single image. Many times there are photos which you can think that are made in one kind of environment but, instead, when you see the surroundings it’s completely different from what you thought. My dream is to take people with me when they look at my shots. You can do that with a photo, but with a video of the photo you can add the sound and the whole background. If it was possible I would even use a ‘smell capture’ in order to reproduce the smell…

    Readers’ Showcase: Giulio Magnifico

    Kilis, Turkey/Syria border. 5/11/2014. Nikon D800E + Nikkor 105mm Micro F2.8 AFS. A little Syrian girl was playing with me and my camera on the streets of the last small city in Turkey before the Syrian border. Photo and caption by Giulio Magnifico

    Your photos are almost exclusively black-and-white – why do you prefer that look?

    Well, the way I see it, light is in black and white. Colors can modify how an image is perceived – a red color can attract attention, green makes you feel relaxed, etc… Also, there are people that see colors very differently from others. I think that one of my particular strengths is to see the scene around me in black and white, or better, with the lights and shadows. I think I honed this skill at school when my teachers taught me how to draw in black and white.

    Readers’ Showcase: Giulio Magnifico

    Diyarbakir, Turkey 9/24/2014. Nikon D800E + Sigma 35mm F1.4 Art. A man is reading the Koran inside the Diyarbakir mosque. Photo and caption by Giulio Magnifico

    What’s your next photographic endeavor?

    I’m currently a bit occupied with some exhibitions and conferences here in Italy, but I will soon go to the Middle East again, to the south of Syria and a nearby region.

    Readers’ Showcase: Giulio Magnifico

    Erbil, Iraq. 9/22/2014. Nikon D800E + Sigma 35mm F1.4 Art. A family of Yazidi refugees in some shacks inside a yard in the neighborhood of Erbil. Photo and caption by Giulio Magnifico

    What’s the best advice you’ve received as a photographer?

    Don’t make boring photos that you can see in a postcard.

    Articles: Digital Photography Review (dpreview.com)

  • Tips for Getting Yourself to Relax as a Photographer and Have More Successful Portrait Sessions

    When I first got started in photography I thought I had things all figured out regarding cameras, lenses, exposure, and even some post-processing. However, the first time I greeted a client on location for an actual photo shoot, I realized just how clueless and ill-prepared I really was, and found myself nervous to the point of almost being nonfunctional. I was so uptight and anxious about the whole photo session, that I’m still not sure how I managed to get any good pictures, but thankfully things have gotten much better in the subsequent years.

    Even though I have greatly expanded my knowledge and experience, I still get a little nervous when meeting with clients. I have found several tips that work well to calm the butterflies in my stomach and help make for much more enjoyable and productive portrait sessions, both for me and my clients. I’m going to share them with you.

    relaxing-for-portrait-session-couple-farm

    Even after doing this type of work for years, I can still get nervous going into a photo session.

    The Three Phases of Portrait Anxiety

    While this triad of temporal distinctions is entirely nonscientific in nature, I have found that my stress and anxiety regarding a given portrait session generally can be divided into three discrete phases:

    • Phase 1 – The days or weeks leading up to a photo session. This lasts the longest, but thankfully doesn’t require impromptu decisions and instead gives you time to be thoughtful, analytical, and reflective. The downside is it lasts the longest! This unfortunately means you have way too much time to over-think and over-analyze everything.
    • Phase 2 – The short time before you start the session. This is usually five or ten minutes, interacting with the client at the session but before you start taking pictures. This period is brief but critical, as it can set the tone for the entire photo session and if you’re not properly relaxed things can go downhill quickly.
    • Phase 3 – The photo photo session itself, which usually lasts about an hour, unless you are doing a wedding or other type of protracted engagement. Things can get very tricky here, but if you have taken the time to properly relax during Phases 1 and 2 you will probably find Phase 3 to be smooth sailing.

    Here are my tips for helping yourself relax, take things easy, and get mentally prepared for the photo session. While not all of these may apply to you, I do hope they are general enough to be useful to you in similar situations.

    relaxing-for-portrait-session-child-looking-up

    If you aren’t relaxed the kids won’t chill out either, and neither will their parents.

    Phase 1: Preparing for the Session

    Adele, one of the most popular singers in the world, recently told Rolling Stone that she gets stage fright. “I’m scared of audiences,” she said. “I don’t like touring. I have anxiety attacks a lot.” As a photographer this gives me some degree of comfort knowing that my nervousness leading up to a photo session is not all that different than world-famous singers and actor,s who perform in front of thousands of people every day. Even though I have done many portrait sessions, I still get nervous beforehand, but have found a few tips and tricks to help calm myself down and relax in order to clear my head and do the best job I can.

    Talk to someone supportive

    Whether it’s a friend, a coworker, a family member, or even a former client, spending time talking about the upcoming session is one of the best ways to clear my head and get some reassurance. For me it’s my wife, who is a solid rock and a constant reminder that I can do the job. She and I discuss my goals for the session, look at examples from other photographers, and talk about what has worked and not worked in past sessions. These conversations always help me calm down, while also giving me a big boost of confidence that goes a long way towards a successful photo session.

    relaxing-for-portrait-session-baby-sister

    In the days leading up to this session, my wife and I spent a long time discussing the shoot and planning things out. This did wonders to calm my nerves and helped me do a better job at the session.

    Look at your own successful images

    Look at your own past images as a reminder that you are fully capable of doing the job. Sometimes in the days leading up to a photo session I start to wonder if I really have what it takes to get the shots I want, but looking through my own portfolio always offers enough reassurance to bring me out of that funk and back to reality. Yes, each session has its own unique challenges, but reminding myself of what I have done before, is a great way to relax and prepare for what is about to come.

    Have a plan

    Have a plan for the session and make a list of poses and shots you want to get. It can be a mental list, but a physical list will help you be sure to get everything you want, and will allow your clients see that you are prepared if you cross items off it during the shoot. One of the last things you want is to get back to your computer and realize you forgot to get a shot of grandma holding her new grandbaby, the happy couple underneath their special tree, or little Timmy in his special new cowboy boots that his mother emailed you about the day before. Making a list will help you avoid this scenario while also helping you to de-stress before the session.

    relaxing-for-portrait-session-couple-downtown

    This couple sent me a few ideas for different shots, and since the location was 60 miles away I used Google Maps Street View to investigate things beforehand.

    Scout the location ahead of time

    Visit the location to make sure you know what it’s like, and how you can use it to frame your shots. Ideally this would be at the same time of day as your photo session, so you can make sure you know what the lighting will look like on the day of the shoot. This will help you see all sorts of things you might miss if you just show up the day of the session, and it will make you look like a confident professional as you direct your clients.

    Know your gear

    Know your gear inside and out. It sounds silly but you don’t want to freeze up in the middle of a session because you can’t find the menu that lets you change white balance, or you forgot which dial changes the shutter speed. If you find that you need a quick refresher re-read the manual, watch online tutorials, or just spend 15 minutes poring through the menus and buttons. When it comes time to do the photo session, you can rest assured that these planning efforts will have been put to good use.

    You don't want to scramble trying to locate menu options and camera buttons. Make sure you know your gear beforehand so you can focus on your clients when you're on the job.

    You don’t want to scramble trying to locate menu options and camera buttons. Make sure you know your gear beforehand, so you can focus on your clients when you’re on the job.

    Practice with test subjects

    If you’re going to do a newborn session, practice with stuffed animals. If you’re on location, get a friend or family member to go out with you a week beforehand and do some test shots, so there are as few surprises as possible when you go out there with the client.

    Make a gear packing list

    Make a list of all the gear you need and check it off one-by-one as you pack up for the session. You don’t want to get to the location and realize you forgot something at home, or left a battery on the charger. I once did an outdoor shoot and realized all too late that I forgot my lens hoods, and almost immediately started hyperventilating into my camera bag when the clients asked for some shots with the sun behind them, just out of the frame. Things ended up working out, but a simple list would have prevented a great deal of stress during the shoot.

    Phase 2: On your mark, get set…

    relaxing-for-portrait-session-couple-barn

    Chatting with this couple as I set up my gear helped put everyone at ease, including myself.

    One of the weirdest parts about a portrait session can be the few minutes when you are visiting with the client before you start actually taking pictures. What do you do? What do you talk about? How do you strike a balance between friendly and professional? It’s enough to send even the most seasoned photographer’s blood pressure to the top of the charts, and messing up this brief pre-session period can send the rest of the gig into a tail spin.

    In my experience one of the best ways to help you and the client relax is to go on the offence instead of playing defence. Don’t stand around waiting for people to talk to you, as they are probably feeling just as awkward, and are likely waiting for you, the person in charge, to take the lead. Even if smalltalk is not your forté, you need to be willing to strike up a conversation and have a few things ready to talk about as you are getting set up. In a nutshell, make this time all about the client, and helping them feel comfortable.

    As you are getting ready to start taking pictures talk to your clients about their life outside of the photo session, and find out what hobbies they have, what they like doing in their spare time, or even what they are doing over the coming weekend. Ask questions to show you are interested, and use this time to also run some ideas past the client in terms of what you will be doing. This helps build a sense of rapport and respect, and can go a long way towards putting everyone at ease. Your clients might be just as nervous as you, but getting the chance to get to know each other will help put everyone at ease and also help them feel comfortable if you have lots of lighting, lenses, or other gear. If there are kids involved, bring some toys or snacks (nothing crumbly as it will get on their clothes) to win them over. At my most recent family session I gave the two-year-old a fake toy camera and asked if he could help me get some photos. This not only won him over but his parents too, and a week later, before they had even seen their photos, they were telling some friends about how much they enjoyed the picture session.

    relaxing-for-portrait-session-family

    A few minutes chatting sports with the grandparents and playing with the kids went a long way towards a more successful photo session.

    Phase 3: Here we go!

    Even though you have done everything in your power to chill out, relax, and put your mind at ease leading up to the photo session, things can still be a little nerve-wracking as you go about the process of actually taking pictures. At any moment there are a thousand decisions to be made, and trying to balance everything can be enough to make your palms sweat. My favorite trick for relaxing during a photo session is to simply make things fun. Don’t bark out orders, but instead have your clients do silly things like make faces or try just-for-fun poses. This will help you loosen up, and also give you a chance to build on the rapport you have already established at the beginning. Clients can tell if their photographer is wound up tight and needs to chill out, and if you make things more fun and lighthearted as opposed to all business, you will find yourself loosening up, relaxing, and getting much better results.

    These are just a few of my favorite tips and tricks to help me calm my nerves before and during a photo session, but what about you? How do you approach your portrait sessions and what do you do to help yourself relax? Share your thoughts in the comments section below!

    People photography week

    This week on dPS we’re featuring articles all about different kinds of people photography including portrait, event and travel photography. See all the previous ones below, and watch for more people photography articles over the next few days.

    • How to Take Low Key Head-shots
    • How to Do a One Light Portrait Setup and Use it as Your Back-up Plan
    • Travel People Photography – Tips and Pitfalls
    • 8 Tips for Photographing Men
    • 24 Diverse Images That Showcase People Photography
    • Weekly Photography Challenge – People Photography

    googletag.cmd.push(function() {
    tablet_slots.push( googletag.defineSlot( “/1005424/_dPSv4_tab-all-article-bottom_(300×250)”, [300, 250], “pb-ad-78623” ).addService( googletag.pubads() ) ); } );

    googletag.cmd.push(function() {
    mobile_slots.push( googletag.defineSlot( “/1005424/_dPSv4_mob-all-article-bottom_(300×250)”, [300, 250], “pb-ad-78158” ).addService( googletag.pubads() ) ); } );

    The post Tips for Getting Yourself to Relax as a Photographer and Have More Successful Portrait Sessions by Simon Ringsmuth appeared first on Digital Photography School.

    Digital Photography School

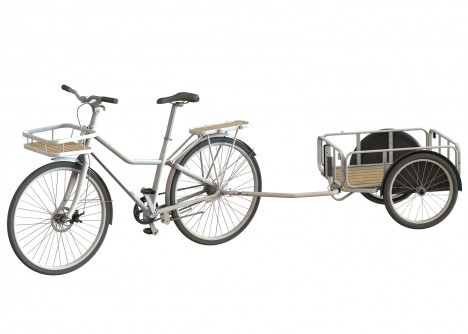
  • Sladda: IKEA to Sell New Flat-Pack Bicycle for Urban Cyclists

    [ By WebUrbanist in Technology & Vehicles & Mods. ]

    ikea bike trailer

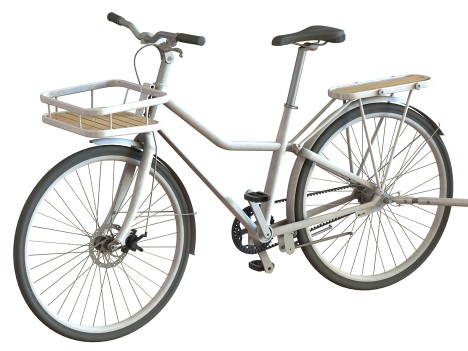
    IKEA has announced a new lightweight bicycle with a rust-resistant chain, aluminum frame and low-maintenance construction all aimed to make it easier for more casual bicyclists to hop on and enjoy the ride.

    sladda bike

    A joint project by Oskar Juhlin, Jan Puranen and Kristian Eke from Swedish studio Veryday Design, the easy-upkeep bike comes in a few basic models with a series of adjustable features.

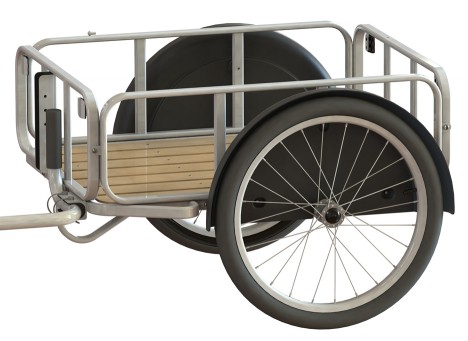
    ikea trailer attachment

    It is simple and unassuming at a glance, but aimed to be a go-to, easy-to-use object just like IKEA’s furniture and furnishing lines (just presumably more robust than some). For many would-be bikers, the prospect of maintaining the bicycle itself is a barrier to entry that IKEA hopes to eliminate as a concern.

    ikea new bike model

    Bike racks, bags and a two-wheeled trailer can all be added via click-to-attach mechanisms to allow for easy adjustments. At $ 750 it won’t be the cheapest model on the market, but affordable for its quality.

    Share on Facebook


    [ By WebUrbanist in Technology & Vehicles & Mods. ]

    [ WebUrbanist | Archives | Galleries | Privacy | TOS ]


    WebUrbanist

  • How to Use the Patch Tool in Photoshop

    There are tools in Photoshop that I use more than others, and some not at all. The Patch tool is one of my favourites. It is so easy to use and with each version of Photoshop, it has gotten even better.

    title-Patch-tool-in-Photoshop

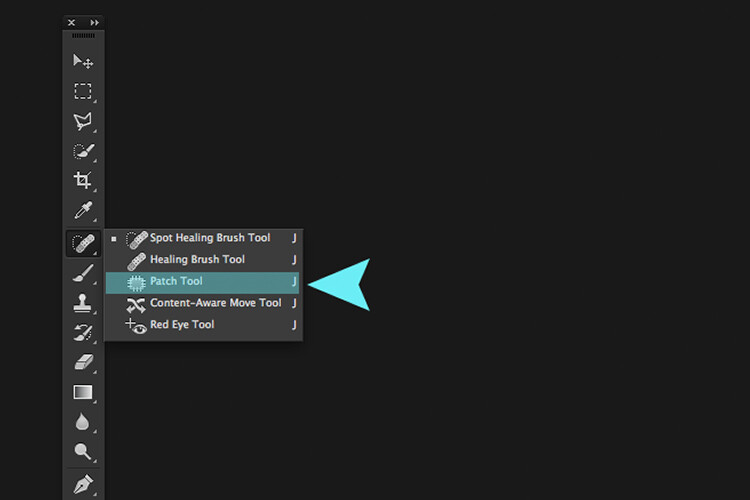
    The Patch Tool is located under the fly out menu of the Spot Healing Brush.

    What exactly is the Patch Tool for?

    The Patch Tool is part of the healing brush set of tools. These are the go-to tools for retouching and repairing your images. The Patch Tool is primarily used to repair larger areas of an image, or get rid of any distractions or blemishes.

    The patch tool was introduced into Photoshop at the same time as the Healing Brush. It is similar to the Healing Brush Tool, in that it matches the texture, lighting and shading of the sampled pixels to the source area. But, the Patch Tool uses selection-defined areas instead of a brush.

    Prior to Photoshop CS6, you could not work on a separate empty layer when using the Patch Tool, unlike the Spot and Healing Brushes. This meant that you had to duplicate the layer that you were working on. However, in Photoshop CS6, Content-Aware was introduced to the Patch Tool. So you can now work on an image using an empty layer. This has made it quite powerful indeed.

    What makes the Patch tool unique is that each time you use, it will give a slightly different result even on the same selection. It is great for retouching larger areas of your image, very fast and quite seamlessly. Or if you are in Destination Mode, this can also duplicate, or clone an object. Although, I rarely use it for that, it’s still an option. I will illustrate this further on in the article. There is also an option to use a pattern or Transparent, neither of which I’ve had a use for yet to date.

    What does the Patch Tool look like?

    The Patch Tool can be found hidden behind the Healing Brush tool in the Tools panel.

    patch tool highlighted in tools panel in photoshop

    By clicking on the Spot Healing brush in the tools panel. A fly out menu appears, the Patch tool is the third one down.

    How does the Patch Tool work?

    1. Select the Patch tool and draw an area around your selection. It works in a similar way to the Lasso selection.
    2. Move the cursor over the selected area and drag it to the left, right, or in any direction.
    3. Choose whether you choose Source or Destination mode in the Options Bar. You will see a preview of the image as you drag it.
    4. When you release the mouse or stylus, Photoshop does the magic of blending the pixels from the source or the destination area, to merge the pixels with the original selection seamlessly. Deselect by hitting Cmd+D on a Mac. Ctrl+D on a PC.
    original image before using the patch tool

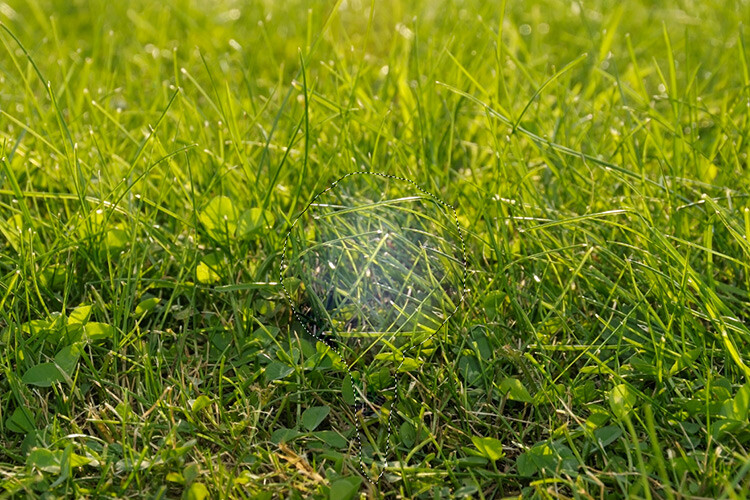
    Image showing definite areas that needs to be removed.

    simple-distractions-removed-patch-tool-normal-mode

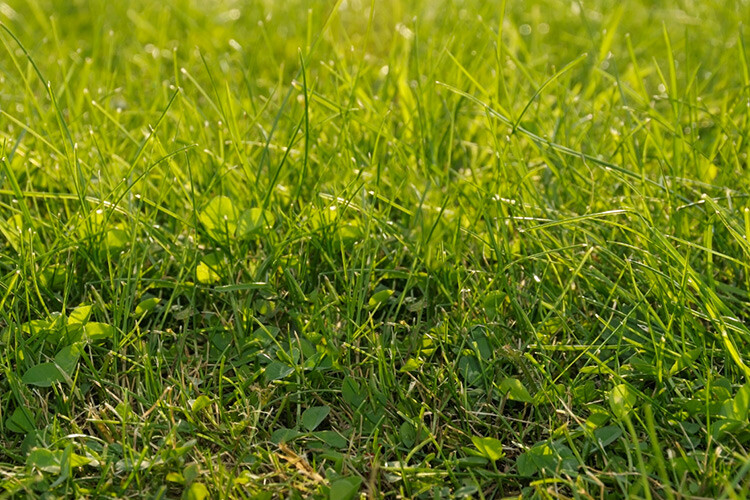
    The Patch Tool in normal mode removed some unwanted things (cigarette butts) in this image very easily and quickly.

    It’s that easy, but you probably won’t get a 100% accurate result every time. You may have to make a few attempts. Just make sure you are working on a duplicate background layer, or using a separate empty layer – not your original background layer.

    Tip: You don’t have to use the Patch tool to define a selection. You can use any selection tool and then select the Patch tool.

    Before I show you how to use the Patch Tool with Content-Aware, I want to demonstrate how the it can be used to clone an isolated area of your image.

    Duplication

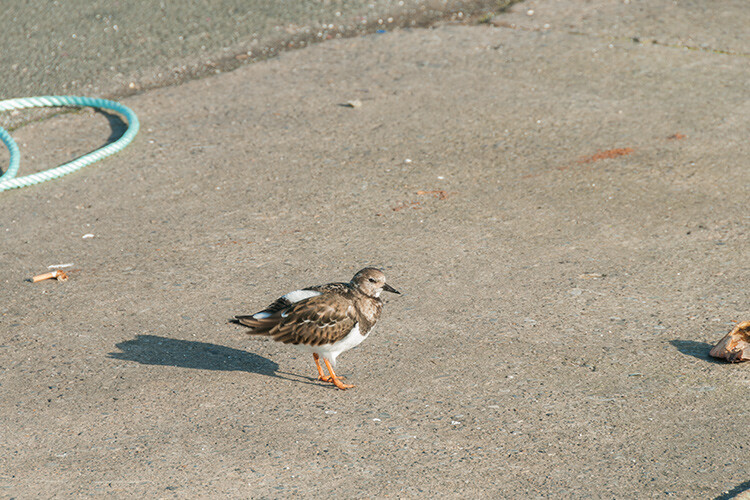
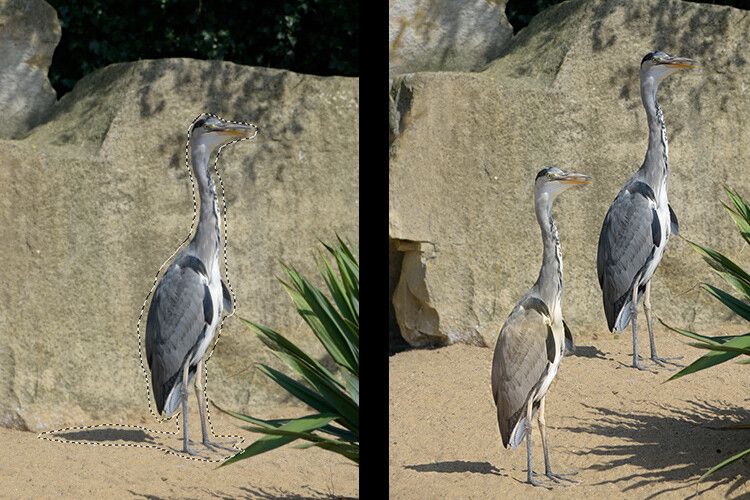
    In the following example, I want to duplicate the bird and add another one. Similar to the steps above:

    • Make a selection around the bird.
    • Choose Destination in the Options Bar.
    • With the Patch tool selected, position the cursor over the selection and move it into place.
    • It doesn’t do a bad job, however, if you look closely the surrounding pixels of the selection haven’t blended in so well.
    patch-tool-options-bar

    Click on the Destination radio button to duplicate or clone a specific area.

    Bird3-duplicated

    Using the Patch tool to clone or duplicate an area of an image in Destination Mode. However, the results can produce a noticeably pixelated edge.

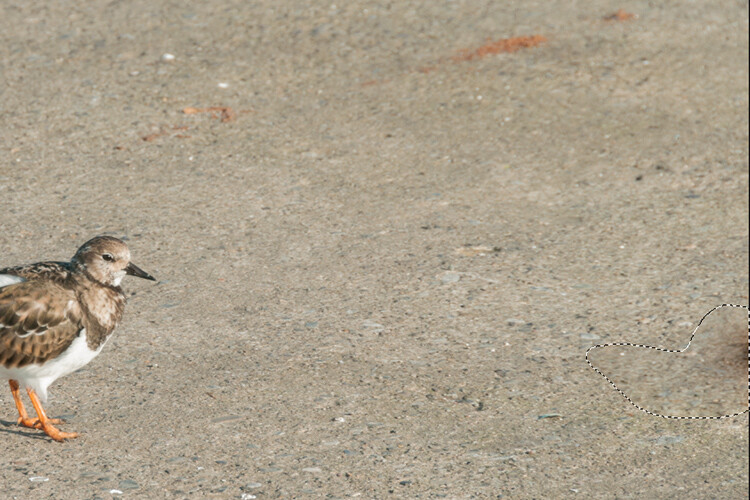
    Here’s an alternative method in getting a better result. Once you have made the selection for duplicating an area.

    Press Cmd+Alt+T on a Mac (Ctrl+Alt+T on a PC). This brings up the free Transform tool. Now move the selection to a new area on the image. Click on the tick box to commit, or press Enter. The selection is still active as the marching ants are visible around it. With the Patch tool selected, move the cursor over the selection, hold down the mouse or stylus and move the selection slightly and then release. You will notice the surrounding pixels are blended better.

    Bird2-duplicated-free-transform

    There is a definite improvement using the free transform tool, then holding down the mouse or stylus and moving the selection slightly at the same time just before releasing it.

    bird-duplicatedx3-after

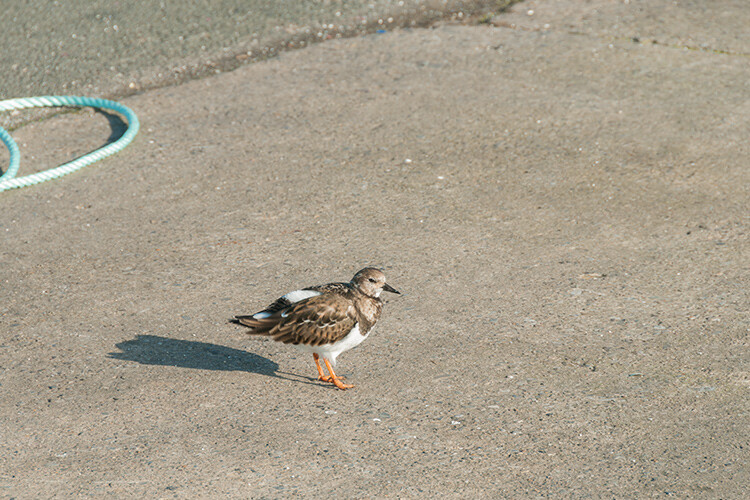
    And voila, three birds!

    Another example of using the free transform tool along with the Patch tool set to Destination Mode.

    I like to use the Patch Tool in both the normal mode and content-aware. In normal mode the Patch Tool does a great job for general clean up. However, where there are areas close to the edge of the image, the Patch tool struggles to blend or repair the selection. This is where the Patch tool in Content-Aware mode really shines.

    When an area has a sharp contrast, or is up against the edge of a photo, the Patch Tool in normal mode is less effective than using the Patch with Content-Aware. (notice the selection on the right here)

    In this image. I removed the unwanted areas using a combination of the Patch Tool in normal mode and Content-Aware.

    Content-Aware Mode

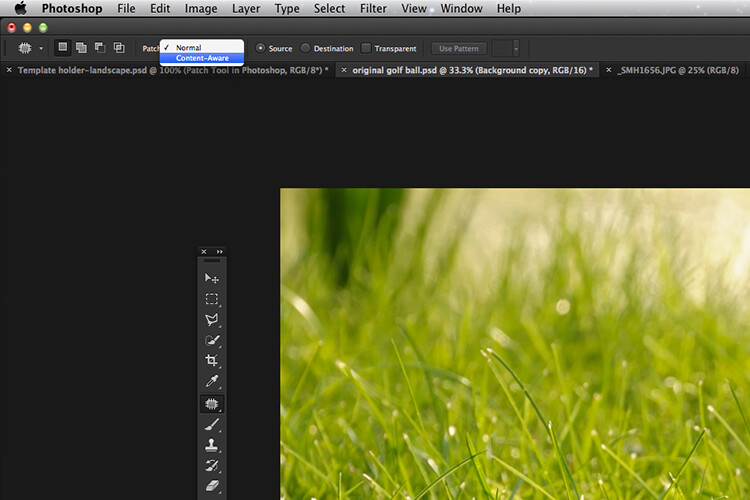
    In order to use the Patch Tool in this mode, go up to the Options Bar and change it from Normal to Content-Aware. If you want to work using an empty layer above the image, make sure Sample All layers is checked. As well, in the Options Bar, you will also see Adaption.

    switching-patch-tool-content-aware

    Switching the Patch Tool in the Options Bar from Normal to Content-Aware.

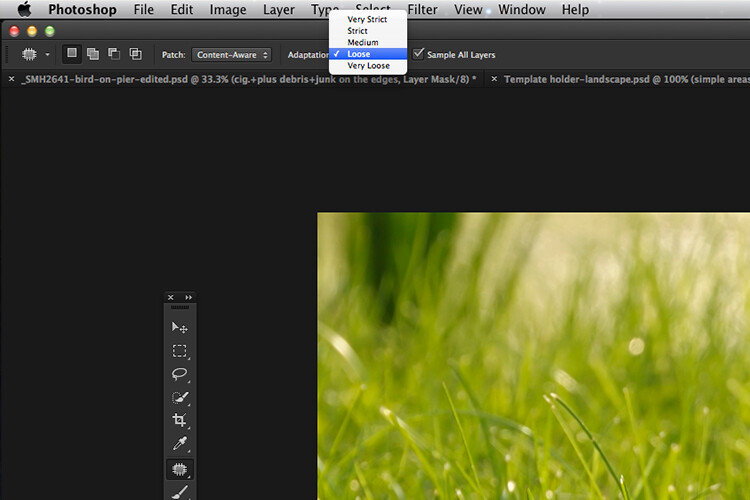
    By clicking on this, a drop down menu appears with five options. Your choices range from Very Strict to Very Loose, depending on how much blending is required. You will need to experiment to see which one looks best. Before you deselect, press Cmd+H to hide the marching ants and toggle between each option to see which one you prefer.

    Patch-tool-content-aware-5-options

    The five options for the Adaptation setting of the Patch Tool in Content-Aware.

    You can see quite clearly the differences between the two modes in the images below.

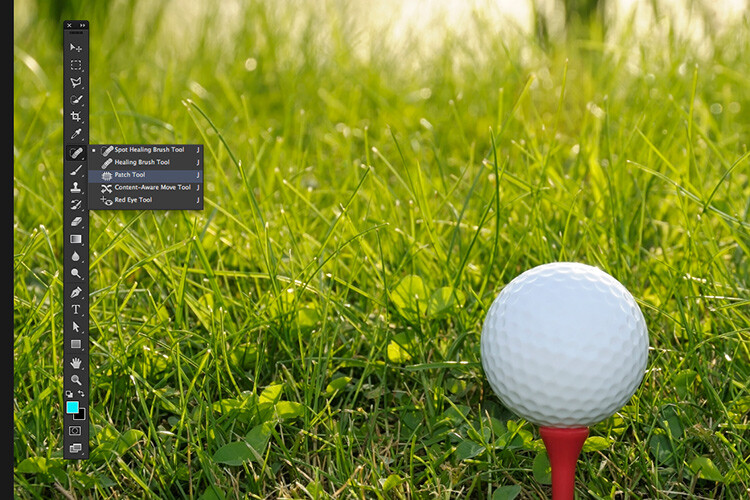
    The Patch Tool in Normal Mode is trying to remove the golf ball on the tee from the image.

    The Patch tool in Content-Aware has successfully removed the golf ball and tee from the image.

    I hope you found this article useful. Do you use the Patch Tool in Photoshop? Please let me know in the comments below.

    googletag.cmd.push(function() {
    tablet_slots.push( googletag.defineSlot( “/1005424/_dPSv4_tab-all-article-bottom_(300×250)”, [300, 250], “pb-ad-78623” ).addService( googletag.pubads() ) ); } );

    googletag.cmd.push(function() {
    mobile_slots.push( googletag.defineSlot( “/1005424/_dPSv4_mob-all-article-bottom_(300×250)”, [300, 250], “pb-ad-78158” ).addService( googletag.pubads() ) ); } );

    The post How to Use the Patch Tool in Photoshop by Sarah Hipwell appeared first on Digital Photography School.


    Digital Photography School

  • Down to the wire: iFixit Fujifilm X30 disassembly guide

    iFixit Fujifilm X30 disassembly guide

    Few of us will ever be so bold as to take a screwdriver and a spudger to a beloved camera. But how do we satisfy the urge to know what’s going on inside of it? For curious types with a weak constitution for taking things apart, there’s iFixit. The good people at iFixit publish product-specific disassembly guides, written to help common folk make simple repairs to their own electronic devices. They’re also an easy way to peek inside a modern digital camera without voiding your warranty. This week, we look inside the Fujifilm FinePix X30.

    iFixit Fujifilm X30 disassembly guide

    Like so many other things, it’s best to start this project at the bottom. After removing the battery, you’ll go about removing screws from the camera’s chassis, including these three on the bottom plate.

    Image courtesy of iFixit

    iFixit Fujifilm X30 disassembly guide

    Once you’ve removed enough screws, the bottom and back panels can be pulled back. So what’s underneath? A whole mess of ribbon cables. 

    Image courtesy of iFixit

    iFixit Fujifilm X30 disassembly guide

    For starters you’ll have to detach these five ribbons that are connected to the motherboard. 

    Image courtesy of iFixit

    iFixit Fujifilm X30 disassembly guide

    After a little spudger action and disconnection of cables from the surrounding circuitry, the copper plate underneath it all is revealed. The copper plate is likely for heat dissipation.

    Image courtesy of iFixit

    iFixit Fujifilm X30 disassembly guide

    Attached to the other side of the copper plate is the X30’s 12MP, 2/3″-type sensor. Lifting it out of the way reveals the lens.

    Image courtesy of iFixit

    iFixit Fujifilm X30 disassembly guide

    With a few screws removed the motherboard can be tilted upward. To completely remove it you’ll need to desolder the black, grey and red wires seen here.

    Image courtesy of iFixit

    iFixit Fujifilm X30 disassembly guide

    And now we come face-to-face with the lens assembly. Remove a few screws… 

    Image courtesy of iFixit

    iFixit Fujifilm X30 disassembly guide

    …and the lens is free for removal. It’s a 28-112mm equiv. F2-2.8 zoom, by the way.

    Image courtesy of iFixit

    iFixit Fujifilm X30 disassembly guide

    Working with the flash capacitor requires some careful maneuvering. As the circuits store charge to power the flash unit, touching the leads at the bottom of the circuit could result in a nasty shock. More desoldering is required here to get this board free.

    Image courtesy of iFixit

    iFixit Fujifilm X30 disassembly guide

    With the eyepiece removed and just a couple more screws taken out of the LCD panel, you’ll have successfully disassembled your Fujifilm Finepix X30. Congratulations, you’re a monster.

    Image courtesy of iFixit

    Articles: Digital Photography Review (dpreview.com)