Blog

  • Yosemite Trademark Dispute Name Changes – The Final Straw

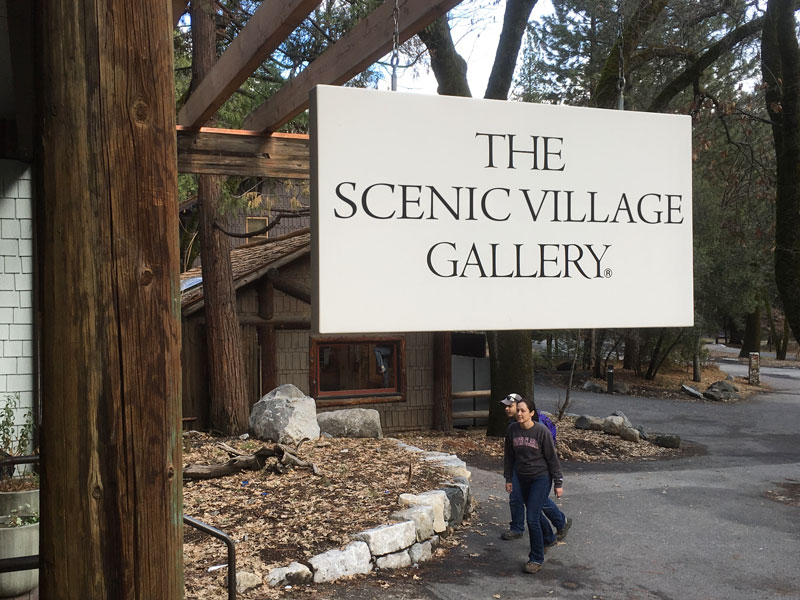
    "The Scenic Village Gallery" formerly "The Ansel Adams Gallery"

    “The Scenic Village Gallery” formerly “The Ansel Adams Gallery”

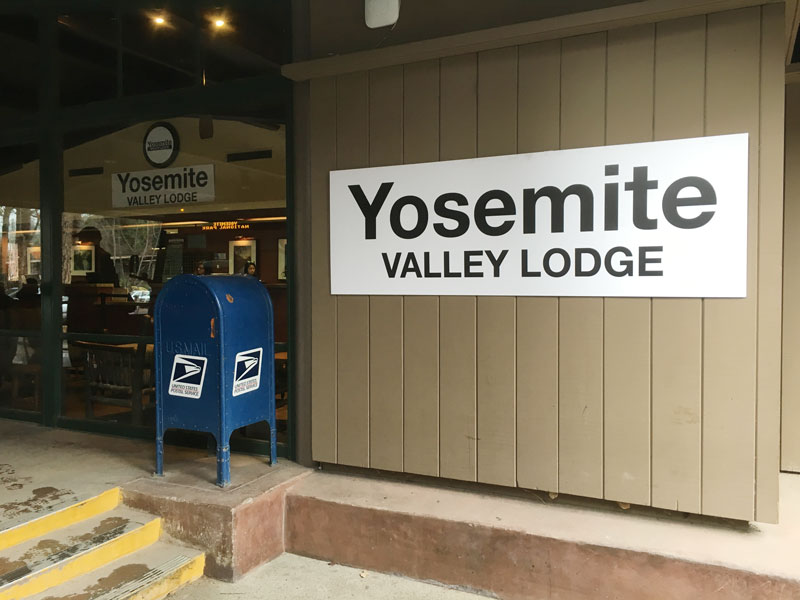
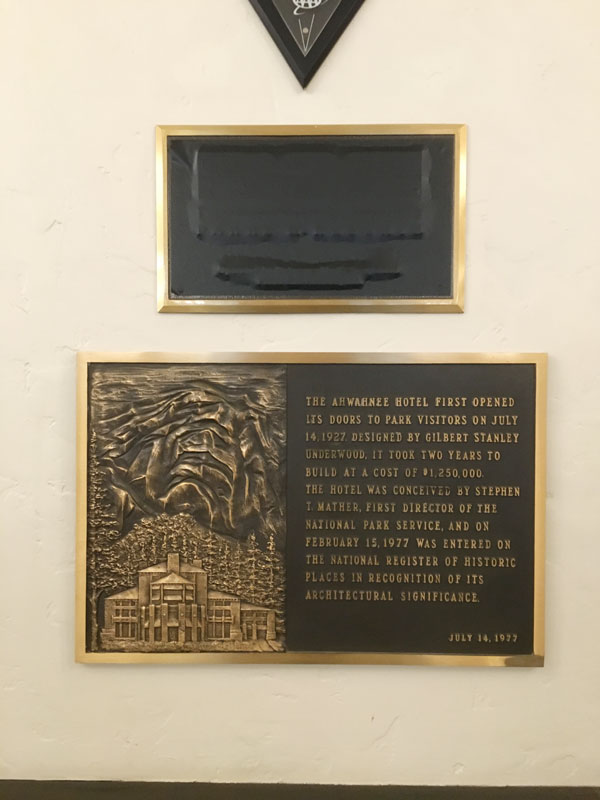
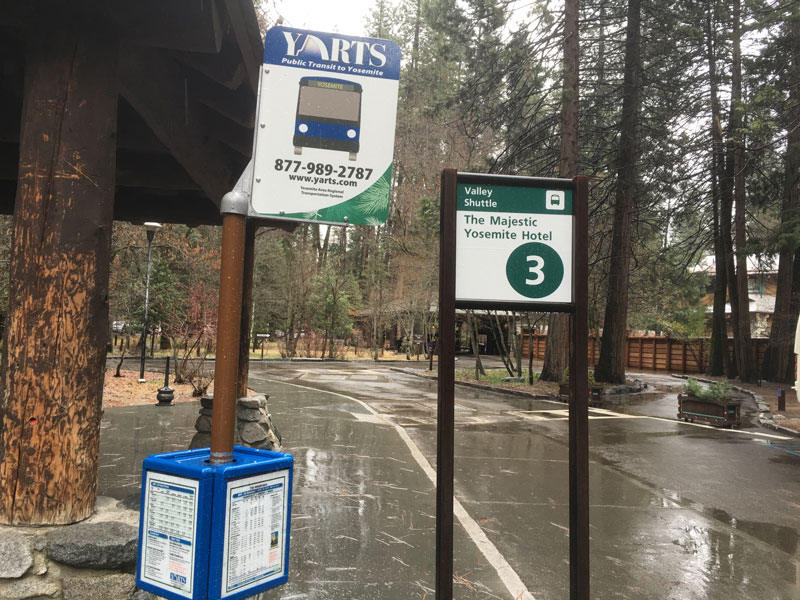
    Yosemite is a place that never ceases to amaze, often evoking a reflexive “Wow!” from my lips as I explore the national park. Indeed on my last visit that wow factor hit me again as snow fell in Yosemite Valley, but I was also wow’d in a way that could only make me facepalm in disgust and embarrassment. What could cause such a reaction? Seeing the recent name changes to much beloved landmarks that have swept across the park due to a heated trademark battle between the National Park Service and Delaware North. Curry Village is now Half Dome Village, Yosemite Lodge is now Yosemite Valley Lodge, The Ahwahnee is now the Majestic Yosemite Hotel, etc., but what pushed me over the edge on my visit was seeing the recent change to The Ansel Adams Gallery which is now The Scenic Village Gallery.  The absurdity of changing the name of a Historical Landmark such as the Ahwahnee is in itself silly especially given the Historical Landmark placards still stand outside & inside the building, but to see tradition further trounced upon by changing The Ansel Adams Gallery to something as generic as “Scenic Village” was mind blowing. Below are some photos of the signs reflecting the name changes I took on my visit. I will say though they got the name right on some buildings that have yet to get much press attention…

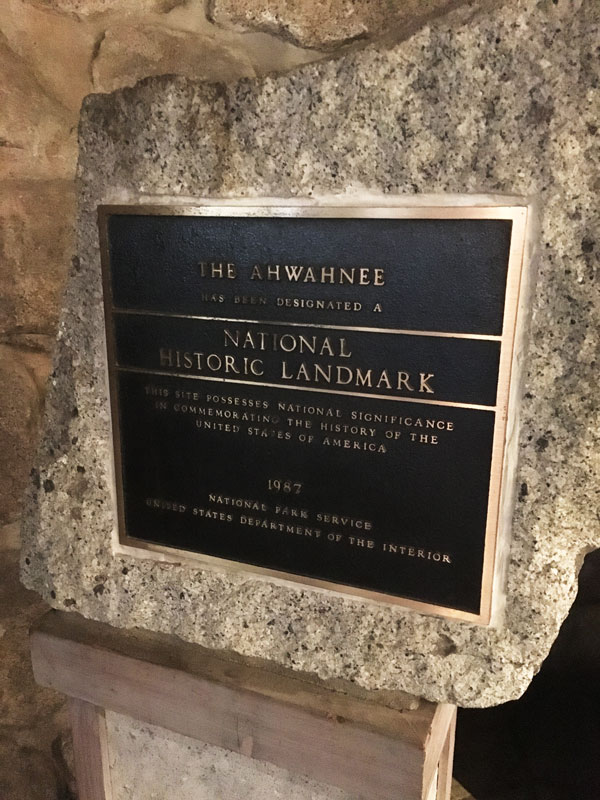
    The Ahwahnee National Historical Landmark  Placard

    The Ahwahnee National Historical Landmark Placard Outside the Majestic Yosemite Hotel

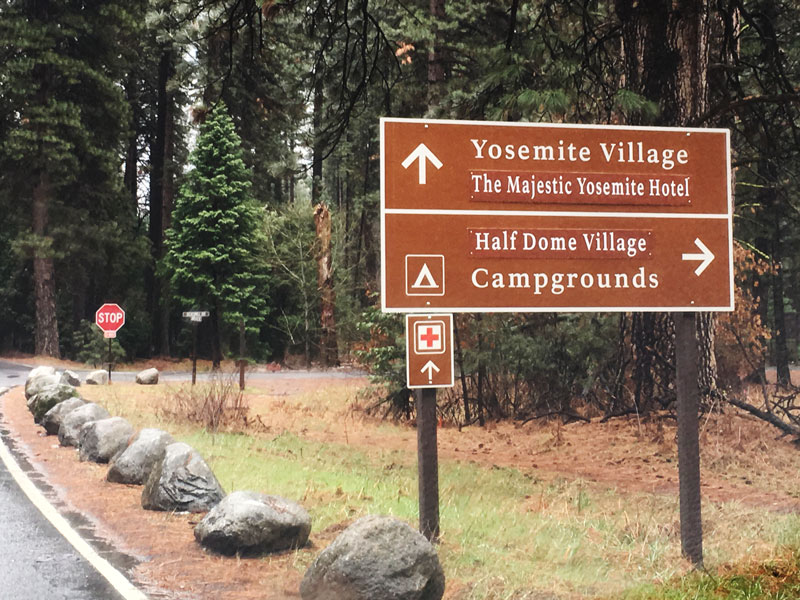
    New Roadsigns in Yosemite Valley

    New Roadsigns in Yosemite Valley Resulting from the Delaware North Trademark Dispute

    Yosemite Valley Lodge Sign

    Yosemite Valley Lodge Sign

    Historical Landmark  Placard Inside the Majestic Yosemite Hotel - Formerly the Ahwahnee Hotel

    The Partially Covered Ahwahnee National Historical Landmark Placard Inside the Majestic Yosemite Hotel – Formerly the Ahwahnee Hotel

    The Majestic Yosemite Hotel Bus Stop

    The Majestic Yosemite Hotel Bus Stop

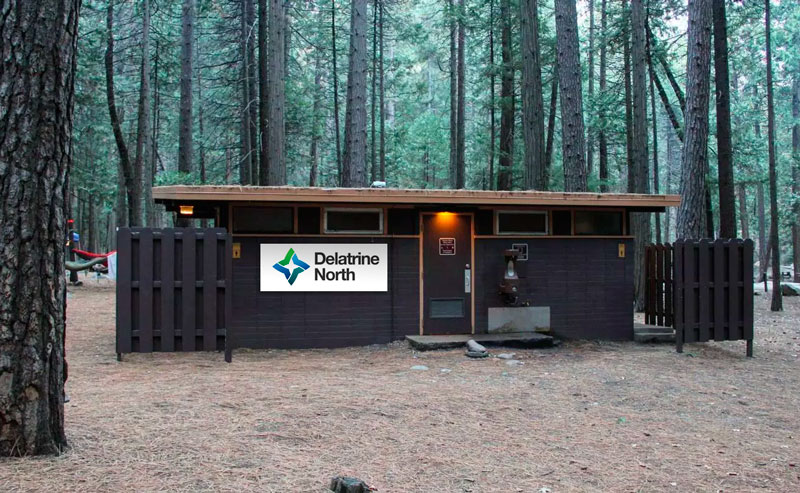
    Newly Named Yosemite Bathrooms - Delatrine Norths

    Yosemite Bathrooms Now Aptly Named the Delatrine Norths


    For more information on the Delaware North / National Park Service  trademark battle read the following articles:

    • A private company trademarked the phrase ‘Yosemite National Park.’ Should the U.S. pay to get it back? – New York Times
    • Op-Ed: Yosemite Is Losing to Corporate Greed – Outside Magazine
    • No Longer the Ahwahnee: new names for Yosemite landmark sites – SFGate.com


    The post Yosemite Trademark Dispute Name Changes – The Final Straw appeared first on JMG-Galleries – Landscape, Nature & Travel Photography.


    JMG-Galleries – Landscape, Nature & Travel Photography

  • DxOMark Mobile report: Nextbit Robin

    The Nextbit Robin looks like your standard smartphone, but its cool blue exterior houses the first real cloud-based phone. It’s an innovative device, but unfortunately its camera falls short of the best in its class. DxOMark has put the Robin through its standard mobile tests, awarding it 81 points and putting it in 18th place in DxO’s mobile rankings. While image testers liked the Robin’s good detail preservation and fast AF, unusually high noise levels kept NextBit’s smartphone out of the higher echelon’s of the DxO rankings.

    Articles: Digital Photography Review (dpreview.com)

  • Upper Yosemite Falls Moonbow, Yosemite National Park

    Upper Yosemite Falls Moonbow
    Upper Yosemite Falls Moonbow

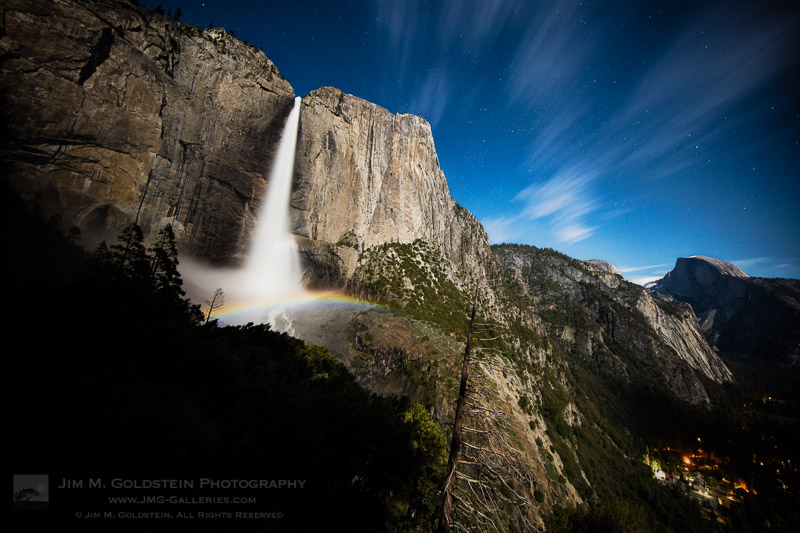
    A moonbow (AKA lunar rainbow) spans across upper Yosemite Falls with passing clouds and Half Dome in view.

    This past week I ventured off to Yosemite to capture moonbows. Midway through my trip I met up with Brian Hawkins who twisted my arm ever so slightly to make a hike to upper  Yosemite Falls for a moonbow shoot. The last time I ventured up to this location I did so solo and while I got great photos it was a grueling hike with the amount of gear I was carrying. For whatever reason this time around while carrying the same amount of gear the hike didn’t seem so hard.  I chalk that up to great company keeping my mind off of the hundreds of switchbacks. Long story short the entire hike and shoot lasted 11 hours leaving on Thursday at 5pm and returning back to the valley floor at 4am.

    Photographing Moonbows in Yosemite (taken Thurs. at midnight). Photo courtesy of Brian Hawkins.

    A photo posted by Jim Goldstein (@jimgoldstein) on


    While the effort was exhausting, the end result is one that I’m proud to share. Conditions turned out great and no one twisted an ankle or squashed one of the dozens of millipedes on the trail.

    Photo Details:
    Canon 5DS R, Canon 11-24mm at f/4, 11mm, ISO 640 and 30 sec.

    The post Upper Yosemite Falls Moonbow, Yosemite National Park appeared first on JMG-Galleries – Landscape, Nature & Travel Photography.


    JMG-Galleries – Landscape, Nature & Travel Photography

  • Highlight reel: top video trends from NAB 2016

    NAB 2016

    Last week Las Vegas once again hosted the annual National Association of Broadcasters Show. Although many of the products and technologies seen at NAB won’t be of direct interest our audience (think satellite trucks and news studios), the explosion of high quality, affordable tools aimed at filmmakers and videographers make it a good place to watch industry trends and new product categories. Perhaps more importantly, NAB can provide insight into what technologies we might expect to filter down to prosumer and consumer products in a few years time.

    Take a look at a few trends and products from NAB 2016 that caught our eye and got us excited.

    Virtual Reality (VR)

    VR was everywhere at NAB, with multiple sessions focused on VR technology, storytelling and distribution that were packed to standing room only. A top destination was the VR Showcase sponsored by Kaleidoscope VR, a VR studio, and Jaunt, a maker of VR cinema cameras. With dozens of stations featuring headsets from Samsung, Oculus and HTC, visitors could experience cinematic VR experiences in person.

    These weren’t just your standard ‘park-a-camera-in-an-iconic-spot-and-look-around’ videos, but actual films created with a VR audience in mind. Imagine watching a film about the 7/7 London Tube bombings, except you’re sitting on the train while the story plays out. It creates an immersive, visceral experience that simply wouldn’t work with conventional filmmaking.

    We’re very excited about the creative possibilities that VR can provide to photographers and filmmakers, so we’re planning a follow-up report to tell you more about VR and our experiences at NAB.

    Nokia OZO: Impressive VR for a price

    The Nokia OZO includes eight cameras and eight microphones to create immersive VR footage. You can pick one up for a cool $ 60,000.

    If you still equate the name Nokia with mobile phones, it’s time to change your thinking. The company has made a big push into VR, making a big splash at NAB with its $ 60,000 OZO 360-degree spherical VR camera. The OZO features 8 cameras, each with 195-degree field of view and global shutter, as well as the ability to capture stereo video for 3D effect. To add additional realism, the OZO also features 8 microphones in order to provide 360 sound, something that’s important for creating immersive VR experiences.

    Although the quality of the footage from the OZO still isn’t up to the resolution and dynamic range standards we’re accustomed to seeing in digital still cameras, the VR experiences created by the OZO were impressive and compelling. The directional sound had a huge impact on the realism of footage shot with the camera, and it captured some of the best VR footage we’ve seen. Count us in for a test unit!

    GoPro Omni

    Not to be left out the the VR extravaganza, GoPro showed off its new Omni camera, a cube-shaped cage that holds six GoPro Hero 4 cameras. Although rigs holding multiple GoPro cameras aren’t new in the VR world, GoPro has embedded useful features to improve the experience of a multi-GoPro setup. Primarily, all cameras in the rig are synchronized and act as a single camera. 

    This may not seem like a big deal, but if you’ve ever tried to set up, sync, and use multiple cameras at one time you’ll appreciate the convenience. Making a mistake on just one camera ruins your entire shoot. The Omni solves this problem and syncs everything, right down to the rolling shutter, between all the cameras at once. 

    GoPro is selling the Omni for $ 1,499 (rig only) or $ 4,999 for the full kit.

    4K? No thanks, I think I’ll take 8K instead.

    Although many consumers are still learning about 4K video technology, the broadcast industry is already beginning to think about 8K video, with companies such as NHK, Canon, Panasonic, Ikegami and Planar showing off 8K cameras and displays.

    Let’s get the obvious out of the way right up front: 8K IS AMAZING! (Yes, we meant to scream that.)

    OK, let’s put 8K this into some context. None of these companies really expect 8K technology to come to your living room any time soon, though that’s likely to occur in some form by the 2020 Summer Olympics in Tokyo, which seems to be a common target in the industry.

    The real interest in 8K technology right now is for content acquisition, and it’s the same reason producers of HD content like to shoot in 4K: additional post-processing options and better quality footage when downsized. Display manufacturers are also excited about 8K for applications where size really does matter, such as cinema screens, displays at amusement parks, and giant stadium screens.

    Trust us, though. Once you’ve seen 8K displays you’ll never look at a 4K screen the same again…

    8K Displays

    It’s almost impossible to see the pixels on Canon’s prototype 8K reference display – even with a magnifying glass.

    Speaking of 8K displays, one of the most impressive examples was Canon’s prototype 8K reference display. To fully appreciate just how sharp this display is, consider that each frame of 8K video is just over 35MP of resolution – the rough equivalent of a full resolution Nikon D810 image. Pack that into a relatively small screen and for all practical purposes it looks like a backlit fine art print.

    Quite simply, this redefines what a video screen is. Once you remove any noticeable pixelation, it’s essentially indistinguishable from a nicely backlit, printed image. We could easily imagine these being used for museum exhibits, but we suspect content creators will come up with interesting ways to use them that we haven’t even envisioned yet.

    Almost as a tease, Canon tethered a magnifying glass to the display so you could look at the pixels up close. While it’s possible to see them you have to look really hard – certainly much closer than you ever would in real world conditions – and even then you have to convince yourself that you’re really seeing them.

    8K Prints

    Prints in Canon’s 8K print gallery were stunning and looked as good as what we would expect from even the best still cameras.

    This is why still photographers should care about 8K video.

    Each frame of 8K video is a 35MP image, meaning that as long as you use settings to avoid motion blur it’s possible to make some spectacular prints.

    Canon illustrated this potential with an 8K print gallery, exhibiting prints made from individual frames of 8K video. The results were spectacular, with vivid colors and sharp edges. Really, if they had told us the photos were shot by a Canon 5DS or a Nikon D810 we would have believed them. If this is the future, bring it on.

    Atomos Shogun Flame and Ninja Flame

    The new Atomos Shogun Flame (top) and the original Shogun (bottom). The new Flame includes an HDR screen and AtomHDR technology, which allows videographers to see a live approximation of what graded footage will look like when shooting in Log.

    Atomos has become a favorite of video shooters thanks to its excellent off-camera displays and recorders. At NAB the company showcased its newest line of ‘Flame’ products, which add significant new features to its Shogun and Ninja recorders.

    The biggest improvement most users will notice are the displays: the screens are now 10-bit HDR displays that are up to four times brighter than previous models, meaning they can even be used outdoors without a hood.

    Atomos also introduced a technology called AtomHDR to help videographers who shoot in Log format. Log video typically looks very flat until it’s color graded; AtomHDR allows you to record in Log while displaying accurate contrast and colors on-screen, giving a good approximation of what graded footage will look like. We use the original Shogun here in our studio and we were really impressed the AtomHDR technology. In the photo above you can see a comparison of the new Shogun Flame using AtomHDR (top) and the old Shogun without AtomHDR, but to be honest the photo doesn’t fully capture how much better the Shogun Flame looks.

    The Shogun Flame lists for $ 1,695, and the Ninja Flame (which lacks some features such as SDI and XLR inputs) lists for $ 1,295.

    Blackmagic Video Assist 4K

    Videographers also flocked to the Blackmagicdesign booth to try out the Blackmagic Video Assist 4K, an updated version of its Video Assist monitor and recorder. The Video Assist 4K is built around a 7-inch display and includes HDMI and SDI plugs, dual SD card slots for continuous UHD recording, LANC connection for remote control, and XLR microphone inputs. Footage can be recorded in 10-bit 4:2:2 video in either ProRes or DNxHD for easy downstream editing. The Video Assist 4K looks to be a great option for people who need off-camera recording, especially those shooting events that may require long, continuous recording.

    The Video Assist 4K lists for $ 895.

    Sennheiser Microphones

    The Sennheiser MKE 440.

    Cameras tend to get a lot of attention, but videographers know that sound can be just as important as a good picture when capturing video.

    Last year Sennheiser introduced the ClipMic digital and MKE 2 digital, lavalier microphones that plug directly into the Lighting port of an iOS device to record high quality sound, turning iPhones into great off-camera recorders. This year, the company followed up with additional Lightning-compatible microphones: The HandMic digital, a handheld microphone designed for mobile journalism, and the MK 4 digital, a studio microphone. We’ve actually been using one of the MKE 2 digital mics with an iPhone to record a lot of interviews over the past year and it works great, so we’re really excited to see Sennheiser expanding this line of products.

    Sennheiser also introduced the MKE 440 stereo microphone for DSLRs (see photo). Designed to mount on a camera’s hot shoe, the MKE 400 provides high quality stereo recording as opposed to the mono recording provided by most DSLR microphones, and should prove useful when recording an immersive soundscape with an on-camera mic is important.

    Lytro Cinema Camera

    The Lytro Cinema camera promises to change the way films are made, though at the moment it’s about the length of a VW minibus.

    Lytro was the clear winner of the ‘Well, that was bigger than we expected…’ award at NAB. 

    The company, which recently announced its exit from the consumer photography business, literally pulled the cover off its new prototype Cinema camera to a standing room only crowd. Featuring a 755MP imaging sensor that appears to be about a foot wide, the Cinema camera has the potential to change the way some films are shot. 

    Lytro’s Jon Karafin gave a live demo illustrating the camera’s unique ability to alter creative choices in post-processing, such as plane of focus, depth of field and depth-based keying. And because all of the computational work is done by thousands of CPUs in Google’s cloud, he was able to run the entire demo off a laptop computer.

    The prototype camera is huge (about the same length as a VW minibus, to our eye), but company representatives told us that smaller versions will follow. We think this technology has a lot of potential and look forward to seeing how it evolves. You can read our analysis of the Lytro announcement here.

    Articles: Digital Photography Review (dpreview.com)
  • Hero shot: Rollocam introduces Hercules pocket motorized dolly

    $ (document).ready(function() { SampleGalleryV2({“containerId”:”embeddedSampleGallery_8306737849″,”galleryId”:”8306737849″,”isEmbeddedWidget”:true,”standalone”:false,”selectedImageIndex”:0,”startInCommentsView”:false,”isMobile”:false}) });

    A pocket-sized motorized camera dolly that runs on an AAA batteries is in the works from US company Rollocam. Hercules is programmable and consists of a three-wheeled body with a tripod screw and a single press-button controller. It’s designed to drive in straight lines or arcs, and is suitable for making movies as well as time-lapse sequences. A collection of accessories also allow it to rotate for 360° panoramas, while different sized wheels alter the speed at which it can travel. Two of the wheels are hinged to allow the user to set a curved path of travel, and the whole unit disassembles for packing away.

    Rollocam says the device can support a 10lb weight, and that it can travel at seven speeds, from 2.5 to 20.3cm/1 to 8in per second, according to the wheels fitted. In time-lapse mode it can be set to travel between 0.13 and 12.7mm/0.005 and 0.5in, across eight settings, with intervals of 1 to 60 seconds.

    Launched as a Kickstarter project last year the campaign raised over $ 380,000, and as the funds increased additional features were added – such as the use of magnets on the metal Rollocam track to stop the dolly and send it back in the other direction. The company says it is also now working on a camera trigger that synchronizes with the traveling dolly so that time-lapse frames can be recorded in an automated move-shoot-move sequence.

    The basic Hercules costs $ 125 on a pre-order deal, and the premium kit with extra wheels, a panorama plate and a mounting plate for heavier cameras costs $ 249. For more information visit the Rollocam website.

    Articles: Digital Photography Review (dpreview.com)
  • The 4th Generation AppleTV is a Flawed and Frustrating Device

    *Disclaimer: Many of the problems of the 4th generation AppleTV are problems by the app creators for the device. Further, cable companies and content providers in many cases are likely disincentivized to make AppleTV a good or smooth experience. Cord cutting certainly hurts the profitability of cable companies and content providers are probably paid more by cable/satellite than AppleTV. I do understand that Comcast is directly responsible for much of what is broken on AppleTV. That said, I believe that Apple could do more to ensure that app creators fall into line. As the largest publicly traded company in the world, Apple has unique clout, an enormous amount of cash, and should bear more responsibility for a solid end user experience.

    I purchased 4 new AppleTVs last year when Apple launched the new 4th generation AppleTV. I have also owned each previous generation of the device. With each release I’ve been hoping for something more and with each release I’ve been let down and disappointed by my experience with AppleTV. While AppleTV may offer the best solution available today, it’s a shame that it is still such a flawed and frustrating device.

    AppleTV-5
    AppleTV-3
    AppleTV-2

    1. My number one issue with AppleTV at present is that it feels like the content companies are at war with the device. Many of the content companies have created apps for the new AppleTV but these apps still require you to maintain a cable/satellite subscription. I am actually fine with this. I don’t mind paying the cable company to access content on my AppleTV. What annoys me though is what a miserable experience it is trying to actually consume your cable subscription content on AppleTV.

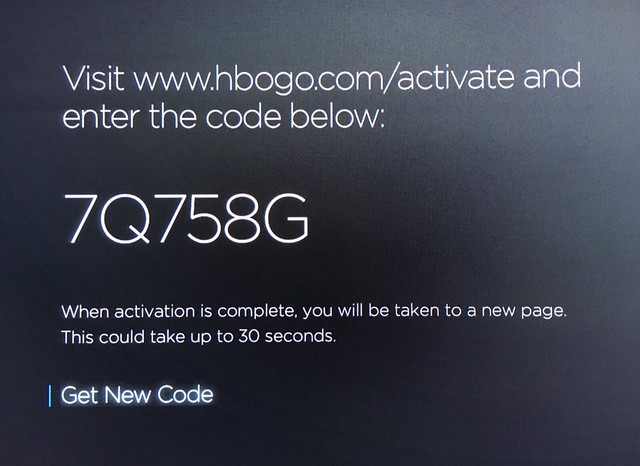
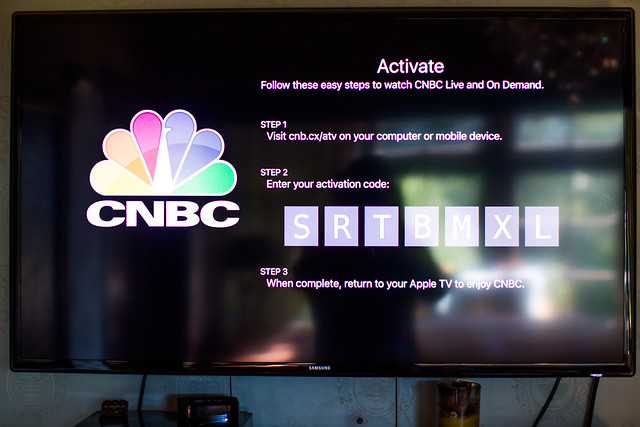
    The basic way that content apps on the AppleTV allow you to access their content is by authenticating with your cable subscription. When you launch the app it asks you to go to a website with your phone or computer. Once you are there (each content app has it’s own unique approach) you are required to enter in your cable TV credentials and a code from your TV screen to “activate” that content. Having to do this multiple times for multiple apps on multiple AppleTVs is a drag. With my four AppleTVs it took me over an hour to authenticate all of the content on all of the devices. It should not be this difficult.

    If consuming cable paid content on your AppleTV were as easy as spending an hour authenticating 50 times, even that might be ok. The problem with AppleTV though is that these content apps make you re-authenticate over and over and over and over and over and over and over and over again. When you are tired at the end of a day and just want to turn on HBO and watch Vinyl, it’s a drag to be jolted with the reauthentication screen yet again. It boggles my mind that my AppleTV and Comcast cannot find an easier way to verify that I indeed do pay and am entitled to consume the content. I’m sure Comcast makes it hard on purpose (it feels like you have to reauthenticate content every 48 hours or so), but Apple shouldn’t let them get away with that.

    2. If the reauthentication were not bad enough, some of the content that I get through my cable provider that I want to watch the most is not even available. AMC is probably my favorite network for content right now (Walking Dead, Fear the Walking Dead) and there is no AMC app for the AppleTV.

    Apple TV is a Flawed and Frustrating Experience

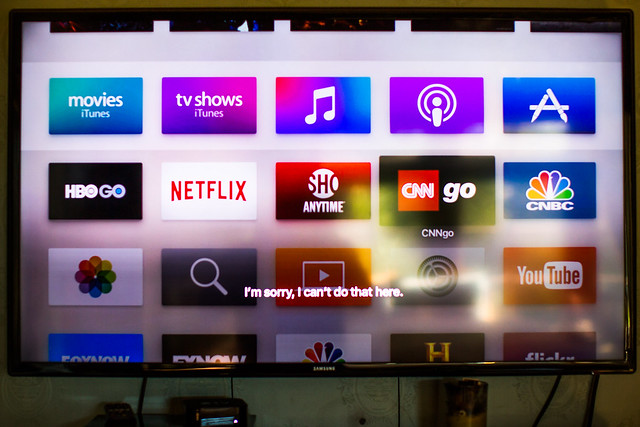
    3. Watching live TV is difficult. While there are apps (like CNN and CNBC) that let you watch live TV, it’s a pain to get to this content. With my Comcast X1 remote I just press and button and say “CNN” into the remote and instantly CNN comes on. When I press the mic button for Siri on my AppleTV app and say “CNN” I get a message on my screen that says “I’m sorry, I can’t do that here.” Even if I say “CNN Go” and get to the app, it still won’t let me watch live TV with Siri. I have to manually go through the menu process to watch TV (and many times once I go through all of this I’m just prompted with yet another requirement to reauthenticate for the 75th time).

    AppleTV-6

    4. Streaming content on AppleTV is a crappy experience. The other night I decided to watch a Bruce Springsteen documentary on the River on HBO on my AppleTV. While watching the show locked up at least 10 times. Sometimes it would take five minutes or more for content to resume streaming. While it’s tempting to blame my ISP for this issue, it should be noted that HBO plays flawlessly on my cable TV box and I have the fastest available internet speed available at present in my neighborhood. Content streams just fine to my computers, it only has freezing issues with my AppleTV.

    AppleTV-4

    5. Photos are boring on AppleTV. I have hundreds of thousands of photos that I’d like to consume on my AppleTV, but seeing the same photos over and over again gets boring very quickly. When you point AppleTV to a folder on your hard drive (through iTunes) of photos to share to the device, it will allow you to create a slideshow or use the screensaver for those photos. Unfortunately AppleTV only chooses about 100-200 random photos from the folder selected and just plays those photos over and over and over again. I would love to watch photos on my AppleTV but it needs to truly send me all of the photos randomized in a folder, not just 100 of them.

    6. I was hopeful that Flickr would work better on the new AppleTV. On my 3rd generation AppleTV Flickr photos suffered the same limitation. If I had Flickr as my screensaver and pointed it to my 100 faves or more album, it would just recirculate 100 or so of the photos from that album. On the new AppleTV Flickr slide shows have the same limitations and Flickr screensaver does not even work at all.

    7. I hate watching commercials. I love the Americans on FX and watch it each week. When I watch it on my Comcast box I just fast forward through all of the commercials with my DVR. When I watch it on AppleTV I can’t fast forward through the commercials, that’s a big drag. Also when commercials play on AppleTV it’s the exact same commercial over and over and over and over again. At least on real TV they mix up the commercials. Having to watch the exact same commercial 5 times in a show is dumb. It makes you hate the product being advertised even more.

    For a 4th generation device I expect something better than what AppleTV offers up today. It’s easy to pass the buck and blame Comcast and the content providers for such a miserable experience on AppleTV, but I think that AppleTV also bears some responsibility for ensuring a better experience for their customers who purchase the device.


    Thomas Hawk Digital Connection

  • How to Blend in Adjustments Using Layer Masking in Photoshop

    In a recent article called: Getting Started with Layer Masks in Photoshop – a Beginners Tutorial, I showed you the basics of layer masks and why they are such powerful tools. Layer masks are essentially what gives Photoshop layers much of their power. They allow you to tell Photoshop exactly where you want your changes applied, and to what degree.

    In that article, I also showed you how to use layer masks in pictures where you had a defined edge to the areas you wanted to change. Photoshop has a lot of great tools that allow you to make selections, which you can then use to define the mask.

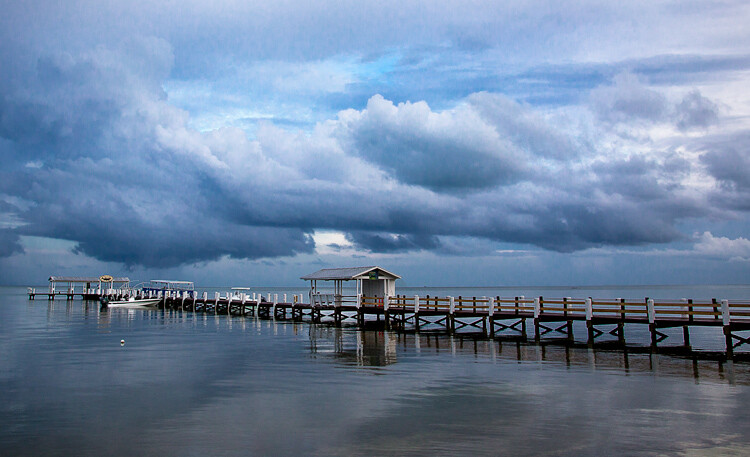
    Here is a picture I took in Florida where I used layer masks and to accentuate parts of the image without changing other parts.

    Here is a picture I took in Florida where I used layer masks and blending, to accentuate parts of the image without changing other parts.

    But what about pictures where you have a soft edge? Or where you want to blend in the effect gradually? That’s what I will cover in this article. It will pick up where the prior article left off, so if you haven’t seen that one yet, check it out. Once you have reviewed the basics of layer masks in that article, come back here and we will get started.

    Step 1: Create an Adjustment Layer

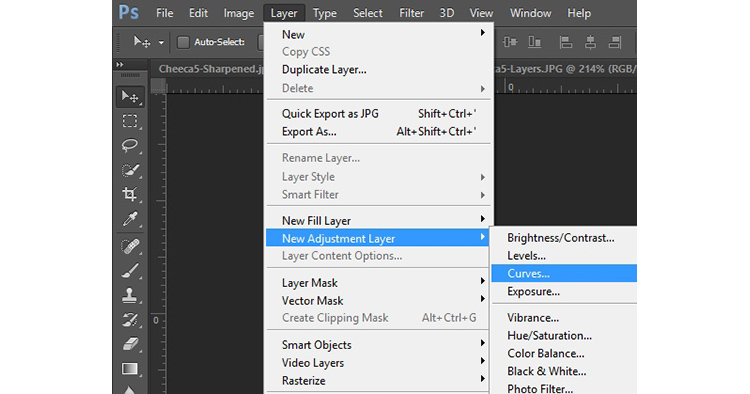
    The first thing to do is make the changes you want to the image, which will then be blended into the selected areas later. To make those changes, I am going to create a Curves adjustment layer. As mentioned in the prior article, Curves adjustment layers are one of the most powerful tools in Photoshop. They allow you to selectively effect brightness, contrast, and/or color. To create one, just select Layer > New Adjustment Layer > Curves. You can also click on the Curves icon in the adjustment layer panel. Don’t worry though – we are not going to do anything complicated with the Curves Adjustment layer.

    Graphic9-NewAdjustmentLayer

    Of course, you don’t have to use a Curves adjustment layer to make adjustments to your picture, you can use any of the adjustment layers offered by Photoshop. If you are more comfortable with Levels, use that. If you want to change the brightness levels, there are Exposure and Brightness/Contrast adjustment layers. If you want to make changes to color, you can use the Hue/Saturation or Vibrance adjustment layers. I consider Curves to be one of the most powerful tools in Photoshop, so that is what I use, but you can use whichever one you want, or you are most comfortable using.

    Step 2: Add in the Effect

    Once your Curves adjustment layer is created, just add the effect that you want. Remember that a white mask is automatically applied to all adjustment layers – so it reveals everything – but we will change that in a second.

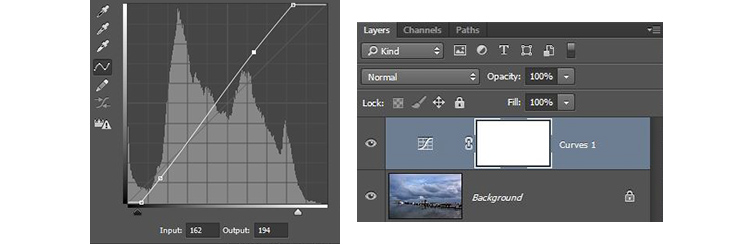
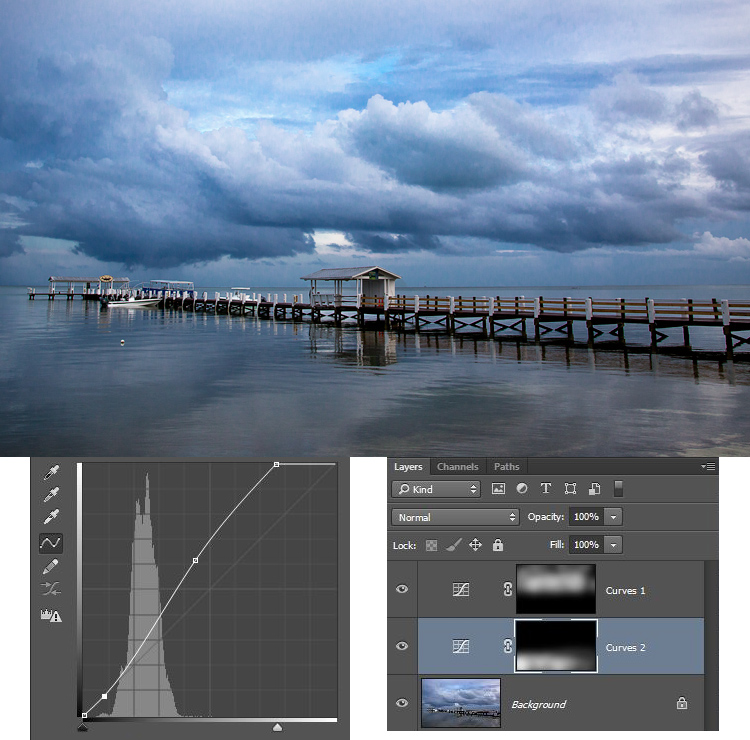
    I want to add contrast, therefore I will just scoot in the endpoints of my curves adjustment layer. You can also drag the line up or down in places. The idea is to steepen the curve where you have a lot of pixels. Doing so adds contrast, which is what we want.

    You don’t need to do anything fancy here. Go ahead and add the effect to a greater extent than you will want it in your picture. In other words, overdo it. Don’t worry if the picture doesn’t look quite right.

    Graphic1-Curves

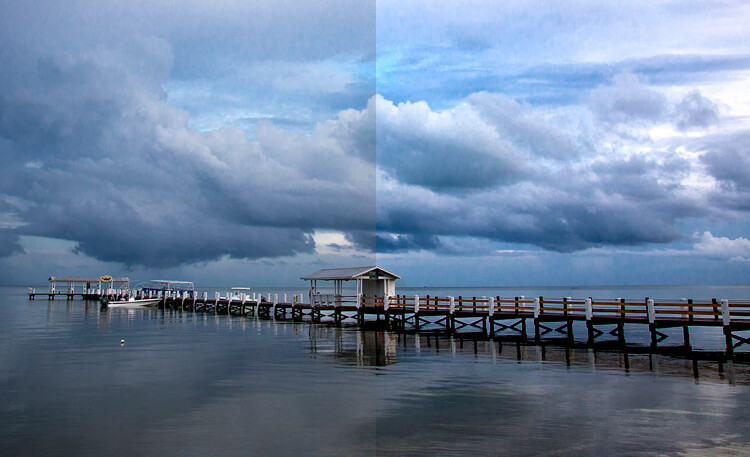
    In addition, don’t worry that the effect is occurring across the entire picture at this point. We will make the changes apply selectively in just a second. For now, just look at the area of the picture where you want the effect to be applied and add it in accordingly. For example, in this picture below, my change is added to the entire picture, even though it results in effects I don’t want (like blowing out the sky on the right). We will fix that in the next step.

    Graphic2-InitialChanges

    The left side of this image shows the original image, the right side shows it after the application of the curves adjustment layer. Notice the far right portion of the sky is blown out, but we’ll remedy that by limiting where the effect applies in the next step.

    Step 3: Brush it in

    Now comes the part when you limit the areas where your changes apply to the image.

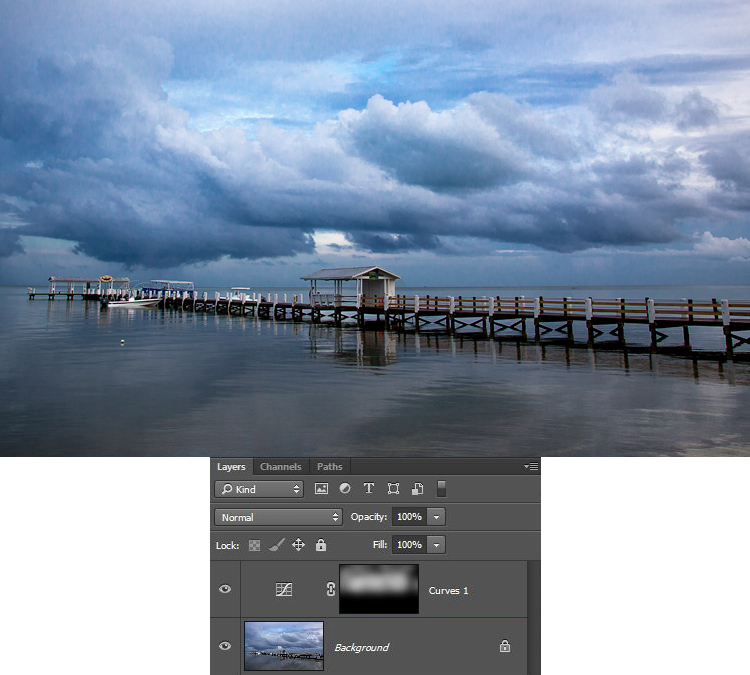
    Start by masking off the entire image, just press CTRL/CMD+I to do so. You will notice that two things happen. First, the effect you just added to your picture is hidden, it’s as if you never made any changes (don’t worry, the changes are still there, they’re just hidden). Second, the box next to the adjustment layer you created turned black. The box represents the layer mask. As we discussed in the last article, a white layer mask means the changes show through to the image (which is why you saw the effect of the changes when the layer mask was white). A black layer mask means the effect does not show up on the picture. Since our layer mask is now black, the effect does not apply anywhere in the picture.

    Graphic3-BlackLayerMask

    Now we can begin the process of adding the effect in gradually. To do so, we will use the Brush tool. You can select it from the list of tools on the left side of your screen (tool panel), or you can just press B to call it up. While you are at it, go ahead and press the D key on your keyboard. This will ensure that the brush is set to its default foreground color, which is white, which is what you want since you will be adding the effect to the picture.

    If you just left the brush as is, when you used it to paint in your picture, it would add the effect 100%. That is not what you want here. You want to add the effect in gradually, so it blends in. Therefore, go to the top of your screen and find Opacity. Pull the Opacity to the left until it is in the range of 5% to 15%. In my case I will use 10% (you can also just type 15 on your keyboard and it will apply to the opacity of the brush while that tool is selected). The lower the opacity, the less the effect gets added with each brush stroke – and the more gradual the change. If you have the patience to keep the Opacity very low (some people go as low as 2-3%), you will be rewarded with very gradual changes.

    Graphic4-BrushTool

    Now you will just paint in the effect. Before you do so, also make sure that the hardness of your brush is set to 0%. You want as soft a transition as possible. In addition, use as large a brush as your picture allows. The larger the brush, the softer the transition. The easiest way to change the size of your brush is with the square bracket keys. The left bracket [ makes the brush smaller while the right bracket ] makes it larger.

    Now just click in the areas where you want the effect applied. You will have to do this multiple times because you have the opacity set very low. That is okay though, be patient. By doing it this way you are ensuring that it’s blended in gradually. You can also add the effect more in some places and less in others. Just click a few more times where you want the effect to be the most visible.

    Graphic5-BrushingIn

    Step 4: Check Your Work and Adjust

    You can check your work by clicking the eyeball next to the layer. When you turn off the layer, Photoshop will show your image without your effect added. Click the eyeball again to see your progress and turn the layer back on.

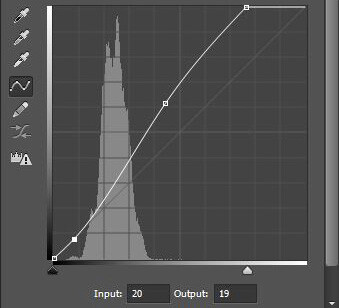
    Here is the histogram after using the brush tool to paint in white. It shows only the pixels that were selected via the brush.

    Here is the histogram after using the brush tool to paint in white. It shows only the pixels that were selected via the brush.

    If you found you overdid the effect, you can always back it off. You do so by turning the color of your brush from white to black. Remember that white reveals the adjustments, black hides them. You could undo the effect by stepping backward (Edit > Step Backward), but the easiest way to do so is just press the X key (that switches the foreground and background colors so you now have black on top). Now when you use your brush it will be removing the adjustment you created. Remember that your opacity percentage applies whether your brush is painting with white or black. When you are done removing the adjustment, press the X key to go back to a white brush and continue adding the effect where you want it.

    You can also go back and adjust your Curve after you have brushed it in. In fact, you should get in the habit of checking the curve your originally set. Once you have used your brush tool, the histogram will show only those pixels within the selected area (where you painted white). In general, you will want to make sure that the steepest part of the curve corresponds with the part of the histogram where you have the most pixels. Make a tweak to your curve to make sure it looks how you want.

    Step 5: Repeat

    Another great thing about this technique is that you can do it over and over again. It’s not uncommon to see photographers with a long list of layers, where they have made adjustments to specific parts of the image. You can use this technique to change the brightness values of the picture, making parts lighter or darker. You can also change the contrast, as we did above. You can even change the colors by going into the individual color channels of the Curves adjustment layer. Of course you could also use the brushing techniques above on a Hue/Saturation adjustment layer.

    Here I used the same process that was set forth above to brighten the water. I created another Curves adjustment layer, turned the layer mask black, and then brushed in the effect with brush set to white at low opacity.

    Graphic7-WaterAdjustmentToo

    Other Changes to Your Image

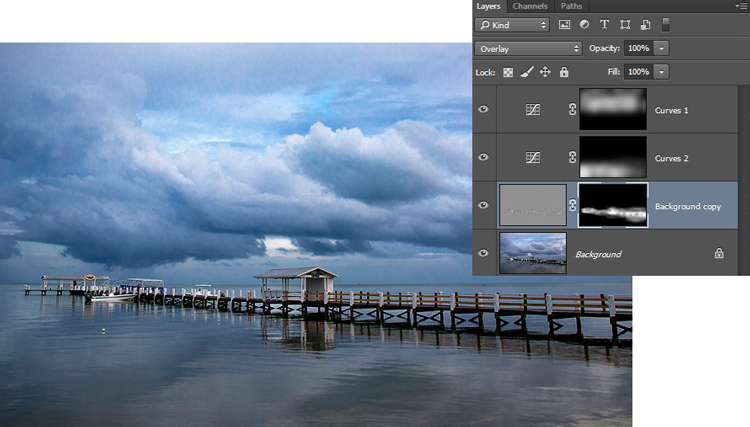
    In this particular image, I also wanted to sharpen the pier without sharpening the rest of the image. To do this, I will use the High Pass Filter (which is a remarkably powerful sharpening tool) and apply a layer mask to limit the effect to the pier. This will demonstrate the use of this layer masking technique outside the context of adjustment layers, which we have been using so far.

    First, let’s quickly walk through the use of the High Pass filter. To sharpen with the High Pass filter, first duplicate the layer (CTRL + J). Then change the blending mode to Overlay (don’t worry about how this makes your image look). After that, call up the High Pass filter (Filter > Other > High Pass). This will result in a small dialog box where you set the amount. Here I will go with an amount of about 4, which I find is pretty typical. Press ok and the effect will be applied to the entire image. This is a pretty handy sharpening technique, but we’ll make it better by applying it only to a specific area (the pier).

    To do this, we’ll add a layer mask and use the same brushing technique. Since we are not starting with an adjustment layer, we will need to add a layer mask. Just click on Layer > Layer Mask > Hide All, which will create a black layer mask. After that, select your brush (press B), set the color to white (press D for default), and set your opacity. Whereas you had been using a very low opacity earlier, in this case you can use a much higher Opacity. Brush in the effect just on the pier and watch it become sharper.

    Graphic8-Sharpening

    Conclusion

    Although this technique is fairly simple, it is a pro move. I know photographers that edit their photos with nothing but a series of Curves adjustment layers where they blend in the effect in this manner. Give it a shot on some of your photos and I believe you will like the results.

    googletag.cmd.push(function() {
    tablet_slots.push( googletag.defineSlot( “/1005424/_dPSv4_tab-all-article-bottom_(300×250)”, [300, 250], “pb-ad-78623” ).addService( googletag.pubads() ) ); } );

    googletag.cmd.push(function() {
    mobile_slots.push( googletag.defineSlot( “/1005424/_dPSv4_mob-all-article-bottom_(300×250)”, [300, 250], “pb-ad-78158” ).addService( googletag.pubads() ) ); } );

    The post How to Blend in Adjustments Using Layer Masking in Photoshop by Jim Hamel appeared first on Digital Photography School.


    Digital Photography School

  • Raspberry Pi updates camera board with 8MP Sony IMX219 sensor

    Raspberry Pi, maker of low-cost miniature computers frequently used in DIY projects, has upgraded its camera board accessory, replacing the previous 5MP OmniVision OV5647 sensor with an 8MP Sony IMX219 sensor. The new sensor is used for both the regular camera board and an infrared-sensitive version, and according to Raspberry Pi, it offers better low-light performance, image quality and color fidelity.

    The camera accessory is a simple, small board with a ribbon cable that can be connected to one of the Raspberry Pi mini-computers. Creators have used the camera modules to record images through a telescope and equip drones with lightweight camera functionality, among many other applications. The previously used OmniVision sensor was discontinued in 2014, but a large stockpile allowed Raspberry Pi to continue offering the model until just recently. 

    Speaking about tuning the image sensor pipeline, Naush Patuck said:

    Regarding the tuning process, I guess you could say the bulk of the effort went into the lens shading and AWB tuning. Apart from the fixed shading correction, our auto lens shading algorithm takes care of module to module manufacturing variations. AWB is tricky because we must ensure correct results over a large section of the colour temperature curve; in the case of the IMX219, we used images illuminated by light sources from 1800K [very reddish light] all the way up to 16000K [very bluish light].

    The Sony-based camera board costs $ 25 like the previous version, and is available through RS Components and element14.

    Via: Raspberry Pi

    Articles: Digital Photography Review (dpreview.com)
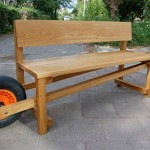
  • Wood Could: 12 Unlikely Timber-Based Transportation Designs

    [ By Steph in Technology & Vehicles & Mods. ]

    wood transit splinter 4

    Why stop at slapping a couple of ‘70s-style faux wood panels on the sides of your ride when you could be driving a car or motorcycle that’s made entirely from wood? Though it’s an unlikely material for this purpose, these 12 modes of transportation are made primarily from trees, including a Vespa, a three-seater bike, a floating Ferrari and a race car.

    Toyota Setsuna Concept Vehicle
    wood transit toyota setsuna

    wood transit toyota setsuna 2

    wood transit toyota setsuna 3

    Nearly every part of the Setsuna Roadster unveiled by Toyota at Milan Design Week 2016 is made of wood, with different varieties selected for different practical applications. 86 handmade panels of Japanese cedar make up the body, while birch was selected for the chassis and smooth castor aralia for the seats. Traditional Japanese joinery techniques like ‘okuriari’ and ‘kusabi’ are put to work so the pieces fit together without nails or screws.

    “When we created the sestina, we envisaged a family pouring its love into it over generations so that the car gains an irreplaceable value. Continuous development is possible in the form of bonds between the car and the family, like the growth rings of a tree. To proceed with the development of a car utilizing the appeal of wood, we directly spoke with experts with wide-ranging knowledge, including carpenters specializing in temple and shine construction and ship’s carpenters.”

    Three-Seater Wooden Motorcycle
    wood transit three seater

    wood transit three seater 2

    wood transit three seater 3

    A Hungarian carpenter made this three-seater custom motorcycle entirely from pine, with handlebars made from the horns of Hungarian grey cattle. It’s fully functional and built around a ZIL 200cc engine and took six months to build. Despite the level of craftsmanship put into this rig, it’s built more for looks and reliability than for speed, topping out at 12 miles per hour.

    Homemade Floating Wooden Ferrari
    wooden transit ferrari

    wooden transit ferrari 2

    wooden ferrari 3

    Made completely out of pine, this replica of a Ferrari F50 is actually a boat. Artist Livio de Marchi wanted a Ferrari to call his own, but needed something more practical to get him around the canals of his home city of Venice, Italy – so this was his compromise. Completed in 2001, it’s been owned by Ripley’s Believe It Or Not! since 2009.

    Half & Half Wood Car
    wood transit half and half car

    wood transit half and half car

    wood transit half and half car 3

    Half retro convertible, half modern Cadillac, this bizarre wooden car made by Ukrainian Vasily Lazarenko is built on a chassis and engine from a 1981 Opel model with a 100 HP engine. It’s not registered, but seems like it would be street legal. The custom creation went up for sale on eBay in 2012 for $ 120,000, though it’s unclear whether anyone ever bought it.

    Next Page – Click Below to Read More:
    Wood Could 12 Unlikely Timber Transportation Designs

    Share on Facebook


    [ By Steph in Technology & Vehicles & Mods. ]

    [ WebUrbanist | Archives | Galleries | Privacy | TOS ]


    WebUrbanist

  • Winners of 2016 Sony World Photography Awards announced

    $ (document).ready(function() { SampleGalleryV2({“containerId”:”embeddedSampleGallery_5299746697″,”galleryId”:”5299746697″,”isEmbeddedWidget”:true,”standalone”:false,”selectedImageIndex”:0,”startInCommentsView”:false,”isMobile”:false}) });

    An Iranian photographer has won the $ 25,000 top prize in the 2016 Sony World Photography Awards with a collection of portraits taken to highlight the horrors of acid throwing and the plight of its victims. Asghar Khamseh, a photojournalist with Iran’s Mehr News Agency, was given the title L’Iris d’Or Photographer of the Year a ceremony in London last week, at which he was also named the winner of the Contemporary Issues prize. His ‘Fire of Hatred’ project portrays the shocking injuries that acid throwing inflicts and the mental trauma it can create, but also the pride, strength and dignity of the mainly women and children affected by these too-common attacks.

    The ceremony also honored 15 other category-winning photographers across 14 professional competitions, an Open section for amateur photographers as well as student and youth contests. The Open winner, Kei Nomiyama from Japan, won a prize of $ 5000, and all category winners won trophies as well as Sony camera equipment. For the first time a photographer won two categories, with Canada’s Kevin Frayer coming out on top in both the Environment and People competitions.

    The prize for Outstanding Contribution to Photography went to a Chinese and Japanese couple, RongRong and inri for their promotion of, and influence on, contemporary photography in China.

    The ninth Sony World Photography Awards received 230,103 entries from photographers in 186 countries, and category winners, shortlisted and commended images will be exhibited in Somerset House in London until the 8th May. A book of images is also available.

    For more information on the awards visit the Sony World Photography Awards website.


    Press release:

    Grand prize winners announced for the world’s largest photography competition – 2016 Sony World Photography Awards

    Iranian photographer Asghar Khamseh wins L’Iris d’Or Photographer of the Year and $ 25,000 prize for powerful portraits of acid attack victims

    London, 21st April 2016: The overall winners of the world’s largest photography competition, the 2016 Sony World Photography Awards, are named today by the World Photography Organisation. An exhibition of all the winning and shortlisted work will run at Somerset House, London from 22nd April – 8th May.

    Following a record-breaking 230,103 submissions to its ninth edition, the awards’ Honorary Judging Committee has selected Iranian photojournalist Asghar Khamseh as the recipient of its most coveted prize, the L’Iris d’Or Photographer of the Year.

    Chosen from the winners of the awards’ fourteen Professional categories, the winning work, ‘Fire of Hatred’, is a powerful portrait series tackling the social issues around the violent act of acid throwing. Khamseh was announced as the winner of the $ 25,000 (USD) prize at an awards ceremony in London in front of industry leaders. The winners and finalists of all fourteen Professional categories were also announced at the ceremony.

    At the ceremony, the World Photography Organisation announced Kei Nomiyama, Japan, as the Open Photographer of the Year and recipient of $ 5,000 (USD). In addition, the organisation announced the winners of the Youth and Student Focus Photographer of the Year titles. All winners of the night received the latest Sony digital imaging equipment.

    Scott Gray, CEO, World Photography Organisation comments: “The awards consistently provide an incredible array of work, from a multitude of countries, and most importantlyprovide the chance for photographers to be discovered and extend their careers. I hope that the winning work this year can provide an inspiration to other photographers, helping to push their creative boundaries, whilst also serving to build the wider appreciation of photography.”

    The Sony World Photography Awards annually recognises the world’s best photography. Free to enter and open to all photographers, the awards are an authoritative voice in the photographic industry that has the power to shape the careers of its winning and shortlisted photographers.

    L’IRIS D’OR PHOTOGRAPHER OF THE YEAR – ASGHAR KHAMSEH
    Born in Tehran in 1963, Asghar Khamseh is a photojournalist with Mehr News Agency, Iran, whose work focuses on social issues.

    The winning series ‘Fire of Hatred’ is a powerful series of portraits of the victims of acid attacks. This beautiful yet thought-provoking work examines the social issues around this violent crime – looking past the physical and psychological damages suffered, and towards the social stigma and blame the victims, who are mainly women and children, suffer.

    Dominique Green, Chair, Documentary Jury said of the work: “Portraits of disfigurement resulting from social violence are undoubtedly a hard-hitting subject, and one which the longstanding tradition of documentary photography does not shy away from. The power of Asghar Khamseh’s imposing series ‘Fire of Hatred’ is such that he enables the viewer to face head-on intimate images, which could be testing to examine closely, with empathy and respect which in turn allows the viewer to become a witness and not just a spectator. The Jury were united in their admiration of this work and the light it shed on the tragic practice it exposes.”

    PROFESSIONAL CATEGORY WINNERS AND FINALISTS
    The winners of the seven Documentary and seven Art categories hail from 10 countries and, for the first time, two Professional categories have been won by one photographer in the same year. Photographers were judged on a body of work.

    ART CATEGORIES
    Architecture winner: Amélie Labourdette, France
    2nd – Hui Zhang, China / 3rd – Stephan Zirwes, Germany
    Candid winner – Kirstin Schmitt, Germany
    2nd – Nick Ng, Malaysia / 3rd – Andrea Rossato, Italy
    Conceptual winner – Julien Mauve, France
    2nd – Alejandro Beltran, Venezuela / 3rd – Barbaros Kayan, Turkey
    Landscape winner: Maroesjka Lavigne, Belgium
    2nd Maoyuan Cui, China / 3rd Stefan Schlumpf, Switzerland
    Portraiture winner: Marcello Bonfanti, Italy
    2nd Fauzan Ijazah, Indonesia / 3rd Rubén Salgado Escudero, Spain
    Staged winner: Alberto Alicata, Italy
    2nd Cristina Vatielli, Italy / 3rd Kristoffer Eliassen, Norway
    Still Life winner: Francesco Amorosino, Italy
    2nd Oliver Schwarzwald, Germany / 3rd Hiroshi Watanabe, Japan

    DOCUMENTARY CATEGORIES
    Campaign winner: Jetmir Idrizi, Kosovo
    2nd – David Chancellor, UK / 3rd – Antoine Repessé, France
    Contemporary Issues winner – Asghar Khamseh, Iran
    2nd – Kevin Frayer, Canada / 3rd – Simona Ghizzoni, Italy
    Current Affairs winner – Angelos Tzortzinis, Greece
    2nd – Andrea and Magda, Italy & France / 3rd – Andrew Burton, USA
    Daily Life winner: Espen Rasmussen, Norway
    2nd Sandra Hoyn, Germany / 3rd Stephanie Sinclair, USA
    Environment winner: Kevin Frayer, Canada
    2nd Li Feng, China / 3rd Lucy Nicholson, UK
    People winner: Kevin Frayer, Canada
    2nd Filippo Venturi, Italy / 3rd Alessandro D’Angelo, Italy
    Sport winner: Nikolai Linares, Denmark
    2nd Jens Juul, Denmark / 3rd Annick Donkers, Belgium

    OPEN PHOTOGRAPHER OF THE YEAR – KEI NOMIYAMA, JAPAN
    “Enchanted Bamboo Forest” by Kei Nomiyama was selected as the single best image in the world by a panel of judges chaired by Jael Marschner, former picture editor Time Out London / Sunday Times Travel. The photographer was awarded $ 5,000 (USD) at the London ceremony.

    A Ph.D. Associate Professor in Environmental Chemistry at Ehime University, Japan, Nomiyama is keen wildlife and underwater photographer. His photograph was shot in the mountains of Shikoku Island and captures the Luciola parvula firefly at the beginning of the rainy season.
    The photograph was selected from 10 Open category winners announced on 29th March. The Open competition asks for a single image and is open to all photographers.

    YOUTH PHOTOGRAPHER OF THE YEAR – SAM DELAWARE, US
    A beautiful portrait of the photographer’s sister won 18 year old student Sam Delaware the Youth Photographer of the Year title. Born in Freeport, Maine and currently attending school in Angwin, California, Delaware is a self-taught photographer who has been shooting since the aged of 12. The photographer was flown to London to attend the awards ceremony as part of his prize.

    The winning image was selected from three Youth category winners announced on 29 March, the Youth competition is open to all photographers aged 12-19.

    STUDENT FOCUS PHOTOGRAPHER OF THE YEAR
    Sofia Jern, aged 23 of Novia University of Applied Sciences, Finland, secured the Student Focus Photographer of the Year title. She collected €30,000 worth of Sony photography equipment for her university at the awards ceremony in London. Jern’s winning work follows the lives of ‘glue boys’, young male drug users escaping reality on the streets of Kitale, Kenya.

    Student Focus works worldwide with over 400 educational institutions with photography courses and is one of the world’s leading programmes for photography students. It is supported by the British Journal of Photography. www.worldphoto.org/student-focus

    OUTSTANDING CONTRIBUTION TO PHOTOGRAPHY – RONGRONG & INRI
    RongRong & inri, the influential photographic husband and wife team who have shaped contemporary photography in China and beyond, collected their Outstanding Contribution to Photography prize at the London awards ceremony. They were recognised by the World Photography Organisation for both their careers as artists and their significant impact on Asian photography.

    RongRong & inri’s photography reflects the intimate world that they have created together and pushes the boundaries of traditional black-and-white darkroom techniques. Together they founded China’s first contemporary art space dedicated to the medium, the Three Shadows Photography Art Centre, and the 2015 Jimei x Arles Photo Festival in partnership with Les Recontres d’Arles.

    The first major European showing of RongRong & inri’s work, celebrating their careers will be presented at Somerset House as part of the Sony World Photography Awards Exhibition.
    The Outstanding Contribution to Photography prize has previously been awarded to Mary Ellen Mark, William Eggleston, Eve Arnold, Bruce Davidson, Marc Riboud, William Klein, Elliott Erwitt and Phil Stern.

    EXHIBITION AND BOOK
    All the winning and shortlisted images will be exhibited at Somerset House, London from 22nd April – 8th May. The exhibition will also include a special dedication to Outstanding Contribution to Photography recipients, RongRong & inri.

    The exhibition is accompanied by a book of the winning and selected shortlisted works, available to buy from www.worldphoto.org

    Articles: Digital Photography Review (dpreview.com)