Blog

  • Spiraling Skyscrapers: Rounding Up the World’s Tallest Twisting Towers

    [ By WebUrbanist in Architecture & Offices & Commercial. ]

    tallest towers

    The Council on Tall Buildings and Urban Habitat, an organization responsible for world records in architecture, has announced its definitive list of the world’s highest twisting skyscrapers (either completed or under construction), many of which are truly stunning. The CTBUH “defines a ‘twisting’ building as one that progressively rotates its floor plates or its façade as it gains height. Usually, but not always, each plate is shaped similarly in plan and is turned on a shared axis a consistent number of degrees from the floor below.”

    diamond tower

    The Diamond Tower (above) being built in Dubai is perhaps the most impressive such spiral structure, its rotating floors extending out from a central spire and adding a dynamic visual layer. It is the second-tallest in the list.

    shanghai tower

    At 2073 feet, the Shanghai Tower by Gensler is the tallest to date (also the second-tallest tower in the world aside from its twist).  The CTBUH reports that these approach to tall architecture is trending around the world. While any single reason would be speculative, one can assume that the variation from floor to floor is part of the appeal, both for internal occupants and in terms of the dynamic profiles this variety entails.

    cayan towe

    The third-tallest is the Cayan Tower in Dubai by SOM. “A stunning variety of textures, view angles, and ripple effects results from these manipulations, making these ‘twisters’ some of the world’s most iconic buildings – and in many cases, aerodynamic and energy-efficient. In this study, we rank the world’s 28 tallest twisting towers (either completed or under construction as of July 2016) and display selected variations on the theme.”

    Share on Facebook


    [ By WebUrbanist in Architecture & Offices & Commercial. ]

    [ WebUrbanist | Archives | Galleries | Privacy | TOS ]


    WebUrbanist

  • How to Shoot Vertical Panoramas (Vertoramas)

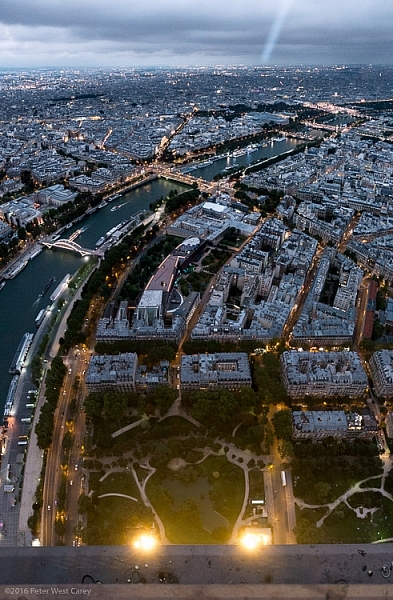
    PWC-Oregon2012-0205-0684-PanoThe Eiffel Tower. The Statue of Liberty. Redwood trees. Not all the world fits into our horizontal frame of it. Some of it climbs up and up! For those images you need to learn a new technique; vertical panoramas, or vertoramas as they are known.

    What are vertoramas?

    A vertorama is simply a panorama, but shot vertically. It is for the tall things of the world, and uses much of the same techniques as a panorama, but with some important considerations I’ll touch on later in this article.

    They are as simple as two shots combined to capture more foreground, or a chance to capture the tallest of the tall things on the planet without a wide-angle lens. They are a great option when you don’t have a super-wide angle lens, or you want to capture more detail than that wide angle lens will provide in one shot.

    Picking the best subjects

    Tall things are the obvious choice for making vertical panoramas, but also look at your normal images to see what can be included in the foreground.

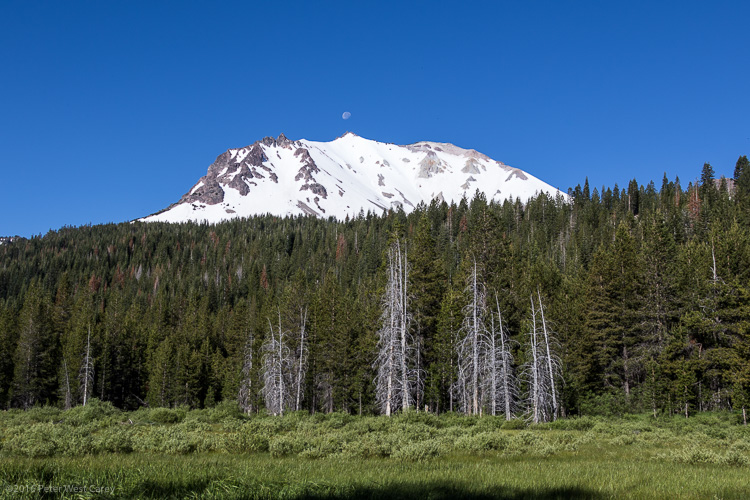
    For instance, this view of Mount Lassen in Lassen Volcanic National Park is pretty enough.

    PWC-Travel2016-0624-8343

    But what else is going on in the foreground? And not just the foreground, but the extreme foreground?

    PWC-Travel2016-0624-8329-Pano

    A Vertorama can take your normal landscape image and give it depth, like this image of Delicate Arch in Utah.

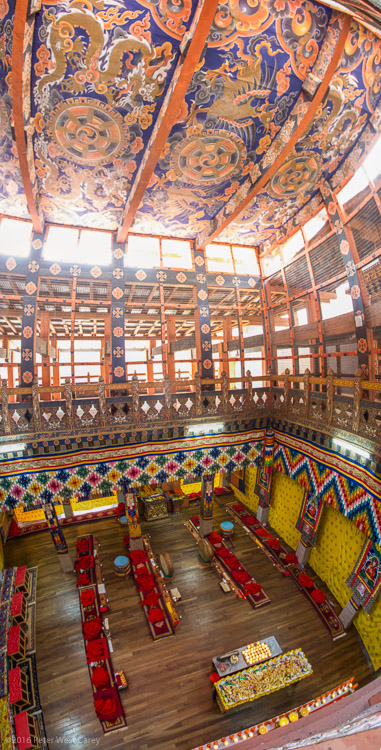
    I pick subjects where my vantage point gives me something above and below a level view of the subject. This view of a temple in Bhutan is such a location, as I was on a balcony with subjects below and certainly above.

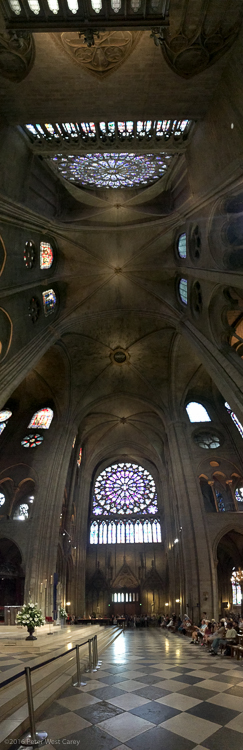
    Vertoramas are also used to emphasize the enormity of an area. In this case I used my iPhone’s panorama mode, turned the phone sideways, and kept panning up and up, and then back over the top of my head (flexibility is a key with this format!) to show the grandeur of the structure. Shot inside the amazing Cathedral Notre-Dame de Paris.

    PWC-France2015-083121-0711

    Waterfalls, statues, buildings, trees, landscapes…they are all ripe for the format.

    How to shoot vertoramas

    Shooting vertoramas is not much different than shooting panoramas, but there are some important considerations. First, if you need help with panoramas, dPS writer Barry J Brady has a good article on them here: How to Shoot Panoramic Photos. The settings are the same for vertical panos, but you need to make sure you can pan all the way up with your subject, which is sometimes hard to do with a tripod.

    Where it gets a little trickier is in the distance of your subject. This is fundamentally different than panoramas, because for the most part, panoramas have a roughly equal distance from the camera to all parts of the scene. Roughly.

    But a vertorama often has a subject leading away from it and this can cause distortion.Can you imagine the truck of this redwood tree being much closer than the 200 foot tall top?

    PWC-Sequoia in Mariposa Grove

    In which case, give yourself plenty of room at the bottom of the image as that will be your constriction point when you go to crop. I shoot landscape orientation (camera in horizontal position) for almost all of my vertoramas, in order to have enough space to crop.

    Editing Options

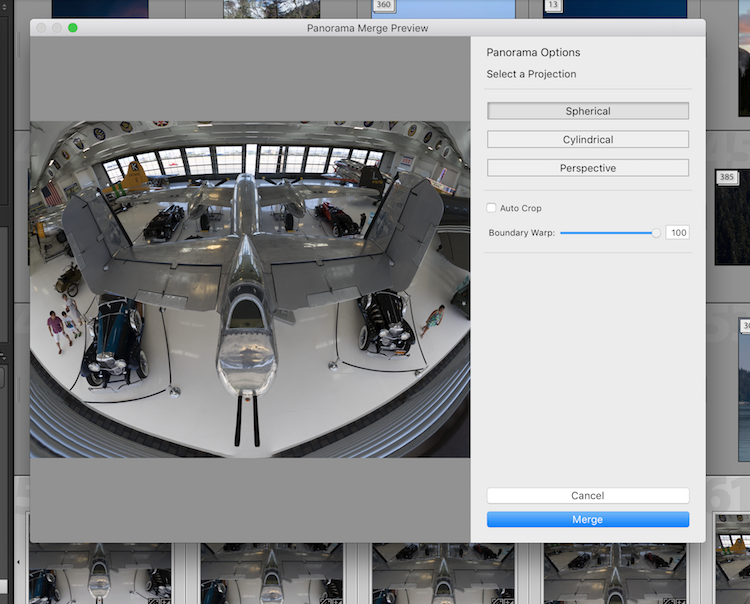
    I find more and more that the PhotoMerge -> Panorama feature in Adobe Lightroom works just fine for vertoramas. So does the same feature in Photoshop proper, maybe 80% of the time. Where it comes up short is in the variety projections.

    PWC-Vertorama-screenshot

    If you are looking for a little more power, try AutoPano Giga by Kolor (now owned by GoPro). There are a number of projections that can help with vertoramas, including Hammer. Plus it has the fun Little World projection that helps make those funky, little world images.

    Both programs are run just as they would be for a horizontal panorama.

    Things to consider

    Sometimes I look at vertoramas and I think they have no place in our digital world. When so much of what we view is on a horizontal screen, it’s hard to see their full beauty. You can turn your phone sideways, but you’re still missing the scale of the shot. Have you found yourself scrolling a lot in this article, and maybe not even seeing the whole images?

    PWC-France2015-083117-0943-Pano

    That being said, I love how vertoramas look when they are printed. Printing can be done at Costco, Walgreens or any place that prints panoramas.

    Vertoramas can be trickier to shoot than a regular panorama as your tripod doesn’t typically pan up and down as smoothly as side to side. I suggest getting more acquainted with shooting these images handheld. It’s not hard to do.

    Also, use your smartphone camera. That panorama mode works perfectly fine when you pan the camera skyward. Most newer phones even realize you made a vertorama and flip the image so it looks proper.

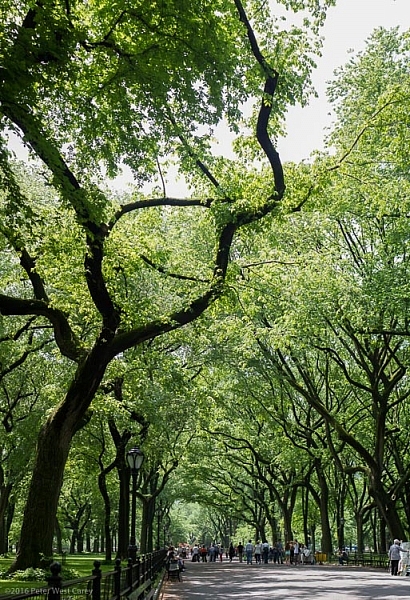
    Lastly, vertoramas don’t all need to be skinny and tall. They are also used to create a more formal aspect, even a nice square, of a subject hard to capture in a single frame. This image of Central Park in New York is an example as it was shot with a 50mm lens on a crop sensor camera, far from being wide angle. But the result is a nice, wide image that gives more depth to the scene. See also: 5 Steps to Rock the Brenizer Method.

    A vertical panorama of trees and tourists in Central Park, New York City, New York, USA

    A vertical panorama of trees and tourists in Central Park, New York City, New York, USA

    Conclusion

    Vertoramas are a fun way to explore the world. They stretch our normal view, and force us to think creatively to capture what we are after. I personally love the format for what the extra foreground can bring to the story.

    If you’ve shot vertoramas before, what are some of your favorite subjects? Any other advice you might give to beginners? Please share in the comments below, along with your vertical panorama images.

    googletag.cmd.push(function() {
    tablet_slots.push( googletag.defineSlot( “/1005424/_dPSv4_tab-all-article-bottom_(300×250)”, [300, 250], “pb-ad-78623” ).addService( googletag.pubads() ) ); } );

    googletag.cmd.push(function() {
    mobile_slots.push( googletag.defineSlot( “/1005424/_dPSv4_mob-all-article-bottom_(300×250)”, [300, 250], “pb-ad-78158” ).addService( googletag.pubads() ) ); } );

    The post How to Shoot Vertical Panoramas (Vertoramas) by Peter West Carey appeared first on Digital Photography School.


    Digital Photography School

  • Throwback Thursday: the Samsung NV10

    Pretty? Yes. Well-built? Yes. Image quality? Ehhh…

    In 2007, I was chiefly concerned with three things: fixing whatever had recently broken on my 1980 Datsun 210, scouring the electronics section of the local Goodwill in an endless quest for a louder stereo, and finding older computer games that my home-built PC would play acceptably well. Despite where I’ve ended up, it turns out that photography wasn’t really near the top of my priorities list.

    Regardless, I was dead-set on spending every penny of savings from my job at Dairy Queen to take a trip to Europe with three friends after our high school graduation, and my grandmother had offered to help me buy a new camera for the trip. That’s where this Samsung NV10 comes in.

    It may look a little odd today, but Samsung’s ‘Smart Touch’ technology actually made for a responsive and engaging way to manipulate the camera’s controls and settings before the advent of affordable touch screens.

    The Samsung NV10, which we reviewed back in 2006, is a compact camera with a 35-105mm equiv. F2.8-5.1 zoom lens, a 10.3MP 1/1.8″ CCD sensor, and Samsung’s ‘Smart Touch’ user interface. Most importantly to the mini-me at Omega Photo in Bellevue, WA, it was small – it could just about fit in a jeans pocket. It was smaller than the hand-me-down Canon PowerShot A70 I had used during high school when my Samsung VGA flip-phone wouldn’t cut it. I liked the NV10’s all-metal, all-black design, and though I really had no idea why I needed the option, it offered at least some control over exposure parameters.

    So despite the best efforts of my dad, who wanted me to get that absolute behemoth that was the Canon PowerShot S3 IS for a similar price (my 18-year-old self couldn’t fathom why anyone would want to carry a camera around his or her neck), I opted for the svelte little Samsung. After some time with the NV10, I decided – in typical American teenage fashion – to ignore nagging suspicions that my dad had been right all along.

    The NV10 produced fairly clean, punchy files so long as there was enough light. I don’t know why I was making that face, nor why I felt I needed to stage a photograph of my car on this lawn. Samsung NV10 @ 35mm equiv. ISO 100, 1/250 sec, F2.8.

    Photo by Erin Bynum

    So, what did I find to be positive about the NV10 besides its design, pocketability and control scheme? Unfortunately, not much.

    As Simon stated in our full review, the NV10 produced files that were excessively saturated and overly contrasty. This often led to clipped shadows and highlights, and though you wouldn’t have expected a Raw option on this camera, there were no options to adjust the JPEG output at all. The battery life was rated at an unimpressive 180 shots and the lens’ wide-angle equivalent left me wanting something a bit wider at the time (today, I find that 35mm equivalent is wide enough). One interesting tid-bit? It did at least support USB charging.

    You want punchy colors? You got ’em. Samsung NV10 @ 35mm equiv. ISO 100, 1/200 sec, F7.1.

    Photo by Carey Rose

    Of course, this is a point-and-shoot compact camera from 2006, and as such, has a very limited ISO range. You could push it up to ISO 1000, but things really started to fall apart around ISO 400. The problem there was that in anything but reasonably bright light, the camera would drag the shutter, likely resulting in a photo that was blurred and noisy, and the slow aperture at the telephoto end of the zoom range meant you were sticking to the wide end if you wanted to avoid using the flash.

    Can’t skip the cat photo. Check out that noise at ISO 400, and the handheld blur from an over-caffeinated teenager. I’m probably hitting the minimum focus distance without macro mode as well. Samsung NV10 @ 35mm equiv. ISO 400, 1/20 sec, F2.8.

    Photo by Carey Rose

    Despite all of this, I managed to convince myself that the Samsung NV10 was fine at the time. In hindsight, I was wrong. Full disclosure, though: my limited knowledge of photographic basics hurt my experience with the camera at least as much as the camera’s limited capabilities. Someone doing a “Pro Tog, Cheap Camera” challenge with the NV10 would likely turn out some good results, but they’d better keep an eye on the ISO value.

    To round things up, then, this was a camera for my graduation trip to Europe, and therefore you may be wondering where all those European photos might be. Well, I ended up losing the camera on a train in Germany, and therefore losing around 600 thoroughly mediocre photos. Turns out, my dad was right – I needed a camera that would stay comfortably slung around my neck.

    I got back home from my trip, saved up some money and bought that PowerShot S3 IS, and never looked back.

    Naches, WA. Samsung NV10 @ 93mm equiv. ISO 200, 1/200 sec, F12.3.

    Everyone makes mistakes. Do you have a camera that you realized you bought too hastily, or have even regretted purchasing? Did you keep it, or trade it out for something else? Let us know in the comments!

    Samsung NV10 real-world sample gallery

    Articles: Digital Photography Review (dpreview.com)

  • Tamron announces 2nd generation SP 150-600mm Di VC USD ‘G2’

    Tamron has announced a new version of its popular 150-600mm telezoom – the SP 150-600mm F5-6.3 Di VC USD G2. The ‘G2’ stands for second generation, reflecting several improvements to the design.

    These improvements include more effective image stabilization (to a claimed 4.5 stops of benefit), faster AF speed and compatibility with Tamron’s ‘TAP-in’ Console, for lens firmware updates and customization. A ‘Flex Zoom Lock’ mechanism has also been added to keep the lens barrel fixed at any focal length. Flourine coating has been added to the front lens element, and the entire lens barrel offers greater moisture resistance.

    The SP 150-600mm F5-6.3 Di VC USD G2 will sell for $ 1399 and will go on sale in Japan starting September 23rd in Nikon and Canon mounts, arriving in the US soon after. A Sony A-mount version will follow later. A pair of new teleconverters designed for use with the 150-600mm have also been announced.

    Press release

    INTRODUCING THE PINNACLE OF ULTRA-TELEPHOTO ZOOMS WITH ADVANCED FEATURES, ENHANCED PERFORMANCE, AND IMPROVED ERGONOMICS

    New generation “G2” lens boasts faster AF speed and enhanced VC

    SP 150-600mm Di VC USD G2 (Model A022)

    September 1, 2016, Commack, New York – Tamron, a leading manufacturer of optics for diverse applications, announces the launch of the SP 150-600mm F/5-6.3 Di VC USD G2 (Model A022). This second generation “G2” lens builds upon the success of the SP 150-600mm F/5-6.3 Di VC USD (Model A011), which launched in December 2013 and continues to successfully meet photographers’ needs in the ultra-telephoto category. The new G2 version was developed to provide superior optical performance with today’s high resolution DSLRs and to add improvements to several features including speed and accuracy of AF and VC (Vibration Compensation). Also, several new features have been added: FLEX ZOOM LOCK mechanism, Fluorine Coating and optional teleconverters. The new lens delivers outstanding performance and a luxurious, upscale appearance, including a metal lens barrel.

    Delivery of the new lens in Canon and Nikon mounts will start on September 23 in the Japanese market and soon thereafter in the U.S. market (Sony A-mount to be delivered at a later date) at a price of $ 1399.

    PRODUCT HIGHLIGHTS

    1. Optical design refreshed to achieve even higher performance
    Three LD (Low Dispersion) lens elements completely eliminate axial and transverse chromatic aberrations. The design also features an upgraded optical construction (21 elements in 13 groups) and leverages improvements in manufacturing technology. As a result, the lens delivers high resolution, improved sharpness and overall better performance.

    2. Tamron’s sophisticated eBAND Coating for eliminating ghosting and flare
    eBAND (Extended Bandwidth & Angular-Dependency) Coating is a nano-structured layer deployed on the lens element surface. In addition to regular anti-reflection coatings, eBAND Coating offers higher light transmission and significant improvement in anti-reflection characteristics, especially against angulated incident rays. Combined with BBAR (Broad-Band Anti-Reflection) coatings, flare and ghosting are reduced to imperceptible levels.

    3. MOD reduced to provide optimum tele-macro photography
    Tamron’s advanced manufacturing technology has made it possible to reduce the MOD (Minimum Object Distance) to 86.6 in (2.2m), compared to 106.3 in (2.7m) for Model A011, and has allowed for the wonders of tele-macro photography with its 1:3.9 Maximum Magnification Ratio.

    4. AF speed is faster and much more responsive with moving subjects
    The Model A022 is equipped with a USD (Ultrasonic Silent Drive) ring-type motor that delivers excellent responsiveness and control. AF speed is significantly improved from the current model, and it enables accurate high-speed focus even when capturing moving subjects. When shooting with AF, the Full-time Manual Focus override allows you to instantly make fine-focusing adjustments manually, without having to switch between modes.

    5. VC performance is now 4.5 stops and offers 3 modes optimized for different situations
    The VC (Vibration Compensation) effectiveness is equivalent to 4.5 stops, based on image stabilization performance levels established by CIPA (Camera & Imaging Products Association) when using VC MODE 3. Model A022 now has three types of VC modes, and it is possible to choose the optimum VC mode according to the situation for taking a photograph, such as when panning.

    • VC MODE 1 is the standard mode that strikes a great balance between the stability of the viewfinder image and the stabilization effects.
    • VC MODE 2 is exclusively used for panning.
    • VC MODE 3 prioritizes the stabilization of the captured images and forgoes the stabilization of the viewfinder image.

    A new VC Mode can be programmed with the optional TAMRON TAP-in Console™. You can overwrite VC Mode 1 with a new VC Mode that allows stabilization to be engaged constantly for videography purposes. In this mode, the LCD screen is used.

    6. New FLEX ZOOM LOCK mechanism enables locking of the zoom ring at any position
    The FLEX ZOOM LOCK mechanism quickly locks or unlocks the zoom at any position simply by sliding the zoom ring. Photographers can shoot from any angle without the zoom extending unintentionally. Additionally, the lens features the conventional Zoom Lock switch to prevent unwanted barrel extension during transportation.

    7. Fluorine Coating and Moisture-Resistant Construction for a more user-friendly lens
    The front surface of the lens element is coated with a protective fluorine compound that is water- and oil-repellent. The lens surface is easier to wipe clean and is less vulnerable to the damaging effects of dirt, dust, moisture and fingerprints. For greater protection when shooting outdoors, leak-proof seals throughout the lens barrel help protect your equipment.

    8. Electromagnetic diaphragm system now used for Nikon-mount lenses
    An electromagnetic diaphragm system, which has been a standard feature for Canon-mount lenses, is now employed in Nikon-mount lenses[1]. More precise diaphragm and aperture control is possible because the diaphragm blades are driven and controlled by a motor through electronic pulse signals.

    9. Lightweight and easy-to-hold tripod mount is compatible with an Arca-Swiss style quick release plate
    A new textured grip and Arca-Swiss style tripod interface enhances both speed and utility. And because the tripod mount is made of lightweight magnesium, it is much easier to carry.

    10. Compatible with TAMRON TAP-in ConsoleTM, an optional accessory product
    The optional TAP-in Console provides a USB connection to your personal computer, enabling you to easily update your lens’s firmware as well as customize features including fine adjustments to the AF and VC.

    11. Teleconverters exclusively for the Tamron lens now developed
    Two exclusive teleconverters[2], which perfectly match the optics of the new SP 150-600mm G2 (Model A022), offer 1.4x and 2x magnification, and provide a maximum zoom range up to 1200mm. These new teleconverters extend focal length of the master lens, making it possible to take pictures in farther ultra-telephoto ranges.

    Changes in zoom range when used with SP 150-600mm F/5-6.3 Di VC USD G2 (Model A022)

      Mounted on 35mm full-frame DSLR camera Mounted on APS-C format DSLR camera
     Without teleconverter  150-600mm  Approx. 233-930mm
     With 1.4x teleconverter  210-840mm  Approx. 326-1302mm
     With 2.0x teleconverter  300-1200mm  Approx. 465-1860mm

    Changes in magnification ratio when used with SP 150-600mm F/5-6.3 Di VC USD G2 (Model A022)

      Maximum Magnification Ratio 
    Without teleconverter 1:3.9
    With 1.4x teleconverter 1:2.8
    With 2.0x teleconverter 1:2

    Available focusing mode when used with SP 150-600mm F/5-6.3 Di VC USD G2 (Model A022)

      When using viewfinder When using live view mode
     With 1.4x teleconverter AF*1*2/MF  AF*2/MF
     With 2.0x teleconverter MF   AF*2/MF

    *1 Autofocus functions normally on any camera that offers F/8 autofocusing (see your camera’s instruction manual for your camera’s ability).
    *2 Subjects with low contrast and/or luminosity values can sometimes result in out-of-focus images.

    12. Based on the rigorous quality standards worthy of the SP series, this new lens is manufactured with thorough attention to details
    For the SP series products in particular, Tamron has established rigorous design and quality standards. These standards apply to the optical design, mechanical design and the cosmetic appearance, as well as to such wide-ranging areas as the product’s robustness and improvements in various individual functions. Tamron thoroughly reviews of all of the design and manufacturing processes in order to offer products to customers with ever-higher precision and quality levels.

    For the SP 150-600mm G2 (Model A022), the optical design was refreshed, mechanical parts were improved and a new exterior design was adopted. To maximize the optical performance intrinsic to this product, Tamron improved the accuracy of component parts and increased the precision of the overall zooming mechanism.

    Design Concept
    The new design adopted for the four SP series lenses already on the market is essentially the fusion of engineering and style, the pursuit of functional beauty and craftsmanship achieved by giving meticulous attention to minute details. Using metal as the exterior material creates a high-grade design based on the concept that emphasizes “Human Touch” characteristics, and significantly improves user-friendliness. The SP models feature a novel design for the switches, easy-to-read characters, an enlarged window over the distance scale and the adoption of organic forms easy for the photographer’s fingers to hold onto.

    This design philosophy-the pursuit of functional beauty with a “Human Touch”-is applied even to the most minute details of the new SP 150-600mm G2 (Model A022) ultra-telephoto zoom. By using metal for the exterior material and adding new functions such as the FLEX ZOOM LOCK mechanism, the Model A022 achieves a size and weight that makes comfortable handheld shooting possible, with a slim and stylish appearance design to top it all off.

    [1]Available only with cameras compatible with the electromagnetic diaphragm (D3100, D3200, D3300, D5000, D5100, D5200, D5300, D5500, D7000, D7100, D7200, D300, D300s, D600, D610, D700, D750, D800, D800E, D810, D810A, D3x, D3s, D4, D4s, Df, D500, D5). (As of September 1; Tamron)
    [2] Additional information will be available on Tamron’s website at a later date.

    Optical Construction:

    MTF:

    SPECIFICATIONS

    • Model : A022
    • Focal Length : 150-600mm
    • Maximum Aperture : F/5-6.3
    • Angle of View (diagonal) : 16°25′ – 4°8′ (for full-frame format): 10°38′ – 2°40′ (for APS-C format)
    • Optical Construction: 21 elements in 13 groups
    • Minimum Object Distance : 86.6 in
    • Maximum Magnification Ratio : 1:3.9
    • Filter Size : Ø95mm
    • Maximum Diameter : Ø108.4mm
    • Length[1] : for Canon 10.2 in / for Nikon 10.1 in
    • Weight[2] : for Canon 70.9 oz / for Nikon 70.2 oz
    • Aperture Blades : 9 (circular diaphragm[3])
    • Minimum Aperture : F/32-40
    • Image Stabilization Performance: 4.5 stops (using VC Mode 3) CIPA Standards Compliant (For Canon : EOS-5D Mark III is used / For Nikon : D810 is used)
    • Standard Accessories : Lens hood, Lens caps, Lens case
    • Compatible Mounts : Canon, Nikon, Sony A-mount[4]

    Specifications, appearance, functionality, etc. are subject to change without prior notice.

    [1]Length is the distance from the front tip of the lens to the lens mount face.
    [2] Weight includes the weight of the detachable tripod mount
    [3]The circular diaphragm stays almost perfectly circular up to two stops down from maximum aperture.
    [4]The Sony mount model does not include VC, since the bodies of Sony DSLR cameras include built-in image stabilization functionality.

    Tamron SP 150-600mm F5-6.3 Di VC USD G2 specifications

    Principal specifications
    Lens type Zoom lens
    Max Format size 35mm FF
    Focal length 150–600 mm
    Image stabilization Yes (VC – Vibration Compensation)
    Lens mount Canon EF, Nikon F (FX), Sony/Minolta Alpha
    Aperture
    Maximum aperture F5
    Minimum aperture F32
    Aperture ring No
    Number of diaphragm blades 9
    Optics
    Elements 21
    Groups 13
    Special elements / coatings eBAND (Extended Bandwidth & Angular Dependency) Coating
    Fluorine Coating
    Focus
    Minimum focus 2.70 m (106.3)
    Maximum magnification 0.2×
    Autofocus Yes
    Motor type Ultrasonic
    Full time manual Yes
    Distance scale Yes
    DoF scale No
    Physical
    Weight 2010 g (4.43 lb)
    Diameter 106 mm (4.16)
    Length 258 mm (10.15)
    Filter thread 95.0 mm
    Hood supplied Yes

    Articles: Digital Photography Review (dpreview.com)

  • The City Is Your Living Room: 15 Modern Street Furniture Designs

    [ By SA Rogers in Design & Furniture & Decor. ]

    city furniture main

    Smart, well-designed urban seating encourages more interaction with the cities we live in and with each other, infusing them with vibrancy and a sense of connection. It’s even cooler when it’s built right into a park or sidewalk as a multifunctional element to add some sculptural visual interest, delineate different zones or offer opportunities for fitness and play.


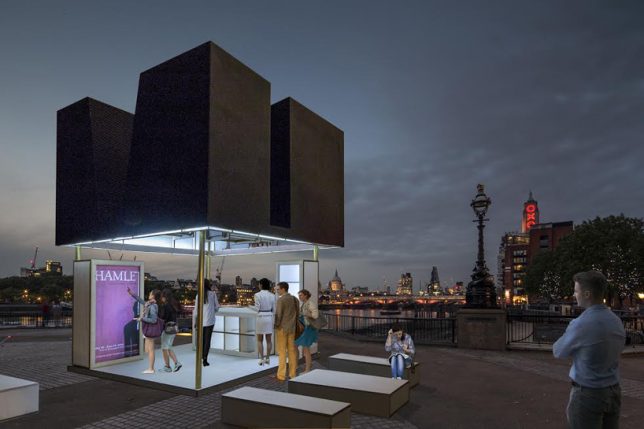
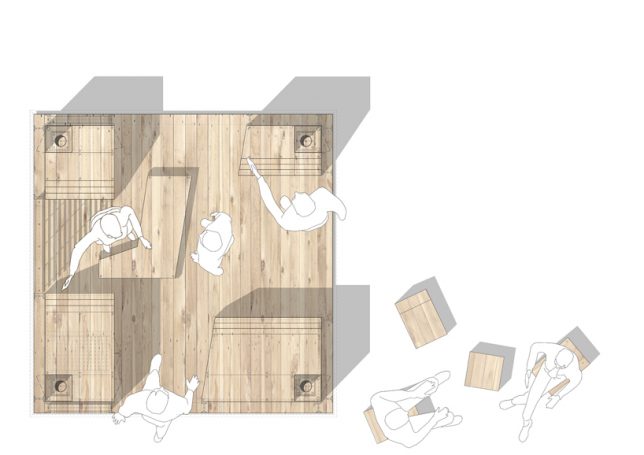
    Just a Black Box: Furniture Transforms Into Kiosk

    city furniture black box 1

    city furniture black box 2

    city furniture black box 3

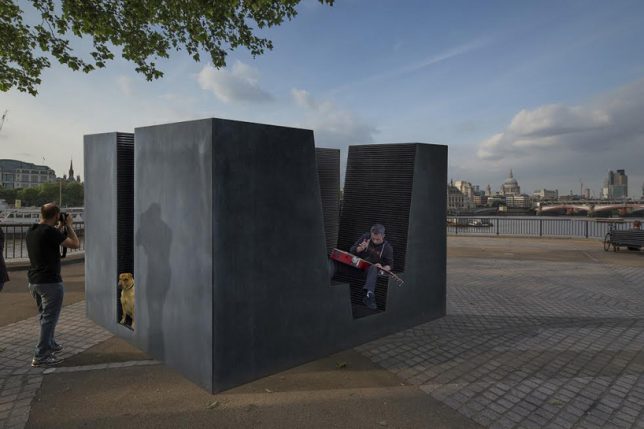
    A cube of semi-private seating by day, ‘Just a Black Box’ by Max Boano and Jonas Prismontas transforms into a kiosk for commercial or public use at night (or whenever else it’s desired.) The box elevates itself on its own hidden hydraulic columns to become a customizable space that can be used for retail, cafes, bike repair, selling tickets or even as a mini theater.

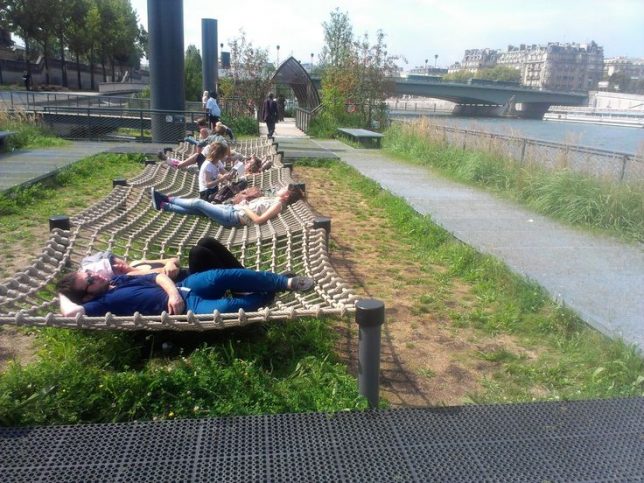
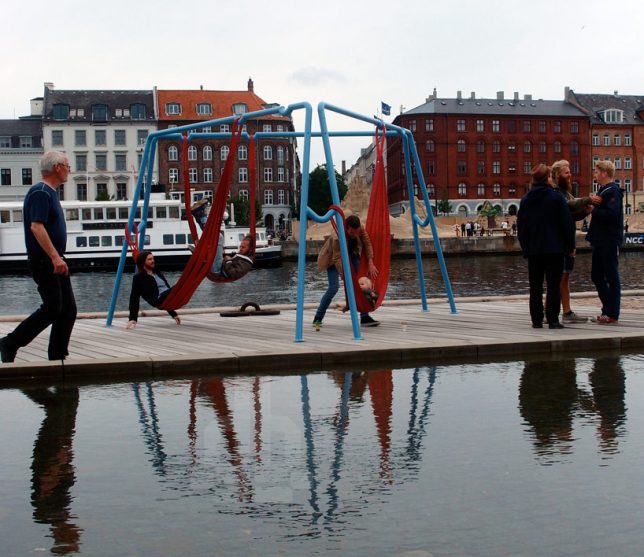
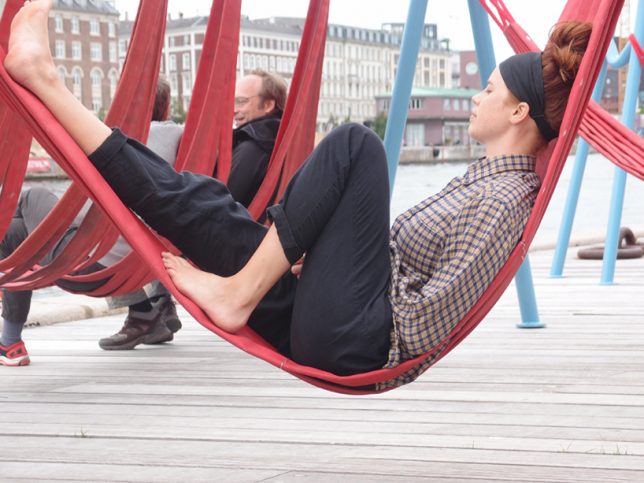
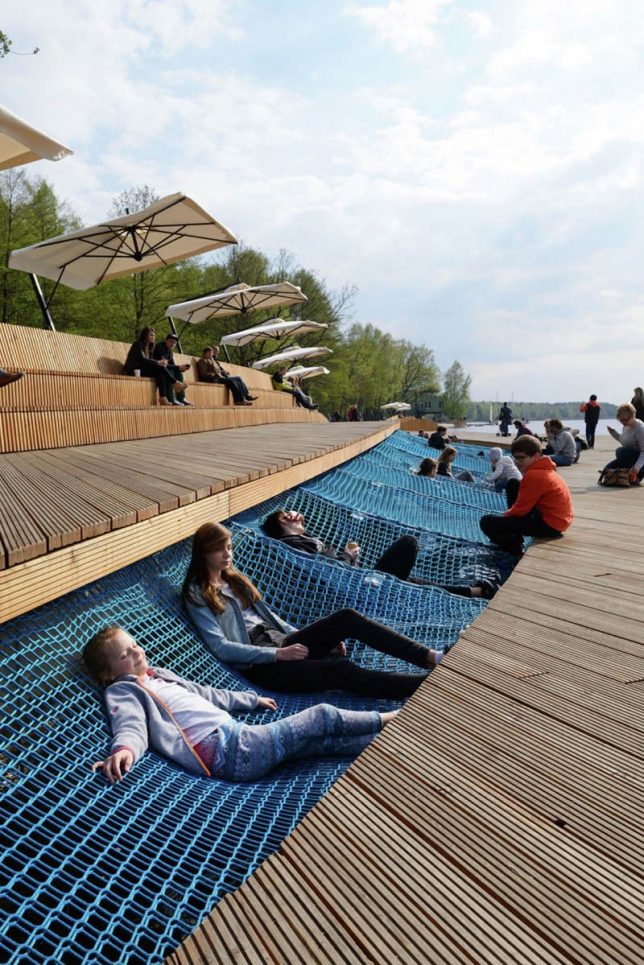
    3 Urban Hammock Installations

    city furniture hammock

    city hammocks 2

    city hammocks 3

    city hammocks 4

    city hammocks 5

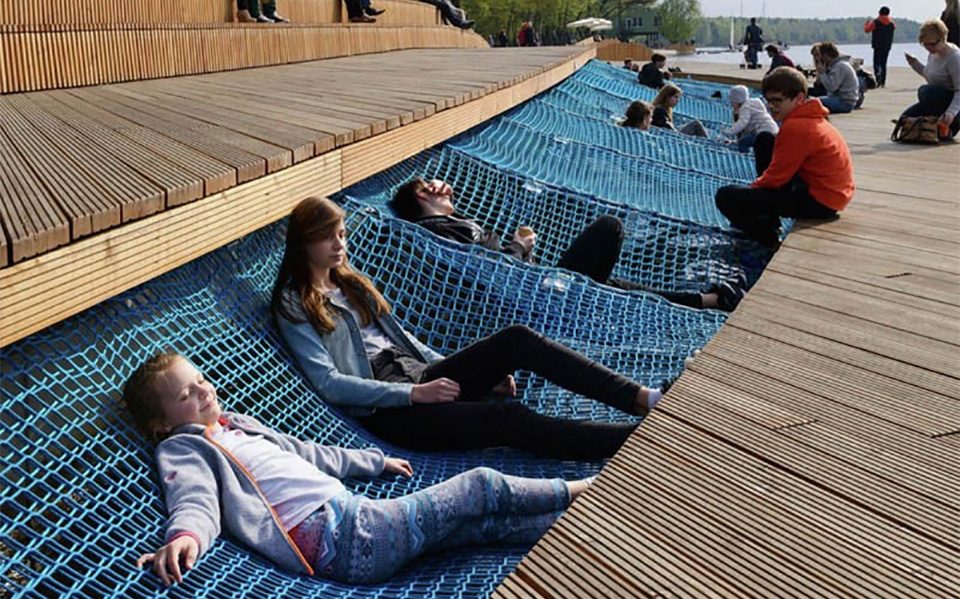
    Comfy hammocks come to public spaces in various forms to create some of the most nap-worthy urban furniture you’ll ever see, including a series of nets strung over the grass by The Chartered Institute of Housing, bright blue hammocks inserted into a void in a promenade along Paprocany Lake in Poland, and re-purposed fire hoses hung from a steel grid in Copenhagen.

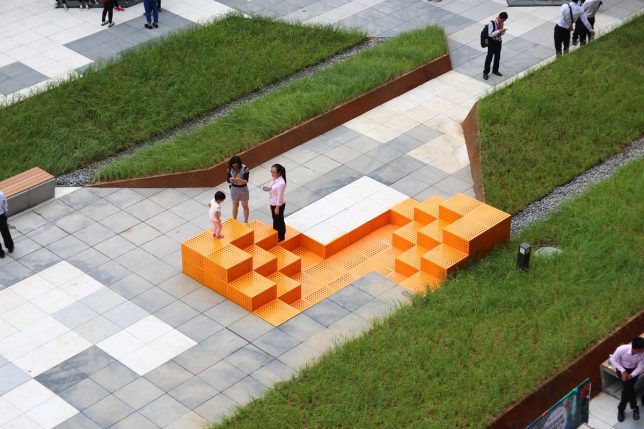
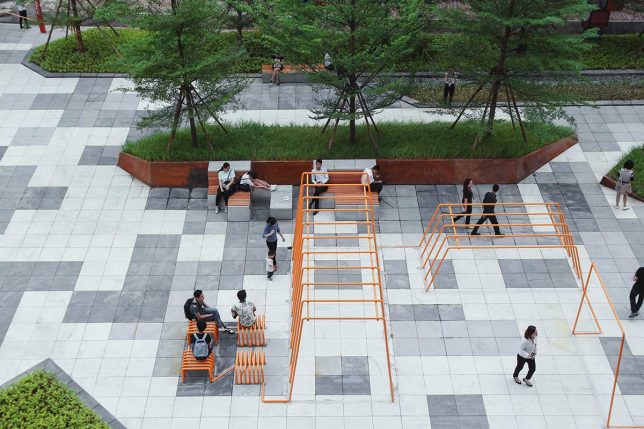
    Vanke Cloud City by Lab D+H

    city furniture cloud city 1

    vanke cloud city 3

    Vanke Cloud City is a mixed-use development project in Guangzhou, China boasting a series of creative public seating strategies by Lab D+H. The Cloud Line is a continuous tubular steel structure offering benches, monkey bars, parallel bars and other uses, while Cloud Seat is a modular set of interacted spaces made of perforated steel plate, with vertically stacked seating.

    Meeting Bowls for NYC

    meeting bowls meeting bowls


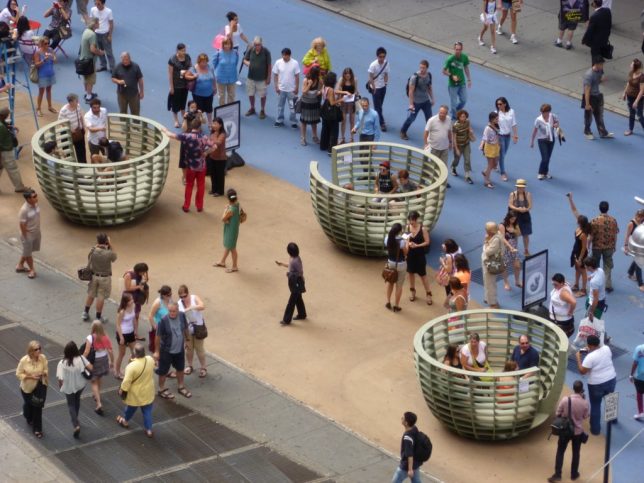
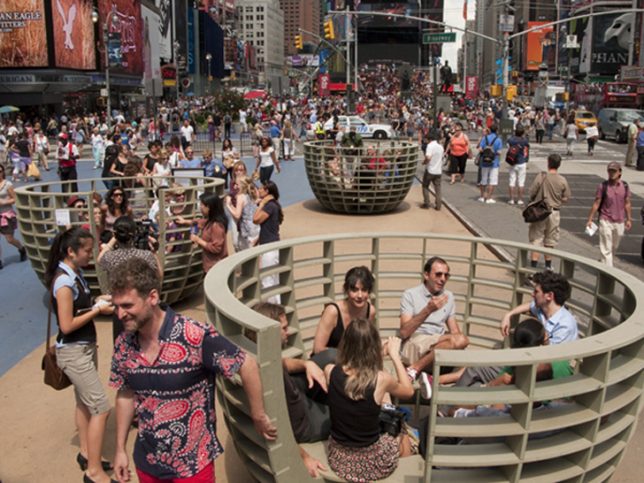
    Small groups can get together and chat face-to-face in a comfortable, breezy space with ‘Meeting Bowls’ by the Madrid-based design firm mmmm… in partnership with the Times Square Alliance. The urban furniture installation was situated in the center of Manhattan’s busiest plaza in summer 2011to facilitate interactions and dialogue between friends and strangers alike. The base of each bowl gently rocks to imitate the sensation of floating.

    Next Page – Click Below to Read More:
    The City Is Your Living Room 15 Modern Street Furniture Designs

    Share on Facebook


    [ By SA Rogers in Design & Furniture & Decor. ]

    [ WebUrbanist | Archives | Galleries | Privacy | TOS ]


    WebUrbanist

  • Book City: Retail Space for Reading Mimics the Look of Urban Spaces

    [ By SA Rogers in Design & Fixtures & Interiors. ]

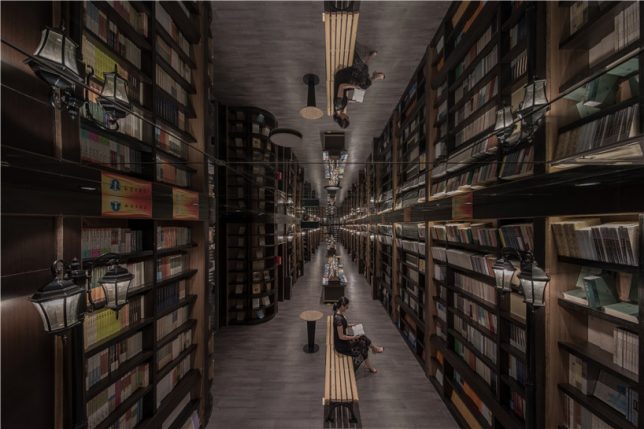
    book city 1

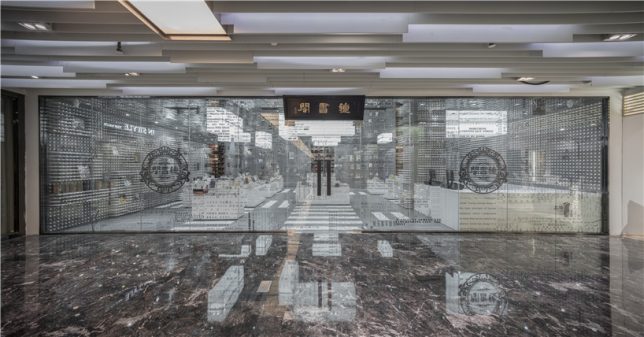
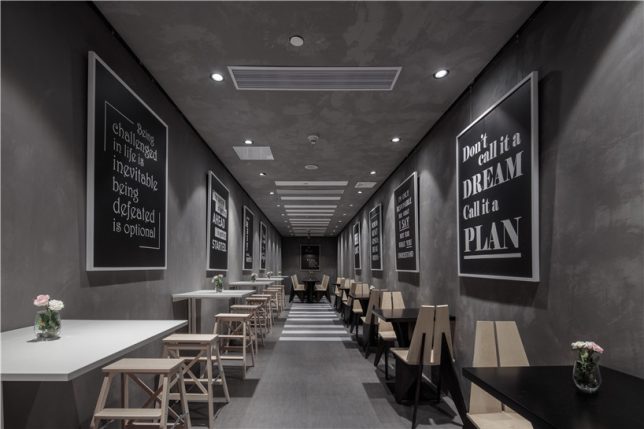
    The appearance of the city outside – complete with crosswalks and grids resembling aerial views of urban blocks – acts as a transition space between the entrance of a bookstore and the quiet, private spaces beyond. This space by XL-muse, located on the fourth floor of the Réel Mall in Shanghai, references the orderly aspects of urban aesthetics, carrying them from the sunny, exposed main room into the darkened alleys full of floor-to-ceiling shelves.

    book city 2

    book city 5

    book city 6

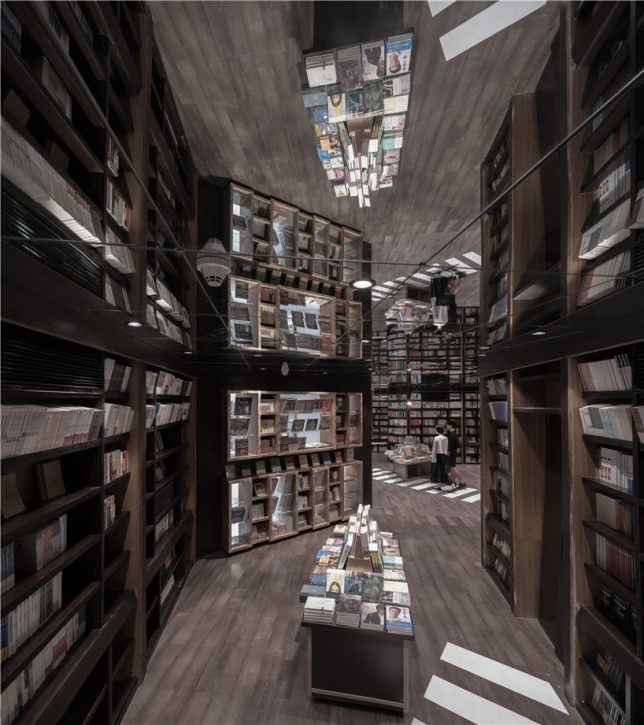
    Street lights gently illuminate the rows of books in these tranquil hallways, organized like pedestrian promenades complete with central park benches and displays. Mirrors are employed to visually double the height of the shelves, making them feel as if they continue up into the sky and stretch far deeper into the building than they really do. Paths direct you from one ‘house’ of books to the next as you explore the shop.

    book city 4

    book city 7

    book city 3

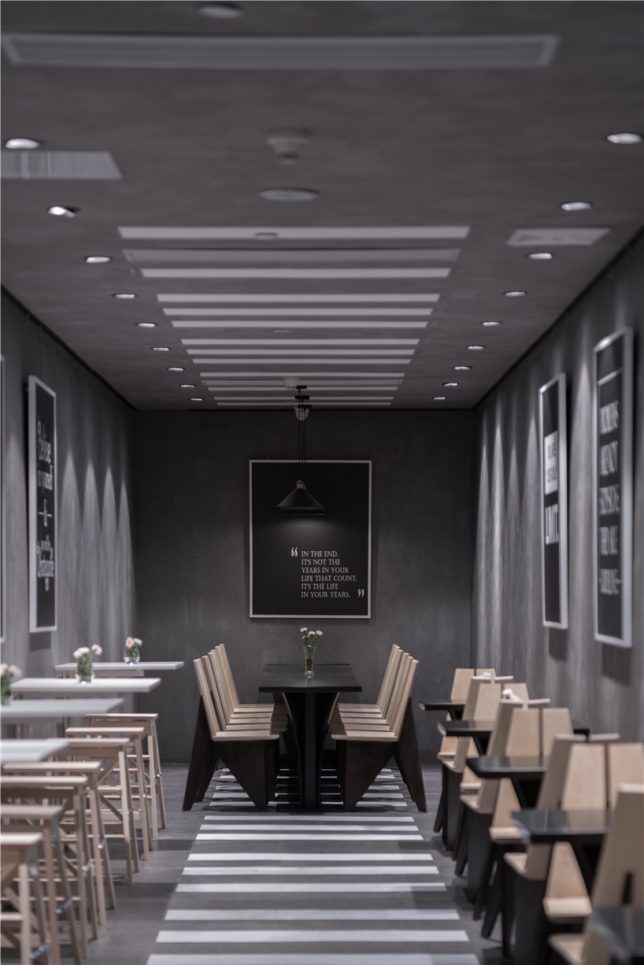
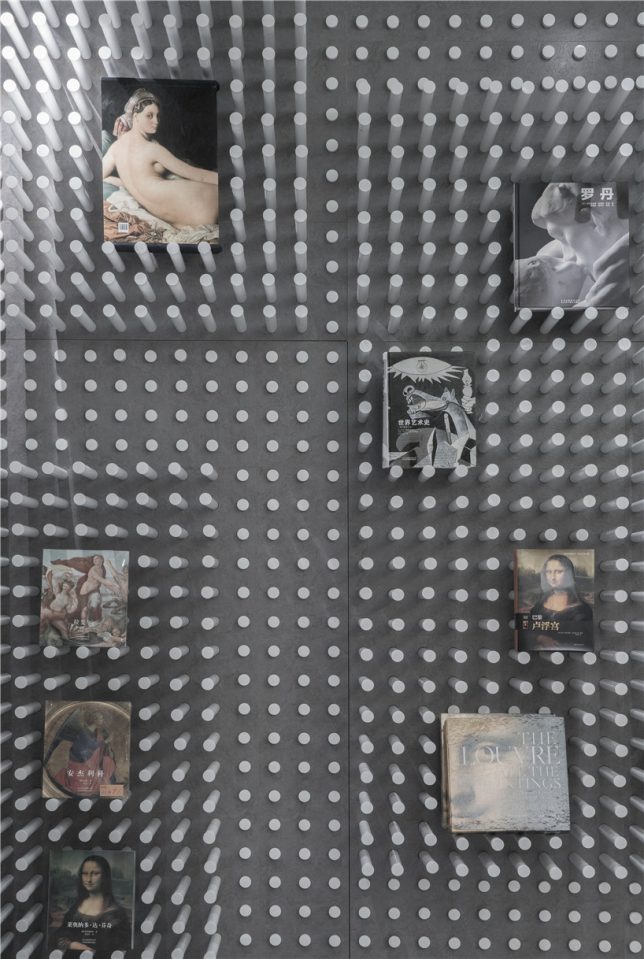
    In these atmospherically-lit areas bursting with dark-stained wood, shoppers feel like they’re navigating the city late at night, when the traffic has died down and the streets are eerily silent. The crosswalks continue into the small cafe, stepping right up onto the ceiling and then back out into the showroom, where white pegs inserted into the concrete walls can be pulled or pushed to create display niches.

    Share on Facebook


    [ By SA Rogers in Design & Fixtures & Interiors. ]

    [ WebUrbanist | Archives | Galleries | Privacy | TOS ]


    WebUrbanist

  • Canon introduces global shutter CMOS sensor with improved dynamic range

    Canon has announced a global shutter CMOS sensor with a re-designed pixel structure aimed at boosting dynamic range. Using global shutter presents a clear benefit for the sensor’s videography applications, as it doesn’t suffer from the distortion effects that a standard ‘progressive scan’ sensor does when capturing fast-moving subjects.

    However, global shutter designs have tended to offer less dynamic range than their conventional counterparts. Canon says that the sensor’s drive system (the way it’s read out) increases the amount of light the sensor can capture before overexposing. This is combined with a more efficient pixel structure and ‘optimized internal configuration’ to reduce noise and increase sensitivity. The result should be improved dynamic range, though it’s not clear how this improved performance will compare with traditional chips of the kind that exhibit rolling shutter.

    Canon says it will explore use of the chip in measurement and industrial applications, and consider applications in video production. No details of the sensor’s size or resolution were given.

    Press release:

    Canon develops global shutter-equipped CMOS sensor that achieves expanded dynamic range through new drive method

    TOKYO, August 31, 2016—Canon Inc. today announced that it has developed a new CMOS sensor equipped with a global shutter function that, because it exposes all of the sensor’s pixels at the same time, enables the capture of distortion-free images even when shooting fast-moving objects. Employing a new signal-readout drive system and new pixel structure that significantly expands the full well capacity and reduces noise, the sensor contributes to high-image-quality video capture by making possible the realization of a wide dynamic range.

    Distortion-free image capture when shooting fast-moving objects

    Standard CMOS sensors make use of the rolling shutter method, which sequentially exposes the pixels one row at a time. Because rolling shutters can create slight discrepancies in signal-readout timing depending on the location of the pixel, images of fast-moving objects may appear distorted and flash photography may result in the occurrence of the flash band phenomenon, in which the upper and lower portions of images display different levels of brightness. Because Canon’s newly developed CMOS sensor employs a global shutter, when shooting such fast-moving objects as a rotating propeller or a speeding train, subjects are able to retain their proper form to create distortion-free images. Enabling the confirmation of object shapes with a high degree of accuracy, the sensor offers potential benefits in industrial applications, including as a sensor for use in inspection cameras.

    Wide dynamic range realized through new proprietary drive method and pixel structure

    When the newly developed CMOS sensor converts light into electrical signals and stores the signal charge in memory, the new drive system achieves a significant expansion in full well capacity. Also, because it employs a structure that efficiently captures light and each pixel incorporates an optimized internal configuration, the sensor makes possible increased sensitivity with reduced noise. The expanded full well capacity, realized through the sensor’s new drive system, and substantial reduction in noise, enabled by the new pixel structure, combine to deliver a wide dynamic range, facilitating the capture of high-image-quality, high-definition footage even when shooting scenes containing large variances in brightness.

    Canon will explore various industrial and measurement applications for the newly developed CMOS sensor and consider deploying it in the field of video production for cinema production applications, TV dramas, commercials and more.

    Articles: Digital Photography Review (dpreview.com)

  • 5 Things Newbies Should Know About Getting Started in Photography

    Getting started in photography can be quite scary. We all start by investing in a DSLR, and think we are going to take amazing images. In reality it is a bit more difficult, because if it was easy… well everybody would sell prints, quit their day job, and live off photography.

    Just like any art, photography has to be learned, and practiced – a lot. It is a trial and error process, we all start at the bottom and build our way up.

    5 tips photography 1

    If your images do not look like you imagined them, then try a different approach. Just do something. Einstein said that the definition of insanity was doing the same thing over and over and expecting different results.

    #1 – Gather information and knowledge

    Photography is the best hobby you could have, but it is a lot of hard work. I personally don’t believe in talent. The first tip I can give you is to absorb as much information as possible. How do you do that ? Well you have so many free resources on the internet, the only need to take advantage of it. Since you are reading this, then you’re on the right track.

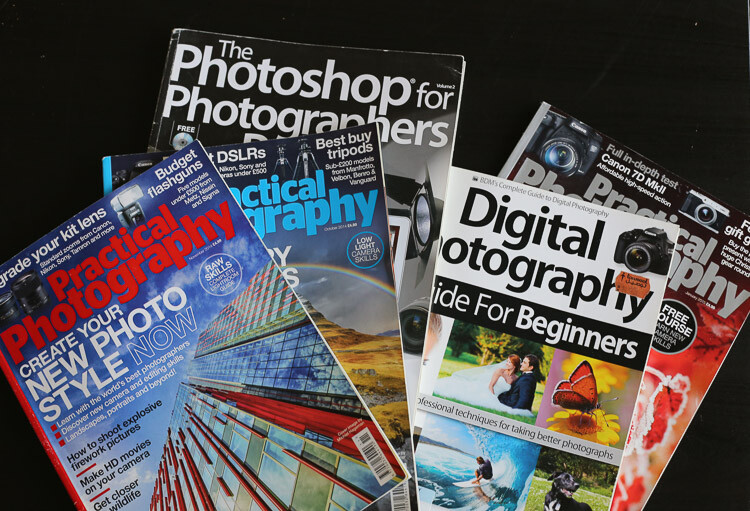
    By resources, I mean articles online, magazines, and YouTube tutorials. You can learn so much in less than 30 minutes. One other tip I can also give is to check multiple resources for the same topic.
    5 tips photography 2

    Read photography magazines. They have amazing stories and tutorials.

    For example you want to learn how take portraits – don’t read or watch only one tutorial. The more you research, the more you will learn, because sometimes one article won’t give you all the answers to your questions, but another article will.

    You should also anticipate. What I mean by that, is to learn about it, before trying to do something.

    For example, say you want to buy a new DSLR. You should learn how to use it before you actually buy it, read reviews and tutorials. If you are planning a trip to the sea, then learn seascape photography before travelling.
    5 tips photography 3

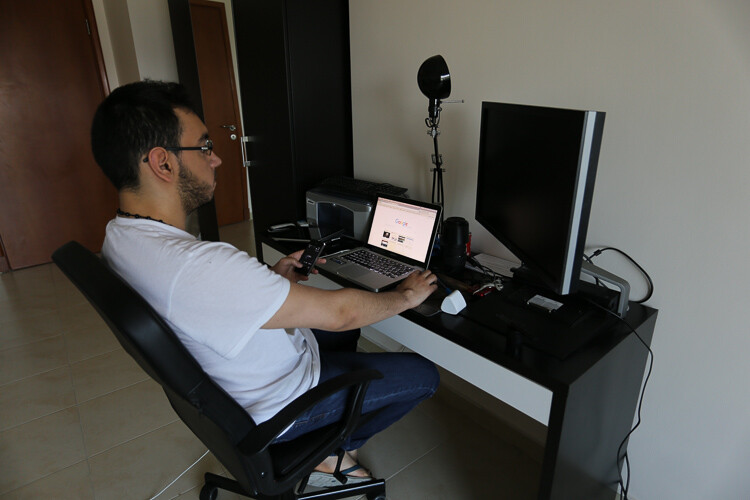
    Photography is spending hours and hours on research.

    #2 – Try all kinds of photography

    This brings me to my second tip: don’t focus on only one type of photography. Of course, if you like portrait photography then do that. What I’m trying to say, is that you should explore all the possibilities, before focusing on only one type of photography. Try to add variation by learning about macro photography, landscapes, portraits, wildlife, etc.

    5 tips photography 4

    Try super sports car photography. It’s so fun, just protect your ears.

    You may be surprised by the results you get, and if you never try, you will never know if you actually like photographing birds or not. From my experience, the more you learn, the more you’ll be able to do things. It’s better knowing how to do five things than only one. Starting photography and only wanting to take portraits is not the right mindset. It’s just like food, if you don’t try new food, you will never know if you like it or not.

    #3 – Photography is an investment

    The third thing you should know is that photography is a big investment. You will need to buy lenses, camera bodies, tripods, and filters, which will end up being quite expensive. If you are not smart with your decisions, then your bank account can end up in tears.

    It may seem confusing when I tell you to try different types of photography, but then warn you about buying too much gear. If you want to try macro photography, don’t buy a macro lens right away. Just buy extension tubes (or close-up filters) until you know if you are serious about macro. They cost a lot less, and increase your focusing distance dramatically.

    5 tips photography 5

    A very inexpensive $ 30 ND Filter.

    For filters, you can buy $ 20 Neutral Density filters for your landscape photography. Of course they won’t have the same quality as the professional ones, but it’s a good place to start.

    I started photography with a phone, then moved up to an entry level DSLR, and now I own a full frame camera. But, it took me four years to go from my phone to full frame, so don’t go out and buy the best DSLR ever, find something that will suit where are you starting first.

    5 tips photography 6

    Phone photography

    Make smart decisions, a normal kit lens is enough to get started in landscape photography.

    #4 – Post-processing is a good thing

    The fourth tip is about post-processing. Most beginner photographers underestimate the power of post-processing. It can make or break an image, that’s why my first point is important. You have to learn and fail in order to succeed – once you learn how to master software like Lightroom and Photoshop, your photography will become more like a process, because you will automatically think about post-production.

    5 tips photography 7 5 tips photography 8

    For post-production, I also recommend learning about the same topic from different sources. There are a lot of different ways to do the same thing, you just have to find which way works the best for you. It doesn’t matter how you do it, the important thing is the end result.

    For example, for dodging and burning an image I prefer using a curves layer with a mask, but that doesn’t mean I don’t know how to dodge and burn using grey layers.

    Post-production can be quite scary because there are so many tools, but once you master a certain software, you will be able to work on your worst shots and get the best out of them.

    I would say that post-production is almost indispensable. There are a lot of photographers who want natural photography, but that doesn’t exist. Your colours will get interpreted anyway, it’s up to you to decide if you want your camera to do it automatically, or if you want to take control over everything.
    5 tips photography 9

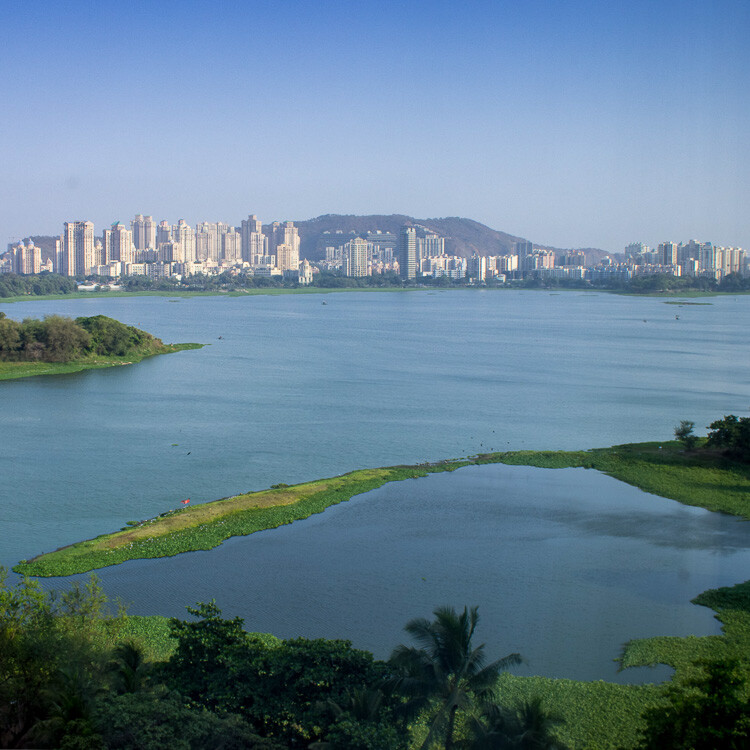
    Simple snapshot with my own interpretation of colors.

    #5 – Good photographers create depth in their images

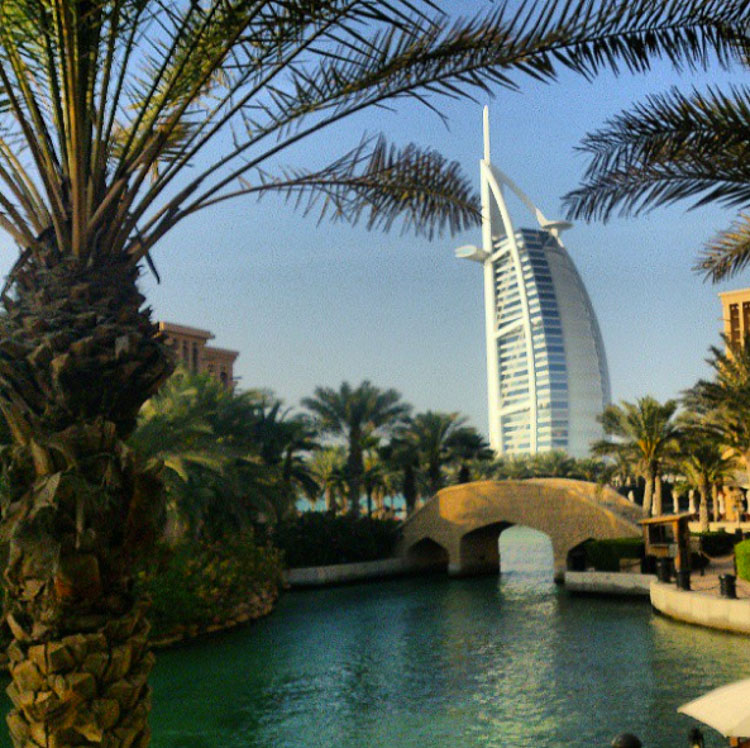
    The last thing you should know is that photography is all about creating depth. There are many ways of creating depth; you can do it with light and contrast, colours, movement, a solid composition, and with depth of field.

    You should aim to have at least one of these elements in your images. If you can mix all these elements in one image, then your result will be even better.

    With light and contrast you can play around with shadows, and dodging a burning. The main purpose is to have uneven lighting on purpose – try to avoid flat lighting. Some area should be lighter than others, and some darker. You also want to know which lighting conditions will give you the best results. For example, if you like shooting landscapes then you will want to know that you get the best light during the magic hour (blue hour).


    Composition is the most important thing, try to use a foreground, middle ground and a background. The rule of thirds is also really useful to frame your subject in a pleasing way.
    5 tips photography 10

    With colours, the main purpose is to have tones that go together. Always look at your colour palette and see what works best. This is quite difficult to do, but one tip I can give you, is that when the colours do not look good, convert your image to black and white.

    For movement, try long exposures, they are a good way to create a surreal images.

    The last thing is depth of field. This is very important if you’re taking portraits, the amount of background blur can completely change an image. If you want to learn about it here’s another article I wrote: How to Achieve Background Blur or Bokeh where I explain three easy ways to achieve a nice bokeh.
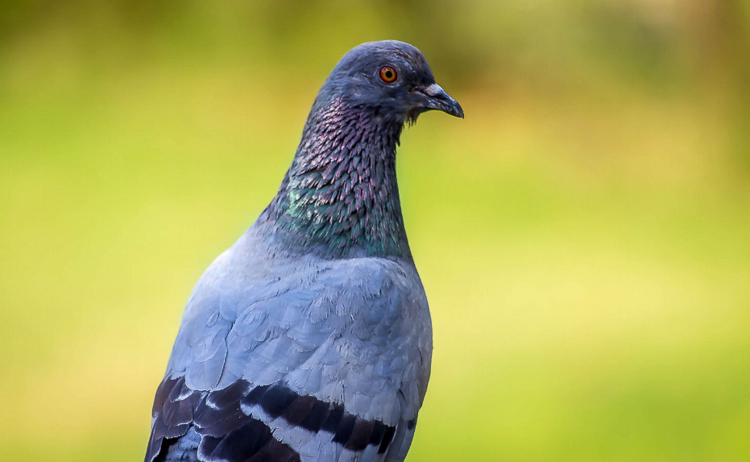
    IMAGE 2

    Summary

    So if you’re just getting into photography, consider these five things as you begin your journey. Learn everything you can from multiple sources, try different kinds of photography to see what you like, don’t get caught in gear envy, don’t be afraid of post-processing and remember to add depth to make more interesting images.

    Are you further along in photography? What other advice would you offer to new photographers? Please share in the comments below.

    googletag.cmd.push(function() {
    tablet_slots.push( googletag.defineSlot( “/1005424/_dPSv4_tab-all-article-bottom_(300×250)”, [300, 250], “pb-ad-78623” ).addService( googletag.pubads() ) ); } );

    googletag.cmd.push(function() {
    mobile_slots.push( googletag.defineSlot( “/1005424/_dPSv4_mob-all-article-bottom_(300×250)”, [300, 250], “pb-ad-78158” ).addService( googletag.pubads() ) ); } );

    The post 5 Things Newbies Should Know About Getting Started in Photography by Yacine Bessekhouad appeared first on Digital Photography School.


    Digital Photography School

  • Peak Design adds Range Pouch to Everyday lineup

    Peak Design has added the Range Pouch to its lineup of versatile Everyday camera bags. The pouch is designed to carry a lens on a belt, in a bag or on a strap, and is available in three sizes. The smallest is designed for kit and prime lenses, and the large will fit up to a 70-200mm. The pouches pack down flat when not carrying a lens, and the larger models can be configured to fit a couple of smaller lenses stacked on top of each other.

    Right now the Range Pouch is available as an add-on when you back Peak Design’s current Kickstarter campaign. The small Range Pouch can be added for $ 29, the medium for $ 34 and the large for $ 39. Following the campaign, the small will cost $ 35, the medium $ 40 and the large $ 45.
    Articles: Digital Photography Review (dpreview.com)

  • 4 Common Lighting Styles to Get the Perfect Portrait

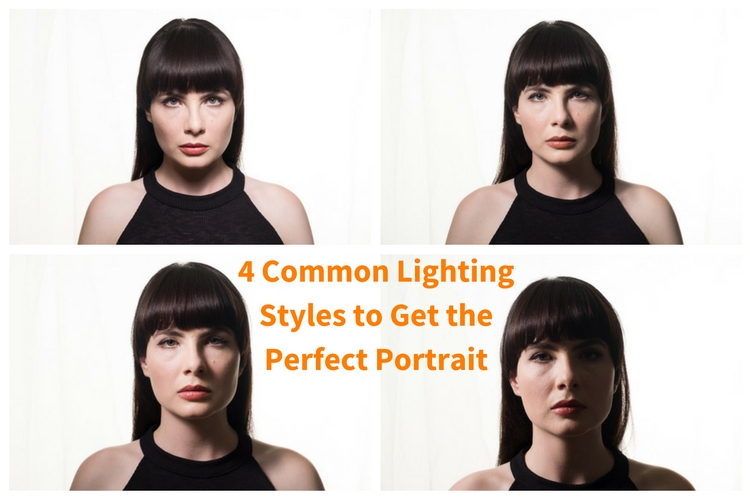
    When you begin doing portrait lighting for the first time, the general advice you get is to put your light at 45º to your subject, and aim it down at 45º. It’s a quick way to get something reasonably good, without a lot of understanding. With a little more knowledge, you can make better lighting decisions, and get more dramatic images.

    4 Common Lighting Styles to Get the Perfect Portrait

    Light has four main properties:

    1. Quantity
    2. Quality
    3. Color
    4. Direction

    In this article, we’re looking at direction of light only. If you look at the work of the Masters in painting, you’ll notice that they go to great pains to create light and shadow through their brush strokes. You can of course translate these to your own lighting. So let’s look at the different portrait lighting styles or patterns you can use.

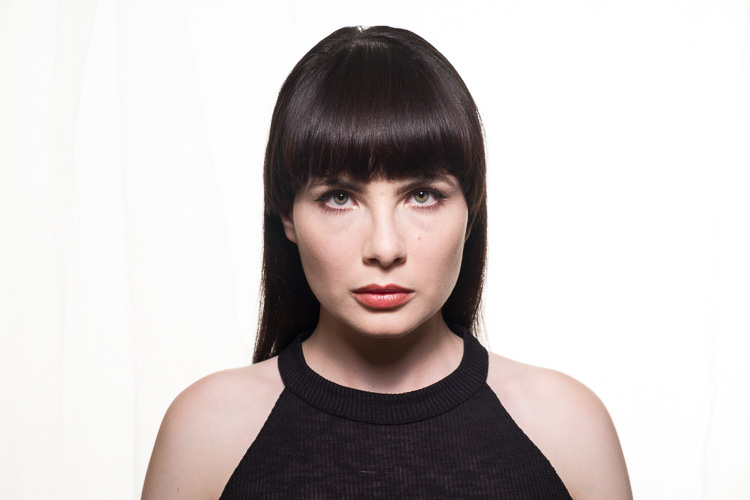
    To be able to see these patterns, your subject should be facing the camera. The key to seeing what’s happening is to pay attention to what the shadow is doing, especially the nose shadow.

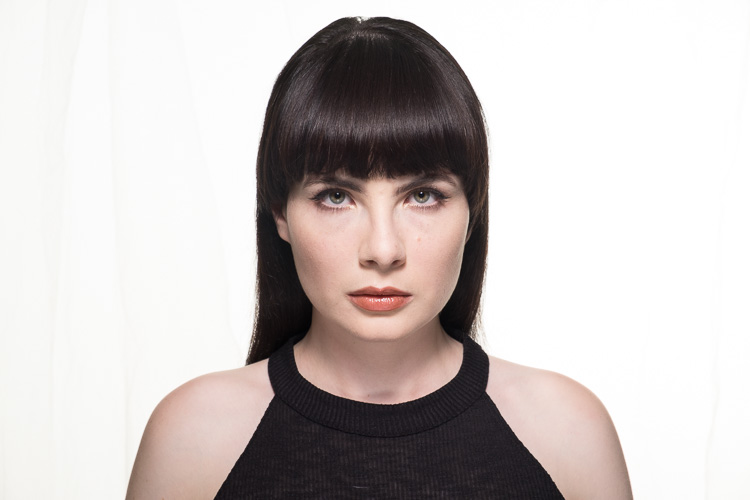
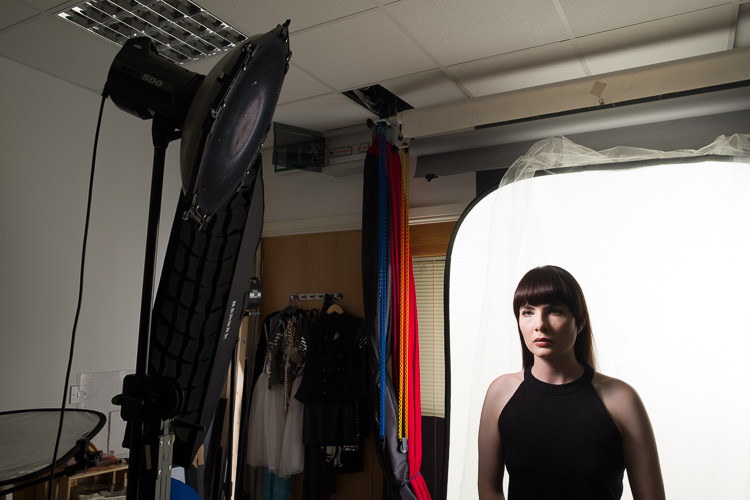
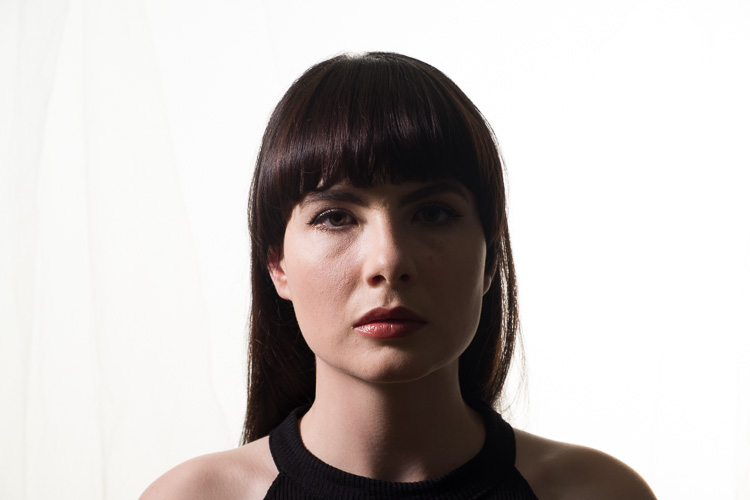
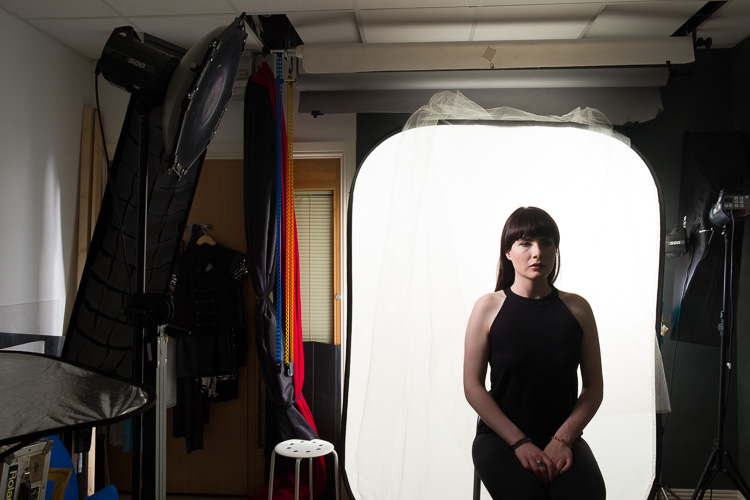
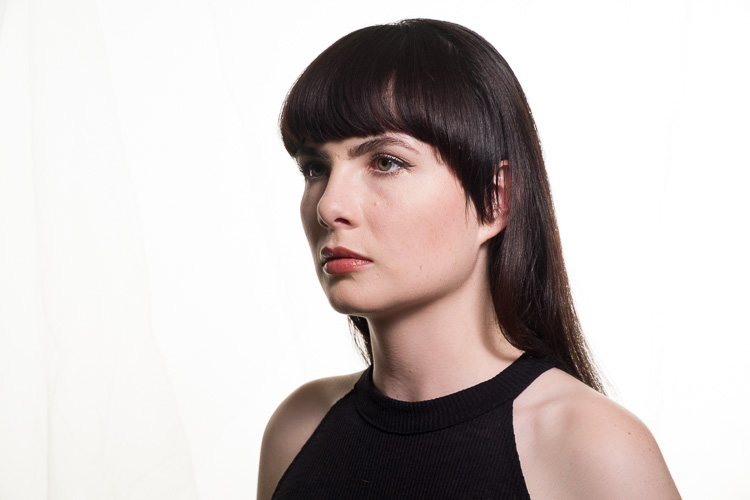
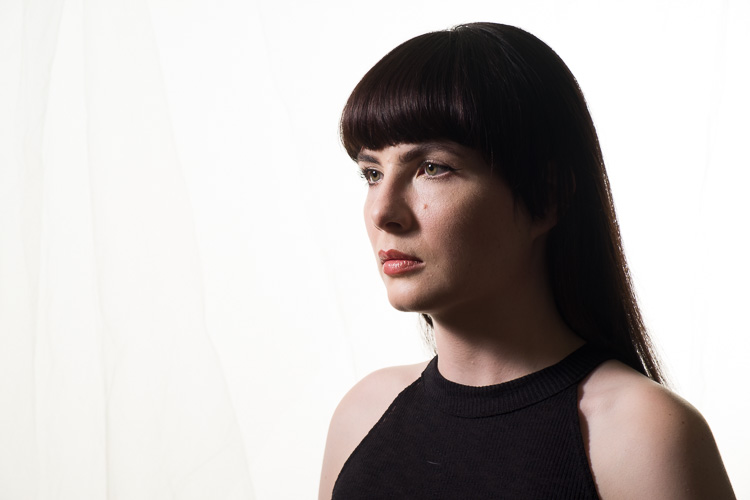
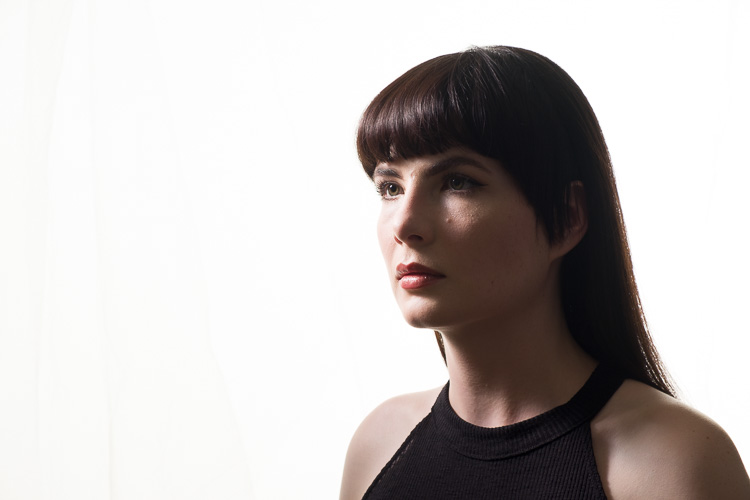
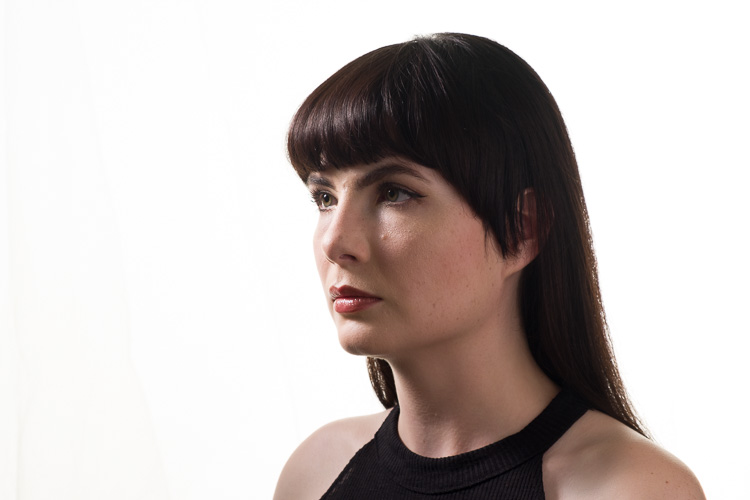
    Short Lighting with a Butterfly pattern.

    Short lighting style

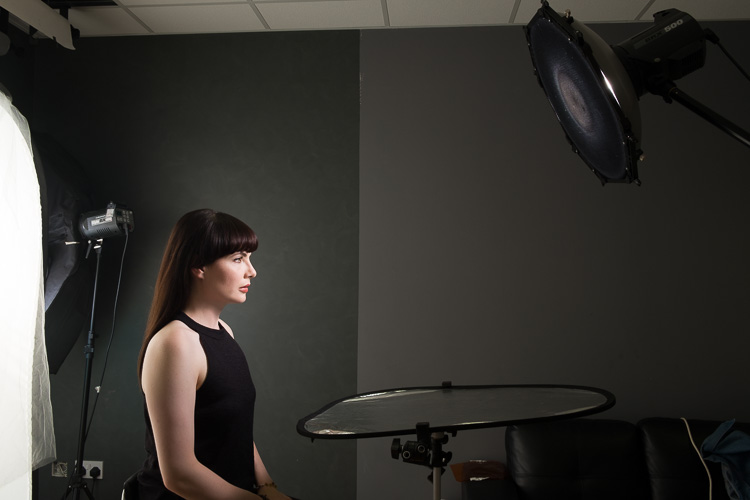
    For this setup, I’ve used an Elinchrom BXR500 with a 44cm white beauty dish. The deflector is translucent, and I’ve added a grid to control the spill of the light. The Camera was a Fujifilm X-T10 with a Fujinon 18-55 lens.

    The Portrait Lighting Styles

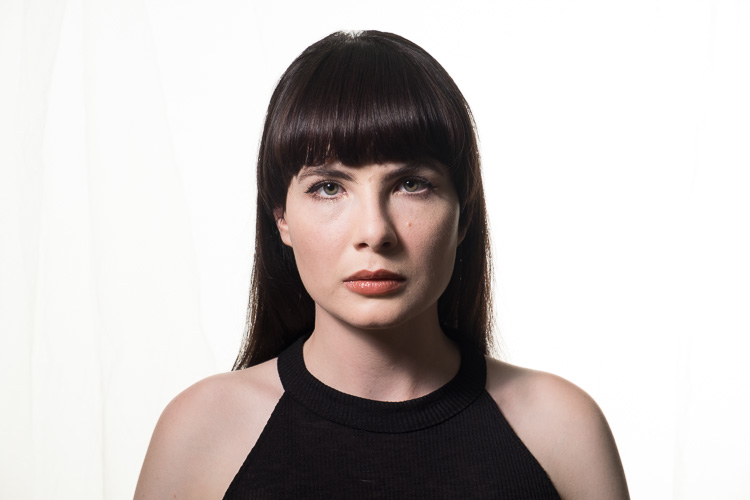
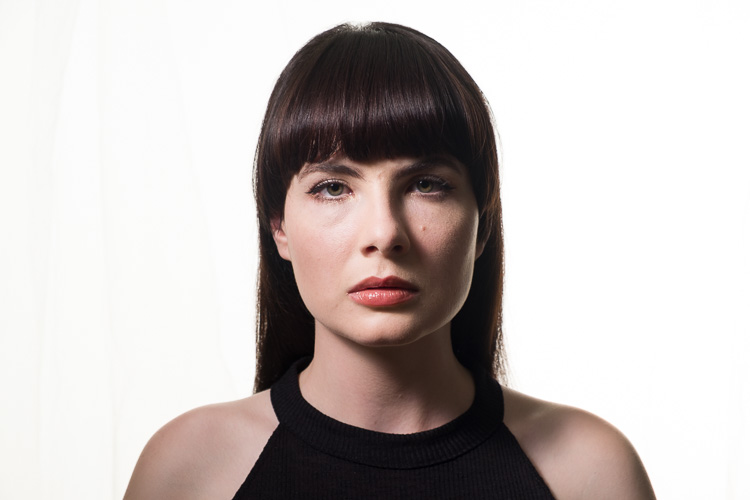
    1. Butterfly Lighting

    Butterfly lighting refers to the shape of the shadow under the nose that this pattern creates. It’s meant to look like a butterfly in flight, viewed from straight on. It’s also called Paramount lighting when used with guys to sound more masculine. If you look at the work of 30s and 40s Hollywood photographers like George Hurrell, you’ll see this lighting style in operation.

    Classical Lighting Patterns 01

    The basic butterfly portrait lighting, with no reflector.

    First you should place your light on a boom stand, and position it so it creates a line between you, the light, and your subject. Your light should be high enough to create the butterfly shadow. If it’s too low, you won’t get a shadow and the light will be too flat. If it’s too high, you’ll have the nose shadow will cut into the lip.

    As you look into the eyes of your subject, make sure you can see a reflection of your light. This reflection is called a catchlight, and helps give life to the eyes. If you cannot see the catchlight, lower your light a bit.

    Classical Lighting Patterns 02

    The basic butterfly portrait lighting, with silver reflector.

    With Butterfly Lighting, it’s common practice to put a reflector (or even another light at lower power) underneath the chin to bounce light back up. This helps soften the look, and reduces the shadows caused by your light position. You’re not trying to overpower the light from above, as doing this will cast shadow upwards on the face, which isn’t particularly flattering.

    Classical Lighting Patterns 03

    Behind the scenes shot of the basic butterfly lighting, with a reflector.

    2. Loop Lighting

    For Loop Lighting, you’re looking for a loop shaped nose shadow. Move your light to the left, or light from the centre. You’ll see the shadow change shape. With Loop Lighting, the nose shadow shouldn’t touch the shadow side of the cheek.

    Classical Lighting Patterns 04

    Loop Lighting

    You should aim to have the bottom of the nose shadow about halfway between the lip and the nose in position. With Loop lighting, you’ve got two main options for filling in shadows. You can use a reflector, or a second light from the opposite side of the face as the key light, or you can use an on axis (behind the camera) fill light (like a ring light or an Octabox).

    3. Rembrandt Lighting

    If you move the key light around a farther, the nose shadow will meet the cheek. Some refer to this as closed loop lighting, with the normal Loop Lighting being referred to as open loop lighting. From a technical standpoint, Rembrandt Lighting usually has a higher light position than closed loop lighting, but for most the term Rembrandt refers to any light that creates a triangle of light below the eye opposite the light source.

    Classical Lighting Patterns 05

    Rembrandt Lighting

    You can probably guess that the name is based on the work of the painter Rembrandt. A lot of his portraits were painted while the subject was lit from a skylight or high window, giving that famous look.

    Classical Lighting Patterns 06

    Behind the scenes making a Rembrandt Lighting.

    4. Split Lighting

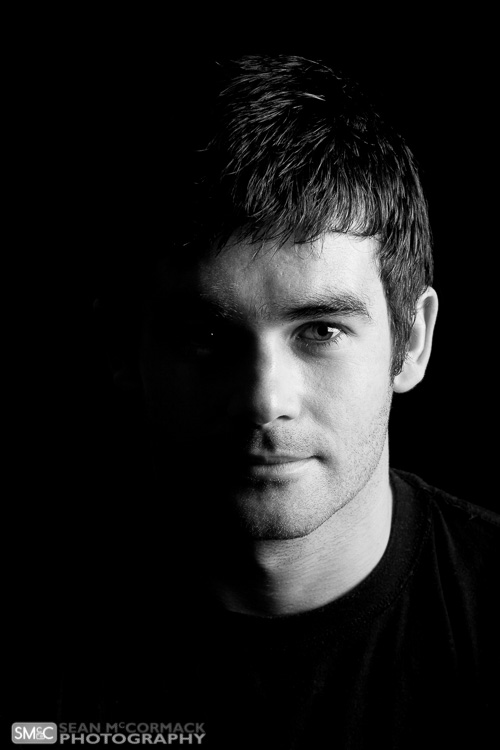
    You’ve moved the light slowly from straight on, and your final light style is when the light is perpendicular to the camera. You’re lighting only one half of the face. One of the most famous uses of this is The Beatles album ‘With The Beatles’, where all four members are split lit. You should only be able to see one eye in the shot for this pattern (the other will be in shadow).

    Classical Lighting Patterns 07

    Split Lighting.

    Classical Lighting Patterns 08

    Behind the scenes for Split Lighting.

    Broad and Short Lighting

    To show how the patterns work, you’ve shot straight on to your subject. In real life this is only one view that you’d capture. By turning the face to the side you get even more options. When the face is at an angle, there are two parts of the face visible, the broad side, and the short side. The broad side is the one nearest you, from the ear to the nose. The short side is the small bit of the side facing away from you, that you can actually see.

    By aiming the light at the broad side of the face, you see the face in detail, with very little shadow. On the other hand, if you light the short side of the face, you get more shadow. These lighting positions are referred to as Broad and Short Lighting respectively.

    You can use Short Light to flatter heavier subjects, as the shadow tends to hide weight in the face. Broad lighting is better for thinner people, and is often used in fashion. For the Short Light example, the light was in the same position as our Split Lighting, the model has just been turned towards the light. For Broad Lighting, you can have it any where in front, though for this example, it was off to camera right.

    Classical Lighting Patterns 09

    Broad Lighting (main light is to camera right).

    Classical Lighting Patterns 10

    Short Lighting (main light is to camera left, closer to the background than the subject).

    Creating Drama

    The trick to creating drama is to use shadow effectively. For this reason Short Lighting is the best option. You can use each pattern in a short light fashion.

    Remember at the start, you were told to pay attention to the nose shadow? For Butterfly, you’re still looking for the butterfly shadow. The light will be directly in front of your subject’s nose to get this. As you move the light away, towards Loop position, it’ll start to become more dramatic. You can even do a Rembrandt portrait for really dramatic effect.

    Classical Lighting Patterns 11

    Rembrandt Lighting, Short lit with no fill.

    Classical Lighting Patterns 12

    Rembrandt Lighting, Short lit with silver reflector fill.

    So that’s how to use common portrait lighting styles or patterns. You should get familiar with them, and as you look at magazines and online, you’ll start to see them in use.

    Examples of Portait Lighting in photos

    Classical Lighting Patterns 16

    Short Lit Loop Light

    Classical Lighting Patterns 14

    Split Lighting

    Classical-Lighting-Patterns-13.jpg

    Butterfly Lighting

    Short Lighting with a Butterfly pattern.

    Short Lighting with a Butterfly pattern.

    googletag.cmd.push(function() {
    tablet_slots.push( googletag.defineSlot( “/1005424/_dPSv4_tab-all-article-bottom_(300×250)”, [300, 250], “pb-ad-78623” ).addService( googletag.pubads() ) ); } );

    googletag.cmd.push(function() {
    mobile_slots.push( googletag.defineSlot( “/1005424/_dPSv4_mob-all-article-bottom_(300×250)”, [300, 250], “pb-ad-78158” ).addService( googletag.pubads() ) ); } );

    The post 4 Common Lighting Styles to Get the Perfect Portrait by Sean McCormack appeared first on Digital Photography School.


    Digital Photography School