Blog

  • Gear of the Year: Carey’s choice – Canon PowerShot G9 X

    Introduction

    I remember very clearly when the Canon PowerShot G9 X arrived in the DPReview offices. I was a fairly recent hire, and myself and another recent hire took the G9 X and the G5 X out to shoot some samples. As a person who still clings to old full frame DSLRs, I got along with the G5 X much more so than with the G9 X. It had way more controls, a good viewfinder, a brighter zoom lens and a real grip. I really liked that camera (and my first field test was done with one), but never really felt any sort of pull toward its smaller sibling. Until recently.

    Typical Tuesday. Processed to taste in Adobe Camera Raw. 28mm equiv., ISO 125, 1/500 sec, F4. Photo by Carey Rose

    It’s so darn tiny

    It was the recent review of the Sony RX100 V which really helped me appreciate the value of having one of these 1″-sensor cameras always in your pocket. I have a lot of respect for folks who can create beautiful and impactful work using a cellphone, but personally, I still like the idea of using a dedicated device. (Of course, this may change in the future – after all, I don’t carry my iPod Classic with me everywhere anymore).

    When it comes to skinny jeans, this is a mighty big difference. Though this is an RX100 IV, it is identical to the V in terms of width.

    So while the RX100 V was incredibly powerful, I started to wonder whether there was something that could get me close to that level of stills image quality but was even smaller – like, ‘not worry about slipping it into the back pocket of my skinny jeans’ smaller. And then it hit me – the Canon G9 X.

    The G9 X is 10mm thinner than the RX100 V (and IV), which doesn’t sound like a ton until you realize that it’s close to a 25% difference. By contrast, my Ricoh GR slides into a pants pocket much easier than the RX100 V, and it splits the difference in width between the two. The Ricoh GR is also within 1mm of width of the original RX100, as well.

    Macro performance is pretty good – but it’s best to stop down a bit. Processed to taste in Adobe Camera Raw. 28mm equiv., ISO 125, 1/640, F2.8. Photo by Carey Rose

    Most impressive to me? The G9 X is just a couple of milimeters thicker than a PowerShot S95, and that camera’s sensor was pretty tiny in comparison. Technological progress is great.

    In any case – when you’re talking about cameras and pockets, every little bit counts.

    The interface is well thought out

    One thing that has been near-universally covered and largely condemned across the internet is the G9 X’s heavy dependence on its touch interface. There’s only one dial, which is around the lens (and it’s clicked! Thank the maker!), and there’s not even a four-way control pad on the rear. I read time and time again how the interface works out okay, and the screen is of good quality, but that it can be fiddly in menus, playback and for fine adjustment of controls. However, almost everyone missed something incredibly crucial.

    JPEGs can be pretty nice out of the G9 X, after you’ve taken time to set them up. I’m not so big a fan of them at defaults. Out-of-camera JPEG with custom color settings and noise reduction set to minimum. 54mm equiv., ISO 800, 1/125, F4.5. Photo by Carey Rose

    The G9 X, despite having one less control dial than the RX100 series, is more responsive to set up in actual use. That’s because you can use the zoom toggle, lens control ring and ‘Set’ button to navigate the menus sans-touchscreen. It’s brilliant, fast and once you realize it’s there, easy. There’s another review erroneously stating that you can’t delete an image without using the touchscreen – also wrong. Just hit the ‘Set’ button in playback, hit it again, and use the front ring to confirm deletion. Sweet.

    Swipe functions in playback work great, but again, you can use the control ring for that. While you’re shooting, the control ring manipulates the setting that makes the most sense at the time – in aperture-and-shutter priority, it controls those respective values. In Program Auto, it controls exposure compensation. Admittedly, in full manual, it defaults to aperture, which is fine, and though you can add an on-screen soft button to have the ring cycle through other controls, that just means you do have to use the touchscreen to manipulate other values. So it’s not perfect.

    Obligatory sunstar photo, processed to taste in Adobe Camera Raw. 28mm equiv., ISO 125, 1/400 sec, F9. Photo by Carey Rose

    The ‘slow’ lens isn’t that slow

    Okay, well, it sort of is. I mean, it’s a 28-84mm (focal length equivalent) F2.0-4.9 lens, making it slower on the wide end than the first two RX100’s, and on par with them on the long end, but with less reach. But a fun fact – the newest RX100 models with 24-70mm equivalent lenses are slower than this model by the time they’ve zoomed from 24-28mm (they reach F2.5 by 28mm). Of course, if you need 24mm, then this isn’t quite so valuable. I personally find that 28mm is usually wide enough for a walk-around camera, and I actually appreciate the small amount of additional reach (versus a 70mm limit) on the long end more than I expected.

    I tried getting an angle to keep that tree from poking out of the top of the house, but obviously I failed. Processed to taste in Adobe Camera Raw. 84mm equiv., ISO 125, 1/640 sec, F4.9. Photo by Carey Rose

    Also, I can’t get too upset about this, because I fully expect the ‘slowness’ of the lens is what really makes the G9 X so much thinner than the competition.

    The rest

    The image quality is predictably good. It uses the same (or very similar) sensor as the RX100 III. It has typically good Canon color response, and though the noise reduction in JPEGs is pretty sloppy, once you crank it down to its lowest setting, it’s not too bad.

    The auto white balance is a bit off here, but the tap-to-focus worked great. Out-of-camera JPEG, 28mm equiv., ISO 320, 1/60 sec, F2. Photo by Carey Rose

    The built-in pop-up flash is slick and handy, and operationally, the camera feels much snappier than any RX100 – except, of course, burst shooting, but that shouldn’t be a surprise (it manages less than 1fps in Raw). Despite it being the second-cheapest 1″-sensor compact out there (the original RX100, still available new, takes that crown), it feels very well-built and if it matters to you, the red-and-silver design accents around the dials add ‘a touch of class.’ There’s even the lovely detail of having a tripod thread in-line with the center of the lens.

    This isn’t a class-leading video camera by any stretch of the imagination, but Canon’s 1080/60p video with optical and digital stabilization continues to impress, though the fact that the control ring can’t be de-clicked limits its application somewhat (albeit the touchscreen allows silent manipulation of some controls). But here’s one thing this camera can do that the Sony can’t – accurate and easy touch-to-focus-and-track in video, even with a ‘lowly’ contrast-detect only system. 

    That’s a wrap

    Here’s hoping the sun doesn’t set on the smallest member of Canon’s revamped G-series. Processed and cropped to taste in Adobe Camera Raw. 28mm equiv., ISO 125, 1/125 sec, F4. Photo by Carey Rose

    I continue to be a fan of the G7 X Mark II, and I hope that Canon will bring the improvements seen in that model to the G5 X and G9 X as well. If they can shoehorn 4K video and maybe even better burst performance into those as well, the whole RX100 line will have even more competition – which is never a bad thing.

    Updated Sample Gallery

    Please do not reproduce any of these images on a website or any newsletter / magazine without prior permission (see our copyright page). We make the originals available for private users to download to their own machines for personal examination or printing (in conjunction with this review), we do so in good faith, please don’t abuse it.

    Unless otherwise noted images taken with no particular settings at full resolution. Because our review images are now hosted on the ‘galleries’ section of dpreview.com, you can enjoy all of the new galleries functionality when browsing these samples.

    $ (document).ready(function() { SampleGalleryV2({“containerId”:”embeddedSampleGallery_7869320616″,”galleryId”:”7869320616″,”isEmbeddedWidget”:true,”standalone”:false,”selectedImageIndex”:0,”startInCommentsView”:false,”isMobile”:false}) });


    Articles: Digital Photography Review (dpreview.com)

  • How to Price Photography Products and Services for Profit

    Think pricing your photography is overwhelming? You’re not alone. If there’s one question that every photographer struggles with time and time again, it’s how to price their products and services.

    • How should you price your photos?
    • What products should you offer?
    • How do you make sure your prices are high enough to make a profit, but not so high that you drive away business?

    https://www.pexels.com/photo/coffee-creative-notebook-office-64776/ price your photography

    No matter how hard you’ve worked to develop your client base, if you don’t have a consistent and effective pricing model in place, you’ll find yourself treading water. Luckily, it doesn’t have to be hard to come up with a pricing system to help you reach your goals.

    To figure out what you’ll need to make annually to run a successful photography business, we’re going to break your expenses down into two important sections: the cost of doing business (CODB) and cost of goods (COGs). Then we’ll explore session and product fees to determine how you can price for profit and success.

    Considerations

    When it comes to pricing, there is no one size fits all solution, so be sure to tailor your prices to fit your specific needs. Before we get started on pricing in detail, here are a few considerations you’ll want to keep in mind throughout the process.

    Target market

    Your pricing should be reflective of your target market. If you’re targeting high-income families in a wealthy area, your prices will be much steeper than if you were targeting budget buyers with more modest incomes. There’s truly no wrong target market. It’s all about defining your goals and knowing your niche.

    How to Price Photography Products and Services for Profit

    Location

    Consider your location. Do you live in an area with a high population or a smaller area with a narrower potential client base? Also, consider your local competition. While you should never construct your pricing based solely off of what your competitors are offering, you don’t want your prices to be drastically off base. Get a feel for what’s selling in your area and for how much, and use that as a baseline. Then adjust according to the specific needs of your business, which we’ll discuss in more detail below.

    Niche

    Although there is no set rule about which fields of photography charge more or less, it’s helpful to consider your niche or genre when coming up with a pricing list.

    For example, if you’re a wedding photographer, consider all of the work that goes into shooting and editing a wedding. Chances are you’ll be there for at least four hours, and that’s a very conservative estimation; many wedding photographers provide around eight hours of coverage on the big day. That’s why wedding photography packages can run upwards of $ 5,000 in some markets. Other niches are less exhaustive and time-consuming, so prices tend to be somewhat more conservative.

    How to Price Photography Products and Services for Profit

    Measuring your cost of doing business (CODB)

    Your cost of doing business refers to any non-reimbursable costs directly associated with running your business. These costs include internet fees, telephone, advertising, software, equipment purchase and maintenance, office supplies, etc. (this list is not exhaustive, think of everything you pay monthly whether or not you have any paying jobs). Calculating your CODB can seem overwhelming at first – especially to those of us who aren’t mathematicians – but it is an absolutely essential part of developing a realistic and profitable pricing model.

    Math time! Don’t run away just yet, it’s simpler than it looks. Your CODB is the result of an equation. It is determined by adding up your annual expenses plus your desired salary, then dividing by the number of billable days (think of this as the number of shoots) for that year.

    For example, if I have $ 30,000 in annual expenses and I want to pay myself a $ 45,000 salary, I know need to bring in $ 75,000 per year. If I plan to do 2 photo shoots per week for 48 weeks (accounting for four weeks of vacation), I’ll be looking at 96 photo shoots per year. $ 70,000 divided by 96 is about $ 781. This is the average amount I need to make in income per shoot, through session fees and products. Here it is broken up for easier reading:

    • Annual non-reimbursable expenses: $ 30,000
    • Plus salary desired: $ 45,000
    • $ Equals: 75,000 in total annual expenses
    • Weeks worked: 48
    • Times 2 Shoots per week
    • Equals: 96 shoots per year (needed)
    • $ 75,000 ÷ 96
    • Equal: $ 781 per shoot/job

    How to Price Photography Products and Services for Profit

    Sound complicated? It doesn’t have to be. The National Press Photographers Association offers a free CODB calculator to help you figure out your annual CODB. Keep in mind that the numbers they’ve plugged in are estimates only. Yours will vary.

    If the annual calculator seems overwhelming, try breaking it down by month. Many people find it helpful to break it down by month instead of looking at annual expenses. Digital Photography School offers a free monthly CODB worksheet that can be used for calculating CODB by month. Add in your own numbers and categories as necessary.

    Your numbers don’t have to be exact but try to make them as accurate as possible. Once you have an idea of what your CODB will be, you can use this number to determine what you’ll need to charge to keep your business running and pay yourself a suitable salary.

    Measuring your cost of goods (COGS)

    Anne

    By Anne

    Think that the cost of goods just refers to the cost of the prints you sell? Think again. If you want to price for success in the photography business, you need to factor in both materials and time.

    As defined on Investopedia, the cost of goods consists of; the direct costs attributable to the production of the goods sold by a company… including the cost of the materials used in creating the good along with the direct labor costs used to produce the good.”

    Sean MacEntee

    By Sean MacEntee

    This means that you need to factor in your time and labor on top of your material costs. Calculating material costs is simple, but figuring out your time can be a little more challenging. You need to account for all the time that goes into a client session, from the first phone call to the moment they receive their products. A typical workflow will look something like this:

    • Initial inquiry or phone call
    • Pre-session consultation (in person or by phone)
    • Session (time spent shooting)
    • Editing photos
    • Reviewing photos with client
    • Ordering prints/products
    • Inspecting prints/products
    • Packaging prints/products
    • Delivering or shipping prints/products

    Estimate the average amount of time you spend on each of these pieces of the puzzle. Many photographers figure in this time to be covered by their session fee, which we’ll dive into in the next section.

    What am I charging for?

    How to Price Photography Products and Services for Profit

    The session fee

    Sometimes referred to as a creative fee, the session fee is typically due in full prior to the session (this helps ensure you don’t have no-shows). This fee covers your time and creative talent as a photographer. By determining the amount of time you usually spend per shoot (as discussed in the previous paragraph), you can establish a base session fee.

    First, determine how much you want to make per hour. A simple way to calculate this is to divide your desired salary by the number of weeks you plan to work and the number of hours you will work each week. For example, from our numbers above:

    • $ 45,000 per year desired salary
    • ÷ 48 working weeks
    • ÷ 40 hours/week
    • About $ 25/hour

    Keep in mind this is adjustable based on your own perceived value. If you plan to make more per year, your hourly rate will go up.

    Then, multiply your cost per hour by the average number of hours you expect to spend on each client. For example, if you plan to spend an average of five hours on a single client from start to finish at $ 25/hour, your session fee is calculated as follows:

    • 5 hours
    • x $ 25/hour for your time
    • $ 125 per session (not including products, which we’ll discuss shortly.)

    This is a fairly average price for a 1-hour photo shoot in most markets. Remember, this fee is in place to reserve your time and creative talent.

    How to Price Photography Products and Services for Profit

    Prints and products

    Your prints and products should be priced according to the amount of money you need to bring in per shoot after your session fee. In keeping with the example above, let’s say we need to bring in $ 781 per shoot. The session fee will cover $ 125 of this, so you need to sell an average of $ 656 ($ 781 minus $ 125) per shoot in products.

    What products will you be selling?

    To start, figure out what products you’ll be offering to your clients. Don’t worry about including everything if you’re just starting out. There’s plenty of time to expand your product line as you grow. Typical photographer product lines include:

    • Prints in a range of sizes from 4 x 6″ to 30 x 40″
    • Framed prints
    • Canvases or gallery wraps
    • Albums
    • Digital files

    What do I charge for these products?

    To figure out what to charge for each item, you’ll want to add your marked up hard costs to your labor costs. We’ll use an 8×10 print as an example.

    How to Price Photography Products and Services for Profit

    1. Determine hard costs

    First, figure out what the print will cost to order from your lab. Add this cost to your other hard costs, like shipping and packaging materials. For example:

    • Print cost: $ 3.50
    • Shipping cost: $ 5.00
    • Cost of your packaging materials: $ 5.00
    • Total: $ 13.50 hard costs

    2. Mark up your hard costs

    Next, it’s time to figure out your product markup. A commonly recommended markup for photography products is 2.85. So in this case: $ 13.50 x 2.85 equals total: $ 38.48 marked up hard costs for that 8×10.

    3. Calculate your labor time

    Then figure in the labor time for each item, being sure to include time for post-processing, ordering, inspecting and packaging. For example:

    • 10 minutes for post-processing
    • 2 minutes to place order with your lab
    • 3 minutes unpacking and inspecting photos
    • 5 minutes packaging for delivery
    • 5 minutes scheduling a pickup time or dropping off at the post office (If you meet with your clients in person this may be a longer meeting, so account for that too).
    • Total: 25 minutes labor time

    If we’re calculating your time at $ 25/hour (as discussed in the above example dealing with session fees), the cost of labor for 25 minutes is about $ 10.50.

    Image3

    4. Add marked up hard costs to labor time

    • $ 38.48 hard costs
    • $ 10.50 in labor costs
    • Total: $ 48.98 rounded to the nearest 0 or 5 and you’ll end up with a retail price of $ 50.00 for an 8×10.

    This is a typical price for many photographers. Adjust accordingly based on the considerations we discussed in the beginning; your target market, location, and niche.

    If your target market is a high-income community in a location where your niche is highly in demand, you can adjust for higher prices – try a 3.5x markup or even higher. But if your target market is a bit more budget-conscious, consider sticking with a 2x markup instead of 2.85x. Just be prepared to do a higher volume of work in order to reach your desired income.

    Follow this process with each item on your product list, being sure to account for the extra time it takes for items like albums. As always, keep in mind that these numbers will vary depending on your hard costs and time spent processing and packaging each order.

    Conclusion

    Taking the time to establish an effective pricing model will put you well on your way to creating a successful and profitable photography business. We know it’s not as fun as getting out in the field and shooting, but you’ll find it’s a necessary part of taking your photography business (and profits) to the next level.

    googletag.cmd.push(function() {
    tablet_slots.push( googletag.defineSlot( “/1005424/_dPSv4_tab-all-article-bottom_(300×250)”, [300, 250], “pb-ad-78623” ).addService( googletag.pubads() ) ); } );
    googletag.cmd.push(function() {
    mobile_slots.push( googletag.defineSlot( “/1005424/_dPSv4_mob-all-article-bottom_(300×250)”, [300, 250], “pb-ad-78158” ).addService( googletag.pubads() ) ); } );

    The post How to Price Photography Products and Services for Profit by Chelsea Lothrop appeared first on Digital Photography School.


    Digital Photography School

  • How Shooting Photos Based on a Theme Can Improve Your Work

    In this article we’re going to talk about how having a theme before you go out to shoot can improve your images.

    I used to go out on the street, in order to find the perfect shot. Months in a row I did that. I knew that I loved this lack of control, but something didn’t match. I wasn’t as excited as I thought and even my images weren’t good enough, I couldn’t understand why.

    So, I took a small break from hunting beautiful images and I started to watch how others worked. I looked at many professional photographers, to find what makes them click.

    Image 001

    That was when I realized my big mistake. My problem was that every time I went out, I had nothing to focus on. My eyes were looking for pictures everywhere, but my mind wasn’t able to sort out all these images. Something was missing, and that was a theme.

    Taking pictures based on a theme has a lot of benefits and it can change your shooting approach in a very positive way. That’s why many photographers work like this because it makes their life much more easy and practical.

    Elimination is the key

    Imagine yourself in a very crowded place, let’s say a musical festival. The possibilities for images and angles are infinite. You may take pictures of the whole crowd, of a couple spending time together, or a detail on someone’s jacket. Or maybe you can take pictures of the musicians only. How can you do all these things and not get tired or confused?

    Image 002

    You need to remove the things that are not important for your ideas or style of shooting. Therefore, you have to know what you’re looking for before you go out to shoot.

    Let’s say you decide that your theme at that music festival should be about ladies dancing. Now, you will focus all your attention only on them, taking pictures of details on their hands, clothes, etc., and mix it up with portraits and action shots. Try different angles and perspectives, because now you have something to focus on. As a result, you eliminate all the things that might get you disorganized, such as big crowds, couples, general landscapes of the festival, etc.

    Elimination is the key.

    You will save time

    Before working on themes in my photography, I spent many hours searching for wonderful movements and scenes to capture with my camera. On an average day, I would walk in the city for eight to nine hours and shoot for only a half hour. Why? Because I didn’t know what I was looking for.

    Image 003

    By choosing a specific theme or subject before you go out, you will know where to look. For example, if you want to take portraits of dog owners, as a first step you can try going to the park where people walk their dogs and ask them to pose for you. On the next day, you may go at a dog grooming place, and so on.

    Working on themes is a very good time-saving habit that can help you remove the gap between finding the perfect shot and actually doing it.

    Targeting specific clients

    Regarding the topics you may choose, your interest can grow in time. You will start to understand more about what you’re photographing and after few months, you may find yourself with a strong body of work.

    Image 004

    Image 005

    Image 006

    For example, if you have a passion for street fashion and you build a portfolio with great images on that theme, you can use that portfolio to find your future clients. You may try fashion magazines, agencies, or even online publications. Also, you can enter those images in a competition to see if they are good enough to grant you some recognition or a prize. But I don’t suggest you take pictures only for getting recognition because then you could end up working on things you may not like that much.

    Theme shooting helps style development

    We all think about style, it’s an artist’s signature. We want people to recognize our pictures just by looking at them and say, “These are John’s images because they look this specific way.” We want our name out there in the best way possible.

    Image 007

    Developing a style is a matter of time. You don’t have to fight for it because it will come by itself after years of hard work.

    By working on themes and the things you care about, you’ll start to notice what things you like to photograph and how you like to do it. You will begin to understand and see yourself in your work. In this growing process, your style will evolve. It’s not a matter of conscious decision, but of knowing yourself.

    If you are in a hurry to stamp your work with your style, then find a theme you are interested in and photograph that. You can’t go wrong.

    Conclusion

    So if you feel like your work isn’t progressing and you’re stuck, try shooting around a theme for a while. See how it helps you focus, improve your style and in the end become a better photographer.

    Please share your thoughts and questions in the comments below.

    googletag.cmd.push(function() {
    tablet_slots.push( googletag.defineSlot( “/1005424/_dPSv4_tab-all-article-bottom_(300×250)”, [300, 250], “pb-ad-78623” ).addService( googletag.pubads() ) ); } );

    googletag.cmd.push(function() {
    mobile_slots.push( googletag.defineSlot( “/1005424/_dPSv4_mob-all-article-bottom_(300×250)”, [300, 250], “pb-ad-78158” ).addService( googletag.pubads() ) ); } );

    The post How Shooting Photos Based on a Theme Can Improve Your Work by Cosmin Cimil appeared first on Digital Photography School.


    Digital Photography School

  • Add Functionality and Battery Life to Your Sony A7 with the MOZA Cage

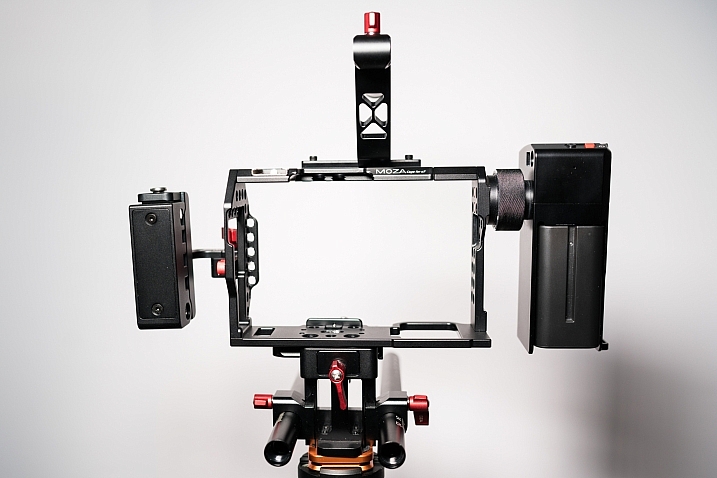
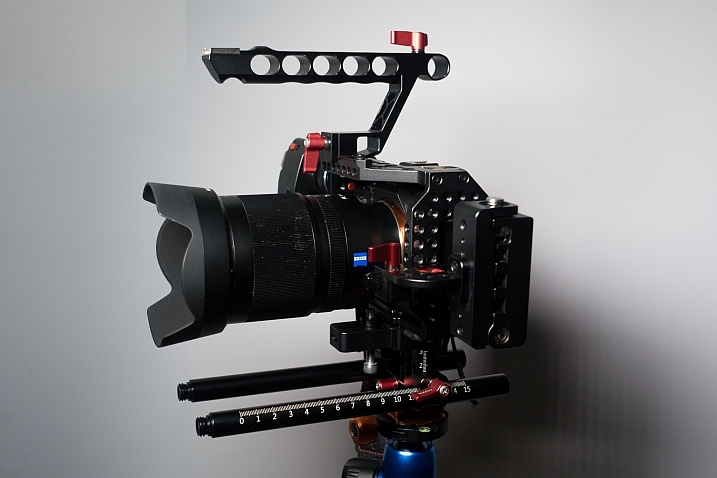
    MOZA sent me their recently released MOZA Cage for review, and while I’m slowly and inevitably getting into more filmmaking with my Sony a7R Mk2, I’m still a photographer first. I thought to myself, “How can I review this cage as a photographer.” After taking delivery, however, I found it quite easy! There are a few unique things you can do with this cage that make it perfect for certain types of photography, not just as a tool for filmmakers.

    MOZA Cage Handheld Camera Gimbal Stabilizer

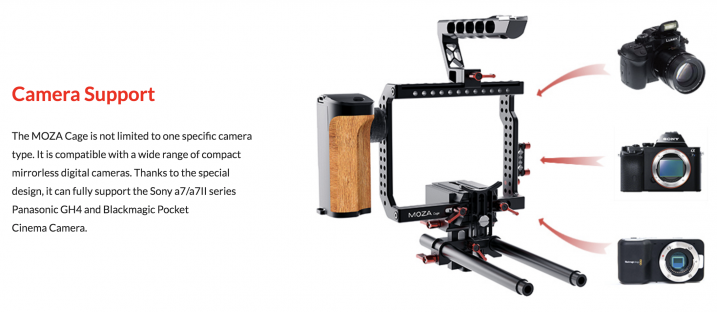
    If you’ve never heard of the term Cage used in conjunction with cameras, in very basic terms a cage is just that. It’s a cage that you screw your camera into, and it provides you with multiple handle options, cable routing options, attachment options (think LED panel lights / microphones, etc.). Cages can range from very basic and a couple of hundred dollars, up to fully featured monsters that will see you shelling out more than a grand (USD).

    But this one, the MOZA Cage is a mid-priced cage with many features of much higher end products. What stood out to me after I unboxed the cage was the build quality. Everything is really well made and works well, and after using the product for a few weeks on multiple shoots, it has given me no problems.

    moza-cage-review-simon-pollock

    Still photography uses

    When shooting video, it’s great to have a cage to help you hold your rig more steady. It’s helpful to attach a small shotgun mic or LED panel if you’re a run and gun interview shooter, or someone shooting an event, etc. But, that doesn’t really apply to us so much here on dPS, as we’re all about the still photos.

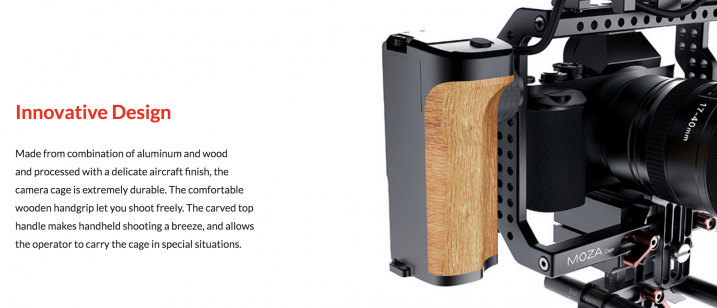
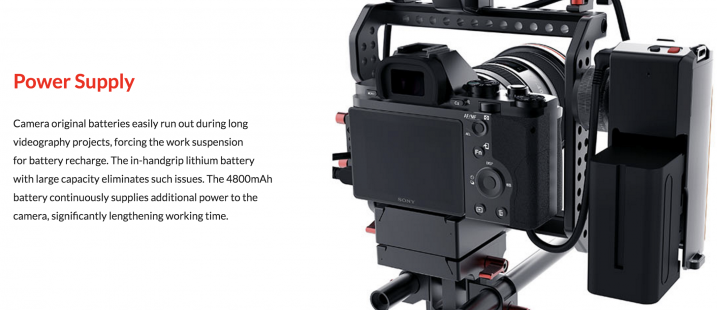
    What appealed to me in the stills department is that the MOZA Cage has a sweet wooden handle grip included. And inside that grip is a 4800MaH battery that is used to power your camera! By way of comparison, the included NP-FW50 batteries in my Sony A7 or a6300 are 1020mAh. So, we’re talking about a unit that will power your camera for a lot longer than usual! (I won’t mention the Sony battery performance, except to say that I’d like more please, more batteries!) 

    gudsen-moza-battery-gimbal-cage-review-gtvone

    Longer battery life

    So what does having more battery power do? It gives us the ability to shoot for longer. Obviously shooting film is the first thought, but I used the cage for time-lapse as well as some regular photography and it worked great. The wooden handle on the MOZA rotates so you can hold the camera down low to the ground by the top handle, while you have your screen tilted up to show you what you’re shooting.

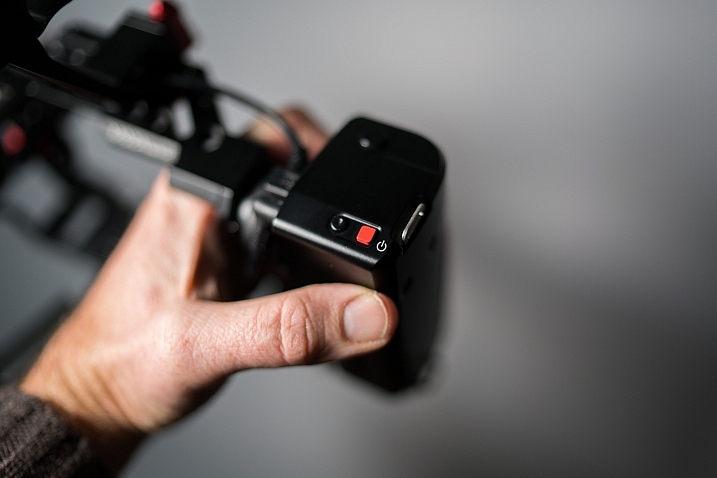
    The next little added bonus is that the MOZA Cage includes a shutter release in the handle, as well as a video stop/start. That shutter release worked really well for shooting from within the cage at weird angles and doing it with no contorted weird ergonomic photographer’s stance! (You know the ones haha)

    simon_pollock_reviews_moza_cage_on_digitalPS

    Benefits

    The cage does have limited use for photographers. But if you’re thinking of trying your hand at shooting some video of your kids, or maybe doing behind the scenes on your next epic production, this cage could really increase your production value. It will give you many more options from a camera handling perspective, as well as those benefits listed for alternate photography uses. The MOZA Cage is $ 499 which, for what you get, is a great price.

    simon-pollock_moza_cage_reviews

    Sony a7RMk2 in situ, ready to go shoot!

    simon-pollock-moza-cage-naked

    The MOZA Cage, Naked

    simon-moza-cage-review

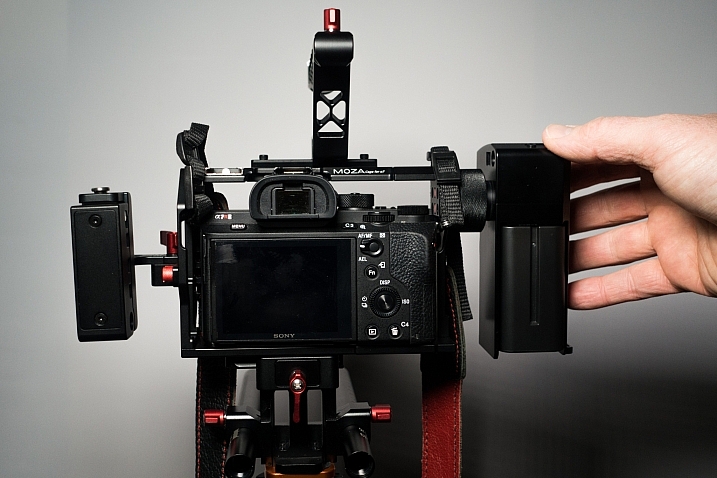
    The Sony a7RMk2 rigged into the MOZA Cage

    simon-pollock-reviews-photo-gear

    Buttons on the MOZA handle unit

    If you’re still shaking your head and muttering “Cage, what’s he talkin’ ’bout…cage!” Here’s a quick overview and a look at how you might set up your camera in a cage, be it this one or any other style cage.

    Summary

    In summary, I don’t really have anything negative to say about the MOZA Cage! From a photography/video convergence point of view, it’s a great mid-level tool that will work very well for you, from a pure photographic perspective. For alternate uses like long events, time-lapse and simply awkward shots down low (I found it particularly handy for these!) it works very well. The build quality, price and customer service were all very good (I did a secret squirrel customer service call with a question… yes, a little sneaky, but we need to know these things!)

    Find out more or purchase the cage on Amazon.

    googletag.cmd.push(function() {
    tablet_slots.push( googletag.defineSlot( “/1005424/_dPSv4_tab-all-article-bottom_(300×250)”, [300, 250], “pb-ad-78623” ).addService( googletag.pubads() ) ); } );

    googletag.cmd.push(function() {
    mobile_slots.push( googletag.defineSlot( “/1005424/_dPSv4_mob-all-article-bottom_(300×250)”, [300, 250], “pb-ad-78158” ).addService( googletag.pubads() ) ); } );

    The post Add Functionality and Battery Life to Your Sony A7 with the MOZA Cage by Sime appeared first on Digital Photography School.


    Digital Photography School

  • Capping Chernobyl: Nuclear Disaster Site Covered in Giant Protective Dome

    [ By WebUrbanist in Abandoned Places & Architecture. ]

    chernobyl-dome

    In an unprecedented feat of engineering, the world’s most infamous nuclear disaster site is being covered by a huge prefabricated steel arch designed to shield the world from its fallout. Made to fit over the so-called sarcophagus, a crumbling concrete and lead shelter initially erected at the site, the New Safe Confinement structure spans nearly 1,000 feet horizontally.

    The original protective shell over the Chernobyl Nuclear Power Plant’s reactor was a hurried affair and never meant to be permanent — 4,000 people in the region were still killed in the initial catastrophic meltdown but many more were saved thanks to this hasty intervention. In the days, weeks and months following the disaster, hundreds of thousands of evacuees and emergency workers were exposed to dangerous radiation.

    construction-dome

    At the cost of 1.5 billion dollars the new lid is also not a solution to last forever, but it is designed to last for 100 years. Weighing 36,000 tons and taller than the statue of liberty (354 feet) the monstrous structure is only partially complete — it still needs to be rendered airtight and radiation equipment is yet to be installed. The entire thing has been constructed offsite on nearby land before being moved into place.

    Share on Facebook


    [ By WebUrbanist in Abandoned Places & Architecture. ]

    [ WebUrbanist | Archives | Galleries | Privacy | TOS ]


    WebUrbanist

  • Santa Claustrophobia: The World’s Creepiest Santa Statues

    [ By Steve in Culture & History & Travel. ]

    santa-statue-1c

    The ho-ho-horror! Much like creepy clowns, these dark and disturbing Santa Claus statues cross the fine line separating awe-inspiring and just plain awful.

    santa-statue-1b

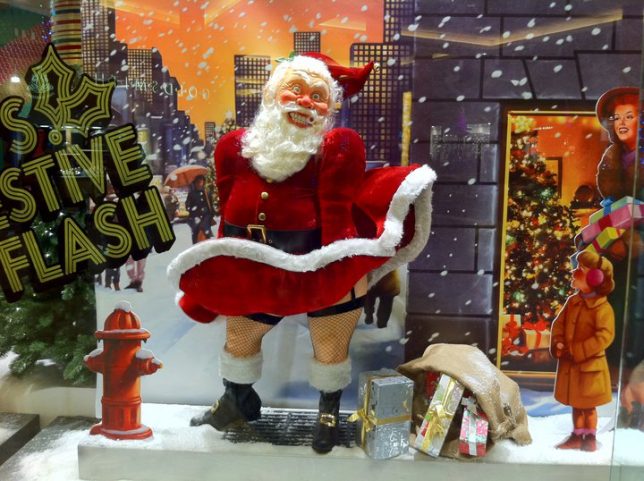
    One would think the bizarre concept of a “Santa Monroe” would be shot down in flames seconds after multiple shocked gasps echoed ’round the conference table. Against all odds, however, the plan was approved and an inflatable, grimacing, pants-less Santa standing roughly 20-feet-tall took his place outside a shopping center in Dongguan, China. We’d make a “Dong-guan” joke here but you probably already have.

    santa-statue-1d

    Like Marilyn Monroe’s iconic pose above a subway grate in 1955 film The Seven-Year Itch, Santa’s long red coat appears to be blown upwards by an unseen wind, revealing what should remain unseen to the public at large. We’re figuring the designers took a leap of faith when they gave Ol’ Saint Nick a set of coal-black briefs. To be fair, it’s not as if there was any precedent to guide them. Don’t place all the blame on China though: the idea seems to have been co-opted by someone who embellished the concept further by adding a rather risque garter belt. Nice… and naughty.

    Texas-Sized Santa

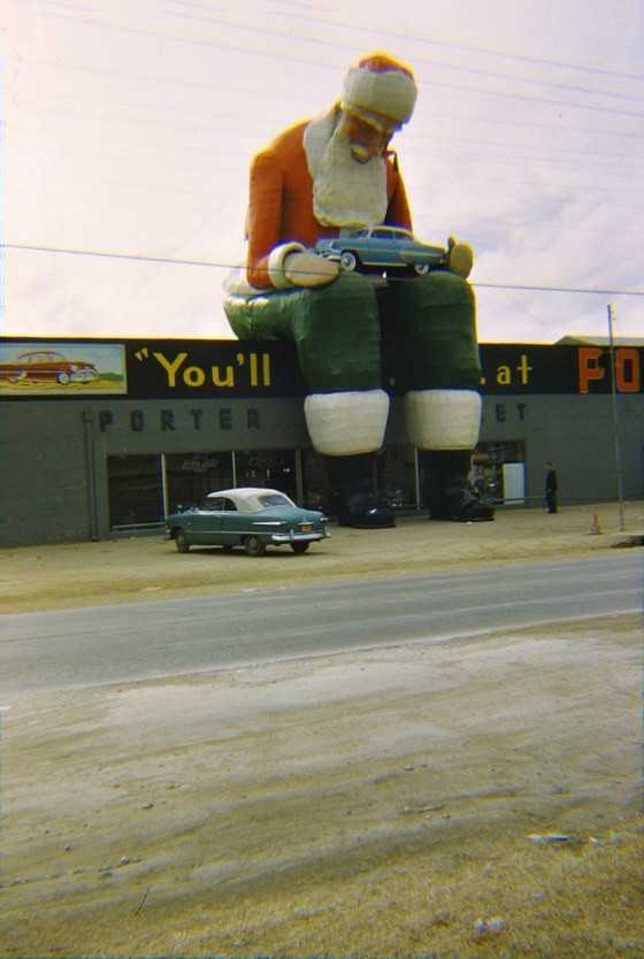
    santa-statue-2a

    In 1953, Jack Bridges, designer of those iconic “Big Tex” statues, was commissioned to create a one-of-kind Santa statue for Dallas auto dealer Porter Chevrolet. The result: an 85-ft-long, 56-ft-tall papier mache Santa that was so large and unwieldy it had to be trucked to the site in pieces. Yes, that’s a real 1954 Chevy Bel-Air Santa’s clutching in his Texas-sized hands. There’s a tragic twist to this tale: area resident Roy Davis, 46, arranged a crane to lift him eye-level with Santa so he could snap a Christmas card photo – a very early selfie, one might say. Like too many modern selfies, Davis’ effort ended badly when he suffered a fatal heart attack and plummeted to the pavement, landing right between Santa’s boots.

    Fingered Down Under

    santa-statue-4a

    santa-statue-4b

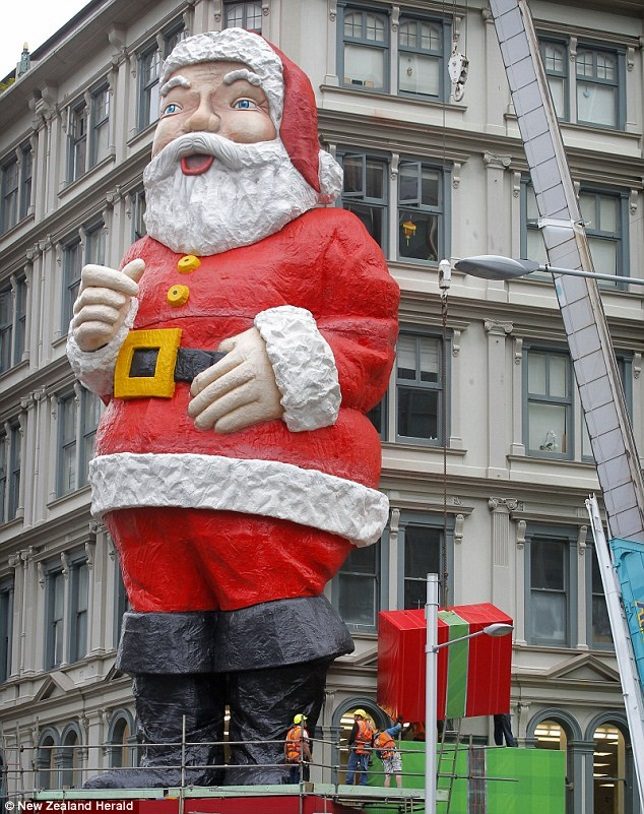
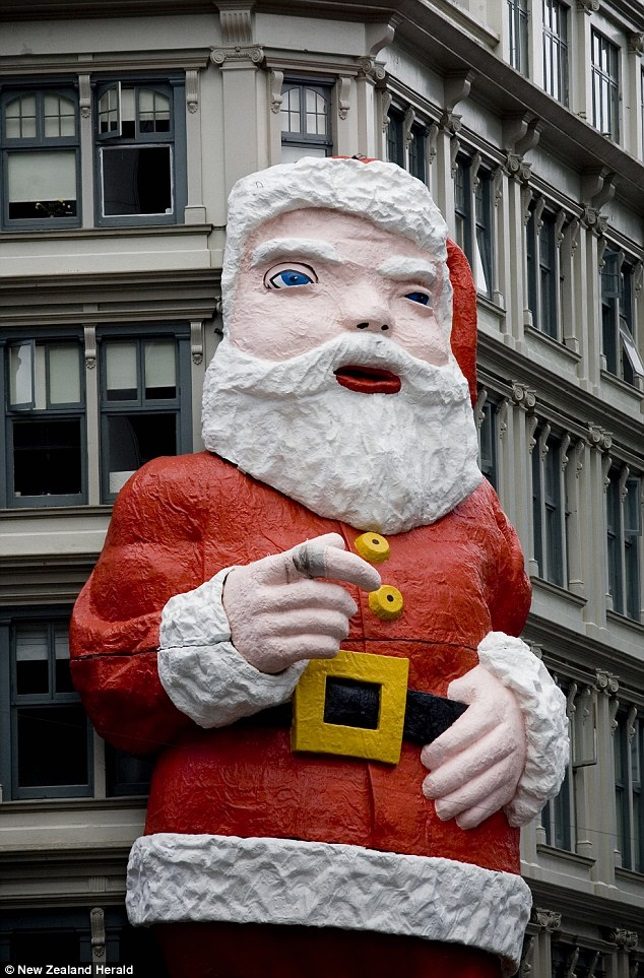
    Auckland, New Zealand’s seasonal claim to creepy fame comes in the form of a 5-ton, 60-ft-tall semi-animatronic Santa statue who’s been affixed to the corner of the Whitcoull’s book store on Queen Street since 1960. The creepy factor derives from the statue’s only two moving parts: a winking right eye and a beckoning index finger. Brrr!

    santa-statue-4c

    santa-statue-4d

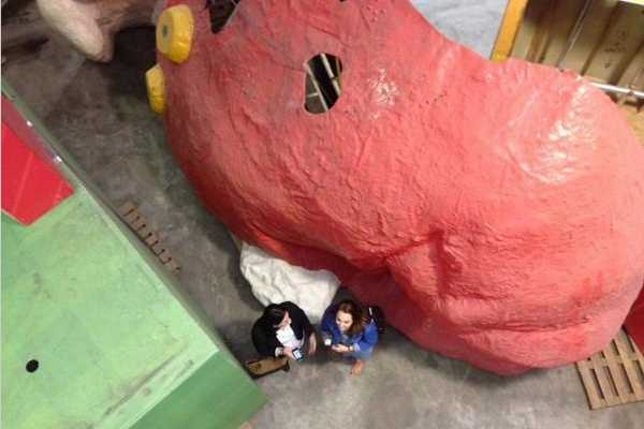
    Sadly (for some), in 2014 the $ 180,000 annual expense required to keep Santa creeping folks out was deemed overly exorbitant. Santa’s been lingering – in pieces – in an Auckland warehouse since then. Anyone who misses Kiwi Santa’s slo-mo winking and fingering – you know who you are – can relive the trauma via this video.

    Next Page – Click Below to Read More:
    Santa Claustrophobia The Worlds Creepiest Santa Statues

    Share on Facebook


    [ By Steve in Culture & History & Travel. ]

    [ WebUrbanist | Archives | Galleries | Privacy | TOS ]


    WebUrbanist

  • People’s Choice Award shortlist for 2016 Wildlife Photographer of the Year Announced

    People’s Choice Award shortlist for 2016 Wildlife Photographer of the Year Announced

    Facing the Storm by Gunther Riehle of Germany / Wildlife Photographer of the Year

    Fans of wildlife and nature photography can now have their say in the annual People’s Choice Award for the Wildlife Photographer of the Year competition. The award recognizes outstanding competition entries as chosen by the public. Lovers of wildlife photography around the world can choose from 25 images, pre-selected by the Natural History Museum from almost 50,000 submissions from 95 countries. 

    Online voting is open now, until January 10th, 2017. Click here to cast your vote, and in case you missed them, take a look at the overall competition winners.

    Wildlife Photographer of the Year is developed and produced by the Natural History Museum, London.

    Facing the storm

    Gunther Riehle, Germany / Wildlife Photographer of the Year

    Gunther arrived at the frozen sea ice in Antarctica in sunshine, but by the evening a storm picked up. Initially just strong winds, by the early morning snow had arrived. He concentrated on taking images of the emperor penguin chicks huddled together to shield themselves from the force of the snowstorm.

    Nikon D4; Nikon 80–400mm f4.5–5.6 lens at 400mm and B+W polarising filter; 1/640 sec at f18 (+0.3 e/v); ISO 640.

    A mother’s hand

    Alain Mafart Renodier, France / Wildlife Photographer of the Year

    Alain was on a wintertime visit to Japan’s Jigokudani Snow Monkey Park when he took this poignant photograph of a sleeping baby Japanese macaque, its mother’s hand covering its head protectively.

    Canon EOS 5D Mark III; 70–200mm f2.8 lens; 1/1250 sec at f2.8; ISO 1600.

    The stare of death

    Johan Kloppers, South Africa / Wildlife Photographer of the Year

    Johan saw this little wildebeest shortly after it was born in the Kgalagadi Transfrontier Park, South Africa. Little did he know that he would witness its death later that same day – the small herd of wildebeest walked right past a pride of lions and the calf was caught by a lioness and then taken by this male lion. 

    Canon 7D Mark II; Canon 500mm f4 lens at f4.5; 1/1000 sec; ISO 1250.

    The blue trail

    Mario Cea, Spain / Wildlife Photographer of the Year

    The kingfisher frequented this natural pond every day, and Mario used a high shutter speed with artificial light to photograph it. He used several units of flash for the kingfisher and a continuous light to capture the wake as the bird dived down towards the water.

    Canon EOS 7D; 100–400mm lens at 160mm; 1/15 sec at f7.1; 250 ISO; four Godox V860 flashes; LED light lantern; Benro tripod and ballhead; Cable release; Hide.

    Hitching a ride

    Daisy Gilardini, Switzerland / Wildlife Photographer of the Year

    This female polar bear was resting with its two young cubs in Wapusk National Park, Manitoba, Canada, when it suddenly got up and rushed downhill through the deep snow. One of the cubs jumped on to her, holding onto her furry backside with a firm bite – totally unexpected and humorous behaviour.

    Nikon D4s; Nikkor 800mm f5.6 lens and 1.25x extender; 1/1000 sec at f13 (+2/3 e/v); ISO 1250; Gitzo tripod and RRS ballhead.

    Eye in focus

    Ally McDowell, USA/UK / Wildlife Photographer of the Year

    Ally often focuses on colours and patterns underwater. She nearly threw away an image of a fish’s eye but her partner asked to see it and then turned it upside down. It was then that Ally saw it was an unusual, abstract view, and so on a night dive, when the parrotfish were still and sleeping, she focused on creating a similar image.

    Nikon D7100; 105mm lens; 1/100 sec at f22; ISO 640; Nauticam housing; Inon Z-240 strobes.

    Head-on

    Tapio Kaisla, Finland / Wildlife Photographer of the Year

    Tapio took a trip to Dovrefjell–Sunndalsfjell National Park, Norway, to find these magnificent oxen amid their natural habitat. Even though spring is not rutting season for these animals, they were already seriously testing their strength against each other and the air rang out with the loud bang of the head-on collision between these two beasts.

    Canon EOS 5D Mark III; 200–400mm f4 lens and 1.4x extender; 1/640 sec at f8; ISO 2500.

    Into the fray

    Stephen Belcher, New Zealand / Wildlife Photographer of the Year

    Stephen spent a week photographing golden snub-nosed monkeys in a valley in the Zhouzhi Nature Reserve in the Qinling Mountains, China. The monkeys have very thick fur, which they need to withstand the freezing nights in winter. This image shows two males about to fight, one already up on a rock, the other bounding in with a young male.

    Canon EOS-1Ds Mark II; 70–200mm f2.8 lens; 1/800 sec at f7.1; ISO 400.

    Confusion

    Rudi Hulshof, South Africa / Wildlife Photographer of the Year

    Rudi wanted to capture the uncertainty of the future of the southern white rhino in the Welgevonden Game Reserve, South Africa, because of poaching. He anticipated the moment when these two rhinos would walk past each other, creating this silhouette effect and the illusion of a two-headed rhino.

    Sony A900; Sony 70–400mm f4–5.6 lens at 210mm; 1/8000 sec at f5.6; ISO 400.

    Rainbow Wings

    Victor Tyakht, Russia / Wildlife Photographer of the Year

    The bird’s wing acts as a diffraction grating – a surface structure with a repeating pattern of ridges or slits. The structure causes the incoming light rays to spread out, bend and split into spectral colours, producing this shimmering rainbow effect, captured here by Victor.

    Nikon D300s; Nikkor 80–400mm f4–5.6 lens at 400mm; 1/8000 sec at f11; ISO 200.

    Articles: Digital Photography Review (dpreview.com)

  • Olympus E-M1 owners report firmware 4.2 bugs

    Olympus OM-D E-M1 owners are reporting issues using their cameras after updating to firmware version 4.2. Forum member Denjw reports problems with focus stacking and corrupted image files after updating to 4.2, echoing comments from German blogger Pen-and-Tell. Firmware 4.2 in part added support to the E-M1 for focus stacking with the 300mm F4, 8mm F1.8 fisheye and 7-14mm F2.8 Pro lenses. We’ve reached out to Olympus for comment and will update this story with any further information.

    Articles: Digital Photography Review (dpreview.com)

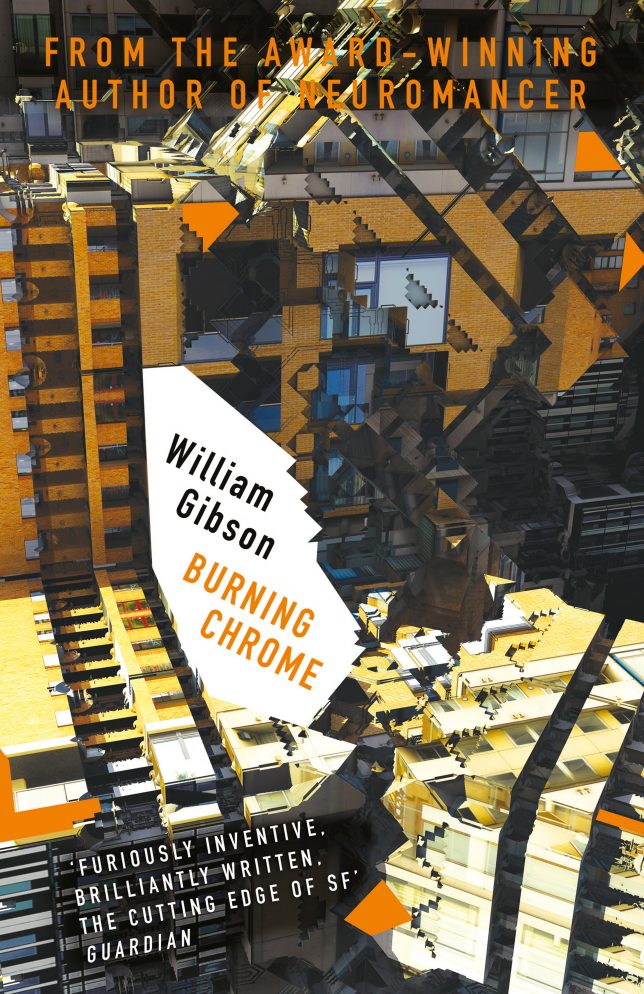
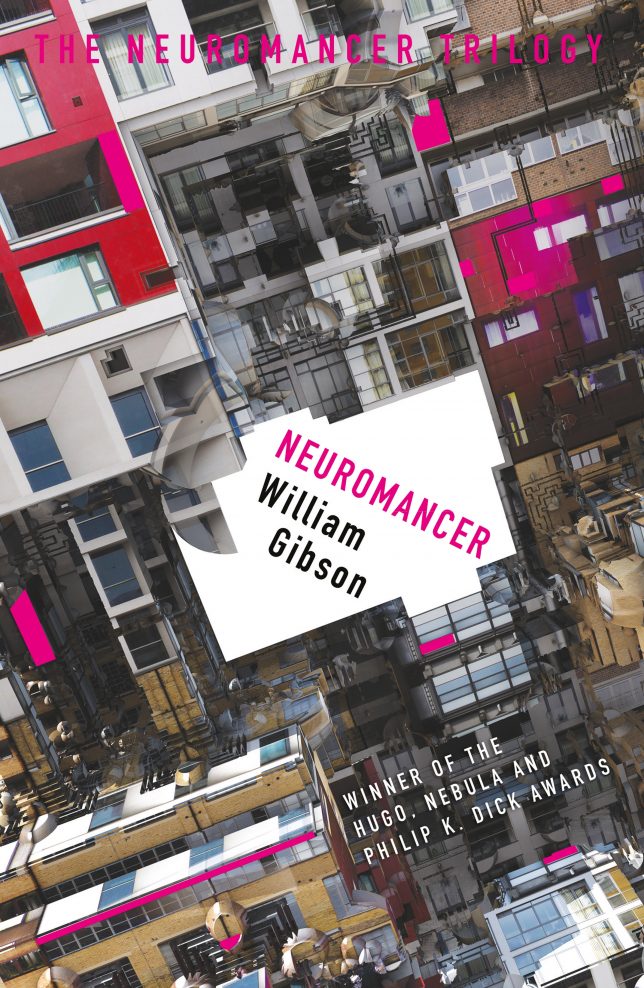
  • Sprawl Trilogy Redesign: Fractal City Covers for Classic Gibson Novels

    [ By WebUrbanist in Art & Drawing & Digital. ]

    fractal-cover-art

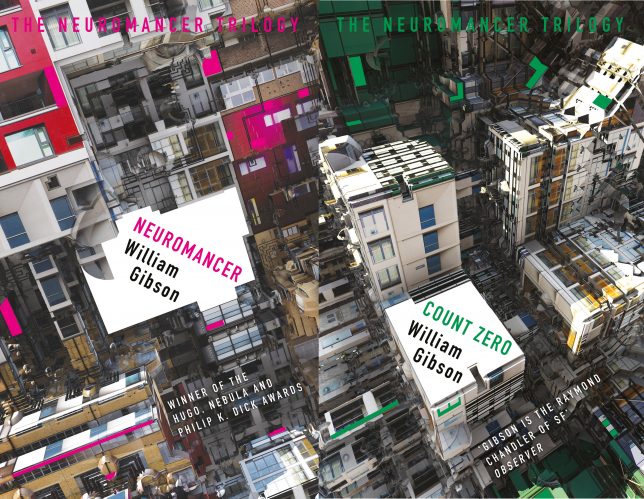
    Three classic cyberbunk books and a short story collection, all by William Gibson, are getting an apt makeover in the form of architectural covers featuring beautifully abstracted (if dystopian) urban landscapes.

    burning-chrome-cover

    Anyone familiar with this master of science fiction will make the connection quickly — the strange and seemingly impossible shapes are exactly what come to mind when reading the Sprawl Trilogy (Neuromancer, Count Zero, Mona Lisa Overdrive) as well as shorts from Burning Chrome. In William Gibson’s fiction, the Sprawl is a colloquial name for the Boston-Atlanta Metropolitan Axis (BAMA), an urban sprawl environment on a massive scale, and a fictional extension of the real Northeast megalopolis.

    neuromancer-cover

    Developed by digital artist, designer and programmer Daniel Brown, the method of these remakes also fits the techno-futuristic narratives in question: fractal mathematics and computer software turned ordinary architectural photographs into these surreal built environments. The covers seem to flow into one another but are distinctly colored, forming unique art separately but a kind of fractal collage when seen together.

    count-zero-cover

    The images were generated by repeating one shot at different scales to create complex patterns, at once recognizable as architectural but hard to pin down, much like a memory or a visualization based on reading a book. Gibson approached Brown when Gollancz, an imprint of Orion, acquired rights to the publishing of these speculative fiction classics.

    mona-lisa-overdrive-cover

    The designer says he was personally approached by Gibson to create the cover designs for the books, which have been recently acquired by science-fiction publisher Gollancz, an imprint of Orion. Their meeting was fortuitous as Brown had been looking for a platform to execute his creative ideas.

    new-gibson-cover-art

    “I had been experimenting with generating architecture via computer code,” says Brown. “As a project it was still in its infancy and without real purpose. Then William Gibson contacted me, and stated it was exactly how he had envisaged The Sprawl. In an uncanny way the code found its own purpose.”

    Share on Facebook


    [ By WebUrbanist in Art & Drawing & Digital. ]

    [ WebUrbanist | Archives | Galleries | Privacy | TOS ]


    WebUrbanist

  • Think Tank Photo Outlet Center launches with discounted goods

    Think Tank Photo has launched a new online Outlet Center offering discounted camera bags. These items, as is sometimes the case with outlet stores, are new products that may for one reason or another lack their original packing material and/or their sales tags. The Outlet Center currently lists 16 bags, though no doubt the number will fluctuate based on inventory. Price reductions are steep, and include the Shape Shifter bag, originally priced at $ 264.75, for $ 149.75.

    Via: Imaging Resource

    Articles: Digital Photography Review (dpreview.com)