Blog

  • Quick Review of the Kupo Click Stackable Light Stand

    I’ve recently started using a pair of Jinbei HD600 studio lights for my photography and what I love about them is that they are self-contained units. They don’t have any requirements for power cables, etc., as they’re battery powered, wireless studio lights. What was starting to bug me, though, was that I only had heavy light stands to mount them on. Not a problem when you’re working in a studio, but when you have to visit a client to do a headshot or a quick portrait of someone, having to take a C-Stand along isn’t always ideal (especially if you’re on public transport).

    I wanted to stick with Kupo gear as I’m very happy with the quality and innovation of their products, so I asked the crew at ProTog what my options were. They suggested I hold out for the Kupo CLICK stackable lighting stands. I did and I’m very happy I did. Here’s my review…

    Check out the Kupo Click Light Stands on Amazon or on B&H Photo’s website.
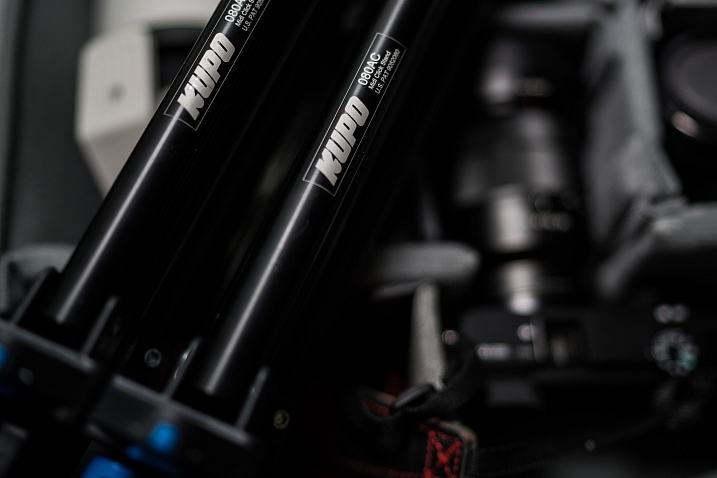
    Kupo click light stand

    My wish list

    I had a few simple ideal specs for the stands that I was after:

    • I wanted them to be light enough to sling over my shoulder when I was on the go.
    • They need to not suffer from bad build quality due to being light weight.
    • I wanted to be able to quickly use them for either a well-placed strobe on an outdoor shoot, a quick portrait in an office or studio, and maybe even to mount a GoPro on to run a quick timelapse of a session.

    Features of the Kupo Click

    The Kupo Click had everything I wanted in a portable light stand. Let’s take a look through the feature list.

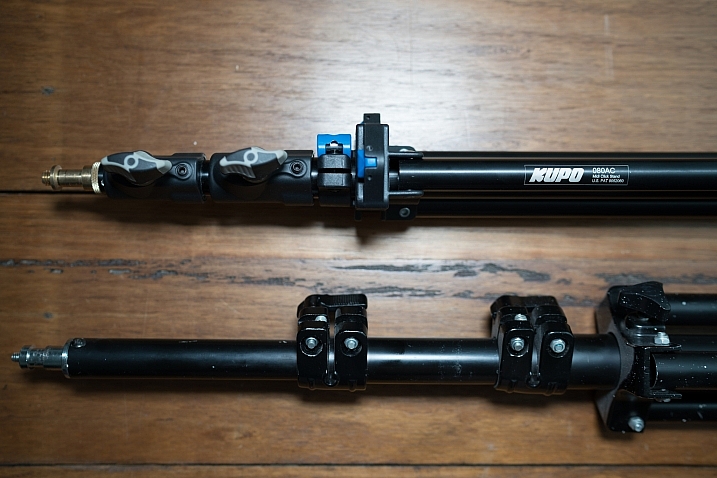
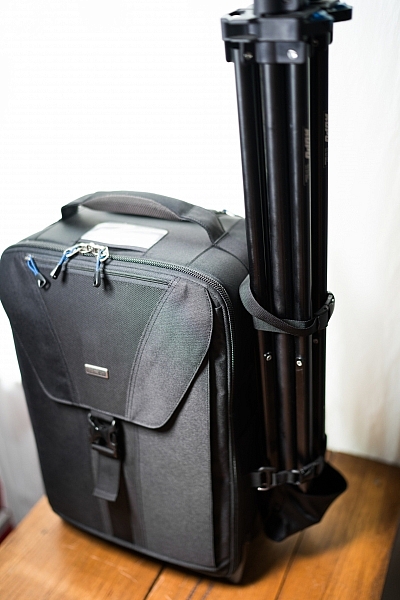
    • Coming in at 1.3kg (2.9 pounds), the weight was just fine, easily able to attach a pair of stands to the side of my ThinkTank Airport TakeOff roller.
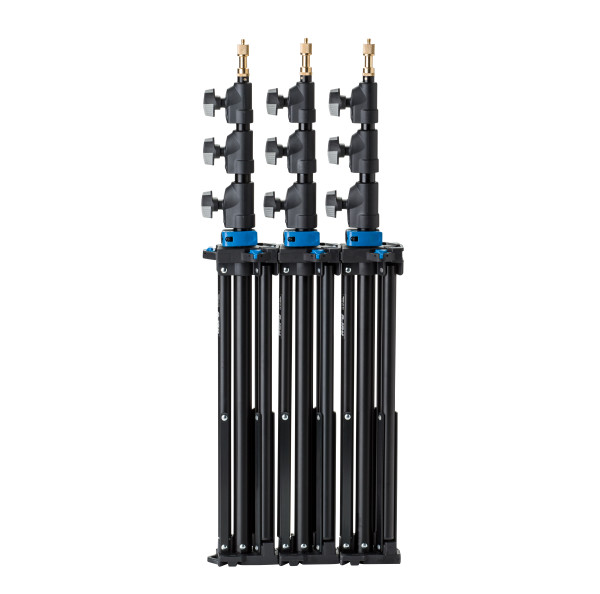
    • In terms of load, the diminutive stands were capable of holding a 5kg (11 pounds) payload, more than I’d need to place atop the aluminum light-weights.
    • The tubes are also double pinned to the threaded ends, this makes them a lot less likely to fail when compared with my old stands, after a few months of heavy use, the stands haven’t loosened up in the slightest.
    Kupo click light stand

    Kupo click light stand

    The Click

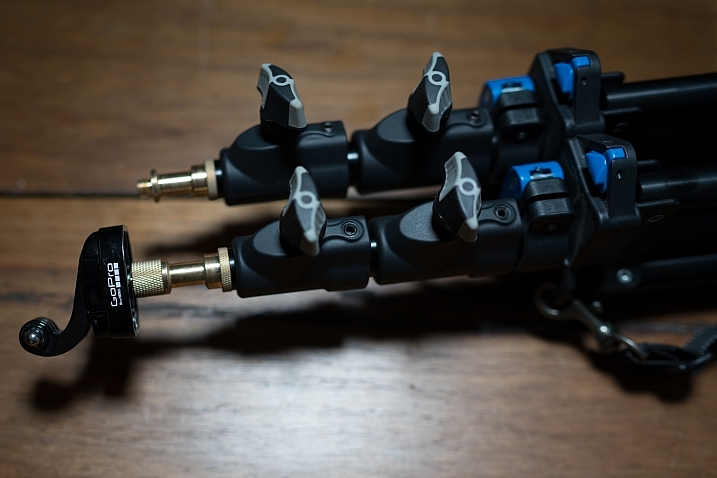
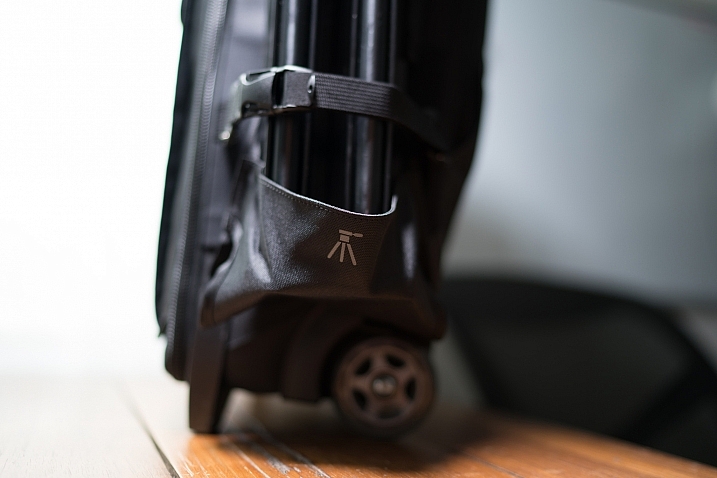
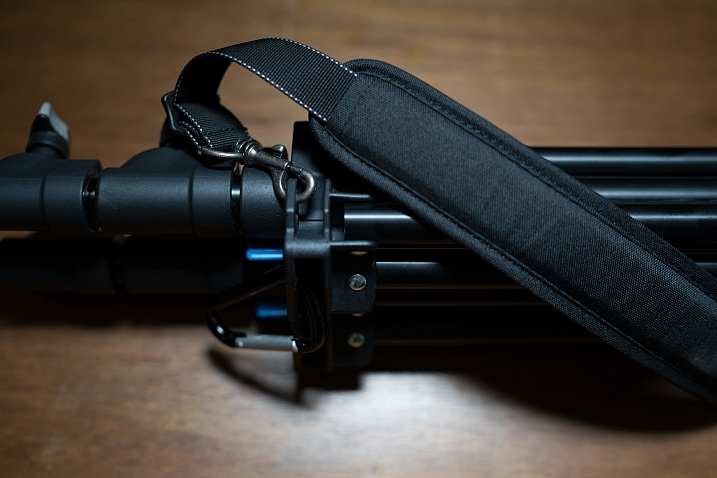
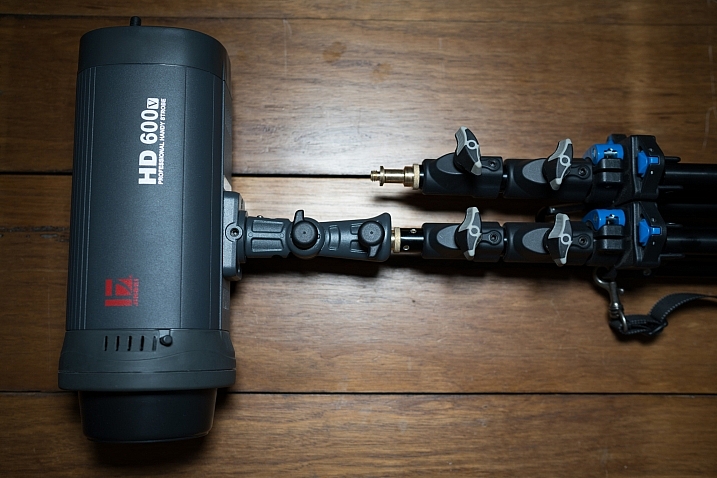
    The Kupo Click light stands allow you to click them together either side by side or on top of each other. So you can essentially have one of them flat on each side of your bag with some little attachment straps, or you can have them side by side (above) and sitting in the tripod cup on your rolling camera bag, or you can use a strap (sold separately, I didn’t get one as I used a regular strap with a clip attached to sling mine over my shoulder, see below)
    Kupo click light stand

    Kupo click light stand

    Kupo click light stand

    The stands have a sweet built-in air damper that prevents damage to your lights if you accidentally undo the locks by cushioning the column on release. I have tested this and it works. The midsection is better than the top section at slowing descent, but it certainly does slow down the inevitable crash and ultimately a replaced flash tube!

    Attaching your lights

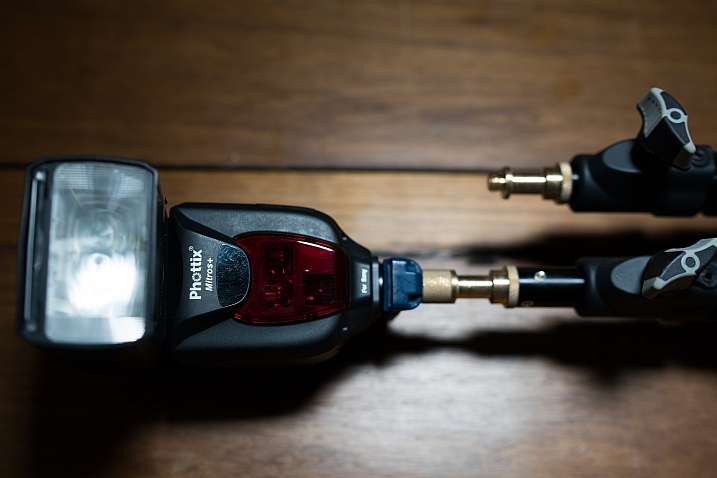
    The stands are equipped with a 5/8″ top stud with a 3/8″ threaded, plus a removable 1/4″-20 threaded top, this lets you mount a whole raft of lighting gear, as well as Sony ActionCam / GoPro mounts (The 1/4 20″ adaptor) which I like to use often on a shoot, or just to pop a camera up high for some reason or other – you can attach a regular ball head and mount your camera on that.
    Kupo click light stand

    Kupo click light stand

    Kupo click light stand

    Bottom line

    I’ve had these stands a few months now and have had many chances to use them and abuse them. They pack away well, they’re all the things I was after in a light stand. I can’t fault these stands and for the price, I’d say they’re one of the best on the market and well worth your hard earned coin. Five stars.

    googletag.cmd.push(function() {
    tablet_slots.push( googletag.defineSlot( “/1005424/_dPSv4_tab-all-article-bottom_(300×250)”, [300, 250], “pb-ad-78623” ).addService( googletag.pubads() ) ); } );

    googletag.cmd.push(function() {
    mobile_slots.push( googletag.defineSlot( “/1005424/_dPSv4_mob-all-article-bottom_(300×250)”, [300, 250], “pb-ad-78158” ).addService( googletag.pubads() ) ); } );

    The post Quick Review of the Kupo Click Stackable Light Stand by Sime appeared first on Digital Photography School.


    Digital Photography School

  • Adorama introduces Canon RT radio controlled TTL studio head and hotshoe flash

    $ (document).ready(function() { SampleGalleryV2({“containerId”:”embeddedSampleGallery_9533390039″,”galleryId”:”9533390039″,”isEmbeddedWidget”:true,”standalone”:false,”selectedImageIndex”:0,”startInCommentsView”:false,”isMobile”:false}) });

    Camera store Adorama has announced that it is to introduce a new line of monoblock studio heads that are designed to work directly with Canon’s RT radio TTL flash system. The company claims that the Orlit Rovelight RT 610 TTL Wireless Monolight, with its RT system built-in, is the first of its kind. The head can also be used with all Canon and Nikon DSLRs using the Orlit TR-611C and TR-612N TTL Transceivers that have been launched alongside the head. These transceivers allow TTL control of the head even with Nikon cameras.

    The Orilt Rovelight RT 610 TTL is a 600Ws head with a guide number of 201ft/61m @ ISO 100 that features modes for Canon’s ETTL and Nikon’s iTTL metering systems. It is powered by a rechargeable 6000mAh lithium ion battery pack that Adorama claims is good for 450 full-power flashes per charge. The longest recycle time will be 2.5 seconds at full power, but the head offers output settings down to 1/256th in 1/3EV steps across the nine-stop range. There is said to be a variance of only 150 K across the output range from the standard color temperature of 5500 K, and a high speed sync mode allows for shutter speeds of up to 1/8000sec. The modeling bulb is a 20W LED that has a 3200 K tungsten color balance and three brightness levels.

    The head accepts Bowens S-type modifiers and has an integrated umbrella shaft slot. The flash control system can be divided into five groups, while 16 channels are provided to avoid interference with other systems in the vicinity.

    The new studio head can also be controlled by or work alongside the company’s Orlit RT-600C TTL Speedlite. This new flash unit can sit in the camera’s hotshoe to act as a master or it can join a group of other RT flashes as a slave. The unit has a guide number of 160ft/48m @ ISO 100.

    The new studio head, flash unit and transceivers will ship later this month but can be ordered now on the Adorama website.

    • Orlit Rovelight RT 610 TTL Wireless Monolight – $ 699.95
    • Orlit RT-600C TTL Speedlite – $ 169.95
    • Orlit TR-611C Transceiver – $ 69.95
    • TR-612N TTL Transceiver – $ 69.95

    Press release

    Adorama Announces Orlit, and “The First Canon RT Wireless Compatible Monolight”

    Adorama, one of the world’s largest photography, video, audio, imaging and electronics retailers, has announced Orlit, the brand new line of TTL flash solutions for photographers. Available exclusively at Adorama, the line consists of the Orlit Rovelight RT 610 TTL Wireless Monolight, the first monolight to ship with the Canon RT radio system built in; the Orlit RT-600C TTL Speedlight for Canon, ideal for Canon users who want to use the unique Canon 600EX-RT wireless radio system; and the Orlit TR-611C and TR-612N TTL Transceivers, which enable shooters to achieve a more extensive and powerful lighting solution with wireless control for Orlit Canon and Nikon systems.

    Optimized for exceptional, true TTL performance, the all-new Orlit flash lighting line is now available for pre-order, exclusively from Adorama, and will begin shipping in February 2017. The Orlit product line-up includes:

    Orlit Rovelight RT 610 TTL Wireless Monolight: The only 600ws wireless TTL monolight that breaks the Canon RT radio barrier and also works with Nikon wireless systems. The Orlit RT610 TTL brings additional professional radio-based and infrared remote flash options to loyal Canon RT users, who can now use the Canon 600EX-RT as a master and the Orlit RT610 as the slave.

    With an outstanding Guide Number of 201 (ft. at ISO 100), and manual levels from full to 1/256 power with fine 0.1 stop graduations, this monolight from Orlit boasts a bright 20 watt LED modeling lamp with a tungsten 3200K color temperature. The HSS Mode allows sync shutter speeds up to 1/8000, while Freeze Mode achieves an additional reach of 1/19000 to capture split second moments.

    The Orlit Rovelight RT 610 user interface features a large, full-color LCD display, simplified menu system, and a generous power and function control dial. Future technologies and camera sync are firmware updated through the USB port.

    The Orlit Rovelight RT 610 TTL Wireless Monolight is now available for preorder and retails for $ 699.95 USD.

    Orlit RT-600C TTL Speedlite for Canon:

    This versatile Canon RT/ETTL wireless radio-compatible speedlight, which transmits both the Canon RT radio and optical systems, can act as a master to up to five independent groups or slave unit for remote power control. A Guide Number of 160 (ft. @ ISO 100, at 200mm zoom) in combination with the compact and lightweight design of the flash makes the Orlit Speedlite a top choice for professional Canon shooters.

    Using the Orlit Speedlite for Canon is a breeze, with a flash head that rotates 180 degrees in any direction and tilts over 90 degrees for any type of bounce or modifier use. The head zooms automatically or manually from 20-200mm, ensuring the necessary coverage without light spill. The Orlit RT-600C also has a holder to place color balancing gels before the flash head. Like the Orlit Rovelight, the Orlit RT 600C user interface features a clear LCD display with a simplified but extensive menu system, with future technologies incorporated via firmware updates.

    The Orlit RT-600C TTL Speedlite for Canon is now available for preorder and retails for $ 169.95 USD.

    Orlit TR-611C TTL Transceiver & Orlit TR-612N TTL Transceivers:

    Designed for Canon and Nikon cameras, respectively, adding 980ft/300m of remote lighting freedom. Using an Orlit transceiver on the camera’s hot shoe, Canon and Nikon photographers can easily adjust the exposure for the Orlit Rovelight RT610 TTL Monolight, while the Canon TR-611C adds control to the Orlit RT600C Speedlite.

    This TTL wireless flash transmitter from Orlit can trigger one or more receivers for studio flash and speedlights. Featuring direct group access, multi-group triggering, stable signal transmission, and sensitive reaction, photographers can achieve wide flexibility and control over their strobist setups. And with the Orlit TTL Transceivers, high speed synchronization is available for most Orlit camera flashes, with a max speed up to 1/8000s.

    The Orlit TR-611C & TR-612N TTL Transceivers are now available for preorder and will each retail for $ 69.95 USD.

    Designed with Users in Mind
    The Orlit TR-611C and TR-612N Transceivers feature an efficiently designed user interface with a clear LCD display, simplified but extensive menu system, and are graced by soft menu touch control buttons for all options. Future technologies are firmware updated through the USB port.

    The Future of TTL Flash is Now
    Coming soon, the Orlit smartphone app seamlessly integrates the latest in wireless command into studio life. A rich array of screens give touch control to the myriad of Orlit features without going near the set, from the convenience of a smartphone.

    Articles: Digital Photography Review (dpreview.com)

  • Fujifilm Instax Mini 8 teardown reveals what makes the camera tick

    The folks at All About Circuits have published a teardown of the Fujifilm Instax Mini 8 camera, revealing a glimpse at the components found within. Disassembly is simple, and mostly involves removing a series of screws, after which point DIYers are presented with ‘a surprising amount of circuitry.’

    Within the camera, All About Circuits discovered a micro-controller, DC buck converter, and a pulse transformer, as well as a xenon flash tube, a light emitter and sensor, and a couple of transformers. This was a surprise to the publication’s Mark Hughes, who said, ‘I expected to find a flash charging and firing circuit similar to the type found in a disposable camera.’

    We can forgive All About Circuits for calling the camera the ‘Insta- X Mini 8,’ because we love peering into the inner workings of cameras we wouldn’t have the nerve to dissect ourselves. Details about the hardware are available in the full teardown here.

    Via: All About Circuits

    Articles: Digital Photography Review (dpreview.com)

  • An Unconventional Composition Technique to Improve Your Photos

    Last month I sat down and reread Michael Freeman’s book, “The Photographer’s Mind.” which I do occasionally. I find that by revisiting the words of other photographers I remind myself of the multitude of tools available to us. There’s so much we can do to create fresh and amazing photographs.

    One of those ways is to push our skills and update our thinking. I think I’ve read through Freeman’s book about two or three times now. Every few years I take it off the shelf again. His books are insightful and interesting to read. Freeman offers up unique ideas for composition using both conventional and unconventional techniques. The books are readily available. You can also check out our review of one of Freeman’s other books here; “The Photographer’s Eye”. In this article, let’s journey through one of the concepts he discusses in his book, “Engineered Disorder”.

    An Unconventional Composition Technique to Improve Your Photos

    The details of the image are broken up into sections by the heavy shadows.

    What is Engineered Disorder?

    Freeman explains that Engineered Disorder is the active effort of a photographer to use non-conventional methods of composing photographs. Essentially, we are breaking the rules to create interesting images. Engineered Disorder means that we forget about conventional methods like unifying elements within the frame. We might allow ourselves to create uncluttered compositions. In one chapter Freeman talks about different methods of creating Engineered Disorder and bucking the system. He mentions using techniques such as disconnects, disruptive foreground, breaking the frame, superimposed layers and extremes of contrast. Maybe these terms sound complicated and a little too complex to understand, but they don’t have to be.

    Let’s break down one of these techniques and see what’s involved in creating Engineered Disorder. We will discuss the use of extreme lighting or chiaroscuro to create disconnect within an image. It’s one of my favorite techniques. I love to include deep blacks and bright highlights in my compositions.

    Chiaroscuro

    Chiaroscuro – chi·a·ro·scu·ro – the treatment of light and shade in drawing, painting, and photography.

    Using this technique means that we employ very hard lighting to break up the unity of a composition. The image becomes a series of pieces that communicate meaning but are broken up by dark shadows and bright highlights. Conventional composition techniques would say that using this type of technique makes for a bad photograph, but remember we are pushing the elements of composition.

    An Unconventional Composition Technique to Improve Your Photos

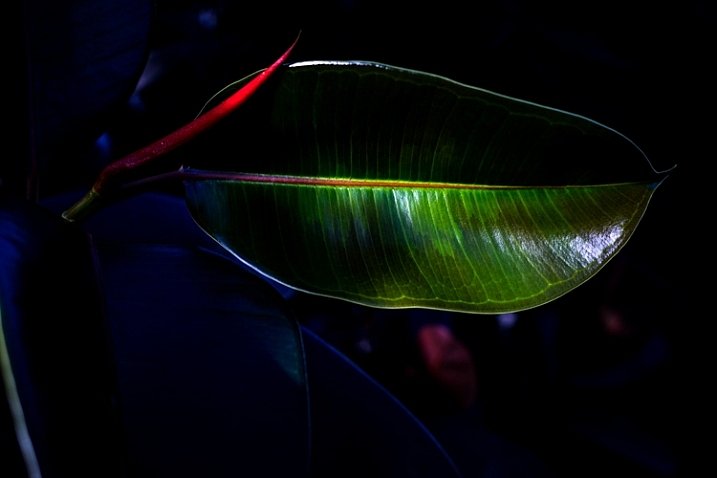
    The strong shadows in this image hide some details from the viewer. The leaf can only be viewed in pieces. This means a viewer has to pause and take in each part of the image separately and then piece together the whole scene. Making a viewer stop and study your image is important. Given the number of photographs out there you want to make viewers take some time to digest your images rather than scan through and move on. 


    Experimenting with dark and light

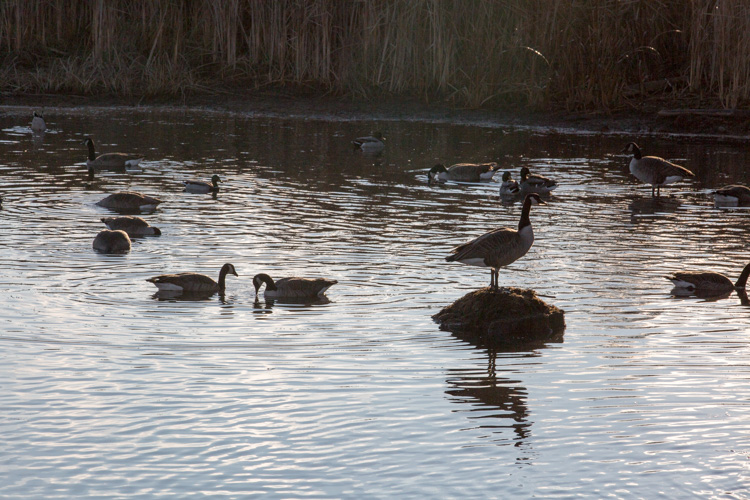
    Consider my careful experimentation with Chiaroscuro. This image portrays the common Canada goose in a much more unique fashion. In the opening moments of golden hours, these geese become elegant shadows. The different sections of light and dark create interesting graphic qualities within the image.

    An Unconventional Composition Technique to Improve Your Photos

    In this second image, I’ve used auto tone to create a more conventional image. While the actual shot is very similar, these two different treatments create considerably different photographs. Which one do you prefer?

    An Unconventional Composition Technique to Improve Your Photos

    A more conventional exposure.

    Other examples

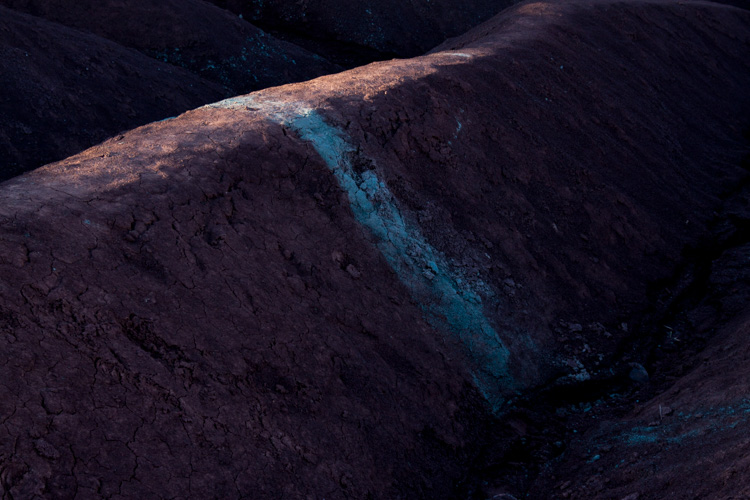
    Here’s another example of Chiaroscuro. This is a photograph of a unique area near my home. Everyone calls this place The Badlands. The red and gray clay create these beautiful graphic designs which draw visitors to the area. The hills are in danger of being destroyed by visitors, but the area is truly beautiful. The shadows and the light create beautiful diagonal lines in this particular image.

    An Unconventional Composition Technique to Improve Your Photos

    This are is now off limits to visitors because of the damage caused by walking on the hills.

    In this final image, the light and darks highlight different circular objects. Perhaps this image isn’t as disconnected as the others but it still presents a unique treatment for the door of a fishing boat. The image focuses on graphic design elements of the boat rather than the uses of the vessel. The image has been turned into an abstract and most viewers will need to analyze the image before they can determine the exact subject matter.

    An Unconventional Composition Technique to Improve Your Photos

    Conclusion – your turn

    Experimenting with different techniques is never a bad thing. You can learn and improve your photos by playing with unconventional techniques. Creating these images certainly pushed the dynamic capabilities of my camera. Exposing for deep shadows can be a challenge all on its own, but it’s a lot of fun to try out these different techniques.

    While we’ve only discussed one of the methods for creating Engineered Disorder, these three examples clearly highlight the technique. It’s better to fully understand just one compositional method rather than scratching the surface of several techniques. Give it a try, and go a little bit extreme. Break away from the conventional and search for ways to compose images that harness the power of Engineered Disorder in your photography. Please share your results in the comments below.

    googletag.cmd.push(function() {
    tablet_slots.push( googletag.defineSlot( “/1005424/_dPSv4_tab-all-article-bottom_(300×250)”, [300, 250], “pb-ad-78623” ).addService( googletag.pubads() ) ); } );

    googletag.cmd.push(function() {
    mobile_slots.push( googletag.defineSlot( “/1005424/_dPSv4_mob-all-article-bottom_(300×250)”, [300, 250], “pb-ad-78158” ).addService( googletag.pubads() ) ); } );

    The post An Unconventional Composition Technique to Improve Your Photos by Erin Fitzgibbon appeared first on Digital Photography School.

    Digital Photography School

  • How to Take Amazing Night Photos

    Have you ever been interested in taking night shots, but never known where to begin?

    Night photography can be intimidating, even for seasoned photographers who are used to taking shots during the day.

    Well, now you can learn how to take amazing photos from dusk till dawn with our brand new Night Photography video course – launched in the last few hours.

    Night photography course eml 01

    In this online video course by regular dPS writer Jim Hamel you will learn:

    • How to master exposure at night to take your photos from average to amazing
    • The secrets to finding the best subject matter and locations
    • The must-have gear to get these stunning shots
    • Detailed retouching techniques to make your photos pop
    • What to look for and how to set up your shot
    • All the technical aspects to nailing the shot

    This is our biggest course ever – with 9 learning modules, 11 practical ‘field work’ videos and over 6 hours of videos so you can learn everything you need to know to take beautiful photos at night.

    Here’s just a taste of what’s inside:

    Best of all – if you pick it up today you can take advantage of a wonderful early bird offer.

    Early Bird Offer – Save 50% and receive a Bonus

    As part of our early bird special on this course, we’re offing 50% off the regular price. Normally $ 99 – today you can pick up our new night photography course for just $ 49!

    In addition to that great saving we are also including a “The Complete Guide to Shooting the Night Sky”, a 40 page ebook dedicated to photographing stars. This great eBook is yours free if you buy but only for a limited time.

    Discover the Secrets to Great Night Photography Today

    We’re so excited to share this course with you today. Everyone we’ve shown it to loves what Jim teaches.

    The early bird price and bonus is only available at this price for the next 3 weeks, so grab it while you can here and start your journey to learning how to take amazing night photography images.

    We Guarantee You’ll Love this Course

    Like all dPS products our Night Photography Course comes with a 60 day money back guarantee. While we’re confident you’ll love this course if for any reason you decide it isn’t for you please just contact our support team within 60 days and we’ll refund your money – you can even keep the bonus eBook as our gift to you for checking out the course.

    googletag.cmd.push(function() {
    tablet_slots.push( googletag.defineSlot( “/1005424/_dPSv4_tab-all-article-bottom_(300×250)”, [300, 250], “pb-ad-78623” ).addService( googletag.pubads() ) ); } );

    googletag.cmd.push(function() {
    mobile_slots.push( googletag.defineSlot( “/1005424/_dPSv4_mob-all-article-bottom_(300×250)”, [300, 250], “pb-ad-78158” ).addService( googletag.pubads() ) ); } );

    The post How to Take Amazing Night Photos by Darren Rowse appeared first on Digital Photography School.

    Digital Photography School

  • This instant camera is made almost entirely of cardboard

    $ (document).ready(function() { SampleGalleryV2({“containerId”:”embeddedSampleGallery_9055945704″,”galleryId”:”9055945704″,”isEmbeddedWidget”:true,”standalone”:false,”selectedImageIndex”:0,”startInCommentsView”:false,”isMobile”:false}) });

    A Ukrainian startup is looking to fund mass production of Jollylook, a camera made mostly of cardboard and paper that accepts Fujifilm Instax mini cartridges. The camera exists in prototype form now, and contains no electronic parts – a specially designed shutter and hand crank used to start the development process are operated manually. 

    Jollylook folds up into an ordinary-looking cardboard box (a little bigger than the box an iPhone comes in, its developer says) when not in use. To start using it, the front unit containing the lens is extended. Set the aperture, raise the viewfinder, frame your shot and fire.

    Jollylook’s makers state that Kickstarter funds will be used to create molds for the camera’s lenses, organize production and help with marketing efforts. They’re closing in on their $ 15,000 goal fast with a full month to go. Backers who pledge at least $ 35 are promised one Jollylook camera and an Instax mini film cartridge. Shipping is estimated for June 2017.

    $ (document).ready(function() { SampleGalleryV2({“containerId”:”embeddedSampleGallery_3471604241″,”galleryId”:”3471604241″,”isEmbeddedWidget”:true,”standalone”:false,”selectedImageIndex”:0,”startInCommentsView”:false,”isMobile”:false}) });

    Jollylook – The First Cardboard Vintage Instant Camera!

    Jollylook is a simple fold out camera for analog photos, made entirely from recycled paper and cardboard. No electronics, batteries or chargers – some paper, a pair of lenses and a cartridge for instant mini photos. Environment friendly – Jollylook uses less materials than used in the packaging of a regular camera. The camera body, the shutter and aperture are made of thick paper and laminated cardboard. Jollylook is as dangerous to the environment as a banana peal!

    On January 31st, 2017 – Jollylook, a Ukrainian team of instant photography enthusiasts, starts a 30-days crowdfunding campaign on Kickstarter.com, to bring Jollylook – The First Cardboard Vintage Instant Film Camera to instant photo lovers.

    Oleg Khalip, co-founder and author of the idea: “Once I was showing my son what’s inside the analog camera and how analog photography works, I thought then – “what if the package itself transformed and fulfilled the function of the camera and the picture turned out immediately?!” There was no problem with instant photos technology, people solved this problem long time ago. What remained to create was an analog camera that would be simple and contained in the package, worked properly and allowed to take pictures and get instant results. I had to study the structure of many analog cameras, before being able to make the shutter – the most difficult part in the development was the shutter (no existing structure worked for Jollylook, so I had to invent a new shutter). After picking the right lens and calculating the aperture, we created a folding “accordion” camera body from paper, then the case where the instax cartridge is placed, and we moved to the design, here there where no doubts – it had to be retro with a little steampunk look. Then we had difficulties with the unit for getting the photo out from the cartridge but after testing many options, we achieved a perfect result, photographs are now developed and pulled out with a rotating handle.”

    “When moments of life that we see freeze on paper – it is magic!” – says Oleg.

    The crowdfunding campaign with a goal of $ 15 000 will last for 30 days and the first mass produced Jollylook cameras are expected in June 2017.

    The advantages of Jollylook:

    Vintage Design – retro with a little steampunk.

    Foldout and Compact – a little bigger than an iphone box.

    A Great Gift – can be used immediately and instantly.

    A Great Toy – Jollylook is a great teaching toy for children. Your kid can take it apart and see how it works.

    A Great Souvenir – even after use Jollylook is beautiful on the shelf!

    Fun – entertaining and positive emotions.

    Beautiful Photos – using Instax mini film you get 10 instant classic color or monochrome analog unique photos. (the cartridges can be changed many times easily and quickly )

    Environment friendly – easily recyclable, as dangerous to the environment as a banana peal!

    Specifications:

    • Lens – a meniscus lens with a focal length of 110 mm (4.33 in), allows to take photos from portrait to landscape. Can be moved up to shoot through the pinhole.
    • Viewfinder – a Fresnel lens
    • Aperture – a switchable diaphragm with manual adjustment for the seven values: f/8, f/11, f/16, f/22; f/32; f/45; f/64 + pinhole.
    • Shutter – automatic with shutter speed of 1/250 or 1/160 and manual shutter mode with the possibility to control the exposure time manually.
    • Pinhole – a round hole in a copper foil 0.6 mm (0.023 in) in diameter, located on the diaphragm disk
    • 10 shots per instax mini cartridge (the cartridge can be changed many times)
    • Storage conditions – store in a dry and dark place at room temperature.
    • Conditions of use – use at temperatures between 10 – 35 °C (50 -95 ?) in dry weather.
    • Size when folded 85 x 127 x 48 mm (311?32 x 5 x 157?64 in)
    • Takes Fujifilm “instax mini” instant film cartridge
    • Photo size 46(W) x 62(H) mm

    Articles: Digital Photography Review (dpreview.com)

  • Exclusive interview: Olympus R&D on continued E-M1 Mark II development

    Conference room to conference room: Setting up for a cross-Pacific meeting.

    Over the years, Olympus has steadily released firmware updates to its previous flagship, the OM-D E-M1. It currently sits at firmware version 4.3, and in the interim, updates have added features such as Live Composite and Live Boost II, and also included functional improvements to such aspects as continuous autofocus performance, image display lag time and more.

    Bearing this in mind, it stands to reason that Olympus would be planning a similar treatment with regards to the E-M1 Mark II. Since its surprise reveal at Photokina 2016, and particularly since we’ve published our full review, we’ve emailed back and forth with both feedback and feature requests for Olympus Tokyo to consider in future firmware updates. This all culminated in an international video conference call last week, where we learned a great deal about just what Olympus’ has in store.

    “I would like to promise that we will be improving and evolving [the E-M1 Mark II] with firmware upgrades.” – Mr. Takao Takasu, E-M1 Mark II Product Development

    It’s important to point out that the Olympus engineers we met with are understandably unable to confirm specifics such as when (or if) certain improvements will come to the E-M1 II, but they are at the very least committed to confirming some items that they are ‘working on.’ The most notable of these include:

    • Adding ‘Auto ISO’ capability to manual video shooting
    • Allowing for control of autofocus racking speed while shooting video
    • Clarifying and enhancing customizability of continuous autofocus behavior beyond the current -2 to +2 ‘tight to loose’ scale
    • Working on the AF algorithm to improve tracking performance
    • Enable the ability to enter playback and menus while the buffer is clearing

    To see considerations as significant as refinement of the autofocus algorithm this early in a product cycle is encouraging. Olympus is adamant (and, given what we’ve found in our full review, rightfully so) that the E-M1 II is part of a system that can appeal to professional shooters looking for a more compact kit without sacrificing anything in terms of overall speed. Admittedly the smaller Four Thirds sensor lags behind many cheaper APS-C and Full Frame solutions with regards to low light and noise performance, but no other camera offers 18fps Raw burst shooting with continuous autofocus, and the smaller sensor in the E-M1 II is precisely what allows the camera to do so.

    “We will try to improve playback function during data recording.”- Mr. Katsuhisa Kawaguchi, Continuous Shooting

    In addition to letting us know what they’re working on for future firmware upgrades, Olympus gave us some further insight into some of the E-M1 II’s headline capabilities.

    With regard to autofocus during burst shooting, the camera is able to capture and analyze phase-detection autofocus information of the image that has just been captured to use it in tandem with Live View autofocus information for more accurate prediction of subject movement – this is all meant to improve tracking performance.

    The in-body image stabilization system currently allows around 5.5 stops of image stabilization at 40mm (80mm equiv.) focal length, with shorter focal lengths reducing overall effectiveness, as with shorter focal lengths, you have ever lengthening exposure times where body shake – as opposed to hand shake – becomes dominant (this is true of all IS systems). Smaller amplitude and higher-frequency shaking from hand shake is far easier to engineer for in terms of sensor movement than high amplitude, slow-frequency shake from a photographer’s whole body.

    “Our [image stabilization] becoming very, very sensitive. But we are not satisfied with the current performance and will continue to improve.” – Mr. Hisashi Takeuchi, Image Stabilization System

    There are, of course, reports of users getting sharp shots at shutter speeds ranging from 2-10 seconds, though these users are also bracing against larger body movements by leaning on a wall, or placing elbows on a desk.

    As with its predecessor, weather sealing and durability was a big point of emphasis on the E-M1 Mark II.

    That being said, the engineers stated that they are aiming to push image stabilization technology even farther than the 6.5 stops afforded when the E-M1 II is paired with an image stabilized lens, such as the 300mm F4 Pro or 12-100mm F4 Pro. We asked them how they aim to do this, and were greeted with a wry smile or two – certainly indicative of some confidence in their ongoing development. 

    Olympus was also able to tell us that the E-M1 II was ‘benchmarked’ against competitors’ models, with a concerted effort being made to improve upon them. In this vein, particular attention was paid to speed of image playback (which is blazingly fast, and highly important considering the burst speeds), JPEG tonality, noise reduction and overall quality (important for quickly filing photos on, say, breaking news assignments), and run-and-gun movie capability, especially in terms of movie image stabilization.

    “We have achieved high quality 4K shooting without a tripod or stabilizer.” – Mr. Kazuhiro Haneda, Video

    It’s clear that Olympus is proud of the E-M1 Mark II, and is serious about tackling its shortcomings with firmware upgrades wherever possible. One thing they won’t be able to fix with firmware is one of the E-M1 II’s biggest criticisms: the price remains prohibitively high for many. 

    But given what Olympus is already aiming to tackle, those investing in the Olympus system for the long term are likely to be rewarded. It’s become more common practice over the past few years to bring updates to camera models (particularly flagships) throughout the product cycle. It’s encouraging to see Olympus continue this going forward, not only in terms of usability and technical improvements, but perhaps new features as well – we’ll just have to wait and see.

    Articles: Digital Photography Review (dpreview.com)

  • How to Use Graduated Neutral Density Filters for Landscape Photography

    Since the camera was invented, we have tried to copy one of the greatest wonders of our body; the human eye. Unfortunately, despite being over 100 years since the first time that we captured light, we are still far from overcoming Mother Nature.

    Why? Because in the visible spectrum your eye sees much better than your camera.

    How to Use Graduated Neutral Density Filters for Landscape Photography

    Dynamic Range

    The parameter that describes this behavior is called Dynamic Range. This basically defines the difference between the minimum and maximum value of brightness that a device (like your eye or the sensor of your camera) is able to record. In the real world, Dynamic Range defines the ability of your camera to see details in very dark areas and very clear (bright) areas of the scene.

    If you’re wondering how much more your eye sees, the answer is staggering. Your eyes have about twice as much range that they can see and capture.

    How to Use Graduated Neutral Density Filters for Landscape Photography

    The problem

    That’s why when you look at a marvelous sunset with your eyes you’re able to see all the details in the scene (in both the sky and the land). But as soon as you try to capture it with your camera, you’ll get an overexposed sky or a underexposed foreground. The Dynamic Range of your camera is only able to capture detail in one of those areas so you have to choose.

    But if even the best cameras have a Dynamic Range which is only half that of the human eye. So how can we hope to shoot a beautiful sunset or a wonderful sunrise and capture all the marvelous details?

    There are different methods to overcome this problem, but my favorite is the use of Graduated Neutral Density filters (GND).

    graduated neutral density filters

    What is a Graduated Neutral Density Filter?

    A Graduated Neutral Density Filter is one made of two distinct parts; a completely transparent area, and a darker section. By setting the darkest part of the filter to correspond with the brightest portion of the scene, you can reduce the exposure difference (dynamic range) in the frame.

    To reduce the exposure difference is to reduce the dynamic range of the scene, and thus allow your camera to simultaneously capture detail in both bright and dark areas of the scene. Basically, to make an analogy, GND filters are like a kind of sunglasses for your camera.

    Types of GND filters

    Graduated Neutral Density Filters are typically distinguished by the type of transition that exists between the transparent and dark areas of the filter. For this reason, we can identify three families of GNDs:

    1. Hard-edge filters, which are characterized by a clear boundary (it’s obvious where one begins and the other ends) between the transparent and dark areas. They are therefore used when the separation between the bright and dark areas of your scene is very defined, such as the horizon at sea.
    2. Soft-edge filters are characterized by a soft transition (they change from light to dark more gradually) and are therefore used when the transition between light and dark areas is not so clear. A classic example is a shot in a mountainous area.
    3. Reverse filters, which are nothing more than hard-edge GNDs with the dark area that fades away the more you move from the line of separation to the upper border of the filter (meaning it’s darker in the middle than on the edge). Basically, they were invented to better manage sunrises and sunsets, where the light is more intense on the horizon line (middle). If you love seascapes like me, this filter will be one of your best friends forever!

    How to Use Graduated Neutral Density Filters for Landscape Photography

    Which to buy?

    Another distinction is between filters is the construction material. Higher quality filters are made of optical glass. Putting an inexpensive resin filter in front of a lens worth hundreds (or thousands) of dollars is not a great idea.

    Finally, GND filters are distinguished by graduation, or their ability to block light through the darkest area. Essentially how dark they are at the extreme. Normally in landscape photography, this difference is between one and four stops during sunset and sunrise, depending on weather conditions. This is the reason why you will find these gradations almost exclusively on the market.

    Shop for Graduated Neutral Density filters on Amazon.com or on B&H Photo Video’s site (they ship worldwide).

    How to use a GND filter in the field

    The use of GND filters in the field is very simple; try to take exposure readings in the darkest and in the brightest areas of the scene (usually the sky). The exposure difference will indicate the intensity of the filter to be used. Let’s assume that the light meter reading for the sky is 1/250th, and the one for the rocks in the foreground is 1/30th. The difference between those readings is three stops (250th > 125th > 60th > 30th), so to balance the exposure you must use a 0.9 (3-stop) GND.

    At this point, just mount the filter with its dark side over the brightest part of the scene. This is why a GND screw-in filter does not make sense. You would not have the possibility to align the dark area in accordance with the scene as well as a drop-in style filter.

    How to Use Graduated Neutral Density Filters for Landscape Photography

    To avoid having to hold the filter with your hands (that could be a problem if you are going to use them together with other filters) you can buy a holder, that once mounted in front of your lens will do the job for you. There are many valid solutions on the market, but the best one (in my opinion) is the V5 Pro Holder by NiSi filters. This is the only one that lets you simultaneously install three different filters and a polarizer without any vignetting issues (as wide as 16mm on full frame cameras).

    At this point, the limited Dynamic Range of your image will be just a bad memory!

    How to Use Graduated Neutral Density Filters for Landscape Photography

    googletag.cmd.push(function() {
    tablet_slots.push( googletag.defineSlot( “/1005424/_dPSv4_tab-all-article-bottom_(300×250)”, [300, 250], “pb-ad-78623” ).addService( googletag.pubads() ) ); } );

    googletag.cmd.push(function() {
    mobile_slots.push( googletag.defineSlot( “/1005424/_dPSv4_mob-all-article-bottom_(300×250)”, [300, 250], “pb-ad-78158” ).addService( googletag.pubads() ) ); } );

    The post How to Use Graduated Neutral Density Filters for Landscape Photography by Francesco Gola appeared first on Digital Photography School.


    Digital Photography School

  • 5 Common Post-Processing Mistakes to Avoid

    For today’s photographer, post-processing is a critical element of image making. Sure, when you first get started with digital photography, you might shoot in JPG mode and allow the camera to make decisions about things like color and contrast. But when you’re ready to take control of your images, it’s time to shoot in RAW format and make the important decisions about how you want your final image to look yourself.

    Estuary in Campbell River BC by Anne McKinnell - 5 Common Post-Processing Mistakes to Avoid

    When you first start shooting in RAW, you might think your images look a bit gray and bland. That’s because the decisions that the camera was making before are now left up to you. That can be a bit daunting! But here are some tips to help you avoid the most common post-processing mistakes and make sure you are helping your images and not hurting them.

    Remember, the purpose of post-processing is not to fix bad photos, but to bring out the best in good photos.

    Mistake #1 – Lightening shadows too much

    Always try to get the best exposure possible in camera. You’ll get a better result when you start out with a good exposure rather than relying on the highlights and shadows sliders in post-processing to balance it.

    That said, sometimes you will still want to use the shadows slider to lighten your shadows to bring more detail in the darker areas of your image. Just be careful not to overdo it, or you’ll end up with an image that no longer looks natural.

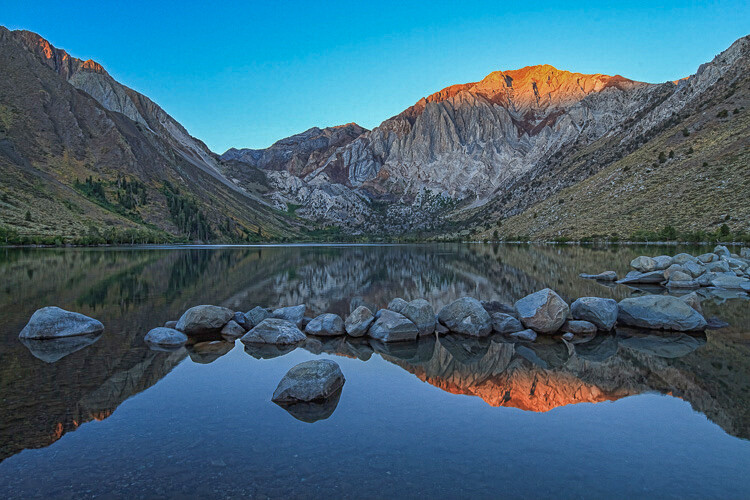
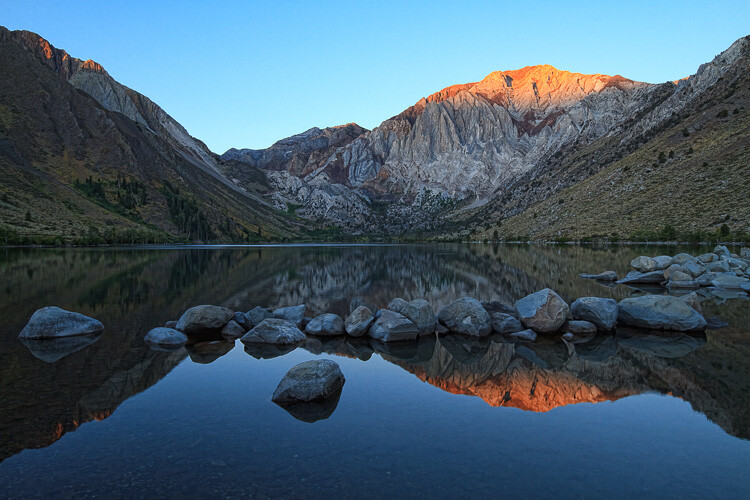
    This is overdone, the shadows have been pulled too far here and it no longer looks natural. Notice it also introduced noise into the sky.

    Convict Lake, California by Anne McKinnell - 5 Common Post-Processing Mistakes to Avoid

    Shadow adjustment in moderation is better.

    If you try to equalize the brightness of the highlights and shadows, you’ll end up with a photo that not only looks unnatural, but the lack of contrast will make the image look boring. Contrast is a good thing! This is especially true when you have a scene with a reflection. The reflection should always be darker than the scene it is reflecting, as it is in nature.

    Mistake #2 – Over saturation

    Another way to create an unnatural looking image is to over saturate everything. It’s a tempting thing to do because a little bump in saturation and vibrance makes such a big difference. Again, just don’t overdo it. A little goes a long way.

    Before you touch those sliders, spend a bit of time thinking about your image and the colors in it. Sometimes adding saturation globally is not the best idea, especially if you have a scene that contains many different colors. Instead, consider using the HSL (Hue/Saturation/Luminosity) panel, choose Saturation, and use the target tool to add saturation to one color in your scene. For example, you might want to add saturation to the main subject to draw attention to it.

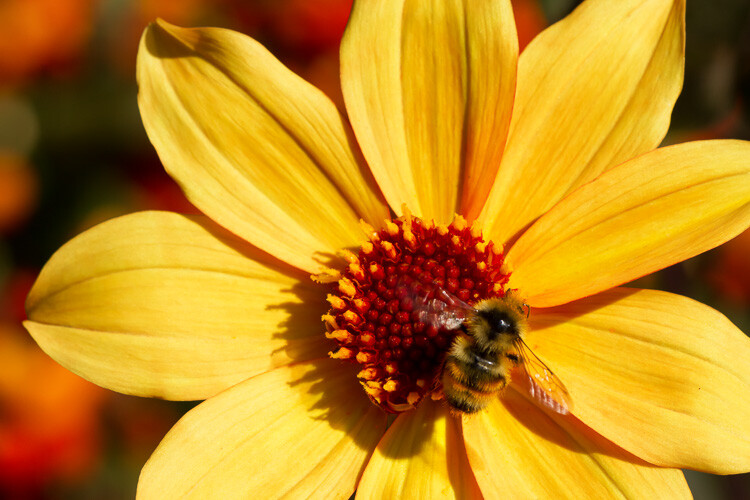
    Over saturation leaves the colors looking odd.

    Yellow flower with bee by Anne McKinnell - 5 Common Post-Processing Mistakes to Avoid

    Better saturation levels.

    Mistake #3 – Over sharpening

    First of all, never use sharpening to try to fix a photo that is out of focus. It just doesn’t work. Sharpening cannot fix blur. However, if you have an image that is in focus, adding a bit of sharpening can make it extra crisp and realistic.

    Again, consider adding sharpening locally (to one select area) not globally, especially if you have areas of your scene that are purposely out of focus, such as when you have a shallow depth of field. Also, the sky usually looks better when it is smooth, so you don’t want to add sharpening there. Keep in mind that adding sharpening will increase noise, which is another reason not to add it globally. Rather, just add it to the main subject or areas of your scene with a lot of detail.

    This has been over sharpened, you can see artifacts throughout the image here.

    Deer by Anne McKinnell - 5 Common Post-Processing Mistakes to Avoid

    Better level of sharpening.

    In Adobe Camera Raw, use the Detail panel to add sharpening. Then, hold down the option (or alt) key and use the masking slider. As you move the slider, the areas that appear black do not have sharpening applied and areas that are white do. This is an effective way to add sharpening to the areas of your image that have details. Another option is to use the adjustment brush to brush sharpening on where you want it.

    Mistake #4 – Over cropping

    The crop tool is a handy way to refine your composition, remove unwanted elements on the edges of the frame, and make sure your horizon line is straight. But don’t use it to remove all the “negative space” in your scene.

    You don’t need to fill the frame with your subject. A little breathing room keeps the image interesting. Think about creating a balance between the space taken up by your subject and the space around it. This is not necessarily an equal balance.

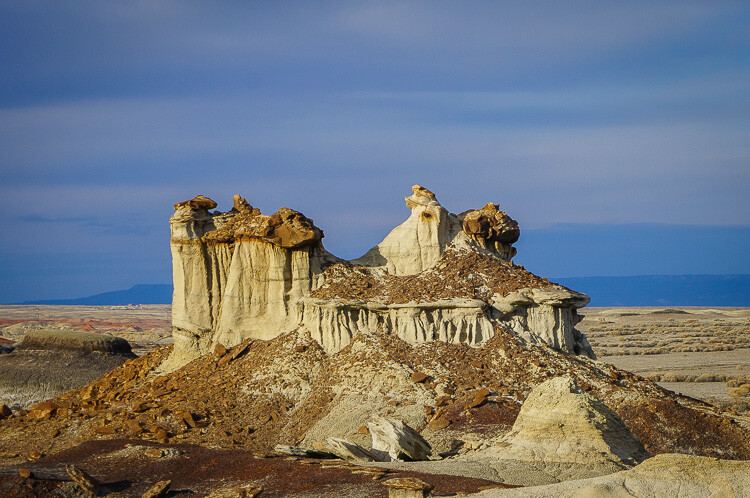
    Cropped too tight on the subject.

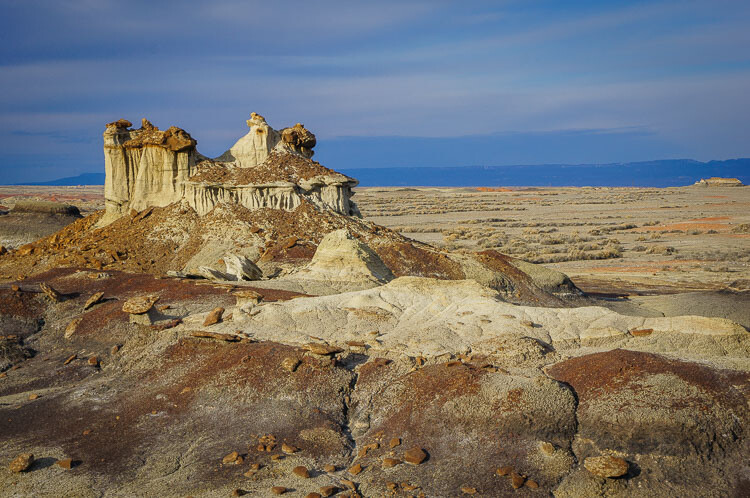
    Bisti Badlands, New Mexico by Anne McKinnell - 5 Common Post-Processing Mistakes to Avoid

    Cropped to leave negative space and lead your eye to the subject.

    Mistake #5 – Too much Noise Reduction

    Sometimes the nature of the light requires the use of a high ISO. Perhaps you need both a small aperture and a high shutter speed for your scene, so increasing the ISO is the only way to get a good exposure. That’s okay. The noise caused by using a high ISO can be reduced in post-processing using the noise reduction slider.

    But nobody said that all images must have no noise. Not all images have to be perfectly smooth looking. Especially if there is a lot of detail and texture in your subject. Using too much noise reduction can create blurry splotches in areas that were previously sharp.

    Too much noise reduction has been applied here and overall the image now looks blurry.

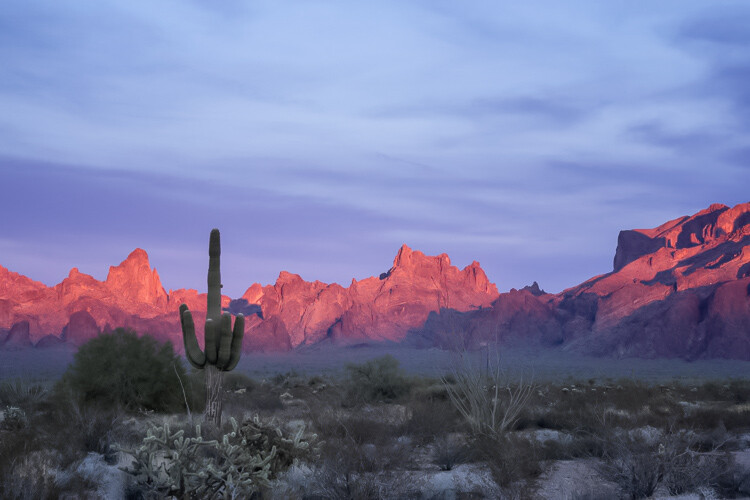
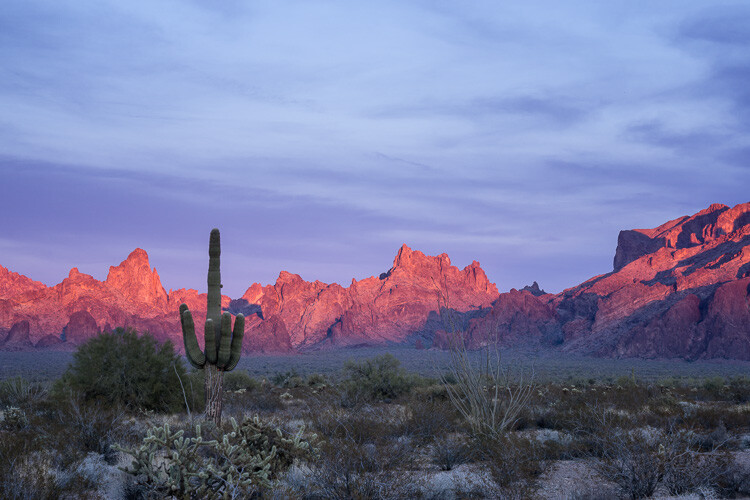
    Kofa National Wildlife Refuge, Arizona by Anne McKinnell - 5 Common Post-Processing Mistakes to Avoid

    Noise reduction scaled back.

    You may have noticed a theme in these common mistakes. Don’t over do it! Small adjustments go a long way to bringing out the best qualities of your images, but taking it too far can just as easily ruin them.

    After you process your image, take a break from it and look at something else. Maybe even give it a day to settle. Then, when you look at it again, it will be more obvious if you have taken the processing too far.

    googletag.cmd.push(function() {
    tablet_slots.push( googletag.defineSlot( “/1005424/_dPSv4_tab-all-article-bottom_(300×250)”, [300, 250], “pb-ad-78623” ).addService( googletag.pubads() ) ); } );

    googletag.cmd.push(function() {
    mobile_slots.push( googletag.defineSlot( “/1005424/_dPSv4_mob-all-article-bottom_(300×250)”, [300, 250], “pb-ad-78158” ).addService( googletag.pubads() ) ); } );

    The post 5 Common Post-Processing Mistakes to Avoid by Anne McKinnell appeared first on Digital Photography School.


    Digital Photography School

  • Proto-Pantone: 800-Page Color Palette Guide Book Hand-Drawn in 1600s

    [ By WebUrbanist in Art & Sculpture & Craft. ]

    color guide

    This vast volume full of mixed watercolor swatches and other illustrations elaborating explains the art and science of combining waters and colors to create a huge array of tones, tints, shades and hues.

    color palette guide book

    historical tone hue guide

    Created by artist  A. Boogert, this Dutch book is one-of-a-kind, a unique handmade production designed to educate students and artists about how to mix, make and deploy individual colors and color schemes. The entire work is thoroughly indexed and each process described in impressive detail.

    historical dutch watercolor swatches

    Medieval book historian Erik Kwakkel considers it a comprehensive coloring guide ahead of its time. “I encountered this Dutch book from 1692 in a French database today and it turns out to be quite special. For one thing, no Dutch scholar appears to have published on it, or even to know about it. Moreover, the object is special because it provides an unusual peek into the workshop of 17th-century painters and illustrators.”

    dutch black white swatches

    More from the aforementioned scholar: “In the 17th century, an age known as the Golden Age of Dutch Painting, this manual would have hit the right spot. It makes sense, then, that the author explains in the introduction that he wrote the book for educational purposes. Remarkably, because the manual is written by hand and therefore literally one of a kind, it did not get the reach among painters – or attention among modern art historians – it deserves.”

    dutch book cover intro

    If you want to see the volume yourself: Aix-en-Provence, Bibliothèque municipale/Bibliothèque Méjanes, MS 1389 (1228). Luckily, the entire book can be viewed here, in hi-res, zoomable images. Here is a description of the book. Thanks to the internet, this single-run work now finally has a shot at the global audience for which it was intended (via Colossal).

    Share on Facebook


    [ By WebUrbanist in Art & Sculpture & Craft. ]

    [ WebUrbanist | Archives | Galleries | Privacy | TOS ]


    WebUrbanist