Tag: first

  • A Step By Step Guide to Making Your First Panorama Photo

    Image 4

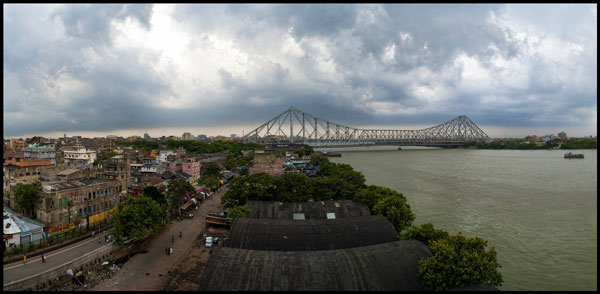
    While visiting an art gallery or a photography exhibition, at times you may have noticed certain landscape photographs have extremely elongated fields of view. They seem quite impossible to have been photographed with a standard camera. If you wonder how such elongated photographs are made, you are not alone. I had my first encounter with a panoramic image of the Himalayan mountain range being displayed at Das Studios in Darjeeling, a Himalayan resort town in West Bengal, India. That photograph had a huge impact on me and it led me to searching for ways and means to photograph panoramic images.

    During my initial search I figured panoramas were probably made with highly specialized cameras and lenses. But, to my surprise I found that panoramic photographs can be made with any kind of camera at your disposal. All you need is a camera, preferably one capable of shooting in Manual mode. Yes, with certain cameras and Smartphones you can get Apps for recording a panorama in a sweep but I never found the results quite satisfactory. Shooting your own panorama gives you the creative freedom and a sense of satisfaction.

    How to shoot a panorama

    A panorama is a combined set of individual photographs, in which two adjacent photographs have at least 20% overlapping areas. These two, or more, overlapping photographs are “stitched” with the help of software to produce extremely elongated fields of view. The overlapping is required as the software is able to understand the common areas in two adjacent photographs and hence can eliminate duplication of a scene by stitching the same into a single photograph.
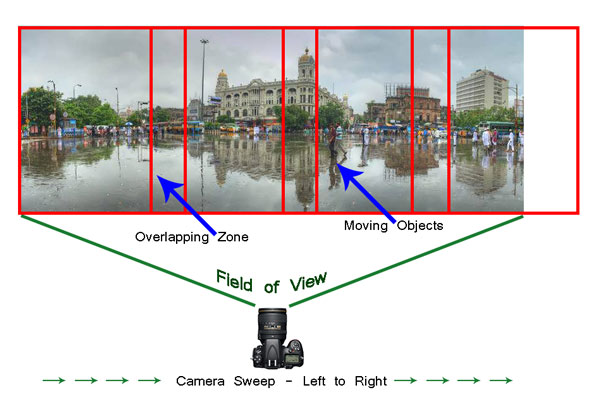
    Image 1

    Before shooting a panorama, you need to plan out well. Here is a list of guiding factors for creating your own panorama.

    #1 Shoot in Manual Mode

    Since a panorama is shot over a large field of view where lighting conditions can be different, it is imperative to shoot in Manual mode with Manual Focus. This will ensure all the photographs shot have an exact exposure value and focus throughout all the images. Shooting in Automatic, Program or Semi-Automatic modes (like Shutter priority or Aperture priority) will result in different exposure values for each photograph, which in turn may cause the final merged photograph to have varied exposure and color casts in different parts of the photograph.

    #2 RAW or JPEG

    While you generally want to shoot in RAW, it is preferable to switch to JPEG for panoramas. Shooting in RAW is absolutely fine, but since the photographs will not be edited individually (we will see this at a later stage) and to reduce shutter lag, shooting in JPEG is preferred. A word of caution – as we will be shooting in JPEG make sure the exposure values are correctly adjusted.

    #3 Tripod or handheld?

    If the weight of your tripod is not a factor, carrying it is always preferable. However on a bright day you can very well rely on your own hands. A steady posture, or using your camera bag or any sturdy object available to rest the camera on, will save you the weight of carrying a tripod.

    #4 Horizontal or vertical

    We are generally accustomed to shoot in Landscape (horizontal) mode. Shooting in Landscape is fine but the resulting panorama will be short in height, since Landscape photographs will be stitched together. Additionally, during the stitching process there will be a lot of redundant or blank areas (you will see later during the post-processing) which need to be cropped out. This will further reduce the height of the panorama. To overcome this issue you may choose to shoot the panorama in Portrait (Vertical) mode. This will help in achieving a greater image height which can be cropped out as per requirement, say for printing or aesthetics.

    #5 Be fast

    Be very quick in shooting since light conditions change fast. Additionally if you are shooting a cityscape, a populated beach or a scenario where there is movement, be cautious. If you are not shooting fast enough, you will find moving objects (e.g., people, cars, bikes) will be duplicated across the frames. You would not want to see the same object twice across the panorama.

    # 6 Plan it out well

    Stand at the selected spot and plan the number of shots in advance. This will help you in keeping a control of the number of shots rather than shooting randomly. Be sure to do a mock round without actually shooting.

    When you are ready, start shooting from left to right. Make sure you have at least 20% overlapping areas in two consecutive photographs. An visual estimate will suffice. Look through your viewfinder and shoot. Do not look at the individual photographs on your LCD screen until you finish shooting. Before leaving the scene turn on the LCD screen and review the photograph series. If you are not happy, shoot again.
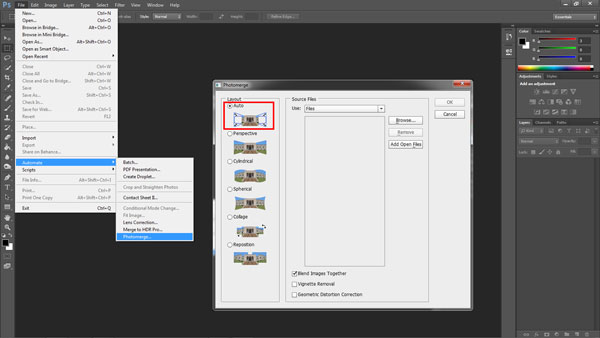
    Image 2

    Stitching your panorama

    The sext step is stitching your panorama. There are plenty of panoramic stitching software available on the internet. I will put a list of links to some of the best software at the end of this article. The stitching process is similar across software but as of now we will use the standard photo editing tool – Adobe Photoshop. The stitching process in Adobe Photoshop is fully automated.

    Since you may have shot more than one panorama series, for the purpose of identification it would be easier to store each series in a separate folder. You may have shot in JPEG or RAW but make sure you do not edit individual photographs.

    Steps to stitch a panorama:

    1. Open Photoshop
    2. Click File > Automate > Photomerge
    3. “Auto” is the default Layout option. Photoshop analyzes the source images and applies either a Perspective, Cylindrical, and Spherical layout, depending on which produces a better Photomerge. Choose “Auto” if it is not selected by default.
    4. Check “Blend Images Together”
    5. Next Click “Browse” and locate the separate Folder where you have put in your panorama series. Select the series and click “Ok”
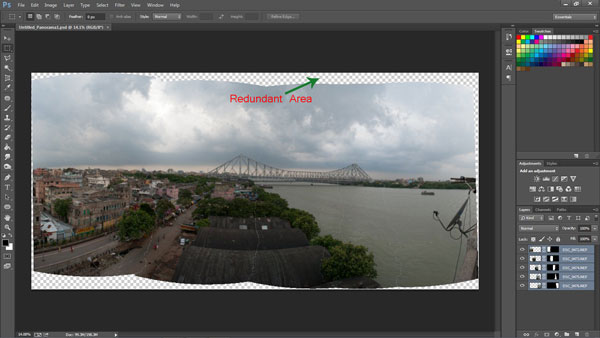
    Image 3

    1. Depending on the number and size of the photographs, it may take a while for Adobe Photoshop to stitch together the images.
    2. After the stitching process is completed you will find a roughly shaped panorama (with a few redundant spaces). Refer to the image above
    3. Right click on a Layer in the Layers panel and click Merge Layers
    4. The next step is to use the Crop Tool to trim out the redundant portions of the panorama
    5. After the final touches you are done with your very own first panorama
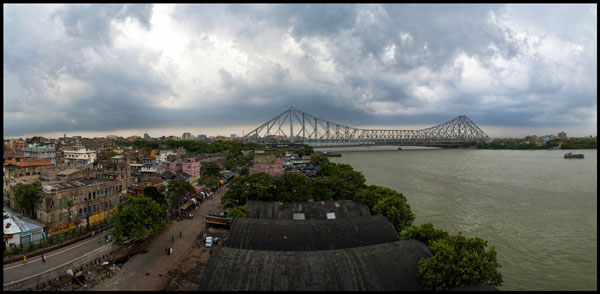
    Image 4

    Links to panorama stitching software:

    • AutoStitch
    • pTGui
    • Hugin
    • Autopano
    • Microsoft Image Composite Editor

    If this is the first time you are creating your panorama, I would love to receive your feedback or to share your panorama in the comments below.

    The post A Step By Step Guide to Making Your First Panorama Photo by Soumya Shankar Ghosal appeared first on Digital Photography School.


    Digital Photography School

  • A newfound focus: Sony SLT-A77 II First Impressions Review

    beautyshot.jpg

    It may look the same as its predecessor, but the Sony SLT-A77 II’s insides are quite a bit different. Featuring a new 24MP CMOS sensor and image processor, along with a dramatically improved AF system, this SLT could be one of the best subject-tracking cameras out there. While we’ve yet to test its performance, we did spend some brief time with the a77 II and have put together our first impressions.

    News: Digital Photography Review (dpreview.com)

  • All teed up: Leica T First Impressions Review

    leica-front.jpg

    Leica’s new T (Typ 701) is the company’s first mirrorless interchangeable lens camera with autofocus. While its ‘guts’ aren’t much different than other cameras in its class, the hand-built body is all Leica. We’ve been able to spend some quality time with the German manufacturer’s latest baby, and have put together our first impressions of it. Find out what we think of it thus far.

    News: Digital Photography Review (dpreview.com)

  • Tips to Prepare for Your First Wedding Photography Gig

    When your photography skills reach a certain level, a family member or friend is going to ask you to shoot their wedding. They might even offer to pay you, which could be your first real gig. Score, right? You’ve made it. 😉 Of course, later when you realize the challenge ahead of you, the pride fades to anxiety, and, googling Continue Reading

    The post Tips to Prepare for Your First Wedding Photography Gig appeared first on Photodoto.


    Photodoto

  • 1991 Nikon-Kodak hack was first DSLR in space

    Screen_Shot_2014-04-17_at_12.40.46_PM.png

    What was the first digital camera in space? It turns out in 1991 NASA sent a modified Nikon F3 with small Kodak CCD sensor and external processing unit on a shuttle mission. Called the Hawkeye II, this system used a RS-232 serial port to connect to its external gear. Kodak would use this platform as the basis for the DCS system, the first commercially available digital camera. Learn more

    News: Digital Photography Review (dpreview.com)

  • Canon G1 X Mark II First Impressions Review

    CanonG1XII.jpg

    Canon’s PowerShot G1 X Mark II is an intriguing update. It keeps the 1.5″-type sensor from its predecessor, but adds a faster processor, longer and brighter lens, tilting LCD, dual control rings and has Wi-Fi with NFC. The big change for 2014 is no more optical viewfinder. Our first impressions review covers the usual aspects of the camera (Controls, Body and Design, etc.), but also has our Shooting Experience report where we talk about it handles in the real-world. Learn more

    News: Digital Photography Review (dpreview.com)

  • A first look at the Sony Alpha 7S 12MP full frame with 4K output

    DSC07571_1_.png

    Sony has just announced a 12MP full frame addition to its Alpha 7 series, designed to output 4K footage over HDMI. We’ve just got back from Sony’s press conference at the NAB show in Las Vegas, where we got a chance to see the camera. We hope to get more hands-on in the coming days, but for now, here’s some more details of the Sony Alpha 7S.

    News: Digital Photography Review (dpreview.com)

  • Meet the UK’s first female press photographer

    Portrait_of_Christina_Broom.jpg

    The Museum of London is celebrating the acquisition of a collection of images from Christina Broom, the UK’s first female press photographer. Self-taught, Broom photographed London life and British military from 1903 to 1939. She started small, learning on a borrowed camera, and in 1904 she became the official photographer for the Household Division. See gallery

    News: Digital Photography Review (dpreview.com)

  • Olympus updates OM-D E-M1 with electronic first curtain ‘anti-shock’

    shared:download-button.png

    Olympus has updated the firmware for its flagship mirrorless camera, the OM-D E-M1, adding a mode that’s designed to eliminate image blurring due to ‘shutter shock’ by using an electronic first curtain at speeds below 1/320sec. The update also adds more options for audio control during movie recording. It’s available to install now, using the ‘Olympus Digital Camera Updater’ program.  

    News: Digital Photography Review (dpreview.com)

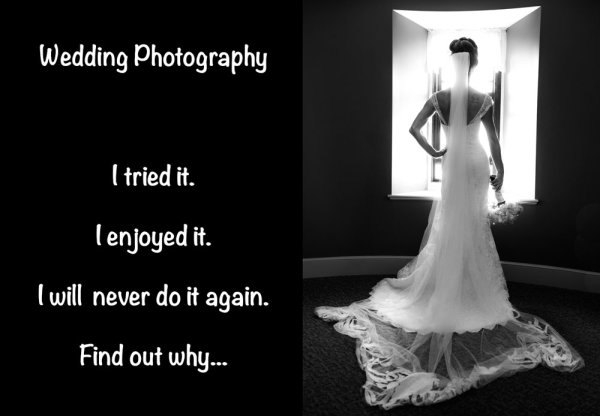
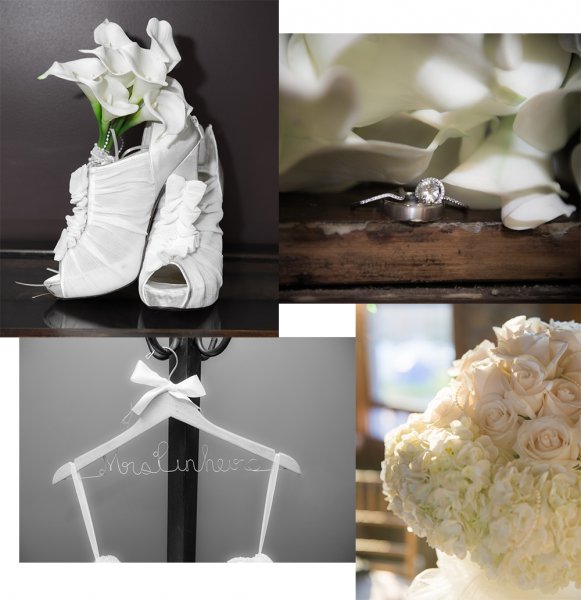
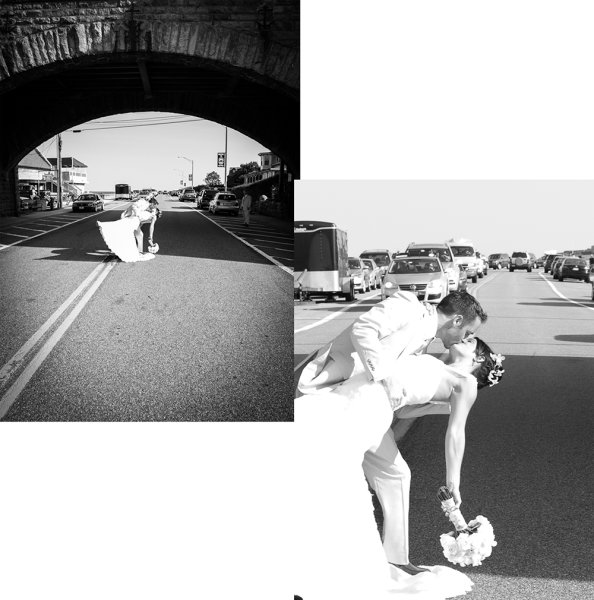
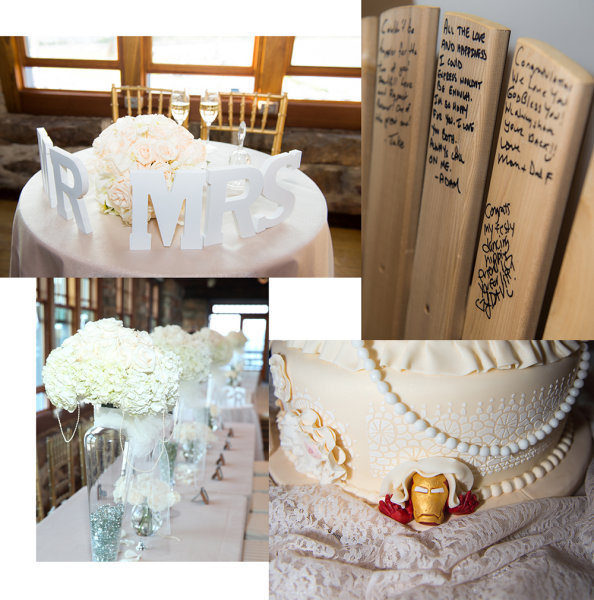
  • The Story of Photographing my First Wedding also Likely my Last

    There’s really no question that wedding photography is one of the most common forms of professional photography and if you’ve recently become the owner of a DSLR odds are sooner or later someone you know might ask you to photograph their wedding. Though this might be a tempting offer, I want you to think long and hard before saying yes, because photographing a wedding is a lot more than pointing a camera and capturing the moments. To help drive home this point I’m telling a bit of a story today.

    weddingalt

    My story is about why, even though photographing this wedding was the best experience of my photography life, I more than likely won’t be photographing another wedding anytime soon.

    I don’t want you to think that I’m here to tell you that it’s a bad idea to get into wedding photography, or even that my first (and last) time as a wedding photographer was a bad experience. Neither of these are the case – in fact I quite enjoyed photographing this wedding, but there are some things that I learned about myself which would make me hesitate if I were asked to do it again.

    SneakPeak1

    First some background

    Like most new photographers these days I created a website, set up a Facebook page, and started sharing my photos on a daily basis. Over time I noticed that my page was growing with not only my immediate friends, but friends of friends, and even people I didn’t know – I guess you could say I started attracting a following.

    After a couple of years of sharing landscape and wildlife shots from around the New England area, one of my sister’s friends reached out to me and asked if I’d photograph her wedding.

    My first instinct was to say “I’m not a wedding photographer – why are you asking me?”. So I sort of brushed it off as a random thing, but she insisted that she liked my style and wanted to work with someone she knew and trusted. If there’s anything to my credit – I’ve always been a hard worker. So, as this post requires that I photograph a wedding, you probably won’t be surprised to hear that I eventually did commit to the job.

    Months of preparation

    And I mean months!

    The bride-to-be was extremely organized and prepared, having everything booked months in advance – in fact – the photographer was one of her last jobs to tackle. After accepting the job I had nearly a full year to learn as much as I could about photographing weddings and that’s exactly what I did. This three part series here on dPS: Wedding Photography 101 (Part 1), Wedding Photography 101 (Part 2), Wedding Photography 101 (Part 3) should be on every prospective wedding photographer’s reading list. But a quick search for “wedding photography” on dPS will yield dozens of other great reads.

    SneakPeak5

    However, all the reading that I was doing, really couldn’t prepare me for the real thing. Emotions, stress, time crunch, uncontrollable problems, and anything else that you can pack into the ten hour day – you simply can’t read that, so I enlisted the help of a professional. I reached out to a local photographer, who worked closely with a friend of mine, and he was kind enough to allow me to shadow him, and even second shoot for him on a couple of occasions.

    This experience gave me a huge boost of confidence going into the event, and I highly recommend reaching out to your own local wedding photographers prior to photographing a wedding on your own for the first time. The experience is priceless.

    The final bit of preparation was gear related – I was being paid for this shoot and as a landscape/wildlife photographer my ultra-wide angle and telephoto zooms were not ideal for the task at hand. So I spent a little of the money that I was paid for the wedding to rent a second camera (you can never be too prepared) and a 24-70mm f/2.8 lens which would be my workhorse for the night.

    The wedding was a success

    Due to my preparation and my commitment to wanting to provide the best possible photographs that my ability would allow, I’d say the wedding was a success. The bride and groom got photos that they will enjoy for the rest of their lives and I learned more than I could ever have imagined in a very short amount of time.

    SneakPeak4

    The day of the wedding I was at my wits end, running on pretty much pure adrenaline at that point. I had a list of ‘must have shots’ which I was able to check off throughout the day and night. It’s hard to imagine that the event lasted as long as it did, as it all went by so quickly, with barely a break for food or drink. All said and done, I left the reception after the last dance feeling confident that I had done the best that I could. So why never again?

    Why I won’t photograph another wedding

    There’s no question that this was a valuable experience. I learned more about myself as a photographer photographing this wedding than I had in the nearly 3 years of photographing landscapes, but I’d also learned that it wasn’t for me. I enjoy the peace and quite of nature and the ability to go back to the same location to fine tune the shot over a period of time and lighting conditions. Weddings are a one shot deal – you get the light you get – you get the weather you get, and you get one shot to make it happen.

    You have to be a people person – something I am not. Going around to get various people that I didn’t know together for photographs was hard enough when there were actually a handful of people that I did know at this wedding (sister’s friend remember?). I don’t think that I could do this on my own, without help, and without a lot more practice. So I urge anyone who’s thinking about photographing a wedding to not take it lightly. It’s an important day for a lot of people – not just the bride and groom – but their parents, extended family, and friends will want to remember this day as well so you MUST get it right.

    The moral of this story is that wedding photography can be a very rewarding experience, but you have got to put the work into it. If you are thinking to yourself that it will be an easy job – think again. Oh and please – don’t ever do this for free – being paid to shoot this wedding was what motivated me to find help, rent gear, drive to their location and process hundreds of photos – the experience was a bonus.

    Some stats from the wedding

    • hours shot from start to finish on the day – 10 hours
    • number of images shot total – 1500
    • number of images given to the couple – 500
    • how long it took to edit it – approximately 5-6 hours
    • number of hours estimated spent preparing: time with other photographer, etc –  Dozens and dozens of hours of prep time between reading articles and spending time with this mentor photographer I would say easily 50 hours or more went into the prep.

    Equipment used to shoot the wedding

    • camera bodies:  rental D600 and my own D7000 as backup
    • lenses:  rented the 24-70 f/2.8 (pretty much used for the entire event) also had my 55-300mm Nikon & 11-16mm Tokina, and a 50mm prime on my D7000 for odds and ends shots
    • flash:  Nikon SB700
    • light modifiers like umbrellas or reflectors – none
    • tripod:  had my Manfrotto 190XBPRO with me but rarely used it
    • other:  nothing else, But Jim (my mentor of sorts) told me that if I were to get into this that it’s a good idea to stock up on things like needles, various threads, safety pins, tape, Advil, Aspirin, Tylenol, scissors, and so much other stuff – not really for you, but you’ll be the hero of the wedding if you pull something the bride needs out of your magic bag of tricks

    Editors note: 

    Having done somewhere in the neighbourhood of 250 weddings in my time, I can concur that everything John has said is absolutely true, and some of the same advice I give people considering doing one for the first time. Being prepared is the number one thing I can say also. I remember wanting to throw up the entire first year I did weddings, the pressure is THAT intense. These are people’s memories and not something to take lightly. I too, like John’s mentor did carry such an emergency kit and can tell you I’ve used deodorant, men’s black socks, nylons, clear nail polish to stop runs in nylons, safety pins, After Bite for bug bites, Visine, allergy meds, Stain remover (get the stick, takes grease right out of a wedding gown), nail glue, bug spray, sunscreen,  and more. John gives great advice from his experience – heed it well.

    The post The Story of Photographing my First Wedding also Likely my Last by John Davenport appeared first on Digital Photography School.


    Digital Photography School