Tag: City

  • Interview: David ‘Dee’ Delgado’s love letter to New York City, shot on 4×5 film

    Genesis + Ronald, Before Prom, Westchester Ave (May 2019)

    David ‘Dee’ Delgado has spent his entire life exploring New York City. Born and raised in the Bronx, in his younger years he traveled the city as a graffiti artist before transitioning into photography. “I got busted a couple of times and I got tired of getting locked up for doing graffiti,” he says. “So I started taking pictures of my friends.”

    He worked as a graphic designer but says he found himself in a creative rut in a career where all his creativity was expended on behalf of the clients – “it was soul-draining in a sense.” And so Delgado found himself gravitating back to his cameras. Six years ago, at the suggestion of his wife, he quit the job that he hated and dove head-on into documentary photography.

    Shot entirely on 4×5 film, Delgados project, ‘On My Block’, is an homage to the people and places that make New York City so special

    These days Delgado works as a freelance photographer for clients like Getty, Reuters, Gothamist and others. He’s spent the last year very busy, on the ground documenting stories about COVID-19, the George Floyd police brutality protests and the 2020 election. In between all of that he’s continued to work on an ongoing personal project called On My Block, which he debuted earlier this year on his Instagram account.

    Shot entirely on 4×5 film, On My Block is a homage to the people and places that make New York City so special. We spoke with Delgado to learn more.


    Saint Guadalupe, Simpson Street (February 2019)

    When did you start shooting images for On My Block?

    I started photographing On My Block in December 2018, I went into it with a direct purpose, although it has morphed. In the beginning, I was thinking about it in terms of gentrification – I’m a native New Yorker, I was born and raised here and I’ve seen how much the city has changed. I turn 45 this year, so I’ve been around for a decent amount of time.

    Shooting 4×5 is a lot slower, especially when you are using a field camera. It slows things down and lets you connect to people, have a conversation and an interaction

    I started seeing the city change so much and was reminiscing back to when I was a graffiti writer and I would go around the city. I decided I wanted to document the city and the people in it. What they are and how I remember them and how I remember it being like. That’s when the project morphed into more of a love letter to New York and less about gentrification. It’s a love letter to the city that I love and know.

    Black and his Son Liam, Barber Shop, Cypress Ave (February 2019)

    What camera are you using to shoot the work?

    I did not want to shoot digital for this project. I have my cameras that are meant for assignment work and then I have my cameras that are my personal cameras that I use just because I love the medium.

    This gives me a break and it gives me the ability to be a little more artistic. As opposed to the hard news, with this, I can slow down and make a pretty photo

    This whole project was shot on a Toyo 45A which is a 4×5 field camera. It’s not a light camera. It’s a heavy camera. Lugging that camera along with the film, film holders, and a dark cloth is not an easy task. Shooting 4×5 is a lot slower, especially when you are using a field camera. It slows things down and lets you connect to people, have a conversation and an interaction, you can make the connection through the camera in a sense. It just slows down the whole process.

    Why was it important to shoot on film? How do you select what film stocks you use for this project?

    I’m a big film buff and I knew I did not want to shoot this in black and white. I wanted it to look less documentary and more personal. The project was shot on Kodak Portra 160, I just found the soft and warm tones of the film leant themselves to what I wanted the project to look like.

    Kayla, Malcolm-X Boulevard and W.117th St (July 2019)

    How does being born and raised in the Bronx influence the way you see and photograph in other New York City neighborhoods?

    When you are young in New York it’s like, ‘don’t leave the stoop,’ but I always wandered. I would always push. ‘I can make it down the block to the bodega before mom notices.’ I always pushed the boundaries of where I was allowed to go. Once I became a little bit older and I was able to leave the stoop I would jump on the subway and I would pick a stop and go there. I would end up in Prospect Park, I would end up in Queensbridge, I would end up in Washington Heights.

    I was always pushing the boundaries of my borders and was interested in embracing the city for what it is: multinational and multicultural

    I’ve always been the person that was talkative and I would speak to people, I would connect to people. I’d be in Queens and when I was growing up, people in Queens used to use slang that was called ‘dun language’, and me being from The Bronx, I didn’t know how to speak dun language. But then I met guys who did and I would practice my dun language with them.

    Then I’d be in the Heights, you know I’m Puerto Rican, and I’d be around the Dominican community and they are having Tres Golpes for breakfast and I was like ‘what the hell is that?’ and its salami and fried cheese and yucca, and I’d try it. I was always pushing the boundaries of my borders and was interested in embracing the city for what it is: multinational and multicultural.

    Monica Flores, Macy Place, and Prospect Ave (December 2018)

    Do you see this work as being related to the work you do as a freelance news photographer, or is this a project that gives you a mental break from that world?

    This gives me a break and it gives me the ability to be a little more artistic and have a little bit more freedom. As opposed to covering the hard news, with this, I can slow down and make a pretty photo.

    What can we expect to see as you continue the project?

    It’s a project that is morphing on a continuous basis. Right now I’m playing with archival photos, I may include a different factor of photography in it. Chapter 2 is something I am still playing with.

    What’s your quintessential New York food and where is the best place to get it?

    Oh wow. Hmm. One of my favorite things – I was raised in Little Italy in the Bronx, 183rd and Crotona – is Madonia’s chocolate bread on Arthur Avenue. That’s definitely something that if you are here in New York, you have to try.


    More photographs from On My Block

    $ (document).ready(function() { SampleGalleryV2({“containerId”:”embeddedSampleGallery_0775908954″,”galleryId”:”0775908954″,”isEmbeddedWidget”:true,”selectedImageIndex”:0,”isMobile”:false}) });


    About:

    David ‘Dee’ Delgado is a Puerto Rican independent photographer based in New York City mainly focused on documentary and photojournalism. The interest in learning and his desire to help people made him realize the necessity of documenting his surroundings and broadening the conversation with the use of a camera. See more of Dee’s work on his site, dispatch.nyc.

    Articles: Digital Photography Review (dpreview.com)

  • New York City map makes it easy to find historical images of NYC from 1939 to 1941

    A newly-launched online mapping system called 1940s NYC makes it simple for anyone to find historical images of the city captured from 1939 to 1941 by the New York City Tax Department in collaboration with the Works Progress Administration. The photography initiative involved capturing images of every home, shop and other buildings in all five boroughs, the result being an incredibly detailed time capsule of the city as it existed decades ago.

    These historical photographs were already available to the public, but getting them — particularly ones of specific buildings — was time-consuming. Things got a bit more simple in 2018 when the New York City Municipal Archives finished digitizing the full collection, a process that also involved tagging each image so that it could be more easily found online using the right details.

    Despite that improvement, the process of browsing these images was still limited. Users must go to the NYC.gov website’s city map tool and enter the exact address for the building of the photo they want. This makes it difficult to casually browse these historical images, something the new 1940s NYC mapping tool solves.

    The new and far more capable mapping tool comes from NYC-based software engineer Julian Boilen, who notes on the website that an automated process was used to place the images on the map and, therefore, there is the potential for some ‘imperfections.’

    The mapping tool is exceptionally simple to use. Every black dot on the map represents a photo of that location; users can zoom in on individual streets and neighborhoods, which appear to be overlaid with historic city zoning maps. Users can also enter an address to go right to a particular building. This is quite a bit more robust than the mapping tool offered by the city itself.

    Users located in New York City also have the option of clicking a location icon that will pull up their current location on the map, making it easy to see what their neighborhood looked like decades ago. As well, the map provides an ‘Outtakes’ section that is a large gallery of browseable photos. Many of these images feature black dots and NYC.gov watermarks.

    In addition to serving as a portal to the 1930s – 1940s NYC images, the mapping tool also includes a link to a similar map that features the same variety of imagery, but one captured in the 1980s.

    This dataset features 800,000 photos of buildings, according to the tool, as well as more than 100,000 ‘street segments.’ This mapping tool includes a ‘Stories’ feature that provides a series of images alongside the stories behind them.

    These stories include things like pointers on spying interesting elements in the photos, details about whether certain buildings still stand and if they were remodeled, notable events that took place at these locations and similar information.

    The website is not affiliated with the New York City Department of Records, which is the agency that owns the historical photos. Anyone can order the high-resolution digitized copies or prints of images they like from the city’s Municipal Archives, otherwise, the public is limited to the watermarked and low-resolution versions made accessible by the NYC Department of Records and Information Services.

    Including these images, the NYC Municipal Archives Digital Collections website offers the public access to more than 1.6 million digital items, including photos and videos.

    Articles: Digital Photography Review (dpreview.com)

  • Video: Typologies of New York City: A Crowdsourced Hyperlapse

    ‘Classics are classic for a reason. We’ve all taken these photos. What happens when everything in the world has been photographed? From multiple angles, multiple times per day? Eventually, we’ll piece those photos and videos together to be able to see the entire history of a location from every possible angle.’ This is how visual artist SamTheCobra describes the inspiration behind his mesmerizing hyperlapse video consisting of some of the most well-known landmarks, along with scenes from daily life, in New York City.

    SamTheCobra spent an undisclosed number of hours sifting through both location tags and hashtags on Instagram, manually, to crowdsource thousands of photos that he converted into the video, above, that clocks in at just under one minute. He spent roughly 200 hours combining his findings from Instagram in Adobe After Effects. The hypnotic soundtrack comes courtesy of a remix from Stones Throw Records, made famous by DJ Shadow’s 2012 ‘All Basses Covered’ set.

    Articles: Digital Photography Review (dpreview.com)

  • Prime lens update: The Canon EOS M6 Mark II photographs dogs, beer and the big city

    $ (document).ready(function() { SampleGalleryV2({“containerId”:”embeddedSampleGallery_2359636629″,”galleryId”:”2359636629″,”isEmbeddedWidget”:true,”selectedImageIndex”:0,”isMobile”:false}) });

    When we first got our hands on the EOS M6 Mark II at Canon’s launch event in Atlanta, we used the 18-150mm F3.5-6.3 kit lens quite a bit – after all, conditions were bright, so we didn’t need super fast apertures, and the zoom reach came in really handy for motorsports photography.

    Now that we’re pushing through our full review of the M6 II back in Seattle, we’ve put our two favorite Canon EF-M lenses onto the camera to see how they stack up in front of the all-new 32.5MP sensor. Check out our sample gallery to see for yourself.

    See our updated Canon EOS M6 Mark II sample gallery

    Articles: Digital Photography Review (dpreview.com)

  • Top Tips for Photographing the Best a City has to Offer in 48-hours

    The post Top Tips for Photographing the Best a City has to Offer in 48-hours appeared first on Digital Photography School. It was authored by Matt Murray.

    photographing a city-matt-murray

    Always be on the lookout for interesting scenes in cities. I saw this view in Taipei from a metro train and went back at dusk.

    You have two days and two nights to photograph a city you’ve never been to before. How will you make the most of this opportunity and come away with amazing photos?

    You could just turn up without much advance thought and deliver a stunning set of images that fits the brief perfectly. Leaving things to chance is not always the best plan, though. You will be better prepared and more confident if you research and plan your trip in advance.

    Whether you’re working for a client, an editor, or taking photos for your own portfolio, these tips will help you make the most of your trip. Here is a guide to photographing a city and the best it has to offer in 48 hours.

    photographing a city-matt-murray

    Find what is unique about your destination and capture it.

    What’s unique about the city?

    The first question you need to ask is what makes the city unique? Does it have stunning architecture? An incredible food scene? Unique modes of transport? Vibrant markets? Make sure you keep this in mind as you plan your trip.

    What types and styles of images are you being asked to deliver?

    What type of shots are you, your client, or your editor expecting? Find out what their expectations are in as much detail as possible. Is there a particular style or theme you need to shoot for? Will your images be used to accompany a story on a particular subject, for advertising, or as a standalone photo essay?

    Think of the final use of your photos. Will you need to capture landscape or portrait orientation photos? Do you need to shoot images with negative space to allow for text to be overlaid?

    Image style is an important consideration. Is your client looking for bright, colorful photos? Images showing well-known landmarks? Hidden gems? Photos with a shallow depth of field? Moody black and white images? Photos of people experiencing the city? It’s important to get agreement on this too.

    Create a mood board

    Visualizing your shots before you go can help the planning process. One way you can achieve this is by creating a mood board for the trip, showing the types and the style of photos you will aim to produce. The good news is, it’s easy to do with a tool such as Pinterest.

    A mood board can also be handy if you don’t have a formal brief. If you create one for yourself or your client showing the type and style of images you propose to take, this can stimulate further discussion. It might be exactly what they’re after, or it could prompt them to get involved in the process and suggest changes.

    photographing a city-matt-murray

    On my list of shots for Taronga Zoo was an iconic view of the Sydney with animals – thankfully, this giraffe helped me out!

    Weather and climate

    The next thing to research is the expected weather and climate at your destination. Bear in mind, some destinations, such as London and Melbourne, are notorious for variable conditions all year round. Getting a sense of what to expect will help with your daily planning and can guide your choices for clothing and equipment.

    For example, if you’re heading to Asia during the wet season, you’ll need to think about taking clothing and camera gear that is water-resistant, whereas if you’re on a trip to somewhere hot and dry, such as Dubai or Death Valley, you may need to consider a hat and sunscreen.

    Next, look at the sunrise and sunset times for the city when you will be there and plan your day accordingly. Make a note of them and think of the most important shots you need to capture at those times. These times will also indicate the number of daylight hours you have on location.

    photographing a city-matt-murray

    Autumn in Sydney was a good opportunity to capture golden leaves.

    Online planning resources

    Two resources that can help you are the Photographers Ephemeris and PhotoPills. These handy guides for photographers also give you information like how long the blue hour and golden hour last for, the direction of the sun at sunrise and sunset, and much more. This can be very helpful, though, remember, in built-up environments, you’ll never truly know how the light falls on your scene until you’re there.

    Background city research

    Researching your destination is one of the most important things to do before you leave. Learn as much as you can. Potential sources of information include travel magazines, travel blogs, official tourism websites, and YouTube videos. It’s also worthwhile downloading guidebooks from companies such as Lonely Planet, or if you’re on a tight budget, you could borrow them from a friend or your local library.

    As you’re doing this research, make a note of previous coverage the destination has had in published articles or photo essays. If you plan to use the same or similar angle, aim to capture the destination in a unique or better way.

    photographing a city-matt-murray

    Image research

    Pay close attention to the types of images used to illustrate and promote this city. What style are they? Do they fall into a particular genre? What kind of lenses do you think the photographer used? This is all useful information.

    Then turn to more visual references. What kind of images show up for your destination using a Google image search? Is there a famous view of the city you’d like to capture? Next, search on Instagram. Look at images used by the official city or country accounts, popular hashtags for your destination and even geolocation image searches.

    Take a look at recent Instagram posts, carefully reading the description. Was the image taken in the last few days? If it was, this might help you understand the weather or lighting conditions at your destination. If there is no context to when the image was taken, it could’ve been from last month or last year.

    Another key place for researching your destination is stock photography sites. What images are the best sellers for the city? Keep these in mind when you’re shooting. As well as your main client, think of other markets where you could sell your images such as stock libraries.

    photographing a city-matt-murray

    Always look for detail shots at your destination that show the way of life.

    Create your shot list

    I love travel photography as it includes so many other genres. On a single assignment, you can include landscapes, cityscapes, street scenes, portraits, food shots, detail shots, architecture, and documentary-style images. Remember this as you create your shot list.

    First, lock in the locations you need to be for sunrise and sunset and have a rough plan for the rest of the day. Plot these locations on a map and make sure you’re leaving yourself enough time to look around and photograph unexpected sights. Sometimes the best shots at a destination are not the things you expect to see, but things you didn’t expect to see.

    Then list the next most important shots for you or your client. Make these a priority.

    Try to capture well-known landmarks in a new or interesting way. This could be through the frame of a doorway or window, a reflection, or a completely different angle or viewpoint not used before.

    Jot down a reminder to get a good variety of images at each location you visit – landscape orientation, portrait orientation, images with negative space, and images that crop well for Instagram. Also, think back to why this city is unique or exotic and make a note to get images of the food, people, clothing – anything that’s different.

    photographing a city-matt-murray

    Booking your hotel

    Now you’ve created your shot list, look at the key locations on your map, and book a hotel nearby. It can be tempting to save money by staying at a hotel further away, but being close to your proposed photography locations is a huge advantage. Not only will it cut down on travel time, but you will also have the advantage of popping back to your room whenever you like throughout the day.

    Quite often when I’m photographing a city, I head back to my hotel for a break. You can have a quick rest, grab a hot or cold drink, back up your images, and review the progress you’ve made ready for the next round of photos. You may even need time to warm up or cool down depending on the weather.

    With your hotel search, always be on the lookout for historic or beautiful hotels that could provide additional photographic opportunities for you. Also, remember to choose a hotel where you feel like your gear will be safe when you’re not there.

    photographing a city-matt-murray

    Carry a travel tripod so you can capture scenes with a slow shutter speed.

    Packing your kit

    Versatility is the key when packing your kit. Fast zoom lenses are generally the travel photographer’s best friend. Also, look at the notes you made during your research. What type of lenses do you think the photographers used? Does your client expect any images with a very shallow depth of field? Do they want images taken with long telephoto lenses or ultra-wide angle lenses?

    Plan your kit, taking into account these considerations along with the expected weather conditions. For a two-day trip, I would typically take the following:

    • Two camera bodies that use the same batteries and lenses, at least one of which is weather resistant.
    • Two zooms covering a wide focal range, at least one of which is weather resistant.
    • One or two small fast prime lenses – these are very handy for low light conditions and shallow depth of field shots.
    • As many reliable high-quality SD cards as you have. Make sure you format them before your trip.
    • As many batteries as you have for your camera system.
    • A small travel tripod and some neutral density filters.

    You can see more about the travel kit I take in my article, The Best Fujifilm X-Series Kits for Travel Photography

    photographing a city-matt-murray

    Sydney Opera House sails with the Sydney Harbour Bridge in the background.

    Traveling to your destination

    As your trip approaches, keep an eye on the weather and current events for the city you’re heading to. Will this present any issues or challenges? Is there other gear you may need to bring? As I write this, I am preparing for a few days in Hong Kong, where there are currently protests taking place. I don’t think these protests will affect my trip or what I plan to photograph, but it’s good to always good to stay up-to-date with what’s going on.

    Before I arrive at my destination, I always sort out some way to use my iPhone when I get there. This can mean either having a SIM card for the country I’m visiting or setting up international roaming before I go.

    On the way from the airport or train station to my hotel, I look for interesting things to photograph. I have my phone at the ready with maps loaded up tracking the journey I’m taking. If I see something interesting, I screenshot the map, so I have the exact location on my phone for future reference.

    photographing a city-matt-murray

    Children playing in the Faroe Islands photographed on a telephoto lens.

    Once you’ve arrived

    You’ve arrived at your hotel, dumped your bag and are now ready to hit the streets and tick off that shot list. Before you go, make sure you have everything you need and leave anything you won’t need at the hotel. Remember to go easy on the air conditioning or heating – extreme temperature changes can fog up your camera lenses.

    Take a few minutes to double-check your camera (especially your ISO and image quality settings), make sure you have fully-charged batteries and formatted memory cards. Then synchronize the clocks on your cameras at local time.

    Regardless of the time I arrive, I always try to hit the streets as soon as I can to get a feel for the place. In tropical locations, shooting conditions are not always ideal during the middle of the day when it’s very bright with the sun overhead. It’s still possible, however, to look for opportunities to keep shooting. On a recent trip to Indonesia, I found the most beautiful light in a semi-covered market place in Borobudur. I took some of my favorite shots of the trip at that market.

    photographing a city-matt-murray

    Borobudur Market.

    After the sun is well and truly below the horizon, you may think it’s time to head back to the hotel, but always see if there are opportunities to photograph food vendors or night markets. You’ll need either a fast prime or zoom lens in conjunction with using a higher ISO to capture handheld shots or a tripod for longer exposures.

    Backups

    When you’re finished shooting for the day, it’s time to head back to your hotel and backup your images.

    For each trip, I create a new Lightroom catalog on my laptop. I then import the images into Lightroom, specifying that the images should be copied from my SD cards to an SSD hard drive plugged into my MacBook.

    After the import, I copy these folders and the Lightroom catalog to a second SSD drive. I always keep these SSD hard drives in separate locations – one with me in my camera bag, and one in my luggage. As I review my shots in Lightroom, if there are any that I think are perfect for my needs or my client, I make another backup of those select images to DropBox. When I get home, I transfer the folders and Lightroom catalog from my laptop straight to my desktop computer.

    photographing a city-matt-murray

    Final thoughts

    I hope these tips will help you think about what you need to plan and research when you’re in a city for the first time on assignment.

    Always remember, though, despite the amount of research and planning you do, things are often out of your hands. If you can’t get that iconic shot due to weather conditions, street closures, scaffolding or who knows what else, don’t beat yourself up too much about it. Instead, concentrate on other opportunities that you can capture while you’re there to make the most of your time.

    Do you have any other tips you’d like to share on photographing a city in 48 hours? Share with us in the comments!


    photographing a city in 48 hours

    The post Top Tips for Photographing the Best a City has to Offer in 48-hours appeared first on Digital Photography School. It was authored by Matt Murray.


    Digital Photography School

  • Some Kansas City hotspots ban photography over growing disruptions

    A number of Kansas City metro hotspots are putting up “No Trespassing” signs that specifically state ‘No Photographers,’ according to local FOX affiliate WDAF. The restrictions were prompted by ‘a few bad apples’ who would set up props for photoshoots in lobbies, doorways, and places that block traffic, the report states.

    Both commercial and Instagram photography is reportedly disrupting certain iconic regions and businesses in Kansas City. Brett Judson, owner of local business Coven KC, explained to WDAF, ‘Besides setting up their fake house in our lobby, in our front door, they will block all the traffic under the 12th Street bridge to get that, like, beautiful family photo or a wedding photo.’

    Some local photographers are speaking up about the issue, stating a minority of individuals are giving the entire profession a bad name. One such photographer is Marsha Baylor, who will join colleagues in cleaning up litter in some of Kansas City’s hotspots to help make the point.

    ‘They’re not the norm,’ Baylor told the local news station. ‘We are the norm. We are the people that step up and say, “This is not OK. This is not how the majority of us run our businesses.’”

    Kansas City currently requires photographers to get a permit when shooting in parks if the sessions will ‘impact others and/or the environment,’ which includes using ‘lots of props/equipment,’ according to city parks’ website. A city spokesperson speaking to WDAF pointed out that there are no laws restricting photographers from shooting while on public property, but that doing so on private property with posted signs can be a trespassing issue.

    In addition, Missouri Department of Conservation spokesman Bill Graham stated that the agency is working on a new policy that will impact commercial photography and videography in all of the region’s conservation areas.

    Articles: Digital Photography Review (dpreview.com)

  • 6 Tips For Photographing Better City Scenes

    6 Tips For Photographing Better City Scenes 1

    Towns and cities can be noisy, busy, stressful and congested but provide excellent subjects for photography. Taking great photographs of cities is not easy so here are six ideas to help you capture city scenes:

    1) City Skyscrapers

    Urban photography offers a great opportunity to document a cities environment.

    On a sunny day, most photographers choose to head out into nature, where the coast or a rolling landscape is usually only a short drive away.

    However, if you opt for urban landscapes, there are a whole manner of worthwhile subjects where you can point your lens. Skylines, architecture, famous landmarks and bridges are all beautiful examples of city elements worth capturing.

    Cities dominated by skyscrapers are visually exciting and provide a wealth of interesting buildings to view and photograph. You could find strong patterns, symmetry, dramatic lighting and different textures amongst high-rise buildings.

    Look for architectural or urban features that create interest and use a wide angle of view to convey a grander sense of the scene.

    6 Tips For Photographing Better City Scenes 2

    Shanghai, China

    2) A Nocturnal Cityscape

    Cities are becoming more popular as destinations for short breaks. Overnight stays in cities provide an opportunity to photograph a nocturnal cityscape.

    One key advantage of shooting a city at night is you can work in all kinds of weather such as rain, snow or light fog.

    It is possible to do this because you are mainly focusing on elements that are characterized by darker tones with a few spots of color and light.

    When capturing cities in the dark, you don’t need to concentrate on the usual shadows and tonal gradations that are relevant in the daytime. You work purely with light.

    I suggest that you set yourself up before it gets dark so you can see what you’re doing and experiment with the changing light as it shifts from light to dark.

    6 Tips For Photographing Better City Scenes 3

    MILLENIUM BRIDGE, London

    3) Reflected City

    Many buildings and city landmarks are so photogenic that they can be too familiar a subject to photograph.

    Instead of shooting the usual perspective of just buildings, concentrate on reflective surfaces that mirror back the surrounding architecture.

    You can find reflections in a pool of water, a polished surface or shiny glass (reflecting abstract patterns) and the bonnet of a car parked on a rooftop.

    6 Tips For Photographing Better City Scenes 4

    Photographs of reflections are visually pleasing when executed correctly. To be most effective, select the maximum depth of field and aim to achieve an image that’s as sharp as possible.

    4) City Scenes by Night

    City centers become great light shows at night.

    They give an array of color from buildings to lights of passing cars. One tip I recommend is you capture the energy and excitement of a nighttime scene by including a human element.

    Doing so will make your images more dynamic and dramatic.
    6 Tips For Photographing Better City Scenes 5

    Radcliffe Camera

    If you are shooting at night, you will need a slower shutter speed to capture the scene. Use this to your advantage by recording flowing traffic such as buses and taxis or colorful clouds.
    These can add motion to your city scenes or a splash of color to supplement the buildings in the background.

    6 Tips For Photographing Better City Scenes 6

    Piran, Slovenia

    5) An Urban Landscape – Day Shots of the City

    Another way you can capture striking images of cities is to photograph the urban landscape.

    Perspectives can be obtained from ground level or by capturing the city from above. Overlook a city from a tower or a rooftop. Find interesting patterns, contrasting buildings or views of street life to photograph.

    6 Tips For Photographing Better City Scenes 7

    University Church of Saint Mary the Virgin viewpoint

    When shooting from high elevations, if you have to lean out for your shot, make sure it is safe to do so. Secure your camera strap around your hand or neck to keep it safe.

    6) City Streets or Cityscapes From Afar

    6 Tips For Photographing Better City Scenes 8

    City streets provide intriguing and picturesque subjects such as human interest and variable light.

    You may find yourself walking past a location every day and not realize its potential. Until striking shadows from the sun transform it into a great composition that brings it to life.

    You don’t have to take pictures of city scenes only from close range. Take a step back and capture a wide shot of the urban landscape from afar. Seek out a viewpoint that allows you to obtain more context from an unusual angle.

    Conclusion

    Use these tips to go out and capture your best shots of city scenes and share your images in the comments below.

    The post 6 Tips For Photographing Better City Scenes appeared first on Digital Photography School.


    Digital Photography School

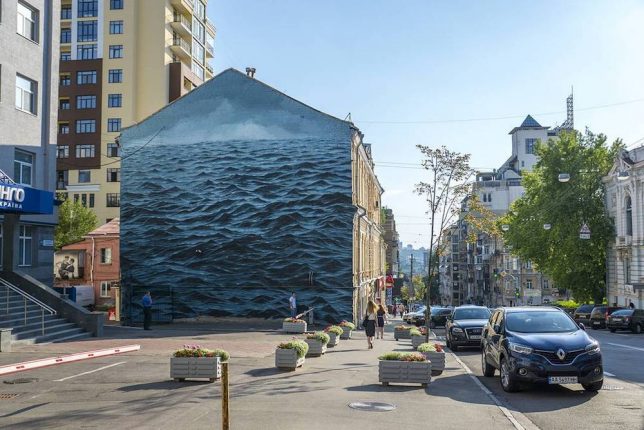
  • Sea Wall: Dark Multi-Story Mural Shows Stormy Waters on City Streets

    [ By WebUrbanist in Art & Street Art & Graffiti. ]

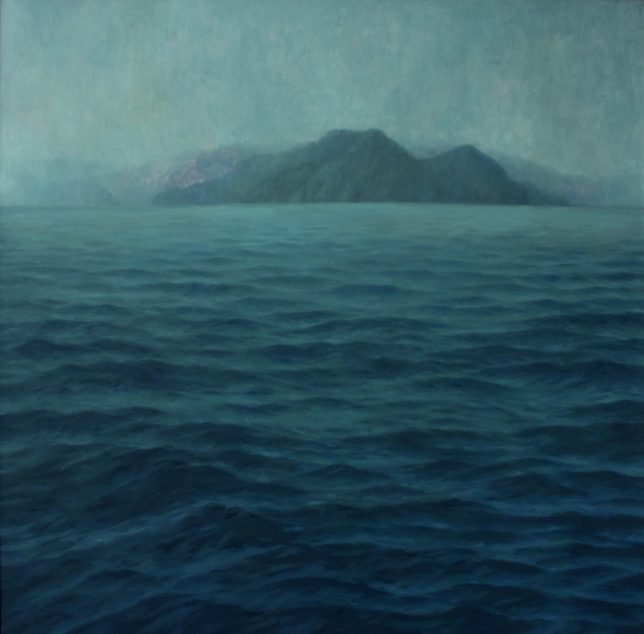
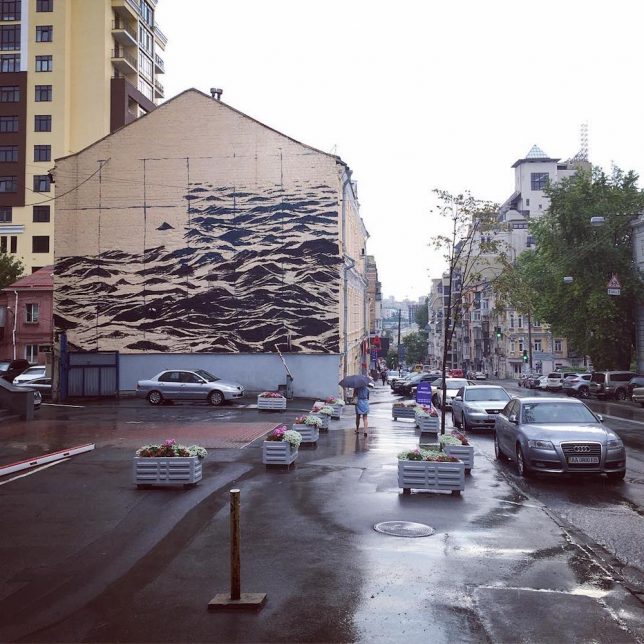
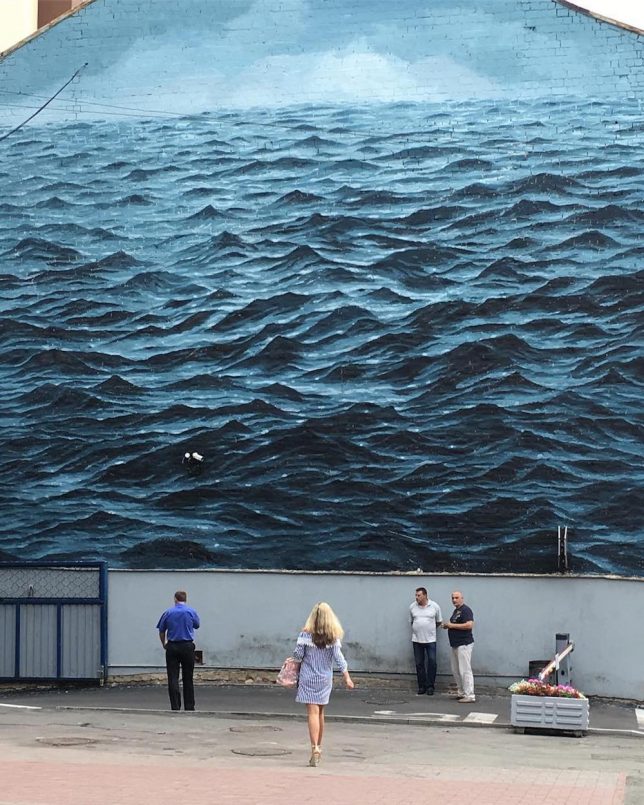
    Lapping up the side of a three-story building in Kiev, Ukraine, this dark mural mixes blue and gray hues to capture dark waters and skies of the Black Sea.

    Originally from London and based in Cape Town, South Africa, artist Jake Aikman enjoys working on extreme and dramatic landscapes, from dark blue oceans to dark green forests and distant lonely mountains.

    The focus in most of his pieces is not so much the scene but the setting — especially at larger scales and absent figures, as in this piece, they create a tone or mood rather than telling a particular story. In short: they leave a lot to the imagination, like a blank canvass providing a time and place but no characters.

    This particular piece is one of his largest to date and was produced for Art United Us. Spanning the entire side of a structure, it was completed in just over a week.

    Share on Facebook


    [ By WebUrbanist in Art & Street Art & Graffiti. ]

    [ WebUrbanist | Archives | Galleries | Privacy | TOS ]


    WebUrbanist

  • Cellular Urbanism: Analyzing the Anatomy of Functional City Block Designs

    [ By WebUrbanist in Architecture & Cities & Urbanism. ]

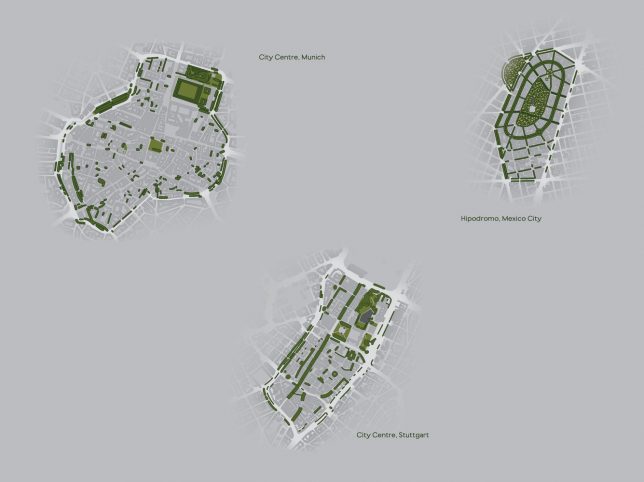
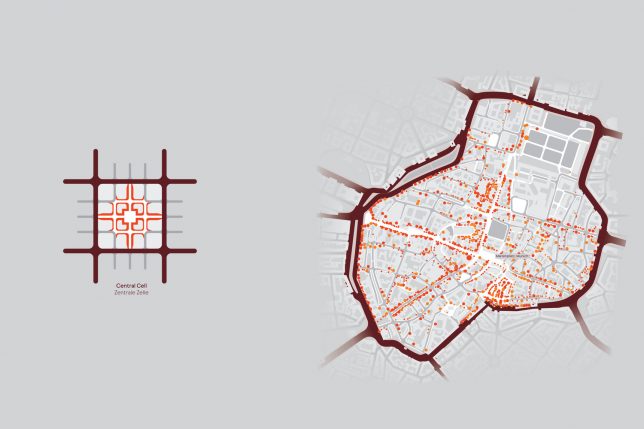
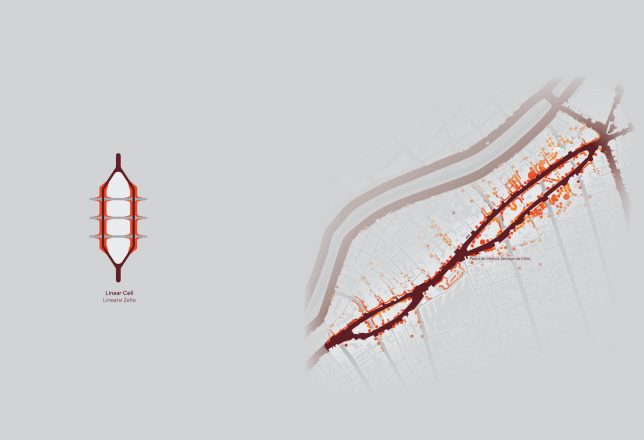
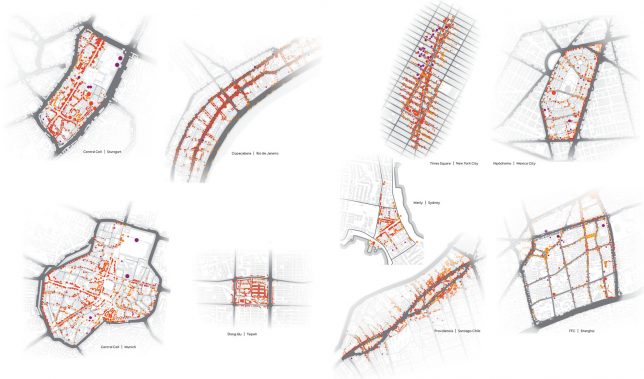
    We all understand intuitively that different urban layouts lead to different kinds of cities, but a new book analyzes these on a block-to-block basis to illustrate how this civic anatomy works on a cellular level. In Urban Being: Anatomy & Identity of the City, Robin Renner uses anatomical-style classifications to look at urban landscapes through a kind of giant microscope.

    Overlaying use patterns and transit networks, the reader begins to understand what types of urban “cells” make for functional built environments. Think of it like genome sequencing: through it, planners and architects can learn how to identify problems and, in some cases, address them or head them off in advance.

    A combination of topography, transportation networks and design ambitions go a long way toward shaping cells in global cities, forming grids and networks familiar from satellite views of cities. All this in turn shapes the kinds of buildings and functions one finds within a given city.

    At the most basic level there are “block cells” made up of arterial routes — these tend to be packed with activity, though specific functions vary on long and short sides of a block (shorter are often busier). These are often found in financial centers of major metropolitan areas.

    There are also “linear cells” where two single-direction roads pass one another, which can form the basis of walkable commercial hubs.

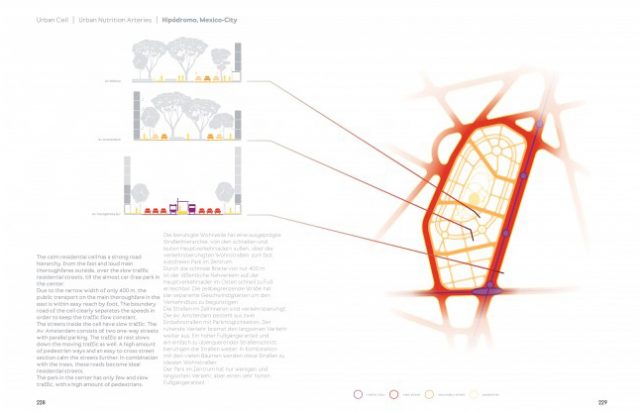
    Inside “central cells,” where traffic is pushed to the periphery, pedestrians can dominate, generating demand for things like stores and restaurants. Barcelona, for instance, has been implementing a plan to turn sets of blocks into single superblocks, leaving central zones free of cars.

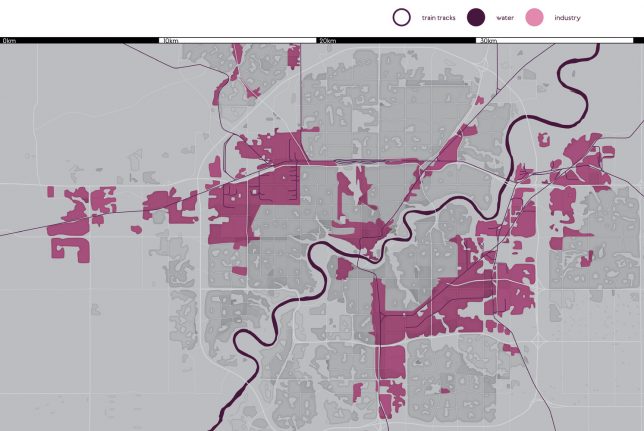
    In the process of analyzing all of these types and how they work together in neighborhoods, Renner has devised some rules of thumb, like: residential cells should be between 1200 and 2400 feet across. Industrial cells, which often grow up around transit routes (railroads, rivers and lakes) can grow too big and isolated unless located close to worker housing or connected via public transit. These kinds of decisions, says Renner, can help cities keep a healthy balance of livability and functionality.

    “There is a long tradition of comparing cities with organisms as they have similarities in their anatomy, explains the author. “But since cities are brought into life by the presence of people, they are less living beings than urban beings with their own identity. This is based on the behaviors, needs and requirements of the residents. In other words, the anatomy of the city informs its identity.”

    Share on Facebook


    [ By WebUrbanist in Architecture & Cities & Urbanism. ]

    [ WebUrbanist | Archives | Galleries | Privacy | TOS ]


    WebUrbanist

  • California City: The Half-Built Desert Metropolis of the Golden State

    [ By WebUrbanist in Abandoned Places & Architecture. ]

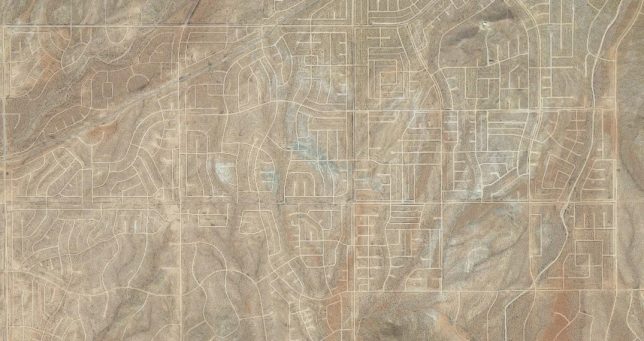
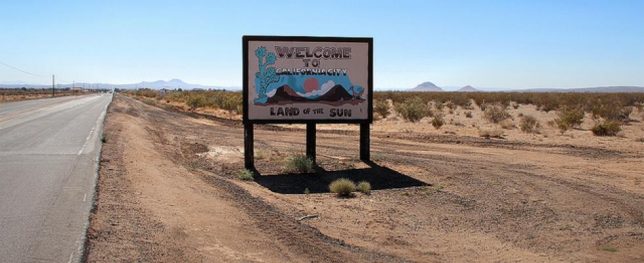
    It’s the third-largest city in California by land area but most people (including many in CA) have never even heard of this mostly-empty desert oasis, home to around 15,000 people. It’s not quite a city, but not quite a ghost town either.

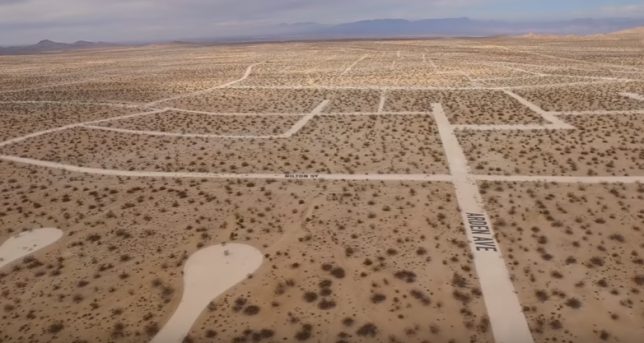
    Visiting the area is a bit surreal – roads running through its 200 square miles connect nothing to nothing in the hot Mojave, in some cases following straight lines and in others wrapping to form cul-de-sacs.

    Some roads are paved, but most aren’t. In places, nature has started to reclaim the dirty gravel strips with hearty desert plants growing right up through streets.

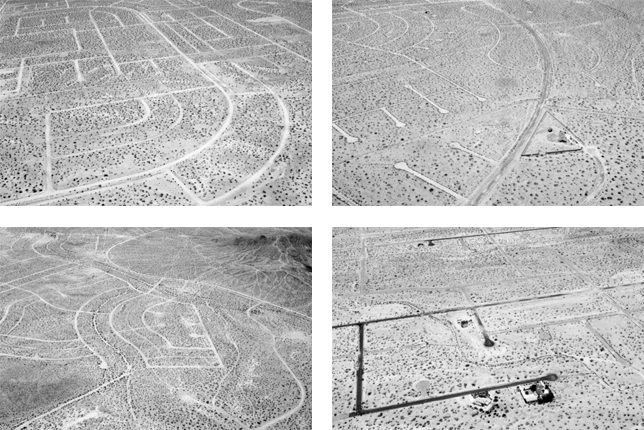
    Photographer Noritaka Minami recently took a trip in a helicopter to photograph the strange sprawling semi-ghost town, which are on display at On Freedom, an exhibition at Aperture for another month.

    The place was a mid-century vision of a real estate developer named Nathan Mendelshon who purchased over 80,000 acres, imagining California City as a fresh metropolis for a growing state.

    Some parcels were resold but never developed — others were bought and remain in use, mainly for people working at a nearby military base or prison.

    The few houses that do exist seem almost stranger than the framework of roads around them, neatly fenced in a neighborhood of empty plots.

    More from Minami: “This project focuses on California City, a master planned community in the Mojave Desert conceived by sociologist turned real estate developer Nathan K. Mendelsohn in 1958. California City was envisioned as the next major metropolis in California in response to the population and economic growths after World War II. This development was based on the belief that even in a harsh desert landscape, mankind had the freedom and power to produce a built environment that provided all of the essential needs for a prosperous modern life.”

    In his series of black-and-white images, “aerial photography is used to document the scale of the vision Mendelsohn proposed in the desert and question whether this ‘wonderland’ could have even been sustainable in this environment. Despite having the foundation for a city in place, there are no indications that this city will ever be realized in the future.” In the end, half-built may be an overstatement — in reality, the place is more like a skeletal outline of a city, punctuated (like a normal rural landscape) by pockets of development and clusters of community.

    Share on Facebook


    [ By WebUrbanist in Abandoned Places & Architecture. ]

    [ WebUrbanist | Archives | Galleries | Privacy | TOS ]


    WebUrbanist