Month: November 2012

  • Metabones adds autofocus to Canon-NEX adapter

    Smart.png

    Metabones has updated its EF to NEX Smart Adapter II, allowing recent Canon lenses to autofocus on Sony E-mount cameras. As with most systems that attempt to use DSLR lenses on contrast-detection-based AF cameras, the focus speed is considerably lower than when used on their native cameras. However, despite not being able to use the hybrid-AF system from the NEX-5R or 6, Metabones claims performance is often better than Sony DSLR lenses being used with the original LA-EA1 adapter. The adapter costs $ 399, with existing Smart Adapter II owners able to upgrade for $ 50.

    News: Digital Photography Review (dpreview.com)

  • 5 Things to Know About Photoshop Brushes

    5 things to know about photoshop brushes opener

    Brushes are used a lot in photo editing from removing blemishes and smoothing skin to dodging and burning and painting on masks. Here are five important features of the brush tool in Photoshop.

    1. Adjust Size, Opacity and Hardness from the Keyboard

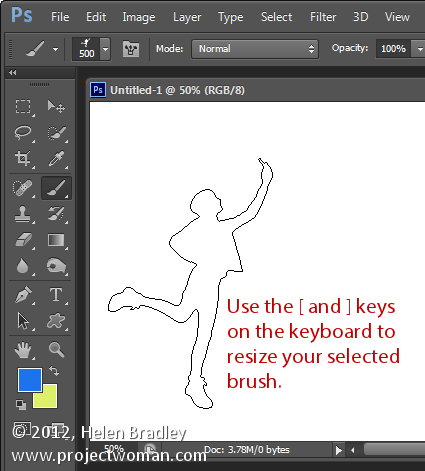
    When a brush is selected you can adjust its size without having to open the Brushes palette by clicking the [ and ] keys on your keyboard.

    Provided a brush is selected you can change its Opacity by typing a number. For example, type 5 to set Opacity to 50%, type 1 for 10% and 0 for 100%.

    To adjust the hardness of the brush hold the Shift key as you tap either the [ or ] keys on the keyboard. Each tap increases or decreases the hardness by 25% in the range 0%-100%. The results of doing this are harder to see as there is no hardness indicator on the tool options bar. However, if you have the Painting Cursor set to Normal Brush Tip in preferences you will see a difference in the brush size as you do so

    5 things to know about photoshop brushes 1

    2. Save the Brush

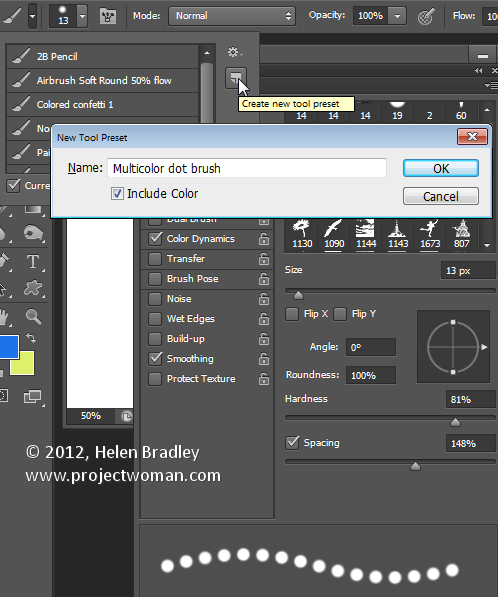
    When you have a brush configured with your preferred settings, save it as a Tool preset. To do this from the Brush Preset list in the top left of the screen click the Create New Tool Preset button and type a name for the preset. Click Ok.

    In future you can select this saved preset from the list and just start painting with it.

    5 things to know about photoshop brushes 2

    3. Disappearing Brushes

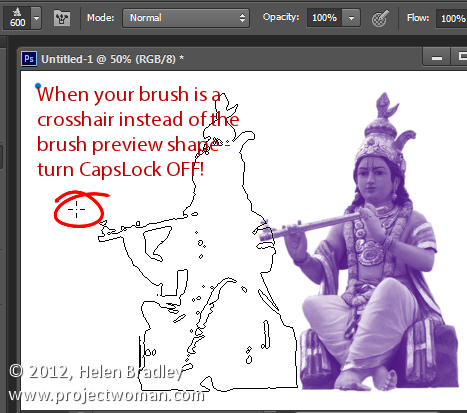
    One of the very annoying things that will happen to most of us at one time or another is to have the brush appear to disappear. Instead of the regular brush cursor which shows the size and style of the brush you will see a crosshair cursor.

    The issue is not with the brushes themselves but is with the Caps Lock key. If you disable Caps Lock on your keyboard the more visual brush cursor will reappear.

    5 things to know about photoshop brushes 3

    4. Paint a Straight Line

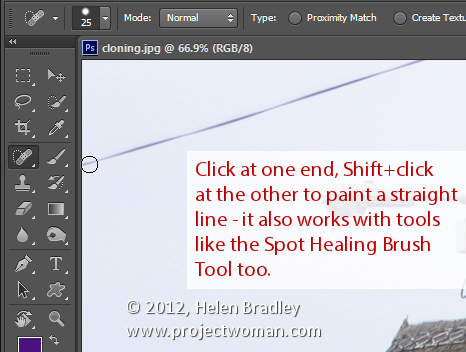
    To paint in a straight line, click at one end of the line, hold the Shift key and click at the other end of the line. This draws a continuous brushstroke between both points.

    If you adjust the spacing of your brush by using the Brush panel Spacing option to make it more than 100% you can create a line of dots this way.

    This can also be used to remove power lines with the Spot Healing Brush Tool. Click at one end of the power line, Shift + Click at the other end to paint a straight line over the power line and it will be removed automatically.

    5 things to know about photoshop brushes 4

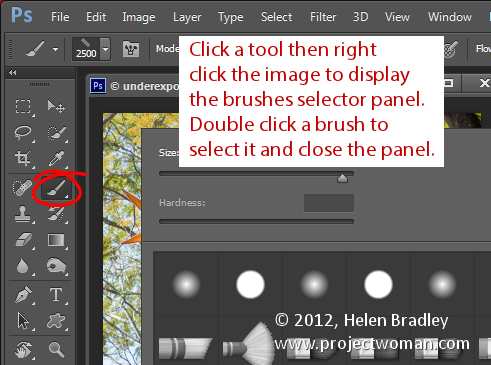
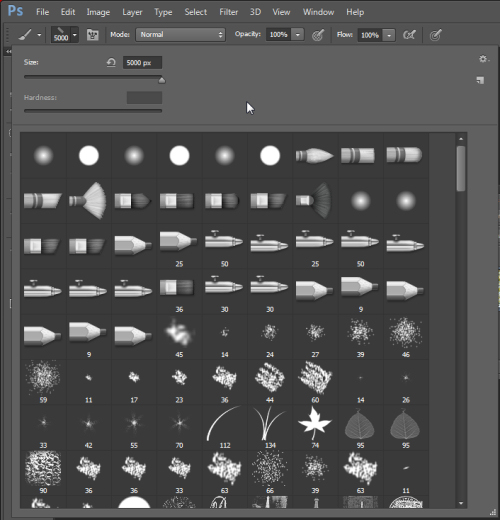
    5. Quickly Show the Brush Panel

    You can quickly show the Brush panel so you can choose a brush to use by first selecting a tool that uses a brush such as the Brush Tool, Dodge, Burn, Eraser tool and so on.

    Then right click on the image and the brush panel appears automatically. To select a brush and exit the panel in one step, double click the brush to use.

    5 things to know about photoshop brushes 5

    And now it is over to you. What other features of Brushes do you think are valuable for photographers to know?

    Post originally from: Digital Photography Tips.

    Check out our more Photography Tips at Photography Tips for Beginners, Portrait Photography Tips and Wedding Photography Tips.

    5 Things to Know About Photoshop Brushes


    Digital Photography School

  • The Green Lantern: Rise of the Manhunters Playthrough (part 12)

    www.gameplayhq.com Harness the power of the ultimate weapon! Inspired by the upcoming Warner Bros. Pictures’ superhero feature film Green Lantern, Green Lantern Rise of the Manhunters soars onto game consoles this summer, extending the theatrical experience of one of DC Entertainment’s most popular superheroes. Playing as gifted pilot Hal Jordan, the first human Green Lantern, gamers will create an arsenal of ring constructs and take flight in outer space and beyond to restore intergalactic order. Players will use the Power Ring to build an array of weapons from green energy to defeat the Manhunters – an evil android race bent on destroying the Green Lantern Corps. •Enhanced Graphics and 3D Capabilities: •Fans can also enjoy the game in stereoscopic 3D when playing on any 3D HDTV while wearing active shutter glasses that are compatible with the television. •Master the Green Lantern Power Ring – Take control of the most powerful weapon in the universe – the Green Lantern Power Ring – and conjure a spectacular range of “hard-light” constructs including a gatling gun, giant fists, and much more, all of which can be linked together to form an endless number of combinations. •Team Up and Battle Together – Gamers playing the Xbox 360 or PS3 versions will have the ability to team-up and battle the Manhunters in seamless drop-in/drop-out local co-op gameplay as Hal Jordan or Sinestro. •Take Flight – Soaring across the universe in intergalactic flight, gamers will dodge past
    Video Rating: 5 / 5

  • Black & White Lies (Photographs by David McKean)

    David McKean (born 29 December 1963 in Maidenhead, Berkshire) is an English illustrator, photographer, comic book artist, graphic designer, filmmaker and musician. His work incorporates drawing, painting, photography, collage, found objects, digital art and sculpture. ‘A SMALL BOOK OF BLACK & WHITE LIES’ WHITE LIES stare king queen travels atmospherics umbilicus four seconds optimist perch bird watcher immovable object irresistible force listen and learn BLACK LIES nightmare roots piercing life lines serrated edges eavesdropping spur arteries spine daydream tip of my tongue crossed binding Music by Robert Fripp, ‘Reflection 1’.
    Video Rating: 4 / 5

  • Cool Visual Art images

    Check out these visual art images:

    repurposed art: sun catcher
    visual art
    Image by jessica wilson {jek in the box}
    blogged

    MIT+150: FAST (Festival of Art + Science + Technology): FAST LIGHT — String Tunnel
    visual art
    Image by Chris Devers
    Quoting from the official pamphlet:

    FAST LIGHT • May 7 + 8, 2011, 7 pm – 10 pm

    Contemporary pioneers in art, science, and technology have come together at MIT to create one of the most exhilarating and inventive spectacles metro Boston has ever seen. On May 7 and 8, 2011, visitors can interact with 20+ art and architectural installations illuminating the campus and the Charles River along Memorial Drive at MIT.

    arts.mit.edu / fast

    Installations scattered around campus (we didn’t quite see all of them), again pasting from the official flyer:

    • aFloat
    MIT Chapel • Saturday, May 7th ONLY
    Inspired by water in the Saarinen Chapel’s moat, a touch releases flickers of light before serenity returns as a calm ripple.
    By Otto Ng, Ben Regnier, Dena Molnar, and Arseni Zaitsev.

    • Inflatables
    Lobby 7, Infinite Corridor
    A dodecahedron sculpture made of silver nylon resonates with gusts of air, heat from light bulbs, and the motions of passersby.
    By Kyle Barker, Juan Jofre, Nick Polansky, Jorge Amaya.

    • (now(now(now)))
    Building 7, 4th Floor
    This installation nests layers of the past into an image of the present, recursively intertwining slices of time.
    By Eric Rosenbaum and Charles DeTar.

    • Dis(Course)4
    Building 3 Stair, Infinite Corridor
    A stairwell transformed by a shummering aluminum conduit inspired by the discourse between floors and academic disciplines.
    By Craig Boney, Jams Coleman and Andrew Manto.

    • Maxwell’s Dream
    Building 10 Community Lounge, Infinite Corridor
    An interactive mural created by magnetic fields that drive patterns of light, Maxwell’s Dream is a visually expressive cybernetic loop.
    By Kaustuv De Biswas and Daniel Rosenberg.

    • Mood Meter
    Student Center & Building 8, Infinite Corridor
    Is the smile a barometer of happiness? Mood Meter playfully assesses and displays the mood of the MIT community onsite and at moodmeter.media.mit.edu
    By Javier Hernandez and Ehsan Hoque.

    • SOFT Rockers
    Killian Court
    Repose and charge your electronic devices using green solar powered technology
    By Shiela Kennedy, P. Seaton, S. Rockcastle, W. Inam, A. Aolij, J. Nam, K. Bogenshutz, J. Bayless, M. Trimble.

    • LightBridge
    The Mass. Ave Bridge
    A dynamic interactive LED array responds to pedestrians on the bridge, illustrating MIT’s ties to both sides of the river. Thanks to Philips ColorKinetics, CISCO, SparkFun Electronics.
    By Sysanne Seitinger.

    • Sky Event
    Killian Court, Saturday, May 7th ONLY
    Immense inflatable stars soar over MIT in celebration of the distinctive symbiosis among artists, scientists and engineers.
    By Otto Piene.

    • Liquid Archive
    Charles River
    A floating inflatable screen provides a backdrop for projections that highlight MIT’s history in science, technology, and art.
    By Nader Tehrani and Gediminas Urbonas.

    • Light Drift
    Charles River
    Ninety brightly glowing orbs in the river change color as they react to the presence of people along the shore.
    By Meejin Yoon.

    • Unflat Pavilion
    Building 14 Lawn
    This freestanding pavilion illuminated with LEDs flexes two dimensions into three. Flat sheets are bent and unfurl into skylights, columns, and windows.
    By Nick Gelpi

    • Gradated Field
    Walker Memorial Lawn
    A field of enticing mounts create a landscape that encourages passersby to meander through, or lounge upon the smooth plaster shapes.
    By Kyle Coburn, Karina Silvester and Yihyun Lim.

    • Bibliodoptera
    Building 14, Hayden Library Corridor
    Newly emerged from the chrysalis of MIT’s diverse library pages, a cloud of butterflies flutters above, reacting to the movement of passersby.
    By Elena Jessop and Peter Torpey.

    • Wind Screen
    Green Building Facade, Bldg 54
    A shimmering curtain of light created by micro-turbines displays a visual register of the replenishable source of wind energy.
    By Meejin Yoon.

    • String Tunnel
    Building 18 Bridge
    A diaphonous tunnel creates a sense of entry to and from the Infinite Corridor and frames the surrounding landscape.
    By Yuna Kim, Kelly Shaw, and Travis Williams.

    • voltaDom
    Building 56-66 Connector
    A vaulted passageway utilizes an innovative fabrication technique that creates complex double curved vaults through the simple rolling of a sheet of material.
    By Skylar Tibbits.

    • Night of Numbers
    Building 66 Facade & E15 Walkway
    A lighting installation enlivens MIT architectre with numbers that hold special or historical significance to the Institute. Can you decode them all?
    By Praveen Subramani and Anna Kotova.

    • Overliner
    Building E-25 Stairwell
    Taking cues from a stairwell’s spiraling geometry, Overliner transforms a familiar and busy passageway into a moment of surprise and repose.
    By Joel Lamere and Cynthia Gunadi.

    • Chroma District
    Corner of Ames and Main Streets.
    Lanterns react to visitors by passing sound and color from one to another, increasing in intensity along the way and illuminating the path to MIT’s campus.
    By Eyal Shahar, Akito van Troyer, and Seung Jin Ham.

    The Gates of Hell
    visual art
    Image by kern.justin
    The portal to The Inferno.
    Through me the way is to the city dolent;Through me the way is to eternal dole;Through me the way among the people lost.
    Justice incited my sublime Creator;Created me divine Omnipotence,The highest Wisdom and the primal Love.
    Before me there were no created things,Only eterne, and I eternal last.All hope abandon, ye who enter in!.
    – Canto III, The Inferno, Dante Alighieri
    Part one of Dante Alighieri’s The Divine Comedy, known more affectionately by those who have read it as "The Inferno," was something close to required reading for college students at The University of Chicago. Dogeared copies of the most recent verse translations were a staple of tables throughout the library. As far as I could tell, every humanities course (a requirement for all students) included at least part of this master work. Much discussion as to its literary merits and political references surely followed, but I think what connected with students was Dante’s vision of the deepest, darkest levels of hell as miserably cold rather than blazingly hot. To an undergraduate facing finals in the depths of January’s arctic grip, this vision of a cold hell continually resonates. So much so that, during my ten years on campus, I could always spot a college student sporting a homemade t-shirt with the slogan "University of Chicago – The level of hell Dante forgot," or "Hell does freeze over." Beyond the delightfully geeky literary reference to Alighieri, these shirts were also remarkable for displaying a table of temperature lows for the dates of the winter quarter.
    Such a table for the temperatures on Stanford’s campus through the corresponding period of time would paint a far sunnier picture. Imagine my surprise then, when I discovered that the Gates of Hell are actually on the Stanford Campus. The Gates of Hell is a massive sculpture by Auguste Rodin inspired by the famous poem; it, and many other of Rodin’s works, is a fixture of the B. Gerald Cantor Rodin Sculpture Garden. The illustrious sculptor worked to create this masterpiece over the course of nearly four decades, until his death. The word massive fails here to convey the size of the gate – it stands at nearly twenty feet tall and over thirteen feet wide. It is imposing without being utterly frightening. Rodin included some of his most famous sculptures within The Gates of Hell – notice the thinker jutting out at you far overhead at the center of the doors. He also included some unexpected things, like The Kiss within the doors and perhaps that little bit of romance and sweetness is the reason that we are not terrified of this massive vision of Hell’s Door.
    112 megapixels of The Gates of Hell.

    I created this image as a massive panorama for two primary reasons. One, because the sculpture defies the small-format photographer to capture its essence and requires a high-resolution approach. Two, because I have been working diligently to produce a workflow of image capture and processing that I will call "Large Format DSLR Photography." You will notice that the above image isn’t just properly exposed and very high-resolution, but it is also perfectly corrected for perspective. Look at the gates, follow the vertical and horizontal lines – you will notice they are all perfectly parallel to the edges of the frame. The door doesn’t shrink at the top where the subject is further from the camera, and it doesn’t expand at the bottom. All this is possible thanks to a very special tripod head (more details on that later) and some careful computation. You’ll be seeing more high resolution images like this and learn more about how to make "large format" digital images like this in the coming weeks and months – stay tuned. I’ve also included a smaller version of the image below so those of you who like to see the whole image all at once can do so. And if you were looking for another indication of scale here – that placard on the right of the frame is about four to five feet from the ground.

  • VersaEmerge – “Past Praying For” acoustic (Atlanta 11/8/09)

    OP Presents Tour acoustic set Filmed with a Nikon D90 and 50mm /1.8
    Video Rating: 4 / 5

  • How to Become a Photographer: The Natural Way

    So you want to become a photographer, huh? Then just forget it, you’ll never be one! And even if you will – you won’t be a good one anyway… What’s the catch? I’ll tell you. But first I want to share a little story from my own life. The “Wannabe” Syndrome For the past 10 years or so I’ve had Continue Reading

    The post How to Become a Photographer: The Natural Way appeared first on Photodoto.


    Photodoto

  • Why Speedlight not studio Lights for Shooting? (by Dom Bower)

    dombowerphoto.blogspot.com In this video I answer another question about flash. this time Why do i use nikon speedlights and not studio lights for my shoots” well here is the answer If you enjoy my videos please post them on your Facebook page and let others know about this channel, please subscribe and share on Facebook and twitter. Also check out the links below. If you really like my work please feel free to check out or buy a copy of the my PHOTOGRAPHY BOOK: Getting There With Photography: By Dom Bower www.blurb.com FACEBOOK Critique/advice GROUP www.facebook.com FACEBOOK PAGE www.facebook.com TWITTER page twitter.com WEBSITE www.dombower.com PHOTOGRAPHY CLOTHING Point and destroy clothing http For my AZ of Weightloss Tips check out: dombowerexercise.blogspot.co.uk And to donate to The Cancer Charity that I am doing a Trek for please visit www.justgiving.com
    Video Rating: 4 / 5

  • Sparrowhawk by Kurien Koshy Yohannan

    A Wildlife photographer learns something new every day – be it about the behaviour of the subjects one photographs or the technique one uses to capture that unique image.

    Wildlife photography, for most part, involves investing a large amount of time and energy – both on and off the field – in studying about the subject you want to photograph, identifying the best habitats to photograph your subject in and then waiting and waiting and waiting…

    But then again, once in a while, your subject may just present itself right in front of you when you least expect it. A case in point is this Sparrowhawk that I managed to photograph the other day. There was a thunderstorm brewing and I was standing in my living room looking up into the sky hoping to capture a lightning bolt. I had the Canon 70-200mm lens mounted on my Canon 50D and was expectantly waiting for a lightning bolt to strike when, out of the blue, I see a bird of prey land on a fence right in front of me. At first I was not sure of what species the bird was except that it was a bird of prey. It was only after I locked focus on it did I realise that it was a Sparrowhawk. A good friend of mine, and photography buddy, had told me that there was a Sparrowhawk in the area and I’d kept an eye out for it but never managed to spot it and here it was sitting right in front of me, when I least expected it. I fired off a few shots, one of which can be seen below:

    Sparrowhawk1

    © Kurien Koshy Yohannan

    She looked like she was not going anywhere and so I took a calculated chance of changing my lens to the Sigma 50-500mm to try to capture a few close up images (as can be seen below). I could not have asked for a more willing subject.

    The one thing I have learnt in my very short time as a Wildlife photographer, and from this particular incident, is the fact that one’s got to be ready to capture a shot at any time. When an opportunity presents itself, one’s got to try to grasp it tight with both hands.

    Links:

    Website: www.igallopfree.com
    Facebook: http://facebook.com/BlackStallionPhotography


    dslrBlog