Month: November 2012

  • How to Backlight: Photography Technique – Backlighting Photo

    Watch this free instructional photography tutorial to learn how to photograph using backlighting photography technique. More free tutorials at LearnMyShot.com

    Diamond Digital Production www.diamonddigital.ca Photography and Videography With Diamond Digital Production, you can preserve your memories forever in a beautifully edited DVD without breaking the bank.
    Video Rating: 5 / 5

  • Add Interest to your Background with Colored Gels

    Colored gels are commonly used to balance flash color temperature with the color temperature of ambient light. But you can also use gels to add creative color effects to your photos.
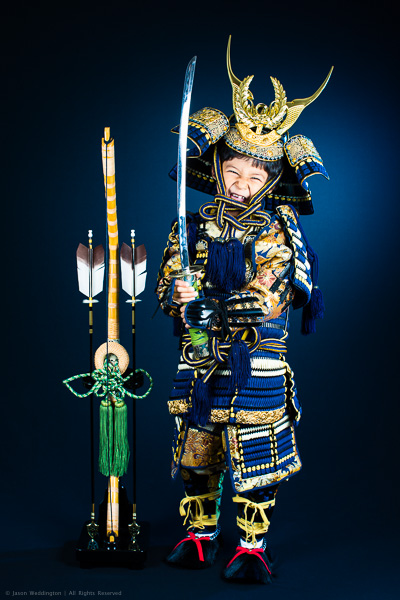
    Photo of a young boy dressed as a Japanese samurai

    I recently shot this portrait of my son to commemorate his Shichi Go San (7-5-3) ceremony. Shichi Go San is a Japanese rite of passage performed at ages 3 and 7 for girls, and at age 5 for boys.

    The background is a black piece of cloth, stretched across a Manfrotto background stand. To separate him from the background, and add visual interest, I used a single flash with a DIY blue gel to add some color to the background. In this article I’ll explain how to make your own gels, and how to use them. Lighting your background separately from your subject, with or without gels, is a great way to add depth to your photos and can help separate subjects from a dark background.

    Here’s how it looks with only the background light:

    Photo showing the use of a blue gel to tone a black background

    First, an overview of the lighting setup for this shot:

    Main Lights: 2 x Canon 430EX II Speedlites at full power, fired through 24″ Lastolite EZY-Box softboxes at camera left and right, just outside the frame.

    Background Light: Single Canon 430EX II Speedlite in a snoot, with DIY blue gel, fired at the background from the right side of the set. I aimed this flash so that the hotspot would be centered behind my son’s head.

    Exposure: 1/200, f/6.3, ISO 200
    Lens: Canon EF 50mm f/1.2L
    Camera: Canon EOS 5D Mark III

    How to make your own DIY Gels

    Any piece of thin colored plastic will work well. For the above photo I used two circles of plastic that I cut from a notebook cover. I purchased the notebook for 100 yen, or about USD $ 1.25. Experiment with different colors to find what works with your creative style, and for the particular photo you’re creating. For portrait work, I’m partial to cool tones, especially blues. Warm colors appear to pop out against cool colors, so a cool colored background works well to compliment skin tones.

    In addition to the gel, you also need a snoot. A snoot narrows the light, and gives a spotlight effect. This keeps blue light from spilling all over the place. For this photo, I used a Gary Fong Powersnoot, because I already have one. But a piece of black poster board folded into a cylinder works just as well.
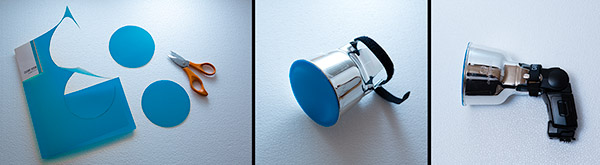
    Photo showing steps to make colored flash gels

    My 8-year-old daughter taped the blue plastic to the end of the snoot for me. If you don’t have an 8-year-old, see if you can borrow one from a friend or relative. Failing that, you can also tape the plastic onto the snoot yourself.

    How much flash output?

    So, how much flash do you need on the background to get a nice color effect? At first glance this may seem counterintuitive, but here’s the rule:

    More flash = lighter color
    Less flash = darker color

    The reason for this is simple. The brighter your background flash, higher the luminosity of the color hitting the background will be.

    So for a nice, deep blue like in this photo, you only need a little kiss of light from your flash. I powered a single 430EX II at 1/4 power for the background light, compared to two 430EX II’s at full power for the main lights. My background flash was about the same distance from the background as my main flashes were from the subject, so basically the light on the background is 4 stops weaker than the light on the subject. (1 flash @ 1/4 power on the background, 2 flashes @ full power on the subject.)

    I hope this article has given you some ideas about how to make your own DIY flash gels from inexpensive materials, as well as how to use gels to add creative color effects to your photos. I’d love to hear from you, feel free to comment below or reach out to me on Google+ or Facebook.

    Post originally from: Digital Photography Tips.

    Check out our more Photography Tips at Photography Tips for Beginners, Portrait Photography Tips and Wedding Photography Tips.

    Add Interest to your Background with Colored Gels


    Digital Photography School

  • Cool Visual Art images

    Check out these visual art images:

    Statue of George I outside The Barber Institute of Fine Arts
    visual art
    Image by ell brown
    This is the The Barber Institute of Fine Arts building on the University of Birmingham main campus.

    It is listed currently as being on University Road, and no longer Edgbaston Park Road (I would assume that University Road is the road that goes from Edgbaston Park Road into the University grounds proper).

    It is a Grade II listed building built between 1935 and 1939, designed by architect Robert Atkinson.

    It is an art gallery and concert hall, and is an Art Deco building. It was opened by Queen Mary.

    1935 completed 1939, architect Robert Atkinson. Sophisticated design marrying
    elements of traditional institutional classicism with Dudok inspired stone
    dressed brick modern. A 2 storey compact block with shallow full height portal
    wing to right hand of front. Ashlar faced ground floor and blind lst floor of
    brick with flat coped roofline. The horizontal emphasis of the strip
    fenestration of the ground floor is suavely combined with the vertical accent of
    the slightly battered portal. The latter is complemented in small scale by
    ashlar panels carved with symbols of the Arts on the first floor and reflected
    by the visual stop of the larger panel at the end of return east elevation.
    The banding and strip fenestration of the front follows round on to the side and
    rear elevations giving a crisp linear definition to the design.

    The Barber Institute of Fine Arts – Heritage Gateway

    To get this statue, I had to walk into the snowy grass around it (so I left my footprints).

    It reminds me of the statue of George IV in Trafalgar Square, its pose is also like the nearby statue of Charles I (south of Nelson’s Column).

    The statue of George I was commissioned by the city of Dublin in 1717. This was to display loyalty to the crown in the face of unrest from Catholic supporters of James Stuart, the ‘Young Pretender’ (son of the exiled James II) who had inspired a unsuccessful revolt against George I two years earlier. – note I think my book means the ‘Old Pretender’ – the ‘Young Pretender’ was his son Bonnie Prince Charlie.

    (back to book info)
    The Statue was by the Dutch sculpter John van Nost the Elder, although it was probably finished by his assistants after his death. It was unveiled in Dublin in 1722.

    It was brought by Thomas Bodkin, first director of the Barber Institute in 1937, and brought to its present location.

    (above info from "Walks through history: Birmingham" – by John Wilks)

    It is a Grade II listed statue.

    Bronze equestrian statue of King George I attributed to J van Ost (Nost) the
    Elder. Originally placed on Essex (now Grattan) Bridge, Dublin, in 1722.

    Statue of George I – Heritage Gateway

    The Barber Institute of Fine Arts – lamps
    visual art
    Image by ell brown
    This is the The Barber Institute of Fine Arts building on the University of Birmingham main campus.

    It is listed currently as being on University Road, and no longer Edgbaston Park Road (I would assume that University Road is the road that goes from Edgbaston Park Road into the University grounds proper).

    It is a Grade II listed building built between 1935 and 1939, designed by architect Robert Atkinson.

    It is an art gallery and concert hall, and is an Art Deco building. It was opened by Queen Mary.

    1935 completed 1939, architect Robert Atkinson. Sophisticated design marrying
    elements of traditional institutional classicism with Dudok inspired stone
    dressed brick modern. A 2 storey compact block with shallow full height portal
    wing to right hand of front. Ashlar faced ground floor and blind lst floor of
    brick with flat coped roofline. The horizontal emphasis of the strip
    fenestration of the ground floor is suavely combined with the vertical accent of
    the slightly battered portal. The latter is complemented in small scale by
    ashlar panels carved with symbols of the Arts on the first floor and reflected
    by the visual stop of the larger panel at the end of return east elevation.
    The banding and strip fenestration of the front follows round on to the side and
    rear elevations giving a crisp linear definition to the design.

    The Barber Institute of Fine Arts – Heritage Gateway

    Two lamps either side of the main entrance to the gallery.

    Visual Artst Frank Bonilla (A)
    visual art
    Image by Visual Artist Frank Bonilla
    This image is the same as my FrankBonilla.tv image, but I needed one for Visual Artist Frank Bonilla.

    This is my logo now for my website. I am Visual Artist Frank Bonilla. The name of my website is www.FrankBonilla.tv. I have also bought and sold domain names since 2003. This is how I learned about the .tv domain extension. For those that don’t know, I used the .tv instead of a .com, .net , or other domain extension. If you watch a lot of television, or are on the internet alot, you will noticew that many companies now also use a .tv domain extension.
    In 2007, I sold the domain name Uv.tv to a German company for ,355! View their great website here: www.UV.tv

  • How to shoot a wedding – Part 4 – Back up & editing workflow

    Part 4 covers back up, storage and editing options, following a wedding shoot. In this series ThatNikonGuy Matt Granger will show you all you need to know to get started in wedding photography. From planning, to gear, to shooting and editing tips, Matt will walk you through the process and help you avoid common pitfalls. Whether you are going in full time, or have been asked to shoot at a friends wedding – take the time to research and plan – it will avoid a lot of headaches down the track! GEAR: Lowepro S&F gear – products.lowepro.com Tamron 70-300SP – www.tamron.com Nikon gear – www.nikon.com.au Join our facebook and flickr groups to stay up to date with what’s going on: Join our facebook group HERE: www.facebook.com Flickr group HERE: www.flickr.com www.mattgranger.com
    Video Rating: 4 / 5

  • On Turkey Prep

    Today is Thanksgiving in the US, a day in which we pause to give thanks and then watch football. And turkey, we eat lots of turkey, too. (Except for the vegetarians, who have to eat "tofurkey," adding yet another thing for us omnivores to be thankful for.)

    So on that note, thank you very much for being a reader of this site. Without you, this whole 2,300-post journey would be โ€ฆ awkward.

    Today's Thanksgiving Day post is off-topic in that it has nothing to do with flash and everything to do turkeys. And with being a thinking photographer.

    More specifically, being a photographer who thinks like a turkey. Read more ยป


    Strobist

  • 22 November, 2012 – Steptoe Butter – Above The Palouse

    As part of his on-going Geotagged Photo Location series, our regular contributor Miles Hecker provides us today with advise on shooting at Steptoe Butte – The Top of the Palouse.

    To all our friends in the USA who today are celebrating Thanksgiving, please accept our best wishes for safe travels and warm family times.

     Happy Holidays! 


    The Luminous Landscape – What’s New

  • Xinyi Liuhebafa Xinyi Zhanzhuang – Fajing.wmv

    Grandmaster David Chan learned from the lineages of Great Grandmaster Wu Yi Hui via Grandmaster Chan Yik Yan, and Great Grandmaster Wang Xiang Zhai via Grandmaster You Peng Xi, for about 18 years. He started teaching Xinyi Liuhebafa and Xinyi Zhanzhuang around the year 1976, in the Philippines. This video shows a bit of our Push Hands, Chinna, and Fajing. Hope you enjoy it! ๐Ÿ˜Ž For Inquiries: JRRodriguezIV@XinyiMeditation.com
    Video Rating: 4 / 5

  • [3DZ] Create Depth Maps – AfterEffects

    This tutorial goes over how to use rotoscoping in Mocha, a very powerful roto tool that comes free with After Effects CS5, to create depth footage. The resulting footage can then be used to create stereo pairs from a single camera. The tutorial is quite long but goes over the entire process from start to finish and tries to explain aspects of Mocha and AfterEffects along the way.

  • Astitva – Ek Prem Kahani – Episode 118 – 10-06-2003

    Manas phones Urmila to talk to her and then disconnects abruptly. She tells Ashwin that she fears Manas may have got suspicious. When Dr. Dalal asks Simran why Ameesha s photographs got rejected, Simran says that she is unaware. Simran tells her about the growing distance between Abhimanyu and her. Vivek tells Anandi that he has got the job. She phones Simran to thank her. They break the news to Anandi s parents. Ameesha informs Dr. Dalal that she has been selected once again. Sanjeev, a client, asks Kiran where he should send Abhimanyu s and her contract. When Kiran tells him to get them to her house, he smells a rat and tells his journalist friend about a possible scoop! Manas phones Urmila to ask about the conference, and she replies that it was fine. But Manas is right there watching Ashwin and her go hand in hand!
    Video Rating: 5 / 5

  • Canon EOS 60D Hands-on Review

    The Canon EOS 60D has arrived! The long-awaited successor to the 50D is out, but how does it fit in to Canon’s DSLR range with the 550D and 7D around? It features an all new swivellly-tilty screen thing, but we take a look to see what else it has. Kai was quite excited to get his hands on one, but something unfortunate happens in the video…watch it to find out! Full size sample shots at Flickr: www.flickr.com Pricing Reference: www.digitalrev.com
    Video Rating: 4 / 5

    Video Rating: 4 / 5