Creating images is a process and, for me, pressing the shutter is only a small part of the journey to an image of sufficient quality to publish. In this article, part 2 to Architecture Photographers on Holiday, I will go through my image workflow.
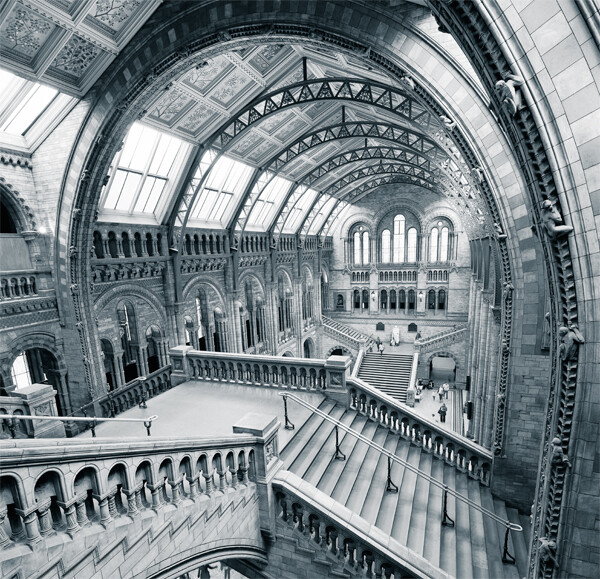
All photography faces the challenge of scenes with a significant dynamic range. Landscape and architecture is really no different. I will capture as many frames as required to cover the entire scene’s dynamic range. For architecture and indoor 3 frames are enough for most scenes. The image above required 9 images; exposures bracketed at -2, 0 and +2 and 1 set for the lower half of the room and another for the ceiling. The additional set is to help me eliminate people from the shot.

You really should …
- Shoot RAW too to retain maximum flexibility in images; we aren’t sports shooters firing a constant stream of images to a desk, where JPEG is pretty much mandatory
- Keep ISO Low
- Use a single white balance setting for the same set of images
- Use the heaviest tripod you have and a remote shutter release, wired or otherwise

This image above, of Canary Wharf underground station, comprises 3 frames. The challenge for this scene was getting a good exposure of the dark surrounding areas, the bright metallic escalator and the ridiculously bright canopy. Each layer contains the properly exposed parts of the composition.
Principal Camera
 Architecture and landscape images are pretty much covered with my 5D Mark II and 17mm TS-E Tilt-Shift lens. I shoot multiple exposures mostly due to the front element being convex and resisting any attempts to use filters. My bag will also always have an EF24 f/1.4 and EF50mm f/1.2. My tripod is a little ropey now; Gitzo legs and a Manfrotto ball head.
Computer & Monitor
 All image editing is undertaken on a dual CPU Mac Pro with 24gb RAM. I frequently work with images in excess of 1GB, so a large amount of memory is a must. I have a Dell 27″ Ultrasharp monitor, which is calibrated using a Spyder 3 Elite.
Before any significant editing session I calibrate my monitor.
Importing Images
 I realise many of you will use different mechanisms, like Lightroom, iPhoto, Picassa, etc. Call me a luddite, but I hate to relinquish control and so my import routine is entirely manual.
On location I will be filling 2 hard drives and, on my return, will be copying across 100GB of images in a single operation, to a location I have prepared. The folder structure on the left has served me very well for the past 10 years.
You’ll notice my prepared JPEG files are prefixed with pixel sizes for various web sites; 500px is 900 pixels wide, however 1x.com is 950 pixels. I will also add ‘bw’ to the file name for monochrome images. These naming conventions make it easy to search your hard drive for correct sized images.
Selection

Of all the numerous photo applications I have installed, day to day, I use Adobe CS5. It is a very reliable work horse for image processing.
Image preview and selection is accomplished quickly in Bridge. I select the images I am interested in – on the right. Once happy with this, I use the filter pane – on the left – to show only my final selection.
Camera Raw

If you are like me, everything on your camera is set to off or zero. Here in Adobe’s Camera Raw application, I will perform a few tweaks to all the images that will go towards a single composite image.

- Ensure you are importing your images in the same color space as your camera. Mine is Adobe RGB, a wider color gamut than the internet’s sRGB. Work on the best quality image and then convert down for your target medium, like the internet
- Edit images in 16 bit
- Select the best and most evenly exposed frame and set your white balance
- If there are hot spots, use the Recovery slider to compenstate. TIP: Press [alt][cmd] together whilst moving the Recovery slider and you will see where the hot spots are very clearly on the black background!
- If you’re using the recovery slider too much, compensate with the exposure slider. Again, press [alt][cmd] together
- You can use the [alt][cmd] again with the black levels – bring the black levels up to just before you start blowing the blacks
- Select all the images, and Synchronize – top left – white balance to the other images in the set
- Open All images into Photoshop
Photoshop Tutorial
My Photoshop workspace is quite austere and my editing process is also quite simple.
I have a number of actions set up for menial tasks, like image resize, colorspace conversion, etc. The discrete tasks I perform can be broken down as follows:
- Layer blend multiple image exposures
- Stitch these composite images if panoramic
- Save the single composite image as a Photoshop PSD file
- Use masking to select targeted regions of the image for color, contrast and exposure control. A simple example might be to process the sky separately from the building in the foreground
- Resave this image with all the layers that have been created
- Flatten the image and straighten. If necessary, crop.
- sharpen
- save a new version of this prepared image as a Photoshop PSD
- resize for your target medium, example, 900 pixels across for 500px.com
- Convert to sRGB and to 8bit
- Save as a JPEG. Remember to prefix the file name with ’900px’ for easy finding later on
Manual Layer Blend
 First, get your separate exposures into one image as layers. You can use the menu to automate this: File > Scripts > Load Files Into A Stack [Add Open Files]
Most Photoshop users are a little wary of masks and selections, etc, but they’re really quite simple. I shall demonstrate!
Choose your Selection Tool of choice. I have used the Quick Selection tool, highlighted on the very left. Press [Shift] to add to your selection and [alt] to remove from your selection. You can see I have selected the correctly exposed canopy in Canary Wharf Station.

This selection is very jagged and will be most visible if we don’t make it more smooth and elegant. So click on the [Refine Edge…] button, again highlighted at the top of the above image.

The red mask area is very useful for viewing selected vs unselected, but you need to set this option. Click on the View drop down at the top of the Refine dialogue and select Overlay.
 We will use the Refine Radius Tool brush, highlighted on the left. It will allow us to paint the edge of the selection and Photoshop will take an educated guess on what should and should not be selected.

Increase the size of the brush with the [Size] option and ‘paint’ lavishly around the edge of the selection. Go over all the edges!
The selection edge is far more gradated now! Press [OK] to save this selection.
 We now to need to create a mask layer. A mask will will make some of the layer image visible and other parts invisible.
Press the [Add Vector Mask] button, which is highlighted.
You can see the black and white thumbnail that has appeared next to my layer thumbnail (below). Black is invisible. Simple as that. Anything not black will show through that same area in the corresponding layer. In my image, the canopy mask is all white and so only the canopy will show through. This is good, as it will leave the layer underneath visible, apart from the canopy.

I have gone ahead and repeated the exposure layer mask for the escalator and canopy surround, which you can see below. The layers, at 100% are too harsh, so I have reduced the opacity of the canopy layer to 80% and the canopy surround/escalator to 70%. A little bit of work, but a very flexible method to be able to represent wide dynamic range scenes.

A great observation to take away from this section is the power and flexibility of layers and masking. It’s precisely how I will process color and contrast in the next section.
Flatten your exposure layers [Layer > Flatten Image] and Save as a Photoshop document. You now have a properly exposed version of your scene. A base you can come back to. Very useful if you want to convert to black and white later on.
Image Edit: Color and Contrast
I shall demonstrate this edit with this single capture from Kolmanskop, Namibia. I have overlayed the processed image to illustrate the differences from RAW to processed.

If I attempted to enhance this image as a whole, it would probably be a mess and manipulating color and contrast for one area would most definitely degrade another portion of the image. Working on separate parts of the image makes most sense to me and this is achieved, once again, with masking and layers.
Create layers of image sections to process using masking
- Select portion of base layer
- Refine Selection
- Copy selection
- Paste to a new layer; name it something sensible
- Repeat for all sections that require separate attention

I will go through my process to apply color and contrast adjustments to the sand.
Saturation
Select the layer you are going to edit – I will select the ‘Sand’ layer.

Tick ‘Use Previous Layer to Create Clipping Mask’ to ensure your edit is only applied to the ‘Sand’ layer. You’ll see the new layer has a little arrow pointing down to reflect this.

 I have selected a predefined level of ‘Increased Saturation More’.
Sand should be a nice warm orange, so I’ll add another adjustment layer of a Photo Filter – Layer > New Adjustment Layer > Photo Filter…. Select the ‘Sand’ layer first and remember to tick the ‘Use Previous Layer to Create Clipping Mask’ option.
 I have selected the ‘Warming Filter (85) and increased the density to 50 for a fuller effect.
 Lastly, I have added a curves layer for contrast. Select the ‘Sand’ layer and, from the same menu location – Layer > New Adjustment Layer > Curves… – select ‘Strong Contrast (RGB)‘.
 Since we have multiple layers corresponding to ‘Sand’, I will select them all, group and them – Layer > Group Layers – and apply a label.
Now I can make the toggle the Group ‘Sand’ on and off to see the effect of my layer adjustments.

 TIP: To adjust exposure by a stop, add a curve layer and set it’s opacity to 38%. For +1 stop, set the Blending Mode to ‘Screen’ and for -1 stop, ‘Multiply’.
All Edits done now and, by editing section by section, I have been able to control the image quite comprehensively.

At this point save the image with all layers as a Photoshop Document.
Straighten. Crop. Sharpen. Save. Resize. Save.
Straighten
 I have 2 methods. Use the Ruler, illustrated left which is very quick once you identify the strongest line in the image, or select all layers, then select the entire image > Edit > Transform > Rotate.
Crop
Simple task, but difficult to undo once your image is saved. I suggest saving your image before proceeding.
Sharpen
There are numerous discussions on the subject of sharpening and I personally have tried them all, but the most elegant sharpening method is the High Pass filter method. The results are sharp, but without artefacts and ‘jaggies’. Sharpening after resize is a definite no no.

- Duplicate the layer – Image > Duplicate…
- Perform a High Pass Filter, 1.0 is a good radius for a well focused image around 10-20mp – Filter > Other > High Pass…
- Set the Blending Layer Mode to ‘Overlay’ in the Layers Palette
Save
Flatten the image – Layer > Flatten Image – and save as a new Photoshop File and name accordingly.
You now have a full resolution properly edited image. When you are preparing images for publication or competition, this is the version you will come back to to resize, save as JPEG and distribute.
Resize
I prepare JPEG image versions for various Blogs, Flickr, 500px, 1x and competition. They are all different sizes.
Save
The final save as a JPEG needs to be converted to sRGB and to 8 bit. These attributes are standard for the internet. If you don’t do either, your image on the internet will simply not look, to others, the same as you processed on your computer.
- Image > Mode > 8 Bits/Channel
- Edit > Convert to Profile…

Well here you are, this is basically my image editing workflow.
I suspect a Part 3, Pro Photographer Monochrome Conversion (TIPS), will be forthcoming, so stay tuned!
Post originally from: Digital Photography Tips.
Check out our more Photography Tips at Photography Tips for Beginners, Portrait Photography Tips and Wedding Photography Tips.
Pro Photographer Editing Workflow (TIPS)