Category: Uncategorized

  • Sony Cyber-Shot RX100 REVIEW

    It’s a big claim: “The best pocket camera ever made.” … or so The New York Times declares. No doubt there will be some rumblings from a well-known German company about such a contention. And Nikon will be banging at the gate too!

    Sony Cyber-Shot RX100.jpg

    (insert Productshot_Front_007-1200)

    Sony’s story is that the RX100 does do things quite a bit differently from the rest of the crowd. For one thing, as a fixed lens camera, the sensor is claimed to be considerably larger than the rest of the crowd, with many having 11mm sensors (as a diagonal measurement). Sony claims the RX100′s sensor is a one inch job.

    Screeech! Reality check! The RX100′s CMOS measures 13.2×8.8mm, which means the diagonal is only 15.8mm and not 25.4m (one inch) … same as the Nikon V1and N1 cameras.


    Sony Cyber-Shot RX100-1.jpg

    Sony Cyber-Shot RX100-2.jpg

    It gets stickier. The RX100 has 20.2 million effective pixels, while the Nikons offers only 10.1 million packed onto the sensor. Same space: smaller pixels. Not a good start!

    Well I’ve got that off my chest.

    Now let’s look at the lens. At last! A star! One of dear old Carl Zeiss’ top optics: the Vario-Sonnar T* f1.8-4.9/10.4-37.1mm job. Yes, it’s relatively fast at f1.9, but this drops off to a much smaller f4.9 at the tele end, giving a modest 3.6x zoom range (based on the 35 SLR equivalent range of 28-100mm).

    Sony Cyber-Shot RX100 Features

    Built around an aluminium body, the camera inherits some features from Sony’s Alpha range of cameras which places it in the same territory as the mirrorless interchangeable lens cameras.

    Although small, the RX100 feels chunky, solid and workmanlike, while feeling surprisingly heavy for such a small camera. Powered down, it fits a pocket easily. Powered up, the lens protrudes another 3.5cm from the 3.5cm deep body.

    It feels good in the hand, although I would have liked a textured grip surface at the front right edge, as there is at the rear edge.

    Controls are very Sony-like: power, zoom and mode dial on top; the rear has a Function button (HDR, scene modes, exposure compensation, ISO), with controls for menu, replay, instruction guide and the movie record button.

    There is a USB port at the camera’s right end with the mini HDMI and memory card access placed in the camera’s base.

    At this point I should mention the lens control ring, close to the body and giving direct access to aperture, shutter speed and manual focus … all operable with the camera in Program AE, shutter or aperture priority and visible on the LCD screen. Pretty neat!

    Menu 1.jpg

    Menu 2.jpg

    I have to say the manual focus arrangement is one of the best I have come across: easy to access and giving the clearest indication of sharp or unsharp focus. However, I found the shutter button hard to feel for, as it’s recessed beneath the top surface. A bad design flaw.

    Maximum image size is 5472×3080 pixels, enough to make a 46x26cm print.

    Movies are well taken care of with maximum res at Full HD 1920×1080 in AVCHD or MPEG format for the lesser sizes.

    Luna Park entrance 1.JPG

    Ferry and city.JPG

    Speaking of which: sounds of the shutter button and zoom can be heard while shooting video — but you can shoot stills while in video mode. The stabiliser works well as does the auto focus. The instruction manual indicates that in some video resolutions still capture is not possible … but I had no trouble.

    Sony Cyber-Shot RX100 ISO Tests

    Sony RX100 ISO 80.JPG

    Sony RX100 ISO 200.JPG

    Sony RX100 ISO 800.JPG

    Sony RX100 ISO 1600.JPG

    Sony RX100 ISO 3200.JPG

    Sony RX100 ISO 6400.JPG

    While the specs indicate the camera has an upper ISO setting of 25,600 this is only available in Auto ISO, with the camera making the setting according to prevailing light levels.

    At ISO 80 the image was sharp and noise free. Only when ISO 1600 was reached did noise appear. By ISO 3200 noise was up but not to an objectionable level. At ISO 6400 noise was up but definition was acceptable. A good performance.

    Startup Times

    It took three seconds from startup to first shot; follow-ons about a second apart.

    Distortion

    No problems at the wide or tele ends of the zoom. A good performance.

    Sony Cyber-Shot RX100 Verdict

    Quality: the pictures I shot with the RX100 simply jumped off the screen with excellent definition and accurate colour. A top performer, no doubt thanks to Herr Zeiss’s precision.

    Why you’d buy the Sony Cyber-shot RX100: a pocket performer.

    Why you wouldn’t: a vari-angle screen would have made the camera near-perfect;

    An elegant and practical camera it could be used by virtually anyone with any skills level. However, it could seriously sing and dance in polished hands!

    Sony Cyber-Shot RX100 Specs

    Image Sensor: 20.2 million effective pixels.
    Metering: multi zone, centre-weighted, spot.
    Lens: Carl Zeiss Vario-Sonnar T* f1.8-4.9/10.4-37.1 (28-100mm as 35 SLR).
    Exposure Modes: Program AE, shutter and aperture priority, manual.
    Effective Sensor Size: 13.2×8.8mm Exmor CMOS.
    Shutter Speed (stills): 30 to 1/2000 second and Bulb.
    Continuous Shooting: 2.5/10 fps.
    Memory: SD/SDHC/SDXC, Memory Stick Pro Duo cards.
    Image Sizes (pixels): Stills: 5472×3080 to 2592×1944.
    Movies: 1920×1080 (AVCHD); 1440×1080, 640×480 (MPEG4).
    Viewfinder: 7.6cm LCD screen (1,228,800 pixels).
    File Formats: JPEG, RAW (Sony ARW 2.2), JPEG+RAW, MPEG4, AVCHD.
    Colour Space: sRGB, Adobe RGB.
    ISO Sensitivity: Auto, 100 to 25600.
    Interface: USB 2.0, HDMI mini.
    Power: Rechargeable lithium ion battery, DC input.
    Dimensions: 102x59x36 WHDmm.
    Weight: 213 g (inc battery).
    Price: Get a price on the Sony Cybershot RX100 at Amazon.

    Post originally from: Digital Photography Tips.

    Check out our more Photography Tips at Photography Tips for Beginners, Portrait Photography Tips and Wedding Photography Tips.

    Sony Cyber-Shot RX100 REVIEW


    Digital Photography School

  • Flickr Groups Are the Hidden Social Network That Yahoo Doesn’t Even Realize It Owns

    Flickr Groups Are the Hidden Social Network That Yahoo Doesn't Even Realize It Owns

    Probably the number one thing that Yahoo has squandered over the years is the early mover advantage that they had when they bought Flickr and along with it one of the best basic frameworks for group social networking on the web today.

    Flickr groups are a potentially powerful social network, even more powerful in fact than Flickr itself as a photo sharing platform. Instead of recognizing and exploiting the full potential of Flickr groups, groups have been left behind to languish in a new more nimble mobile world of instant communication.

    Yahoo never even understood what they had. They barely understood Flickr, how could they understand an obscure part of Flickr and the seed for greatness that existed there? Carol Bartz, Scott Thompson (and now Marissa Mayer) couldn’t/can’t even be bothered to set up Flickr accounts.

    Today more powerful, wealthy, and connected internet businesses are rapidly building out group oriented features (Google+ Events for example) that will further diminish Yahoo’s potential in the social networking space. Yahoo still does have a chance to try to turn Flickr groups into something larger, but the time is short. Understanding the power of Flickr groups means actually spending time using it and studying it. Like her predecessors, we can’t even get Marissa Mayer to open up her own Flickr account, so my outlook for Flickr groups is not great.

    Those that have lived in Flickr groups for various periods of time over the past 8 years know exactly what I am talking about. They know how powerful groups can be. This small population of outliers on the web know that for many of them Flickr groups have been the most addictive thing they have ever experienced on the web — more addictive than Facebook, more addictive than Google+, more addictive than any social experience on the web for them ever. Groups of tight knit communities have flourished in obscurity on Flickr but have resulted in some of the most significant offline real life communication and life involvement for those who know.

    The power of Flickr groups is that they allow small interest groups (that oftentimes end up transcending their own interest and purpose for existence) to turn into tightly knit communities — strangers bonding in ways that are unusual for the internet. A lot is said about how busy people are today, and people are — but at the same time people are basically bored and lonely. As connected as we are with people that we know, we thirst for more. We thirst for real interaction on the web. “Nice photo,” “wow,” “excellent composition,” are not what we are really after. We are after something deeper — something more real, authentic and meaningful. We long for connection. We thrive for real understanding and admiration. We want to belong to associations. We’ve lost touch with our churches and political parties and social clubs and even our families at times. In our isolation the web becomes our new wild, wild west. We seek connection and group association even if we do not realize it. We want to belong.

    Exploring the full potential of Flickr groups and how this structure and format can be improved upon should be a major directive of Marissa Mayer. If Yahoo cares about social networking (and they should) this is where they need to start.

    The power of Flickr groups basically comes down to one thing. The threads are super easy to read, bumped and interactive. Simplicity really is the power of groups as much as anything.

    Below is a roadmap for how to unleash the real power of Flickr groups. As part of a longer-term plan, Yahoo needs to figure out how to roll out the group framework on Flickr to every single property on Yahoo.

    1. Flickr needs more robust blocking tools. If people are going to get up in each other’s grill, they will eventually get up in each other’s grill. If groups are going to bring people to extreme levels of connection, inevitably there will be the destroyers. The basic group format allows group administrators to remove pariahs from the group experience, but this is not enough. Those in the know understand that destroying a group is largely a matter of will power. With the ability to install an unlimited army of Flickr troll accounts who can wreck havoc on a group experience, many have abandoned Flickr groups for this simple reason alone.

    Google+ and Facebook understand the need for true and complete blocking. When you block someone on Google+ they are 98% gone. The blocking action renders them invisible to you anywhere in the network. Occasionally you are puzzled when you see the mention of someone’s name in a thread and then you remember, aha, yes, you’ve blocked that person. Not so with Flickr groups. When you block someone on Flickr they are free to roam any group you are a member of and continue harassing you. This drives the most social among us away. While group administration and Flickr themselves may take action if the harassment is significant enough, this is not adequate. It is not immediate. Even if action is taken, a new troll is quickly introduced to allow the same actions (98% of the time this harassment is done anonymously).

    Allowing us control over our Flickr social experience should be the first priority for Flickr. Allowing a complete and total block should have been implemented a long time ago, before so many were driven from the Flickr group experience. If someone does not like someone for any reason whatsover, they should be equipped with a tool to remove them from their personal space — even within a group. A total block has deeper implications than simply removing unwanted harassment from your group experience. A total block introduces the threat of group membership shunning another member. This provides a powerful incentive for a group member to engage in more respectful social engagement and interaction.

    2. Flickr groups need a mobile experience. This may need to even be a stand alone application for Android and iOS. Flickr needs to introduce a simple interface that allows you to scroll and fave group photos (Instagram style with easy scrolling and tapping to fave). More significantly though they need to introduce a basic thread reader that is as simple and easy to read and respond to threads on the mobile platform as possible. At present Flickr’s mobile app cannot interact with group threads. Trying to browse group threads on the non-mobile web version of Flickr on a mobile device drives all but the most hardcore away from group threads when they are away from their computer. We are increasingly mobile, a proper addiction should follow you from your computer to your phone. Lost non-computer time reduces engagement. Engagement begets engagement in Flickr group threads and giving people 24/7 access should be a goal.

    3. Groups need better filtering tools. The goal should be engagement. Every thread in a group that will not produce engagement is noise and wasted opportunity. Allowing individuals to filter out threads that they do not care about is essential. If I do not like football, I should not have to see the “who will win the superbowl” thread in my social group over and over and over again because other group members want to talk football. This also gives group members a key tool to prevent against thread bumping abuse. Sometimes to make a point, a troll will bump one thread over and over and over again. If members have the power to simply hide that thread, it diminishes the power over the group that a troll will have.

    4. Groups need subscriptions. The most active potential users will go to more than one group. They will spend time in several. In order to get someone to return to a group though, there must be a payoff. After checking group threads and finding them inactive 10 times in a row, I will come back less and less over time. Even when a thread I care about is updated, I won’t know because by then I’ve lost interest due to low payoff. By allowing me to subscribe to threads across all Flickr groups I can be assured that if a thread I care about is updated I will see it. A page of all threads that I’m hyper interested in and care the most about will be irresistible to me. If done right, this page could become the most viewed page on all of Flickr. This page would allow faster more frequent responses to powerful group threads. Again, activity begets activity. Faster more frequent payoffs make it more difficult to walk away from the thread experience.

    Letting me build my own personalized group forum of threads that I am 100% interested and invested in across all groups on Flickr would significantly increase the chances that I would engage in threads as other activity took place. Zeroing in on the threads that I care most about would perhaps be the most powerful tool of any social network ever. Too often conversations that we care about are lost on the web forever. Bookmarking them and them bumping them based on activity has never been done by anyone that I’m aware of and would represent one of the most powerful tools in social networking ever.

    5. Groups need a significant events page. See Google+ for how to do this right.


    Thomas Hawk Digital Connection

  • In the City: Weekly Photography Challenge

    Earlier in the week we shared 49 city skyline shots in an image collection that got passed around the web quite a bit. I thought it might be good this weekend to followup with a ‘city’ themed photography challenge.

    vanishing point

    So your challenge is to shoot and share an image or two on the theme of ‘in the city’. You can shoot some skylines if you wish or can interpret the theme in any other way that you wish. Photograph people in the city, do some street photograph, concentrate on architecture, photograph a street parade or festival – whatever you wish.

    Once you’ve taken and selected the ‘city’ image that you’d like to share – upload it to your favourite photo sharing site or blog and either share a link to it or – embed them in the comments using the our new tool to do so.

    If you tag your photos on Flickr, Instagram, Twitter or other sites with Tagging tag them as #DPSCITY to help others find them. Linking back to this page might also help others know what you’re doing so that they can share in the fun.

    Also – don’t forget to check out some of the great shots posted in last weeks challenge – Water challenge where there were some great shots submitted.

    Post originally from: Digital Photography Tips.

    Check out our more Photography Tips at Photography Tips for Beginners, Portrait Photography Tips and Wedding Photography Tips.

    In the City: Weekly Photography Challenge


    Digital Photography School

  • Blogger Hangout: Building a Successful Photo Blog

    On Tuesday I did a G+ hangout on air with the community manager from Blogger at Google in Mountain View. At the last minute we were joined by photographer Patrick Smith, who brought the perspective of a more traditional photo blogger.

    It's a wide-ranging discussion (video after the jump) and we answered a variety of viewer questions. If you have any related Q's of your own, feel free to drop them in the comments afterwards. Read more »


    Strobist

  • Aspen Alley by Karen Marie

    Aspen Trees, Trembling Aspen (Populus tremuloides) are a colorful sight to the landscape in the Western mountain states.

    Their bright yellow, almost golden, colors in the fall are an exhilarating sight to see.

    These trees have always fascinated me. Colorado and Wyoming have beautiful stands of aspen trees.

    aspen-alley-by-karen-marie

    One in particular, a unique place called Aspen Alley outside of Encampment, Wyoming in the Medicine Bow National Forest. Both sides of a side road are lined with aspen trees. Taking a walk or drive amongst them is wonderful. For a photographer, the depth of field captured in a camera at Aspen Alley is incredible. A favorite aspen tree drive of mine in Colorado is near Clark in the Routt National Forest. There is a back road that curves through hills and meadows where the aspen thrive.

    A peaceful and beautiful place to photograph and capture different landscape angles of aspen trees. Having lived in both Colorado and Wyoming, my explorations are extensive. Photographing places that you have discovered while exploring new areas can be rewarding. I always kept my camera with me when taking drives throughout the mountains and back roads. And the pictures help me recall special aspects and memories of each place.

    To view a photo is almost like revisiting that place, even if only in thoughts. Aspen trees reflect a feeling of comfort to me. They are a tree I enjoy photographing the most.


    Karen Marie enjoys capturing and sharing outdoor images of adventure, inspiration, and simplicity. Specializes in western landscapes, nature, cowboy lifestyles, barns, classics, and more.

    Website: http://www.karenmarieimages.com

    dslrBlog

  • Travel Photography Inspiration Project: Peru

    Peru has an amazingly diverse geography. From deserts on the coast to lush jungle in the East and high altitude mountain environments in between, the country is wedged between the Amazon River and the Pacific Ocean in South America.

    I thank the DPS readers who submitted not only their images, but helpful tips if you should decide to travel to Peru in the future.

    This is the twelfth country we are covering in the reader fueled DPS Travel Photography Inspiration Project.

    If you would like to be involved in the next country’s post, drop me a line here.

    hillside

    Hillsides of Peru by Jeff Johnson

    Description:On the road from Cuzco to Ollantaytambo, you will find beautiful scenery.

    Tip: I took many pictures from the inside of a taxi with a fast shutter speed. This is one of them. You will find the weather changes rapidly, but frequently rains.

    peru resized 2

    Girl And Cat by Misty Neilsen

    This girl and her cat were sunbathing when I caught them.  Many of the homes are reached through narrow entrances and alleyways and it pays to take a closer look at these areas.

    Taxi

    Taxi by Bruno Santos

    Those taxi there, asked for panning photos…. Slow shutter speed (those taxis aren’t fast), the right place to be at, smooth camera movement, and a lot trial and error to get the photo.

    "Healing the Children" expedition to provide dental care in Peruvian Amazon villages

    Untitled by Sergio Burani

    The fauna is also gorgeous. You can benefit from a good telephoto lens – at least 200mm.

    2. Uros, Peru paradise

    Uros, Paradise by Patricia Reyna

    Uros Floating Islands is a group of artificial islands on Lake Titicaca, made ??of reeds. The construction of these islands is ??by weaving the reeds and forming a natural layer on which they build their homes.

    You can arrive to the place by using a boat.

    Cusco- -Machu-Pichu-(12)

    Aged beggar by Robyn Rose

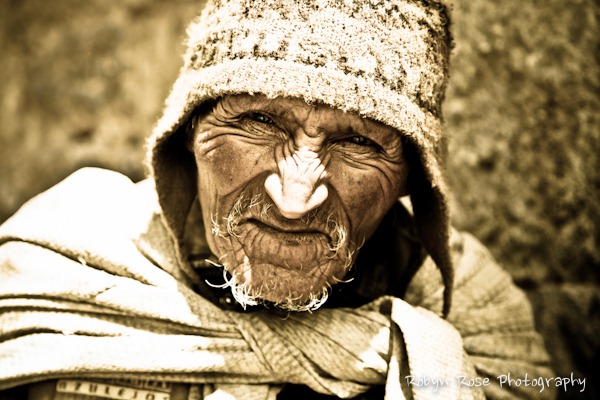
    This old man stood on a street corner in Huanchaco. He had a warm and gentle disposition. I gestured that I would like to take a photo of him and he was most obliging. I was happy to contribute some local currency for his time. TIP – Even though my Spanish is poor, with a smile and gesturing we managed to share a few minutes together and comfortably too. I am always nervous approaching strangers, as I never enjoy getting rejected. However if I smile, treat them politely and passively, then the rejection seem to hurt less! Of course the ones who allow you to take their photo seem so much more worth it after plucking up some courage to approach them and ask.

    Arequipa convent

    Arequipa Convent by Lori Sorrentino Photography

    This convent in the colonial city of Arequipa is a photographer’s paradise, and one not too many travelers seem to visit in Peru. I spent an entire day in the convent, the size of a large city block, and could have spent more! It’s well worth the trip and traveling the 8 hours or so by bus to get there from Puno and Lake Titicaca.

    posing_llama

    Posing Llama by Jeff Johnson

    Description: While in Machu Picchu, nearly ten llamas surprised us as they appeared from around a corner. This particular one was not camera-shy.

    Tip: While atop Machu Picchu, it’s suggested that you have one lens that can zoom from 18mm to at least 250mm. Without such a luxury of a single multi-purpose lens, I was challenged with having to swap lenses frequently.

    peru resized 5

    Untitled by Misty Neilsen

    While waiting for THE Machu Picchu photo, I decided that the partially fog covered shot was more interesting than the clear shot…and I still think so.

    Coca Tea

    Coca Tea by Bruno Santos

    The traditional tea, served at the home stay.

    "Healing the Children" expefition to provide dental care in Peruvian Amazon villages

    Untitled by Sergio Burani

    The children are beautiful. This little girl is playing “mother” to her brother. People are very available to being photographed, especially children. They expect a little money.

    4. Playing the Pututo

    Playing the Pututo by Patricia Reyna

    This man of the Taquile island is playing a Pututo, an instrument made ??of seashells, which was used by the Quechua-speaking peoples in ancient times to call meetings or make announcements of something.

    Taquile island is in the Titicaca Lake, and hundreds of tourists from all around the world visit this beautiful and interesting place.

    Cusco   Machu Pichu (149)

    Machu Pichu Security by Robyn Rose

    These guards watch over and protect the sacred ground of Machu Pichu. The Wayna pichu looms overhead. TIP – To give a sense of the mist and clouds that were descending  all around us I converted to black and white.

    Camera fun

    Camera Fun by Lori Sorrentino Photography

    The highlight of my trip was a homestay visit to the island of Amantani (Machu Picchu was great but this has it beat!). If you join a small tour from Puno, you can stay overnight with a local indigenous family and spend time learning about their culture. Part of our stay included a tour of their school. I met several of the young children who were so fascinated by my point-and-shoot camera. So I handed it to them and they had a ball taking photos of themselves with the reversing LED screen. Two of these little girls belonged to the family we stayed with, and these photos they took of themselves making faces and laughing at themselves are some of the most dear to me.

    proud_boy

    Proud Boy by Jeff Johnson

    Description: In the city of Ollantaytambo, this hard-working young boy was spotted working away.

    Tip: This photo was taken with a Canon Rebel T3 with the stock lens in the kit. I used the “Creative Auto” setting. While in Peru, explore the ruins of the mountain Pinkuylluna.

    Feeding the Lama

    Feeding the Lama by Bruno Santos

    At the home stay in Ccaccallo, near Cusco, we had contact with some Lamas.

    Tip: Making the Inca Trail is a must do in Peru. It’s hard, yes, but you can do it at your speed and arriving at Machu Pichu is a rewarding victory. But you have to be lucky do don’t get rain, cause the tropical forest is tricky.

    Cusco   Machu Pichu (24)

    View of Peru by Robyn Rose

    The view from the Sacsayhuaman ruins. The high altitude and the ever changing cumulonimbus clouds create for dramatic photographs. TIP – I boosted contrast and used a graduated filter in Lightroom to darken the clouds and create a more ‘moody’ shot.

    Hiking Huanya Picchu

    Hiking Huayna Picchu by Lori Sorrentino Photography

    We decided to hike the giant mountain you see in the background of all the shots of Machu Picchu, called Huayna or Wayna Picchu. The mountain is another 1000 ft higher and is not for the faint of heart, but is definitely worth it to get a different perspective looking down on the Machu Picchu site. Take a wide lens for the best images to capture the immense and wide never ending views!

    Cusco   Machu Pichu (23)

    City trawlers by Robyn Rose

    These women and their alpacas roam the cobbled streets of Cusco trying to make a buck posing for photographs. The police are constantly chasing them away. TIP – This was taken in mid day where the light was harsh and created harsh shadows. I used a 480 EC Canon flash to create a more even light across the shot as well as desaturated the colours using Lightroom in order to induce a more uniformed look.

    Cuzco woman

    Cuzco Woman by Lori Sorrentino Photography

    This is my favorite photo I took in Peru. This woman sat at the top of this hill at the base of the Christo Blanco (White Jesus) statue overlooking Cuzco, and was so gracious in letting me photograph her. The expression on her face is so intriguing and calm, as if she’s lived a thousand lifetimes.

    Lastly, here’s my take of Machu Picchu as a time lapse as the morning clouds burned off:

    Post originally from: Digital Photography Tips.

    Check out our more Photography Tips at Photography Tips for Beginners, Portrait Photography Tips and Wedding Photography Tips.

    Travel Photography Inspiration Project: Peru


    Digital Photography School

  • BTS: Martin Schoeller Photographs Ryan Lochte

    Photo ©Martin Schoeller

    Martin Schoeller is one of my favorite photographers, and it so cool to see a BTS video of the Time cover above with a few nice layers of technical info included.

    Video and links after the jump. Read more »


    Strobist

  • Is Geotagging Images a Dying Trend? POLL RESULTS

    It wasn’t long ago that when experts were asked about what the next big thing in photography would be that ‘geotagging’ images was the commonly heard answer. We have seen more cameras released with geotagging capabilities and a lot of post processing software being released with it built in – but is anyone geotagging their images?

    We decided to ask our readers if they’ve ever geotagged an image and here’s what they said (based upon 17,478 responses).

    Screen Shot 2012-07-27 at 3.48.23 PM.png

    So 72% of our readers have never Geotagged an image and a further 2% have done it in the past but no longer do.

    Of course this might not be too bad for Geotagging – after all its a relatively new thing isn’t it?

    Here’s where it gets interesting – we ran exactly the same poll just over 3 years ago – back in 2009 – when Geotagging was much newer and where it was more difficult to do (in fact many of our readers back then were doing it quite manually). So what were the results back in 2009?

    Screen Shot 2012-07-27 at 3.54.14 PM.jpg

    That’s right – back then 35% of our readers said that they either geotagged all the time or some of the time (as opposed to 26% today).65% didn’t geotag any more as opposed to 74% today.

    Now these are not scientific results by any means and our readership has grown and changed a fair bit since 2009 – however I find it interesting that despite there being more tools available to geotag images that our readership is doing it less than they did 3 years ago.

    Post originally from: Digital Photography Tips.

    Check out our more Photography Tips at Photography Tips for Beginners, Portrait Photography Tips and Wedding Photography Tips.

    Is Geotagging Images a Dying Trend? POLL RESULTS


    Digital Photography School

  • 3 Tips for Shooting Portraits in Bright Sunshine

    Fill Flash with the Sun Behind the Subject Creates Nice Backlighting but a Well Lit Face (the hat helped shade the face too) – Image by Cayusa

    It’s a bright sunny day and you’re out with friends making the most of the good weather. You decide to take your camera – after all what better day to shoot some portraits of your friends than a sunny day – bright light = great shots doesn’t it?

    Unfortunately lots of light doesn’t always equal great shots – in fact sometimes when you’re shooting portraits in bright sunshine you can run into real problems.

    For starters shooting in bright midday sun where light is coming from directly above is going to mean that your subject can have some pretty heavy shadows cast on parts of their face.

    Not only that, if you’ve ever posed for someone taking a picture in bright sunlight you’ll know just how difficult it can sometimes be to look natural and not end up looking like you’re grimacing in pain while you squint to keep the sun out of your eyes.

    So what’s one to do?

    Here’s three simple tips for shooting portraits in bright sun light. I’ve kept them pretty basic for those of you who are out and about and don’t want to haul an outdoor studio along with you!

    1. Fill Flash

    It seems a little odd switching the flash on in bright sunlight but it’s one of the best times to do it. Those heavy shadows cast on your subjects face (particularly under the eyes) by the midday sun can be a thing of the past with a little extra light from your camera’s popup flash.

    Many cameras will allow you to control the intensity of the flash output with their flash compensation function so don’t be satisfied with your first shot – dial it up or back a little once you’ve taken a first test shot until you get a nice natural light.

    Shot in open shade and using a reflector – Image by christianyves

    The bonus of using a little fill flash is that it will often darken your background a little which can give your shot a little more punch and make your subject stand out a little from their background. Fill flash will also create a little catchlight in the eyes of your subject, giving their eyes that little extra sparkle!

    Sometimes using fill flash will also allow you to shoot with the sun behind your subject – this means their face has no direct sunlight on them but that they have a little back light falling upon their hair and shoulders which can create a nice impact.

    2. Shoot in the Shade

    Another easy way to stop the shadows on the face of your subject is to simple move them (and yourself) into a much bigger shadow and to shoot in the shade.

    The key is to find a spot where they’re not in the dark but have a nice even light falling on them. So avoid dappled light under some trees a tree or you’ll get spots on their face but go for something with a nice even coverage.

    If you’re going for a tight head shot you might even be able to get away with having someone hold up an umbrella or some other object to create some shade over their face (as long as the other person is out of shot).

    3. Find a Reflector

    A combination of shooting in shade and using a reflector gives this portrait an even lighting – Image by JesseBarker

    It’s unlikely that you’ll be hauling a proper reflector around with you (although I know some dPS readers always travel with a small foldable reflector in their camera bag) but that doesn’t mean you can’t use the same principle to bounce a little light into the face of your subject to help light up some of those shadowy areas.

    Pretty much any white (or light) surface can act as a reflector of light and held at the right angle you can use it give your subject a little extra light.

    One photographer we talked to a while back swore by always wearing a white t-shirt for this but you could get a similar result by positioning your subject by a white wall or positioning many white objects just out of frame to reflect light. I’ve even seen one photographer friend take aluminium foil from a picnic and using it to help make a reflector (although it did create a little ‘dappled’ light on his subject.

    Bonus Tip: Get Creative

    Once you’ve taken a few nice portraits with the above tips, why not try a few experiments and use the bright light to see if you can inject a little creativity into your shots. You might just take one with the WOW factor. For try creating some lens flare by shooting into the sun (just be careful not to burn your eyes looking directly into it). Alternatively you might try some silhouette shots for portraits with a little mystery and drama.

    What other tips would you give someone looking to shoot portraits in bright sunlight?

    Post originally from: Digital Photography Tips.

    Check out our more Photography Tips at Photography Tips for Beginners, Portrait Photography Tips and Wedding Photography Tips.

    3 Tips for Shooting Portraits in Bright Sunshine


    Digital Photography School

  • Snettisham Spectacular by Charles Fennell

    charles-fennell-snettisham-1

    © Charles Fennell

    It’s 6 am on a very cold October morning in North Norfolk and a hundred people are walking in single file along a narrow path between the beachfront holiday homes and a large pond. Some are experienced birders or photographers, carrying long lenses and expensive binoculars. Others are tourists enjoying a holiday before the winter. Volunteer wardens from the Royal Society for the Protection of Birds are on hand to steer people towards the best places when they finally arrive at the beach, and they are unusually excited.

    This is Snettisham, a small village on the edge of The Wash, a vast flat estuary on the east coast of England made up of shifting sand and mud banks, where in 1216 King John lost England’s crown jewels when he and his knights were cut off by the tide and had to abandon their baggage.

    charles-fennell-snettisham-2

    © Charles Fennell

    The estuary is now home to huge colonies of wading birds, such as the oystercatcher and the knot. At the very highest tides of the year, all of the banks on which they roost offshore are submerged. It’s the “Snettisham Spectacular”, when 50,000 or more circle above the sands as the tide covers them.

    It’s a perfect location for wildlife photographers at any level of experience and with any sort of equipment. The kit lens that comes with the cheapest DSLR is enough to capture the shape of the birds in the air; a long lens can pick out individuals.

    charles-fennell-snettisham-3

    © Charles Fennell

    At first, nothing happens. The sea is at least a mile away, and as the deep channels fill up , there is only a lone egret looking for something to eat. The people watching are starting to make conversation. Many of them have never seen oystercatchers before. Then the display starts, slowly at first, but then for fifteen or twenty minutes there is the unique sound of thousands of small birds flying together, creating a vast shifting airborne shape.

    Then it’s over as quickly as it started: almost in unison the last few thousand fly over the heads of the spectators and disappear. It’s 9 am, the sun is up, and the spectators wander back to the carpark, knowing that they’ve seen something quite unique.


    Charles Fennell is a wildlife and landscape photographer in Yorkshire

    dslrBlog