Category: Photography

  • CLC Patuxent 19.5 Stitch-and-Glue Kayak


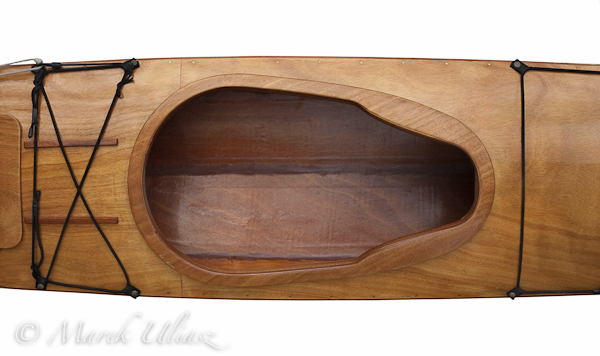
    cockpit and deck of wooden sea kayak

    July 11, 2009. A keyhole cockpit of the Patuxent 19.5 kayak – a plywood stitch-and-glue boat from Cheasapeke Light Craft. Camera: Canon EOS 40D with Canon EF-S 17-55mm f/2.8 IS USM lens.

    I built Patuxent in my garage from a kit in 2009. The choice of a fast kayak was not dictated by my racing interest, but rather by a photography. I just needed a fast way to reach my shooting destinations. Racing came later. I paddled Patuxent on San Marcos and Guadelupe rivers in 2001 in my first training for the Texas Water Safari, but run the race in Spencer Xtreme canoe. The only race done in the Patuxent was the Colorado River Race in the upper Glenwood Canyon. I still paddle the Patuxent kayak mostly in a recreation and photography mode.

    This picture is available for licensing as a royalty free image from my stock photography portfolio.

    Related post:
    Paddling with Canon PowerShot G11 Camera on a Monopod Mast
    My First Paddling on the South Platte River near Greeley


    paddling with a camera

  • Top 10 WordPress Photography Themes To Rock Your World

    Photographs and images – these are the powerful bullets you can send out into the world to get its attention. But what good are bullets if you do not have the appropriate device to fire them? Simply tossing them won’t do the trick; you will need a formidable gun with the right attributes – WordPress and its amazing selections of photography themes. Check out the following top 10 WordPress photography themes that will rock your world!

    wordpress photography themes

    1.    Photocrati

    This theme seems to be the crowd’s favorite, and with its 15 various styles and four home page designs which allow for maximum flexibility minus the need for coding, it is rightly so. Aside from its amazing selections of designs to choose from, Photocrati also comes with its very own e-commerce image galleries. With this theme, displaying AND selling your photos online cannot be any easier!

    2.     Viewfinder

    This timeless theme allows your works of art to take center stage with its classy design. Viewfinder comes in two different styles (light or dark) and offers the option to add countless galleries. With the wide scope of choices, you can set up your online presence as it suits you.

    3.     Deep Focus

    Looking to turn your WordPress blog into a completely operational online image gallery while still upholding all of the characteristics of a normal blog? Then this theme might just be what you are looking for. DeepFocus is a polished portfolio theme that expands on iPhoto, gallery, and other previous gallery themes. With a gallery layout, a blog, and a CMS-style homepage, this could be the answer to the prayers uttered by photographers and artists hoping to wow the online realm with their creative presence. You will also be happy to know that cropping of photos on post pages is no longer necessary, thus, you can make use of landscape and portrait images.

    4.     Style

    The name says it all! This theme, while far from being minimal, gives a clean feel to the overall design with its nicely spaced out elements. Style ingeniously manipulates white and dark spaces combined with elegant typography to give creative individuals a highly clean (yet stylish) web presence.

    5.     Evolution

    Evolution is a totally responsive design and has the extraordinary capability of adapting to different screen sizes. With this theme, which comes in 4 unique layouts, your browsers can admire your site on handy mobile phones and tablets without having to zoom and scroll. The layout of the theme automatically adapts to the smaller screen and dish up your content accordingly. Evolution not only serves the purpose of showcasing your portfolio, it also acts to widen your audience reach.

    6.     Work

    Work can give you a helping hand with building your portfolio through its abundant built-in page templates capable of creating up to four column gallery layouts. Whether you want to showcase illustrations or photographs, this theme can give you a creative boost.

    7.     Boxed 

    Boxed is a sophisticated and responsive full background portfolio theme designed to aid you in producing a tasteful theme, which makes use of a distinctive left-sided navigation but still keeps the site in the browser’s center. It gives you the option of choosing a full-screen background image slider to show different images on a page or a normal static image instead. No matter which option you go for, you can never go wrong with the clean and modern design of the Boxed theme.

    8.     Exposure

    Heaps and heaps of exposure is what you will get with this theme. With its tons of features, user-friendly unbranded Options Panel, and superb documentation, showing off your work with Exposure can be a breeze!

    9.     Picture This

    A full screen theme that abides by a minimalistic and unique concept – this is the perfect description of PictureThis. It boasts of a full screen image slideshow, a plethora of color choices, cutting-edge portfolio options, countless sidebars, and 3 custom widgets. With all these fantastic features and pleasing aesthetics, PictureThis is ideal for budding artists out to make a lasting impression.

    10.    Done

    With its highly customizable features and multipurpose benefits, Done can surely cater to several types of business or private portfolios and blogs. You never have to worry about getting the job done with this theme!

    There are heaps of WordPress photography themes out there, but you should start with these top 10. Let your needs and preferences guide you, and choose the theme that will set the online world on fire!

    Sunny Popali is SEO Director at http://tempocreative.com, an Arizona Marketing firm specializing in digital and internet marketing services including web design, SEO, social media and strategy.

    dslrBlog

  • Along The Quiet Water by Paul Chong

    Forest-Wildflower

    © Paul Chong

    A morning walk along the lakeside of HangZhou can be a wonderful and refreshing experience especially on a cool and beautiful day. It is surrounded by breathtaking scenery of emerald hills, woodland, rivers and colorful wildflowers while beautiful sounds of birds can be heard chirping by the tree top. Along the lakeshore, gentle wind blow against the willow trees creating a welcoming and pleasant environment for a leisure walk along the promenade. Many local folk likes to gather by the open spaces for daily exercise, chinese tai chi, fan dancing and socializing. While families would enjoy their day by taking their time out for a camp and picnic over the weekend to take a rest from their busy day. Visitors who enjoy tea can have a wonderful and relaxing time along the lakeside while sipping over a cup of local Chinese tea.

    West-Lake-Landscape

    © Paul Chong

    Along the quiet water, boats can be seen floating on the peaceful lake as if resting over a giant mirror of still reflection, projecting a calm and relaxing ambiance. There is an old saying by the chinese, “There is heaven above, Suzhou and HangZhou below”, it is a statement to declare the indescribable beauty that can only be found in HangZhou West Lake. Throughout the year and in every season, people could enjoy while appreciating the changing landscape and colors from spring to fall.

    Woodland-Landscape

    © Paul Chong

    The lake itself is also characterized as a series of picturesque landscape to explore. It is divided by different causeway such as Su Ti, Bai Ti and YangGong Ti. Along the lakeshore, there are many pagodas, gardens, temples, sculpture and artificial island bearing some of the uniqueness Chinese culture since ancient history. This is also one reason which makes the West Lake a great place for many tourists to come and discover the beauty of its’ culture and heritage.

    Paul Chong enjoy travelling and capturing the beauty of nature. Specialist in China Landscape Fine Art Photography

    Website: www.paulchong.photoshelter.com

    dslrBlog

  • Photo Contests – Is that a contest or Rights Grab?

    A Guest Post by Dale Wilson

    Photo Contest

    Photo contests have been around since the days when chemistry was first introduced to develop light sensitive cellulose – in other words, since before photography became a popular hobby in the 1930’s.

    What has changed, however, is the intended flavour of the contest. It wasn’t long ago the photo contest was a vehicle that promoted the pleasurable pursuit of photography as a hobby and rewarded excellence in craft.

    However, in the past decade, photo contests have more often than not become a rights grab by preying on unsuspecting entrants who have absolutely no idea what all the legal talk translates too. For example, the following text is copied from a recently announced contest by an internationally recognized environmental NGO that I have supported for years. Its rules read, in part:

    By entering (reference to contest deleted) the contest, you retain the rights to your works while granting XXXX (sponsors name deleted) the unrestricted, royalty-free, perpetual right to use, reproduce, communicate, modify and display the works (in whole or in part) for any purpose without any fee or other form of compensation, and without further notification or permission.

    By participating in this contest, you release and agree to indemnify and hold harmless XXXXX(reference to contest deleted) and its employees, directors, officers, affiliates, agents, judges and advertising and promotional agencies from any and all damages, injuries, claims, causes of actions, or losses of any kind resulting from your participation in this contest or receipt or use of any prize.

    So, what does all this mumbo-jumbo mean and how does it relate to the photographer who wants to have some fun with their pictures?

    First, because the contest sponsors are using a lot of legal jargon, it behoves the photographer to understand some of the terms. But first, let’s do a very quick primer on photography and copyright. As a preface let me first say this is NOT LEGAL ADVICE, but opinion based on more than 20 years as a professional photographer who has had to learn Copyright legislation by default.

    In most free countries of the world, the moment you release the shutter on a camera the image is by default copyrighted in your name as the author of the work. There are a few exceptions, but as an amateur they probably don’t apply. As the owner of copyright, only you have the right to authorize reproduction of that photograph. Furthermore, you also have the right to have your name associated with the work in what is known as moral rights. Refer to the copyright legislation in your country, but for the most part this should hold true for countries subscribing to the Berne Convention.

    With that out of the way, let’s get this in context. First, don’t be swooned by having your name appear in print – by law, in most cases, the publisher is compelled to identify you as the photographer under the Moral Rights conditions of the Act. That is the easy one.

    What does Royalty Free mean? RF is a picture reproduction term which means the publisher is only compelled to honour you with a ‘reward’ just once. When they add all these other terms be aware that you could very well be providing them the authorization to re-sell your picture, or allow any company of their choosing, to use your picture without any further reward (royalty) coming back to you. The clause of “Royalty Free in Perpetuity” in all likelihood means the sponsor will be gaining something tangible from the use of your free source photo for many, many years into the future. This, in my opinion, is wrong and these contests should be avoided at all costs.

    What does “Forever hold harmless and Indemnify” mean? This is the one clause that should send the largest red flag waving from the highest yardarm you have ever seen. Avoid at all costs, as it has potential to cost you more than anything you have ever owned, or will own.

    Basically, by giving the sponsor the right in perpetuity to do whatever they wish with your picture you are saying they can use the image in any way they might decide without ever having to consult you prior to that use. In reality the sponsor could potentially sell that image of your neighbour’s young teen (even though you had permission to take the photograph) to a condom manufacturer for advertising purposes without you ever knowing. Your neighbour eventually sees the image, and rightfully flies off the handle and sues.

    The publisher says “Not our problem” the photographer indemnified us from any and all claims. Ultimately you have absolutely no say in how the image is used, yet you assume any and all liability. Yes, you are giving the sponsor the right to sell that photo as a stock image so they can earn an income for their cause, and you have provided them the authority to do so just by entering a well intended photo contest for fun – regardless if you are a winner, or not!

    Only you can decide whether you wish to enter a contest that demands indemnity against any and all claims. I can only say to you: I never would; it really is that plain and simple.

    Before you enter that contest, read the entry rules, and, even more importantly, understand without reservation exactly what you are agreeing to merely by entering an image in the contest. Unfortunately, photo contests really have become the messenger for the time worn saying “the devil is in the details.”

    Incidentally, I no longer offer visual or financial support to the NGO whose contest rules I have adapted for this entry. Common logic would suggest a sponsor should have the right to reproduce winning and honourable mention photos for the purpose of promoting future contests.

    Once you understand the contest rules, ask yourself: Is this a bona fide contest that promotes and rewards excellence in my hobby, or is this a rights grab with a devil that may come back to haunt me?

    See more of Dale Wilson’s work at his website.

    Post originally from: Digital Photography Tips.

    Check out our more Photography Tips at Photography Tips for Beginners, Portrait Photography Tips and Wedding Photography Tips.

    Photo Contests – Is that a contest or Rights Grab?


    Digital Photography School

  • Texture: Weekly Photography Challenge

    Claire Woollam Leaf.JPGThis week your challenge is to take and share an image with the theme of Texture.

    To participate check out our post this week with 8 ideas for creating great Texture shots and pick one of them (or choose one of your own) and get out there looking to capture some interesting textures in your photography in the next few days.

    Once you’ve taken and selected the ‘Texture’ image that you’d like to share – upload it to your favourite photo sharing site or blog and either share a link to it or – embed them in the comments using our embed tool to do so.

    If you tag your photos on Flickr, Instagram, Twitter or other sites with Tagging tag them as #DPSTEXTURE to help others find them. Linking back to this page might also help others know what you’re doing so that they can share in the fun.

    Also – don’t forget to check out some of the great shots posted in last weeks challenge – Candid Portraits challenge where there were some great shots submitted.

    Post originally from: Digital Photography Tips.

    Check out our more Photography Tips at Photography Tips for Beginners, Portrait Photography Tips and Wedding Photography Tips.

    Texture: Weekly Photography Challenge


    Digital Photography School

  • Catching High Water on the South Platte River


    s-platte-packraft

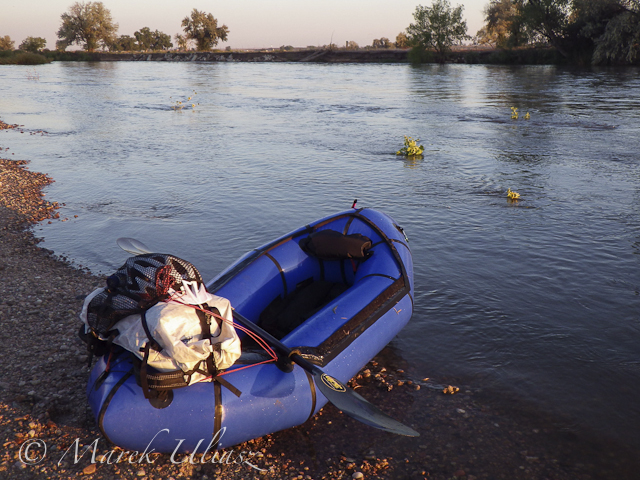
    September 13, 2012. Alpacka Yukon packraft on the South Platte River between Kersey and Kuner. Camera: Pentax Optio WG2

    A couple days of rain increased water level in the South Platte River from around 100 cfs during dry summer to 2000 cfs at Kersey. I managed to catch the high water wave in this late afternoon bike-packraft trip: Kuner-Kersey-Kuner.

    Related posts and more pictures:
    Wildcat Mound Run – the South Platte River by Bike and Packraft
    Biking and Packrafting – A Selfsupported Classic Run on the South Platte River near Greeley
    Inline Skating and Packrafting – Road and River Test on the South Platte
    South Platte River below Denver, Colorado
    GPS/photo river guide


    paddling with a camera

  • Output from Lightroom to Your Blog

    Lightroom print image with border opener

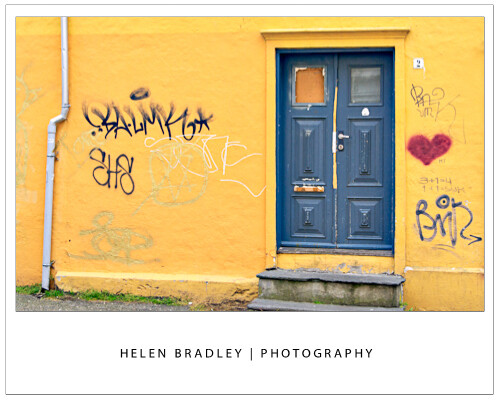
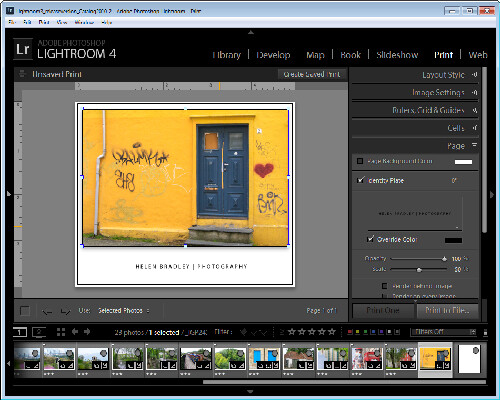
    I use Lightroom to prepare the images ready to upload to my blogs so it’s critical that I can get them out of Lightroom all ready to upload without having to do any more work on them. On one blog I use framed images and therein lies a problem – the images need a thin keyline around them so you can see the edge. Without an edge the image would just blend into the surrounding white background of the blog page.

    So, here’s how to create a frame effect in Lightroom – the images will be sized for the web with the appropriate resolution, they will have a frame around them, together with my name, and they will have a keyline around the image and around the page itself. And, to finish, it will all be saved as a reusable template.

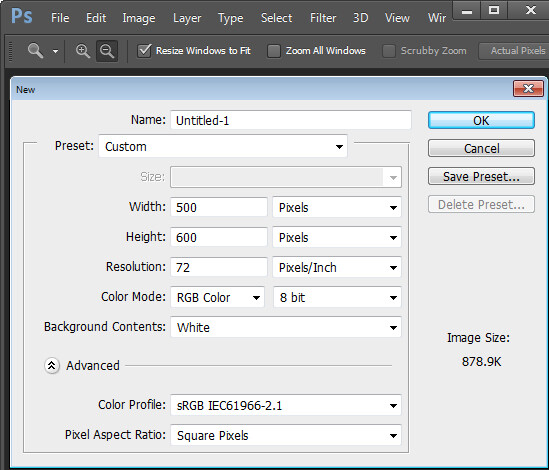
    Start outside Lightroom in any graphics or photo-editing program and create an image 500 x 600 pixels in size and filled with white. Save it as a jpeg format image and import it into Lightroom – place it somewhere easy to find.

    Lightroom print image with border 1

    Then, in Lightroom place the images for the blog post into a collection and add the empty image you just created to the same collection. For convenience I use a single collection for the images destined for my blog – it makes them easier to find and it simplifies the output process.

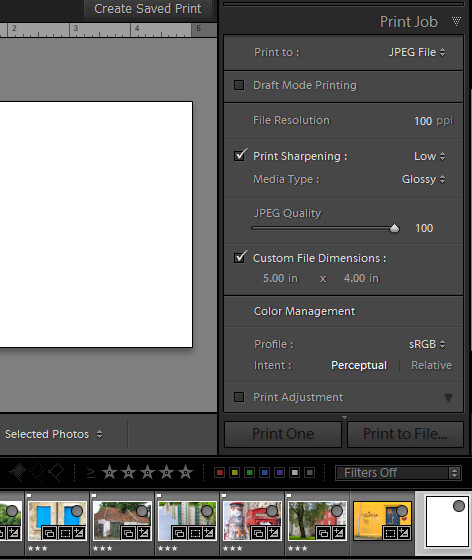
    Switch to the Print module and select the collection. To configure the document size, from the Layout Style panel select Custom Package and from the Print Job panel set Print To to read JPEG file. Set the File Resolution to 100 ppi and select the Custom File Dimensions to 5 in x 4 in to make a landscape orientation image which will ultimately be created as a 500 x 400 pixel image. Set Color Management Profile to sRGB.

    Lightroom print image with border 2

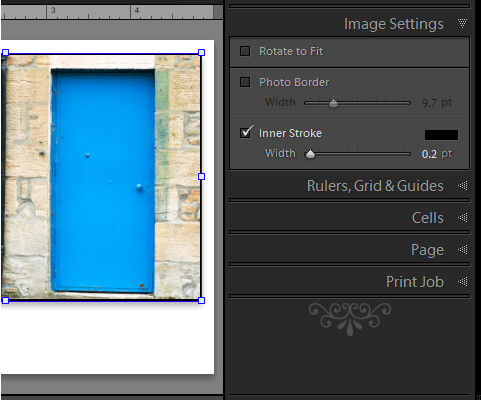
    Now, drag and drop the first image into the work area and size it to suit. Choose Image Settings > Inner Stroke and then set the width to 0.2 pt black line. This will appear around the image.

    Lightroom print image with border 3

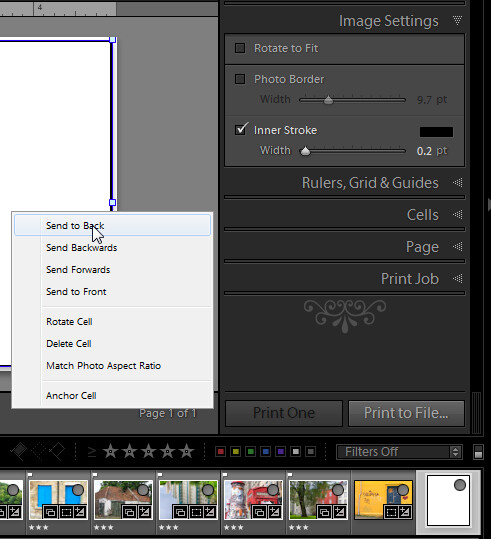
    Now drag the empty white image into an empty place in the work area and then size it to just smaller than the size of the work area. It will automatically have a line around it – the Inner Stroke setting is applied to all the images. To place this image behind the first image, right click it and choose Send to Back.

    Lightroom print image with border 4

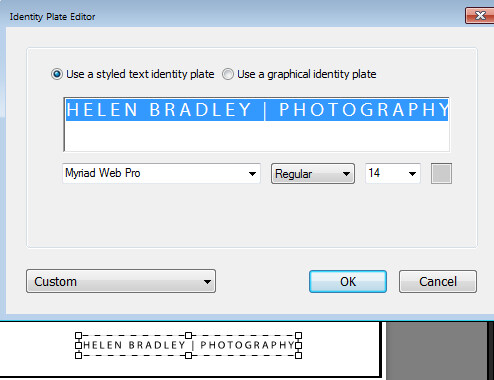
    The text is added using an Identity Plate. To make one, click the Page panel and enable the Identity Plate checkbox. Click the small triangle in the Identity Plate box and click Edit and then click Use a styled text identity plate. Type the Identity Plate text – for example, mine reads Helen Bradley | Photography – select and format it as desired. Click the Custom button, click Save As and type a name for it, click Save and then Ok to add it. Move it into position and size it to suit.

    Lightroom print image with border 5

    When you’re done click Print to File to print the image.

    Lightroom print image with border 6

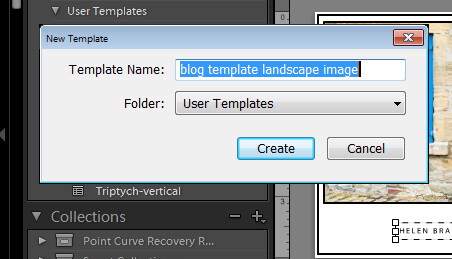
    To save the design as a template you can use over and over again, click the + opposite Template Browser in the left panel. Type a name for the template.

    Lightroom print image with border 7

    In future you can select this template and use it to print another image. Before you do so, you will need to drag and drop an image into the image placeholder and add the empty image to the larger placeholder. If you want to be able to print portrait orientation images, repeat the process to create a second template – you can reuse the empty image and the Identity Plate.

    Lightroom print image with border 8

    Post originally from: Digital Photography Tips.

    Check out our more Photography Tips at Photography Tips for Beginners, Portrait Photography Tips and Wedding Photography Tips.

    Output from Lightroom to Your Blog


    Digital Photography School

  • Panasonic Lumix DMC-GF5

    The G5 slid out of the review basket just as this baby fell in!

    Talk about comparing apples with oranges. More like comparing melons with mandarins. Or, sizewise, potatoes with peas.

    Panasonic Lumix DMC GF5 front

    Panasonic Lumix DMC GF5 angled

    Panasonic Lumix DMC GF5 side

    Panasonic Lumix DMC GF5 side 2

    Incredibly tiny, even for a mirrorless digicam, the review DMC-GF5 came equipped with the same lens as the review G5: the Lumix G Vario f3.5-5.6/14-42mm pancake lens, a lens that I came quite to like over the few days that I used it, notwithstanding its not-so-wide end of 28mm as a DSLR equivalent.

    Panasonic Lumix DMC-GF5 Features

    Using the Micro Four Thirds System, the CMOS sensor can capture a maximum image size of 4000×3000 pixels, or 34x25cm as a print. Effective pixel count: 12.1 million.

    Movies: again, like the G5, this one can take Full HD 1920×1080 video with 1920×1080 pixel resolution in either AVCHD or MPEG: the latter has many followers who indulge in post production. You can shoot video and capture stills at the same time without interrupting the movie’s flow.

    Menu 1

    Menu 2

    Menu 3

    The 7.6 cm LCD is the same size but does not swing out, up or down. A pity. But the $ $ saving is significant.

    External controls are minimal: top deck has the shutter button, power on/off, video record, Intelligent Auto; rear has the four way control dial (white balance, burst shooting, exposure correction, AF area); plus replay, display options, Q menu/trash. And that’s about all. Unlike the G5, I found it quite easy to get around in my early hours with the camera.

    The Contrast AF system is quite fast and, via the touch screen, quite accurate. Once you get used to it.

    I missed the on-body zoom lever. Ho hum, guess I’ll have to make do with the lens-mounted lever, set just above the lens’ manual focus. But having said that, I discovered that when you shut the power down, the lens retracts. And … you can drive the zoom via the touch screen.

    Continuous shooting is on tap: 4 fps at full size, or two other speeds: 2 and 3 fps.

    As with the G5, the Scene Guide helper has 23 sample pro quality pictures to help you choose the one closest to your current needs: the settings will be made automatically by the camera.

    In Creative Control mode there are now 14 filters: soft focus, monochrome, art, etc. Each is adjustable. Additionally, in iA or iA Plus modes there are recommendations as to what filters to use.

    To my mind these features make the GF5 an excellent camera for the photo beginner.

    I have to admit that, at first, I had a little difficulty in wrangling the various ISO settings for my ISO Tests and, I never thought I would say this, the touch screen came to the rescue: made it dead easy!

    A level gauge detects the horizontal/vertical angle of view while shooting and shows this on-screen, as well as indicating a camera tilt forwards or back.

    Panasonic Lumix DMC-GF5 ISO Tests

    Panasonic DMC GF5 ISO 160

    Panasonic DMC GF5 ISO 400

    Panasonic DMC GF5 ISO 800

    Panasonic DMC GF5 ISO 1600

    Panasonic DMC GF5 ISO 3200

    Panasonic DMC GF5 ISO 6400

    Panasonic DMC GF5 ISO 12800

    I figure you could (just about) use ISO 6400 if you had to! But avoid ISO 12800! I’m sure this spec is in the camera just to please the marketting people!

    Trimmer ISO 800

    Trimmer ISO 12800

    Then, by chance I shot this lawn trimmer at ISO 12800. Wow! The noise.

    Compare it to the same shot taken at ISO 800.

    Cactus 2.JPG Statue.JPG

    Panasonic Lumix DMC-GF5 Verdict

    Quality: Excellent quality, far above many fixed lens compacts.

    Why buy it: if you can make do with just 12.1 megapixels of capture, this is a great camera.

    Why not: too simple for some.

    An excellent starter camera.

    Panasonic Lumix DMC-GF5 Specifications

    Image Sensor: 12.1 million effective pixels.
    Metering: Multiple, centre-weighted and spot.
    Effective Sensor Size: Four thirds 17.3×13.0mm CMOS.
    Lens Factor: 2x.
    Compatible lenses: Micro Four Thirds.
    Exposure Modes: Auto, Program AE, shutter and aperture priority, manual.
    Shutter Speed: Bulb, 60 to 1/4000 second.
    Burst Speed: 4, 3, 2 fps.
    Memory: SD/SDHC/SDXC cards.
    Image Sizes (pixels): 4000×3000 to 1440×1440. Movies: 1920×1080, 1280x720p, 640×480, 320×240.
    Viewfinders: 7.6cm LCD screen (920,000 pixels).
    File Formats: JPEG, RAW, AVCHD/MPEG4, MPO (3D).
    Colour Space: Adobe RGB, sRGB.
    ISO Sensitivity: Auto, 160 to 12800.
    Interface: USB 2.0, AV, HDMI mini, DC input.
    Power: Rechargeable lithium ion battery, AC adaptor.
    Dimensions: 108x67x37 WHDmm.
    Weight: Approx. 267g (inc battery).
    Prices: Get a price on the Panasonic DMC-GF5KK DMC-GF5 or Panasonic Lumix DMC-GF5 with 14-42 Power Zoom Lens.

    Post originally from: Digital Photography Tips.

    Check out our more Photography Tips at Photography Tips for Beginners, Portrait Photography Tips and Wedding Photography Tips.

    Panasonic Lumix DMC-GF5


    Digital Photography School
  • The New Canon EOS 6D – Welcome to the Full-Frame Club!

    Rejoice, Canon fans, for we have a new Canon EOS 6D coming. Preorders are already available at Adorama, Amazon and B&H Photo at the price of $ 2099 for body only, $ 2899 for kit with EF24-105mm f4L IS USM Lens. While technical specs have already spread all over the internet, we know that it would be a full-frame mid-size DSLR with Continue Reading
    Photodoto

  • Evening with WSBS Thunderbolt Kayak on Beaver Pond


    WSBS Thunderbolt kayak

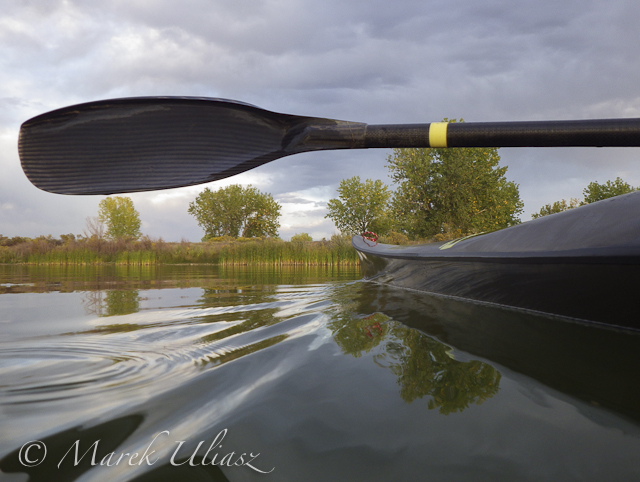
    September 16, 2012. 1 hour evening paddling with WSBS Thunderbolt-X kayak on the Beaver Pond in Arapaho Bend Natural Area near Fort Collins. Camera: Pentax Optio WG2

    Related posts:
    3 Pictures from My Paddling Pond in Fall Colors
    7 Pictures from Fall Paddling in Colorado Featuring Thunderbolt Kayak


    paddling with a camera