Category: Photography

  • How to Create a Winter Wonderland Holiday Photo

    There is so much to photograph during the holidays from religious symbols, to beautiful outdoor lighting displays, a well decorated tree, and the gathering of family and friends. You might already photograph and print your own holiday cards or a personal calendar, and each year you might be thinking of new and unique ideas for next year’s images.

    With the holidays soon over and all those displays being packed away until next year, many Christmas trees will soon be recycled. But before you recycle your tree, consider using it for a unique photography opportunity: an illuminated Christmas tree in an outdoor setting. It could be that new and unique photo for next year’s holiday card!
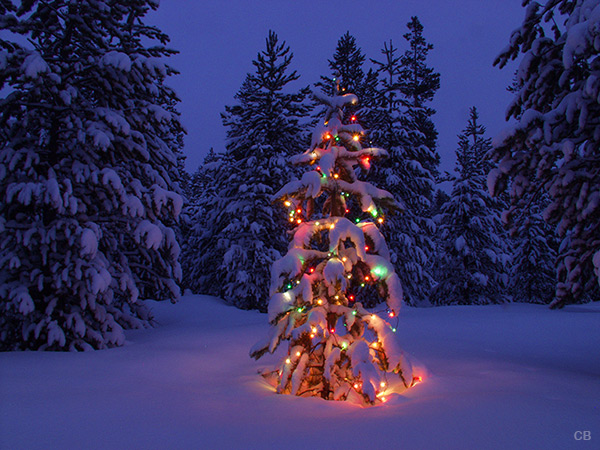
    Winter wonderland holiday photo tree 14a

    If you happen to reside in an area that enjoys wintery and snowy conditions, you have a setting ready to create an illuminated holiday tree similar to this one. But it is worth noting that even if you don’t live in a wintry or forested area you can still create a holiday light photo anywhere with a little imagination. A cactus in the desert, a shrub in your yard, a roadside mailbox, a rusty old car in a field, or anything you can attach lights to. You’re only limited by your imagination!

    To create a winter wonderland holiday photo like the one above, here’s what’s needed:

    Christmas lights for the tree

    You can use regular tree lights that use AC power if you have a location to plug them into. I needed 3 long extension cords to reach my garage, for power to run these lights.

    There are also battery power lights available that will work wonders if you prefer to photograph further out and away from power sources.

    A tree

    Ideally, it would be great to head into the forest and find the perfect tree sitting in the perfect spot. Just add the lights, and wait for snow. But finding the perfect tree, in the perfect place can be challenging. When you’re looking to create a well composed image, where the illuminated tree stands prominently in your composition, the search for that perfect tree can be elusive.

    Instead, I have found it easier in most cases to bring my own tree and put it right where I want it, in front of a suitable background. Since we live on this property we often cut our own Christmas tree and once the holidays are over, I take the tree outside, still in its tree stand, and place it to fit my composition. I then adjust the lights and wait for snow, which is never long.

    Exposure

    Exposure for the scene can be a bit challenging because you are working with two constant light sources. It’s similar to photographing a city skyline where you have constant light that does not change, such as street lights and building windows, and you have constant light that does change: the setting sun and darkening ambient light.

    For this winter tree photo you have the same: the tree lights, which remain constant in their brightness level, and the diminishing natural light. After the sun has set there is a ‘window of opportunity’ where these two light sources are closely matched for the perfect exposure: the darker background and the perfectly exposed tree lights.

    I set f/16 as my aperture so the tree lights will have that ‘starburst’ or sparkle and then bracket my shutter speed throughout that ‘window of opportunity’ shooting period. I also drop my white balance down to 4000k (if your camera doesn’t offer White Balance adjustments by degrees Kelvin, choose Tungsten or Incandescent from the WB presets) to increase the blue tone of the overall picture, which enhances the feel of ‘cold and winter’. To ensure that I take advantage of that window of opportunity, I start photographing about 15 minutes after sunset and continually evaluate the exposure.
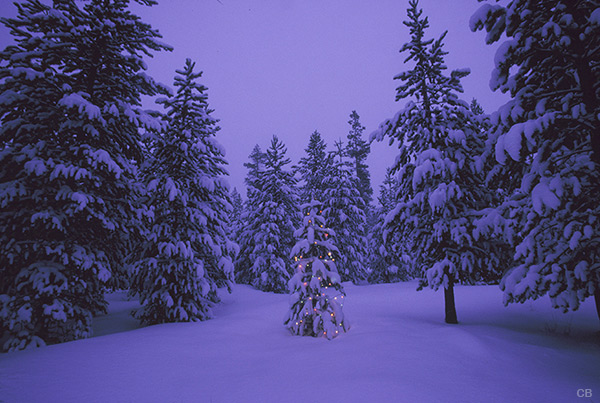
    Winter wonderland holiday photo tree 20

    If the ambient light brightness level has not darkened enough the tree lights will not stand out as the image above shows. The lights are not bright enough in relation to the background and surroundings, so the solution is to wait a little longer. To achieve that cold winter feel the snow cannot be exposed as white or even slightly grey, but rather closer to middle grey. I often start using Aperture Priority mode with a -1 exposure compensation setting, and continue to use auto bracketing (AEB). Once the ambient light brightness level is perfect, the tree lights will glow brightly and not blow out against the background.

    winter-wonderland-holiday-photo-tree-14a.jpg

    ISO 100, f/16, 12 second exposure

    This was my final image choice because the lights glow nicely, even those under the snow, and are not blown out, while leaving some glow on the ground level snow at the base of the tree. The exposure of 12 seconds at f/16 maintained great detail in the background as well.

    The time to stop shooting is when the background becomes too dark in relation to the tree lights exposure, which will start blowing out as the shutter speed gets longer.
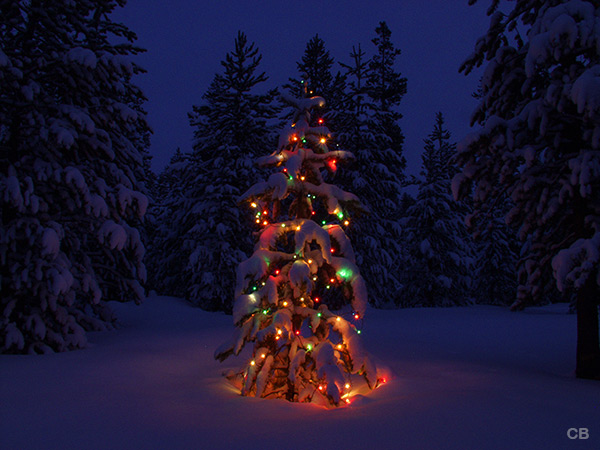
    Winter wonderland holiday photo tree 17

    The image illustrates just that. The tree lights are still exposed properly but the surrounding ambient light is border line too dark, as details in the darker area of the trees are beginning to merge. Of course, it is a matter of taste but for me at this point it is time to pack up and head indoors and review the images.

    Plan ahead by testing

    As you prepare to venture out and create a Holiday lighting image, a few steps before you leave will guarantee better results:

    1. A day or two before you plan your photo venture, place your lights outside, even around your home, plug them in and wait for sunset
    2. Set your aperture to f/16, place your camera on the tripod, and attach your cable release
    3. 15 minutes after the sun has set take your first picture and bracket your shutter speeds: normal (0), -1, and +1
    4. Wait another 10 minutes and take another set of three pictures
    5. Continue testing until you find the ambient light is to low and you determine that by looking at your Normal test exposures in the series and an image showing the lights blowing out against a very dark background
    6. Download your images and select the image you feel has great background exposure and perfectly exposed lights
    7. Once you find that perfect exposure, review the metadata for the shutter speed used and the time of capture. Then if you plan to shoot in the next day or two you will have a guide for the best time of day, and the best shutter speed, so you can head outdoors with a great starting point for the best exposure.

    There are so many subjects that would work well with Christmas lights outdoors and to create something unique it pays to develop an idea first. Then decide on a suitable location that supports the subject rather than detracts from it. If you plan to head out into cold winter conditions be sure and dress warm, protect your gear, and most importantly, have a great time!


    Editor’s note: this article is just in time for the Weekly Photography Challenge this week which is WINTER!  If you need more inspiration check out these 30 images of winter photography.

    The post How to Create a Winter Wonderland Holiday Photo by Charlie Borland appeared first on Digital Photography School.


    Digital Photography School

  • Are you Ready to be a Wedding Photographer?

    ready-to-be-wedding-photographer-12As a photographer the time will come that you are asked to shoot a friend’s wedding for free or for payment. Most photographers baulk at the idea, citing the importance of the day and fear of failure as the main reasons. In this article I want to look at what it takes to shoot someone’s wedding to help you decide if it is your lack of self confidence that is preventing you for taking one on, or a honest reflection of your abilities coupled with a moral obligation telling you not to ruin the day.
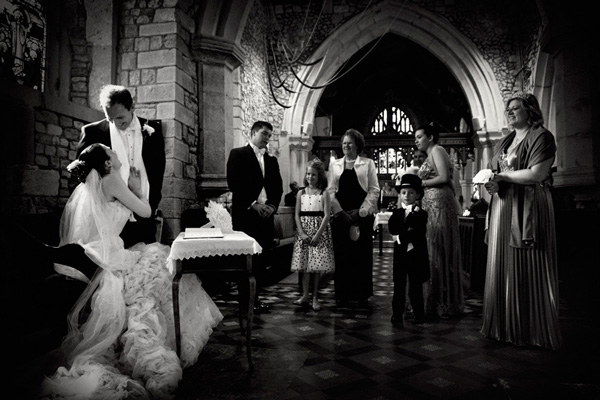

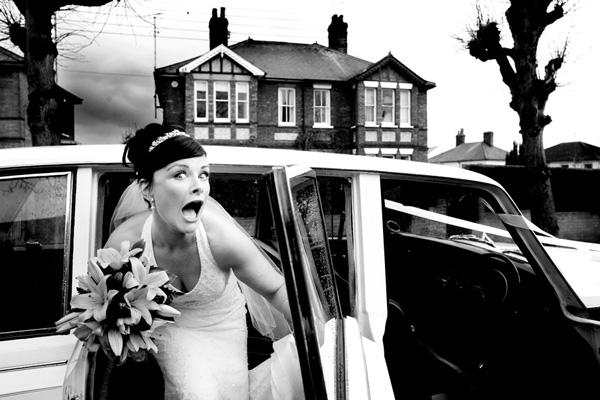
    Are you ready?

    This is clearly subjective and to a certain extent determined by the visual literacy of the bride and groom. What are their expectations and do they match what you are technically able to do? From your perspective, before you can even entertain the proposition, you should be competent, technically, with a camera. This means being able to use it comfortably in full Manual mode with an understanding of how shutter speed, aperture and ISO work together to give the correct exposure. If you currently work in Program ( P ) mode, although you may get okay results, you should probably decline the opportunity.

    The above may seem harsh so let me explain my reasoning. If you do not understand the principles of how to nail exposure fairly accurately in Manual mode, then chances are that you will not be well versed in composition or the use of light, both of which are integral to creating images the bride and groom will love. You may ask at this point ask what does it matter if I shoot in Program mode – I spent a lot of money on my camera and I get well exposed images. Well, the problem is that you are not in control. Wedding photography is about translating what is in your mind’s eye into a photo, and you need the technical know how to do this, at the same time as capturing the couple’s and guests’ emotions. In short you need to control the depth of field which means shooting in Manual or Aperture priority mode (the latter in fine as long as you can do it manually as well and know about exposure compensation).

    Do you have the right gear?

    ready-to-be-wedding-photographer-01

    If I shoot a wedding I take at least three bodies with me (often five) so as not to miss a special moment while changing lenses, and to act as back up. The latter is incredibly important. You do not need a top of the range kit – in fact a good photographer could shoot a wedding very well with an entry level DSLR, but it does help. Do you have fast glass (f/2.8 or faster) or are you using a kit lens? If you have a kit lens, is it fast enough to give a sufficient shutter speed to capture the ceremony? The last thing you want is to ruin the proceedings and romance by using a flash. A 50mm f/1.8 can be purchased very quickly and are ideal as they all come with a built in zoom – your feet!

    Can you direct people and blend into the wedding?

    Even photojournalists will usually take portraits of the bride and group and arrange group shots, so being able to pose people is really important. It is an area that most photographers struggle to get right though and this shows up in the final images. They look awkward and unnatural, which is the last thing you want. It is something you can learn before the wedding and practice to get right. You really don’t want to be doing this on the day and lining the family up like a firing squad.

    ready-to-be-wedding-photographer-08

    Do you have insurance?

    Even if you are covering a wedding for a friend you should still have insurance in case something happens. Your bride and groom may be forgiving, but suppose staff member at the venue trips over your bag, which you momentarily put down, and hurts themselves? You do not want to be sued!

    How do the bride and groom want their images?

    They may have expectations of a grand album. Can you provide this, design it and deliver it? Do you have the time to do this or would you prefer to just hand over a disk of images?

    ready-to-be-wedding-photographer-03

    Set the expectations for the bride and groom

    A wedding is a serious thing and if you decide to take one on for the first time it is important to be very honest with the couple. Tell them that you are nervous and that it will be your first time. Unless they are very misguided, they will likely have asked you to cover it because you are either free or inexpensive, or they simply want a record of their day and you have a flash camera which works better than a camera phone.

    You may be an excellent photographer, but can you handle your nerves? Can you think straight and logically if something goes wrong? Can you work to a strict deadline, like when the meal is due to be served. Are you comfortable shooting in bright sun, rain, snow or dark conditions? You need to ask yourself these questions, and ideally do a complimentary engagement shoot with the couple to ensure they like what you produce.

    ready-to-be-wedding-photographer-10

    Conclusion

    So, are you ready to be a wedding photographer?

    The above hardly touches the surface, but if you have the self belief and confidence that you can shoot a wedding, then go for it. Just be honest with the bride and groom, and set expectations. From their point of view they may not have a budget for a professional and would prefer that you got something for them instead of none. It is hard work. Your brain will ache and you really need to do your homework first, but if you do, then chances are you will love every second.

    The post Are you Ready to be a Wedding Photographer? by David Pearce appeared first on Digital Photography School.


    Digital Photography School

  • How to Shoot Sports at Night and in Other Challenging Situations Like a Pro

    Sports photography is often shot either one of two ways – a 1/1000th shot freezing everything in frame and capturing a single, frenetic moment during a race, or at 1/60th, panning with the subject and creating some motion blur to emphasize the speed of the subject. No matter which method, they’re always taken during the day. Daylight allows photographers to Continue Reading

    The post How to Shoot Sports at Night and in Other Challenging Situations Like a Pro appeared first on Photodoto.


    Photodoto

  • Weekly Challenge – Winter Weather Photography

    This week we’re going to focus on the season at hand and just embrace it! Your weekly  photography challenge is – winter!

    I know it’s cold out (trust me I KNOW!) but find a day that’s bearable and just go for it. Be prepared (see link to some tips below), dress warmly, grab a hot chocolate and away you go!

    Doing what others find difficult or challenging, including shooting in what some might call inclement weather, will help take your photography to the next level. You’ll come back with shots none of your friends have, and get “ooohs” and “ahhhs” on our images when you post them online. Dare to be different. Be brave. You can do it!

    Winter Weather Photography

    By Derek Tam

    By Sharon Mollerus

    Further reading on winter weather photography:

    • 5 Uncommon snow photography tips that can transform your winter scenes
    • How to handle cold weather photography
    • Things to do for photographers when the weather is bad
    • Beating the winter blues with a Lensbaby Composer
    • Winter sports photography tips – flash compensation
    • Why is the snow in my pictures so blue?
    • Tips to protect your gear in harsh weather or adverse conditions

    For those of you in the southern hemisphere without snow try some infrared techniques to make it look like a snowy scene:

    • 20 stunning infrared photographs
    • Infrared digital photography an introduction

    By Tom Gill

    By Robert Martinez

    Share your winter photography images!

    Once you’ve taken your ‘Winter Photography’ shots we’d love to see them in comments below. Simply upload your shot into the comment field (look for the little camera icon in the Disqus comments section as pictured below) and they’ll get embedded for us all to see or if you’d prefer upload them to your favourite photo sharing site and leave the link to them.

    By Eric

    By Shane Gorski


    The post Weekly Challenge – Winter Weather Photography by Darlene Hildebrandt appeared first on Digital Photography School.


    Digital Photography School

  • Get 30% Off Jared Polin’s Beginner Training Guide

    On the eighth day of Christmas dPS gave to me …

    A 30% saving on the FroKnows Photos Beginner Training Guide

    book8-single-facebook.jpg

    I know many dPS readers are fans of Jared Polin from FroKnow Photos – he’s a big personality in the online photography training space and the deal he’s put together for dPS readers today is big too!

    In a style that only Jared can deliver he’s developed a really effective training guide for DSLR owners who are wanting to get out of Auto and get more control of their cameras.

    There’s a fantastic run down of what is included in this guide over at Jared’s site here but in short you get 3 hours of video training that covers teaching on everything from composition, the shooting modes on your camera, teaching on shutter speed, aperture, depth of field, ISO, focal length, your camera’s light meter and much more.

    You’ll also see Jared shoot a variety of real life shoots which is where all the theory comes together.

    Today you can enrol in this fantastic guide for just $ 47 — a bigger discount than Jared has offered ever before.

    All the details and a sample of what to expect in these guides can be found here. It’s worth having a look even just for the intro video.

    Bundle the Guide for More Fro Knows Photo Goodness

    If you want a little more than just Jared’s beginner guide – check out the bundle option that he offers where you can get the Beginner Guide AND his brand new Flash Photography guide.

    These two guides make a great set – details of what is included are here.

    book8-bundle-facebook.jpg

    The post Get 30% Off Jared Polin’s Beginner Training Guide by Darren Rowse appeared first on Digital Photography School.


    Digital Photography School

  • Walking in a Winter Wonderland – 30 Images of Winter Photography to Motivate You

    If you live in the norther hemisphere like I do you may have been buried by the white stuff already. Here in Alberta we’ve had almost as much snow in the last 30 days as we did all last winter, and it’s still coming! Yesterday Mother Nature decided to play games with us and rain, giving us skating ponds for roads and sidewalks. Thanks!!

    But, this season can also make for some stunning winter scenes, if you can motivate yourself to get out of your nice warm house and go do some photography. The light is great this time of year because of the low angle on the horizon, so take advantage of it! Get up early and photograph the hoarfrost, if it occurs in your neck of the woods, it makes for breathtaking images that make our southern counterparts want to come visit!

    For you southern hemisphere dwellers, enjoy these image, and do come visit us up north any time you have a desire to photograph in the snow!

    Here’s a few articles on winter photography to help you get started:

    • How to stay motivated to photography nature after months in the snow and cold
    • How to photograph snowflakes with a DSLR
    • Photography in extreme cold
    • Embrace the weather with your photography Part One
    • Embrace the weather with your photography Part Two

    By Luigi Torreggiani

    By Tom Gill

    By Dawn Ellner

    By Trey Ratcliff

    By blmiers2

    By 8#X

    By Keith Williams

    By Bert Kaufmann

    By LASZLO ILYES

    By Eyesplash – Winter is coming along with Santa

    By martinak15

    By Alexey Kljatov

    By martinak15

    By carfull…Cowboy State-r

    By Marilylle Soveran

    By contemplative imaging

    By chrmoe

    By Ryk Van Toronto

    By carfull…Cowboy State-r

    By Martin Liebermann

    By Tatiana Gerus

    By Bas Bloemsaat

    By Scott Law

    By fotosutra

    By Doug Brown

    By Denis Messié

    By Ingo Meironke

    By glasseyes view

    By Zach Dischner

    By Pascal


    The post Walking in a Winter Wonderland – 30 Images of Winter Photography to Motivate You by Darlene Hildebrandt appeared first on Digital Photography School.


    Digital Photography School

  • Getting to Know Picasa – a Free Image Editor and Browser by Google

    Getting to know Picasa

    If you’re looking for an image browser and editor that is feature packed and easy to use then Picasa just may be the only bit of software you’ll ever need. It may not have all the advanced features you would expect from some of the more well-known image editors but it is a nice piece of software that punches way above its weight, and what’s more, it’s free and available for both Mac and Windows platforms.

    Photo editing picasa 01

    Before I get started I will state unequivocally that I have never in the past or present worked, in any capacity, for Google or any of its subsidiaries. Furthermore, I have never received payment of any kind for writing about their products. I wish!

    I recently ran a digital photography course in Perth, Western Australia and was asked by my boss to use Picasa as the editing software. I was sceptical at first about what I could achieve with freeware, mainly because I was used to working with the Adobe Creative Suite, and initially protested. But after downloading and trialling Picasa, I was pleasantly surprised to find it’s actually quite a useful and feature-packed piece of software.

    So what exactly is Picasa?

    According to Google, it’s software that helps you “organize, edit and upload photos”. When you download and install Picasa, the first thing the software will do is trawl through your computer, and attached hard drives, looking for image files such as jpegs, bitmaps, tiffs. In fact Picasa recognizes most image file types, including Photoshop PSD. So what you’ll end up with is a large library of pictures organized chronologically in folders, which is handy for finding that holiday snap you took several years ago. How long this all takes will depend on how many images you have on your computer or hard drive, so be patient and wait until it has finished collating.

    Browsing

    Once Picasa has catalogued all your pictures you can then start to browse, organize, and edit, as well as having the option of grouping them into Albums. One of the nice things about Picasa is that it’s non-destructive. So edits you make to photos can be undone. Picasa also stores all edits as separate files so your original pictures are left intact. Picasa also scans your hard drive and updates itself whenever you add more pictures so it’s always up to date.

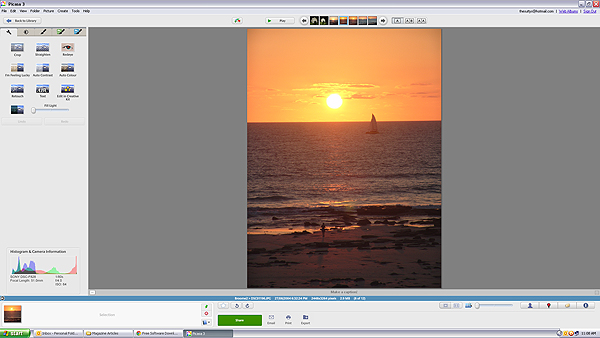
    Picasa main screen 01

    Picasa’s main browsing interface is simple and easy to navigate

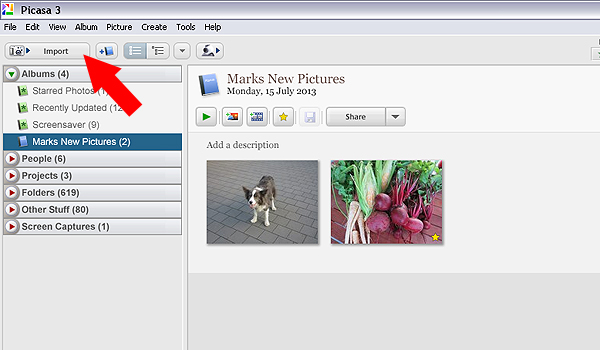
    You also have the ability to import photos directly from cameras and portable drives using the import function in the top left hand side of the browser. Simply connect the device to your computer and navigate to the photographs on your device. Once you have all your pictures imported, and in their respective folders, you are ready to start editing.

    Picasa import button 02

    Use the import function to download from a digital camera or portable hard drive

    Editing and effects

    To begin editing you simply double click on a picture in the Picasa browser. This activates the editing functions and you can begin making changes to your selected photograph.

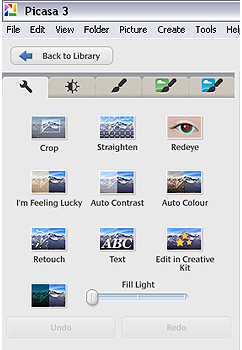
    There are five tabs at the top left-hand side of the editing window:

    Use the import function to download from a digital camera or portable hard drive

    Use the import function to download from a digital camera or portable hard drive

    TAB #1 COMMONLY NEEDED FIXES

    The tools in this tab gives you control over cropping, straightening, red-eye removal, basic brightness and contrast adjustments. There are some automated features too such as “Auto contrast” and “Im feeling lucky”, which all deliver varied results. The “Edit in Creative Kit” feature has been discontinued but there is the opportunity to edit online inside Google+. There’s also a “Text” tool for adding some titles and information to your selections as well as a “Retouch” tool for fixing blemishes and scratches.

    TAB #2 CONTRAST ADJUSTMENTS

    The second tab gives you more brightness and contrast options and a greater level of control. It includes sliders to adjust the amount of fill light and shadows in your picture, and you also have the ability to change highlights. There’s a temperature control feature but in reality this simply adds either a blue or sepia tint to the picture which simulates daylight or interior colour temperatures.

    TAB #3 FILTERS

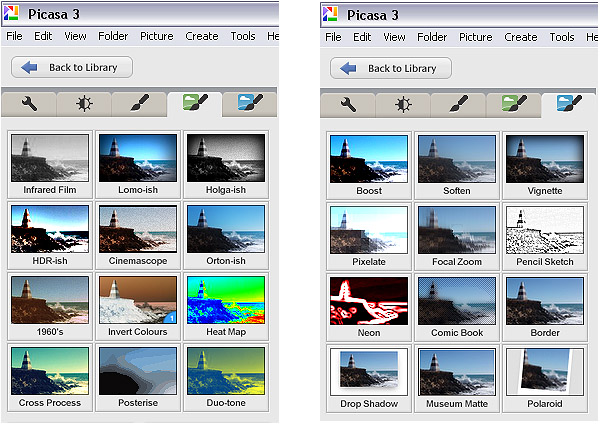
    The third tab is where Picasa starts to offer some cool features. Here you will find a series of twelve preset filters such as sharpening, film grain and black and white. Most of the filters are adjustable so you can control the amount of each effect applied to a photograph.

    TABS #4 and 5 MORE FUN FILTERS

    Similarly, tabs four and five continue to offer you even more fun filters to apply to your photographs, with twenty four additional styles.

    Picasa effect previews 04

    The image filters in Picasa offer a wide range of modern and classic effects

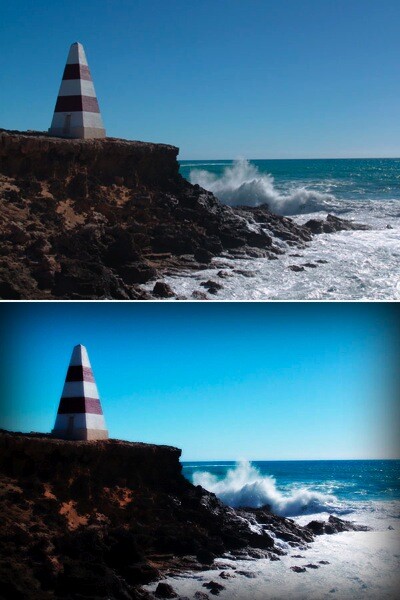
    In the picture below I applied the Orton-ish filter and a Vignette to get a softening, yet dynamic effect.

    Picasa before and after 05

    Video

    So, you’ve messed around for a few hours and now have a dozen images you want to show off to friends and family. Well Picasa’s bag of tricks doesn’t stop there. In fact, there’s some very useful output options available should you want to either print, make a video, or simply upload your pictures to the web.

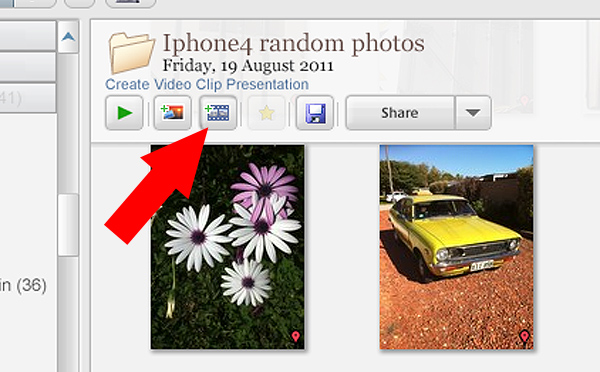
    Picasa create video icon 06

    Making videos is simple and fun in Picasa. Just click the “Create Video Clip” icon to get started

    By selecting a group of pictures in the browser and selecting “Create Video Clip Presentation’ it puts your selected pictures onto a simple video timeline. You can then add titles, and even import a music sound track to go with your pictures. If you’re not happy with the selection order you can shuffle the pictures, and then output the file to one of several video formats, including high definition 1080P.

    There’s also the option of making a collage for print, screen or for the web. There are tons of options and it takes very little time to come to grips with how it all works.

    Other features

    If you think that’s impressive, wait, there’s more! If you have a free Google+ account you can upload and share your pictures right from the Picasa browser, to Picasa’s Web Albums photo sharing site with very little effort. Just make sure you familiarize yourself with the privacy settings before you start uploading and always read the terms and conditions.

    On the downside,

    On the downside Picasa has limited raw editing features, so if you want to try something more advanced then you will have to look elsewhere. That said there’s enough features in this little program to keep most people happy.

    Bottom line on Picasa

    Picasa is really a fun and easy program to use and the learning curve isn’t too steep. If you need an application that is primarily for browsing and organizing, then this is a handy program. Although the editing capabilities are basic there are some useful features such as geotagging, keyword tagging, face recognition and a range of exporting options. But if you are a serious photographer that needs a program that can do some heavy lifting then perhaps you’ll need something more robust.

    Picasa will certainly appeal to a broad demographic and it is really intended to perform many of the most common photographic tasks. It can also speed up the process of getting your pictures online. While I was reluctant to start using this program I have warmed to it. So if you need a photo organizer and editor that’s quick, easy and – dare I say – fun to use then perhaps give it a go.

    Download it:

    • Picasa for Windows
    • Picasa for Mac OSX

    The post Getting to Know Picasa – a Free Image Editor and Browser by Google by Mark Sutton appeared first on Digital Photography School.


    Digital Photography School

  • Prismatic Launches iOS Version 2.0

    Prismatic for iOS
    Prismatic 2.0 for iOS released this morning.

    I’ve been a big fan of the news aggregator Prismatic ever since it originally launched on the web. As far as I’m concerned, there is no better site on the internet today for aggregating all of the news stories that *I* care about than Prismatic. It’s the ultimate personalized news feed.

    On Prismatic, I enter my interests (subjects, topics, companies, people, TV shows, etc.) and Prismatic offers me up a daily feed of pretty accurate stories that I will be interested in. Prismatic has completely replaced my old RSS reader for me and is my go to place each day to view my favorite stories, personally tailored to my interests. The design is fast and elegant and easy to use. Prismatic currently indexes 5 million new stories every day and contains over 10,000 interests you can follow.

    Prismatic for iOS

    On Prismatic I can like or dislike stories and Prismatic uses a machine learning algorithm to tailor my future posts even more to my interests.

    With the new iOS version Prismatic gets even more social than it’s been in the past. I can follow people and things that my friends like are included in the algorithm for what I’m presented.

    While I spend a lot of time working on my photos or spending time on social networks when I’m on my computer, Prismatic is the perfect companion to my iPhone, where I want to quickly find great articles that interest me while I’m on my commute or walking around mobile. You can easily share stories you find and like directly from Prismatic to Twitter or Facebook.

    Congrats to Bradford Cross and his team at Prismatic on today’s launch. Go get the new Prismatic for iOS in the APP store and check it out. I think you’ll be impressed by how many great stories are personalized to you — especially great photography stories. :)

    More from Matthew Ingram at GigaOm here.


    Thomas Hawk Digital Connection

  • “Photography Business Secrets” – A Review

    "Photography Business Secrets," by Lara White is a great business resource for any photographer looking to grow their business.

    “Photography Business Secrets,” by Lara White is a great resource for any photographer looking to grow their business.

    With just a few weeks left before the end of the year, I find myself deep in my annual wrap-up ritual. I don’t like carrying stuff over from December into January if I can avoid it. I make sure that shoots are edited, albums and prints are ordered, contracts are signed, gear is cleaned and serviced, and any other loose ends are taken care of. Transitioning from one year to the next isn’t just a matter of getting my “stuff” in order, but it’s also about getting my head in the right place for whatever challenges– photographic, business, or personal– the coming year might have in store for me.

    I don’t think I’m unique in this regard. I think the end of the year is a good time for everybody to look ahead, setting goals for themselves and charting a course for where their photography business is going to take them after January 1st. I think that this pause to reflect on the current and future health of our businesses is particularly important for those of us in creative fields, because so many of us are simply not hard-wired for business to the same extent as we are for photography. One of the best new tools I’ve found for helping with these tasks is “Photography Business Secrets,” by Lara White. A former wedding photographer,  White is a leading expert in the field of photography business education. As founder and operator of PhotoMint, an online business development resource for photographers, her words of wisdom have now been published in more than 70 magazines and professional photography blogs, including right here at Digital Photography School.

    When you think of your photography business, have you ever figured out how much of it is “photography,” and how much is actually “business?” White has, and the numbers might surprise you. On average, 20% or less of your time is spent on actual photography. And that’s a good week! With numbers like that, it is essential to get a proper handle on the business end of things. After all, the term “starving artist” started somewhere, right? Passion alone isn’t going to cut it.

    Ready to Give Up Your Day Job?

    DSC_6591

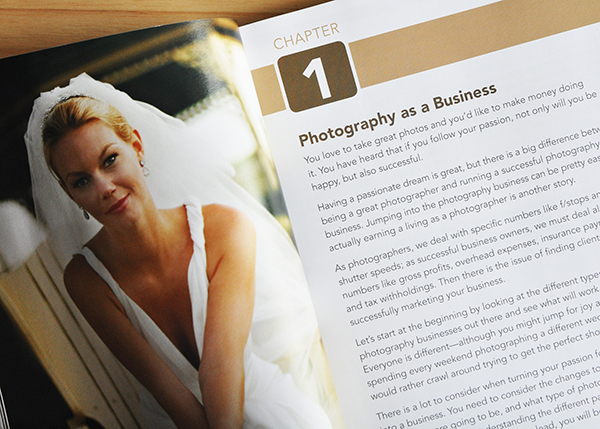
    If your photography plans for next year include ditching your 9-to-5, Section 1 of this book is absolutely required reading. In “Moving from a Hobby to a Business,” Lara walks you through three chapters full of the information you need, questions you need to ask, and steps you need to take before you even think about giving your two weeks notice. This is a big decision, with life-changing ramifications– especially if you have a family that enjoys eating and having a roof over their heads.

    This is the perfect chance to get valuable advice from someone who has been where you are and lived to tell the tale. By giving readers a realistic view of some of the issues that can impact transitioning from a hobby to a career, readers are assured very early on that this book has their best interests at heart. Gaining the training and experience you need, as well as figuring out your market, are just a few of the key factors addressed.

    Business School for Photographers

    DSC_6602

    In my previous life as lawyer, my biggest complaint was that law school did nothing to prepare me for the actual day-to-day, nuts-and-bolts of practicing law. Becoming a professional photographer poses similar hurdles. Like any other profession, people tend to have a long list of preconceived notions of what it means to be a photographer. Remember that 80/20 time split I mentioned earlier? That’s just one of the things I’m talking about, and it’s why the seven chapters of “Business Fundamentals” make this such a valuable book–regardless of whether you are an emerging, struggling, or succeeding professional.

    Section 2 takes you through the basics of drafting a business plan, calculating overhead, creating a budget, and more. Every journey starts somewhere, and yours as a professional needs to start with the steps that are designed to keep you both functional AND legal. Once those concerns have been addressed, you can move on to advanced business challenges like branding, pricing & products, customer service, and day-to-day operations.

    I’m Up and Running. What’s Next?

    DSC_6606

    It’s a pretty basic premise that you’re in business to make money. I love being an artist, but just being an artist doesn’t pay for my son’s education or the insurance premiums on the studio equipment. As much as I may hate the prospect of being a “businessman,” if I’m not willing to take on that responsibility, I’m going to fail before I even start.

    Section 3 answers questions revolving around sales and growth, since the two are inextricably linked. The bottom line is that sales means growth. Tips on getting and increasing sales range from the seemingly obvious (be prompt, creative, and attentive), to running promotions and overcoming shyness. Using these tips to increase your cash flow will help get you over the next hurdle.

    The chapter on “Growing Your Business” guides you through the processes of outsourcing, hiring staff, adding new services, and raising your prices. Here, White offers three case studies, showing how actual photographers have dealt with these issues, clearly demonstrating that these are real-life concerns, and not just theoretical exercises.

    Looking Ahead

    DSC_6609

    Sprinters can see the finish line within seconds of leaving the starting blocks. They go all out, giving it everything they’ve got, but they are going to run out of gas pretty quickly. Long-distance runners are in it for the long haul. It may sound like a cliché, but you want to run marathons, not 100-meter sprints. Learning to understand your clients, develop your style, and create marketing strategies isn’t something that comes naturally to most people. Here is your chance to learn those skills without having to reinvent the wheel.

    The Bottom Line

    A lot of photography books come across my desk. The best among them speak to a broad audience, and this is definitely one of them. It is entirely possible that not every aspect of this book will apply to you or your photography business, but if you find even just a few lessons here that increase your business stability– and therefore your profitability– it will be well worth the $ 20.00 investment.

    “Photography Business Secrets: The Savvy Photographer’s Guide to Sales, Marketing, and More” is available at Amazon.com.

    The post “Photography Business Secrets” – A Review by Jeff Guyer appeared first on Digital Photography School.


    Digital Photography School