Blog

  • Sony a7S II sends 4K video from the International Space Station to Earth

    Last December a Japanese rocket brought cargo 249 miles above the Earth to the International Space Station. On that rocket was none other than a Sony Alpha a7S II, which was soon mounted on the outside of Japan’s KIBO module to take photos and videos of the mothership, so to speak.

    Mounting a camera to a space station isn’t like putting a GoPro on your handlebars – the a7S II is enclosed in a specially designed aluminum housing with a radiator to keep it at a comfortable temperature in the vacuum of space. It’s mounted on a two-axis gimbal so, unlike prior cameras on the ISS, it’s not constantly looking straight down. The camera itself is basically the same as what you could buy off the shelf, and has an FE 28-135 F4 G OSS power zoom lens attached.

    Head on over to Sony’s website to learn more about why the company’s high-sensitivity full-frame camera was chosen and how it all works. You can also find additional 4K videos to enjoy.

    Articles: Digital Photography Review (dpreview.com)

  • Now with More Minimalism: Brandless Brand Trademarks Bland White Boxes

    [ By WebUrbanist in Design & Products & Packaging. ]

    Viral Silicon Valley controversies like those revolving around Juicero (a device that squeezed out juice) and Lyft (which seems to be reinventing the bus) are often held us as examples of how innovators are out of touch, which leads us to Brandless, a brand that is apparently reinventing minimalist packaging — the kind of thing that companies like Target have been doing for ages.

    To be fair, the Brandless boxes don’t look all that bad, and color-coding products make some sense. Plus, the idea of making everything the same price (three dollars) is fascinating if a bit difficult to scale. They are trying to take things a step further, too, by putting more information on the box (including the Brandless name) and less on the product, which could in theory be a nice way to visually declutter one’s home.

    But of course, reality and regulations don’t always play nice with packaging design — for starters, the smooth look is interrupted by a black-printed net weight stamp toward the bottom and other essential labels of that sort. And, really strangely, a white trademark stands out from the colored portion of the product. Naturally, if one wants to order the flat-priced products, a shipping charge also interrupts the otherwise consistent pricing scheme.

    None of this is meant to knock the conceptual underpinnings or commercial viability too much — entrepreneurs Tina Sharkey and Ido Leffler are clearly tapping into the West Coast demographic that has money and craves simplicity. But their claim to be making something “completely fresh and new” is a bit much — grocery and convenience store chains have been selling products in simplified and distinctive brand-free packages for a long time, with the same mission in mind (to reduce the “brand tax” people pay to get a name-branded version of something).

    For now, the company is rolling out around 200 initial products. And, at least for the time being, they are all at the same price point. But one has to wonder: does that flat rate idea really make sense for a growing consumer brand? Surely some things are best bought in bulk to save money, or simply too expensive to sell for a few dollars. And consumers who want one-stop shopping may find their offerings a bit thin. In the struggle for minimalist simplicity, Brandless just may be making things harder on themselves than they have to.

    Share on Facebook


    [ By WebUrbanist in Design & Products & Packaging. ]

    [ WebUrbanist | Archives | Galleries | Privacy | TOS ]


    WebUrbanist

  • Richard Prince must face lawsuit over image theft, judge rules

    Controversial artist Richard Prince must face a lawsuit over his unauthorized use of photographer Donald Graham’s photo ‘Rastafarian Smoking a Joint,’ a federal judge has ruled. The ruling concerns a 2015 lawsuit Graham filed against Prince after he failed to heed a cease and desist order. Prince and Larry Gagosian, owner of the Gagosian Gallery where the pilfered image and others were displayed, had claimed the work is ‘transformative’ in an effort to have the case dismissed.

    Real Bongo Nyah man a real Congo Nyah ? repost @indigoochild

    A post shared by Jay Kirton Kwame Ka Asante (@rastajay92) on

    Though Prince has managed to escape past lawsuits unscathed, this latest one may prove different. Talking about the ‘transformative’ claims, U.S. District Judge Sidney H Stein stated, “The primary image in both works is the photograph itself. Prince has not materially altered the composition, presentation, scale, color palette and media originally used by Graham.”

    Graham’s version of the image was acquired from another Instagram account where it was featured; he had it enlarged and printed with his own Instagram-style comment beneath the original user’s caption. The exhibit at Gagosian contained a total of 38 of these ‘borrowed’ images, including the Rastafarian photo cited in the lawsuit. The court’s ultimate ruling on the lawsuit could set a major precedent for fair use as it relates to Instagram images.

    Via: New York Times

    Articles: Digital Photography Review (dpreview.com)

  • Three Good Reasons To Learn More About Photography

    Photography has become so popular, mainly because of the inclusion of cameras on mobile phones, so it’s more difficult for your photos to be noticed. But, if you learn a little more about photography your photos will be more likely to stand out from the crowd.

    Your life is full of gadgets and equipment that can be challenging to learn to use really well. Learning to use your camera will make your photography so much more enjoyable. Photography is therapy. Picking up your camera, making time to take photos, can be a wonderful break from the busy pace of your daily life.

    Three Good Reasons To Learn More About Photography - Thai ladies

    Committing even a small amount of time regularly to learn more about photography will help you enjoy the creative process of image making. It will help overcome frustrations you may have because you don’t understand your camera well enough. As you study you will find that your creative ideas and expression will come more naturally. And, as you know and understand more and begin to relax when you have your camera in your hands, you will find a personal groove and means of expression that will be unique to you.

    So here are three really good reasons for you to learn more about photography.

    #1. Create outstanding photos

    Most of us love to share our photos and see the response or family and friends have to them. Even more exciting is when strangers begin to show appreciation for our photographs. The desire to have your photos seen and enjoyed by others can be a real motivation for you to enjoy photography. But getting your photographs noticed is not so easy.

    Three Good Reasons To Learn More About Photography - girl with elephant

    This has become more of a challenge in recent years because pretty much everybody has a some form of a camera these days. Social media has made it extremely easy to share photos and have them seen by a potentially global audience. But how do you get your photos noticed when everyone else is sharing their photos in the same way?

    Take some time to learn more. Learning about light, exposure, color, tone, composition and timing will help you produce more creative, more interesting, more noticeable photographs. And, if you think about it, you probably something about these things already, because you see them all the time, but are not necessarily thinking about them.

    You can’t see anything if there’s no light. Light is the essence of photography. With no light, you can have no photo. Learning to appreciate different types of light and when some light is better for making photos than others, will help you create more outstanding photographs. You see light all the time and if you can begin to understand it and appreciate how to expose your photographs well, you will create more compelling images. Knowing something of the limitations of your camera and how it captures tone and color will also help greatly in the creative process.

    Three Good Reasons To Learn More About Photography - flower

    Compose and time your photos better

    Learning composition rules and developing a real feel for them will also help your photographs be more impactful. Like with any creative expression, learning the rules will allow you to eventually implement them without really thinking about them. This is when I believe you will become most creative.

    Certainly timing your photographs well takes research and practice. Learning to anticipate action and choose precisely the best time to make a photograph, the decisive moment, is a skill that will certainly enhance your photography and make it stand out.

    2. Become intimate with your equipment

    Learning how to use your camera well and becoming confident will result in a more enjoyable and more creative photography experience. I have met (and taught) many people who own very nice cameras but are not confident in using them. If you don’t have a good understanding of your camera you will most likely become somewhat frustrated when you pick it up to use it, or later when you are looking at disappointing photos.

    Three Good Reasons To Learn More About Photography

    Becoming familiar with your camera and how to use it well takes time and commitment to study. Because each camera model is different, with the controls in different places, it means you need to do some research and hands on practice to know how to use your cameras with confidence.

    Essentially all cameras are the same. They function the same way, with light hitting the sensor (or film) to create photographs. Whether you use a camera in any of the automatic modes, or prefer to use it in Manual Mode, the process of creating photos is the same, but the amount of creative control differs greatly.

    Setting your exposure manually gives you far more control over the end result. Learning to do this takes a bit more dedication but will ultimately result in you making more unique, creative photographs. If your camera is always set to one of the automatic modes then the camera is making some (or all) of the most creative choices. Cameras are smart, but they are not creative – you are.

    Three Good Reasons To Learn More About Photography

    Learning to take control of the camera will help you enjoy the creative process of photography far more than if you have to stop and think about the basics of what to do each time you pick up your camera.

    3. Photography can be therapeutic

    Having creative drive, wanting to make good photos and have others enjoy them, will hopefully lead you to want to learn more about using your camera well. Doing that will free you up to enjoy your whole photography experience and you can then experience photography as a therapy.

    Three Good Reasons To Learn More About Photography

    Expressing your creativity with a camera you understand and love is very therapeutic. Taking time out from your busy day, even just for 10 or 15 minutes, to take a few photographs can be enjoyable and relaxing. Indulging in longer photography sessions on weekends or during vacations can be terrifically therapeutic.

    I find when I pick my camera up to shoot for pleasure, (it’s different shooting for work if I have a client to please,) I can easily become absorbed only in making photographs, and nothing else matters! Being able to really zone in on what I am doing helps me forget all the worries and stresses I may be experiencing in life and just enjoy the process of being creative.

    Narrowing the attention of your thoughts to the creative processes of photography, meditating on photography, brings a whole other dimension to the experience. Being aware of and intentionally seeking opportunities where you can use your camera creatively can help you relax differently than other activities you may enjoy. Watching the news on TV, checking social media, or going to a movie are all things that add a change of pace to your daily life. But a lot of what you do to relax does not involve being creative. Being creative with your camera adds a whole new dimension to life and can be most therapeutic.

    Three Good Reasons To Learn More About Photography

    Conclusion

    Having the desire and drive to want your photos to be noticed when you share them is a good reason to learn more about photography. Overcoming the frustration you may feel because you haven’t taken the time to learn how to use your camera is another good solid reason to invest some time, and maybe even some money, in learning how your camera functions and how you can control it better (preferably in manual mode.)

    Once you are on the path to learn more about your camera and about photography, knowing that it can be wonderfully therapeutic, should be most encouraging for you to follow some course of study to make the most of your camera – even your phone camera! Here’s a video for you to watch more on this topic as well.

    What other good reasons do you have for learning more about photography? Please share in the comments below.

    The post Three Good Reasons To Learn More About Photography by Kevin Landwer-Johan appeared first on Digital Photography School.


    Digital Photography School

  • Capitol Hill photographers asked to delete protest images, claim journalists

    Photo by Phil Roeder, licensed under Creative Commons

    Journalists photographing a protest in the US Capitol building report that they were told by Capitol Police to delete photos and videos of arrests. The events unfolded yesterday in the third floor Senate wing of the building as demonstrators protested the vote that would begin an effort to repeal the Affordable Care Act.

    As police handcuffed and removed protestors from the hallway outside of the Senate chambers, journalists were reportedly told by police to stop taking photos, and were instructed to delete photos and videos they had captured.

    Official policy for press in the Senate Gallery states that photography is indeed prohibited in that area. However, the ACLU spoke up to remind press that police may not force anyone to delete a photo or video without a warrant, no matter the circumstances.

    Articles: Digital Photography Review (dpreview.com)

  • How to do More Creative Wildlife Photography by using Rim Lighting

    Wildlife photography is one of the fastest growing hobbies today. With DSLR and lenses getting cheaper by the minute, it is only bound to grow faster. With more and more people taking to wildlife photography as a means to connect with nature and share its beauties, it’s become imperative that you start pushing the bar of your photography ever higher. One of the best and easiest ways to do that is to try out rim lighting shots. If you do not know what that means, you are on the right page – keep reading.

    How to do More Creative Wildlife Photography by using Rim Lighting

    There are many ways to get creative with your wildlife photography, but in this article I will teach you one of the most impactful. Let’s start with getting to know rim lighting a little better.

    What is rim lighting?

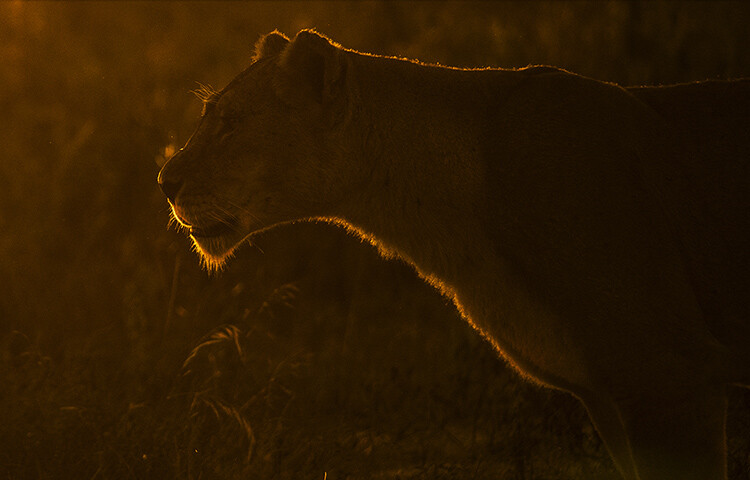
    By definition, rim lighting in photography means any image where the light at the edges of the subject seems more intense than the other areas. For example, take a look at the image below.

    How to do More Creative Wildlife Photography by using Rim Lighting

    Notice how the outline of the giraffes stands out? The rim of the subject looks well-lit. Quite simply, that’s what rim lighting is about.

    How do you achieve rim lighting?

    First and foremost, you need to position yourself such that the subject stands between your camera and the light source (more often than not, that will be the sun in nature photography). Rim lighting will happen in the natural world only if you can see the rim, lit up with your eyes. Some of the easiest subjects for this are animals that have a lot of fur and are not too smooth coated, for example, bears, giraffes, lions, or deer with antlers.

    Take a look at the visual below for a quick understanding on positioning yourself.

    750

    Guidelines

    There are a few guidelines that you need to adhere to while trying to obtain a rim-lit image:

    • Rim lighting happens best when the sun is low in the sky, so try to look for a subject around that time.
    • A dark background is necessary (check all the images in this article) so make sure that you try this in an area where your background is conducive to good results.

    Speaking about the camera now, composition aside, rim-lit photography can be done using one of two approaches.

    Approach #1 – Exposure Compensation

    Using exposure compensation is the easiest way to execute rim-lit shots. Once you have ensured that you are able to see a rim-lit subject just go ahead and try a test shot with a little underexposure. Take a look at the sequence of images below.

    How to do More Creative Wildlife Photography by using Rim Lighting

    Make note, by default when using the built-in metering system in your camera, more often than not the image in such scenarios (a lot of black and little bit of white) will turn out to be a bit washed out. It is just that the camera does not know what is the most important part of the image and makes an error in judgement (it tries to average the exposure).

    Knowing where to stop with regards to exposure compensation is a subjective call. You could be happy with the second or the third image above. Just know that the more you underexpose the darker the surroundings will get.

    This is a perfectly valid way of getting a rim-lit shot, but I generally recommend the second approach. The simple reason being that exposure compensation doesn’t reset itself. If you forget your camera is set at an EV of -2, it would mean disaster for the next few shots where you may not be trying to create a rim lighting shot.

    How to do More Creative Wildlife Photography by using Rim Lighting

    Approach #2 – Exposure Lock (AE-L)

    This approach is slightly more advanced in terms of understanding. Imagine yourself standing in front of a monkey with the sun setting behind him and the immediate background being dark trees. Now, do the following:

    • Point your camera toward the sky. Half press your shutter-release button to activate metering.
    • Next, press the Exposure Lock Button (AE-L or * button) which often resides right where your right-hand thumb would rest.
    • Now, recompose your image with the subject as needed and click.

    What happens is that when you point your camera towards the sky and ask it to meter from there, it takes a light reading from the bright sky and sets up a shutter/aperture combination accordingly. Let’s assume for a minute that the value came out to be 1/2000th at f/4.

    Now, if you press the Exposure Lock button, the camera will lock on to these readings and will not change them for your next set of clicks. So when you recompose and photograph the monkey, the camera uses the locked in settings thus rendering only the areas in the frame that are as bright as the sky correctly. In this recomposed image, the only area that is as bright as the sky is the outline of the monkey, giving you a nice, well exposed rim-lit image.

    How to do More Creative Wildlife Photography by using Rim Lighting

    Practice around home first

    Go ahead, practice the AE-L at home and then get out there and try a couple of rim-lit shots. Here is what you can do at home, before heading out to the wild.

    Catch hold of a friend or family member and make them stand in front of a car at night. They should be covering the headlight of the car completely. If you stand at the other end with your friend in between yourself and the light source, you should be able to see his entire body with rim lighting.

    Now that you know how to get a subject, go out there with your camera and start trying the exposure compensation trick to get some fabulous rim-lit images. Please share your rim-lit wildlife images below as well as any questions you may have about this technique.

    How to do More Creative Wildlife Photography by using Rim Lighting

    The post How to do More Creative Wildlife Photography by using Rim Lighting by Rahul Sachdev appeared first on Digital Photography School.


    Digital Photography School

  • GoPro launches QuikStories feature for automated story-telling

    GoPro’s Quik app for making short and shareable videos from your GoPro footage has been available for a while. Now the new QuikStories feature is taking things one step further by generating clips automatically and making them as easy as possible to share on social media and get them off your GoPro’s memory card.

    QuickStories is integrated into the latest version of the GoPro app. After a day of shooting video with your GoPro the app will search your camera for new clips and automatically create a shareable version, complete with edits and music. It’ll also picks brief elements from longer clips and you can still interfere manually though and change the order of clips or the music. You can also add other media from your phone into the mix if you want to.

    As you would expect, QuikStories integrates with most social networks you already have on your phone but you can also export the finalized video to use it in any way you want. The video below gives you a pretty good idea of how the feature works.

    Articles: Digital Photography Review (dpreview.com)

  • How to Make Funky Colorful Images of Ordinary Plastic Objects Using a Polarizing Filter

    A cornerstone in modern manufacturing, plastic is an amazing thing. Look around and you’ll see an abundance of plastic materials used in an endless variety of products. From pens to planes – yep, even modern commercial aircraft are cutting down on weight by introducing plastic composite components – plastic has revolutionized the way we live. And while much of the plastic we encounter is discarded after the first use – this photography tutorial will give you a good reason to hang onto those plastic knives and forks. By using a polarizing filter, some plastic materials and a computer screen, we can reveal a surprisingly beautiful side to the internal stresses of hard plastic material.

    How to Make Creative Colorful Images of Plastic Objects Using a Polarizing Filter

    Supplies you will need:

    • Polarizing filter or polarized sunglasses
    • Computer screen
    • Camera
    • Clear sticky tape
    • Sheet of glass
    • Tripod (optional)
    • Transparent plastic objects

    Setting up

    In basic terms, what we’ll be doing is sandwiching a plastic object between a polarized light source and an on-camera polarizing filter. Polarizing filters that screw into the front of a camera are used by photographers to add contrast and reduce glare.

    How to Make Funky Colorful Images of Ordinary Plastic Objects Using a Polarizing Filter

    Don’t have a polarizing filter? Use your polarized sunglasses in a pinch.

    If you don’t have a polarizing filter, a pair of polarized sunglasses will do the trick. Simply position the sunglasses so that one eye sits over the front of the camera lens like a filter. Keep in mind that the shape of the eyepiece will probably prevent complete coverage of the front lens element. If this is the case, some cropping may be required in Photoshop later. You may also need to do some sticky-taping to ensure the glasses sit correctly.

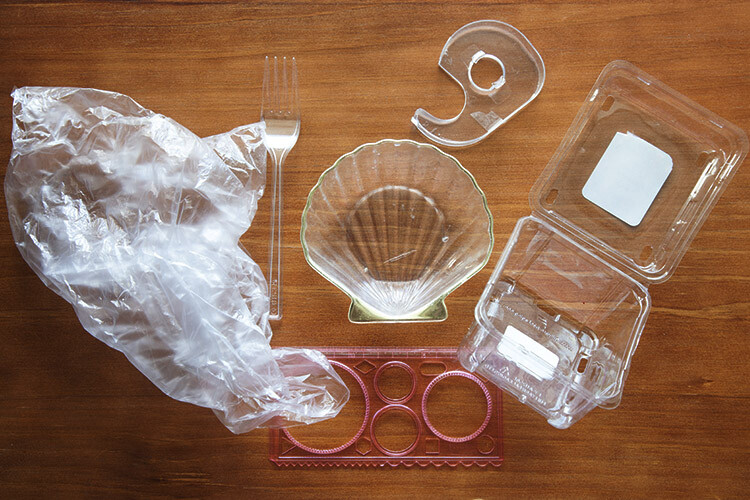
    Now gather some clear plastic materials to photograph. Objects like plastic bags, sticky tape dispensers, plastic food containers, clear plastic cutlery and packaging all turn out well. Basically, any cheap, transparent plastic will work to some degree, so have a good scavenge around!

    How to Make Creative Colorful Images of Plastic Objects Using a Polarizing Filter

    Finding good backlighting

    Next, you’ll need a polarized light source to shine through the transparent plastic material. Conveniently, modern desktop and laptop computer screens emit linearly polarized light. First, you need to maximize the white light emitting from our computer screen. To do this, download a plain white background from Google Images. Once downloaded, open the file in a default image viewer and set the image to Full-Screen Mode. This will spread the white backdrop over the entirety of the functional computer screen, providing the backdrop for our polarized objects.

    Once downloaded, open the file in a default image viewer and set the image to full-screen mode. This will spread the white backdrop over the entirety of the functional computer screen, providing the backdrop for your polarized objects.

    How to Make Creative Colorful Images of Plastic Objects Using a Polarizing Filter

    Set the viewing mode of a clean white image to full-screen so that it completely covers the screen.

    Arrange the subjects

    Once the white background is set, you can start arranging your plastic items on the computer screen. If you have a choice between using a desktop or laptop computer, I recommend going with the laptop. Unlike a desktop computer, you can turn an open laptop upside down, so the screen lays flat on a surface. This turns your laptop into a home-made light box of sorts, perfect for sitting your plastic objects on.

    Keep in mind however that laptops with touchscreen capabilities may not work as effectively. From my own experience, these laptop screens deliver far less pronounced results. Note: A large tablet or iPad may work as well.

    How to Make Creative Colorful Images of Plastic Objects Using a Polarizing Filter

    Viewed through a polarizing filter, this transparent stencil is placed on the top of a touchscreen laptop. While the polarizing effect can still be seen, the finished image falls flat.

    Workaround for desktop screens

    Because the screen is upright, using a desktop computer for this project can seem a little trickier. Rather than tipping a full sized computer screen on it’s back, I’ve been fixing my plastic materials to a sheet of glass with tiny pieces of clear sticky tape. Easily recovered from old photo frames, the glass sheet means you can avoid sticking tape directly to your computer screen, without blocking out any light. For best coverage, a larger sheet of glass is preferable, just make sure that it’s dust free. Once you are finished taking your photographs, you can remove any evidence of the sticky tape with the “Clone Stamp” in Photoshop.

    For best coverage, a larger sheet of glass is preferable, just make sure that it’s dust free. Once you are finished taking your photographs, you can remove any evidence of the sticky tape with the “Clone Stamp” in Photoshop.

    How to Make Creative Colorful Images of Plastic Objects Using a Polarizing Filter

    I’ve affixed this transparent stencil to a pane of glass to keep it upright against the computer screen. The small amount of tape can be removed easily in Photoshop later.

    How to Make Creative Colorful Images of Plastic Objects Using a Polarizing Filter

    In this image, a small piece of the clear sticky tape can be seen.

    How to Make Creative Colorful Images of Plastic Objects Using a Polarizing Filter

    Taking advantage of the solid black background, any trace of the sticky tape can be removed by using the paintbrush tool with a black swatch selected

    Getting the shot

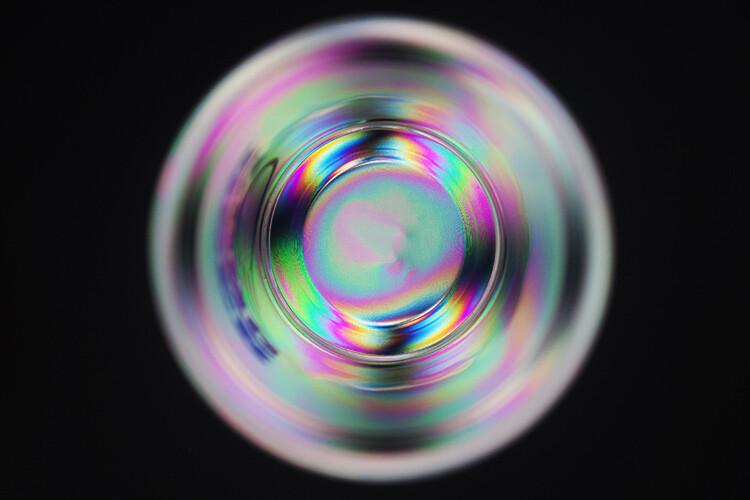
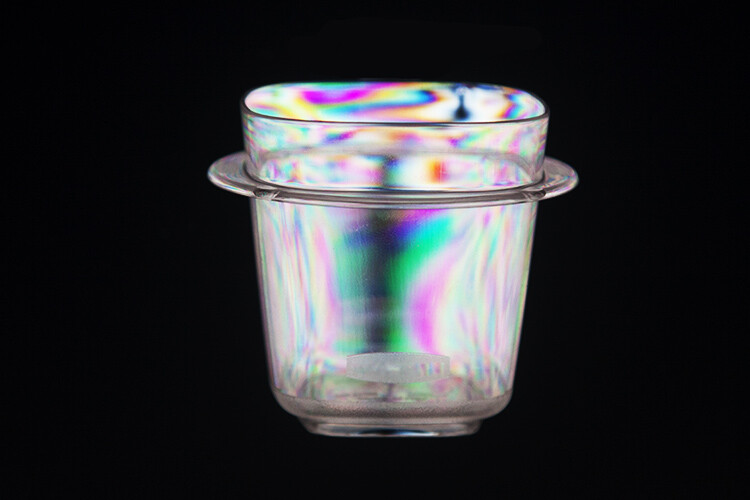
    Once you have assembled your objects against the computer screen, it’s time to see some results!  Grab the camera you outfitted earlier with either the polarizing filter or the polarized sunglasses. While looking through the viewfinder (or LiveView Mode) point the camera at your plastic assemblage. Like magic, the boring clear plastic materials are filled with a beautiful array of colors.

    Change the angle – change the background

    Depending on the angle of the polarizing filter, you’ll notice that the backdrop of your image ranges from the white computer screen to jet black. The degree of polarization you see through the lens is dictated by the angle of the filter in relation to the wavelengths emitted by the computer screen. This means that by changing the angle of the polarizing medium, you can adjust the brightness of the computer screen without impacting the color of the plastic objects.

    Simply hold the camera in one hand (or use a tripod) and use the other to slowly rotate the filter around. The same effect can be achieved by manually tilting the polarized sunglasses from side-to-side.

    How to Make Creative Colorful Images of Plastic Objects Using a Polarizing Filter

    An image of a pretty shell shaped container I had on my dresser. The polarization effect highlights the stresses in a plastic material, rendering them as beautiful arrays of color.

    The same shell container, this time with the filter angled so that the white light passes through to the camera sensor, rendering a white background

    Your turn!

    Now that you’ve got the basics, it’s time to raid the recycling bin! Post your results below and have fun.

    How to Make Creative Colorful Images of Plastic Objects Using a Polarizing Filter

    How to Make Creative Colorful Images of Plastic Objects Using a Polarizing Filter

    How to Make Creative Colorful Images of Plastic Objects Using a Polarizing Filter

    The polarizing effect caused this plastic bag to take on a rugged, mountainous appearance.

    How to Make Creative Colorful Images of Plastic Objects Using a Polarizing Filter

    How to Make Creative Colorful Images of Plastic Objects Using a Polarizing Filter

    How to Make Creative Colorful Images of Plastic Objects Using a Polarizing Filter

    The post How to Make Funky Colorful Images of Ordinary Plastic Objects Using a Polarizing Filter by Megan Kennedy appeared first on Digital Photography School.


    Digital Photography School

  • Nikon marks 100th anniversary with new scholarship program

    Nikon is marking its 100th anniversary in many ways, including the creation of a new scholarship program for ‘future visual creators’ in the USA and Canada.

    The scholarship will consist of two programs: ‘The Nikon Storytellers Scholarship’ will award ten college students with academic scholarships of $ 10,000. In addition, Nikon will identify rising stars on digital platforms and recognize them as a part of a curated ‘Nikon100 List.’

    Criteria for consideration will be announced later this year, and submissions will be reviewed, selected and awarded prior to the 2018-2019 school year.

    Press Release:

    NIKON INC. CELEBRATES 100TH ANNIVERSARY WITH SCHOLARSHIP PROGRAM FOR FUTURE VISUAL CREATORS AND PLANS TO RECOGNIZE UP-AND-COMING PHOTOGRAPHERS TO NEW #NIKON100 LIST

    Imaging Leader Allocates $ 100,000 in Scholarship Funds to invest in Next Generation of Students Pursuing Photography, Film, Journalism, Visual and Fine Arts Degrees

    NEW YORK, NY (July 27, 2017 at 10:00 a.m. EDT) – Today, Nikon Inc. announced two new programs to recognize and support the next generation of visual creators. “The Nikon Storytellers Scholarship” will award ten college students with academic scholarships of $ 10,000. Additionally, Nikon Inc. will identify rising stars on digital platforms and recognize them as a part of the curated “Nikon100 List.”

    “For the past 100 years, Nikon has been at the forefront of optical innovation and exploration,” said Kosuke Kawaura, Director; Marketing, Communications & Planning, Nikon Inc. “We have never been more excited about the future of imaging and are committed to supporting the next generation of photographers and creators that are eager to capture and share their world.”

    This fall, Nikon will announce the criteria for students throughout the United States and Canada to be considered for the scholarship program. Submissions will be reviewed, selected and awarded prior to the 2018-2019 school year. Recognizing the value of education and creative collaboration, Nikon is using their 100th Anniversary milestone to celebrate current and future creators.

    “Nikon understands the dedication it takes to pursue and become successful in creative fields, and we are honored to play a role in supporting students’ achievement in academic excellence,” added Kawaura.

    In addition to the scholarship, Nikon will identify and curate a list of rising stars in photography. The “#Nikon100 List” will identify photographers on Instagram that are creating inspiring work and telling amazing stories. Throughout the 100-day campaign, Nikon will highlight one new photographer to follow each day and will share that individuals’ photos on the Nikon Instagram channel with hashtag #Nikon100.

    These new programs build upon the deep commitment Nikon has made to supporting imaging talent. Nikon is the founding sponsor of the Eddie Adams Workshop, an intense four-day gathering of top photography professionals and 100 carefully selected, gifted students. Nikon also has a robust product loan program for students to learn the art of photography at 33 colleges and universities throughout the country. For some students, this is their only opportunity to access photography gear to learn and share their creative point of view. Nikon has also been teaching photographers of all levels for over 30 years through their Nikon School program which offers online and offline courses.

    Students interested in the Nikon Storytellers Scholarship and those looking to learn more about the “#Nikon100 List” can follow Nikon on Instagram , Facebook, Twitter or Snapchat (@NikonUSASnap) or visit http://www.nikonusa.com this fall for more details.

    Articles: Digital Photography Review (dpreview.com)

  • Pursuit: A spectacular storm-chasing time-lapse made from 90,000 photos

    Storm chaser and award-winning photographer Mike Oblinski has done it again: he’s created a time-lapse that will blow you away. Captured over the course of three months, across 10 states, and involving 28,000 miles of driving and over 90,000 time-lapse frames, Pursuit is the result of utter determination.

    Oblinski tells the story behind this time-lapse in the video’s description, explaining how this season of storm chasing nearly broke him.

    After 12 straight days on the road and away from his family, he left once again, just 24 hours after getting home, to chase another storm on June 12th. But doubt got the better of him, and he found himself 80 miles away from the spot he needed to get to.

    “I got back in the car and as I drove, the pain got the better of me and the tears came,” he writes. “It may not be easy to understand why, but when you work as hard as I did this spring, a moment like that can break you. I felt like I let my wife down. But mostly I let myself down. I forgot who I was and that’s not me. Or it shouldn’t have been me. I failed myself. And it seemed like the easy choice to just give up and head for home.”

    But he didn’t head for home, he decided to keep going, got out ahead of the storm, and captured one of the best structures he’d seen all spring.

    The result of that decision not to give up, to keep on going even when it seemed like he had utterly failed, is one of Oblinski’s best time-lapse films yet… and that’s saying something if you know his previous work.

    To see more from Oblinski’s portfolio, head over to his website or give him a follow on Facebook and Instagram.

    Articles: Digital Photography Review (dpreview.com)