Blog

  • X-Pedition: Cuba

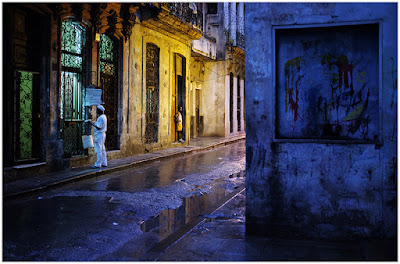
    Are you busy next January? I’ve been given the opportunity to lead a small-group photo trip to Havana, Cuba.

    I was last in Havana in 2013, teaching for Santa Fe Workshops. But that was someone else’s curriculum. This time the program is ours to design, and we are planning a week of exploring, learning and lots of time behind the camera.

    If that sounds like your thing, keep reading.

    An Immersive Week

    This is not the typical photo tour group, which invariably ends up as some version of a photo walk with everyone getting versions of the same pictures. I’m working with Focus On The Story, a D.C.-based organization for photographers. The trip leaders are myself and fellow journalist Joe Newman, whom I’ve known for over 30 years.

    Our trip will be more of a small-team experience, and very photo-centric. It will include instructional time as well as plenty of time to explore on your own—or with a teammate, if you prefer.

    We’ll always be out shooting at the edges of the day when the light is good, and at other times as dictated by the locations we have lined up. During the harsh light of midday, we’ll typically be in instructional mode. We’ll also be editing, comparing notes, evaluating what we can do better and preparing to go out and do it again.

    Please note that this is not a lighting seminar. I am traveling very light—an X100F and a similar backup body just in case—and probably won’t even bring a flash. We’ll be more in photojournalist mode than studio mode.

    In the evenings we’ll continue the conversation, perhaps over a mojito or a glass of Cuba’s famous dark rum. Nights in Havana are vibrant, with the sound of music filling the city. Its economic hardships may be well-known, but life and culture always find a way.

    Finding Your Balance

    We are traveling under a people-to-people license, which means you’ll get lots of interaction with locals throughout the week. You’ll also have time to absorb the city; to sit and watch the world go by. Whether along the Malecón or on the Paseo Prado, Cuban life is always on display.

    To always be in 100% photo mode is to miss one of the most important parts of the travel experience. Taking the time to observe the city both creates memories and informs your approach as a photographer when you pick the camera back up.

    The X-Factor

    The “X” in X-Pedition is a nod to Fuji’s X series cameras. Small, light, quiet and unobtrusive, Fuji X series bodies are ideal travel cameras. I took a leap of faith on my first trip to Havana, bringing only a Fuji X100s with its fixed 35mm equivalent lens. In retrospect, it was a great decision. And it has changed the way I approach travel photography ever since.

    So if you are also a Fuji shooter, you can expect tips and advice on how to get the most out of your cameras. Or to even borrow a lens if you like.

    Do you have to be a Fuji shooter to come along? No, you don’t. (And don’t worry, we promise not to try to convert you.) But we do strongly suggest that you travel very light with respect to photo gear. It’s good travel photo advice in general, but especially in a place like Cuba where the economic disparity is a factor.

    The Bigger Picture

    Havana is a unique opportunity for photographers. It goes without saying that it is not going to stay unique for very long. The island is already experiencing rapid change.

    Our goal with this trip is to help you grow as both travelers and photographers; to gain the skills and confidence to choose future destinations that are off the beaten path.

    __________

    This trip will sell out. So if you are interested in joining us, don’t sit on the fence too long. You can find full details and information on Focus On The Story’s X-Pedition Cuba page.

    Hope to see you there.
    Strobist

  • Entry-level DSLRs compared: Canon EOS Rebel SL2 vs. Nikon D3400

    Entry-level DSLRs compared: Canon EOS Rebel SL2 vs. Nikon D3400

    The entry-level DSLR segment is traditionally highly competitive, and dominated by two big names: Canon and Nikon. With Canon’s new Rebel EOS SL2 just hitting dealers’ shelves, we’ve compared it against one of its main competitors – the Nikon D3400.

    Keep an eye out for our full review of the Canon EOS Rebel SL2 coming soon, and read our previously-published review of the Nikon D3400 here.

    Sensor

    Twenty four megapixels is becoming a pretty standard resolution for entry-level and midrange DSLRs, but despite the identical pixel count, the sensors in the Nikon D3400 and Canon EOS Rebel SL2 are quite different. Most significantly, the Canon’s sensor is slightly smaller. This means that it introduces a slightly more aggressive crop factor of 1.6X, compared to 1.5X from the D3400.

    Crop Factor

    Should you care about this? That depends. We expect image quality from both cameras to be broadly similar for most shooting, but the increased crop factor may be relevant to you, especially if you enjoy shooting with long lenses.

    You should be aware that (for example) the new Tamron 18-400mm will offer slightly greater telephoto reach on the SL2 (29-640mm equiv.) than it will on the D3400 (where it will cover an equivalent zoom range of 18-600mm). Likewise, a typical 50-200mm telezoom will reach slightly further on an EOS Rebel SL2 (~320mm) than it will on the D3400 (where it caps out at an equivalent focal length of 300mm). Honestly though, the difference between a 1.5X crop and a 1.6X crop is so minimal at normal focal lengths that shouldn’t be a reason to choose one system over another.

    Autofocus (viewfinder)

    Entry-level DSLRs are not typically characterized by advanced autofocus systems, and the Nikon D3400 and Canon EOS Rebel SL2 are pretty typical of cameras in this class. Remarkable, the D3400’s 11-point AF system has been around for more than ten years, and the SL2’s 9-point AF system (illustrated above) isn’t much newer. Neither AF system is particularly remarkable, but both are perfectly reliable in normal everyday use.

    Where the Nikon scores over the Canon is in AF-C mode, with 3D AF Tracking turned on. Although nowhere near as versatile as the 153-point system in Nikon’s high-end D5 and D500, 3D AF Tracking does work in the D3400, and offers a good solution for casual sports and wildlife photography.

    Autofocus (live view / video)

    In live view and movie mode, the AF tables are turned. Here, the Canon EOS Rebel SL2 offers a far superior autofocus system, thanks to Canon’s unique Dual Pixel AF, which provides on-sensor phase-detection, covering 80% of the image area (indicated above). As such, the SL2 actually boasts better AF performance in live view mode than it does when used as a conventional DSLR.

    General performance

    The Nikon D3400 and Canon EOS Rebel SL2 give similar performance overall, when measured by standard features like maximum continuous shooting rate (which is the same, at 5fps for both cameras) and ISO sensitivity span (again, the same, at ISO 100-25,600). Both are capable of capturing great-looking images in most shooting situations, and doing so quickly and without fuss. Both cameras offer an option for quiet/silent shooting, too – which is nice.

    The Nikon D3400 does have a couple of tricks up its sleeve though – for one thing, it offers a more generous Raw buffer in continuous shooting, and is capable of capturing 10 Raw files at 5 fps as opposed to 6, from the Canon SL2, before slowing to allow the buffer to clear. The D3400’s 11-point AF system is superior to the 9-point system in the SL2 too, especially when it comes to tracking moving subjects.

    Rear screen

    The Canon Rebel EOS SL2 has a far better rear screen than the Nikon D3400, in multiple respects. For one thing it’s articulated, rather than being fixed. This is especially helpful for movie shooting and live view work. It’s higher resolution than the D3400’s LCD too, offering 1.04 million-dots compared to 920k.

    Touch-sensitivity

    The difference between 920,000 and 1.04 million dots is modest, but more significant is the addition of touch-sensitivity in the Canon SL2, which can be extremely useful when it comes to setting AF point position in live view and movie modes. And thanks to Canon’s Dual Pixel autofocus system, when you set AF by touch on the SL2, you can expect fast, accurate and smooth focus.

    Movie mode

    As far as video is concerned, these cameras offer a near-identical specification, but very different user experiences. Both the D3400 and Rebel SL2 feature a now-standard (for entry-level DSLRs at any rate) 1080/60p maximum resolution setting, and both can shoot perfectly good looking video. At this level we wouldn’t expect any video-centric extras like zebra highlight warnings or focus peaking, but it’s nice to see that Canon provides a mic socket on the SL2 (pictured above) for users that want to upgrade from the camera’s built-in microphone.

    The big differences between the D3400 and SL2’s video modes become obvious when you start shooting. The D3400’s fixed, non touch-sensitive rear LCD and contrast-detection autofocus system provide a pretty clunky experience. You can shoot video on the D3400, and footage looks fine, but it’s not much fun.

    The SL2 on the other hand offers a fully articulating, touch-sensitive rear display and Canon’s excellent Dual Pixel autofocus system. This is a no-brainer: if you’re interested in shooting video as well as stills, get the SL2.

    Connectivity

    Both of these cameras offer built-in connectivity options, but they work in very different ways. Nikon has tried to make things easy with its low-energy Bluetooth ‘Snapbridge’ connectivity suite (see screen-grabs above) but in practice, we have had issues getting it to work reliably, especially when paired with iOS smart devices. And even when it does work, sending files to a smartphone over Bluetooth is a very slow, frustrating experience. If you want Wi-Fi, you’ll have to upgrade to a model higher up in Nikon’s DSLR lineup.

    The Canon EOS Rebel SL2, on the other hand, includes built-in WiFi with NFC, plus Bluetooth, and the option to add a GPS receiver. The overall implementation of these features is much more sensible and versatile. It’s also pretty hassle-free.

    User interface / handling

    As entry-level DSLRs, the D3400 and Rebel SL2 are designed to be as small and light as possible, while remaining easy to use for beginner photographers. Both Canon and Nikon have long experience of designing cameras for this audience, and it shows. The D3400 and SL2 are mature, well-designed products that serve their intended buyers well, offering a range of fully automatic shooting modes, along with manual exposure control for more advanced or aspiring photographers.

    In addition, both cameras offer a simplified, more illustrative UI compared to their higher-end stablemates, including the option of a specifically beginner-focused interface, geared towards educating novice DSLR photographers about the best choice of settings for certain subjects, and the effects of different exposure parameters on the final image.

    For our money, the D3400’s ‘GUIDE’ mode, which takes the form of a simplified on-screen tutorial, makes it a better DSLR for the absolute beginner.

    User interface / handling

    Both cameras are very small and light, but impressively, the SL2 offers a fully-articulating, touch-sensitive LCD screen while still feeling very slim. The D3400 is a few grams lighter, but not enough that you’d notice when the two cameras are held side by side.

    Battery life

    The D3400 offers substantially greater battery life than the Canon EOS Rebel SL2, at a quoted 1,200 shots compared to 650 under CIPA conditions, which includes 50% flash use. Canon quotes a battery life of ~800 when flash is not used at all. We generally expect CIPA estimates to be on the low side, so the SL2’s battery life will probably be better than these figures might suggest in normal use, but it’s clear that the D3400 offers a lot more endurance on a single charge.

    Articles: Digital Photography Review (dpreview.com)

  • Good, Better, and Best Noise Reduction Techniques

    When it comes to noise reduction, you always have two goals. First, obviously, you want to get rid of any digital noise in your picture. But secondly, you want to preserve detail. These often work against each other because increasing noise reduction often leads to a loss of image detail, but if you focus on preserving the detail then you may end up with a noisy picture.

    Good, Better, and Best Noise Reduction Techniques

    So what can you do about it? Different people have different methods, but for me, there is a good, better, and best way to go about noise reduction. As you might imagine, my good way is simple, the better way involves a little more effort, and my best way requires a lot more effort (and can be rather complicated). In this article, I will walk through my favorite options so that you can decide if one of them is appropriate for your own noise reduction workflow.

    “Good” Noise Reduction

    Lightroom has very good noise reduction tools. They are powerful and really easy to use. They reduce noise and do a decent job of preserving detail. Further, the noise reduction in Lightroom seems to get a little better with each new iteration. If you want a good noise reduction tool that will take up almost none of your time, simply use Lightroom.

    Good, Better, and Best Noise Reduction Techniques

    Lightroom noise reduction sliders.

    The primary slider is the top one labeled Luminance. I think of that as the amount of noise reduction being adding to your photo. From there, you can fine-tune your noise reduction using the additional sliders below it. Frankly, however, if I am using Lightroom for noise reduction, it is because I want it to be quick and easy, so I usually just use the Luminance slider.

    Suggested starting points

    You may be wondering about a starting point for the amount of noise reduction to apply. Of course, that is hard to do, and it depends on a lot of things. First of all, it depends on the ISO value you used. It also depends on the low-light performance of your camera. However, I hate the “it depends” answer, so to give you an idea of a starting point taking into account those variables, here is a chart with some suggested values for the Luminance slider.

    Good, Better, and Best Noise Reduction Techniques

    Suggested starting points for noise reduction settings in Lightroom.

    Of course, there are other factors involved as well, which this chart does not take into consideration. For example, dark tones will show noise much more than lighter tones, so you may need to increase the amount where you have darker tones. Just use this chart as a starting point, and don’t take it as a definitive range that you must stay within.  Always do whatever the picture requires, even if it is drastically different than what is set forth here.

    Read more on noise reduction in Lightroom here: How to do Noise Reduction in Lightroom

    Selective Adjustments in Lightroom

    The noise reduction settings within Lightroom will apply to your entire picture. We are going to get into selective noise reduction later, but I should mention here that you can also use the Adjustment Brush in Lightroom to selectively add noise reduction.

    Select the Adjustment Brush and find the slider labeled Noise. That’s right – you only have one slider for this, so think of it as the equivalent of the Luminance slider you used above. From there, just set your brush size (you can use your left and right bracket keys for this) and paint in the effect where you want it. You’ll see better ways to selectively apply noise reduction in a minute, but if you aren’t too picky about the selection then the Adjustment Brush might be the tool for you.

    Good, Better, and Best Noise Reduction Techniques

    Noise reduction slider inside Lightroom’s Adjustment Brush.

    “Better” Noise Reduction

    Normally, when I want to bring out the heavy artillery in any aspect of post processing, I find that I need to head into Photoshop. That is sort of true here, in that we will be heading to Photoshop, but then again not true in that we won’t be using Photoshop’s noise reduction. I find that Photoshop’s noise reduction tools aren’t that great, and Lightroom actually works better (there are plenty of people that disagree with me though, so make up your own mind about that as you use them both).

    Instead, I merely use Photoshop to take advantage of third party noise reduction software that works within Photoshop. Yes, you could also use them from Lightroom, but using them within Photoshop will allow you to take advantage of Photoshop’s powerful masking techniques (which you will see in a minute).

    Noise reduction plugins

    What are these noise reduction applications that are available?  Let’s take a look.

    • Noiseware: First, we have Noiseware by Imaginomic. I mention this first because it is the application I have used for my own noise reduction for the past several years. It works really well, does a great job eliminating noise, is simple to use, and it preserves a lot of detail. There are several presets to choose from and then a few sliders to make adjustments from there.
    • Nik Define: A free option is Nik Define. It is part of the Google Nik Collection, which is now free. It does a nice job of reducing noise, and if you are looking for a free option this is a good one. The downside is that it appears this software is no longer being updated and its days are numbered.
    • Noise Ninja: This is part of the Photo Ninja Suite by Picture Code. The entire suite costs $ 129. I personally have not used it, but the reports I have heard from others and the reviews have always been positive. Read: How to Reduce Noise with Photo Ninja for more info.
    •  Topaz Denoise: Topaz makes a series of plug-ins that do a variety of functions really well. Their noise reduction software is called Denoise and it costs $ 79 (or you can get the whole suite of apps for $ 500).  I haven’t used this one either, but the reviews have been good and my experience with other Topaz apps has been very good.
    • Macphun’s Noiseless: Inside Macphun’s Creative Kit you will find the Noiseless plugin (you can also buy it alone). Read this for more info on this option: Macphun Noiseless Pro Software Review

    Any of these will do a nice job.

    Good, Better, and Best Noise Reduction Techniques

    Screenshot of Noiseware interface.

    “Best” Noise Reduction

    The best way I have found to apply noise reduction is exactly the same as the way you just saw, except that you apply it selectively. The reason is that noise reduction reduces detail in your image. It is often hard for noise reduction software to tell the difference between noise and important detail. That is particularly true in night sky photos, where the many stars can resemble the random flecks that constitute noise.

    Basic Masking

    To avoid having your noise reduction software reduce detail, you can use Photoshop to mask off the more important areas of the sky. To accomplish that, you just create a layer mask so that the noise reduction only applies to certain parts – which will be white in the mask – of your image.

    A simple, but admittedly imprecise, way to do this is with a brush. If you start with a “reveal all” (white) layer mask, you will then use the brush (color set to black), which will keep the noise reduction from reducing detail in the areas you choose. On the other hand, if you start with a “hide all” (black) layer mask, you will paint the entire mask with white except the part where you want to preserve detail. You can get as course or fine as you want (or time allows).

    An example of masking off noise reduction in an area where you want to preserve detail in the picture. This applies to the cliffs picture at the top of this article.

    How to do you do it? First create a new layer copy (Ctrl/Cmd+J if your picture only has one layer, or Ctrl/Cmd+Shift+Alt+E if you have multiple layers already), then apply your noise reduction as you normally would. After that, just click on the Add Layer Mask icon at the bottom, which will create a white (reveal all) layer mask (or press Alt while doing so to create a black layer mask to hide all). Then just use your Brush (B) to paint with the opposite color as your mask.

    You can get as involved as you want with masking. You likely have your own favorite ways already, so go ahead and use them. There is no right or wrong way to mask.

    Applying Noise Reduction

    So those are my three ways to apply noise reduction. You can add some quick noise reduction in Lightroom, which takes only a second. For slightly more involved but also more powerful noise reduction, add the addition application of your choice. For your most important pictures – or the ones with the biggest problems – add noise reduction and then use masking to limit the effect to the specific areas you want.

    These are just my ways though. Do you have your own special methods that are different?  If so, let us know about it in the comments below.


    If you found this article helpful it is just one of 31 tips you will get if you grab Jim’s new dPS course: 31 Days to Becoming a Better Photographer.  Enrollment for this course is only opened for a limited time and closes August 11th (5 more days) so get it now.

    The post Good, Better, and Best Noise Reduction Techniques by Jim Hamel appeared first on Digital Photography School.


    Digital Photography School

  • How to Find Your Photographic Zen – Tips to Recharge When You’re Feeling Stuck

    Lately, I have been feeling very burned out and unmotivated with my photography. Several months ago I was preparing for a summer away from my business. My days were spent photographing editorials, working on client images and writing photography articles to prepare for a three-month sabbatical. I was working non-stop for several weeks as well as managing other aspects of my life. All that hustle to be prepared seemed to have gotten the best of me. I was feeling completely unmotivated and stuck, almost to a point of being irritated to pick up my camera and take a few shots.

    I knew this was a phase, and that I just needed to ride it out. But at the same time, I was trying to understand how to effectively manage this so that my craft and my business wouldn’t suffer too much.

    How to Find Your Photographic Zen - Tips to Recharge When You're Feeling Stuck

    This was the scenery outside my bedroom window. I was so out of it that I did not even bother cleaning the window of raindrops before I took this shot (smudges seen in the bottom left of the frame) – I took the shot because I had to not because I wanted to!

    As I write this article, I have spent the past 10 days living in a mountain village with incredible views of the Nanda Ghunti mountain range of the Himalayans right outside my bedroom window. My days are spent completely cut-off from most of the outside world, having copious amounts of tea, belly laughs with family, and intimate conversations by the fireplace listening to the frogs and beetles chirping all night long. I have probably lost many followers on social media, and I have several hundred unanswered emails. But I have come to the realization that time away from the outside world is just the thing I needed to recharge and get back my mojo!

    So if you are like me and feeling a little deflated with your art, here are a few tips to help you overcome that lull and get back into it with renewed passion.

    #1 – Permission to take a step back

    Let me tell you something – burn out is very real and happens to everyone at some point in their lives, no matter what field of work you are in. For people in the creative arts, burn out tends to happen faster and more often because as a creative, all your senses are heightened and you are aware of everything around you 24/7. For photographers, burn out manifests either as a lack of interest in picking up the camera or disliking everything you create. If this sounds like you, acknowledge it and please give yourself permission to walk away from it all – even if it’s just for a day. If you can afford to take a longer break then do so.

    #2 – Capture heartfelt stories and frames

    As photographers, we have an incredible opportunity to document life stories – whether it is of people or for landscapes. The wrinkles and toothless smile of an elder speak volumes about his life’s journey. Don’t just take the shot and walk away. Spend a few minutes and listen with both your heart and your head. Then when you do take the shot, it will become so much more meaningful and special – even if it is just for you and your subject.

    How to Find Your Photographic Zen - Tips to Recharge When You're Feeling Stuck

    On the left – A young village girl gave me the sweetest of smiles when I handed her an extra piece of candy that I had purchased for my kids. She pointed to my camera and asked me to take her picture and was giggling with laughter when I showed her the back of the camera! On the right – the local temple priest was going to town and as we were waiting for a ride together he started chatting with us. Everything about him calmed me down and gave me a sense of peace!

    How to Find Your Photographic Zen - Tips to Recharge When You're Feeling Stuck

    These three generation of women were chatting up a storm as I passed them by during a photo walk. When they saw a camera in my hand, they called me back to come take their picture! – I happily obliged and was offered a hot cup of chai in exchange – Before I walked away, I had made a new set of friends!!

    #3 – Take a wabi-sabi approach to your images

    A wabi-sabi method requires a slower, quieter approach to life. The concept is very similar to Japanese Zen gardens that promote tranquility and calmness. Slow down and quiet your mind. Stop chasing that next award winning frame for just a few minutes and open your eyes to all that is around you. Stop – Look – Feel and then click. This will make each frame more meaningful and help you convey the story better once you yourself understand what is unfolding around you.

    How to Find Your Photographic Zen - Tips to Recharge When You're Feeling Stuck

    The fog was so thick that it covered the whole valley and only the tops of some of the trees were visible – this scene was so soothing and almost like a painting. It was the perfect zen for my troubled mind!

    #4 – Rule of Thirds and negative space

    Try and step away from rules and conformity. Resist the urge to put everything in the dead center of the frame. Instead embrace negative space, the rule of thirds and/or focus on singular elements in your frame. Not only will you create work that is different from the rest but you’ll also learn to approach life in a very different way – more relaxed and free flowing as opposed to stressful and rigid.

    How to Find Your Photographic Zen - Tips to Recharge When You're Feeling Stuck

    #5 – Free-range photography

    The best thing I can do for myself based on my personality is to practice free-range photography. For me, this means breaking free from my norm (leaving the status-quo and photographing something completely out of character). Not only does this clear your mind of preconceived photography habits and notions but also gives you a fresh perspective in the art of photography.

    Do not approach this exercise with the idea of perfecting it and getting award winning shots. Instead, approach it with the idea of doing something different, making mistakes, and yet having fun with it.

    How to Find Your Photographic Zen - Tips to Recharge When You're Feeling Stuck

    I am fascinated with the old doors, windows, and archways found in India. To me, their textures, colors and characteristics speak volumes about their history.

    Conclusion

    So if you are feeling stuck and burned out in your photography, know that it is absolutely normal and expected. Don’t fight that feeling. Instead, accept it and embrace it with open arms. Once you accept it, you will figure out a way to work around it and create a meaningful body of work because you have given yourself permission to recharge, renew and get reenergized with your craft.

    The post How to Find Your Photographic Zen – Tips to Recharge When You’re Feeling Stuck by Karthika Gupta appeared first on Digital Photography School.


    Digital Photography School

  • Flash Shopping Guide – 5 Things to Consider When Buying a Speedlight

    Lighting is one of the most challenging aspects of photography and is often the thing which makes or breaks a photograph. There are several problems when you shoot with the built-in flash on your camera. The images appear washed out (overexposed), have red-eye, and many other issues. Using the built-in flash also creates harsh shadows, and gives you a rather flat-looking image.

    External flashes, or speedlights, are photographic equipment which can be used to compensate for the pop-up flash. They allow far superior control over the lighting and exposure of an image, even in low-light shooting conditions.

    Use a speedlight or flash to create better lighting.

    For newbies in the field of photography, and even for people who have been shooting for quite a bit of time, choosing the correct external flash can be a huge challenge. There are countless brands on the market today offering a huge variety of flashes which makes it all even more confusing.

    Below are the five essential things that we felt must be considered, before investing your money on an external light source. Read this if you are about to buy a new flash or speedlight for the first time.

    Flash Shopping Guide - 5 Things to Consider When Buying a Speedlight

    #1 – The Brand

    Initially, buying a flash was really simple. If you wanted to buy a speedlight then you had to buy it from your camera manufacturer – usually Nikon or Canon. Today the situation is completely different, and the market is flooded with several other companies that sell speedlights such as; Yongnuo, Godox, Nissin, etc. So you can opt to buy the flashes by your camera manufacturer or purchase one sold by one of the third party companies.

    Although the flashes sold by Nikon, Canon, etc., are really expensive compared to the third party options, many photographers believe that they are still a better buy as they have a longer life, are more durable and are more compatible with their DSLRs.

    However, even the third party speedlights these days are increasingly giving competition to the big brand names in terms of performance, durability, and more. Another plus is that they are a lot cheaper. A flash by Godox is much easier on the pocket than one by Canon, which is a welcome point for many looking to buy their first flash.

    #2 – Flash Life and Longevity

    Speedlights are just like any other bulb, as in they too have a limited life before which they “burn out” and stop working. Thus, before purchasing any speedlight, be it of any company or any model, do some research about its longevity, and the amount of time it can be used effectively before it needs to be replaced.

    If a flash does not fire properly and at full power, then it would disturb the lighting of an image and give you an unusable photograph as well in many cases.

    #3 – Flexibility

    Flash light buying guide 4

    Light from a speedlight used off-camera with light modifiers.

    Apart from its many drawbacks, another major restriction with the pop-up flashes are that they are completely fixed and not movable at all. They only point in one direction, forward, and cannot be moved along with the camera. Thus, the light being fired cannot be controlled or bounced, as per the photographer’s wish.

    This is why it is important to check the flexibility of a flash unit before purchasing it. If the head of the flash you buy cannot be moved, tilted, or angled up-down, left-right, etc., then that defeats the very purpose of using it. A speedlight is used to bounce light around, reflect it off different surfaces, and so on, and if the flash doesn’t have that much control, then using it would virtually be a waste of time.

    #4 – Automatic (TTL) or Manual Control

    There are two types of flashes or speedlights – TTL and fully manual. TTL simply stands for Through The Lens, which is a type of automatic flash.

    Flash light buying guide 5

    Do you need TTL or will a Manual flash suffice for your needs?

    A manual flash has to be told and directed by you, as to how much light is to be emitted. Any change in the power of the light emitted by a manually controlled flash has to be done by you according to your requirements. These manual flashes are cheaper because their build is much simpler and more basic than a TTL flash.

    A TTL flash, on the other hand, is an automatic speedlight, which interacts and communicates with the camera to determine the optimal amount of light required to illuminate a particular scene properly. An additional advantage of TTL flashes is that they can also be used in full manual mode, if you wish, for greater control.

    TTL flashes have proven to be extremely accurate and reliable. Although there is a slight chance that they might not give the expected results. But that is a very minimal risk.

    #5 – Flash Recycle Time

    This is a point to consider especially by sports and action photographers, who often have to shoot multiple bursts of shots together. The recycle time or recycle rate is simply the time taken between two pops/firings of the flash for it to be ready to fire again. The recycling rates are usually always mentioned by the manufacturers in terms of seconds.

    The specs for a speedlight will usually have two different times mentioned (e.g. 0.3-5 seconds). The lower number denotes how soon another flash shot can be taken if the flash produces its lowest light output (lowest power setting) while the higher number indicates the time it will take before taking another flash shot when it has generated its maximum light output (full power).

    Flash light buying guide 6

    If you need a flash that recharges and is ready to go quickly, make sure to check the recycle rate before you make your purchase.

    The important recycling time to consider is the one at maximum output. Always aim to get a flash that has a shorter maximum light output time. However, even along with keeping this point in mind, remember that you also need to buy a proper battery for your flash to get the recycle rate mentioned by the manufacturer.

    Conclusion

    So, it all comes down to what you are comfortable with when buying a flash, depending on your usage needs and budget. To begin with, you can go with a basic manual flash and once you start understanding the application of a speedlight you can always upgrade. Nowadays, the third party flashes are almost on par with the brands such as Canon and Nikon, so nothing is stopping you from capturing creative frames irrespective of your budget.

    The post Flash Shopping Guide – 5 Things to Consider When Buying a Speedlight by Kunal Malhotra appeared first on Digital Photography School.


    Digital Photography School

  • How to Take Control of Contrast Using Curves and Levels in Photoshop

    Have you ever found your photos flat? The colors are muted and it just looks dull? That’s because it lacks contrast. Sometimes regardless of your best exposure skills, the conditions are not suited to get a wide range of tones. Not to worry though, it can be fixed in post-processing. I’ll show you my workflow for how you can take control of contrast in your images using Curves and Levels in Photoshop.

    Of course, there are many ways to adjust the contrast on Photoshop, there’s even a tool called Brightness and Contrast, however, it doesn’t give you much control. What I like to do is to manipulate Curves and Levels. In this article, I’ll explain to you why and how I use these tools to boost contrast.

    The issue of low contrast

    Low contrast can happen for many different reasons; bad weather for example or photographing through glass. In any case, the resulting image doesn’t show a wide range of tones, in other words, there’s not enough difference between the lights and the darks.

    I find this problem occurs especially while traveling, because you can’t go back to the location when the weather is better, or because you are seeing things through a pane of glass. For example, the image I will use for this tutorial was taken through the window while traveling on a tour bus.

    How to Take Control of Contrast Using Curves and Levels in Photoshop

    How do you know it’s low contrast?

    I chose an image where the contrast is clearly low so that you can easily see the effects of every step. However, in some cases, it won’t be as obvious, but you can always review the histogram to know the tonal range of your image.

    A typically correct exposure should have a histogram that reaches from black (left) to white (right) evenly spread, with the highest values in the middle. Please note that this can change if you are going for a different effect like low key or high key where you purposely choose a specific range to work with, so I am just talking about the average image here.

    As you can see, in this case, all the information is concentrated in the middle tones, but it doesn’t reach the black or the white side (see histogram below). This is why the image has no contrast.

    How to Take Control of Contrast Using Curves and Levels in Photoshop

    Using Curves

    First, we are going to manipulate the Curves tool. Remember to do it on an adjustment layer and not directly on your original (this is non-destructive editing), that way you won’t loose any information and you can always go back and start again if you don’t like the results. To do this go to the menu then: Layers > New Adjustment Layer > Curves and a new window will pop up.

    Curves

    You can also get to Curves on the Adjustment panel.

    Curves adjustment

    Inside that, you’ll find a graph with the histogram on it. The line that crosses the graph controls the contrast; the steeper it is, the greater the contrast.

    Curves- How to Take Control of Contrast Using Curves and Levels in Photoshop

    You can fix anchor points along the line that you can move up or down to adjust the contrast of the image. Add as many anchor points as you need. The higher right quadrant controls the highlights and on the lower left one, you have the dark tones.

    Curves Anchors - How to Take Control of Contrast Using Curves and Levels in Photoshop

    If you want to increase contrast, as we do in this case, add one anchor point in the lower left quadrant and slowly pull it down. Watch how it affects the dark areas of the image. Move it until you’re happy with the result. Then add another anchor point in the upper right quadrant and pull it up slowly until the highlights are bright enough for your preference. By making the straight line into more of an s-curve you will add contrast to the image.

    Note: if you have an image with too much contrast the opposite can work. Pull down the highlights, and push up the dark areas on the curve to get an inverted s-curve.

    After fixing the curves for the overall image, this tool allows you to fine-tune by channel. The step we did before was working on RGB, however, if you click on the drop down menu you can choose each channel to work with separately.

    In this case, let’s start with the Blue channel. If you pull up an anchor point from the highlights (the upper right quadrant) you are making the sky, which is the lighter part of the picture bluer. In the left lower quadrant (the shadows) pulling the anchor a little bit down allows you to remove some of the color cast.

    Next is green channel so that you can get a wider tonal range out of the forest and nature of the scene. The adjustments are very subtitle because when you are working in such detail the tools become very sensitive. Move around the graph until you are happy with the result.

    Remember different light sources have different colors;  a sunset has warmer colors than at noon, artificial light can be more yellow than natural light, etc. Apart from correcting any color bias, it works to add some special effects and get creative. In the next example, you can see what happens when the graph gets completely inverted in the red channel. You can also achieve this by playing with the different presets, in this case, color negative.


    Using Levels

    Next, you want to manipulate the Levels, also using an adjustment layer. You can do this by going to the menu > Layers > New Adjustment Layer > Levels (or you can find it on the Adjustments panel just to the left of Curves). Again a new window will appear with a different graph, this represents the darkest parts of the picture (0) to the lightest parts (255).

    Levels - How to Take Control of Contrast Using Curves and Levels in Photoshop

    You can manipulate contrast by dragging the sliders underneath the graph, however, you will have much more control if you use the eyedroppers. This is how to work with them:

    First, choose the white eyedropper (bottom one next to the graph) and click on the lightest part of the image that still has information or detail. You’ll notice how your entire image becomes lighter and brighter. Don’t worry about getting it right on the first try, you can click around on the image until you are satisfied with how it looks.

    Levels white eyedropper

    Levels White - How to Take Control of Contrast Using Curves and Levels in Photoshop

    Then pick the black eyedropper and click on the darkest part of the image with detail. Same as the white one, try it until you get it right. You can always do some final adjustments with the sliders as well.

    Levels Black - How to Take Control of Contrast Using Curves and Levels in Photoshop

    Finally use the gray (mid-tones) eyedropper to set the ambiance or mood of the scene, as it will change depending on where you click. Here some examples:


    In Levels, you can also do the selective adjustments by channel if you need.

    Before and after

    And there you go, when you are satisfied with your results, flatten the image by going to the menu Layers – Flatten Image. See how the histogram has a much wider range now, and the final image has more impact.

    How to Take Control of Contrast Using Curves and Levels in Photoshop

    Before image.

    Before - How to Take Control of Contrast Using Curves and Levels in Photoshop

    Before adjustments for reference.

    Histogram After - How to Take Control of Contrast Using Curves and Levels in Photoshop

    Histogram after Curves and Levels adjustments.

    after - How to Take Control of Contrast Using Curves and Levels in Photoshop

    After image.

    Handling reflections – example

    Remember that when you are photographing through glass there might be reflections, and when you boost the contrast these reflections will be much more noticeable. So think about that before shooting, when you are composing your image.

    In order to demonstrate this for you, I made a photo while enjoying a panoramic view from a skyscraper in Milan. It was a 360 degrees glass wall, so I was bound to have a reflection. In order to use it to my advantage, I decided to place my foot strategically so that its reflection would be in between two buildings and entitled the photo “Stepping into Milan”.

    Skyscraper Before - How to Take Control of Contrast Using Curves and Levels in Photoshop

    Before processing.

    Skyscraper After - How to Take Control of Contrast Using Curves and Levels in Photoshop

    After processing, notice my foot in the lower left corner?

    Dull weather – example

    As I mentioned before, it’s not only shooting through glass that can give you low contrast scenes. Here I have another example that had to do with the weather. It was a very cloudy day so there were no shadows, everything looked kind of gray and the light was very flat. This too can be fixed with Curves and Levels following the previous steps.

    Canal Before - How to Take Control of Contrast Using Curves and Levels in Photoshop Canal After - How to Take Control of Contrast Using Curves and Levels in Photoshop

    Conclusion

    Now you know that a low contrast photo doesn’t mean you’ll end up with a flat or dull image, so shoot away! I hope you found this helpful and if you have any doubts or tips about contrast, please share them with us in the comments section below.

    The post How to Take Control of Contrast Using Curves and Levels in Photoshop by Ana Mireles appeared first on Digital Photography School.


    Digital Photography School

  • Warming Signs: Clet Abraham Rewrites Rules Of The Road

    [ By Steve in Art & Street Art & Graffiti. ]

    Guerrilla street artist Clet Abraham may be the Banksy of the boulevard, hacking road signs with stickers and encouraging people to question authority. Our lead image dated August 31st of 2013 comes courtesy of Flickr member Oilvier Ortelpa, who snapped Abraham’s enhanced traffic sign in Brussels, capital of the EU.

    Clet Abraham‘s creative road sign hacks turn everyone’s frowns upside down – well, unless you work for the City – but his subversive street sign stencils are meant to be more than just amusing. The Florence, Italy-based guerrilla artist sees graphic, no-nonsense road signs as uncompromising symbols of authority. His clever stencils facilitate alternate interpretations of the signs’ harsh and uncompromising symbolism, and thus invite the public to think twice before blindly obeying those anonymous commands.

    One of Abraham’s favorite targets is the ubiquitous red & white NO ENTRY sign. Possibly alluding to the human tragedy of Europe’s migrant crisis, Abraham hopes to provoke more public debate over the concept of NO ENTRY and what it means to not only those hoping to come to Europe but those already living there. Some examples of the artist’s work in his hometown of Florence are shown above, snapped by Flickr member Marianne (Mariannera) in October of 2013.

    When In Rome, Hack The Signs

    Now 50 years old, Abraham has lived in Florance since 2005 but originally hails from Brittany, France. He studied at the Ecole des Beaux-Arts in Rennes before moving to Rome, where he honed his skills restoring antique artworks – you won’t find any botched frescoes on his resume!

    It was the “omnipresence of street signs” in Italy, however, that spurred Abraham “to intervene, both to notify the public of the absurdity of the situation, and to propose a constructive and respectful alternative.”  Flickr member Philosofia captured a small selection of Abraham’s work on the streets of Rome in January of 2012.

    Labor Of Love

    “My adhesives are developed to add a further level of reading (to street signs),” adds Abraham, “constructed on the base of their original signification in order to maintain its utility but give it some intellectual, spiritual, or simply amusing interest. The final objective? That traffic keeps flowing without us feeling spoken down to!” Flickr member Irene Grassi snapped the above sun-faded stenciled sign in Florence on January 1st of 2015.

    Next Page – Click Below to Read More:
    Warming Signs Clet Abraham Rewrites Rules Of The Road

    Share on Facebook


    [ By Steve in Art & Street Art & Graffiti. ]

    [ WebUrbanist | Archives | Galleries | Privacy | TOS ]


    WebUrbanist

  • Social Media Vs. Reality video calls out the most common Instagram lies

    Anti-bullying organization Ditch the Label—the folks behind this 2017 survey that found Instagram is terrible for teens mental health—created a funny-but-also-very-sad video to accompany their findings. The video is called “Are You Living an Insta Lie? Social Media Vs. Reality”.

    The video covers “some of the funniest and most common Insta Lies posted on social media,” and they really did cover most of their bases. Some of the tropes covered include #wokeuplikethis photos, the start of a ‘healthy’ juice cleanse, not-so-blissful relationship bliss and lots more.

    We’re not sure any professional photographers use Instagram like this, but chances are good we’ve all… bent the truth on Instagram a time or two. If you can think of any common photographer Insta Lies, share them in the comments.

    Articles: Digital Photography Review (dpreview.com)

  • This crazy fire-and-water wedding portrait was shot in a single exposure

    Photographer Markus Hofstaetter doesn’t shy away from challenging projects. Inspired by a previous fire-background hot-rod photo shoot he did, Hofstaetter had the idea to try this same technique with a portrait. There would just be one key difference: this one would be a single exposure.

    A photo shoot like this is all about safety, and Hofstaetter did everything he could to ensure his subjects, assistants, and the backyard stayed nice and unburnt.

    He got himself a heat-proof suit from the Muckendorf-Wipfing fire department, moistened the entire backyard, cut away stray branches to ensure he had enough room, had damp sheets at the ready, and actually built a little pond in his backyard. That last part did keep the couple a bit safer, but it was actually all about getting a killer reflection in the final photograph.

    You can see how the photo shoot came together in the behind the scenes photos and video below:

    $ (document).ready(function() { SampleGalleryV2({“containerId”:”embeddedSampleGallery_3170715563″,”galleryId”:”3170715563″,”isEmbeddedWidget”:true,”standalone”:false,”selectedImageIndex”:0,”startInCommentsView”:false,”isMobile”:false}) });

    Once it came time to shoot the actual photo, he used a Canon 5D Mark IV and 35mm lens set to F22. The full exposure was 4.4 seconds long. The fire background was made by dipping a 6-foot-long Kevlar wick into one liter of lamp oil, hanging it on an aluminum stick, and setting it ablaze.

    The exposure lasted as long as it took for the fire to cross the frame, with a nice burst from two Hensel strobes to light the couple.

    The final photograph took 4 or 5 tries, as you can see from the BTS video above, but in the end Hofstaetter managed to capture the memorable portrait he was after:

    The photo has made its way around the Internet over the past week, but something people don’t know is that Hofstaetter’s initial plan was to capture the shot on both digital and large format film (his specialty).

    “You see there also a large format camera (Linhof Master Technika) in one photo,” he tells DPReview. “I wanted to shoot film too, but it was too stressful to handle both cameras, because I had to light the fire too. Plus, I couldn’t get the analog camera in a good position with the lenses I had available… next time I’ll try to shoot it on film too, and maybe get a wider angle lens for the Linhof.”

    To see more of Hofstaetter’s work, head over to his website, follow him on Instagram, or follow along on his blog as he continues to experiment with all sorts of crazy ideas.


    All photos © Markus Hofstaetter and used with permission.

    Articles: Digital Photography Review (dpreview.com)

  • Marketing isn’t a dirty word (but camera companies are not your friends)

    Marketing departments work to develop products that people will want. They aren’t always trying to make the best product for you, though.

    Camera companies are not your friend but they’re also not trying to trample on your dreams. It seems like an obvious statement, but a misunderstanding of how markets and marketing work sometimes leads to exactly this sort of misconception. A look at the role marketing plays can help explain why ‘your’ brand sometimes makes decisions you hate.

    Making a profit is not the same as profiteering

    Brand loyalty sometimes prompts people to forget that every significant camera company is a large, profit-driven corporation. The fact that they make tools for a very personal, expressive, creative purpose and are often staffed by people who really care about photography (even in the marketing departments), shouldn’t obscure the fact that they’re trying to make money. But that isn’t the same thing as profiteering: it’s in their interest to make products that you want. And it’s the marketer’s role to work out what that product would be.

    Marketing isn’t the enemy

    Product development isn’t about virtuous engineers who create lovely things and evil marketing people who take them away. It’s usually a back-and-forth to create models that suit a specific audience without overwhelming them with tools and features they don’t necessarily want or producing cameras they can’t afford.

    It’s true that, without the input from marketers, engineers can produce Formula One race cars. However, most people find a Ford Focus, Honda Civic or BMW 3 Series much more affordable and considerably more convenient for collecting the weekly shop. Still, if you wait long enough, some of that Formula One know-how may well make an appearance in your family hatchback.

    It’s a process called market segmentation: identifying large enough groups of people with similar enough needs and disposable income, then making models specifically for them. If you get it right, you end up with a range of cameras that appeals to a broad range of people and makes it obvious to each buyer which model is best for them. Most of us aren’t racing drivers, after all.

    It might not be for you

    The upshot of this is that not every model is aimed at you. You may have read my car analogy and found yourself thinking ‘I’d never drive a Ford Focus.’ But, whether that’s a matter of taste or because it doesn’t suit your needs, this doesn’t mean the Focus isn’t a good product.

    It is common to assume that your needs are universal or, at least, typical. However, just because you find a feature to be indispensable doesn’t mean that everybody else does. It follows then, that a company may not be wrong to remove it. So before you find yourself stating “no xxxx, no sale,” it’s worth thinking whether the product in question is aimed at you and whether it might be a good fit for other people. It could be that the sale to you was never expected.

    Just because you find a feature to be indispensable doesn’t mean that everybody else does

    For instance, there are a lot of people who are very vocal about the absolute necessity of viewfinders, but if you look back to the days when people actually bought compact cameras, you’ll notice that the majority of them didn’t have one. Most manufacturers would offer one or two models simply to capture the refusenik dollar, but the vast majority of users bought the cheaper model without one and did the same when replacement time came around.

    D7500: desirable or debacle

    The D7500 is a great example of the challenge of market segmentation. By resuscitating its high-end Dx00 line, suddenly the D7200 successor has to fit between two models rather than sitting as the best APS-C camera Nikon offers. Cue cries of outrage from people who decide that the features omitted to squeeze it into the gap were absolutely essential. To them.

    Nikon reintroducing its high-end Dx00 series, means the D7500 is targeted at a slightly different group of people compared with its predecessor.

    Nikon will have done its market research and presumably it’s concluded that most D7x00 users don’t want, need or use a second card slot or lenses that need metering tabs. It may also have concluded that most users who still want these features will either also want/need the other additional features that the D500 offers and will, however grudgingly, pay the extra money to step up, or decide that they can, regretfully, live without them and buy a D7500 anyway. After all, companies don’t try to pitch their products at the price you want to pay, they set them at the amount you’re willing to pay.

    Companies don’t try to pitch their products at the price you want to pay, they set them at the amount you’re willing to pay

    The other way of looking at it, of course, is that the D7500 is a faster camera than the D7200, with a bigger buffer and 4K video capability as well as some AF upgrades. So there are likely to still be plenty of people who’d never buy a D500 but who will find the D7500 offers them an awful lot of camera at a price they’re willing to pay, just as the D7200 did before it.

    This isn’t to say marketing departments and market are always right, though. Confuse the customer or play things too conservatively, and you risk your company’s whole future.

    Getting the message across

    A clear example of unclear messaging is Sony’s a6x00 series. With its a6000, a6300 and a6500, Sony makes three fairly different cameras for fairly different users, yet there are lots of people confused about which models ‘replaces’ which and how Sony can justify apparent price increases.

    The problem seems to be that the physical similarities and the naming convention are enough to convince some people that they are successive, rather than complementary, sister models. Step back and look at the pricing and the differentiation of feature sets though. The a6000 is the mass-market, circa $ 700 model. For a bit more money you get a better viewfinder, 4K video and faster shooting in the a6300. Then, at an even higher price point, you get the in-body stabilization, touchscreen control and deeper buffer of the a6500.

    The pattern isn’t so different from that of Nikon’s D5x00, D7x00 and Dx00 series, or Canon’s 77D, 80D, 7D Mark II lineup, yet it’s one that causes a lot more angst and uncertainty.

    Canon, competition and complacency

    Then there’s the behavior of Canon, which is often criticized for making ‘uncompetitive’ models. Don’t they get it?

    There’s something to these charges, perhaps. Companies with less market share will try to cram extra features in or set more aggressive prices to catch the eye of customers who’d otherwise gravitate towards market leaders. There isn’t the same pressure on the market leader to do the same.

    People may decry the Rebel series as being dull or underspecced, but they’re a good enough fit for their target audience that Canon still sells a bucket load of them, irrespective of whether another brand offers a better feature set or that a mirrorless camera might be more convenient. And for many of their users, they are very good cameras.

    But there’s risk in such caution. Ignore your smaller competitors for too long and you risk discovering they’ve eaten your lunch. While I’d take Sony’s claims of being number 2 in ILCs with a fair amount of salt*, it’s fair to say that the company that brought you the Walkman and the Playstation is also making significant inroads into the high-end camera market.

    I don’t believe the continued absence of 4K from most of Canon’s models is purely a question of market segmentation. Or of complacency.

    It seems unlikely to me that Canon hasn’t noticed this, which is why I don’t believe the continued absence of 4K from most of its models is purely a question of market segmentation. Or of complacency. Yes, Canon wants videographers with a project budget to buy into its Cinema EOS system. But the absence of 4K across much of the company’s lineup and the heavily cropped, yet still rolling-shutter prone, implementation on the EOS 5D IV (a camera nominally targeted at video shooters) suggests the company is also facing technological challenges in providing it.

    The EOS 5D Mark IV (now available with Log gamma) is Canon’s most video-centric DSLR and yet its 4K capture is somewhat limited by significant rolling shutter. It seems extremely unlikely that this has been done with an eye on Cinema EOS sales.

    Similarly, I doubt that Canon intentionally held back the dynamic range (DR) on the EOS 6D II to push people to buy the EOS 5D IV. It’s much more likely that it was cheaper to iterate on an existing design or to spread the cost of an older, coarser production line over one last generation of sensors because they don’t think the end user will mind. Or, at least, not enough to stop them buying the camera.

    It’s worth not making the mistake of thinking that one brand must to offer a feature just because its rivals do.

    As we tried to stress in our write-up, DR is not the sole significant factor in image quality, and the addition of Dual Pixel AF will represent a major benefit to a lot of 6D II buyers. So it’s worth being careful not to fall into the ‘no xxxx, no sale’ trap or making the mistake of assuming that one brand must offer a feature or capability just because its rivals do. Maybe the vigorous defenders of Canon’s honor are correct. Maybe the 6D II will be good enough, given the camera’s price. The alternative is that more competitive rivals will step in and dislodge the Canon from its dominant position. Ultimately, the market will decide.

    You can’t always get what you want…

    It can be frustrating to watch a camera company create products that don’t quite fit your need, worse still to see another brand offer something that’s closer to what you want, especially if you have enough money tied up in lenses to preclude swapping system or when it means having to spend more money to get the feature you want.

    However, let me make a suggestion. Think about the camera you owned five or ten years ago, what it could do and how much it cost. Now have a look at the one you currently own.

    If you feel that your current camera is a better match for your needs and skills than the one it replaced, that’s thanks to, not in spite of, the efforts of the marketing department. And, with this thought in mind, why not wander outside and make use of that capability? Because that’s what the engineers and marketers were all working towards.


    *I’m not questioning whether the claim is true, just querying its significance. Outselling Nikon in terms of value of sales over a very select period, immediately after a stretch of not being able to supply cameras, when you’ve released several high-value cameras much more recently isn’t quite the same is saying “Sony is #2 now.”

    Articles: Digital Photography Review (dpreview.com)