Blog

  • Photo story of the week: Fire and Ice

    ?A striking 2 a.m. sunrise in Disko Bay, Greenland

    This photograph was taken at 2AM on Disko Bay in Greenland. I had been sailing for several hours between immense icebergs, and the clouds were building in such a way that it was becoming clear that the sunrise was going to be something special.

    Upon approaching a patterned iceberg floating between smaller pieces of ice, the light struck it from the side in a way that accentuated its texture. The smaller ice pieces provided the foreground, and it all really came together wonderfully.

    The image won a gold medal on the 2015 Arctic Awards.

    Photo taken with a Canon 5D Mark III and Canon 16-35mm f/4L IS.


    Erez Marom is a professional nature photographer, photography guide and traveler based in Israel. You can follow Erez’s work on Instagram, Facebook and 500px, and subscribe to his mailing list for updates. Erez offers photo workshops worldwide.

    Articles: Digital Photography Review (dpreview.com)

  • Affinity Photo 1.6 released: faster processing, new features, and free stuff

    Serif has updated its image editing software Affinity Photo with ‘a huge performance boost’ to make it faster to use and more capable with large files. The step to v1.6 also brings a new ‘light’ user interface option for those new to the program or those who don’t need the full range of features.

    Additional feature enhancements include a stroke stabilization mode for brushes and pencils, as well as better support for its Photoshop plug-in. Here’s a full list of the new features you’ll find in Affinity Photo 1.6:

    • New light user interface option
    • New stroke stabiliser for all pencil and brush tools
    • New “Edit In” integration with Apple Photos
    • Metal 2 accelerated view optimised for macOS High Sierra
    • Improved view pan/zoom performance and
    • Improved performance with large documents
    • New font chooser dropdown with recents, used fonts and favourites
    • New Glyph browser
    • Align to key items
    • Text frame vertical alignment options
    • Fit frame to text
    • Custom brush wet edges
    • Outlier stacking mode
    • Improved Photoshop Plugin support
    • Improved Live Filters performance
    • Many PDF export improvements including vector export of multi-stop gradients
    • Numerous bug fixes and other improvements

    Additionally, the update gives new and existing users what the company describes as ‘bonus content’ worth around £120, including:

    • Dirk Wüstenhagen Fine Art Texture Collection: 99 beautifully crafted, high-resolution textures
    • Uplift Epic Skies Overlay: A versatile collection of 50 striking cloud overlays
    • Macro Pack: A stunning set of image styles, light leaks and distortions

    Affinity Photo costs £49 / $ 50 / €55 and can be downloaded directly from the Affinity website.

    Press Release

    {PressRelease}

    Affinity 1.6 updates and free bonus content available now

    We are thrilled to announce that both Affinity Photo and Affinity Designer have just received a fantastic new update. And to celebrate for the next two weeks we are giving away a huge bundle of creative content free with every purchase!

    Our apps continue to push the boundaries of professional creative software and this latest update raises the bar once again with a huge performance boost making them faster, smoother and more powerful than ever.

    We’ve added valuable new features including a light UI mode, brush stabilisation and tons of useful performance improvements and enhancements. For more details check out our brand-new product pages and the 1.6 feature video below, all created using artwork submitted by our very talented users.

    Affinity apps are all about enabling you to work faster – whether it’s a quick design draft or photo edit, or a painstaking, complex document involving hundreds of layers or stacked images.

    Our apps are already a trusted part of the workflow for creative professionals around the world. The latest versions build on those proven capabilities to deliver lightning speed, pinpoint accuracy and incredible processing power like never before.
    Along-side the v1.6 update you will also receive:

    Affinity Photo bonus content worth around £105

    • Dirk Wüstenhagen Fine Art Texture Collection – 99 beautifully crafted, high-resolution textures
    • Uplift Epic Skies Overlay – A versatile collection of 50 striking cloud overlays
    • Macro Pack – A stunning set of image styles, light leaks and distortions

    Affinity Designer bonus content worth around £60

    • Frankentoon Texturizer Pro Brush Pack – Over 70 brushes created exclusively for Affinity Designer
    • Tom Chalky Handcrafted Fonts & Textures – A huge bundle of stylish fonts and over 80 textures
    • Grade UI Kit – More than 1000 fully-customisable elements, icons, panels and buttons

    If you already own Affinity Photo or Affinity Designer this update is completely free, and to thank you for your support we’ve also made the free content available to existing users until 16 November when the special offer ends.

    Mac customers can download the update right now from the Mac App Store and Windows customers will be prompted to update the next time they open their app. Once installed a link to the free content will appear on the app welcome screen (go to Help and select Welcome if it does not appear at start up).

    If you don’t own them yet now is the perfect time to buy. The apps are available priced at £48.99 / $ 49.99 / 54,99€ each, which we think is great value for money ? the free content alone would cost more than the app, if bought separately. And remember there’s no subscription and future updates like this one are also included in the price!

    It’s also worth noting our free trials have now been reset, so if you downloaded a trial in the early days and would like to see how far our apps have come, you can now download the trial from our website for a second time.

    {/PressRelease}

    Articles: Digital Photography Review (dpreview.com)

  • How to Create a Beautiful Online Gallery with Lightroom Classic CC and Adobe Portfolio in 15 Minutes

    One of the common questions I hear from photographers is regarding a way to link Lightroom to a photography portfolio website. It usually comes from photographers who don’t like the design options in the LR Web module. The perfect solution doesn’t exist, perhaps the closest (until recently) is Koken, a free plugin that I wrote about some time ago that uses Lightroom’s Publish Collections to update your online portfolio.

    But, the good news is that Adobe has just made creating a portfolio website a whole lot easier with its latest update to Adobe Portfolio.
    Adobe Portfolio Lightroom

    What is Adobe Portfolio?

    Adobe Portfolio is exactly what it sounds like – an online gallery of photos. The benefit of using Adobe Portfolio is that it’s very easy (no web design or coding skills required). It also integrates with your Lightroom Collections (this is the update I just referenced).

    That means all you have to do is set up some Collections containing the photos you want to include in your gallery and synchronize them with Adobe Portfolio. Then it’s just a matter of choosing a layout, tweaking the design, and making the website live. You can do all of this in less than 15 minutes.

    The only caveat is that you need to be an Adobe Creative Cloud Photography Plan subscriber. Just like Lightroom mobile and Lightroom web, it isn’t available to photographers who use a standalone (purchased) version of Lightroom.

    Curious? You can check out a portfolio website I created for myself using Adobe Portfolio here to see what it’s capable of.

    Adobe Portfolio Lightroom

    Step-by-Step Guide to Adobe Portfolio

    The first step – and probably the hardest – is to decide what photos you want to include in your portfolio. Once you’ve made your mind up about that, the rest is easy.

    1. Create a Collection Set in the Library module called Portfolio.
    2. Create several Collections inside this Collection Set, one for each gallery you want to include on your portfolio website.
    3. Add photos to the Collections.
    4. Arrange the photos in the order in which they are to be displayed online.
    5. Synchronize the photos in the Collections by ticking the boxes to the left of the Collection name (marked below).

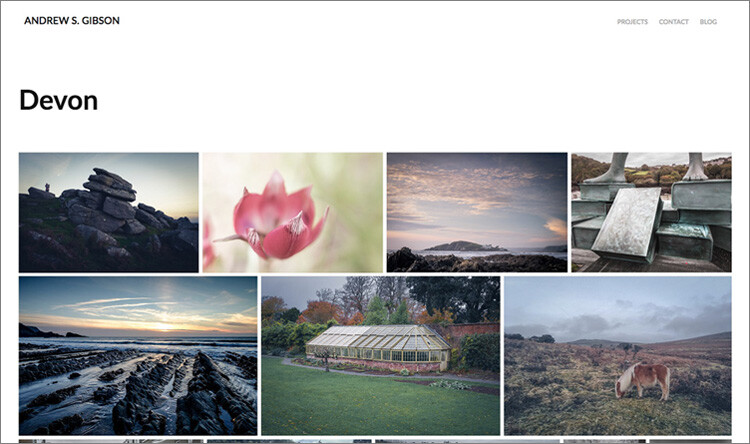
    My portfolio website (link above) has four galleries; Black & White, Portraits, Spain, and Devon. Each gallery corresponds to a Collection in Lightroom with the same name (seen below).

    Adobe Portfolio Lightroom

    Register

    Go to www.myportfolio.com and sign in with your Adobe ID. If you haven’t created a portfolio yet click the button that says Get Started Free. Otherwise, click the button that says Edit Your Portfolio.

    Adobe Portfolio Lightroom

    Choose a design for your gallery

    Now it’s time to choose a layout. Start by clicking the Switch layouts icon (marked below).

    Adobe Portfolio Lightroom

    Adobe Portfolio gives you eight layouts from which to choose. All the layouts are fully mobile responsive, which means they work and look professional on mobile phones and tablets as well as desktop computers. Decide which one you want to use and click the Use this layout button.

    Adobe Portfolio Lightroom

    It may be difficult to visualize which one works best when populated with your photos. Don’t worry about that at this stage – you can change the layout afterward if you want to.

    Settings

    Next, click the Edit your settings icon (marked below).

    Adobe Portfolio Lightroom

    Go to Site Options and click the Lightbox for Images tab. Tick the “Enable lightbox for images on my pages” box and click Done (see below). This is important as it lets people view the photos on your portfolio website. If you don’t tick it all they will be able to see are thumbnails.

    Adobe Portfolio Lightroom

    Add images to your gallery

    Click the Manage content icon (marked below).

    Adobe Portfolio Lightroom

    Go to the Integrations tab and Click the Add Collections button. The website opens a window that displays all your synchronized Lightroom Collections. Pick the ones you want to include in your portfolio and click the Import Selected button (see button below lower-right).

    Adobe Portfolio Lightroom

    Go to Adobe Portfolio, click on the Manage content icon again and go to the Website Pages tab. Make sure the switch is set to the On position for each Collection you want to display on your portfolio website.

    Adobe Portfolio Lightroom

    Choose cover photos

    Now it’s time to tidy up the gallery cover photos. You’ll need to do this once for each gallery. Start by clicking the pencil icon next to the gallery cover photo (see below).

    Adobe Portfolio Lightroom

    Pick Edit Cover Image from the menu to edit the cover photo. At the moment this feature is a little limited – the website automatically picks the photo that appears on the cover and it’s not easy to change it.

    The only way currently is to click Upload a new image and upload a photo you’ve exported from Lightroom – there’s no way to select another photo from the Collection. But you can zoom the photo and adjust the crop. Click Done when you’re finished and repeat for the other gallery cover photos.

    Adobe Portfolio Lightroom

    Setup the domain name

    Click the Edit your settings icon again and click Domain Name. You can select a URL for your portfolio in the form yourname.portfolio.com. This is the easiest option. Alternatively, if you have a domain or a subdomain you can follow the instructions to use that.

    Adobe Portfolio Lightroom

    Preview your portfolio gallery

    Click the gray Preview button to see a preview of your portfolio website. Happy with what you see? Click Update Live Site to publish your portfolio to your chosen URL. Congratulations – your brand new portfolio website is now live!

    Adobe Portfolio Lightroom

    Customizing the design

    So far I’ve shown you how to get your portfolio website online as quickly as possible. The hardest part, as I said, is deciding which photos to include in your gallery. That can take hours, days, or even weeks. But, once the decision is made, you can get your portfolio online in under 15 minutes. It really is that quick.

    If you’re happy with the default settings of your layout you can stop there, your job is done. But it’s worth spending some time looking at both the page and global settings. You can customize things such as fonts, colors and the number of columns on your front page. There is an option to add pages (for instance an About page) and links to other websites. You have a lot of options and it’s worth exploring them to see how you can individualize your portfolio website.

    You can even change the layout by clicking on the Switch layouts icon. Adobe portfolio remembers your customizations, which gives you peace of mind as it means you won’t lose your customizations when you switch from one layout to another.

    When you are finished, remember to click the green Update Live Site button. None of your customizations are published until you click that button.

    How to update the photos

    Portfolios are fluid and as time goes by you will add and remove photos from the Collections you created. You may also add more Collections as your photo collection grows. There are two steps to updating your portfolio website.

    1. Update your Lightroom Collections and make sure Lightroom has had time to synchronize the changes.

    2. Go to Adobe Portfolio, click on the Manage content icon and go to the Website Pages tab. Click on the Cog icon next to the Collection that you want to update and select Reset from Lightroom to update your portfolio gallery.

    Adobe Portfolio Lightroom

    3. Finish by clicking the green Update Live Site button to publish the updates to your portfolio website.

    Next steps

    With the recent update that lets you integrate Lightroom Collections, Adobe Portfolio has become the easiest way to create a portfolio website using Lightroom Collections. The only downside, as mentioned earlier, is that you need to be a Creative Photography Plan subscriber to use this feature.

    If you are not, then look at Koken as an alternative. Don’t dismiss the Web module out of hand either, it has some very useful features and doesn’t require a CC subscription to use.


    You can learn more about all aspects of Lightroom with my bestselling Mastering Lightroom ebooks.

    The post How to Create a Beautiful Online Gallery with Lightroom Classic CC and Adobe Portfolio in 15 Minutes by Andrew S. Gibson appeared first on Digital Photography School.


    Digital Photography School

  • Hasselblad unveils 135mm F2.8 for X1D, promises 80mm with fastest aperture yet

    Medium format camera and lens maker Hasselblad has released its XCD lens roadmap for 2018, revealing the nine total lenses that will be available for X1D-50c shooters by the end of next year. Mainly, the company has added two new models to the system in the shape of a 135mm F2.8 with a built-in teleconverter, and what it is describing as an 80mm with the widest aperture Hasselblad has ever produced.

    In addition, Hasselblad has altered the spec of its already announced 22mm wide lens. It will now come to market as a 21mm F4 after a slight change of plan in what Hasselblad says is a response to feedback from customers.

    The new XCD 135mm F2.8 is due to arrive in the first half of 2018, and will come with a built-in 1.7x converter that will transform the lens into a 230mm F4.8. With the sensor of the X1D, this lens will deliver the same sort of angle of view we’d expect from a 110mm lens on a full-frame system, while with the converter that becomes just over 180mm.

    The maximum aperture of the promised 80mm hasn’t been disclosed, but if it is to be the widest aperture Hasselblad has ever produced it will need to be wider than the F2 of the 110mm Planar T*. The company has said more will be revealed closer to the launch date at the end of 2018.

    Aperture details of the forthcoming XCD 35-75mm zoom and the XCD 65mm have also been released, with the zoom varying between F3.5 and F4.5, and the 50mm-equivalent focal length coming in at F2.8. Prices are also to be released at a later date.

    For more information, visit the Hasselblad website.

    Press Release

    Hasselblad expands the XCD lens range to a total of nine lenses in 2018

    Hasselblad updates the XCD lens roadmap for the award-winning X1D-50c with the XCD 135mm and the 80mm lenses, rapidly expanding the XCD lens range to a total of nine dedicated lenses. By end of 2018 X1D users will have a wide range of lens options to maximize their creative vision.

    The XCD 135mm f/2.8 lens comes with a dedicated 1,7x converter that extends the tele lens to 230mm f/4.8, while the XCD 80mm is set to become the highest aperture lens that Hasselblad has ever introduced.

    In addition to these two new lenses, the previously announced XCD 22mm ultra-wide-angle lens has been updated to 21mm to meet the Hasselblad users’ demand for a better wide-angle lens experience.

    Like the other XCD lenses, all new XCD lenses have an integral central shutter offering a wide range of shutter speeds and full flash synchronisation up to 1/2000th second.

    Hasselblad is also releasing aperture details for previously announced XCD lenses: the XCD 21 ultra-wide-angle lens will feature f/4.0, the XCD 35-75mm zoom lens will have f/3.5-4.5, and the XCD 65mm lens will have f/2.8.

    All new XCD lenses, besides XCD 80mm, are expected to be available during the first half of 2018, while the XCD 80mm high aperture featuring lens is planned for the second half of 2018.

    The demand for the previously announced XCD 120mm macro lens and the XH lens adapter exceeded Hasselblad’s expectations, but the production is now being ramped up and orders are being fulfilled globally.

    In addition to the nine dedicated XCD lenses, the XH lens adapter allows the X1D owners to use all twelve HC/HCD lenses.

    Pricing and additional technical specifications will be provided closer to the availability of each lens. Specifications are subject to change.

    Articles: Digital Photography Review (dpreview.com)

  • GoPro Q3 2017 financial results reveal return to profitability

    GoPro has reported its Q3 2017 financial results, detailing revenue that highlights a return to profitability. The company has undergone extensive business restructuring over past months in an effort to reverse its fortunes while decreasing non-GAAP expenses. According to its latest quarterly results, GoPro saw a 37% year-on-year revenue increase, raking in $ 47 million in cash with a 40% gross margin.

    GoPro achieved both GAAP and non-GAAP profitability during its third fiscal quarter, with company CEO Nicholas Woodman saying, “GoPro has turned a corner, restoring growth and profitability to our business.” In addition to growing revenue, GoPro saw “dramatically reduced operating costs,” though the lower costs won’t affect its product roadmap, according to Woodman.

    In its third quarter last year, GoPro saw a GAAP net loss of $ 104 million. Compare that to this year’s Q3 GAAP net income of about $ 15 million, and you’ll get a sense of the drastic improvement the company just posted. The turnaround has been largely driven by GoPro’s average sales price (up 22% year-on-year) and the cat that its quarterly operating expenses were the lowest they’ve been in 3 years.

    Articles: Digital Photography Review (dpreview.com)

  • Halide 1.5 camera app is designed specifically for the iPhone X

    Lucky owners of the new iPhone X have a tempting new camera app option. The newest update to Halide (v1.5) features a new interface designed from scratch for the iPhone X—one that positions all of the controls near the bottom where they’re within thumb’s reach. Additionally, Halide leverages the iPhone X display’s ‘ears’ on either side of the top notch, using that space to display a histogram and exposure values.

    Halide 1.5 is designed to optimally use the phone’s long OLED display, as well as its rear cameras, offering support for depth capture as well as a clean interface that provides an unobstructed viewfinder. The new interface is designed to be used with one hand on the iPhone X, though the update does bring ‘a more ergonomic experience’ to older iPhones as well.

    Existing Halide users can download the 1.5 update for free, while new users can buy the app for a discounted $ 3 rate through the iPhone X launch weekend, after which the price will revert to the usual $ 5.

    Articles: Digital Photography Review (dpreview.com)

  • Outex launches clear, universal underwater camera housing

    Outex has launched a clear version of its rubber underwater camera ‘housing’ via Kickstarter, where it is seeking $ 35k in funding to bring the product to market and help even more people get into underwater photography without breaking the bank.

    This clear version joins the company’s original rubber sleeve, which features a solid blueish color with the exception of the lens cover. The clear design, according to Outex, makes it easier to adjust camera settings after putting the camera in the sleeve. And while the Kickstarter doesn’t mention it explicitly, we assume this version features the same IP08 rated waterproof design as the blue version, which can withstand depths up to 10 meters or about 33 feet.

    Unlike most camera housings, which are made of rigid materials and designed to fit a specific camera, Outex’s rubber sleeve stretches to accommodate a variety of camera and lens shapes and sizes. Additionally, Outex says its new model has an “improved material composition” that makes both installation and removal easier by offering increased malleability and elasticity.

    Finally, Outex says the housing covers also have better longevity thanks to a reformulated compound design and better manufacturing process.

    As of this writing, Outex is about $ 10,000 of the way to its $ 35K goal with 31 days to go, but if the Kickstarter campaign brings in enough funds to meet certain stretch goals, Outex will also launch covers for mirrorless and compact cameras ($ 75k goal), large-body cameras ($ 150k goal), and even covers that can accommodate pistol grips and tripods ($ 175k goal).

    The Kickstarter campaign is offering backers one clear cover for pledges of at least $ 100. Assuming the funding goal is met and everything goes according to plan (NEVER a guarantee), backers will receive their products in January 2018.

    Articles: Digital Photography Review (dpreview.com)

  • Weekly Photography Challenge – Play with Your Food

    Your mother may have told  you not to play with your food, but this week you have our permission.

    Shot I did in New Orleans – very famous coffee and donuts.

    I recently shared some video tutorials with food photography tips – check those out if you need help.

    Here are some other dPS articles on the topic if you want more tips and ideas:

    • 4 Tips for Beginners to Food Photography
    • The Secret to Finding the Hero Angle in Food Photography
    • 8 Tips for Food Photography Newbies
    • How to Take Cool Food Photos in Your Refrigerator
    • Household Items to Bring to Your Next Food Photography Shoot
    • 5 Tips for More Professional-Looking Food Photography
    • 5 Tips That Will Make Your Food Photos Stand out from the Crowd
    • Using Focus Creatively with Food Photography

    I used to do food photography commercially – a long, long, time ago! Here are some of my tips:

    Don’t forget your fruit and veggies – even still in the tree or on the vine.

    Food in its raw form including still on the tree works!

    Not quite on the tree. I added the hands here to add interest and show scale, as well as the inside of this nut.

    Add a human element or photograph the preparation of the food as well as the finished product.

    The making of the iced coffee.

    Add a human element for interest. Yes I did drink it and yes it was amazing!

    Get the light right. The most common placement or direction of light with food photography is to have the light actually coming from behind the food. It makes it look shiny and more appetizing that way. Like this Colombian ajiaco soup.

    Play with angles, light, and composition. Don’t just take one shot.

    I wanted to show how full the table was here so I used this overhead angle. This is shot I did for a hotel in Nicaragua showcasing the breakfast they serve.

    I took a lower camera angle here to show the setting of where the breakfast is served.

    Here I added the human element and motion with the juice pour.

    Now it’s your turn!

    Weekly Photography Challenge – Food

    Simply upload your shot into the comment field (look for the little camera icon in the Disqus comments section) and they’ll get embedded for us all to see or if you’d prefer, upload them to your favorite photo-sharing site and leave the link to them. Show me your best images in this week’s challenge. Sometimes it takes a while for an image to appear so be patient and try not to post the same image twice.

    Share in the dPS Facebook Group

    You can also share your images on the dPS Facebook group as the challenge is posted there each week as well.

    The post Weekly Photography Challenge – Play with Your Food by Darlene Hildebrandt appeared first on Digital Photography School.


    Digital Photography School

  • Positano, Italy will start charging $1,150 fee for commercial photography, $2,300 for video

    Photo by JeCCo (CC-BY-4.0)

    The picturesque seaside Italian city of Positano will soon begin charging photographers a substantial €1,000 (~$ 1,150 USD) fee if they plan to shoot photos for commercial purposes. Videographers, meanwhile, will have to pay €2,000 (~$ 2,300 USD) for commercial work, and Positano authorities are also banning drone use in the city, eliminating aerial projects altogether.

    Due to its unique position, Positano attracts a large number of photographers, some working for brands or otherwise capturing content for commercial reasons. According to city mayor Michele De Lucia, per the Italian publication Repubblica, Positano isn’t enacting this fee as a way to make money, but instead to deter the photography sets that can disrupt pedestrians and result in “discomforts and bickering.”

    It also lends the city an element of control over who gets to shoot there—”not everyone must be able to tie their own brand to Positano,” explains De Lucia.

    Anyone taking photos or recording video for non-commercial purposes is exempt from the fee. The city will also allow photographers and videographers to work in certain circumstances without paying the fee, including for documentaries, TV shows, newspapers, and magazines.

    The regulation states that anyone planning to photograph or record will need to submit a request at least 30 days ahead of time to get permission. Requests submitted late will require a 50% surcharge. As far as photography goes, the regulation uses the phrase ‘advertising shooting,’ indicating the fee in primarily targeted at brands and advertising agencies.

    Articles: Digital Photography Review (dpreview.com)

  • Sony FE 70-200mm F2.8 GM sample gallery updated

    $ (document).ready(function() { SampleGalleryV2({“containerId”:”embeddedSampleGallery_1304509160″,”galleryId”:”1304509160″,”isEmbeddedWidget”:true,”standalone”:false,”selectedImageIndex”:0,”startInCommentsView”:false,”isMobile”:false}) });

    The 70-200mm F2.8 is a staple piece of kit for a lot of professional and advanced shooters. Sony’s full-frame E-mount version happens to carry the ‘GM’ logo, designating it one of the brand’s highest quality pieces of glass.

    We carried it along while exploring the areas in and around Jackson, Wyoming and found it capable of excellent image quality. This is especially true when you stop it down a bit. You can also take a look at our previously-published Sony FE 70-200mm F2.8 GM roller derby gallery.

    See our Sony FE 70-200 F2.8 GM sample image gallery

    Articles: Digital Photography Review (dpreview.com)