Blog

  • Sigma’s new 16mm F1.4 will cost $450, ships this month

    We got to see the 16mm F1.4 DC DN |Contemporary lens in person at the PhotoPlus Expo last month.

    Just before the PhotoPlus Expo in October, Sigma teased crop-sensor Sony E-Mount and M43 shooters with a new lens: the 16mm F1.4 DC DN | Contemporary. We got to see this “in development” lens for ourselves at the expo, and were left very impressed by its build quality, but had no idea how much it would cost or when it would arrive on the market.

    Until now.

    Announced earlier today, the Sigma 16mm F1.4 DC DN | Contemporary will cost $ 450 and is scheduled to ship at the end of November. For Sony users, this lens represents a ‘world’s first’: “the first lens offered for Sony E-mount systems to feature a 24mm F1.4 focal length (35mm equivalent) and aperture.” On Micro Four Thirds systems, it provides a 32mm equivalent focal length.

    To learn more about this lens, check out our hands on first impressions or head over to the Sigma website.

    Press Release

    Sigma Announces Pricing and Availability for the 16mm F1.4 DC DN Contemporary Lens

    Shipping at the end of November for a retail price of $ 449.00 USD

    Ronkonkoma, NY – November 9, 2017 – Sigma Corporation of America, a leading still photo and cinema lens, camera, flash and accessory manufacturer, today announced that its brand new Global Vision 16mm F1.4 DC DN Contemporary lens for APS-C mirrorless Sony E-mount and Micro Four Thirds camera systems will be available at the end of Novem-ber for $ 449.00 USD through authorized US retailers. The fast aperture, wide-angle 16mm prime lens is the first lens offered for Sony E-mount systems to feature a 24mm F1.4 focal length (35mm equivalent) and aperture. On Micro Four Thirds systems, it offers a 32mm focal length.

    Lightweight and compact, the 16mm F1.4 is equipped with a stepping motor designed for fast, ultra-smooth, and accurate autofo-cus performance for both still and video capture. Key features include a dust- and splash-proof mount, nine rounded aperture blades, advanced lens coatings to minimize flare and ghosting, and a reversible and removable petal-type hood. Full technical specifications can be found on the Sigma website at: www.sigmaphoto.com/16mm-f1-4-dc-dn-c.

    Articles: Digital Photography Review (dpreview.com)

  • ON1 Photo RAW 2018 takes on Lightroom with more features and improved Raw processing

    After releasing it in beta last month, ON1 has officially announced the latest version of its image editing and organization software: ON1 Photo RAW 2018. With this newest version, ON1 wants to establish its application as a viable alternative to Adobe’s Lightroom, and says most of the improvements to the new version are a direct result of community input.

    The new app comes with an updated raw processing engine and a new HDR function that merges a bracket of photos for increased dynamic range. Pano Stitching combines multiple photos into a single panoramic image and a host of new masking tools allow for precise selection of image areas and background masking.

    ON1 has also updated the UI for a cleaner and more modern look, and has added support for the Nikon D850, Olympus EM-10 III, Panasonic DMC-G85, preliminary support for Sony a7R III, and a range of new lenses.

    Other features include: re-editable adjustments for exposure, contrast, color, shadows, highlights, lens correction, and transform tools, as well as hundreds of customizable photo effects.

    ON1 Photo RAW 2018 for Mac and Windows is available now for download as a free 30-day trial from the ON1 website. Previous owners of any ON1 app (or ON1 plug-in) can upgrade to the new version for $ 100, while new users will have to pay $ 120. However, a single license can be activated on up to five computers.

    For more information and a full list of updates, check out the video below and read the full press release below that.

    Press Release

    Portland, OR – November 9, 2017 ­– Today, ON1, Inc. announced ON1 Photo RAW 2018 is officially available. Along with the essential tools and features needed in a photography workflow, ON1 Photo RAW 2018 includes key updates to the fast, non-destructive raw processing engine. Photographers now have an integrated tool with accelerated photo management, precise photo development, hundreds of customizable photo effects, fast and beautiful HDR, pano stitching, masking and blending adjustments, layers, and much more – in one app.

    From the beginning the ON1 community has driven the development of ON1 Photo RAW based on what’s most important to them. Almost every feature and improvement made to the app in version 2018 is a direct result of community input through the ON1 Photo RAW Project.

    This type of transparency is what customers can continue to expect from the ON1 team. This process has solidified ON1 Photo RAW as the app designed by photographers for photographers and a great alternative to Adobe® Lightroom®.

    ON1 Photo RAW 2018 includes major updates and enhancements in many areas. Key new features include the following.

    • ON1 HDR – Create stunning HDR photos that merge all tonality from a bracket of photos in a fraction of the time (test results have shown up to seven times faster than other HDR apps). Automatically aligns photos and removes ghosting from motion between exposures. Includes full non-destructive editing with natural results and can be turned up to 11 for a surreal look.
    • Pano Stitching – Combine multiple photos into a single panoramic or matrix photo. Automatically aligns photos, even if they are not shot on a tripod, and blends them together seamlessly. An option to embed panoramic metadata for Facebook panning is also available.
    • Global Mask Editing Tools – These include new mask Density and Feather sliders to allow for changing the density or opacity of masks as well as blur masks for softening.
    • Luminosity Mask Updates – Adjust the levels of a mask to increase the contrast or brightness as well as set a tonal window to only affect a certain zone. These updates allow users to target just the area they want, based on the photo.
    • Color Range Masks – Create a mask from a color range selection.
    • Blur and Chisel Mask Tools – In ON1 Effects, the Blur and Chisel mask tools are now included. The blur tool is perfect for softening or feathering a mask selectively. The Chisel tool lets the user push or pull the edge selectively, to remove halos. All of these new masking options are re-editable and non-destructive.
    • Versions — Versions are virtual copies of the same photo. Each version created can include non-destructive settings, including crop, retouching and adjustments. Versions work just like any other photo without taking up more space on your computer.
    • Updated UI — Clean and modern UI where your photo is the center of attention. Custom name filters and layers to easier keep track of work. Also select your own UI accent color.
    • Paint with Color Brush — Painting with color can be a solid color, perfect for skin smoothing and making annotation layers, or paint with just the color and leave the underlying luminosity in place to change the color of objects like eyes.
    • Selectively Add or Remove Noise — Brush away noise in areas like skies or add noise for an artistic effect.
    • Improved Highlight Recovery –– The algorithms for highlight recovery have been improved.
    • ON1 Photo for Mobile — Take the best shots with you on the go with the free ON1 Photo for Mobile app. It’s a great way to share portfolios. It can also sync new photos taken on phones back to the desktop so those photos are ready for editing.
    • Additional Camera & Lens Support — Added support for the Nikon D850, Olympus EM-10 III, Panasonic DMC-G85, preliminary support for Sony a7R III, plus a ton of new lenses.

    ON1 Photo RAW 2018 differentiates itself from other apps by allowing photographers to both browse and catalog their photos from the very beginning of their workflow. This hybrid system provides one of the fastest digital asset management tools available today. The ultra fast photo browser is perfect for quickly viewing and culling through photos without having to wait on an import process. Once the culling process is complete, the ability to create and catalog those photos is the next step in common workflows.

    There is plenty more available within the app’s non-destructive photo development. These features include re-editable adjustments such as exposure, contrast, color, shadows, highlights, lens correction, and transform tools. The hundreds of unique photo effects are also perfect for finishing off your photos to add that extra punch. Photographers have complete control of how each effect is applied using masking brushes, gradients masks, and local adjustments. Each effect is also completely customizable to save any look as a custom preset.

    Photo editing technologies such as live blending options, apply to, smart layers, smart photos, and mask refinement tools also make ON1 Photo RAW 2018 a more advanced pixel editor without having to launch a separate app. The ability to combine photos together with layers, masks, and selectively apply filters and effects to raw photos gives users a big advantage.

    ON1 Photo RAW 2018 isn’t just for raw files. Supported file formats include JPEG, TIF, PSD, PSB, PNG, and DNG are supported and benefit from the speed, performance, and abundance of editing tools in the app. Photo RAW 2018 also continues to work seamlessly within current photography workflows. The app integrates as a plug-in for Adobe® Lightroom® Classic CC and Photoshop® and further builds its case as a complete standalone photo editor or alternative to the Adobe Photography Plan. Version 2018 also integrates with the major cloud services to allow for uploading, managing and editing photos across multiple computers. This also allows users to sync photos and their edits across multiple computers or in a studio setting.

    Price and Availability

    ON1 Photo RAW 2018 is available for download as a free 30-day trial from the ON1 website. Previous owners of any ON1 app (or ON1 plug-in) can upgrade for $ 99.99. Those who don’t own an ON1 app can order for $ 119.99. ON1 Photo RAW 2018 is also bundled with some excellent bonus materials which include: Three ON1 Photo RAW 2018 Courses by Product Director Dan Harlacher, and all of their 2017 and 2018 Loyalty Rewards. ON1 Photo RAW 2018 works with both Mac and Windows and includes activation on up to five computers.

    Articles: Digital Photography Review (dpreview.com)

  • Lighting 103: Takeaways

    Abstract: Some parting thoughts as we wrap up Lighting 103.

    Hopefully, you have enjoyed our discussion of color and light in Lighting 103 v1.0—or at least found it useful as you expore your own lighting.

    Coming next will be a whole new section: The Strobist Lighting Cookbook. (More info on that soon.)

    But for now, here are some takeaways as we wrap up our module on color. Read more »
    Strobist

  • Google rolls out ‘Saturated’ mode to address Pixel 2 XL display issues

    The Google Pixel 2 might sport one of the best smartphone cameras around, but when it comes to the display—particularly on the larger XL—model, Google has had nothing but trouble. Reports of everything from burn-in, to blue tint off-axis, to ‘dull’ colors have left the tech giant playing catch up, and today it finally … well… caught up. Or at least it tried.

    A promised software update released on Tuesday (and rolling out to all users by the end of the week) addresses the issue of burn-in with some minor tweaks, and adds three total color saturation modes under the phone’s Display settings to hopefully quiet down the complaints about ‘dull’ colors.

    Here’s a quick summary of the update in Google’s own words:

    This update includes some of the enhancements we posted about on October 26, such as the new Saturated color mode for Pixel 2 and Pixel 2 XL, a fix for the faint clicking noise heard in some Pixel 2s, and other bug and security updates. As we mentioned in our deeper dive, this update also brings planned UI changes which extend the life of the OLED display, including a fade out of the navigation buttons at the bottom of the screen and an update to maximum brightness.

    According to Android Central, the updated saturation settings come in three flavors: Natural, Boosted, and Saturated. Natural should provide the most accurate color reproduction; Boosted takes the place of the “Vivid Colors” setting previously available, which boosted saturation by 10%; and, finally, Saturated will put the display in an “unmanaged configuration” that will make colors “more saturated and vibrant, but less accurate,” according to Google’s deep dive on the topic.

    Unfortunately, this mode throws away one of the most important things about Android Oreo: color management. In ‘Saturated’ mode, all apps, images and video will first render to sRGB (for now) and then be stretched to the display’s wider color gamut.

    This will make for inaccurate colors across the two devices, but there is hope for us color nerds. As Seang Chau, VP of Engineering at Google, says in his blog post: due to color management under the hood in the new OS, “an Android app developer can now make use of the wider Display P3 color gamut precisely for a wider range of colors. Google apps will take advantage of wide colors in the future.” We’re hoping this means that future apps will render either to P3 or straight to a display profile provided by Google, which would allow for saturated colors when appropriate, but not at the cost of accuracy.

    Finally, no comment was made on the poor viewing angle of the XL model that introduces a strong blue-tint off-axis (see picture above of the Pixel 2 XL vs the original XL). This can make photos with warmer tones look even more desaturated by shifting toward blue. But while Google was able to address some of its display complaints this week, this seems like a hardware problem that will be difficult to fix via software.

    Articles: Digital Photography Review (dpreview.com)

  • New Lightroom CC or Lightroom Classic: Which Version is Right for You?

    You may have heard that Adobe recently unveiled some pretty significant changes to Lightroom. When you consider using Lightroom, you will now have two different versions to choose from; both are aimed at different audiences. In this article we will take a look at both the new Lightroom CC and Lightroom Classic, so you can choose the one that best meets your needs.

    New Lightroom CC or Lightroom Classic: Which is Right for You?

    How we got here

    There are a lot of letters and numbers associated with Lightroom, so it might be helpful to walk through a quick timeline of how we got here.

    In the beginning, way back in 2007, there was Lightroom. At first, Adobe was content to come out with periodic new releases and number them. So we had Lightroom 1.0, 2.0, 3.0, 4.0, 5.0, and 6.0, with each version they added some new features. If nothing else, the system was easy to understand.

    After that, however, Adobe moved to a subscription model. They simply called it Lightroom CC, which stood for Creative Cloud. With the change to the subscription model, there wouldn’t be big periodic launches. Instead, new features would be rolled out periodically. That’s the world we lived in until recently.

    Now, however, Adobe has essentially split Lightroom into two different applications. They are Lightroom CC and Lightroom Classic. Let’s take a closer look at each of them.

    Lightroom Classic

    Let’s start with the simple one, Lightroom Classic. If you are already familiar with Lightroom, then this is the easy one to understand. Lightroom Classic is basically the same Lightroom you have been using but it’s just updated a little bit. There are really only two changes.

    The first is that it is faster. It uploads (imports) image faster, it moves through pictures faster, it edits faster – it seems to do everything faster. There have been a lot of complaints about speed in recent versions of Lightroom. As Adobe added more and more features, it gummed up the works so it was moving slower and slower. Adobe clearly made fixing this a priority.

    So Lightroom Classic is faster – a lot faster – than previous versions of Lightroom. How much faster? I haven’t seen any numbers, but the increase in speed will be noticeable to you immediately. It is much faster.

    Beyond the speed, is there anything actually different between Lightroom Classic and the prior version? Yes, but not that much. In fact, when it comes to making global changes to your pictures, there is nothing different. The features and controls are all exactly the same. There is one change that is small but is really handy if you make local adjustments to your pictures (i.e. changes to discrete portions of your pictures rather than the whole thing).

    New Lightroom CC or Lightroom Classic: Which is Right for You?

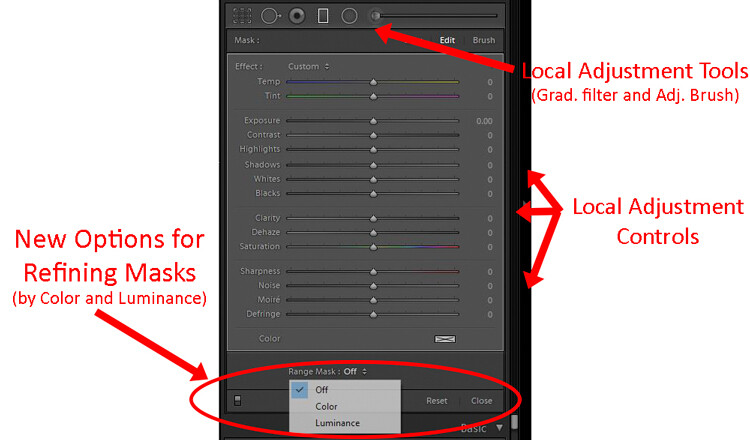
    Adobe added new masking controls to the local adjustment tools – those being the Adjustment Brush, Graduated Filter, and Radial Filter. It is called the Range Mask feature, and it allows you to limit the selection you make by either the Luminance or the Color. In other words, if you make a selection with the Adjustment Brush or one of the filters, but there are things you don’t want to be included in your selection, you can remove them using these tools. This promises to make local adjustments much more doable in Lightroom.

    Lightroom CC

    Now comes the new part, and the one everyone is talking about (for good or for bad), Lightroom CC. This is a whole new Lightroom. It really comes down to three principles.

    1. Lightroom CC is simpler to use
    2. It is designed for mobile devices
    3. It relies largely on cloud storage

    Let’s take a look at each of these.

    #1 Lightroom CC is simpler

    Lightroom CC has a simpler interface. It is streamlined and more intuitive. Those new to Lightroom will find it easier to navigate and use.

    New Lightroom CC or Lightroom Classic: Which is Right for You?

    Simplified Lightroom CC editing controls.

    This comes at a cost though. Experienced Lightroom users will find the experience a little like switching from Photoshop to Photoshop Elements. There are entire modules of Lightroom that are missing from Lightroom CC.

    There are no Print, Maps, or Books modules. There are some editing functions that are missing as well (the Tone Curve and Camera Calibration). There is no Photo Merge or HDR. In fairness, however, over 90% of the editing functions in traditional Lightroom are present in Lightroom CC.

    New Lightroom CC or Lightroom Classic: Which is Right for You?

    Expanded Lightroom CC editing controls.

    #2 Lightroom CC is for mobile

    Lightroom CC is designed for mobile platforms. It will look and work exactly the same whether you use it on your phone, your tablet, or your desktop. You’ll be editing full resolution versions of your photos, and they will be synced to all your devices. What’s more, Lightroom CC makes it easy to share your photos to various social media channels. Because of this, however, you can only export to JPEG (no PSDs or TIFFs) and only in sRGB, which is the color space that is used for all online photos.

    #3 Cloud storage

    All your edits in Lightroom CC are backed up to cloud storage. Of course, this will cost you extra. More about the plans below, but the first TB of data will cost you $ 10 a month, and it goes up from there. There is also an additional element of organization added in; Lightroom CC uses Adobe’s Sensei to automatically add keywords to your photos.

    The Plans

    Here’s the deal, though, you don’t necessarily have to choose between the different versions of Lightroom. If you subscribe to the Photography Plan (in my opinion, most readers of this website should be doing that) you already get Lightroom CC. It has just been added to your subscription, along with a token 20 GB of cloud storage. If you aren’t already familiar with the Photography Plan, it is where you get Photoshop and Lightroom for $ 10 a month.

    If you want additional cloud storage, it will cost you more. 1 TB of cloud storage costs another $ 10 a month, taking the Photography Plan plus the 1 TB of cloud storage up to $ 20 a month.

    Finally, if you only want the new Lightroom CC, you can get it along with 1 TB of cloud storage for $ 10 a month. That might be a good option for those that are very mobile, store everything to the cloud, and/or are just getting started with Lightroom.

    Here is a chart from Adobe showing the options:

    Purchased outright version is going away

    There is one more thing you need to know. If you want to purchase Lightroom outright and avoid the monthly charge, you can still do so, but Lightroom 6 is your last chance. Adobe will also stop updating that fairly soon (meaning if you buy a new camera and LR 6 can’t open the raw files there will be no update for that – you’d have to convert them all to DNG before importing). The days of being able to purchase Lightroom (as opposed to renting it) appear to be just about over.

    Which version of Lightroom is right for you?

    So, which one is right for you? If you are just starting out with Lightroom and your photography is based on mobile platforms, then Lightroom CC might be for you. But if you are already using Lightroom, I think Classic is the way to go.

    If you are used to Lightroom, then switching to CC will probably seem like a step backward. Further, if you tend to use desktops and laptops for your editing, then Classic is clearly the way to go. For those instances when you need to do something on your phone, there is always Lightroom Mobile (not ideal, but it works in a pinch).

    Of course, all this assumes that Adobe keeps updating Lightroom Classic (the use of the term “Classic” has a lot of people scared since that is often the kiss of death in the tech world).  For the moment at least, Adobe is promising continued updates to it.

    Poll

    Fill in this quick poll and tell us what you’ll be choosing in regards to Lightroom.
    Note: There is a poll embedded within this post, please visit the site to participate in this post’s poll.

    The post New Lightroom CC or Lightroom Classic: Which Version is Right for You? by Jim Hamel appeared first on Digital Photography School.


    Digital Photography School

  • Tips for Shooting Cityscapes Through a Window at Blue Hour

    Shooting cityscape photos from inside a building (such as an observation deck of a tower, hotel room, etc.) pose a different set of challenges that you won’t experience shooting outdoors. Here are a few easy-to-follow tips for shooting the city at blue hour, with a focus on how to eliminate unwanted reflections from the glass.

    Japan - Tips for Shooting Through a Glass Window of an Observation Deck at Blue Hour

    Shanghai - Tips for Shooting Through a Glass Window of an Observation Deck at Blue Hour

    Vietnam - Tips for Shooting Through a Glass Window of an Observation Deck at Blue Hour

    The reflection-free shots above of Fukuoka skyline (Japan, top), Shanghai skyline (China, center) and Ho Chi Minh City skyline (Vietnam, bottom) were shot through glass windows of Fukuoka Tower, Shanghai World Financial Center Observatory and Bitexco Financial Tower respectively – following the methods described in this tutorial.

    Bring a mini-tripod

    In order to shoot at blue hour, a tripod is essential whether you’re shooting indoors or outdoors. But some observation decks don’t allow tripods because they are seen as a hindrance for other visitors. In that case, you may try to bring in a mini-tripod like a Gorillapod, as it’s unlikely to disturb other non-photography visitors.

    Even if tripods are allowed, you may as well bring a mini tripod just in case, as it comes in handy when there is no suitable space to set up a regular tripod.

    Gorillapod - Tips for Shooting Through a Glass Window of an Observation Deck at Blue Hour

    Wipe the glass with a cloth

    Glass windows of an observation deck aren’t always clean. Make sure to keep a cloth in your camera bag so that you can wipe an area to shoot through if it’s dirty. Obviously, you can’t wipe the other side of the window, though, so choose an area that has no stains, etc.

    How to eliminate reflections off the window

    This is the biggest challenge when taking photos through a glass window. The window works much like a mirror and it’s hard to completely prevent reflections (e.g. such as yourself, room lights) from showing up.

    Typical tips to follow are shooting in close and as straight as possible to the glass (i.e. leaving a little gap between the glass and the lens so as not to let indoor lights creep in) and using a polarizing filter which helps cut reflections to some extent. Aside from these tips, I’d recommend the following “tools”.

    Reflections - Tips for Shooting Through the Glass Window of an Observation Deck at Blue Hour

    Ho Chi Minh City skyline (Vietnam) shot through the window of Bitexco Financial Tower. I tried my best by getting the lens really close to the window (almost touching it) and using a polarizing filter, but the room interior and stray lights still got reflected in the glass.

    Using a DIY blackout curtain

    This might be an old-school method, but I recently came across a photographer doing this on the observation deck of Shanghai World Financial Center (see below). Not advisable to use such a large curtain, though, as it blocks the view for other visitors and you’ll run the risk of being asked to leave by floor staff.

    Blackout curtain Tips for Shooting Through the Glass Window of an Observation Deck at Blue Hour

    Using a black jacket

    I used to rely on this method and it worked relatively well. Set up a tripod very close to the window, and cover the whole rig (camera and tripod) with a black jacket to create a closed-in area around the camera so that no indoor lights get inside the jacket. Make sure to use a “black” jacket to reduce reflections, as a lighter-colored jacket does more harm than good and causes even more reflections.

    Using black neck gaiter

    This used to be my favourite method, as it doesn’t really catch the unwanted attention of other visitors (compared to using the jacket, etc.). The concept here is the same as using a jacket. To block any stray lights from getting in, wrap the black neck gaiter (neck warmer or scarf) around the lens and push the whole setup (camera and tripod) onto the window to completely shade the front element of the lens.

    Jacket neck gaiter - Tips for Shooting Through the Glass Window of an Observation Deck at Blue Hour

    Using a black jacket (left) and a black neck gaiter (right) to shade the front element of the lens and cut reflections from the window.

    Using a lenskirt

    A lenskirt is a tool specifically created to cut out reflections. This is what I’ve been using for the past few years with great success. By attaching a lenskirt to the front of your lens and the pushing suction cups onto the window, it shades the front element of the lens. This helps cut reflections from the window, leaving no chance for any stray light to get in.

    With a black neck gaiter, I always had to make sure not to have vignetting (dark corners) by checking through the viewfinder (due to the edges of the neck gaiter getting too close to the lens). But the window-facing end of a lenskirt opens up like a softbox, so there is no worry of any edge vignetting being introduced.

    Lenskirt - Tips for Shooting Through the Glass Window of an Observation Deck at Blue Hour

    Conclusion

    I hope these tips help you take reflection-free cityscape photos through glass windows of an observation deck on your next visit.

    Lastly, you may wonder why I didn’t mention a rubber lens hood (which is said to work well for shooting through glass). I’ve tried it before but found it prone to vignetting, especially at a wide angle like 18mm or wider. And, when shooting cityscape photos from high above like an observation deck, you’re very likely to shoot wide, therefore I’ve excluded it from the list.

    If you have any other tips or experiences using these suggested tools in this post, please share them in the comments below.

    The post Tips for Shooting Cityscapes Through a Window at Blue Hour by Joey J appeared first on Digital Photography School.


    Digital Photography School

  • Cinematic 4K footage shot with the Apple iPhone X

    Matteo Bertoli, a California-based cinematographer, got a chance to try out the iPhone X’s video capabilities in Kauai and has just published the results. And before you ask – Bertoli states that it was all shot handheld.

    “I DID NOT use any lenses, accessories, tripods or sliders. Everything was shot handheld, the only thing I had on the phone was the silicon case, that’s it. Also I DID NOT use Filmic Pro. Everything was done with the native camera app. Shot in 4K at 24fps,” he states on YouTube.

    Bertoli did grade the footage in Davinci Resolve 14. He also stays that, impressively, most of the video was shot using the telephoto camera. The secondary camera module’s inclusion of OIS and a brighter F2.4 aperture means it’s more useful for these kinds of applications.

    Take a look at the footage above and let us know what you think in the comments.

    Articles: Digital Photography Review (dpreview.com)

  • DxOMark: DJI Zenmuse X7 outperforms GH5, on par with top-notch APS-C DSLRs

    Remember when the DJI Zenmuse X7 drone camera was released, and we said DJI had become a camera company without anybody noticing? You might consider the latest scores out of DxOMark proof of that assertion. The sensor testing company just released its review of the X7, ranking it above the popular Panasonic GH5 and on part with top-scoring APS-C sensors like the Nikon D7500.

    Sporting the largest sensor yet for a DJI camera module, the X7 boasts a Super 35/APS-C sized chip that DxO discovered will hold its own against the leaders in that category. In fact, going through the rankings, you’ll find that only two APS-C sensors have ever scored higher than 86. And when you compare it to one of the top-scoring APS-C cameras (the Nikon D7500) and the often-drone-mounted Panasonic GH5, you see that DJI is not playing around:

    As DxOMark points out in their conclusion, this is an impressive showing for the drone maker:

    Thanks to an increase in its size as much as to technological advancements, the DJI Zenmuse X7’s sensor takes a significant step up in performance from the Zenmuse X5S sensor. In fact, it delivers results that compete closely with those from a high-scoring APS-C format DSLR, despite being housed in a camera that’s mounted in a stabilized gimbal and specifically designed for aerial photography.

    Be sure to head over to DxOMark to read their full DJI Zenmuse X7 review. And then check out our own opinion piece about DJI’s transformation from a drone maker, into a full fledged camera company.

    Articles: Digital Photography Review (dpreview.com)

  • Panasonic Lumix DC-G9 first impressions

    Introduction

    The Panasonic Lumix DC-G9 is the company’s newest mirrorless interchangeable lens camera (ILC), and in many ways, the first Lumix camera ever to be aimed squarely at professional and advanced amateur stills photographers – and it shows.

    But that doesn’t mean the G9 is light on video specs; Panasonic has long been a leader in ‘hybrid’ stills and video cameras with the impressive GH-series, but just as the GH-series leans slightly more to the video side of things, the G9 leans the other way.

    Even though we’ve had only a few days with our G9, we’ve already seen improvements to the JPEG engine (color in particular), and been able to play around with some of its new features like the 80MP high-resolution mode, and been blown away by its incredibly large electronic viewfinder. Some of its capabilities – like impressive-looking 20 fps burst shooting with continuous autofocus – will need more in-depth testing.

    But for now, we’ve put together some of our first impressions and takeaways – let’s get started.

    Key specifications

    Design sketch of the Panasonic Lumix DC-G9.

    The Lumix G9 is overflowing with refinements and improvements both inside and out. There’s a lot to digest in this camera, but here are what we believe to be the G9’s most important qualities:

    • 20.3MP Live MOS sensor with no AA filter (same as GH5)
    • 6.5-stop 5-axis Dual I.S. 2
    • 0.83x (35mm equivalent) high-res, 120 fps electronic viewfinder
    • 80MP high-resolution mode
    • 20 fps bursts with continuous autofocus (60fps with focus locked)
    • Dual UHS-II SD card slots supporting new high-speed V-rated cards
    • Assortment of 4K and 6K Photo modes, in-camera focus stacking
    • Refined ergonomics and controls
    • USB charge and USB power capability, 400 shots per charge battery life (CIPA)

    But for established photographers, particularly those Panasonic is targeting, equally important in addition to this list of objective specifications are the intangibles; how does the G9 feel in the hand, and how does it respond to your inputs?

    Let’s get started with that first consideration, and look at the G9’s body and design.

    Body, design and handling

    The G9 isn’t a small camera, but with a suitably compact lens, it isn’t too intimidating. Out-of-camera JPEG, processed in-camera with increased exposure compensation. Panasonic Leica DG 25mm F1.4.
    ISO 3200 | 1/500 sec | F1.4

    The G9 comes with splash, freeze and dust proof construction, and feels in the hand as though you’re holding a chunk of solid magnesium alloy, as opposed to a hollow one filled with Panasonic’s most advanced photographic technology to date.

    Battery life from the G9 is good if not downright impressive, at a CIPA rated 400 shots; it’s compatible with the same battery as the GH5, and will easily last you many hours of serious shooting. As always, exploring menus and rocketing through images in playback will shorten the battery’s stamina.

    Speaking of playback, the rear jog dial does a good job of moving through your images quickly, handy for when you start firing off those 20 fps bursts. The new top-plate LCD allows you to check your settings at a glance, even if the rear screen is folded away, and the combined Mode + Drive dials on the left shoulder work surprisingly well; some competitors that have attempted this end up feeling kind of ‘fiddly.’

    The top plate on the G9 is one of its key physical differentiators versus the GH5.

    The AF joystick has been tweaked, with a new textured finish and a click-in option to toggle between your chosen AF point and the center. Unfortunately, we think it could still be faster to move your AF area when you tap it to the side, and if you’re holding it to the side, your moving AF area won’t respond to a change in your desired direction unless you release the joystick, and push in that new direction. Compounding this is that you can’t move the point diagonally; only horizontally and vertically.

    As always, having an AF joystick is always better than not having one, and we’re hopeful to see these issues addressed in a future firmware update.

    Body, design and handling

    An abundance of controls and overall responsive performance helped me get this grab image of a low-flying plane in South Seattle. Out-of-camera JPEG, cropped to taste. Panasonic Leica DG 12-60mm F2.8-4.
    ISO 200 | 1/640 sec | F4.5

    The G9 has tons of controls, and tons of customization options. It can take a while for you to find your way around the camera, but that’s nothing out of the ordinary for a flagship. One thing we’ve noticed is that, likely on purpose, the shutter button on the G9 is very sensitive, so that could be something users may need to adjust to.

    What shouldn’t require much adjustment to is the all-new 0.83x (equivalent) optical viewfinder. It’s among the largest electronic viewfinders ever built into a digital camera, providing an immersive shooting experience that’s enhanced by the use of an OLED display, which gives great contrast.

    As someone who’s just officially griped about the necessity of USB charging, it’s nice to see it make an appearance on the G9 in addition to the ability to run off of USB power. The batteries by now are commonplace, but it’ll be great to power the camera with a USB power pack for longer shoots like timelapses, or when you need to top-up a battery off the grid.

    The G9 has among the largest electronic viewfinders ever built into a digital camera.

    And finally, let’s address the issue of size. There’s also no doubt that the G9 is fairly ‘chunky,’ especially given the Four Thirds sensor inside. Despite this, we think it’s likely to be a good fit for its intended audience.

    After all, a comfortable grip, extensive external controls, decent battery life, robust weather sealing and a crazy stabilization system all come with size and weight penalties; but even so, the G9 is lighter than the GH5. Indeed, couple the G9 with the appreciably small size of many Micro Four Thirds lenses, and you have the potential to make for a lightweight yet comprehensive kit that doesn’t skimp on ergonomic comfort.

    New and notable features

    In this image, you can see how possible motion in your scene might impact your ability to use this mode – but you can also see just how much detail is there in the static portions of the scene. Panasonic Leica DG 12-60mm F2.8-4.
    ISO 200 | 1/500 sec | F4

    The new 80MP high resolution mode on the G9 works similarly to competitors’ offerings, and takes eight shots in quick succession, moving the sensor by a half-pixel for each image. In practice, it’s one of the faster implementations of a pixel-shift high res mode that we’ve seen, and predictably comes with a serious increase in image quality. Usually.

    What you gain in detail and noise characteristics, you lose out depending on how much motion is in your scene. The above image is a good example of both the detail benefit you can get from this mode, as well as how it copes with moving subjects – and for the record, this is not necessarily the setting Panasonic would recommend for this feature, but we figured you, dear reader, might be curious about it.

    Image stabilization on the G9 is a claimed 6.5 stops, which is basically magic.

    As an added bonus, if you did attempt an 80MP image and were bothered by unintended motion artifacts, the G9 has an option to capture an additional ‘normal’ 20MP Raw and JPEG image simultaneously.

    Image stabilization on the G9 is a claimed 6.5 stops – which is basically magic. With shorter lens, you’ll have an almost glidecam experience (even if you’re only using the in-body stabilization), and even with the new Panasonic Leica 200mm F2.8 lens and 2.0x teleconverter, you can easily frame your subjects shake-free through the viewfinder, even hand-held.

    Image and video quality impressions

    Panasonic told us that, for their latest JPEG engine, they’ve been working hard on the G9’s rendition of yellows and blues, particularly for blue skies. We think they look pretty darn good.

    While we don’t yet have Raw support for the G9, the early JPEGs coming out of our camera look good. We’ve been critical of Panasonic’s JPEG color and noise reduction in the past, and our early sample shots seem to show noticeable improvements.

    First, the automatic white balance seems to handle a variety of settings with much greater reliability – warm evening light is represented as such, without going over-the-top orange, colors are nicely saturated and exhibit far less ‘green-shifted yellows’ than before. We’ll wait until we can perform our studio testing to make a definitive call on noise reduction, but it looks to this reviewer that there’s less smearing of areas of fine detail, which was historically a problem even at lower ISO values.

    Panasonic is claiming more sophisticated sharpening and noise reduction on the G9, but we’re waiting for our studio scene analysis before we can claim anything definitive in this regard.

    In terms of video, the G9 offers 4K UHD capture at up to 60 fps, as well as an array of slow-motion modes in both 4K and Full HD. While you lose out on some more advanced features of the GH5, such as ultra-high bitrate recording, higher color depth capture and unlimited clip length (the G9 tops out at 10 minutes and 30 minutes for 4K/60p and 4K/30p respectively), video capture is still taken from the full width of the sensor and downscaled, and so should provide great detail. Lastly, our initial impressions show DFD autofocus to be more decisive and less prone to ‘wobble’ when shooting video, making run-and-gun capture more feasible.

    Overall impressions and sample gallery

    Out of camera JPEG. Panasonic Leica DG 12-60mm F2.8-4.
    ISO 200 | 1/4000 sec | F4

    Credit where credit is due, Panasonic has a long history of bringing cameras to market that bear impressive technical capabilities; from the lineage that gave us the first-ever mirrorless interchangeable lens camera, to the first mirrorless camera that could capture 4K video comes the stills-focused G9. With this new model, Panasonic has taken advantage of that greater emphasis on stills to pack some advanced and innovative features into a camera that is meant to be rugged and reliable for professional use.

    Starting with ruggedness, we have to admit the G9 feels great in the hand. It’s all-metal, with a redesigned (and really comfy) grip. It’s far from compact, but it doesn’t feel heavy for a professional-level camera; its overall size allows room for an enormous viewfinder, good-sized battery and abundant external controls.

    We’ve only had the G9 for a few days, and so we’ve not had time to fully evaluate all of the G9’s new features in-depth. For now, we remain impressed with overall JPEG image quality, video autofocus performance looks to be improved and the image stabilizer is really something you have to see to believe.

    The G9 continues to use the same Four Thirds 20.3MP sensor as the GH5.

    With the same mechanical shutter as the GH5, it offers 9 fps burst shooting with what should be similar (read: very good) autofocus performance at 9 fps, but we’re really looking forward to doing some sports testing at the full 20 fps with electronic shutter. We have to admit we’re also curious how the new V-rated SD cards holds up to the CFast and XQD slots in high-end sports DSLRs.

    There will always be folks that will have a hard time seeing past the Four Thirds sensor in the G9, relative to APS-C and full-frame offerings. But the G9 nonetheless comes with incredible image stabilization, high shooting speed, high quality 4K video and compact-yet-high-quality lens offerings (all of which are made possible, or at least easier, with the smaller Four Thirds sensor). For this, we think the G9 represents a compelling option for professional photographers needing all of the capability, customizability and resilience they can get in a smaller package than many competitors are able to offer.

    Articles: Digital Photography Review (dpreview.com)

  • Panasonic announces Leica DG Elmarit 200mm F2.8 Power OIS telephoto prime

    $ (document).ready(function() { SampleGalleryV2({“containerId”:”embeddedSampleGallery_9122994535″,”galleryId”:”9122994535″,”isEmbeddedWidget”:true,”standalone”:false,”selectedImageIndex”:0,”startInCommentsView”:false,”isMobile”:false}) });

    Panasonic has announced its Leica DG Elmarit 200mm (400mm equiv.) F2.8 Power OIS telephoto prime. This hefty, weather-sealed and freezeproof lens features 15 elements, 2 of which are ‘ultra extra-low dispersion’. The lens has image stabilization onboard, though Panasonic does not quote a CIPA figure for shake reduction. The 200mm F2.8 is compatible with the Dual IS systems built into most modern Panasonic mirrorless cameras.

    The lens features a triple linear focus motor system with a 240 fps sensor drive speed along with a ‘micro-step’ drive system that allows for precise aperture control.

    Panasonic includes the new DMW-TC14 1.4x teleconverter in the box with the lens, bringing the focal length up to 280mm (560mm equiv.). It’s also compatible with the company’s 2x teleconverter.

    When it launches in January 2018, some functions on the 200mm F2.8 will not be compatible with the Panasonic GH5, and a firmware update slated for March will take care of that.

    The Panasonic Leica DG Elmarit 200mm F2.8 Power OIS will be priced at $ 2999.99.

    Press Release

    LEICA DG ELMARIT 200mm / F2.8 / POWER O.I.S. (H-ES200)

    The New Compact, Lightweight Ultra Telephoto Lens with POWER O.I.S. For Handheld 400mm Equivalent Ultra-Telephoto Shooting

    November 8, 2017 (Newark, NJ) – Panasonic Consumer Electronics Company is proud to introduce a new telephoto single focal length lens, the LEICA DG ELMARIT 200mm / F2.8 / POWER O.I.S. (35 mm camera equivalent: 400 mm). The LEICA DG ELMARIT 200mm / F2.8 / POWER O.I.S. is the first large-diameter ultra-telephoto fixed focal length lens with a name of LEICA DG. It boasts sharpest-ever image quality from corner to corner in the history of LUMIX digital interchangeable lenses. Featuring high mobility in a compact, lightweight design, it also realizes handheld ultra-telephoto shooting.

    With its 400mm ultra telephoto focal length and stunning descriptive performance, the LEICA DG ELMARIT 200mm / F2.8 / POWER O.I.S. is suitable for wildlife or sports photography. The 1.4x Teleconverter (DMW-TC14) is bundled*1 to extend the focusing distance to 560mm (35mm camera equivalent) for close-up shots.

    The fast F2.8 aperture lets you capture fast-moving subjects while the POWER O.I.S. (Optical Image Stabilizer) effectively compensates for hand-shake movement, making it easy to shoot even without a tripod or in low-lit situations. The lens works with Dual I.S.*2 (Image Stabilizer) and Dual I.S. 2.0*3 system when mounted on the compliant Panasonic LUMIX DSLM (Digital Single Lens Mirrorless) cameras for more powerful hand-shake suppression.
    Clearing the stringent quality standard of LEICA, the lens is comprised of 15 elements in 13 groups, featuring two UED (Ultra Extra-low Dispersion) lenses. The use of UED lenses and Panasonic cutting-edge optical technology achieve high resolution, high contrast image from corner to corner while suppressing distortion and chromatic aberration.

    Incorporating a triple linear motor system and max.240 fps sensor drive, the new LEICA DG ELMARIT 200mm / F2.8 / POWER O.I.S. achieves high-speed, high-precision contrast AF system for both photo and video recording. This stunning AF performance is excellent to record 4K video, where precise focusing is required. In addition, the micro-step drive system in the aperture control section helps the camera smoothly catch up to brightness changes when panning.

    It boasts a rugged, dust/splash-proof design and are even freeze-proof down to -10? (14 degrees F) to withstand professional use under harsh conditions. Offered in sharp, metallic black color, it stylishly matches the LUMIX G Digital Single Lens Mirrorless (DSLM) cameras.
    The LEICA DG ELMARIT 200mm / F2.8 / POWER O.I.S. can also be used with the 2.0x Teleconverter DMW-TC20 (sold separately), which extends the focusing distance to 800mm (35mm camera equivalent) to capture subjects at a greater distane.

    *1 The 1.4x Teleconverter (DMW-TC14) is also sold separately as an optional accessory.
    *2 Dual I.S. is available on GX8, GX80/85
    *3 Dual I.S. 2.0 is available on GH5, G9, G80/81/85
    •Some functions of H-ES200 cannot be used with DC-GH5. The firmware for DC-GH5 to fully comply with H-ES200 is scheduled to be released by the end of March, 2018.
    •Design and specifications are subject to change without notice.
    •LEICA is a registered trademark of Leica Microsystems IR GmbH.
    •ELMARIT is a registered trademark of Leica Camera AG.

    The new ELMARIT 200mm lens and accessories will be available in early January 2018. The lens with the 1.4x teleconverter MSRP will be $ 2,999.99 and the optional 2x teleconverter is $ 599.99.

    Leica DG Elmarit 200mm F2.8 Power OIS specifications

    Principal specifications
    Lens type Prime lens
    Max Format size FourThirds
    Focal length 200 mm
    Image stabilization Yes
    Lens mount Micro Four Thirds
    Aperture
    Maximum aperture F2.8
    Minimum aperture F22
    Aperture ring No
    Number of diaphragm blades 9
    Optics
    Elements 15
    Groups 13
    Special elements / coatings 2 ultra extra-low dispersion + Nano Surface Coating
    Focus
    Minimum focus 1.15 m (45.28)
    Maximum magnification 0.2×
    Autofocus Yes
    Motor type Stepper motor
    Full time manual Yes
    Focus method Internal
    Distance scale No
    DoF scale No
    Focus distance limiter Yes
    Physical
    Weight 1245 g (2.74 lb)
    Diameter 88 mm (3.46)
    Length 174 mm (6.85)
    Materials Magnesium alloy
    Sealing Yes
    Colour Black
    Filter thread 77.0 mm
    Hood supplied Yes
    Tripod collar Yes
    Other
    Notes Includes 1.4x teleconverter

    Articles: Digital Photography Review (dpreview.com)