Blog

  • 6 Tips for Working with Unruly Animals in Pet Photography

    Whenever I do an event that promotes my pet photography, there are always one or two potential clients that have reservations about booking due to their beloved furry family member’s “unruly” behavior. Whether it be a hyperactive puppy that does not yet know how to sit still or a feline that runs the roost, some owners believe their pets to be impossible to photograph!
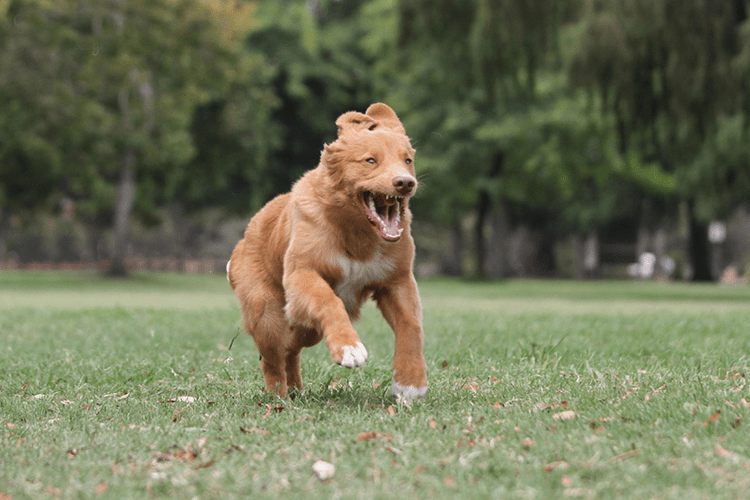
    Working with Unruly Animals in Pet Photography

    But you see, this perspective comes from someone who lives with their critters. Those who specialize in pet photography know just how to work with all sorts of four-legged personalities that find themselves in front of the camera. Here are some tricks for working with the hyper, the untrained, the unruly, or the camera-shy to help you bring out their best sides.

    Please note that the tips provided below are not intended as a pet training mechanism or a deep insight into animal behavior – they are only to be used for individual photography sessions.

    Working with Unruly Animals in Pet Photography

    #1 – A Tired Dog is a Good Dog

    Each old saying has a grain of truth to it, and in this case, significantly more than just a grain. An animal that is tired is less likely to have the energy to misbehave! A key tip in working with untrained pets is getting them too tired to exert their boisterous behavior or protest having to stay still. Playing, running, and stimulating the dog, cat, or even parrot before a session will keep them mellower when it comes time to take the photographs.

    Depending on how you run your photo sessions, you will either suggest this for your client or proceed to take on the responsibility of doing it yourself. If your client is the one to do this, ensure that they time the play effectively so that their furry family member isn’t so stimulated that the presence of a photographer causes stress or anxiety. The key is to get the animal to the level of tired that they no longer care about what is happening around them. Combined with other techniques as I am about to discuss, this is a sure way to get a great photo session.

    Do keep in mind that it certainly depends on the age of the animal you are working with in regards to how long they remain tired or how long one should play. Puppies and kittens tend to tire out very easily, while an adult dog and cat take a longer amount of time. Baby or young animals may also remain tired for less time than an adult counterpart, as their energy comes in bursts.

    Working with Unruly Animals in Pet Photography

    #2 – Become Boring John or Jane Doe

    Unruly animal behavior can often be linked to excitement, overstimulation, or anxiety about something new in the pet’s home or immediate location. Animals communicate with body language and conduct. Because pets cannot speak words to us, their method of expressing emotions is very physical.

    Knowing this means that we, as photographers, must find a way to dull the reaction our own presence causes. Allowing pets to become familiar with us is a good way to do so, such as letting a dog sniff us and our equipment or having a cat circle around and check us out. Letting owners interact with the photographer as they would any familiar person can also help the animal become more familiar.

    Working with Unruly Animals in Pet Photography

    For fearful pets, getting down to their level (sitting on the ground, for example) and letting them come to you is key. Try not to look at them or pay much mind until they become insistent on receiving attention from you. Depending on the personality and temperament of the pet, giving the animal their favorite treat can also aid. Try not to act overly excited or exceptionally grabby or touchy with the pet, as many animals take that as “play”.

    #3 – Tap Into Your Inner Mind Reader

    Working with Unruly Animals in Pet Photography

    The following tip can be applied to all animal photography, whether it be wild animals or domestic. Ensuring that you are always ready to capture the perfect moment whenever it may occur is key. A good way of knowing when to raise the camera and click the shutter is to predict the animal’s behavior.

    Much of this does come from experience and exposure to various kinds of pets, but you can often use common sense to figure out what your subject is going to do next. If a dog is about to run, practice your panning technique! If a cat is about to jump from the back of a couch, prepare yourself to capture that action.

    Working with Unruly Animals in Pet Photography

    #4 – Become an Observer

    Sometimes, the best pet photography shots are those in which you play no involvement and sit back as an observant photographer rather than one who dictates the session. It is often to your benefit to sit farther back with a telephoto or zoom lens and not interfere with what proceeds to occur.

    This does depend on what your client wants from the photo shoot, what you expect, or what the animal you are working with is like – but certainly, give it a thought!

    Working with Unruly Animals in Pet Photography

    #5 – Toys and Treats Capture Hearts

    Depending on the pet you’re photographing, toys and treats can become your best friend. Though you do not want to overstimulate the pet, keeping their attention can be equally important. Treats, toys, and noises can often do this for you.

    You may even be able to teach a dog to sit during your photo session or keep a cat looking at you as you take pictures, depending on how you are with animals. The key with treats is to use high-value treats, a common term used among dog trainers. High-value treats are goodies that the pet finds irresistible, and that becomes a big motivator for them to do what you want.

    Working with Unruly Animals in Pet Photography

    Certain types of toys can be the same. Toys and noises are also a great way to get alert ears and a happier facial expression.

    #6 – Be Creative

    This is the most important piece of advice anyone can give you – just be creative. A successful photographer is one who knows how to adapt to any situation thrown their way, and an animal that isn’t behaving is just another circumstance to overcome.

    Take your creativity for a spin as you adapt to what you’ve been given, and find new and unique ways to capture the creature’s personality on camera. Whether it’s using a different lens or changing your perspective and composition, doing something new based on what’s happening is a great way to work with animals.

    Of course, all animals are different. Your reaction should be based on the individual animal’s personality, reaction, and needs. Pet photographers must display a sensitivity and empathy towards their subject, and act accordingly!

    Conclusion

    Hopefully, these tips have given you some ideas or inspiration to work with all kinds of animals, mellow and not-so-mellow!

    Working with Unruly Animals in Pet Photography

    The post 6 Tips for Working with Unruly Animals in Pet Photography by Anabel DFlux appeared first on Digital Photography School.


    Digital Photography School

  • 5 Must-Know Photoshop Retouching Tips and Tricks for Photographers

    Here are five quick tips for doing retouching in Photoshop that are essential to know. Learn them to do better retouching on your photos.

    #1 – Load Luminosity as a Selection

    In Photoshop you can use the luminosity of an image (the bright pixels) as selections. The easiest way to make a selection out of the bright pixels of a photo is by pressing Command+Option+2, (Windows: Ctrl+Alt+2).

    If you cannot remember the keyboard shortcut, you can also load luminosity as a selection by holding Cmd/Ctrl and clicking on the RGB thumbnail in the Channels panel.

    01 selection - 5 Must-Know Photoshop Retouching Tips and Tricks for Photographers

    With a selection active, you can create an Adjustment Layer to apply the selection to the Layer Mask.

    02 adjustment mask - 5 Must-Know Photoshop Retouching Tips and Tricks for Photographers

    This Adjustment Layer will only target the brighter pixels of your image. If you make an adjustment, you’ll notice that you will only affect the bright pixels and not the dark ones.

    03 adjustment lights - 5 Must-Know Photoshop Retouching Tips and Tricks for Photographers

    You can target dark pixels by inverting the selection. To do so, Select the Layer Mask, and clicking on Invert in the Properties panel.

    04 invert mask - 5 Must-Know Photoshop Retouching Tips and Tricks for Photographers

    Now if you make an adjustment, the dark pixels will be affected and not the bright.

    05 adjustment darks - 5 Must-Know Photoshop Retouching Tips and Tricks for Photographers

    #2 – Spot Healing Brush Tool Modes – Lighten and Darken

    One way to remove wrinkles, blemishes, and other distractions from the face quickly and efficiently is to use the Modes in the Spot Healing Brush Tool and Content-Aware.

    First, think of the blemish, wrinkle, or distraction that you are trying to remove. Is it darker than the skin tone or is it brighter than the skin tone?

    06 portrait - 5 Must-Know Photoshop Retouching Tips and Tricks for Photographers

    In this case, the wrinkles are darker than the skin tone. That means that you want to “lighten” those wrinkles.

    With the Spot Healing Brush Tool selected, in the Options bar, click on Content-Aware, and under the Mode drop-down menu, select Lighten.

    07 lighten - 5 Must-Know Photoshop Retouching Tips and Tricks for Photographers

    Then start painting with a small brush and small strokes over the wrinkles to remove them. But you will not lose essential details in the highlights. The Spot Healing Brush tool is only targeting dark pixels which are the wrinkles.

    08 before after - 5 Must-Know Photoshop Retouching Tips and Tricks for Photographers

    If your blemish or distraction is brighter than the skin tone, such as the bright wrinkles above the lip, then select Darken from the Mode drop-down menu, and paint them away.

    10 final heal - 5 Must-Know Photoshop Retouching Tips and Tricks for Photographers

    To learn more about how this technique works, check out this video on the Spot Healing Brush Tool:

    #3 – Open the Same Image in Two Windows

    In Photoshop, you can open the same image in two windows and set them side-by-side to work on both details and the overall image at the same time.

    This technique is great when you are working with two monitors. But even with one monitor, this technique can be very useful.

    To open the same document in two windows, go to Window > Arrange, “New Window for [Name of Document].” Then go to Window > Arrange > Two up Vertical to put the two tabs side-by-side. You can then Zoom into one window, and zoom out on the other.

    same doc two windosw - 5 Must-Know Photoshop Retouching Tips and Tricks for Photographers

    These are not two separate files. They are the same document, and any adjustments that you make to one will reflect on the other instantly.

    #4 – Targeted Selections with Color Range

    The Color Range command can be an excellent tool for selecting difficult areas of an image. However, if you simply use the Color Range on a problematic image, it may not give you the results you want. Sometimes there is too much information on a single image, and you need to focus on just one area.

    To focus the Color Range in only one area, create a selection around the object that you want to select. A simple rectangular selection will be fine.

    12 selection - 5 Must-Know Photoshop Retouching Tips and Tricks for Photographers

    Then go into Select > Color Range, and you will see that Color range is now focusing solely on the selected area.

    13 color range - 5 Must-Know Photoshop Retouching Tips and Tricks for Photographers

    Select a red color on the shirt using the eyedropper, then use the fuzziness slider to adjust the selection.

    Keep in mind that it is going to be next to impossible not to select the hands or the railing that she’s leaning on because the skin tones and the paint on the railing are very similar in color to the red that you are trying to select.

    But you can use the Lasso tool to quickly deselect those areas, leaving only the red in the shirt selected.

    14 selection only red - 5 Must-Know Photoshop Retouching Tips and Tricks for Photographers

    With a selection active, you can create a Hue and Saturation Adjustment Layer that will just target the red in the shirt.
    Then use the Hue slider to change the color of the shirt.

    15 change color - 5 Must-Know Photoshop Retouching Tips and Tricks for Photographers

    #5 – Use the Lab Color Mode

    Most of the time, you will work with RGB or CMYK while in Photoshop. But there is another Color Mode that you can use that can be very useful in certain situations. If you go to Image > Mode > Lab Color, you will change your photo’s color mode to Lab.

    16 color mode - 5 Must-Know Photoshop Retouching Tips and Tricks for Photographers

    The Lab color mode has three channels: Lightness, A, and B.

    • The Lightness channel contains the detail of the image – the Luminance values.
    • “A” is the relationship between green and magenta. These are the same colors as the Tint slider in Lightroom and Camera Raw.
    • “B” is the relationship between blue and yellow. These are the same colors as the Temperature slider in Lightroom and Camera Raw.

    17 lab graphic

    One of the most significant advantages of working with the Lab color mode is that Lab separates detail (luminosity) from color. This separation allows you to work with color without affecting detail and vice versa.

    17 red dress - 5 Must-Know Photoshop Retouching Tips and Tricks for Photographers

    For example, you could turn a red dress green by duplicating the layer, and then selecting “A” from the Channel’s panel, and pressing Cmd/Ctrl+I to invert the channel.

    18 a channel

    Notice that the color of the image changed, but the detail was left intact.

    19 green layer - 5 Must-Know Photoshop Retouching Tips and Tricks for Photographers

    You could then use a Layer Mask to contain the adjustment to only the dress.

    20 mask dress

    Another advantage of using the Lab color mode is that you can sharpen without affecting the color of a photo. If you apply any sharpening filter to the Lightness channel, you will only target the detail and will leave the color intact.

    The example below has the same Sharpening filter applied to both the regular image and the Lightness channel in Lab Color. I’ve made sharpening effect an extreme one for demonstration purposes, to make the results more noticeable.

    Notice that when you apply sharpening to the Lightness channel (right), the colors on the edges are not saturated or changed. They only become brighter or darker. While the sharpening on the regular layer increases the saturation of the edge pixels.

    21 sharpening

    As a side note, Photoshop doesn’t really add detail to an image when you apply sharpening. It creates the illusion of detail by adding contrast to the edges in the photo. You can see that edge contrast in these extreme adjustments.

    You can learn more about sharpening in this video on sharpening photos in Photoshop:

    One important thing to note is that the Lab color mode does not have access to all the Adjustment Layers, and some Adjustment Layers will work a bit different than their RGB counterparts.

    If you are working with Adjustment Layers and you would like to go back to the RGB color mode, you will have to put the image, and the Adjustment Layers in a Smart Object then make the conversion. Otherwise, Photoshop will ask you to delete the Adjustment Layers or flatten the image.

    Conclusion

    I hope you found these tips helpful for retouching or editing your images in Photoshop. Do you have any other tips or tricks that you use? Please share in the comments below.

    The post 5 Must-Know Photoshop Retouching Tips and Tricks for Photographers by Jesus Ramirez appeared first on Digital Photography School.


    Digital Photography School

  • The 2 Minute Lightroom Workflow Toolkit

    Sick of struggling with Lightroom? Disappointed with one-click presets and want to know how to produce stunning, natural images in under 2 minutes… read on!

    Earlier this year we offered dPS readers an amazingly simple Lightroom Workflow by professional Aussie photographer Johny Spencer. It was one one of our most popular offers of the year.

    As part of our dPS Christmas Deals, we’ve brought this amazing offer bundled with 2 of Johny’s other awesome Lightroom resources: Mastering Lightroom & Ultimate Lightroom Finishing Moves

    Three Lightroom Resources for the Price of One

    For the next 48 hours you can get this toolbox of Lightroom resources for 67% off. Normally you’d pay $ 237 for this collection, but you can get them now for just $ 79.

    Here’s what’s included:

    1. Ultimate Lightroom Workflow – Johny’s own workflow he uses every day to process 1000’s of photos in minutes.
    2. Mastering Lightroom – The definitive guide to using Lightroom to process landscapes and nature photographs.
    3. Ultimate Lightroom Finishing Moves – the secret final steps pros use to take their Images from stunning to spectacular

    Johny know his stuff. He has every photographer’s dream job: Professional Landscape and Nature photographer for the National Parks Service in Australia. This means he takes thousands of photos a month… and then edits them in Lightroom.

    Grab the Ultimate Lightroom Workflow Toolkit while you can. This deal ends in 48 hours.

    Parter Bonuses

    Access our exclusive Partner Bonus Offers from New York Institute of Photography, KelbyOne, Perfectly Clear and ON1 when you purchase any dPS Christmas Deal. Check your purchase receipt email for the access link!

    Christmas Deals:
    Bonus Offers

    Bonus Offers

    Brought to you by

    ON1
    Athentec Perfectly Clear
    KelbyOne
    New York Institute of Photography

    The post The 2 Minute Lightroom Workflow Toolkit by Darren Rowse appeared first on Digital Photography School.


    Digital Photography School

  • Canon PowerShot G1 X Mark III review

    Introduction

    The Canon PowerShot G1 X III is a high-end compact camera with a 24MP APS-C sized sensor, Dual Pixel autofocus and a 24-72mm equivalent F2.8-5.6 zoom lens. It’s Canon’s new flagship for the PowerShot G-series, and the sensor is the largest they’ve ever fitted to a fixed-lens camera. It also has the company’s latest DIGIC 7 processor, Wi-Fi with Bluetooth connectivity, and promises a degree of dust and water resistance.

    While sales of compact cameras at the low end continue to evaporate, manufacturers are still churning out premium, high-end models in an attempt to lure enthusiasts and amateurs with deep pockets. The G1 X III is certainly an interesting proposition in this segment – indeed, it’s the only compact on the market with an APS-C sensor and a lens that zooms, and is designed to be weather sealed to boot.

    Key Features

    • 24MP APS-C CMOS sensor
    • Dual Pixel autofocus for stills and video
    • DIGIC 7 processor
    • 2.36M-dot electronic viewfinder
    • 3″ fully-articulating LCD
    • 9fps burst shooting (7fps with continuous AF)
    • 1080/60p video recording
    • Wi-Fi and NFC with Bluetooth
    • 200 shot-per-charge battery life (CIPA standard testing)
    Processed and cropped to taste in Adobe Camera Raw.
    24mm equiv | ISO 125 | F2.8 | 1/1000 sec
    Photo by Carey Rose

    There are, of course, sacrifices to be made when shoehorning such a large sensor into such a small body. First, the MSRP is pretty high, even for this market segment. Though the lens has a respectable range, its maximum aperture range isn’t exactly impressive, and battery life is just plain bad. Regardless, as an overall package, the G1 X III is likely to attract the interest of a wide variety of photographers.

    Compared to…

    That the G1 X III is a unique offering makes it difficult to really draw comparisons to other models; regardless, those shopping for a fixed-lens pocketable compact at this price are likely to stumble across the RX100 V and the older RX100 IV. They offer much smaller sensors, but come with similar zoom ranges and brighter maximum apertures for their lenses.

    Canon G1 X
    Mark III
    Sony RX100 V Sony RX100 IV
    MSRP $ 1299 $ 999 $ 899
    Sensor 24MP APS-C CMOS 20MP 1″-type
    stacked BSI CMOS
    20MP 1″-type
    BSI CMOS
    Lens 24-72mm equiv. F2.8-5.6 24-70mm equiv. F1.8-2.8 24-70mm equiv. F1.8-2.8
    ISO range
    (native)
    100-25600 125-12800 125-12800
    AF system Dual Pixel on-sensor phase detect On-sensor phase detect Contrast detect
    EVF 2.36M-dot 2.36M-dot 2.36M-dot
    LCD 3″ 1.04M-dot fully articulating
    (720 x 480 RGB)
    3″ 1.28M-dot tilting
    (640 x 480 RGBW)
    3″ 1.28M-dot tilting
    (640 x 480 RGBW)
    Touchscreen Yes No No
    Burst rate with AF 7fps 24fps 5.5fps
    Video 1080/60p 4K/30p 4K/30p
    Wireless WiFi w/NFC + Bluetooth WiFi w/ NFC WiFi w/ NFC
    Battery life (CIPA 200 shots 220 shots 280 shots
    Dimensions 115 x 78 x 51 mm 102 x 58 x 41 mm 102 x 58 x 41 mm
    Weight 399 g 299 g 298 g

    It’s worth noting that there are older options (in some cases, discontinued) that may be of interest. The Panasonic LX100 comes with a 4/3-type sensor and similar zoom range, but only offers 12MP of resolution. Fujifilm’s X70 and Ricoh’s GR II both have 16MP APS-C sensors and are even smaller than the Canon, but both have fixed 28mm-equivalent prime lenses.

    In terms of other current cameras that aim to strike a balance between being pocketable and taking decent photos, Panasonic’s LX10 comes with a 24-72mm equiv. F1.4-2.8 lens in front of its 1″-type sensor, and Canon’s own G7 X Mark II has a 24-100mm equiv. F1.8-2.8 lens in front of its 1″-type sensor. And they’re all much cheaper than the G1 X III.

    The lens

    What’s likely to cause the most consternation for serious photographers considering the G1 X III is the lens. The camera is impressively compact, but as noted earlier, at the expense of its maximum aperture range. This limits the usefulness of the larger sensor, particularly in terms of depth of field control (blurry backgrounds) and low light capability – though you should retain a dynamic range advantage in bright light.

    Let’s see how it compares to some of the other zoom-equipped models we’ve mentioned here.

    LensEquivalentApertures([“Equivalent focal length (mm)”,”Canon G1 X II”,”Panasonic LX100″,”Canon G7 X II”,”Panasonic LX10″,”Sony RX100 V”,”Canon G1 X III”], [[24,3.84,”Canon G1 X II at 24mm: F3.8″,3.7434,”Panasonic LX100 at 24mm: F3.7″,4.90909090909091,”Canon G7 X II at 24mm: F4.9″,3.8181818181818183,”Panasonic LX10 at 24mm: F3.8″,4.90909090909091,”Sony RX100 V at 24mm: F4.9″,4.5170606663860564,”Canon G1 X III at 24mm: F4.5″],[25,4.224,”Canon G1 X II at 25mm: F4.2″,3.9636,”Panasonic LX100 at 25mm: F4.0″,null,””,4.0909090909090917,”Panasonic LX10 at 25mm: F4.1″,5.454545454545455,”Sony RX100 V at 25mm: F5.5″,null,””],[26,4.8,”Canon G1 X II at 26mm: F4.8″,4.1838,”Panasonic LX100 at 26mm: F4.2″,null,””,4.90909090909091,”Panasonic LX10 at 26mm: F4.9″,6.0000000000000009,”Sony RX100 V at 26mm: F6.0″,5.1623550472983508,”Canon G1 X III at 26mm: F5.2″],[27,5.3759999999999994,”Canon G1 X II at 27mm: F5.4″,4.404,”Panasonic LX100 at 27mm: F4.4″,null,””,5.454545454545455,”Panasonic LX10 at 27mm: F5.5″,null,””,null,””],[28,null,””,4.6242,”Panasonic LX100 at 28mm: F4.6″,null,””,6.0000000000000009,”Panasonic LX10 at 28mm: F6.0″,6.8181818181818183,”Sony RX100 V at 28mm: F6.8″,null,””],[29,null,””,null,””,null,””,6.8181818181818183,”Panasonic LX10 at 29mm: F6.8″,null,””,5.646325832982571,”Canon G1 X III at 29mm: F5.6″],[30,6.144,”Canon G1 X II at 30mm: F6.1″,4.8444,”Panasonic LX100 at 30mm: F4.8″,null,””,null,””,null,””,null,””],[31,null,””,null,””,null,””,7.6363636363636367,”Panasonic LX10 at 31mm: F7.6″,null,””,null,””],[32,null,””,null,””,6.0000000000000009,”Canon G7 X II at 32mm: F6.0″,null,””,7.6363636363636367,”Sony RX100 V at 32mm: F7.6″,6.4529438091229379,”Canon G1 X III at 32mm: F6.5″],[34,null,””,5.0645999999999995,”Panasonic LX100 at 34mm: F5.1″,null,””,null,””,null,””,null,””],[37,null,””,5.2848,”Panasonic LX100 at 37mm: F5.3″,null,””,null,””,null,””,7.2595617852633048,”Canon G1 X III at 37mm: F7.3″],[39,null,””,null,””,6.8181818181818183,”Canon G7 X II at 39mm: F6.8″,null,””,null,””,null,””],[40,6.72,”Canon G1 X II at 40mm: F6.7″,null,””,null,””,null,””,null,””,null,””],[41,null,””,5.505,”Panasonic LX100 at 41mm: F5.5″,null,””,null,””,null,””,null,””],[44,null,””,5.7252,”Panasonic LX100 at 44mm: F5.7″,null,””,null,””,null,””,null,””],[45,null,””,null,””,null,””,null,””,null,””,8.0661797614036725,”Canon G1 X III at 45mm: F8.1″],[52,null,””,6.1655999999999995,”Panasonic LX100 at 52mm: F6.2″,null,””,null,””,null,””,null,””],[54,null,””,null,””,7.6363636363636367,”Canon G7 X II at 54mm: F7.6″,null,””,null,””,null,””],[57,null,””,null,””,null,””,null,””,null,””,9.0341213327721128,”Canon G1 X III at 57mm: F9.0″],[70,null,””,null,””,null,””,null,””,7.6363636363636367,”Sony RX100 V at 70mm: F7.6″,9.0341213327721128,”Canon G1 X III at 70mm: F9.0″],[72,null,””,null,””,null,””,7.6363636363636367,”Panasonic LX10 at 72mm: F7.6″,null,””,null,””],[75,7.4879999999999995,”Canon G1 X II at 75mm: F7.5″,6.1655999999999995,”Panasonic LX100 at 75mm: F6.2″,null,””,null,””,null,””,null,””],[100,null,””,null,””,7.6363636363636367,”Canon G7 X II at 100mm: F7.6″,null,””,null,””,null,””],[120,7.4879999999999995,”Canon G1 X II at 120mm: F7.5″,null,””,null,””,null,””,null,””,null,””]], {“isMobile”:false})

    As you can see, both Panasonic models offer larger aperture diameters at the widest end of their zooms, meaning greater scope for low-light work. Meanwhile, the Canon G7 X II offers more subject isolation and potential for low light image quality once you pass 29mm – all of this is in spite of the fact that the G1 X Mark III’s sensor is the largest, by a fair margin. It speaks volumes to the trade-offs that have been made in getting the G1 X III to fit in your coat pocket.

    Articles: Digital Photography Review (dpreview.com)

  • Houston neighborhood removes photography ban after sidewalk compromise

    Historic Broadacres neighborhood of Houston, Texas. Photo by Ed Uthman, used under CC 3.0 license.

    Broadacres, a wealthy Houston neighborhood, has reversed its ban on photography following a previous attempt to prevent photographers from holding photo shoots in the area. The issue, according to the Broadacres Homeowners Association (BHA), was that commercial photographers were blocking public sidewalks. “It’s the abusive commercial photographers that have ruined it for everyone,” BHA president Cece Fowler said in a statement to the Houston Chronicle.

    The neighborhood has attracted an increasing number of photographers who use it as a picturesque backdrop for wedding photos and more. This has resulted in 50 or more photo shoots every week, according to residents, which at times are said to include large props and groups. Fowler claims that some of these shoots have even caused damage, such as when a Jeep was reportedly driven onto the neighborhood’s esplanade.

    Some of these shoots have even caused damage, such as when a Jeep was reportedly driven onto the neighborhood’s esplanade

    Frustrated by this, Broadacres put up signs that read, “Welcome to Broadacres; No Photo Shoots.” That resulted in quick backlash on social media, however, and the signs have since been removed. Photography is again permitted in the neighborhood, but with one exception: photo shoots can’t take place on the sidewalks due to city ordinances. Residents have been advised to call the city’s 311 line if such obstructions appear in the future.

    According to the Chronicle, Houston Public Works public information officer Alanna Reed said, “We hope the community will be respectful of the neighborhood. Remember the Golden Rule — would you want somebody coming into your neighborhood doing the same thing?”

    Via: Fstoppers

    Articles: Digital Photography Review (dpreview.com)

  • How to Photograph Fireworks to Create Impressionistic Images

    I love experimenting with different techniques and ideas. So when our editor here at dPS, Darlene, asked if someone was willing to try out a technique and experiment with fireworks. I jumped at the chance. I love being creative and pushing the limits of new ideas. Her idea for an article about creating artistic images of fireworks came from this article – Bloom or boom? Photographer captures the moment fireworks erupt into life – creating amazing images that look like flowers.

    How to Photograph Fireworks to Create Impressionistic Images

    Here’s a fairly typical image of fireworks.

    Successful recreation

    I loved the look of the images and this type of artistic experimentation is right up my alley. I try this type of stuff all the time. Sometimes it works. Other times it’s not such a success, but the point is to learn and grow as an artist and photographer.

    These first set of shots were taken using the technique described by the photographer in the article. Yes, it is copying someone else’s technique, but there’s nothing wrong with that. Imitation can lead to ingenuity. I used a long exposure and then tried to time my movements of the focus ring with the explosion of the fireworks. Timing is everything with this technique, and it’s hard to master. It took me almost the entire fireworks display to get some images that copied his technique.

    Note: you don’t need to crank the focus ring. A small movement out of focus will create the desired effect.

    How to Photograph Fireworks to Create Impressionistic Images

    I like the look of these fireworks. The explosions remind me of flower petals.

    How to Photograph Fireworks to Create Impressionistic Images

    These blurred images of the firework create a more artistic and impressionistic image.

    It’s okay to fail!

    I’m quite satisfied with the look of these images. I used a 70-200mm lens and set the exposure at 0.6 seconds, with an aperture of f/2.8 and ISO 250. It worked fairly well. The timing was by far the hardest part of this whole endeavor.

    I had an awful lot of failed images. There were times when the shot was too far out of focus. The result was some really nice bokeh lights that I’ve since used as image overlays. Usually, black and white art shots and blended them in to create light and interest. Every shot can have a use, so don’t always delete your “failures”.

    How to Photograph Fireworks to Create Impressionistic Images

    In this case, I turned to focus ring too far and created some pretty bokeh.

    How to Photograph Fireworks to Create Impressionistic Images

    While the colors are pretty, this one is a fail too.

    The images that were never planned

    Other images didn’t turn out exactly as the other photographer’s work but I think the results are still successful. The images are pretty and have turned out to be successful images for birthday cards.

    I still used the same technique he did, but I didn’t get the timing correct so these images don’t have the same look as the first ones. They are still appealing though and there is nothing wrong with these unexpected surprises.

    How to Photograph Fireworks to Create Impressionistic Images

    I accidentally moved the camera while turning the focus ring. It’s a mistake but I still like the effect.

    How to Photograph Fireworks to Create Impressionistic Images

    I love this shot. The lights remind me of popcorn for some reason.

    How to Photograph Fireworks to Create Impressionistic Images

    These lights remind me of rain or comets.

    Using fireworks was tough. The timing was very difficult to master. I was only able to capture a handful of shots during the 30-minute firework display. This fact led to another experiment. This time sparklers were used. The night was fairly windy so I used my garage as a studio.

    Pushing the experiment further

    NOTE: Lesson learned – wait for a night when there is no wind to shoot with sparklers. The fumes from the sparklers filled the garage, and I had a headache after shooting. Of course, I should have thought of this before attempting, but when in the moment…

    For the following shots, I used the same premise as I did shooting the fireworks. The one difference was my f-stop. This was my mistake. I set my camera to f/16. This was a huge mistake on my part. I couldn’t replicate the out of focus look for my photos. You need to use a wide open aperture for the experiment to be successful. As a result, the images I created are considerably different from the impressionistic flowers created at the fireworks. There are still a lot of interesting images in this collection, but it wasn’t the look I was hoping to capture.

    How to Photograph Fireworks to Create Impressionistic Images

    I used a longer lens for this shot but didn’t use the focus ring.

    How to Photograph Fireworks to Create Impressionistic Images

    I love how this seems to look like exploding rain.

    Making mistakes

    The settings for these shots used a range in aperture from f/16 to f/32. They are still pretty I think, and I will find a use for them for sure.

    The next step in the experiment involved getting closer to the sparklers and capturing something different. I attached an extension tube to my lens and got very close to the sparkler. Perhaps a little too close, it is possible to damage your sensor by shooting something too bright. The aperture was small however so this may have saved my camera.

    How to Photograph Fireworks to Create Impressionistic Images

    This quick phone shot my son took shows the distance between the camera and sparkler with the extension tube in place.

    Using an extension tube

    Here are the results of the experiment. The images allow us to see how the base of the sparkler ignites. These are also interesting images and worth the time it took to create them.

    How to Photograph Fireworks to Create Impressionistic Images

    I used my 12mm extension tube on my 50mm prime lens for this shot.

    How to Photograph Fireworks to Create Impressionistic Images

    Here’s a shot where I captured the sparks as they fell from the sparkler.

    Being creative in post-processing

    It was also fun to play with color during the post-processing stage. An adjustment to the color temperature slider changed the sparkler lights from a warm yellow to an intense orange.

    Again this is all experimentation. The process may not result in a finished image, but it’s all about playing with settings and trying to create different effects in your photography.

    How to Photograph Fireworks to Create Impressionistic Images

    I simply moved the slider to adjust the color of the light.

    How to Photograph Fireworks to Create Impressionistic Images

    I adjusted this shot using the split-tone sliders in Lightroom.

    Trying one more time

    Naturally, the experiment continued with a second try at the sparkler images. This time I set a much wider aperture. Here are the results using the same method as I used to create the firework images.

    How to Photograph Fireworks to Create Impressionistic Images

    I like the effect of the wide open aperture. Only a few of the sparks remained in focus.

    While the sparklers did not recreate the blooming flower impressionistic type effect, I still like the look of these shots. The sparkler allowed me to focus more easily on the task at hand. While I still had to move quickly it wasn’t as rushed as shooting the fireworks. Both activities were enjoyable and challenging in their own way.

    How to Photograph Fireworks to Create Impressionistic Images

    The focus here is more exact.

    How to Photograph Fireworks to Create Impressionistic Images

    There are some unique lines created by the flares in this image.

    Give it a shot!

    It’s almost New Years and time for fireworks once again. Share with us some of your experiments and results. It doesn’t have to be fireworks. You could use lights or flashlights. Be creative! Show us what you’ve created!

    My next experiment will involve spinning the sparkler while I shoot. What kind of effect will that create?

    How to Photograph Fireworks to Create Impressionistic Images

    Just one more shot.

    If you want some tips on shooting fireworks with a more traditional approach try these articles: 

    • 15 Tips for Successful Fireworks Photography
    • How to Photograph Fireworks

    The post How to Photograph Fireworks to Create Impressionistic Images by Erin Fitzgibbon appeared first on Digital Photography School.


    Digital Photography School

  • Weekly Photography Challenge – Holiday Images

    Nothing hard this week for the photography challenge. Just show us your holiday-themed images. How do you celebrate with your family? Is it a big festive meal? Then photograph that. Do you deck the house out with sparkly lights? Photograph that!

    Weekly Photography Challenge – Holiday Images

    Time to practice shooting bokeh with your Christmas tree or holiday lights. Or maybe try some fireworks if your city sets them off for the holidays.

    Editor’s note: A crazy but true story, I was in Matagalpa in Nicaragua on December 25th last year and that city set off the official fireworks in the local central park – but that wasn’t the only ones! All around our hotel we saw fireworks in every direction, right at midnight. And it went on for about 30 minutes! We were doing our Christmas tradition – watching Die Hard – and at first, we ignored it. But it went on for so long we had to go look. They really like fireworks in Nicaragua and call them “bombas” or little bombs. 

    Or try these if you need more ideas: Five Fun Ideas for Making Festive Holiday Images

    Simply upload your shot into the comment field (look for the little camera icon in the Disqus comments section) and they’ll get embedded for us all to see or if you’d prefer, upload them to your favorite photo-sharing site and leave the link to them. Show me your best images in this week’s challenge. Sometimes it takes a while for an image to appear so be patient and try not to post the same image twice.

    Share in the dPS Facebook Group

    You can also share your images in the dPS Facebook group as the challenge is posted there each week as well.

    The post Weekly Photography Challenge – Holiday Images by Darlene Hildebrandt appeared first on Digital Photography School.


    Digital Photography School

  • Tether Tools reveals it used an image without permission, issues public statement and apology

    Tether Tools CEO Josh Simons has preemptively apologized for the company’s use of an image without the permission of the photographer who took it. In a letter published on December 14, Simons explained that an image used as a placeholder in concept mockups for the company’s redesigned website accidentally went live on the final site.

    Explaining the process that led to this image’s accidental use, Simmons wrote in his letter:

    One concept used behind-the-scenes candid images of photographers using Tether Tools’ gear. Behind the Scene Instagram images, similar to what you would see here @tethertools were added For Placement Only (FPO) during the design phase, to show an example of the type of photos that could be rotating regularly on an embedded Instagram API feed. This API mock-up, which included a customer’s Instagram BTS photo, was placed near the footer of one page in the proposed layout.

    Over the course of time, through various layouts and edits the design was approved but embedding the Instagram API on this page was overlooked by the web design team. At launch the new website had close to 1,400 pages and finalizing this element on this page was missed. The use of the image was accidental and simply an oversight. The photo was never used in any other way, not in advertising campaigns or print materials, nor to promote any specific product.

    Simons says Tether Tools was alerted to the image’s presence by a third-party, and that the company has since removed the image and contacted the photographer. The photographer, who is said to be a Tether Tools customer, has been compensated for the image’s use and was given an apology for the mistake.

    In a statement to Fstoppers, Tether Tools said, “Both parties are satisfied and most of all we are gratified by the nature in which everything was handled.”

    Via: Fstoppers

    Articles: Digital Photography Review (dpreview.com)

  • Panono’s new owner offers camera to original backers at production cost

    Despite raising about $ 1.25 million in a crowdfunding campaign, now-defunct company Panono GmbH went bankrupt after failing to deliver its 360-degree camera to many of the people who had backed the product. The company was bought by the Swiss-based private equity investor Bryanston Group, which acquired most of its assets but none of its obligation to Indiegogo backers.

    Bryanston Group AG has brought back the Panono camera under a new holding company called Professional GmbH. Despite stressing that it doesn’t have any “liability or obligation” resulting from its assets acquisition, the company has said that it feels it has “a moral obligation to compensate the project’s early supporters.” For that reason, the company is offering the project’s original backers the opportunity to purchase the resurrected Panono camera at production cost.

    The production cost is about half-off
    the camera’s retail price

    About 2,000 Indiegogo backers who received neither refund or camera have been sent this offer, according to the company, which says the production cost is about half-off the camera’s retail price. In addition, these former backers are also offered unrestricted access to Panono’s cloud features, which is said to have about a $ 600 value.

    According to the Verge, this discounted rate means backers who take up the offer will pay around $ 1,120 to $ 1,240 for the production-cost camera bundles available. This is on top of the $ 500 or more these backers already spent on the camera (they never received) as a pledge during the original Indiegogo campaign.

    Professional GmbH is limiting discounted Panono camera sales to 50 units per month; customers are limited to one discounted camera each. The Panono website lists the Panono camera set, which includes a case, stick, tripod adapter, and messenger bag, at 1899€ / $ 2,250. Cheaper alternatives exist, though not necessarily with comparable specs, such as the Ricoh Theta V.

    Articles: Digital Photography Review (dpreview.com)

  • Have Your Say: Best Gear of 2017

    Have Your Say: Best Gear of 2017

    For the past few weeks we’ve been running a series of polls to find out what you – our readers – think of the major product releases of 2017. For the first round of voting we made six initial polls covering lenses, compact cameras and interchangeable lens cameras (ILCs). Now that those polls have closed, we’re pleased to announce the winners. Thanks to everyone that voted!

    But the voting isn’t (quite) over yet. You don’t get away that easily…

    In this slideshow we’re announcing the winners and runners-up in each category, and kicking off a final poll, to determine which of the twelve individual winners from the first round should be crowned as your choice for overall best gear of 2017.

    Best smartphone camera – Runner-up: Google Pixel 2

    In terms of ‘pure’ photography (if that’s even a thing, anymore, in the age of smartphones) the Pixel 2 turns out some of the best images you’ll find from any curren smartphone, and at the moment holds the top spot in DxO’s Mobile rankings. Stills and video (up to 4K/30p) footage looks great, and future firmware updates promise further enhancements.

    The Google Pixel 2 just edged out the Samsung Galaxy Note 8 to take the runner-up spot in this year’s readers’ choice poll for best smartphone camera.

    Best smartphone camera – winner: Apple iPhone X

    All screen, all the time (well, apart from that awkward notch). The Apple iPhone X is the company’s flagship handset and the most significant redesign of the iPhone’s 10-year history. As a photography device, the X delivers excellent still images, a useful Portrait mode, some fun lighting effects, and truly stunning 4K video. It’s not cheap, but it’s your pick for the best smartphone camera of 2017.

    Best prime lens – Runner-up: Sigma 14mm F1.8 Art

    One of the first new lenses we used in 2017 turned out to be one of the best. It’s a big piece of glass, but the Sigma 14mm F1.8 Art is a stunning lens, equally as useful for landscapes and cityscapes as it is for more specialist applications like astrophotography.

    Clearly this fast, wide prime has impressed you too, earning (we think) a well-deserved runner-up spot in this year’s readers’ poll for best prime lens of 2017, just beating Sony’s FE 85mm F1.8.

    Best prime lens – Winner: Sigma 135mm F1.8 Art

    Sigma really cleaned up this year, taking both winner and runner-up spots in our readers’ poll for best prime lens. Just edging out the 14mm F1.8, Sigma’s 135mm F1.8 was your overall pick, and deservedly so. The combination of speed, sharpness and handling is hard to beat. We rate this lens very highly, and clearly so do you.

    Best zoom lens – Runner-up: Tamron SP 70-200mm F2.8 G2

    Plenty of great zoom lenses were released in 2017 from all of the major manufacturers, but Tamron’s two F2.8 G2 lenses were a hit with our readers. Taking the runner-up spot (just) is the 70-200mm F2.8 G2. We love this lens for its combination of compact build, excellent handling and effective image stabilization. Great image quality and a low price compared to big name competitors doesn’t hurt either.

    Best zoom lens – Winner: Tamron SP 24-70mm F2.8 G2

    And the winner, beating out some outstanding competition (including Sony’s pair of excellent wideangle zooms) is Tamron’s G2 24-70mm F2.8. An affordable alternative to offerings from Canon and Nikon, the Tamron 24-70mm F2.8 G2 performs well, handles well, and delivers solid image quality.

    Third-party lenses are always popular with DPReview readers, and for good reason. The Tamron 24-70mm F2.8 G2 has clearly proven a hit with you this year.

    Best high-end compact camera – Runner-up: Sony Cyber-shot RX10 IV

    Yes, we know that the Sony Cyber-shot RX10 IV isn’t exactly ‘compact’ (thanks to the many people that pointed that out in the comments on these polls and the DPReview awards article) but technically, fixed-lens cameras of this type are classed as such, and we’re not very good at coming up with new names for things.

    Sony are pretty good at naming things, but when all you have to do is just count upwards, it’s probably pretty easy. The fourth model in the company’s RX10-series, the Mark IV improves on the Mark III (which also came second, in last year’s DPReview readers’ poll for best compact) with the addition of phase-detection autofocus to its already very impressive feature set.

    Best high-end compact camera – Winner: Fujifilm X100F

    OK, now you have to admit that this one is pretty compact. The Fujifilm X100F is another fourth-generation camera, but compared to the Sony RX10 IV it’s a very different beast. There’s the larger, APS-C format sensor for one thing, and a fixed, fast 35mm equiv., prime lens, as well as a hybrid optical / electronic viewfinder.

    Beyond the core specifications, the Fujifilm X100F offers an entirely different handling experience. More refined, more discreet, more traditional. And slightly more popular with you, our readers, apparently. The award for best high-end compact of 2017 goes to the Fujifilm X100F.

    Best entry-level ILC – Runner-up: Panasonic Lumix DC-GX850

    Designed to be as small as possible, the DC-GX850 comes kitted with a slimline collapsible lens and a stripped-down control interface which makes heavy use of a tilting touch-sensitive LCD screen. There are better cameras out there for beginners wanting to learn about the practice of adjusting exposure, but few which can fit as comfortably into a handbag or jacket pocket.

    The DC-GX850 is evidently a hit with our readers, earning the runner-up spot in our poll to find the best entry-level ILC of 2017.

    Best entry-level ILC – Winner: Olympus OM-D E-M10 III

    We’ve really enjoyed testing and using the Olympus OM-D E-M10 III since it was released this summer. Despite being absolutely tiny, it offers full manual control, in-depth custom options and a great feature set. Yes, this is an entry-level camera, but features like 5-axis in-body stabilization, a high-quality electronic viewfinder and 4K video make it one of the most versatile models in its class.

    We selected the OM-D E-M10 III as our choice for the best entry-level ILC of 2017 recently, and it’s obvious that you agree.

    Best midrange ILC – Runner-up: Fujifilm X-E3

    We loved the X-E2/S but with the launch of the X-T10 and X-T20, we didn’t really expect to see it superseded. We were pleasantly surprised, therefore, when the X-E3 arrived on the scene. The X-E3’s combination of classic handling and excellent image quality is hard to argue with, and clearly it’s popular with you, our readers too. The X-E3 took the runner-up spot in this year’s midrange ILC poll, with 14.8% of the total vote.

    Best midrange ILC – Joint-winner: Fujifilm X-T20

    There were a lot of tight polls this year, but none was tighter, for longer, than the contest for best midrange ILC. In the end, with only 0.2% of the total vote separating the two front-runners, it’s only fair that we call them joint winners.

    First up is the Fujifilm X-T20 – one of Fujifilm’s new generation of mirrorless ILCs, featuring a 24MP sensor and DSLR-style ergonomics, plus a high-resolution, tilting touch-screen. The X-T20 is a fantastic performer, and in our opinion, one of the most likable cameras in its class. Obviously you agree.

    Best midrange ILC – Joint-winner: Nikon D7500

    Joint-winner of our 2017 Readers’ choice award for best midrange ILC is a very different, but still very likable camera. The Nikon D7500 is a powerful DSLR that inherits a lot of its core features from the professional D500.

    Capable of shooting at up to 8 fps with a 51-point AF system borrowed from Nikon’s previous-generation flagship DSLRs, the D7500 is a fast and capable camera. Since its release earlier this year we’ve been hugely impressed by the D7500, and apparently so have you.

    Best high-end / professional ILC – Runner-up: Sony a9

    This poll was so tight that we issued a last-minute request for more votes to break a tie between four cameras – two runners-up and two front-runners. A handful of last-minute votes just (and we do mean just) nudged the Sony a9 ahead of the Fujifilm GFX 50S to claim the runner-up spot in our readers’ choice poll for best high-end ILC of 2017.

    The Sony a9 is one of the most technologically advanced cameras we’ve ever seen, capable of reliable high-speed capture in the kind of demanding environments that professionals need to work in. It impressed us in our full review, and obviously it has impressed you too.

    Best high-end / professional ILC – Joint-winner: Nikon D850

    With 0.4% of the total vote separating the two front-runners, this was another extremely tight poll and one in which (again) we’ve opted to award two cameras the winning position. The Nikon D850 is one of our favorite DSLRs of recent years, and was joint-winner (with the Sony a7R III) of our DPReview Award for best high-end camera, and runner-up for product of the year when DPReview staff voted internally earlier this month.

    Clearly, some of our readers are having the same arguments that we did, because the results of this poll basically match our own opinions after testing this year’s crop of high-end ILCs. With 27.3% of the total vote, the Nikon D850 is joint winner of this year’s readers poll for best high-end ILC, alongside… you guessed it…

    Best high-end / professional ILC – Joint-winner: Nikon D850

    The Hasselblad Lunar! Just kidding, that would be ridiculous. There was only really one more contender for best high-end ILC of 2017, and that was the Sony a7R III. Announced towards the end of the year, the a7R III rewrote the rules for mirrorless interchangeable lens cameras, providing high resolution capture without compromising on speed, and a solid hybrid stills/video feature set.

    It seems like there’s not much that the a7R III can’t do. Some people will still prefer an optical viewfinder and more conventional DSLR ergonomics (clearly – since the D850 was joint-winner in this poll) but the a7R III closes the gap between DSLR and mirrorless technology more convincingly than any previous camera in its class. After a nail-biting poll, the a7R III is a well-deserved joint winner of this years’ readers’ choice award for best high-end ILC.

    Have Your Say

    You’ve seen the results from our six polls, so now’s the time to pick an overall winner. You can vote for up to three of the products in this poll, and voting closes at midnight (PT) on January 4th, 2018. We’ll announce the overall winner and runner-up early in the new year. And before you know it, it’ll be time to round up the best product of 2018! How time flies…

    As always, thanks for voting, and for contributing to DPReview over the past year. We couldn’t do any of this without you and we don’t take it for granted. Happy holidays from all of us, to all of you.

    .


    Have your say

    $ (document).ready(function() { Poll({“pollId”:”9228925404″,”openForVoting”:true,”mainElementId”:”poll0″,”slot”:null,”isSingleChoicePoll”:false,”minNumberOfChoices”:1,”maxNumberOfChoices”:3}); })

    Have your say: Best product of 2017
    Your answers
    1. Required
    2. Optional
    3. Optional
    You need to login to vote

    Apple iPhone X

    Fujifilm X100F

    Fujifilm X-E3

    Fujifilm X-T20

    Google Pixel 2

    Nikon D850

    Nikon D7500

    Olympus OM-D E-M10 III

    Panasonic Lumix DC-GX850

    Sigma 14mm F1.8 Art

    Sigma 135mm F1.8 Art

    Sony a9

    Sony a7R III

    Sony Cyber-shot RX10 IV

    Tamron SP 70-200mm F2.8 G2

    Tamron SP 24-70mm F2.8 G2

    Voting is easy – you pick your favorite products by dragging and dropping. You can pick up to three, and rank them in order of priority.

    Articles: Digital Photography Review (dpreview.com)