Blog

  • Take a look inside Hasselblad’s camera factory in Sweden

    Take a look inside Hasselblad’s camera factory in Sweden

    Hasselblad’s factory is located in Gothenburg – Sweden’s second largest city. The company has operated in Gothenburg since 1841, but it only became a camera manufacturer in 1941. Today’s HQ, down the river from the city centre, is where the company makes both the H-series cameras and the newer X1D mirrorless model.

    During a recent visit I was shown around the factory and was lucky enough to get permission to photograph the production line in detail. They knew I was coming so any secret stuff was tucked away safely out of sight, but it was just as interesting speaking to the staff and finding out about the components of the cameras, what they do and seeing how they are made.

    There were three things that really struck me about the factory. The first is that it is a lot smaller than other similar plants I’ve visited in the past. I was escorted almost all the time I was there, but there was no reception desk where I had to sign in, and I didn’t even have to wear a visitor’s badge – I guess because everyone knows everyone else and strangers stand out. The company employs 180 people worldwide, with only 40 people at the factory – and 30 of them working in production.

    The second thing that caught my interest is the number of components that have been designed to be used in both H6D and X1D, thus making manufacturing more efficient. The third is the hand-made nature of the products. I’m used to factories powered by robots and automation, but this was a world of hand-tools and humans.

    Click through this article for a tour.

    The factory floor

    This is the main area of the assembly line where the H6D and X1D are produced. I had expected to see the processes in a linear fashion from start to finish, but actually it seems different components are assembled as they are needed and each worker performs a range of tasks. This photo doesn’t show the whole factory, as there is an R&D area that I couldn’t go into, but this is where the current shipping products are put together. Hasselblad designs all the components itself but has most of them made by external suppliers, mostly from Sweden.

    In this picture an X1D’s audio system is being tested in the foreground, and to the left a H6D body is being put together. In the distance, shutter units are being made.

    Making the shutters

    The shutter units start with a moulded ring of plastic onto which the components are attached. The company makes two sizes of shutter unit, both of which can be used in HC and XCD lenses for the H cameras and the X1D. The smaller, a 20mm shutter, uses one piezo-electric motor to open and close the iris, while the 28mm version has two.

    A detailed shot of shutter unit, mid-assembly.

    Making the shutters

    So far the XCD lenses have only used the 20mm unit, but I’m told future lenses will use the larger one as well. The upcoming fast 80mm XCD lens will be a candidate for the larger shutter as its maximum aperture will be wider than f/2.

    Measuring tension

    The worker assembling the shutter units tests the tension of the shutter release mechanisms with her thumbs, as over time she has come to know what the right tension feels like. Once she thinks she has it right she tests each switch with a meter to verify her instincts.

    After hand-testing the shutter release tension, the technician checks with a measuring tool.

    Building the iris

    Each blade of the lens iris is riveted by hand. It is then cleaned and attached to the main shutter mechanism.

    Testing shutter accuracy

    Each shutter unit is tested for accuracy and consistency of performance using a collimator and a device that measures the shape and size of the iris opening. Each aperture setting is tested multiple times, as is each shutter speed. If the unit isn’t up to scratch the operator on the testing desk either fixes it or sends it back a stage for investigation.

    This shows a short sequence from a shutter accuracy test, measuring the shutter opening time and iris size. Other long term tests are carried out about once a week, and involve a shutter unit being put in a machine that triggers it for days on end. I was told the shutter life of Hasselblad lenses is quoted as over 1 million actuations.

    H6D handgrips

    The day I was at the plant, handgrips for the H6D were being made. There’s quite a lot of circuitry to fit into a small space.

    50MP back for the A6D aerial camera

    Here is the back of an A6D aerial camera being assembled. The main parts that go into the back are the 50MP sensor unit, the processing board and the control board. I was amazed that the company uses 32GB micro SD cards in these backs, but was told the calibration and firmware files the back uses are very big.

    The ribbon cables and the boards are all connected by hand and fitted into the back during a delicate, pains-taking process.

    Tilt and shift adapter

    Here’s a HTS 1.5 tilt and shift adapter being put together. The adapter provides ‘large format’ movements for six of the company’s H system lenses. It allows up to 18mm of shift in both directions and 10° of tilt, while multiplying the focal length by approx. 1.5x because of its thickness.

    Tilt and shift adapter

    Again, the device is assembled by hand, with each screw being secured in place with thread-locking glue.

    Assembling the auxiliary shutter

    Between the mirror box and the sensor of the H series cameras there’s an auxiliary shutter that has to be sprung with exactly the right tension. Again this shutter unit is assembled by hand from a number of small components and then tested by touch while the tension is adjusted.

    The man working at this station told me he needed the tension to be about 0.9 Newtons, and then tested the one he had just made to find he was only 0.02 N out. He said it took a few months of continuous manufacturing for him to be able to get the tension right by touch.

    Adding the AF module and shutter mechanism

    The aluminum chassis of the H6D is made at a foundry not far from the factory and has remained very much the same since the original H1. The final assembly of the body looks very complicated, as there is a mass of ribbon cable to fit between the boards, as well as the auxiliary shutter, the mirror mechanisms and the AF module. The chassis, the steel mount and the body shell are all made in Sweden.

    The shot on the left shows the AF module of the H6D, which sits behind the main mirror. The last shot shows the chassis loaded with electronics and ready to be fitted into the body and to have the handgrip attached.

    Mechanical tests for the H6D

    In this picture, H6D bodies await mechanical testing and measuring. The length of the body can’t vary by more than 0.02mm in order for the autofocus to work. This machine is used to measure the position of the AF module and the AF mirror, and to match the view of the viewfinder with the sensor via the position of the mirror.

    Each body is then attached to a metal block for the orientation sensor to be calibrated – a process that helps facilitate the company’s True Focus feature. This feature measures the angle the camera moves during a focus-lock-and-recompose routine, so that the added distance between the image plabe and the subject can be compensated for in the focusing.

    Calibrating the H6D

    In a clean room each H6D undergoes its individual calibration procedure. First the sensor and filters are checked for dust and dirt, and cleaned until they are spotless. Then the sensor is checked for dead pixels and the color characteristics, dynamic range and brightness response are measured.

    Calibrating the H6D

    Each camera has its own calibration program which is loaded onto the body and fired up every time the camera starts. The calibration data is saved at the factory should it ever need to be reloaded to the camera.
    It takes about an hour to calibrate each body.

    X1D mechanical tests

    Once assembled the cameras go through a series of mechanical and systems tests to ensure they are functioning correctly. Operators take a series of pictures with each model and check the audio system, among other things.

    X1D mechanical tests

    The technician looking down a long dark box is checking there’s no light leaking from the side of the rear LCD panel.

    Profiling X1D bodies

    Color response is recorded and adjusted so that the camera will produce ‘Hasselblad Color’. As with the H6D, each X1D body has its own tailor-made calibration which is loaded to the internal memory. That’s why the cameras take a couple of seconds to start up.
    Each camera takes about 700 pictures during the calibration process.

    Profiling X1D bodies

    Here an X1D is being calibrated, and the monitor shows the characteristics that are being checked with. As can be seen, in this example the sensor (which is CMOS, not CCD as marked) isn’t aligned within tolerances, so it will be adjusted.

    Final checks and cleaning

    The last part of the process involves a bright light and a high powered magnifying glass. A lady personally inspects every model that leaves the factory for dirt, dust and marks. She cleans each body very carefully, rubs and polishes, before she is satisfied and it can be boxed.

    Final checks and cleaning

    X1D bodies towards the end of the production and checking process, before being boxed and shipped to customers all over the world.

    Articles: Digital Photography Review (dpreview.com)

  • Mastering and Sharing One-Click Presets in Luminar

    One of the main strengths of Luminar by Macphun, soon to be Skylum, is how it makes a suite of professional-style editing tools available to even the most casual of photographers. It does it all with a user interface that is clean, simple, and easy to understand. In contrast to some other editing programs on the market, Luminar’s full suite of powerful tools is available through a simple approach based on applying Filters and Presets, along with more advanced options such as layers and masking.

    Instead of hiding these under myriad menus and obscure tiny buttons, Luminar presents you with easy-to-understand options when choosing your edits and includes real-time previews of what your edits will look like. And much of this starts with the simple act of selecting a Preset.

    Mastering and Sharing One-Click Presets in Luminar

    Presets versus Filters

    Before getting too deep into how to use and share one-click Presets, it’s important to understand some basic terminology related to Luminar’s use of Presets and Filters.

    When you load an image into Luminar’s editing interface you are presented with two main options to edit your images: Add Filter or Apply Preset.

    Filters

    Filters are individual editing tools that let you perform basic adjustments such as color temperature, exposure, and white/black levels. Luminar also contains more advanced filters like color balance, texture overlay, HSL, and the Accent AI filter that uses artificial intelligence to adjust a range of parameters all with a single slider. Filters can be applied across an entire image, brushed in selectively, and used in combination with layers in a manner similar to Adobe Photoshop’s editing workflow.

    Mastering and Sharing One-Click Presets in Luminar

    Click Add Filters, then select a filter such as Saturation / Vibrance, and you will be shown a description of the Filter as well as a preview of how it would look applied to a sample image.

    Presets

    Due to the sheer number of filters available the options can seem overwhelming even to seasoned editors. This is where Presets come in handy, and where the brilliant simplicity of Luminar really starts to shine.

    A Preset is a collection of filters specifically chosen by the developers of Luminar to produce a certain type of effect on the whole image when combined. At the bottom of the Luminar interface, you will see a row of Presets with names like Soft & Airy, Sky Enhancer, and Vivid which are good starting points when editing a variety of image types. Click the Categories button to see the filters organized as specific collections that can be useful depending on the specific types of images you are editing.

    Mastering and Sharing One-Click Presets in Luminar

    Presets are organized into specific categories, and you can also access your favorites and any custom Presets with the click of a button.

    If all this talk of Presets has you feeling overwhelmed before you even start, just take a breath and know that it’s a lot simpler than it might seem especially when you actually open Luminar and start to use it. You don’t even have to use Presets at all but I have found them to be a great starting point when editing my images. It’s a nice compromise between me performing all manner of meticulous edits by hand and having Luminar do all the work for me.

    Presets occupy a comfortable middle ground that allows you to have one-click access to a set of edits that will enhance your images in a heartbeat. At the same time, they still allow you to retain as much control over the individual editing parameters as you would like.

    Preset walkthrough

    To show how Presets work I’m going to walk you through an example step by step beginning with this image of some autumn leaves. This is the RAW file straight out of my camera with no edits applied.

    Mastering and Sharing One-Click Presets in Luminar

    Original boring unedited image. Cue sad trombone sound effect…wop wop woooop.

    When you load an image into Luminar you will see it take up most of the screen except for a portion at the bottom and the right. The former is where you can select a Preset and the latter is used for applying and editing Filters.

    Mastering and Sharing One-Click Presets in Luminar

    Add Filters on the right, Presets are at the bottom.

    Forget about Filters for now and just focus on the Preset options at the bottom of the screen. Each one has a name that describes the type of effect it will have on your photo. Best of all, each Preset has a mini preview of what it will actually do if you apply it to your image.

    Preset previews rock!

    This is one of my favorite features of Luminar, and it’s almost worth the price of the program all by itself because you can quickly scan through the many options available and choose one to instantly transform your photo with the click of a button.

    Mastering and Sharing One-Click Presets in Luminar

    The Preset panel gives you real-time previews of what each one will look like when applied to your image.

    As an added bonus you can even adjust the degree to which Luminar applies a Preset by clicking on one and then dragging the slider to the left. That way if you like the effect that a Preset has on your image but find it to be a bit overdone, just lower the value a bit with the slider. You also have the option of clicking the star icon in the corner of any Preset which saves it to a list of favorites.

    Mastering and Sharing One-Click Presets in Luminar

    Use the slider to adjust the degree to which a Preset is applied.

    The following image is an example of what one click on the “Warm Sunset” Preset did to transform the original picture of some dull green and yellow leaves.

    Mastering and Sharing One-Click Presets in Luminar

    The finished version, all done with a couple of clicks thanks to the Presets in Luminar.

    Not too shabby, right? As a comparison, I loaded the same RAW file into Lightroom and was able to get similar results but it took a lot more time and required changing values on a dozen different sliders.

    Such is the beauty of Luminar’s approach. The developers have done much of the heavy lifting so that you don’t have to, while still giving you full access to all the editing options within each of the Presets. So if you really want to do a dive deep and adjust your images on a granular level, you can.

    Note: You can also add a texture overlay and save that in a custom preset as well.

    Editing the Presets

    If all the screenshots and arrows in this article have your head spinning, here’s a refresher of the basic Luminar workflow:

    • Step 1: Import an image into Luminar
    • Step 2: Click on a Preset
    • Step 3: You’re done. There is no Step Three.

    However, if you would like to dive into some of the finer details of using Presets, Luminar lets you see exactly what each one does and also tweak the parameters to your liking. You can save your edits as new Presets, and even create your own Presets from scratch.

    For example, the Warm Sunset Preset that I applied to the image of the leaves is really just a collection of Filters with specific adjustment values already applied. The following screenshot shows the specific filters that Warm Sunset uses, as well as the numerical values that have been dialed in by the Luminar developers.

    Mastering and Sharing One-Click Presets in Luminar

    The Warm Sunset Preset consists of three Filters, each with pre-determined values dialed in that you can change at any time if you like.

    When you click on a Preset you will see all of its Filters show up on the right side of your screen, and you are free to change any of the values you want or even add new Filters to the mix. It’s an endlessly customizable editing solution that can go a long way towards giving you the professional results you have always wanted without the hassle and steep learning curve inherent in some other photo editing programs.

    Creating and Sharing Presets

    Even though there are dozens of Presets already built-in to Luminar, you can create your own by choosing any combination of filters, editing them to the values you want, and choosing “Save Filter Preset…” from the Filters menu.

    I often find myself adding a little clarity along with some post-crop vignetting to my images (and for nature shots a bit of vividness too) so I pulled those Filters, dialed in the values for each one, and then saved it as a Preset called “Clarignette” (my attempt at making a new word).

    Mastering and Sharing One-Click Presets in Luminar

    A custom Preset I created called Clarignette, which uses the Clarity, Brilliance/Warmth, and Vignette Filters.

    Custom Presets can be accessed by clicking the Categories button just above the row of Presets and choosing “User Presets.” Any Presets that you create or customize can also be shared with other users which makes this a great way to use custom Presets on multiple computers or in any type of collaborative editing environment. Choose “File > Show Presets Folder…” to see the folder on your computer where your custom Presets reside. Each one is saved as an “.lmp” file that you can copy to the Custom Preset folder on another computer or send to a friend.

    Stacking Presets with Layers

    One final ace up Luminar’s sleeve is its ability to let you combine filters using layers, in precisely the same way Photoshop and other image editing programs handle a layer-based non-destructive workflow.

    Instead of applying a Preset directly to the image you are working with, you can click the “+ Overlay Preset” button in the lower-right corner of the Luminar workspace which adds a layer onto which your Preset edits are applied. This is exactly the same as an Adjustment Layer in Photoshop. Your Preset edits can now be applied, controlled, and adjusted independently of the image itself. Masking tools can then be used on each layer to control which parts of the image are affected by the Preset.

    Note: You can also apply a mask to any of the Filters applied directly to your image as well.

    Mastering and Sharing One-Click Presets in Luminar

    I started with an image of some leaves, and created an Overlay with the Vivid Preset. Then I added a second Overlay with the B&W Preset and applied that with a radial mask so it is only affecting the outer edges of the image leaving all the color in the center.

    This layer-based Preset implementation is another illustration of how Luminar takes a powerful-but-simple approach to editing. It’s not that Luminar is quantifiably better or worse than other editing programs because such an evaluation depends greatly on the individual needs, workflow, and style of the photographer. However, for users who are relatively new to photo editing and want a program that offers a simple, clean, intuitive approach with a feature-set deep enough to grow with them over time, it’s hard to beat Luminar.

    Anyone who has used Instagram or other social media apps to apply image edits with the click of a Filter or Preset button will feel right at home with Luminar. As those individuals demand greater control and flexibility as they improve their skills, Luminar is right there beside them ready to meet the challenge. I really do like Luminar’s approach to editing with Presets and Filters and I think it’s a nice way to bridge the gap between amateur and professional photo editing. It’s simple enough for casual users but has a deep feature-set to cater to more demanding photographers too.

    Disclaimer: Macphun, soon to be Skylum, is a dPS advertising partner.

    The post Mastering and Sharing One-Click Presets in Luminar by Simon Ringsmuth appeared first on Digital Photography School.


    Digital Photography School

  • A Fresh Look at Learning Photographic Composition

    Popular teaching about photographic composition says to learn the rules and then break them. I prefer to encourage the people who join our photography workshops to learn the rules, understand them well and put them into practice so frequently they become second nature.

    If you can apply the rules without even consciously thinking about them you will create more dynamic, interesting photographs which convey more feeling.

    A Fresh Look at Learning Photographic Composition

    Why do we have rules?

    Rules are important as they are the underlying structure of composition. Much like scales are to musicians. Much like grammar is to language.

    Successful musicians have typically spent long hours going over and over the same scales until they know them so well they do not need to think about them. When we learned our first language, our “mother tongue”, we never consulted the textbooks to study the grammatical structure of the language, we just absorbed it, (most frequently from our mothers.)

    A Fresh Look at Learning Photographic Composition

    Some people will have more difficulty learning the rules of composition and applying them effectively than others. Very much like some people can learn to play musical instruments or learn new languages easier.

    I think it is because we are all creatively gifted in different ways. If you are gifted with a visual creativity you may find it easier to compose photographs than say someone who is gifted with a musical creativity and finds it easy to play the guitar or trumpet for example.

    A Fresh Look at Learning Photographic Composition

    I do like what the famous American photographer Edward Weston had to say about learning and implementing the rules of composition:

    “Now to consult the rules of composition before making a picture is a little like consulting the law of gravity before going for a walk.”

    I doubt any of us can recall studying the law of gravity before we learned to walk. But we certainly knew about it.

    A Fresh Look at Learning Photographic Composition

    Know them at a subconscious level

    Knowing the rules is important as they will help guide our creative thinking, but applying these rules rigidly will generally lead towards making rather static and lifeless photographs. As you learn the rules and know them so well you can incorporate them into your photographs intuitively you will find your images may take on a whole new dynamic. Very much like walking and talking, it’s good to be subconsciously aware of the rules and laws as they are there for good reason.

    A Fresh Look at Learning Photographic Composition

    Practice constantly

    Reading about and studying the rules of composition will help you gain a good understanding of them. Practicing them frequently is the most effective means of consistently integrating them into your photographs. Practice them even when you don’t have your camera with you.

    Begin to see in the rule of thirds, discover leading lines and strong diagonals, look for frames and how you can use symmetry. One side effect of seeing like this will likely be that you start taking your camera everywhere with you.

    Fill the frame

    When I first started working in the photography department of a newspaper it was impressed upon me to “fill the frame”. This encouragement has stuck with me and I am aware, consciously or subconsciously, of wanting to effectively achieve this with every photograph I make. This was important in the newspaper in order to convey the story effectively, (and so sub-editors had less flexibility to horribly crop your photos).

    A Fresh Look at Learning Photographic Composition

    Filling your frame does not mean that in every photo your subject must be pressed out to the edges of your viewfinder. It means however you are choosing to compose your photograph, make sure whatever is within the four corners and edges is relevant to the picture you are making.

    A Fresh Look at Learning Photographic Composition

    If empty space is relevant and adds to your composition, use it well. If cropping in so tight that part of your subject is cut off makes a stronger image, then crop tight.

    However you decide to compose your image, be happy with it. Don’t get hung up on the rules. But do have a solid understanding of them and explore how you like to incorporate them into the creative photographs you are making. And, if you so come up with any new rules, please do let me know!

    Here’s a little video talking about this concept of composition.

    The post A Fresh Look at Learning Photographic Composition by Kevin Landwer-Johan appeared first on Digital Photography School.


    Digital Photography School

  • 5 Ways to Invest in Your Photography Over the Next 365 Days

    Happy 2018! Can you believe it is already 2018? Seems like just a little while ago we were all celebrating ushering in the Y2K era and now to think that 2020 is just two years away seems unreal. I love the new year. It brings forth hope, aspirations, and positivity.

    Metaphorically, it is like the slate has been wiped clean and you have a chance to chase some of your most amazing and lofty goals. So why not use this new year to invest in something that you really love as well – your photography. Here are some simple easy ways to invest in bettering your creativity and your craft over the next 365 days.

    Sunset golden hour photo - How to Invest in Your Photography Over the Next 365 Days

    #1 – Create smart goals for your photography

    Let’s drop the myth that only professional photographers who are in business are allowed to have photography goals. I don’t care if you are just beginning to learn photography or have been doing this for years, one of the best ways to improve at anything is to have realistic goals for what you aspire to and want to achieve.

    Goals can be things like learning to photograph in manual mode, selling stock images or booking your first wedding client. No matter what your goals are, I encourage you to take it a step further and create SMART goals. A SMART goal is defined as one that is;

    • Specific
    • Measurable
    • Achievable
    • Results-focused
    • Time-sensitive

    So for each of your goals, add additional parameters to convert them to SMART goals by figuring out how to measure them, how to achieve and execute them, and what specific timeframe you want them to be completed by.

    Jaipur Lake Palace Photo - 5 Ways to Invest in Your Photography Over the Next 365 Days

    A SMART goal to travel and explore my home country has lead to some amazing opportunities. All because I really thought through what I wanted to do, how I wanted to execute it, and what outcomes I wanted from those opportunities and really working towards those goals!

    #2 – Plan to do at least 4 personal photography projects

    I really believe that personal projects are the cornerstone to helping you improve your photography. Once you take the pressures of working with clients out of the equation, you are free to explore, get creative, and challenge yourself. This creative freedom is bound to reflect positively on your work.

    Personal projects can be short exercises directed to help you improve in some area of your photography or extended self-assigned projects that really take you completely out of your comfort zone to try something different. You can choose to space out your personal projects throughout the year – perhaps even commit to doing one per quarter.

    No matter what you choose, have SMART goals on what, when, and how you are going to execute your personal projects. You can see more details on the importance of personal projects in this previous article.

    Ocean views from the caribbean - 5 Ways to Invest in Your Photography Over the Next 365 Days

    One of my ongoing personal projects to learn and master film photography because it provides so much more room for learning and improving my photography in general. I even went so far as only taking a 35mm film camera on vacation to the Caribbean.

    #3 – Practice photography every day

    One of the easiest ways to practice photography every day is by signing up for a 365 series. Quite simply put, a 365 series is a commitment to creating one photo every day for 365 days. You can use a DSLR, a point and shoot camera, or even a smartphone to work on this series.

    You can even take this a step further by joining one of the many online groups available. They are created solely for the purpose of encouraging you to photograph and post a single photo every day for 365 days straight. They even provide photo prompts to help you stay on track so you are constantly thinking of what to photograph every day.

    Small waterfall photo - 5 Ways to Invest in Your Photography Over the Next 365 Days

    A picture a day is literally just that – a photo a day. Get as creative as you want with this exercise. Use it as a way to get out of the house, meet fellow photographers, or just as some quiet time to reflect on who you are as a photographer and what motivates you.

    #4 – Share your work online and offline

    Join online groups or even local camera clubs to meet and socialize with other photographers. Many clubs have critique nights where members submit photos and comment on each other’s work. This is a great way to not only have your work be seen by others but also to get unbiased feedback on your work, which can be used for improvement and growth.

    Many times we are our own worst critic and downplay our talents and skills because we are afraid or maybe lack the confidence in our photography. And you know what’s the best part? Having a group of like-minded people that you can talk photography about with all day long without them tuning you out within the first five minutes of any conversation (Can you tell this is how my family is when I start to talk photography!?).

    Photo of the Taj Hotel in Mumbai at sunrise - 5 Ways to Invest in Your Photography Over the Next 365 Days

    I have made some amazing friends via online communities – we have collaborated together, referred work to each other and bounced life and business challenges off one another. But most importantly, I have made some incredible friends who I know have my best interests at heart.

    #5 – Attend a photography workshop, conference or take an online course

    Like most other professions, the photography industry is continually evolving and changing. New products, techniques, and styles are constantly being introduced. So attending a photography workshop or conference is a great idea.

    Plus you never know who you might meet there in terms of future friends, potential clients, or even referral opportunities. There are numerous workshops, seminars, and even free online events and tutorials to keep you busy learning new things.

    Keeping abreast of the latest in any business is a good thing. It shows your clients, both present, and future, that you value your business and skill, enough to invest in it.

     Mirror reflection of an alpine lake in Oregon - 5 Ways to Invest in Your Photography Over the Next 365 Days

    Workshops, and conferences are another great way to expand your professional circle, make industry friends and learn new skills/techniques. Make sure you do your research prior to committing funds to attend an event/workshop or conference.

    What will you do with the next 365 days?

    I hope these tips were helpful to you as you plan out 2018. Remember, getting your photography to a level that you are proud of takes time and a lot of hard work. Make this your year to shine with your photography.

    The post 5 Ways to Invest in Your Photography Over the Next 365 Days by Karthika Gupta appeared first on Digital Photography School.


    Digital Photography School

  • SLC-2L-01: Owning the Sun with Two Speedlights

    When working with one speedlight outdoors in daylight, logic dictates that you need to find the shade if you want to create a nice quality of light.

    This is because you only have one light, which a) needs to do all of the heavy lifting, and b) is not very powerful. Which means that you tend to go soft—and close—with your one light.

    So one light can be limiting. But as you'll see, a second light can open up some pretty neat options. Read more »
    Strobist

  • Sample gallery: Utah with Scott Rinckenberger and the Olympus OM-D E-M10 III

    $ (document).ready(function() { SampleGalleryV2({“containerId”:”embeddedSampleGallery_7798063598″,”galleryId”:”7798063598″,”isEmbeddedWidget”:true,”selectedImageIndex”:0,”isMobile”:false}) });

    We recently spent some time in Moab, Utah with seasoned adventure photographer Scott Rinckenberger. The area’s incredible landscapes and wide array of outdoor activities made for a very photogenic few days – here are some of the still images Scott captured along the way. For the full story behind the photos, check out our video.


    This is sponsored content, created with the support of Amazon and Olympus. What does this mean?

    Articles: Digital Photography Review (dpreview.com)

  • Top Street and Travel Photography Tips 2017

    If you’ve been reading over the last few of days you may have seen these already:

    • The Best Landscape Articles on dPS in 2017
    • Top Portrait Photography Tips of the Year on dPS in 2017
    • Most Popular Post-Processing Articles of 2017
    • Best Beginner Photography Articles 2017
    • Reviews and Articles on Photography Gear – 2017

    Top Street Photography Tips 2017

    1. The Ultimate Guide to Street Photography
    2. What are the Best Street Photography Camera Settings and Why
    3. How to Conquer the Biggest Fear in Street Photography
    4. Tutorial – Easy Camera Settings for Street Photography
    5. 7 Vital Tips to Improve Your Candid Street Photography
    6. 6 Reasons Why You Should Use a Standard Lens for Street Photography
    7. The Pros and Cons of Black and White Versus Color for Street and Travel Photography
    8. 7 Tips for Capturing the Decisive Moment in Street Photography
    9. How to Tell a Story With Your Street Photography
    10. 5 Tips for Photographing Street Portraits

    Top Travel Photography Tips 2017

    1. 6 Reasons Why Your Travel Photos Don’t Look Like the Ones in Magazines
    2. 7 Non-Photography Items Which No Travel Photographer Should Leave Home Without
    3. 6 Practical Tips to Instantly Make Travel Photography Easier
    4. 7 Travel Photography Tips I’ve Learned from People in the Industry
    5. 8 Travel Photography Tips for Your Next Journey
    6. 10 Quick Tips for Travel Photography
    7. How to Backup and Manage Your Photos When Traveling Without a Computer
    8. How to Shoot Engaging Travel Portraits from Start to Finish
    9. How to Plan a Street Photography Shoot When Traveling
    10. Tips for Taking Documentary Style Travel Photos
    11. 7 Realities That Hit Once You Become a Professional Travel Photographer

    The post Top Street and Travel Photography Tips 2017 by Darlene Hildebrandt appeared first on Digital Photography School.


    Digital Photography School

  • Happy New Year 2018 – Recap of our Ultimate Guides to Photography

    Wishing you the happiest new year from the dPS family.

    As a bonus, here is a summary of some amazing ultimate guides we published in 2017. Each is available as a free PDF – just click on the ones you want to download below.

    • The Ultimate Guide to Street Photography
    • The dPS Ultimate Guide to Landscape Photography
    • The dPS Ultimate Guide to Getting Started in Lightroom for Beginners
    • The dPS Ultimate Guide to Photography for Beginners
    • The dPS Ultimate Guide to Photography Terms – a Glossary of Common Words and Phrases
    • The Ultimate Guide to Nature and Outdoor Photography
    • The dPS Ultimate Guide to Fine Art Photography

    Enjoy and please share this page with your friends if you find these valuable!

    The post Happy New Year 2018 – Recap of our Ultimate Guides to Photography by Darlene Hildebrandt appeared first on Digital Photography School.


    Digital Photography School

  • 2017 in review: a look back at December

    December brings with it colder weather and early much-too-early sunsets (at least here in Seattle), as well as a chance to look back on the last twelve months. 2017 saw the continued rise of the smartphone coupled with uncertainty in the interchangeable lens and compact camera market. Will there be fewer camera manufacturers a year from now? We’ll find out soon enough.

    As you might imagine, December a quiet month for camera announcements. Information about the next generation of smartphones started to trickle out, including news of the upcoming Snapdragon 845 processor and the Huawei P11, which may feature three cameras. December also marked the arrival of the iMac Pro that, fully loaded, will set you back more than $ 13,000. Speaking of Apple, Final Cut Pro X received a much-needed update, adding HDR, VR and curves support.

    2017 saw the continued rise of the smartphone coupled with uncertainty in the interchangeable lens and compact camera market

    The end of the year brings with it lots of “best of” competitions, and some like National Geographic’s Nature Photographer of the Year, Sony World Photography Awards and the always entertaining Comedy Wildlife awards are worth a look. We joined the competition parade and shared our favorite products of the year, which were drawn from our latest Buying Guides. We also pitted the Nikon D850 against the Sony a7R III and compared the portrait modes of the Google Pixel 2 and Apple iPhone X.

    For those seeking more pretty pictures, we posted galleries for the Olympus 45mm and 17mm F1.2 Pro lenses, the Rokinon AF 50mm F1.4 FE and, naturally, the iPhone X. We also cranked out two reviews, of the Canon PowerShot G1 X Mark III and G9 X Mark II.

    See all December content


    Leica, Leica, Leica

    In addition to announcing a special red edition of its M (Typ 262) body, the company also reported a 6% increase in revenue compared to the last fiscal year.

    Read more about the red Leica M

    Read more about Leica’s earnings

    And, in drone news…

    December was a busy month for drone regulation. In a not very surprising move, the Federal Aviation Administration banned drone usage near US nuclear facilities. Over in Holland, the country’s drone-catching eagles are being retired due to a lack of demand and training difficulties. A shame, since that would’ve been fun to watch.

    Read more about new FAA regulations

    Read more about drone-catching eagles

    Canon EOS 7D Mark III on the way? (Of course!)

    The rumor mill is buzzing about an update to Canon’s venerable EOS 7D series of APS-C DSLRs. Rumor website CanonWatch says that the third revision is coming before next summer, which even if the rumor itself isn’t based on any solid facts, still seems like a pretty safe bet. We made a wish list of what we’d like to see in the next 7D, as well.

    Read more about Canon 7D Mark III rumors

    Photographing the Northern Lights

    Photographer and DPReview contributor José Francisco Salgado teamed up with our own Dale Baskin to share tips on how to capture this amazing phenomenon.

    Read full article

    Articles: Digital Photography Review (dpreview.com)

  • Best Photos of 2017 by Jim M. Goldstein

    I’m happy to report 2017 was a much better year than 2016 on many fronts. Family was healthy, we avoided experiencing the passing of family members, there was a fair amount of travel, a few great photos were taken and most importantly to me my boys continue to experience nature and ask for repeat camping trips.

    In past years yearly recaps I’ve emphasized how much of my focus has shifted from taking nature photos to instilling a sense of wonder about and deep respect for nature in my two young sons. That continues to be the case.   I’ve never delved into it too deeply in past yearly recaps why my prioritization has shifted. In part it’s likely very obvious for some. That said I do want to call it out. I became a photographer because of my love for nature. If I hadn’t been so intrigued by nature I’d never have had a reason to pick up a camera. With the onset of social media and mobile phones with cameras I’m not sure that can be said of many young photographers today. More and more as I view photography online I wonder whether people are truly interested in their subjects (all styles of photography not just nature) or just trying to increase their follower stats because that’s the thing to do in this day and age. Perhaps my cynicism is getting the better of me after working at Borrowlenses where I dealt with photography talking heads & professional and aspiring professional photographers on a daily basis. An element of my becoming a jaded photographer I’m sure (kudos to my friend Richard Wong for writing that post). I’ll avoid going down the path of airing dirt for now as that’s a series of posts unto itself. Anyhow once my boys got old enough it was quite natural for me to want to go back to my roots enjoying nature over photography. I’d like my children to deeply respect and value our natural world. What would I be teaching them, about nature and in general, if I was always taking photos on our trips versus living the moment?

    For that reason my yearly recap photos have and will continue to be split between family photos and everything else. While my boys are in their most formative years I’ll continue to put my emphasis behind experiencing nature versus artistically capturing it. The fact that my boys regularly tell me, often out of the blue, they want to go camping again means the world to me. I’m incredibly grateful one aspect of my professional outdoor photographer mind has not lost a beat and that is timing our trips for optimal conditions. This used to torment me as I’d leave my DSLR behind, but the more my boys reminisce and ask for more nature experiences the more I know I’ve made the right call.
    Now that that’s out of the way… my favorite photos, in no particular order are below. Enjoy and thanks for taking the time to view this post and my blog in general.  If you happen to have a recap of your best photos of 2017 I invite you to submit it to my blog project, where I list the best photos of photographers who read my blog. It’s a lot of fun and a great way to get inspired at the beginning of the new year.

    Best of  Landscape & Nature

    _MG_9035-_MG_9089-3

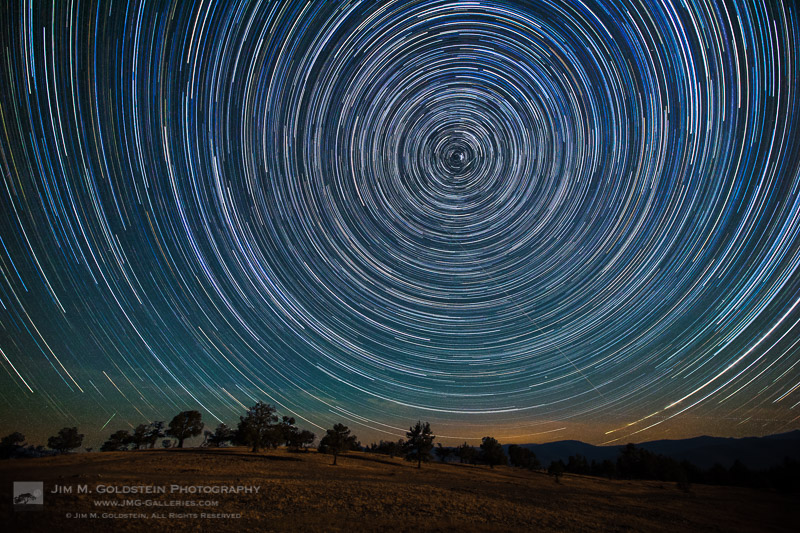
    I took my boys to witness the total solar eclipse in August of 2017. We went off road to an isolated mountaintop with 360 degree views in eastern Oregon. My focus for the eclipse itself was on the experience with my boys, but we did star gaze a lot at night before the big day. In trying to explain how the earth moves I set up a quick star trail sequence to show the boys. This was the result.

    _A2A1077M-2

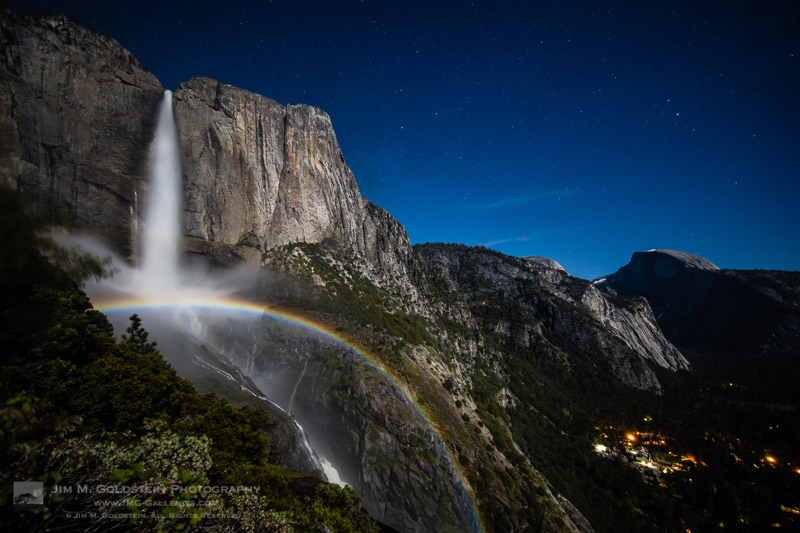
    Water levels were near record levels this spring in Yosemite Valley. I made what has become a regular hike to Upper Yosemite Falls to take time-lapses of moonbows with my friend, Brian Hawkins. Like me, he seems to have enough screws loose to think this night hike is a good idea along with huddling in ice cold mist to capture this view.

    _MG_7933-edit-3

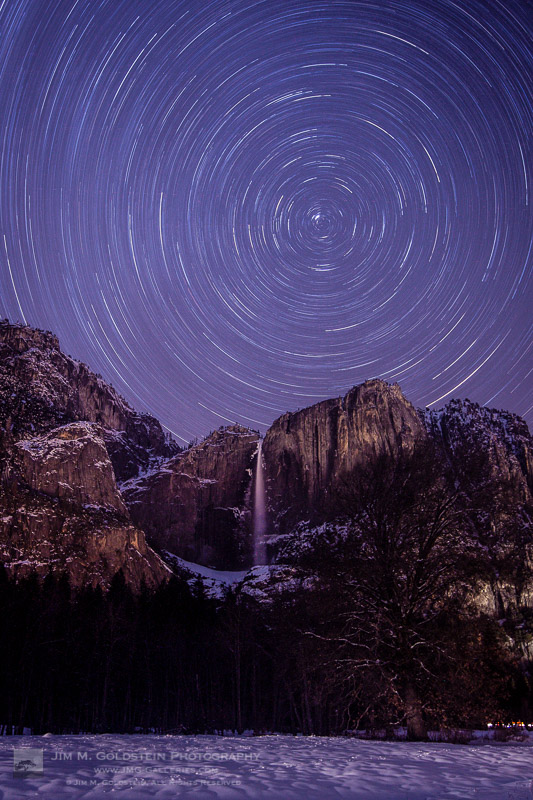
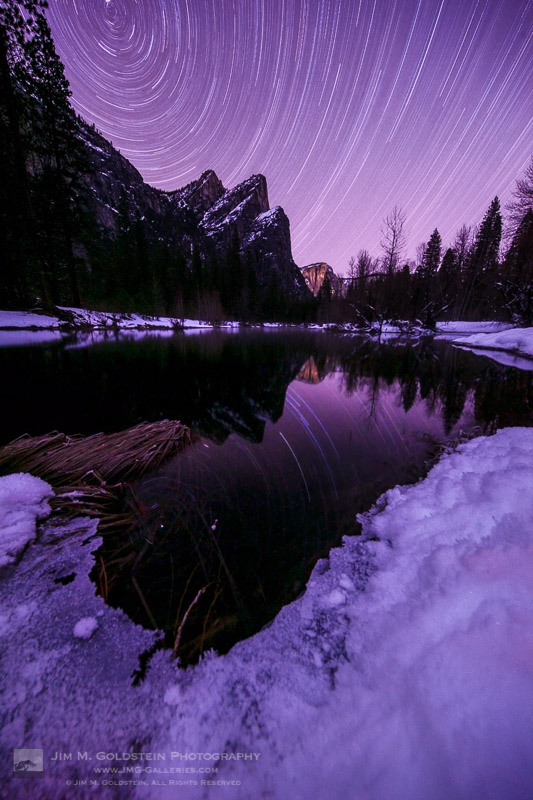
    At the beginning of the year I timed a trip to Yosemite Valley to capture some long overdue winter star trail photos. This was a single 2+ hour exposure taken with my Canon 5D Mark II. Pictured is Three Brothers with star trails reflected in the Merced River.

    _MG_7906M-4

    Another single 2+ hour exposure taken with my Canon 5D Mark II. Pictured is Upper Yosemite Falls as seen from the valley floor.

    PacificOverlander.com Truck Under the Milkyway

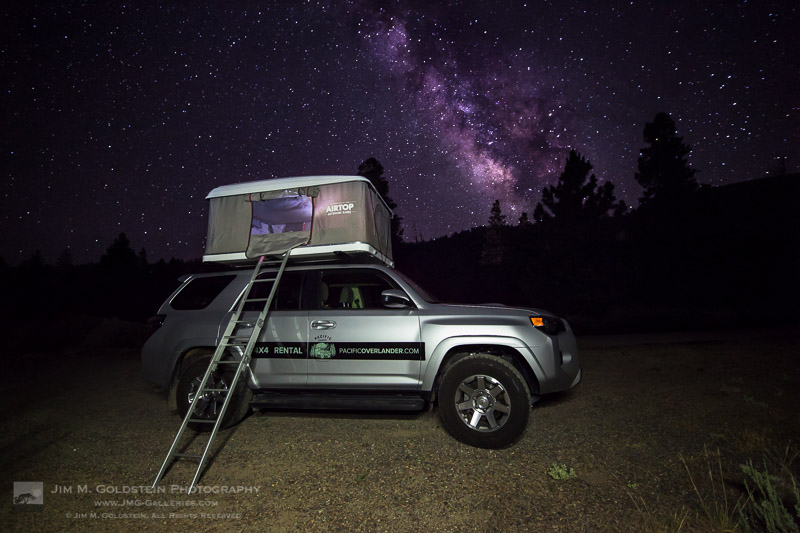
    For most of my family trips this year I’ve rented an SUV outfitted with a rooftop tent via PacificOverlander. I took this photo on the first night of one of my trips with the boys as we explored the Owens Valley. While they slept I snuck in this photo of our truck/tent under the Milky Way. If you’re unfamiliar with PacificOverlander it’s well worth investigating. I’ve had several amazing experiences and my boys keep asking me why I keep giving the truck back. They regularly have so much fun on these trips it would seem they’re sold on having a truck/rig like this of their very own.


    Best of Family

    IMG_4675-2

    Taken on our trip to see the total solar eclipse, the boys enjoy hanging out in the tent atop our PacificOverlander SUV. This photo sits atop both my home and work desk. It’s probably my favorite photo of the year as it captures the raw joy my boys have on our camping excursions.

    _MG_9412-2

    I spoiled my kids with ice cream atop the Glacier Point lookout in Yosemite National Park. A moment I enjoy remembering through this quick snapshot.

    _MG_9241-2

    Wrangling family for a group photos is… a challenge. This is especially true when the boys enjoy making faces and test the patience of my wife. Every so often though a photo comes out just right. This was one that I took while we enjoyed a sunny day at a beach near Half Moon Bay.

    _MG_9801-4

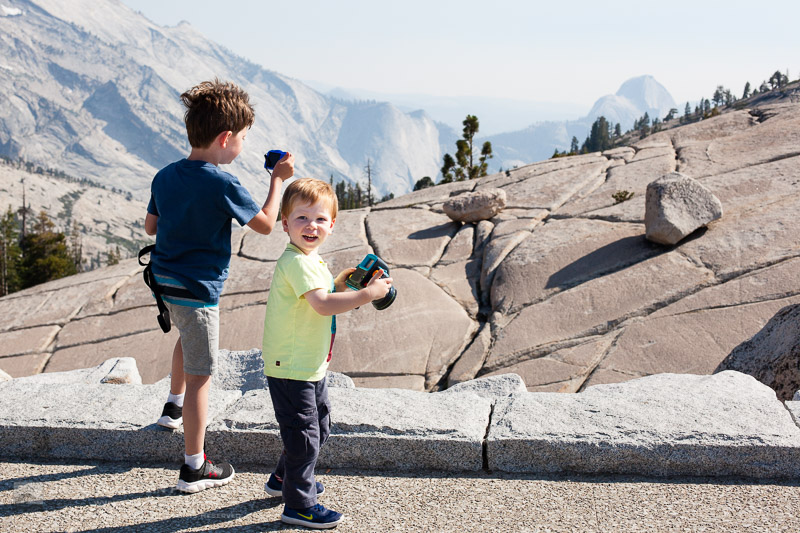
    Not a technically great photo, but the fact it captures the raw excitement of my youngest son exploring new places makes it one of my favorite of the year. The had a fun time rock hopping at Olmsted Point in Yosemite National Park.

    _MG_8189-3

    Trains… my boys love trains. Given the opportunity they’ll always jump on a train and lucky for them the commuter train, Caltrain, is very close to where we live. Bright eyed and excited I couldn’t help but take this photo of my son as we started to roll.


    Bonus Images / Honorable Mentions

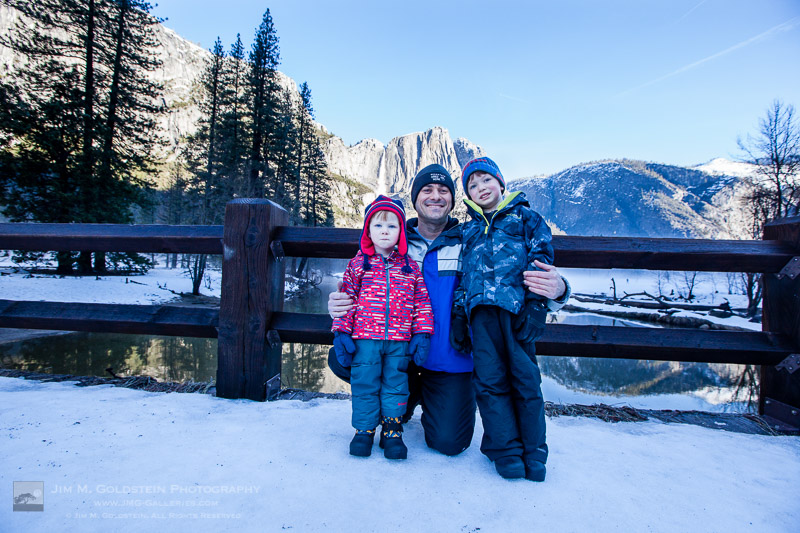
    I didn’t take this first image, but it’s impossible to exclude as it’s a great keepsake from a very fun trip. Below that you’ll see a short slideshow of images that might show a glimpse of the future. While I’m not actively taking serious photos in front of the boys they’ve none the less taken to photography on their own. If you’ve seen my past years “Best of” photos you’ll also see that my oldest son continues to enjoy being part of trick photos (forced perspective, rotated images, etc.). His best this year was “rock climbing” at Devils Postpile National Monument. Lastly my oldest also enjoyed getting drenched under a rainbow at Bridal Veil Fall in Yosemite this spring.
    _MG_7944-Edit-2

    Click to view slideshow.

    If you’re curious to see how these compare to my “best of” images selections from years past I invite you to check them out: Best Photos of the Year by Jim M. Goldstein.

    Wow! You made it this far. Thanks for taking the time to view all my photos. Keep tabs on my latest posts by subscribe to my blog or (ironically) follow me on social media. I’m not posting as frequently as I used to, but when I do it’s likely something you won’t want to miss. Also I do have a mail list if you’d like to subscribe (at my current rate I send out 1-2 email per year due to a hectic schedule).


    The post Best Photos of 2017 by Jim M. Goldstein appeared first on JMG-Galleries – Landscape, Nature & Travel Photography.


    JMG-Galleries – Landscape, Nature & Travel Photography