Blog

  • 9 More Great Apps You Need for Your Smartphone

    What are the next great apps you need for your Android and your iPhone?

    There are many apps out there that are fun to use. In part two we bring you 10 more great apps for your smartphone (read part one here). Some of the ones listed below are for shooting, some are for creativity, and others are great tools for the landscape photographer. Most are available for both Android and iOS, some just available for iOS.

    Shooting apps

    #1 – ProCamera 10 – iOS – $ 4.99 9 More Great Apps You Need for Your Smartphone

    ProCamera gives you a lot of control over your settings while shooting with your iPhone. It is easy to use and offers advanced features such as RAW capture, a live histogram, and an anti-shake feature. In the new iPhones with multiple camera lenses, it has the ability to access either lens.

    The images come out sharp with accurate exposures. The reason is that
    you can separate the focus and exposure points to really create a sharp balanced composition.

    You can also shoot in either Manual, Semi-Automatic or Automatic mode with on-screen display modes of standard, medium or light to hide non-critical display elements. It also has a low light mode called Low Light Plus which captures up to 64 photos and combines them into one photo with reduced noise.

    9 More Great Apps You Need for Your Smartphone - ProCamera

    ProCamera 10 screenshots.

    9 More Great Apps You Need for Your Smartphone - VSCO#2 – VSCO Cam – for iOS and Android – Free with in-app purchases

    VSCO Cam is one of my favorite apps. This free app has a powerful built-in camera with very clear image resolution and the ability to separate exposure and focus points which is vital in creating optimal imagery with a smartphone. This app also has built-in presets as well as ones you can purchase. It has a very active community that shares photo “recipes” to gain inspiration and create similar photographic styles in post-processing.

    When taking photos in VSCO, you can have manual control of focus, exposure, white balance, and even ISO and shutter speed. Depending on the model of your phone, you can even shoot in RAW mode.

    A big part of this app is the VSCO community and the navigation can be a bit confusing, but the results are consistently great.

    Light Effects Apps

    10 More Great Apps You Need for Your Smartphone - Lens Distortions#3 – Lens Distortions – iOS only – Free

    Lens Distortions is a unique app that will change the way you see iPhone photo filters. The app’s editing platform allows you to combine subtle blur effects, light leaks, textures, sun flares, and sunbursts to help you enhance your images with light.

    Lens Distortions is a great app for any iPhone photographer who is looking for unique filter effects that are easy to control and can be used to highlight a specific subject rather than apply it to the entire image. When used properly, the effect can look like it was taken on a much more advanced camera. Since smartphones don’t have an aperture which allows you to create a sunburst or sun flare effect like you can on a DSLR, this app will let you apply a sunburst, and give a realistic effect of the sun’s rays.

    9 More Great Apps You Need for Your Smartphone

     10 More Great Apps You Need for Your Smartphone - Rays#4 – Rays App – iOS only – $ 0.99

    The Rays app is great for creating realistic light ray effects quickly and easily. The rays are only added to the bright highlight areas and have the effect of passing through objects while adding a three-dimensional quality to your image. You can add shafts of light streaming through trees, rays filtering through clouds, beams of light coming through the fog, or even rays coming out of some text. You can customize the color of the rays using a color picker and specify where the rays will be visible.

    9 More Great Apps You Need for Your Smartphone - Rays

    Blend Mode Apps

    Creating Your Own Textures

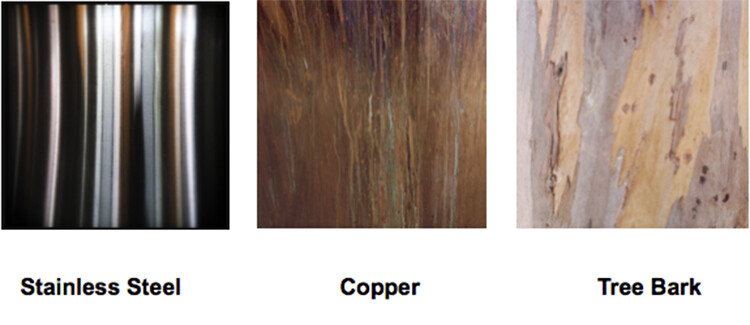
    Before introducing some blending mode apps, I want to introduce you to creating your own textures. You can create your own palettes by taking pictures of interesting tree bark, floors, walls, or anything that catches your eye and combine it in a blending program.

    Here are a few textures that I’ve used to create an interesting appearance in the background of an image.
    9 More Great Apps You Need for Your Smartphone

    There are several apps available that give you stock textures to add to your compositions, but why not create your own? It’s just another way to see creatively and use your smartphone to make something unusual.

    9 More Great Apps You Need for Your Smartphone - superimpose#6 – Superimpose – iOS / Android

    ($ 1.99 for IOS, $ 0.99 for Android)

    If you want a powerful app to combine images and textures, look at Superimpose. You can create professional level layered images on your Smartphone and easily blend one photo on top of another with this app.

    You can also use this tool to blend textures, overlay borders, or create double exposures while adjusting transparency with 18 different blend modes.

    To use this app, first load a background image. Then load a foreground image, masking out any unwanted elements in the foreground image. You can then move, scale, resize or flip the foreground and adjust colors and exposure. Then you can save the blended image to the photo library at full resolution.

    Use the textures you created in the exercise above to give your images a unique and creative twist.

    9 More Great Apps You Need for Your Smartphone - superimpose

    The rich brown hues of the copper background layer and the blend modes give a warmth to this image that it didn’t have before. You can move your background layer around to work with the foreground. Notice you don’t see the copper texture in the sky in this sample image. That was because it was rotated to work in that space with minimum texture.

    9 More Great Apps You Need for Your Smartphone - mextures app#7 – Mextures – iOS / $ 1.99

    Mextures app lets you create grunge patterns, textures, and light leaks quickly and easily. With Mextures, you bring in an image from your camera roll and decide what texture from their menu you would like to use as a background layer. Once you apply that texture to the first layer, you can add another layer of texture, pattern, or light.

    Layers are used in more advanced photography programs like Photoshop and are useful for making color and texture adjustments that won’t affect the whole picture. In this app, you can add texture in layer one, and then add gradient color in layer two. If you decide that you don’t like the gradient color, you can just delete that layer and redo it without affecting the texture layer.

    Layers in both Photoshop and apps like this work the same way. Imagine having a stack of tissue paper, and each tissue has an element that you can add to your image. One tissue layer could have color, one could have texture, and one could have light leaks. It’s easy to take them in and out or change them without affecting the layers above or below.

    This app gives you formulas that are saved presets which may be a combination of textures, colors, and gradients. You can even scroll through “Guest” formulas, and use them for your own images.

    9 More Great Apps You Need for Your Smartphone - mextures app

    Plumeria Flower created with Mextures App

    For Landscape Photographers

    9 More Great Apps You Need for Your Smartphone - Aurora app#7 – My Aurora Forecast and Alerts – For Android / iOS – Free

    Many photographers have shooting the Northern lights on their bucket list. This app will help you track the sometimes elusive Aurora Borealis and give you a forecast based on the Aurora activity. You can track the Aurora from your present location or at another location in the world. It will also give you alerts as to when the Aurora is active and in what location.

    An interesting way to use this app is to follow Aurora cams around the world and then set your alerts as to when these areas are active. Then you can tune in and watch the show!

    Get the app for Android here – and iOS here.

    9 More Great Apps You Need for Your Smartphone#8 – Geotag Photos Pro – For Android / iOS – Free

    Geotagging is the process of adding geographical identification metadata to your photographs or videos. This data usually consists of filename, folder location, city, GPS coordinates, date, and time captured.

    The Geotag Photos Pro app is meant to be used while you are shooting with your DSLR. It will record your position while you are taking photos and create a GPX file that you can export to your desktop app or to other apps and services like Lightroom, Flickr, and Apple Photos.

    This is a particularly good tool for landscape photographers or anyone who wants to know exactly their route or the specific location they shot a group of images. The images below show how you can set your interval time for the track log as well as watch the track log as it is being created.

    9 More Great Apps You Need for Your Smartphone

    Don’t worry, we weren’t walking in the ocean! The app did not recognize the pier in the route.

    It is a quick, easy, and cheap way to keep track of your locations and log a shoot. There is no need for any expensive bulky additions to the hot shoe of your camera. It’s all tracked by synchronizing the clock on the app with the clock on your camera. It will create a track log with custom interval settings that you set up.

    The best part is you can bring it into the Lightroom mapping module or connect with the Geotag Photo Pros online site and it will create a map of your shoot with thumbnail images along the route.

    9 More Great Apps You Need for Your Smartphone

    Mapped route after it was imported into Lightroom.

    9 More Great Apps You Need for Your Smartphone - sun seeker#9 – Sun Seeker – iOS / Android

    $ 9.99 for IOS – $ 7.49 for Android

    Sun Seeker is a great app for landscape photographers as it shows the angle of the sun and where it will be setting and rising in several different views. It provides a flat compass view as well as a real time image with an overlay of the sun’s projected solar path. You can choose any date and location in the world to plan for optimal light conditions. It helps you to find the right time and location to set up for your landscape photography.

    9 More Great Apps You Need for Your Smartphone

    Views showing the projected trajectory of the sun in the Sun Seeker App.

    Conclusion

    Whether or not you are using your smartphone as your primary camera, or you’re using it as a tool to help you get the shot with your DSLR, these apps can add fun and functionality to any shoot. Give them a try and let me know what you think!

    If there are others that we’ve missed (check part one also) please give us the info in the comments below. What apps are your favorite?

    The post 9 More Great Apps You Need for Your Smartphone by Holly Higbee-Jansen appeared first on Digital Photography School.


    Digital Photography School

  • Fujifilm XF 80mm F2.8 OIS WR Macro sample gallery

    $ (document).ready(function() { SampleGalleryV2({“containerId”:”embeddedSampleGallery_4627096713″,”galleryId”:”4627096713″,”isEmbeddedWidget”:true,”selectedImageIndex”:0,”isMobile”:false}) });

    Announced in September last year, the Fujifilm XF 80mm F2.8 Macro is the first X-series lens to give full 1:1 reproduction. It’s a 122mm equivalent on Fuji’s camera bodies, and provides weather and dust resistance. The lens is a tempting option for Fuji shooters looking for a portrait-friendly prime; see how it performs with the X-T2.

    See our Fujifilm XF 80mm F2.8 Macro sample gallery

    Articles: Digital Photography Review (dpreview.com)

  • Practical Tips for Doing Commercial Product Photography

    If you’re like me, you may be wondering, “What exactly is commercial photography?” Well simply put, it is taking photos for commercial use. Common uses include ad space, websites, product placement, and items for sale. As you can imagine, having a working understanding of the essential elements of product photography can be extremely beneficial. Commercial shots influence consumers immensely. You can spruce up a client’s Etsy store, eBay listing, or even personal website with well done commercial shots.

    Practical Tips for Doing Commercial Product Photography

    Commercial photography is a great way to sell your prints to businesses as well. Many businesses love to have nice, professional shots of their product hanging in their office space, hallways, or lobbies. Have fun shooting products you enjoy, and you never know if the business will be interested in buying and displaying the print.

    Practical Tips for Doing Commercial Product Photography

    Practical Tips for Doing Commercial Product Photography

    In this article, I’m going to talk about some essential tips for nailing commercial work. We’ll talk about how to set up a lightbox, selecting gear that’s right for the shoot, placing the product in flattering light, and how to touch up the image once it’s shot.

    Equipment for commercial photography

    First, it is highly beneficial to have a lightbox or light tent to use. The particular model I use folds and snaps together using magnets. You will first assemble your lightbox into its standing shape and then select the backdrop. Commonly used backdrop colors are black and white, and you will see that these are the ones I prefer to shoot against.

    Feel free to have fun with the colors though! After all, you are the one behind the camera, so you call the shots. The use of a small stand may also be very beneficial for you. One tip though – be sure to position your camera in a way that the product will obscure the stand in the shot.

    Practical Tips for Doing Commercial Product Photography

    Lens choice

    My all-time favorite lens for commercial work is the Nikon 105mm f/2.8 macro. In fact, all of the images included in this article were shot with this lens. Macro lenses are great, in particular for small objects, to reveal extreme detail in the item.

    Remember, that is a core component of shooting product photography – you want to advertise how great the item is to the audience of consumers! All the details matter, and all the resolving power of the lens counts. One thing to be wary of is that exact resolving power.

    The magnification of macro lenses can become a heavy problem because they will make things like dust, scratches, and fingerprints appear clearly prevalent. Thankfully, I will share my tips to help edit these things out in Lightroom and Photoshop later.

    Practical Tips for Doing Commercial Product Photography

    Lighting

    Most light boxes, like mine, come equipped with a set of LEDs that are programmable or can be dimmed to various ratios of light. You will want to position the item you’re photographing so that the LEDs can light it in a flattering and dynamic way. Depending on what you’re shooting, you may want softer lighting or something that will really pop.

    Be careful to avoid things like glare when positioning the item, as this problem will only become a headache in the touching up part of the job. In terms of positioning, I love to mess around with the shadows that are cast against the backdrop of my lightbox.

    Practical Tips for Doing Commercial Product Photography

    Get ready to shoot

    Now, it’s almost time to shoot! I would recommend canned air to blast some dust and dirt off the subject if it needs it. A tripod is also a MUST for this sort of work.

    I generally shoot at small apertures to keep the images as sharp as possible, with as much in focus as possible. However, sometimes it can be nice to shoot wide to create a nice depth of field perspectives with the shots. There is a delicate balance between showing artistic intent and making the shot distracting when advertising a product, so be sure to keep the client’s intent in mind when shooting.

    Here you can see a real-world example of what the setup could look like when using a lightbox to shoot a product.

    Practical Tips for Doing Commercial Product Photography

    A remote trigger is also very helpful, as commercial work necessitates eliminating camera shake. If you don’t have a remote trigger, my advice is to use the delayed-timer on your camera. Simply set the camera (mounted to the tripod) on self-timer for 10 seconds or so, focus the shot, depress the shutter release, and wait. Naturally, this method can add time to the process, so it isn’t a bad idea for you to invest in a remote trigger.

    Post-processing

    Now that you have the shots you want, it’s time to touch them up. This part can be long and tedious, but it makes a huge difference in the end product. I generally lean toward Lightroom when touching up shots, but for commercial macro work, in particular, I gravitate to Photoshop. I will explain the process for each.

    In Lightroom: I normally boost highlights and whites to blow out the backdrop and create a nice glow to the product. You can do this by sliding the adjustment sliders for both highlights and whites to the right. The amount really varies shot to shot, but don’t be afraid to experiment! Exposure can also be adjusted by moving the exposure slider to the right, however, make sure to not clip the highlights! I also may adjust clarity and make slight contrast adjustments. The real work comes in with spot removal on the dust specks, which I generally do in Photoshop.

    Here you can see the lightbox shown with unattractive shadows and blacks, which can be boosted as explained above, to white out the background as shown in the image below.

    Edits are done in Lighroom showing the effect on the image.

    In Photoshop: You should always clean your product before shooting, but some dust will not be avoided. Luckily, with Photoshop, you can select Filter > Noise > Dust and Scratches. From here, you can select the radius in pixels to target the dust specks. You will have a tendency to lose some sharpness since the filter isn’t perfect. It can have a tendency to smooth out sharp edges or features you intended to remain in the shot.

    For this reason, I always create new layers of areas I want to filter and then re-stack the layers to show the changes while leaving sharp edges unaffected. Select certain areas to target with the lasso tool, then copy those layers, run the filter, and restack the layers.

    Original image showing the dust specks.

    The masked image with the dust specks removed.

    Restacked layers with the dust removed.

    Outside of this dust removal, I generally reopen the image in Lightroom and do any other necessary edits there. Generally the discussed touch ups I talked about for Lightroom in conjunction with the dust/scratch removal in Photoshop is enough for my taste as long as I shot the frame with correct exposure and settings.


    Conclusion

    While commercial photography can be intimidating at first, I find that it can be extremely rewarding and versatile alongside other ventures. I’ve found it to be on the lucrative end of the photographic spectrum in terms of genres, and I definitely recommend it as a skill set to add to your photographic tool belt.

    Be sure to pay attention to details when shooting product work, and also pay attention to how you market these images to organizations and businesses to ensure the highest possible level of success within the genre. Above all else, go out, purchase a small light box and shoot! You may find that you love commercial work as much as I do!

    I hope these tips help you with your commercial product photography. Please share your images and thoughts in the comments below.

    The post Practical Tips for Doing Commercial Product Photography by Michael Neal appeared first on Digital Photography School.


    Digital Photography School

  • The Hasselblad H6D-400c multi-shot captures insane 400MP images

    Swedish medium format manufacturer Hasselblad has introduced its next-generation multi-shot body, building a monster that outputs 400MP images.

    Following in the footsteps of the company’s H6D-100c, the H6D-400c MS uses sensor-shift technology to combine up to six exposures into a single monster image measuring 23200 x 17400 pixels. If you work to the principle that 300ppi is ‘”photo-quality”, that means you can create a print of over 77x58in.

    The final image from the 6-shot process is a 16-bit TIFF that weighs 2.3GB.

    The camera is aimed at the art digitizing market and other industries that require super-resolution and accurate color.

    The H6D-400c MS gathers color information by shifting the sensor by a pixel at a time in a four-by-four grid, and recording four images with the red, green and blue filters over-lapping to produce RGBG at every pixel. The sensor is then returned to the normal position before being shifted half a pixel horizontally and then half a pixel vertically to record extra resolution via these two extra images.

    The GIF below shows the whole process from start to finish:

    The system is similar to that used by companies like Olympus and Panasonic, except that these manufacturers use their ‘floating’ 5-axis sensor image stabilization technology to manipulate the sensor into position. Hasselblad’s system uses a machined metal block with a track milled into it that the sensor is shifted along.

    This creates a system that’s more rigid, to ensure the sensor movements are absolutely parallel and precise every single time. When not being used in multi-shot mode, the camera acts just like a H6D-100c, so it can be used normally too.

    The H6D-400c MS will begin shipping in March, but pre-orders are being accepted immediately. The price of the camera will be $ 47,995 (€39,999 / £36,250 / RMB 319,999 / JPY 5,391,380 excluding VAT). If that’s a little out of your budget, you will be able to rent it directly from Hasselblad for about $ 480 (€400 / £360) per day, with discounts available for longer-term agreements.

    For more information visit the Hasselblad website.

    Press Release:

    Hasselblad Introduces the H6D-400c MS, a 400 Megapixel Multi-Shot Camera

    Building on a vast experience of developing exceptional, high-quality single and multi-shot cameras, Hasselblad once again has raised the bar for image quality captured with medium format system.

    Multi-Shot capture has become an industry standard in the field of art reproduction and cultural heritage for the documentation of paintings, sculptures, and artwork. As the only professional medium format system to feature multi-shot technology, Hasselblad continues to be the leading choice for institutions, organizations, and museums worldwide to record historic treasures in the highest image quality possible.

    With over 10 years of digital imaging expertise, the latest Multi-Shot digital camera combines the H6D’s unrivalled ease of use with a completely new frontier of image quality and detail. This new camera encompasses all of the technological functions of Hasselblad’s H6D single shot camera, and adds to that the resolution and colour fidelity leaps that only Multi-Shot photography can bring to image capture.

    With an effective resolution of 400MP via 6 shot image capture, or 100MP resolution in either 4 shot Multi-Shot capture or single shot mode, the Multi-Shot capture requires the sensor and its mount to be moved at a high-precision of 1 or ½ a pixel at a time via a piezo unit. To capture Multi-Shot images the camera must be tethered to a PC or MAC.

    In 400MP Multi-Shot mode, 6 images are captured, the first 4 involve moving the sensor by one pixel at a time to achieve real colour data (GRGB- see 4 shot diagrams below), this cycle then returns the sensor to its starting point. A further two exposures are made moving the sensor by ½ a pixel horizontally and then ½ a pixel vertically (see 6 shot diagram on next page). These 6 captures are then merged to give the equivalent of a single 400MP image, delivered as a 2.3GB 16-bit TIFF (23200 x 17400 pixels), for those seeking the utmost in image quality and resolving power.

    The H6D-400c MS encompasses all the features and functionality of Hasselblad’s standard single shot cameras:

    • USB 3.0 type c connection for tethered shooting, high speed data transfers & 30FPS live view
    • Dual media card slots: CFast 2.0 and SD card
    • 3.0-inch touch rear display
    • Smartphone style user interface
    • HD & UHD video
    • Modular system with improved back removal process
    • Technical camera connectivity (single shot)
    • Wi-Fi
    • HDMI & Audio I/O
    • True Focus II

    The H6D-400c MS will begin shipping March 2018 with a MSRP of € 39,999 / $ 47,995 / £ 36,250 / RMB 319,999 / JPY 5,391,380 excl. VAT.
    Pre-orders can start to be taken January 16th

    The H6D-400c MS will also be available to rent through your local Hasselblad sales representative. The rental fee is approx. €399/day for short term loans, but you can save up to 50% of that cost if you rent for a longer period.

    Articles: Digital Photography Review (dpreview.com)

  • Buying guides updated with Panasonic DC-G9

    Now that we’ve completed our review of Panasonic’s Lumix DC-G9, we’ve updated its entry in our Best Cameras Under $ 2000 and Best Cameras for Sports & Action buying guides. The G9 is Panasonic’s flagship stills camera, and earned a Silver Award with impressive stabilization, burst shooting, and solid image quality.

    Head to our buying guide hub for help finding the right camera by both price and use case.

    Read our Best Cameras Under $ 2000 buying guide

    Read our Best Cameras for Sports & Action buying guide

    Articles: Digital Photography Review (dpreview.com)

  • Kodak Super 8 camera footage showcased in newly published sample reel

    During CES 2016, Kodak announced plans to resurrect its Super 8 format via the launch of a new Kodak Super 8 camera, one that will blend analog and digital technologies. Following that announcement was a hands-on look at the new Super 8 camera during CES 2017, but an actual product launch is still forthcoming. Getting us closer to that point is Kodak’s latest update on the project: it’s showcasing footage recorded with the Super 8 camera during CES 2018.

    The new Kodak Super 8 camera is a hybrid of sorts, pairing a 3.5″ LCD “viewfinder” with an 8mm film cartridge for a simultaneous digital and analog experience. A control wheel is paired with the display for controlling the camera in lieu of touchscreen functionality or manual controls. This is joined by a Ricoh 6mm F1.2 prime lens and C-mount compatible with additional lenses.

    True to its hybrid nature, the new Kodak Super 8 camera also features an integrated SD card slot; audio is recorded to the media card, whereas the film cartridge is mailed to Kodak after recording is finished. After developing the film, Kodak mails it back to the customer, and also uploads the content to the cloud where the customer can download a digitized version.

    As noted by Cinema5D, Kodak also released a podcast about a month ago with an update on the Super 8 project. A firm launch date and price haven’t yet been provided, but the Kodak Super 8 camera is expected to launch this year at a price between $ 2,500 and $ 3,000 USD.

    Via: Cinema5D

    Articles: Digital Photography Review (dpreview.com)

  • AT&T decision to drop Huawei Mate 10 Pro reportedly made under pressure from US Congress

    According to a report by Reuters AT&T’s decision to not sell the Huawei Mate 10 Pro, currently one of the best camera smartphones, in the US might have been made under pressure from the US Congress.

    According to the report, lawmakers did pressure the communications company to drop its plans to offer Huawei’s devices to customers. AT&T is also being urged by Senators and House members to put an end to its collaboration with the Chinese manufacturer on standards for its 5G network.

    The report claims that companies are being told that doing business with Huawei, China Mobile and other Chinese companies could reduce the chances of procuring government contracts. “The next wave of wireless communication has enormous economic and national security implications,” said Michael Wessel of a US-Chain security review commission. “China’s participation in setting the standards and selling the equipment raises many national security issues that demand strict and prompt attention.”

    According to US intelligence information, Huawei has shared sensitive information with the Chinese government

    In addition, Congress has proposed a bill that would prevent any government agencies from working with the Chinese company. The proposal says that, according to US intelligence information, Huawei has shared sensitive information with the Chinese government, and that Chinese security agencies can make use of Huawei equipment to spy on US businesses.

    As one would expect, Huawei insists that its technology does not come with any built-in tools for access to US communications infrastructure. The company also told Reuters that its equipment is used by 45 of the world’s top 50 carriers, for all of whom security is a priority.

    The good news is that If you are based in the US and did like the Mate 10 Pro’s camera performance in our full review, you’ll still be able to purchase the device, just not through a carrier. Instead you can buy the unlocked version on Amazon, Best Buy and other retailers.

    Articles: Digital Photography Review (dpreview.com)

  • Sony E 18-135mm F3.5-5.6 OSS sample gallery

    $ (document).ready(function() { SampleGalleryV2({“containerId”:”embeddedSampleGallery_3207546459″,”galleryId”:”3207546459″,”isEmbeddedWidget”:true,”selectedImageIndex”:0,”isMobile”:false}) });

    Sony hosted us for a few days in Hawaii to shoot with the company’s newest E-mount lens, the 18-135mm F3.5-5.6 OSS. It’s been more than four years since Sony introduced an E-mount APS-C lens, emphasizing that its design maximizes corner-to-corner sharpness. We put it to work capturing Honolulu’s vibrant Chinatown and the spectacular landscapes that the Aloha State is known for.

    See our Sony E 18-135mm F3.5-5.6 OSS sample gallery

    Articles: Digital Photography Review (dpreview.com)

  • 8 Tips for Rocking the Photography Equipment You Currently own Versus Buying New Gear

    “I really don’t need any more photography equipment in my gear bag”, said no photographer ever!

    We all know that is this far from the truth. Even if you have not voiced this thought out in the open, you have certainly thought it. Especially when you see a photographer that you admire rave about a certain piece of gear that they absolutely cannot live without.

    We, photographers, get very upset when strangers compliment our gear over our skill. Yet we seem to fall into that same trap when we don’t quite get the shot we really want.-If only I had that fast lens, if only my camera could handle a low light situation, if only I had image stabilization on my lens, or if only I had a camera that takes more frames per second, etc., etc., etc.

    Rocking the Photography Equipment You Currently own Versus Buying New Gear

    Before you get ready to give up on the gear you have, I encourage you to look at your pictures with a critical eye and analyze if it is truly a gear limitation versus user error or inexperience. Now, I am not saying that the user is at fault in every situation. I will admit that in some situations gear is very important. For example, photographing a leopard chasing down its next meal or that sports car as it races around the track.

    But in most cases, depending on your skill level AND the intended use of your pictures, you can get the shot with the equipment you already own. Here are some tips to help you.

    #1 Perfect your composition skills

    There are several different composition techniques that you can use to take your photographs from boring to interesting. Often just a small change can create a big impact. Are you finding yourself using the same center focused composition time and again? Try using the rule of thirds instead. Are you always photographing at eye level? Change your perspective and perhaps photograph from top-down or at a 45-degree angle.

    Rocking the Photography Equipment You Currently own Versus Buying New Gear

    A cloudy gloomy day in Vridhavan, India gave me the perfect opportunity to capture reflections on this relatively still river. I intentionally chose an off-center composition to add additional interest to this image.

    #2 Take your camera everywhere

    If you are really serious about improving your photography, one of the first things to do is to understand your gear. The best way to do that is to take lots of photos. Take your camera with you everywhere you go.

    If you really want to improve your photography, you have to take lots and lots of photos. By taking lots of pictures, you will start to understand how to use your camera in different lighting conditions and what works and what doesn’t. You can only do this if you give yourself many different opportunities to photograph different subjects in different lighting situations.

    Take this a step further by actually taking and using the gear you want to perfect. If you own a DSLR but find it too heavy or cumbersome, then perhaps it is time to buy a simple point and shoot or smaller mirrorless camera.

    Rocking the Photography Equipment You Currently own Versus Buying New Gear - horse photos

    I am always carrying my camera to the barn where my kids learn horse riding. There are so many interesting stories that unfold and the lighting is quite challenging especially during winter so it gives me a chance to practice difficult lighting techniques as well!

    #3 Learn to read and analyze light effectively

    One of the most important elements of photography is light and yet it is amazing how many photographers don’t understand this important concept. Also, not all light is equal.

    Light changes during the day and different types of light can affect images differently. Morning light is different from afternoon light which is different from evening light (a.k.a golden hour) which is yet again different from blue hour. In order to really improve your photography, you must learn to distinguish these different types of lighting situations and how to effectively work in each situation.

    Dark and Moody Lifestyle Equestrian Photos - Rocking the Photography Equipment You Currently own Versus Buying New Gear

    I saw this image long before I even took the photo. Just something about the light filtering from the right, the catch light and even the color of the horse just made this one of my favorite equestrian photos of all times!

    #4 Use a tripod

    A tripod is a very useful tool for you as a photographer. It opens up new opportunities for creative photography like low light or night photography. You can experiment with the light at night to capture really beautiful images.

    A tripod can let you capture sharp images of non-moving subjects and blur out moving subjects, creating very interesting photographs. You can take this a step further by using a remote trigger that will also enable you to take long exposure shots without fear of camera shake.

    #5 Learn to photograph in manual mode

    Your camera is a pretty sophisticated piece of machinery with a pre-programmed brain (shooting modes). These modes can be found on the top dial of your camera and are generally labeled as P (Program), M (Manual), Av/A (Aperture Priority), and Tv/S (Shutter priority), plus other automatic modes.

    Manual mode (or M on most cameras) is much like using an old film SLR, when they didn’t have buttons that do it all for you. Being the only option, photographers were forced to learn to use their cameras in Manual. In doing so, they fully learned how their cameras worked. Once you know how to properly use your camera, it becomes much easier to spot where you’re going wrong and to fix it.

    Semi-automatic modes are good for some situations but, once you know how to properly shoot in Manual, you’ll find there’s no need for them and you’ll get better results on your own. Manual mode also gives you the freedom to make mistakes, freedom to bend the “rules” of photography, and in turn, gives you the freedom to excel in your art.

    Car in a foggy day along a ridge road - Rocking the Photography Equipment You Currently own Versus Buying New Gear

    Manual mode on your camera gives you so much flexibility in terms of getting creative, photographing in different conditions and also allowing you to experiment with different techniques.

    #6 Find great locations to photograph

    Don’t just sit at home and expect great pictures to happen. Find local and state parks or perhaps even national parks that might be close to you (by close I mean within an acceptable driving distance) and look for potentially good spots for photography.

    When shootig landscapes, you will have to envision your image to see what could look good and what may not. For example, a still lake is a great way to produce a mirrored image where the clouds, trees, and other objects are reflected on the lake. For portrait photography, drive around and see if you can find locations that will look good in the background.

    The great thing about portrait photography is that a good background is often easy to find like a white wall, an old building, or an interesting fence. Use your imagination and you will soon be finding great spots all around you.

    Custer State Park Outdoor Photos - Rocking the Photography Equipment You Currently own Versus Buying New Gear

    #optoutside and I guarantee you will find amazing things to photography. Just being outside in nature changes our perspective and lifts the mood!

    #7 Understand basic post-processing

    Exposure or brightness, contrast, color balance, and tone/tint are some of the basic things you can fix in an image. There are many free post-processing software out there in the market that you can use to make basic adjustments to your image.

    If you want to learn advanced editing techniques there are many options for you like Photoshop, Lightroom, Luminar, etc. Adobe has great creative editing programs that are subscription based (a fee every month). Maybe invest in these programs on a trial basis and see if they will suit your editing needs.

     Custer State Park sunset photo - Rocking the Photography Equipment You Currently own Versus Buying New Gear

    I have a certain style of how I like my photos and I always look for elements that will work well with that style. I have a relatively easy hand in terms of editing my photos – minor adjustments in exposure, contrast, tonality and shadows/highlights and I am done. My preference is to keep the natural look and feel of my images intact – just my personal style of photography!

    #8 Photograph in RAW

    If you are still using JPEG for your pictures, it is about time to move to RAW. Most of the newer cameras today are capable of recording images in RAW format, so give it a try. A RAW image is called “raw” for a reason – it is an unprocessed image with a lot more colors to work with than a JPEG image.

    It might not look great at the back of the camera when you take the photo but when you import it into your editing software, you have a lot more options to adjust to give it the look and feel you want. One caveat is that RAW  images do take up more space than JPEG, so you might have to invest in memory cards with more storage and a larger hard drive.

    Custer State Park Paddle boarding in Lake Custer - Rocking the Photography Equipment You Currently own Versus Buying New Gear

    When we visited this state park, there were a lot of wildfires that were burning in the neighboring areas, so the sky had this general pink glow all throughout! By photographing in raw and editing in post, I was able to retain the look as I remember seeing the park when we visited!

    Conclusion

    I hope these tips help you understand your existing gear a little bit better. Sure, you may have reached a point in your career where an upgrade is absolutely required and essential.

    If not, rather than investing more money in gear that you may not be ready for, try to improve your craft with what you have and a little extra effort.

    The post 8 Tips for Rocking the Photography Equipment You Currently own Versus Buying New Gear by Karthika Gupta appeared first on Digital Photography School.


    Digital Photography School

  • HTC U11 Eyes smartphone features a dual selfie camera with live bokeh

    HTC has launched a new variant of its U11 smartphone called the HTC U11 Eyes, and it’s built specifically for selfie takers (cue eye roll). The name “Eyes” refers to the handset’s chief feature: dual front-facing cameras, which resemble a pair of eyes and bring features like live bokeh and post-focusing to selfies.

    HTC packs some other premium features into the model, including an 18:9 ratio Full HD+ 6″ Super LCD 3 screen and a “flagship camera” on the rear, but other than the front-facing camera, the handset is more-or-less the same as the regular HTC U11.

    The front-facing camera is comprised of dual 5MP BSI sensors behind F2.2 aperture lenses, which support Full HD 1080p video capture in addition to stills. The selfie cameras produce “studio-quality portraits,” claims HTC, with Bokeh Mode being the most notable feature. In that mode, selfie backgrounds are blurred in real time, though users also have the option of adjusting it manually after the fact.

    The model’s front camera also supports Screen Flash, HDR Boost, Voice Selfie, Auto “Beautification,” Auto Selfie, and Selfie Panorama. The rear camera, meanwhile, features a 12MP HTC UltraPixel 3 with 1.4?m pixel, BSI sensor, OIS, F1.7 aperture, an LED flash, and UltraSpeed Autofocus. HTC has included a “Pro Mode” with manual control for its rear camera, including 32-second long exposures, Raw support, and manual control.

    Cameras aside, the HTC U11 Eyes has a high-capacity 3930mAh battery that supports up to 28.8 hours of talk time (depending on the network) as well as Qualcomm Snapdragon 652 processor, IP67 water- and dust-resistance, Edge Sense squeezing support, HTC USonic audio tech, active noise cancellation, and Face Unlock.

    Availability outside of China and pricing isn’t clear. Engadget reports that its “local sources” put the price potentially at HK$ 3,200, which is equivalent to about $ 410 USD and 334 EUR.

    Articles: Digital Photography Review (dpreview.com)