Blog

  • US intelligence agencies warn against purchasing Huawei smartphones

    Directors from six US intelligence agencies, including the CIA, FBI, and NSA, have told the Senate Intelligence Committee that they wouldn’t recommend Americans use Huawei services or products, according to CNBC.

    FBI Director Chris Wray explained to the Committee:

    We’re deeply concerned about the risks of allowing any company or entity that is beholden to foreign governments that don’t share our values to gain positions of power inside our telecommunications networks. That provides the capacity to exert pressure or control over our telecommunications infrastructure. It provides the capacity to maliciously modify or steal information. And it provides the capacity to conduct undetected espionage.

    This saga actually began in 2012, when the Chinese tech company was the subject of a national security investigation by US government officials who worried that its products may pose a cybersecurity risk. Huawei publicly dismissed the concerns, though the final investigative report alleged the Chinese company wasn’t fully cooperative with investigators. Australian government officials had expressed similar concerns at the time.

    Huawei has consistently denied claims that its products and services may be compromised by the Chinese government. These concerns, however, have persisted to varying degrees over the years, and recently came to a head when AT&T abandoned plans to offer the Huawei Mate 10 phone in its stores.

    The Huawei Mate 10 Pro went up for pre-order in the United States earlier this month.

    Sources speaking to Reuters last month claimed that US lawmakers pressured AT&T into cutting commercial ties with Huawei over national security concerns, and that included asking AT&T to stop offering Huawei phones through its Cricket subsidiary. Bloomberg reported similar issues related to Verizon’s abandoned plans to sell the Huawei Mate 10.

    This intelligence report to the Senate Intelligence Committee is the latest, and possibly the worst, blow for Huawei, which has struggled to enter the US market. The Mate 10 Pro and its impressive camera only just went up for pre-order in the US, and already consumers are being warned against purchasing.

    Chinese drone maker DJI recently faced similar issues following a leaked government memo and a report detailing what is claimed to have been a major security vulnerability.

    Articles: Digital Photography Review (dpreview.com)

  • Tamron teases new lens ahead of CP+

    Tamron Japan has posted an intriguing teaser image on its Instagram account, just in time for an announcement at either WPPI or CP+ (probably the latter). The backlit image is all we have to go off of, but naturally, speculation is running rampant online.

    Canon Rumors thinks this might be a 100mm f/2 VC or a 135mm f/2 VC, while Sony Alpha Rumors received an anonymous (and therefore still highly unreliable) tip that it is in fact a “28-75mm F/2.8 Di III RXD” for Sony FE mount. Based on the design alone, we’re leaning towards calling this a zoom lens—notice the two rubber rings and the gap between the top ring and the top of the lens.

    As user Sharlin points out in the CR forums, the design is very to the Tamron 18-200mm F3.5-6.3 Di III VC.

    Of course, all of this is errant speculation until Tamron decides to officially announce whatever its teasing. But if you have any educated guesses about what the lens might be, drop them in the comments along with your reasoning.

    Articles: Digital Photography Review (dpreview.com)

  • Learning to shoot video with a gimbal: a frustrating, yet highly rewarding experience

    A new Panasonic GH-series camera always seems to mean having to learn more about video, but that also tends to mean getting experience behind a video camera. I’d like to think I’m getting better as a videographer. Hell, I even remember to record some background audio most of the time, but the GH5S review meant having to learn about a whole new piece of kit.

    The GH5S’s oversized sensor means there’s little scope for any kind of sensor-shift stabilization, which means it’s best suited to shooting with external forms of stabilization*. This meant that, in addition to borrowing a nice video lens, I needed to rent (and learn to use) a gimbal.

    Gimbaling around

    In just a few years, external stabilization has gone from being the preserve of Hollywood movies (most famously by Steadicam) to something that can be provided by sub-$ 1000 equipment. It probably shouldn’t come as a surprise that DJI, best known as a maker of drones, also sells the technology required to mount and control aerial cameras as stand-alone stabilization rigs.

    The DJI Ronin M is essentially a scaled-up version of the gimbals DJI mounts its drone cameras on. It provides a cradle that can move in all three axes, with motors to correct for (or provide) movement in each of these directions. At its most simple, it provides a platform that tries to keep the camera steady, regardless of the movements you make while holding the handles. This is both its fundamental role and the thing that makes it tricky to get used to.

    The GH5S with Metabones Speedboost Ultra and Sigma 18-35mm T2.0, mounted in a DJI Ronin M: a powerful combination but one that’s not particularly easy to hold at shoulder-height for any length of time.

    Initial setup is pretty easy: you connect the camera cradle to a top handle, screw some lateral arms and handles on, then clip a large rechargeable battery pack on the back. You then have to carefully adjust the position of the cradle so that the camera and lens are neutrally balanced (that way the gimbal isn’t having to constantly fight against the camera’s weight to keep the it level).

    To make the most of the GH5S I borrowed a couple of nice pieces of kit: a Sigma 18-35mm T2.0 CINE lens and a Speedbooster Ultra 0.71. The problem is that this is a pretty substantial combination, something that would come back to haunt me later.

    Lens choice

    A Speedbooster is essentially an equivalence machine, condensing the lens’s projected light down onto a smaller sensor, shortening the focal length and lowering the F-number (since you have the same entrance pupil but with a shorter focal length lens). The upshot is that the 18-35mm T2.0 ends up giving essentially the same angle of view and depth-of-field it was designed to provide on APS-C/Super 35 format.

    The result is something along the lines of a constant F1.4 lens. And, while it’s not really sensible to start mixing F and T-stops**, it quickly becomes irrelevant. Because, to shoot in daylight, the camera’s base ISO setting (320 in Log mode) meant I had to use a variable ND filter to prevent over-exposure, which meant I could use the aperture primarily to control depth-of-field, without necessarily having an impact on exposure.

    Only the realization that I really can’t think in Imperial took the shine off one of my favorite lenses

    Coming from a photography background it still feels somehow wrong to throw away light like this, but if your minimum ISO is 320 and you need to keep the shutter speed somewhere around 1/50th of a second, you’re going to have to do something to prevent constant overexposure. Sacrificing it to an ND filter is preferable to stopping down, since you then lose control over depth-of-field and smooth your footage with the power of diffraction.

    It was a lovely combination to shoot with, though, offering a really useful zoom range, more than enough control over depth-of-field and beautifully damped controls for everything. Only the realization that this version had its distance scale in feet, and that I really can’t think in Imperial, took the shine off this version of one of my favorite lenses.

    In practice

    There’s a difference, of course, between knowing the theory and putting it into practice. I knew in principle what 10-bit capture should mean and I knew how a gimbal was supposed to work, but that’s not the same as seeing it out in the field. Or, in this case, in one of Seattle’s public parks.

    I’d tested the gimbal the night before. Checked it was level and, via an app on my phone, configured it to move the way I wanted it to. Because while the basic function of a gimbal is to correct for the operator’s movement, the Ronin can also be configured so that a large movement of the handles is treated as an instruction to move the camera. You can configure which axes it’ll move in, how sensitive the system is to your inputs and how quickly it moves the camera in response. It’s all really clever.

    It’s also a bit of a handful, at first. I quickly found myself trying to operate the focus and exposure on a camera that was constantly trying to move away from my attempts to grab it. Between this, the sheer weight of the setup and the inability to see the camera’s screen, it was incredibly difficult to make or assess any changes on the camera: a deeply frustrating experience. Then the rain we’d timed our shoot to avoid started. And then turned to hail.

    1’9? So that’s, what, about 1/6th my height, plus about one and a half of those 15cm rulers we used at school? I’m not very good at thinking in Imperial measurements.

    I was feeling pretty defeated. I’d shot maybe 10 seconds of footage, couldn’t work out how to operate the camera and was beginning to think I was wasting everyone’s time. The rain hammered down and I desperately cast around for a Plan B.

    But you know what they say about silver linings? Mine was that the enforced rain break gave me more time to learn to handle the gimbal. In the end I developed a technique that involved powering it down, reaching for the camera with my right hand and letting the carrying frame collapse into the crook of my arms. I could then hold and operate the camera comparatively normally before finally making a grab for the carry handle with my left hand, letting the camera hang, then powering it all back up again.

    The Ronin M went from nearly bringing me to tears to being one of the most fun pieces of equipment I’ve ever used

    It also became apparent that some of the difficulty I was having was the result of the combined weight of the camera and lens, rather than just user error. The quick-release lever that locked the cameras fore/aft movement wasn’t tightened quite enough to withstand the weight of my setup. So as soon as I let the camera hang on the gimbal to change settings, it was slipping forwards or backwards on its plate, throwing off the balance I’d so carefully set up. Hence its refusal to then work properly afterwards.

    With these problems overcome and the sun starting to strike out from behind the clouds, I found myself getting more and more confident with every shot I took. And in a matter of hours, the Ronin M went from nearly bringing me to tears to being one of the most fun pieces of equipment I’ve ever used.

    Back at the computer

    Even after dragging all the camera gear back up the hill from the beach, the emotional peaks and troughs weren’t complete, though. As with every other video project I’ve undertaken, there’s a moment back at the editing machine where I wished I’d done almost everything differently, if given the chance to do it again. Obviously I was missing the necessary audio for a key part of the video (again) but I also found myself wishing I’d shot using a different color mode.

    The moment I applied Nick Driftwood’s LUT to my sole HLG clip, I wish I’d shot the whole thing that way

    As I wrote up my review, I speculated whether it’d be better to shoot using the HDR-video-made-easy ‘Hybrid Log Gamma’ (HLG) mode, rather than the V-Log L workflow designed for professionals. I had reason to believe the simpler mode might make better use of the GH5S’s 10-bit video capability. However, the knowledge that I already had the look-up table (LUT) to convert V-Log L footage into something that more usable was enough to tip the balance in that direction, so I shot everything but the closing shot that way.

    The moment I applied Nick Driftwood’s LUT (found via Google) to my solitary HLG clip, I wish I’d shot the whole thing that way. It may not prove to be the professional choice but it immediately got me closer to the end point I was hoping for.

    I’m acutely aware of the risks of over-using the effect that that gimbal gives

    That said, for all that I’d do the whole thing differently, I’m pretty pleased by the way the video turned out. No, my gimbal work isn’t particularly polished and there are a thousand little tweaks and changes I wish I’d made (including, as always, the need to shoot more little ‘B-roll’ clips to cut away to), but I think the results look better than my previous efforts, and that’s how learning works.

    I’m also acutely aware of the risks of over-using the effect that that gimbal gives. But I’m itching to get a chance to use one again, hone my skills and bring a little bit of drifty magic to my next project. Once my shoulders have stopped aching.


    *Panasonic would say I’ve got cause and effect confused. The outcome is similar though: I needed a gimbal.

    **Since these same optics sold for stills use as an F1.8, you could argue that, with a 0.71x focal length reducer it ends up being an F1.3 lens. Certainly it can’t be said to be a T1.4, since the additional glass in the SpeedBooster will inevitably reduce the light transmission a smidge. But, as I say, the numbers don’t matter so much as the effect.

    Articles: Digital Photography Review (dpreview.com)

  • How to Add a Sense of Scale to Your Landscape Photos

    You might find that sometimes you take pictures of grand, scenic landscapes only to have viewers not react to the picture the way you had hoped. You present them with a well composed, properly exposed photo of a dramatic scene, but the viewers quickly pass it by. Why is this happening with your landscape photos?

    Adding a Sense of Scale to Your Landscape Photos - Grand Canyon

    One reason might be that the viewer cannot get a sense of the scale of the scene.  They cannot tell if they are looking at something really big, or just something that looks big in a picture. Viewers are used to being tricked by the camera, such that small things look huge.

    Remember that a picture is just a two-dimensional representation of a scene and it is hard for the viewer to put things in the right context. You only have a split second to do so, or the viewer has likely moved on to other things.

    Using items to add a sense of scale

    It can be tricky to relay a sense of proper perspective in your photographs. For example, you might have a photo of some cliffs, but it might not be clear to the viewer whether these cliffs were 7 feet tall or 700 feet tall.

    It happens to me all the time, and my hard drive is littered with photos of large cliffs and mountains that did not translate into compelling photographs because there is no sense of scale. In the example below, however, I think you get a sense of the height of these cliffs. How?

    Adding a Sense of Scale to Your Landscape Photos - cliffs

    I think it is because of the castle in the middle of the picture. It is just a tiny item, but your eye picks up on it and uses it to put the rest of the picture into context.

    It is probably not something you really think about, but it happens nonetheless. You know that castles are fairly tall, and you subconsciously use that knowledge to add a sense of scale to the entire picture.

    Finding items to use to add a sense of scale

    The same dynamic works in other contexts. Your picture doesn’t need to be dramatic cliffs like the one above. It can be any landscape or coastal scene.

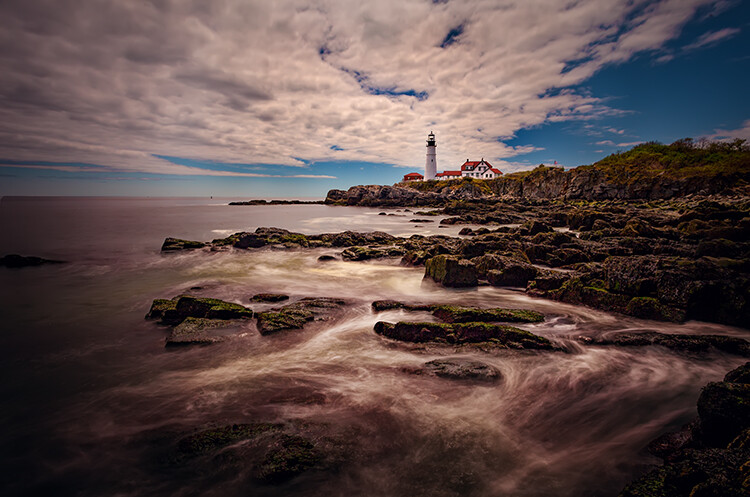
    Look for things that your viewer knows. Those items give them something to use to add a sense of scale to the picture. It can be anything. Sometimes the item you use is the actual subject of the picture. For example, in this picture below, the lighthouse provides an actual subject or center of interest for the picture.

    lighthouse - Adding a Sense of Scale to Your Landscape Photos

    In addition to providing a point to the picture, the lighthouse is also providing your viewer with a sense of scale. It makes the viewer’s mind more comfortable with the entire image. The viewer has a better idea of what they are looking at, and the relative size of all the elements.

    Small things provide scale too

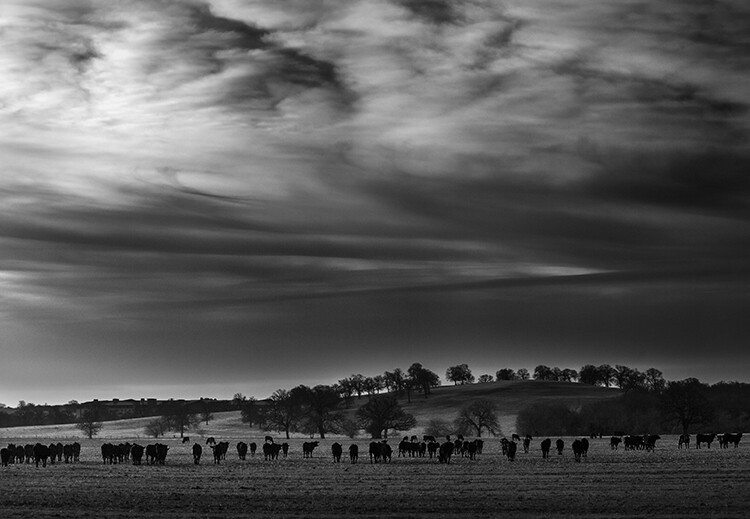
    You don’t have to use a large structure like a lighthouse to provide this sense of scale though. You can also include small things that just give your viewer a little clue. In the case of landscapes, perhaps a bird or birds in the distance will help. In fact, animals of any kind often work. In the picture below, the herd of cows provides context for the picture.

    cows - Adding a Sense of Scale to Your Landscape Photos

    When there is nothing else available, just use trees. We have a sense of the general height of trees and our mind will use that to provide context to the photo. Of course, there are trees everywhere (you almost cannot avoid them) so that should be easy to do.

    Keep the people in your pictures

    The final item I want to mention is the one that you may struggle with, and that is adding people to your pictures. This is an incredibly powerful tool. We, humans, are amazingly adept at recognizing people in a picture and we will use that to provide context to the entire scene.

    Therefore, there is no more powerful way to add a sense of scale than by including people to your pictures. Your viewer will see those people in the pictures and naturally use them to gain a sense of scale.

    little people on a cliff - Adding a Sense of Scale to Your Landscape Photos

    To do this, you will have to reverse your thinking in a lot of ways, particularly if you are a landscape photographer. You probably spend a lot of time trying to avoid having people in your pictures.

    You probably ask the people you are with to step out of your frame. Or you might spend a lot of time standing around waiting for people to move. In many cases, you will still want to do that, but sometimes – to add this sense of scale – you might want to include those people in your image.

    Adding a Sense of Scale to Your Landscape Photos

    Conclusion

    There is no magic bullet to creating a sense of scale in your images. It is something I get asked about from time to time, and I do not have a quick answer. The good news is that just thinking about it puts you ahead of the curve.

    So next time you are out shooting, look around and find things that will work for you. Use them to add that sense of scale. Hopefully, the ideas in this article will provide you with some things you can use for your images.

    The post How to Add a Sense of Scale to Your Landscape Photos by Jim Hamel appeared first on Digital Photography School.


    Digital Photography School

  • DPRSplit will help pull more dynamic range from Canon 5D Mark IV Dual Pixel Raw files

    RawDigger and FastRawViewer have released the beta version of an application called DPRSplit, designed for Canon 5D Mark IV owners. With DPRSplit, photographers can input a CR2 file from a Canon 5D Mark IV and then extract a second image from it, one with an exposure value that is about one stop lower than the original CR2 image.

    This utility works only if the camera’s Dual Pixel Raw mode was enabled when the shots were taken.

    Canon explains how this technology works on its website:

    The Dual Pixel sensor’s pixels have a dual photodiode construction. This sensor design means the sensor can receive an A and B signals from the subject and to detect any phase differences between the two signals, allowing them to attain focus as part of the Dual Pixel AF system … During Dual Pixel RAW shooting, a single RAW file saves two images into the file. One image consists of the A+B combined image data and the other only the A image data.

    Photographers benefit from this technology by using Canon’s Digital Photo Professional software, which enables users to make “microadjustments” to focus, bokeh shift, and reduce ghosting. However, the software doesn’t enable users to extract both images from the CR2 file separately—that’s where DPRSplit comes in.

    With this utility, photographers get access to that second frame, which has half the light of the composite image. This means that, in essence, the camera is automatically capturing two shots, bracketed by about 1EV.

    Extracted images are saved as DNG files for editing with any software that supports the format, so you can blend the images back together and get about +1EV more usable dynamic range. And since the exposures are captured simultaneously, you don’t have to worry about motion blur in your image. The only potential “issue” is a minor parallax error between the two frames.

    DPRSplit beta 0.8 is free to download for Windows 7 or higher and Mac OS X 10.6 through macOS 10.13. As with any beta software, it is possible users will encounter bugs, but if you’re a 5D Mark IV user and you already shoot in Dual Pixel Raw, this one might be worth a shot.

    Articles: Digital Photography Review (dpreview.com)

  • Lightroom Classic 7.2: Major performance boost, new features, and more

    Lightroom Classic 7.2—the performance boosted version of Lightroom DPReview got to test for ourselves at the end of January—has finally arrived! And with it come numerous performance improvements, better support for Intel hardware, a fix for speed issues experienced by some users, and some new features to boot.

    Additionally, Adobe has also updated the new cloud-based Lightroom CC ecosystem for both desktop and mobile operating systems. Let’s take them one at a time.

    Lightroom Classic Performance Boost

    The company explains that it has worked with Intel to improve performance scaling on computers that have multiple cores and at least 12GB of RAM, and as we showed in January, the result is much faster importing and preview generation, and improved speed for things like adjustments rendering in Develop, HDR/Panos rendering, and more.

    “One key attribute of the enhancements is that they scale appropriately with a customer’s investment in hardware,” says Adobe. Users who invest in newer, more powerful hardware will see more performance improvements, particularly if the system has at least 12GB of memory. This time around, Adobe says it focused on batch processing improvements (how efficiently system resources are used and batch tasks are completed), but the company will also focus on Interactive (interface response speed) needs in the near future.

    Some users had experienced problems with Lightroom Classic slowing down over time, an issue Adobe says it has fixed “in most cases,” though it is possible some users will still experience this issue.

    Lightroom Classic Feature Enhancements

    Performance improvements and fixes aside, Lightroom Classic 7.2 comes with multiple new features, including a text search for finding a specific folder (“Folder Search”), the ability to filter favorites within folders, an option for creating collection sets from folders for use with Lightroom mobile, as well as a feature for creating collections from Map Module pins.

    This version of Lightroom Classic also adds a library filter for unedited and edited images and enables users to create smart collections with unedited or edited images.

    $ (document).ready(function() { SampleGalleryV2({“containerId”:”embeddedSampleGallery_3173476968″,”galleryId”:”3173476968″,”isEmbeddedWidget”:true,”selectedImageIndex”:0,”isMobile”:false}) });

    Finally, Adobe says it has enabled Photoshop Continuously Scalable User Interface in the Adobe Camera Raw plugin, with the scaling limited to 100% or 200%. Support for per-monitor scaling in Windows has also been added. In explaining the plugin update, Adobe said, “This is primarily a Windows change to sync up Photoshop, and Windows users will now be able to scale the ACR plugin from 100% to 500%, in increments of 100%.”

    The full Lightroom Classic 7.2 update changelog is available here, new camera support can be found here, and new lens profile support can be found here.

    Updates to Lightroom CC and Lightroom Mobile

    In addition to the Lightroom Classic CC updates, the whole Lightroom CC ecosystem—including the Lightroom Mobile apps on iOS and Android—have been updated as well with “optimized performance, added support for new cameras and lenses, and some great new features for desktop and Android.”

    Adobe says it put a lot of effort into “tuning and improving stability” with this update. Lightroom CC on Mac and Windows will see performance improve when moving between photos, grid scrolling, and exporting, while all the apps across mobile and desktop should be “a lot more stable.”

    As for new features, Lightroom CC for desktop gets the ability to add copyright to imported images; meanwhile, Lightroom Mobile on Android gets a geometry tab for correcting perspective distortion, the ability to add a watermark upon export, the ability to search your Lightroom library with Google Assistant, and a new “Add to Lr” option that will allow you to add photos from third party apps directly into your Lightroom library.

    $ (document).ready(function() { SampleGalleryV2({“containerId”:”embeddedSampleGallery_8528326624″,”galleryId”:”8528326624″,”isEmbeddedWidget”:true,”selectedImageIndex”:0,”isMobile”:false}) });

    All of these updates are available now, so if you have a Creative Cloud subscription, update to the latest versions and give them a go. And if you want to dive deeper into all of these new features, head over to the Adobe blog.

    Articles: Digital Photography Review (dpreview.com)

  • Science photography award goes to image of a single trapped atom

    Single Atom in an Ion Trap | Photo by David Nadlinger/University of Oxford/EPSRC/PA

    A photo of a single trapped atom has won the Engineering and Physical Sciences Research Council’s (EPSRC) science photography contest. The image, which is titled “Single Atom in an Ion Trap,” was taken by David Nadlinger of the University of Oxford. Showcased in the image is single positively-charged strontium atom trapped by electric fields produced by metal electrodes.

    You have to zoom in to really see it, but even that is incredible when you really wrap your mind around what you’re looking at. Here’s a closer crop:

    This closer crop better shows the glowing strontium atom, trapped by electric fields produced by electrodes in the vacuum chamber.

    According to the EPSRC, the image is a long exposure that was taken through an ultra-high vacuum chamber’s window. A blue-violet laser was used to illuminate the atom, which absorbed light particles and then re-emitted them. That process produces enough light that a regular camera can photograph the atom if a long exposure is used.

    Photographer and overall EPSRC contest winner David Nadlinger discussed the idea behind the image:

    The idea of being able to see a single atom with the naked eye had struck me as a wonderfully direct and visceral bridge between the minuscule quantum world and our macroscopic reality. A back-of-the-envelope calculation showed the numbers to be on my side, and when I set off to the lab with camera and tripods one quiet Sunday afternoon, I was rewarded with this particular picture of a small, pale blue dot.

    Articles: Digital Photography Review (dpreview.com)

  • Fujifilm Imaging Solutions posts excellent financial results

    Fujifilm Holdings has posted its financial results for the first three quarters of the 2017 fiscal year, and it’s all good news for the Imaging Solutions division. The segment recorded a revenue of 297.7 billion yen (approximately $ 2.77 billion USD), a bump of 15.6% year-on-year. Imaging Solution operating income totaled 50.0 billion yen (approximately $ 465 million USD), up 76.1% over the same period during the previous year.

    From the figures in its earnings presentation, it seems the bulk of the increase comes from the Photo Imaging business—read: Instax cameras—but strong sales in the Electronic Imaging business show the X-Series is starting to deliver. Quarterly revenue for Electronic Imaging is up 39%, thanks to strong sales of the X-E3, X-T20 and X100F models, and the mirrorless medium-format camera GFX 50S and corresponding lenses.

    Sales also increased in the Optical Devices business, largely due to strong sales of various industrial-use lenses, used for example in vehicle cameras or projectors. And, finally, Fujifilm’s presentation also mentions the launch of the new MK series of lenses, which are designed for cinema cameras and targeted at the growing area of video creation for online purposes.

    If you want to dive into more detail, you can find all the report documents, including a video of the presentation, on the Fujifilm Holdings website. But long story short: Fujifilm’s Imaging Solutions division seems to be doing very well.

    Articles: Digital Photography Review (dpreview.com)

  • Why Olympus Mirrorless Cameras are Top Notch for Travel Photography

    From entry-level to pro, the Olympus Mirrorless Four Thirds OM camera series has something for every aspirational travel photographer.

    Why Olympus Mirrorless Four Thirds Camera Systems are Top Notch for Travel Photography

    Camera – Olympus Mirrorless E-M1 with kit lens at 38mm, 1/250th, f/14, ISO 400.

    Are you looking to get serious about your digital photography and move up to an interchangeable lens system? Or maybe you are looking to upgrade to a pro level weatherproof transportable system?

    Are you off on a journey of a lifetime and looking to record every moment? You want to be sure there’s no danger the camera won’t be up to the task – so which will you take along?

    Why Olympus Mirrorless Four Thirds Camera Systems are Top Notch for Travel Photography

    Camera – Olympus mirrorless E-M10 Mark II, Lumix G 20mm lens, 1/125th, f/2.2, ISO 200.

    The Olympus OM Micro Four Thirds system could be heaven sent. In this article, we’ll look at the OM-D E-M10 entry-level camera and the top of the range OM-D E-M1 through almost 12 months of use.

    Why Olympus mirrorless systems are phenomenal travel cameras

    Why Olympus Mirrorless Four Thirds Camera Systems are Top Notch for Travel Photography

    Olympus EM1, kit lens at 14mm, 1/5th of a second, f/22, ISO 3200.

    This was taken handheld, showing just how good the image stabilization is on these cameras.

    The important considerations for travel cameras are size and weight, versatility, durability, performance, and picture quality. Ideally, you want a light-weight system that will easily move between landscape, street, and portrait photography.

    Let’s look at each of these considerations in turn.

    Size and weight

    Why Olympus Mirrorless Four Thirds Camera Systems are Top Notch for Travel Photography

    The flagship model Olympus EM-1 weighs in at just under 500g (1.1 pounds), the smaller and lighter EM-10 at an incredible 342g (0.75 pounds). Both are smaller in size than my hand.

    Incredibly, they both fit in a parka-style coat pocket when fitted with a 14-42mm kit lens. Look at the size of my Sony DSLR in this picture below to see just how much of a space saving there is comparatively.

    Why Olympus Mirrorless Four Thirds Camera Systems are Top Notch for Travel Photography

    There are obvious advantages to the smaller cameras in regards to luggage on a plane, and carrying gear around all day. But the small size is also non-threatening if your shots include passers-by. Plus you can take it places where professional style cameras are not allowed.

    The Micro Four Thirds System also means lenses are much more compact. For instance, the Olympus 75-300mm zoom lens measures 130mm and weighs in at 430g (just under a pound). The equivalent focal range for a full frame camera is 150-600mm. That kind of glass for a DSLR would weigh in at about 3kg (6.5 pounds)!

    Versatility

    Why Olympus Mirrorless Four Thirds Camera Systems are Top Notch for Travel Photography

    There is a good range of lenses available for the Micro Four Thirds mount including ranges by Lumix and Panasonic, as well as Olympus. The range will take you from a fish-eye pancake lens, through wide-angle primes to long zooms. The image stabilization system built into the camera means the lenses are both light and affordable.

    Extension rings with electronic connections to allow your lens and camera talk to each other are also available allowing you to make the best use of your available lenses. Two lenses and one converter will take you from wide-angle to macro to long zoom without missing a beat.

    Durability

    Both these cameras look and feel solid and durable. Having used them both for almost a year in sometimes inhospitable conditions and on long hikes, I have had no issues with these cameras or the lenses I use.

    If you look at the pictures the condition is still like new. They even get taken along on motorbike and camping trips in the winter!

    Why Olympus Mirrorless Four Thirds Camera Systems are Top Notch for Travel Photography

    Olympus E-M10, 40-150mm zoom at 150mm, 1/400th, f/7.1, ISO 200. Despite the dark and overcast day, the camera produced good detail straight out of the camera in this JPEG image.

    Performance and Picture Quality

    Firstly, I should mention I am using systems that were current when they were purchased at the beginning of 2017. They have both been upgraded since with some notable improvements. The EM-1 now has a Mark II version with a 20MP sensor rather than 16MP chip, and improved AF tracking. The EM-10 moves up from Mark II to Mark III with more minor improvements.

    Why Olympus Mirrorless Four Thirds Camera Systems are Top Notch for Travel Photography

    The camera has a fantastic viewfinder with 100% picture coverage as well as a touch-control rear screen, a feature that will feel familiar if you use a smartphone. A massive range of buttons allows you to set up the camera to suit your style with several where you can assign the functions. The menu system will feel familiar if you’re a DSLR user. It has a very useful one-click user “Myset” comprising four customizable options for configurations that you use frequently.

    My set screen - Why Olympus Mirrorless Four Thirds Camera Systems are Top Notch for Travel Photography

    The 5-axis stabilization is excellent, making handheld shooting easy and rewarding. The AF system has 81 points and is surprisingly good though tracking is not up to that of the weightier and roomier APS-C cameras. This is one of the trade-offs for having the compact size.

    As the cameras use electronic viewfinders or the rear LCD screen, batteries get used up quickly. Battery packs are available, but this adds to the size. So if you attach one the camera won’t fit in a pocket anymore.

    Why Olympus Mirrorless Four Thirds Camera Systems are Top Notch for Travel Photography

    Olympus E-M1, kit lens at 35mm, 16mm extension tube, 0.3-second exposure, f/7.1, ISO 400. I adjusted levels in post-processing to lighten the image and create a fine art feel.

    All the photographs in the article are taken with either one or the other of these two cameras, so you can judge for yourself the quality of the results. The newer versions of these cameras can only be even better.

    The cameras provide great results for landscape photography, handling a range of tones well, especially with the added use of the HDR function to bring out details at both ends of the scale.

    At lower ISO levels, up to 1600, there is little evidence of noise, although it increases in the dark areas as you approach that mark. Quality is acceptable up to ISO 6400, in my opinion.

    Why Olympus Mirrorless Four Thirds Camera Systems are Top Notch for Travel Photography

    Olympus E-M1, 82mm, 1/200th, f/9, ISO 1600. Look, I’m Pinnochio! Grab shot – love the skin tones and the AF got the near eye, spot on.

    Skin tones are good, producing great portraits and color handling is great. Low light shooting isn’t a problem for this camera, especially at the lowest ISO.

    Millstone beach - Why Olympus Mirrorless Four Thirds Camera Systems are Top Notch for Travel Photography

    Olympus E-M10, Lumix 20mm, 1/80th, f/1.8, ISO 200. Fabulous colors despite the overhead canopy and reduced light.

    CONCLUSION

    Both of these Olympus mirrorless cameras are fantastic pieces of kit for almost every situation. Picture quality is good, handling with the stabilization is awesome, AF and exposure are solid. With an entry-price of about $ 500 for the EM-10, the value is terrific.

    The pricier EM-1 is also a good value, especially when considering the price of additional lenses. A Mark I at less than $ 1100 represents astonishing value. However, I do aim to upgrade to the EM-1 Mark II when finances allow, knowing I already have a decent range of accessories for it.

    Why Olympus Mirrorless Four Thirds Camera Systems are Top Notch for Travel Photography

    Olympus E-M1, 75-300mm lens at 270mm, 1/40th, f/6.7, ISO 400. The quality of this shot is fantastic, just look at that tail!

    As a travel camera, I don’t think these two Olympus mirrorless cameras can be beaten at their respective price points. If you are new to system cameras, the EM-10 would be a fantastic introduction, with its straight-forward layout. A more seasoned photographer may prefer the customizable options and total control of the EM-1

    Why Olympus Mirrorless Four Thirds Camera Systems are Top Notch for Travel Photography

    Olympus E-M1, kit lens at 22mm, 1/60th, f/22, ISO 2000 using Aperture Priority. Straight out of the camera JPEG file. Great results even if you’re not a Photoshop fan.

    Either way, you won’t be disappointed with the results. You can take that once in a lifetime trip knowing you’ll bring back images of your travels to be extremely proud to show off to friends.

    The post Why Olympus Mirrorless Cameras are Top Notch for Travel Photography by Janice Gill appeared first on Digital Photography School.


    Digital Photography School

  • Panasonic Lumix ZS200 offers 1″ sensor and 24-360mm equiv. zoom in a pocketable form factor

    $ (document).ready(function() { SampleGalleryV2({“containerId”:”embeddedSampleGallery_7054722075″,”galleryId”:”7054722075″,”isEmbeddedWidget”:true,”selectedImageIndex”:0,”isMobile”:false}) });

    Panasonic has announced the ZS200/TZ200, a 20MP 1″-sensor compact that updates the existing ZS100 and its 25-250mm equiv. zoom with a 24-360mm equiv. F3.3-6.4 lens that’s both slightly wider and much longer (though a bit slower).

    Like its predecessor the ZS200 offers a 3″ touchscreen, accompanied by an upgraded 2.3 million-dot EVF with 0.53x magnification. Contrast detect autofocus is aided by Panasonic’s very good Depth from Defocus technology, and up to 10 fps burst shooting is available with AF-S (6 fps in AF-C). Rounding out a travel-friendly feature set are 4K video, Wi-Fi with Bluetooth, 5-axis image stabilization and a new L.Monochrome Photo Style for a black-and-white film look.

    The ZS200’s 3840 x 2160 4K recording is offered at 30p and 24p. Familiar 4K Photo features like Post Focus are available, in addition to a couple of new modes. Auto Marking analyzes a 4K video clip and automatically marks points at which it detects action. Sequence Composition allows you to composite multiple frames of a moving subject in front of a static background into a single image – think of the images you see of a snowboarder frozen mid-flight in the various stages of a jump.

    The Panasonic ZS200 boasts an improved battery life of 370 shots per charge (the ZS200 claimed 300) thanks to a new eco-friendly mode. It will ship in mid-March for $ 799 in your choice of gunmetal silver or black.

    Press release:

    LUMIX DMC-ZS200 Travel Zoom Camera

    Powerful 15x Optical Zoom with 1-in. 20.1-MP High Sensitivity MOS Sensor for 4K Video/ 4K PHOTO Capability

    Newark, NJ (February 13, 2018) –Panasonic is proud to introduce the LUMIX DMC-ZS200, the new flagship camera of the popular Travel Zoom series. The compact LUMIX ZS200 comes with a 24mm ultra-wide angle LEICA DC VARIO-ELMAR lens and enhanced 15x optical zoom (35mm camera equivalent: 24-360mm). The camera also includes 5-Axis HYBRID Optical Image Stabilizer Plus*1 to suppress hand-shake in both photo and video recording. For added creativity the LUMIX ZS200 integrates a new L.Monochrome mode in Photo Style for monochrome images with rich B/W film gradation.

    The camera’s 1-inch MOS sensor produces high-quality images with stunning details. The combination of a High Sensitivity MOS Sensor and Venus Engine delivers up to ISO 12,800 for high sensitivity quality beyond the reach of most other digital compacts. And an upgraded Live View Finder (LVF) integrates a new 0.21-in. 2,330K-dot equivalent LVF to provide a high magnification ratio of approx. 1.45x/0.53x (35mm camera equivalent). Both LVF and a 3-in. touchscreen display provide approx. 100% field of view. The LUMIX ZS200 boasts exceptional optical performance with stunning clarity with minimum distortion and flare. This new lens system also enables stunning close-up shots with its 3cm macro capability.

    With the LUMIX ZS200, 4K video recording is every bit as stunning with high-resolution QFHD 4K video in 3840×2160 at 30p or 24p in MP4. And 4K PHOTO lets LUMIX ZS200 users capture memorable moments by extracting single frames from 4K burst files shot at 30 fps to save as 8-megapixel equivalent images. Auto Marking and Sequence Composition, included in addition to Post Focus and Focus Stacking, make 4K PHOTO even easier to use.

    A Contrast AF System features DFD (Depth From Defocus) technology*2 and excels in both speed and accuracy for ultra-fast auto focusing in approx. 0.1 sec*3. The LUMIX ZS200 includes Bluetooth and Wi-Fi® connectivity for a more flexible shooting experience and instant image sharing. Compatibility with Bluetooth 4.2 (Bluetooth Low Energy) enables a consistent connection with a smartphone or tablet with minimum power consumption.

    The independent dials and Control Ring located on the lens barrel provide an intuitive way to capture creative vision. Smoother control of exposure and zoom allows users to concentrate on framing the perfect picture and press the shutter at the perfect moment. It also provides easier access to frequently-used settings such as aperture, shutter speed, focus, filter effect and scene mode. For even more precise control over focusing, the LUMIX ZS200 also boasts a Focus Peaking function that shows the peak of focus in manual focus mode to ensure users know exactly where the focus is.

    The LUMIX ZS200 will be available in stores on March 20, 2018. Suggested retail price is $ 799.99. Available in Black and Silver.

    Additional features

    Bluetooth 4.2 and Wi-Fi 2.4GHz (IEEE802.11b/g/n)
    The LUMIX ZS200 integrates Bluetooth and Wi-Fi® connectivity to offer a more flexible shooting experience and instant image sharing with easy operation. Once the camera is connected to a smartphone or tablet installed with the Panasonic Image App for iOS / Android, users can shoot, browse and share images remotely. They can also choose the quality of images to transfer using the Image App. Compatibility with Bluetooth 4.2 (called BLE: Bluetooth Low Energy) enables a constant connection with a smartphone/tablet with minimum power consumption. This activates the camera by simply using a smartphone/tablet or to automatically add GPS geotags on the photos.

    • Long battery life and AC/USB Power Charging
    Thanks to a newly adopted eco30fps mode, the LUMIX ZS200 provides long battery life for approx. 370 pictures (when using a rear monitor) per charge. The battery is recharged via AC or USB according to user convenience.
    • Exposure / WB / Focus / Aperture Bracket
    Focus Bracket and Aperture Bracket are new additions to the conventional Exposure Bracket and WB Bracket to let users choose their best shots later. In Focus Bracket, a maximum 999 images can be shot with different focus points. The Aperture Bracket enables multiple shots with different depths of field.
    • In-Camera RAW Data Development
    • The LUMIX ZS200 can shoot images in RAW and develop them in-camera.
    • LEICA is a registered trademark of Leica Microsystems IR GmbH. • LEICA DC VARIO-ELMAR lenses are manufactured using measurement instruments and quality assurance systems certified by Leica Camera AG according to the company’s quality standards.
    • “AVCHD Progressive”, “AVCHD”, the “AVCHD Progressive” Logo and the “AVCHD” Logo are trademarks of Panasonic Corporation and Sony Corporation.
    • Manufactured under license from Dolby Laboratories. Dolby and the double-D symbol are trademarks of Dolby Laboratories.
    • All other company and product names are trademarks of their respective corporations.
    • The LUMIX ZS200 is compatible with both SD/SDHC/SDXC Memory Cards. Use SDHC/SDXC Memory Cards on compatible devices only. SDHC/SDXC Memory Cards cannot be used with devices compatible only with SD Memory Cards. (Before using an SDHC/SDXC Memory Card in another device, read the operating instructions for that device.)
    • Some accessories are not available in some countries.
    • Design and specifications are subject to change without notice.

    *1 5-axis compensation works in video recording except for 4K video recording.
    *2 Works for still image recording.
    *3 Based on the CIPA standard.

    Panasonic Lumix DC-ZS200 specifications

    Price
    MSRP $ 799
    Body type
    Body type Large sensor compact
    Body material Metal
    Sensor
    Max resolution 5472 x 3648
    Image ratio w:h 1:1, 4:3, 3:2, 16:9
    Effective pixels 20 megapixels
    Sensor photo detectors 21 megapixels
    Sensor size 1″ (13.2 x 8.8 mm)
    Sensor type CMOS
    Processor Venus Engine
    Color space sRGB
    Color filter array Primary color filter
    Image
    ISO Auto, 125-12800 (expands to 80-25600)
    Boosted ISO (minimum) 80
    Boosted ISO (maximum) 25600
    White balance presets 5
    Custom white balance Yes (4 slots)
    Image stabilization Optical
    Image stabilization notes Hybrid 5-axis available in movie mode
    Uncompressed format RAW
    JPEG quality levels Fine, standard
    File format
    • JPEG (Exif v2.31)
    • Raw (Panasonic RW2 format)
    Optics & Focus
    Focal length (equiv.) 24–360 mm
    Optical zoom 15×
    Maximum aperture F3.3–6.4
    Autofocus
    • Contrast Detect (sensor)
    • Multi-area
    • Center
    • Selective single-point
    • Tracking
    • Single
    • Continuous
    • Touch
    • Face Detection
    • Live View
    Autofocus assist lamp Yes
    Digital zoom Yes (2X)
    Manual focus Yes
    Normal focus range 50 cm (19.69)
    Macro focus range 5 cm (1.97)
    Number of focus points 49
    Screen / viewfinder
    Articulated LCD Fixed
    Screen size 3
    Screen dots 1,240,000
    Touch screen Yes
    Screen type TFT LCD
    Live view Yes
    Viewfinder type Electronic
    Viewfinder coverage 100%
    Viewfinder magnification 0.53×
    Viewfinder resolution 2,330,000
    Photography features
    Minimum shutter speed 60 sec
    Maximum shutter speed 1/2000 sec
    Maximum shutter speed (electronic) 1/16000 sec
    Exposure modes
    • Program
    • Aperture Priority
    • Shutter Priority
    • Manual
    Scene modes
    • Clear Portrait
    • Silky Skin
    • Backlit Softness
    • Clear in Backlight
    • Relaxing Tone
    • Sweet Child's Face
    • Distinct Scenery
    • Bright Blue Sky
    • Romantic Sunset Glow
    • Vivid Sunset Glow
    • Glistening Water*
    • Clear Nightscape
    • Cool Night Sky
    • Warm Glowing Nightscape
    • Artistic Nightscape
    • Glittering Illuminations
    • Handheld Night Shot
    • Clear Night Portrait
    • Soft Image of a Flower
    • Appetizing Food
    • Cute Dessert
    • Freeze Animal Motion
    • Clear Sports Shot
    • Monochrome
    Built-in flash Yes
    Flash range 6.80 m (at Auto ISO)
    External flash No
    Flash modes Auto, Auto/Red-eye Reduction, Forced On, Forced On/Red-eye Reduction, Slow Sync., Slow Sync./Red-eye Reduction, Forced Off
    Continuous drive 10.0 fps
    Self-timer Yes (2 or 10 secs, 3 shots @ 10 sec)
    Metering modes
    • Multi
    • Center-weighted
    • Spot
    Exposure compensation ±5 (at 1/3 EV steps)
    AE Bracketing ±3 (3, 5, 7 frames at 1/3 EV, 1/2 EV, 1 EV steps)
    Videography features
    Format MPEG-4, AVCHD, H.264
    Modes
    • 3840 x 2160 @ 30p / 100 Mbps, MOV, H.264, AAC
    • 3840 x 2160 @ 24p / 100 Mbps, MOV, H.264, AAC
    • 1920 x 1080 @ 60p / 28 Mbps, MOV, H.264, AAC
    • 1920 x 1080 @ 60p / 28 Mbps, AVCHD, MTS, H.264, Dolby Digital
    • 1920 x 1080 @ 60i / 17 Mbps, AVCHD, MTS, H.264, Dolby Digital
    • 1920 x 1080 @ 30p / 20 Mbps, MOV, H.264, AAC
    • 1920 x 1080 @ 30p / 24 Mbps, AVCHD, MTS, H.264, Dolby Digital
    • 1920 x 1080 @ 24p / 24 Mbps, AVCHD, MTS, H.264, Dolby Digital
    • 1280 x 720 @ 30p / 10 Mbps, MOV, H.264, AAC
    Microphone Stereo
    Speaker Mono
    Storage
    Storage types SD/SDHC/SDXC card (UHS-I compatible)
    Connectivity
    USB USB 2.0 (480 Mbit/sec)
    USB charging Yes
    HDMI Yes (microHDMI)
    Microphone port No
    Headphone port No
    Wireless Built-In
    Wireless notes 802.11b/g/n + Bluetooth 4.2 LE
    Remote control Yes (via smartphone)
    Physical
    Environmentally sealed No
    Battery Battery Pack
    Battery description Lithium-ion battery & charger
    Battery Life (CIPA) 370
    Weight (inc. batteries) 340 g (0.75 lb / 11.99 oz)
    Dimensions 111 x 66 x 45 mm (4.37 x 2.6 x 1.77)
    Other features
    Orientation sensor Yes
    Timelapse recording Yes
    GPS None

    Articles: Digital Photography Review (dpreview.com)