Blog

  • Is the Olympus OM-D E-M1X right for you?

    Is the Olympus E-M1X right for you?

    Our comprehensive Olympus E-M1X review is live if you’d like to dive deep into the camera’s image quality, handling and autofocus performance. But for a more straightforward take on the E-M1X, here’s how well-suited it is for a few popular photographic use cases:

    • Sports and wildlife photography
    • Landscape photography
    • Wedding and event photography
    • Portrait photography
    • Video work

    All photos by Dan Bracaglia unless noted otherwise

    Sports and wildlife

    Fast burst shooting, reliable autofocus and controls that don’t require you to take your eye from the finder – these are just some of the things you’ll want from a camera if capturing peak action is your aim. The E-M1X is advertised as a professional-grade sports and wildlife camera and it mostly lives up to this billing. Plus it’s got an enormous family of telephoto lenses to complement its aspirations.

    Many sports and wildlife photographers rely on continuous autofocus and the E-M1X can shoot up to 10 fps (mechanical shutter) and 18 fps (electronic shutter) in AF-C. Continuous autofocus performance is good, but other sports cameras like the Nikon D5 and Canon 1DX II offer slightly more reliable results. Still, subject tracking is impressively sticky and the camera’s buffer depth is also solid. If you’re okay with focus being locked after the first frame it can do 15 fps (mechanical shutter) and 60 fps (e-shutter) – just be aware that using the e-shutter can result in banding under certain lighting and rolling shutter (though this is fairly well-controlled).

    The finder offers a fast refresh rate and minimal resolution loss while the shutter’s pressed, making it easy to follow fast-moving subjects

    The camera’s ergonomics are excellent, full stop. I’s one of a handful of bodies on the market with built-in vertical controls. Whether shooting vertically or horizontally, dialing in settings can be done without removing your eye from the finder. Speaking of the finder, it’s not the highest-resolution nor does it offer the highest contrast on the market, but it does offer a fast refresh rate and only minimal resolution loss while the shutter’s pressed, making it easy to follow fast-moving subjects. The camera’s also got a tank-like build and IPX1-rated weather-sealing. The only thing truly missing from this pro-level body is a top plate info display.

    Image quality is excellent for its sensor size – with lovely out-of-camera JPEGs – but it can’t match the resolution of higher-resolution cameras, limiting your ability to crop in post. Similarly, shadow noise at higher ISOs is more prevalent than on larger-sensor bodies – this also limits your ability to push the exposure in post.

    Landscape photography

    High resolution is normally the name of the game when it comes to landscape photography, and we’re not going to pretend the E-M1X’s Four Thirds chips can match the resolution or image quality of larger sensors… on its own. But this camera has some tricks up its sleeve, including a 50MP hand-held high-resolution mode and an 80MP tripod-based high-resolution mode. The latter combines 8 images and even has the benefit of improved noise performance over a standalone file. However you’ll want to avoid scenes with a lot of movement when using either high-res mode.

    The E-M1X also has some other nifty tricks landscape photographers will appreciate: there’s a ‘live ND’ filter for long exposure simulations and various in-camera time-lapse options. Sadly, the two can’t be combined.

    In terms of ergonomics, the E-M1X is a bit of a beast to carry around for long periods of time. On the other hand, it’s got excellent weather-sealing and a tough build, so it’s doubtful the camera will let you down in nasty conditions. Plus a fully-articulating screen is great for high and low shots, and battery life is solid thanks to twin batteries.

    Photo by Scott Everett

    Wedding and event photography

    For those already invested in Micro Four Thirds, the E-M1X could be a great addition to your wedding or event shooting kit. Vertical controls are extremely handy for shooting portraits. And the camera’s Face Detect and Eye Detect both work with good reliability if your subject fills most of the frame. Wedding ceremonies are moments when the E-M1X’s truly-silent e-shutter could be invaluable. And we doubt you’ll be able to chew through both the camera’s batteries, even with a full day of shooting.

    The E-M1X is compatible with Olympus’ flash system, however as of writing, there are no Olympus flash units that can fire an AF assist beam without triggering the strobe – something wedding and event photographers often rely on for precise autofocus in very dark scenarios. Still, the camera’s high-resolution modes can be handy for detail shots of say, a dress or the bridal bouquet.

    Photo by Carey Rose

    Portrait photography

    As with landscape photography, resolution is also an important factor for portrait photographers. So right off the bat, the E-M1X is at a disadvantage here over its larger-sensor competition. And don’t count on the high-res modes to save the day – these are intended for static subjects, not people. Still, vertical controls are handy for shooting in the traditional portraiture orientation and the E-M1X’s Face and Eye detect both work well.

    We’re also fans of Olympus’ JPEG rendition of skin tones. Plus, if you’re shooting portraits using controlled lighting, shadow noise shouldn’t be an issue. There’s also a wide range of excellent portrait-appropriate glass available for this system.

    Photo by Scott Everett

    Video

    The E-M1X is a sports and action-oriented camera, so why use it for video? Here are a few compelling reasons: It can shoot good-looking Cinema 4K (24p only) as well as 1080/120p slow motion footage. It offers a fully-articulating touchscreen with sticky video AF. And the camera’s Sensor+Digital image stabilization offers the smoothest in-camera, hand-held shooting we’ve experienced (it does come with a slight crop, though).

    Other call-outs include headphone and microphone ports, Flat profiles and Log capture. Sadly the latter is limited to 8-bit compared to 10-bit offered by some of its peers. This means you won’t get the same video dynamic range as say, a Panasonic Lumix GH5. Still, for more-casual filmmaking, without the need for a tripod or stabilization rig, the E-M1X can be a solid option.

    The wrap

    The Olympus OM-D E-M1X is a sports and action camera that also happens to function quite well for a number of other photographic situation. However for most of these scenarios, unless you’re already invested in the system, there are other cameras that will likely serve you better for less money.

    But back to sports and action. For way less money, the E-M1X shoots faster than even the most expensive sports cameras, like the Nikon D5 or Canon 1DX II, while offering similar ergonomics and build quality. It doesn’t quite offer the same level of autofocus reliability as these cameras, nor can it match the resolution/noise performance of their larger sensors. Still, it’s an outstanding choice for Micro Four Thirds shooters who want a no-compromise camera to point at fast-moving subjects. And if you end up also photographing portraits, landscapes, events or video, well, the camera will be able to handle that too.

    Articles: Digital Photography Review (dpreview.com)

  • Nikon confirms some counterfeit EN-EL15b batteries were sold by authorized retailers

    Last week, B&H Photo began emailing customers who had purchased Nikon EN-EL15b rechargeable Li-ion camera batteries, advising these buyers that they may have received units from a ‘subpar batch.’ The company didn’t elaborate on what subpar meant in this instance, but did state that it would replace all Nikon EN-EL15b batteries it had shipped because it couldn’t determine which customers had received the bad units.

    Following a leak that claimed as much, Nikon has confirmed counterfeit EN-EL15b batteries have been sold by authorized retailers to some of its camera owners. In a statement to DPReview, a Nikon spokesperson said:

    We have been made aware that some customers who purchased individual EN-EL15b batteries from authorized Nikon retailers received defective product. These batteries are not genuine and were not manufactured or distributed by Nikon USA. Concerned users can find a guide for determining if the battery they have purchased is a genuine Nikon battery at this link.

    Counterfeit batteries may be poorly constructed and cause damage to the camera hardware; lithium-ion batteries are known to be volatile and counterfeit units are particularly prone to overheating, which may result in fire or explosion. In addition to the fake EN-EL15b batteries, Nikon says it has been alerted to other counterfeit batteries intended for its hardware, including fake versions of its EN-EL11, EN-EL10, EN-EL9a, and others.

    Nikon customers who have purchased camera batteries from third-party sources can evaluate their products for signs of being counterfeit using Nikon’s guide. Indications may include font differences in the logo and text on the battery and the possible inclusion of the battery model number on the front of the batteries.

    B&H Photo encourages its customers to recycle the EN-EL15b batteries they received from the retailer. These customers will receive free authentic replacement batteries from B&H, which will send both order processed and shipment emails to the customers.

    Articles: Digital Photography Review (dpreview.com)

  • Kipon shares new details of upcoming 12mm F2.8 lens for Fujifilm X-mount cameras

    Kipon has shared new details about an upcoming 12mm F2.8 manual wide angle lens for APS-C camera systems.

    The Ibegon 12mm F2.8 lens is being sold under the Kipon name, but its optical formula was designed by the German IB/E Optics. Its optical construction consists of 12 elements in nine groups and it features a seven-blade aperture diaphragm. It has a minimum focusing distance of 15cm (approximately 6in) and an aperture range between F2.8 and F22.

    Blurry MTF charts provided by Kipon.

    Currently, the product page only mentions availability for Fujifilm X mount camera systems, but Kipon previously teased at CP+ 2014 that it would be available for MFT, Sony E and EOS M mounts as well. Kipon hasn’t shared specific pricing information, but says it plans to ship the lens starting September 2019.

    Kipon hasn’t shared specific pricing information, but says it plans to ship the lens starting September 2019.

    Articles: Digital Photography Review (dpreview.com)

  • This wooden Leica is a covert music box with rotating ‘lens’

    Unlike some of the camera replica projects that have surfaced over the years, this wooden Leica music box is available to purchase now. The music box, which is available from multiple sellers through online retailers Amazon and eBay, features a combination of wood components and wood burning to imitate the Leica M camera system.

    $ (document).ready(function() { SampleGalleryV2({“containerId”:”embeddedSampleGallery_5276490978″,”galleryId”:”5276490978″,”isEmbeddedWidget”:true,”selectedImageIndex”:0,”isMobile”:false}) });

    Different versions of the music box are available, including options that play Für Elise, The Blue Danube, and more modern tunes like the Harry Potter theme song. Users wind the music box by rotating the front lens, which then slowly unwinds as the music plays. Prices vary based on seller, but generally sit around $ 12.

    Articles: Digital Photography Review (dpreview.com)

  • K&F Concept TC2335 Carbon Fiber Tripod Review

    The post K&F Concept TC2335 Carbon Fiber Tripod Review appeared first on Digital Photography School. It was authored by Adam Welch.

    I’ve worked with a quite a few products from the folks over at K&F Concept in the last couple of years. Quality has ranged from great to average to the not so spectacular. When I was asked to have a look at their TC-2335 carbon fiber travel tripod, my expectations were at most cautiously optimistic. That being said, I’m happy to report that this little carbon fiber tripod from K&F Concept offers a lot in terms of performance. So, lets talk about K&F Concept TC-2335 carbon fiber tripod; what I liked, what I didn’t like and what you need to know if you happen to be in the market for a lightweight travel tripod.

    First appearances

    When the box first arrived my immediate reaction was “this is tiny…really tiny.” Not only that, but the entire package was alarmingly lightweight. After opening up the box I realized the logical reason for this: the TC-2335 is really tiny and incredibly lightweight. In fact, it is the most feather-like, compact tripod I have ever evaluated. The tripod itself is housed in its own padded carrying bag.

    After removing the TC-2335 from its carrier, I was met with a surprisingly attractive carbon fiber tripod.

    In terms of aesthetics, the TC-2335 proves to be one of the better-looking tripods I’ve entertained from K&F Concept. The carbon fiber is well done and is a default matte gray. This particular model comes with a matching orange color scheme, which looks great, But it is also available in an unlikely “thunder” version which features blue lighting graphics on the leg’s of the tripod…yes, really.

    All leg locks are the twist type and are rubberized. I was honestly surprised with just how cleanly the leg locks are executed and would compare them to some higher-end tripod models I have handled.

    Overall, the appearance of this tripod looks fantastic. But how would it perform in the field? Let’s find out.

    In operation

    Before we get rolling with how the TC-2335 performs, let’s have a look at a few specifications that you will want to know.

    Practical technical specifications

    • Folded Height: 13.6 inches (34.54cm)
    • Maximum Height: 53.1 inches (134.9cm)
    • Minimum Height: 12.9 inches (32.8cm)
    • Weight: 1.85lbs (839g)
    • Maximum Weight Supported: 26.5lbs (12kg)

    Stability

    For such an admittedly small form factor, the TC-2335 is very stable. The terminating leg sections are quite small in diameter and this would lead one to assume that the legs are flimsy. But this is not the case. When locked down, this little tripod is reasonably stable even in high wind and awkward positions.

    Speaking of the legs, I’ve mentioned already how impressed I was with the leg lock mechanisms, but there’s more. I was concerned, given the slender legs, that the overall stability would be compromised. However, the leg locks do an excellent job of arresting almost all leg movement.

    The leg angle locks are something that I dislike about this tripod. They are not spring loaded; meaning that after you pull out on the locks, you must manually press them back into place to lock the legs. Again, I’m sure this is a weight saving measure, but the added convenience would have been worth the small amount of bulk, in my opinion.

    The ball head

    I used this tripod with three separate camera’s, ranging from lightweight crop-sensor mirrorless to full-frame DSLR. The ball head had no problems supporting the weight placed on it throughout my tests. K&F states that the tripod is capable of supporting virtually fourteen times its weight. While that may be extreme, I do not doubt that the ball head mechanism could support a camera system upwards of five to six pounds should the circumstances present themselves.

    The ball head itself sports only a single adjustment knob which controls both panning and the ball head articulation. I’m sure this is a weight saving measure but can lead to complications when adjusting your camera at times. While panning is silky smooth, the ball head seems to be somewhat rough and quite audible when moved. A small amount of lubrication may help in this area. I feel I should also note that the ball head features not only a bubble level – which is quite useful – but also a magnetic compass.

    Again, yes…really.

    What’s great

    In terms of packability, the TC-2335 from K&F Concept is superb. It’s extremely lightweight and doesn’t take up much room anywhere. It would be ideal for those who do a lot of flying or for anytime space comes at a premium. It looks great and is more than capable of supporting most camera systems that you’ll likely want to be carrying around. The twist locks on the legs also secure with extreme solidity. Overall, for a tripod of this size, the entire platform is oddly stable.

    What’s not so great

    I can’t get past the angle locks for the legs not being spring loaded, and this is the major gripe I have with this tripod. Granted, this is the first tripod I recall using which doesn’t have this feature. At the same time, I’m sure this would be something that could be a personal preference. Also, the quite serviceable ball head is not exactly smooth in operation, and I would have liked to have seen a secondary knob for panning.

    Final verdict

    For a tripod which is intended to be a travel companion for the highly mobile photographer, the K&F Concept TC-2335 is a wonderful low-cost option if you are in the market for a compact carbon fiber tripod. It’s good looks and solid stance will be completely adequate for most shooters who understand it’s uses and limitations.

    Don’t look for a workhorse tripod here. Rather, I would suggest you view the TC-2335 as a wholly capable shooting platform that will come in handy when weight, size, and portability take precedence over the subtle functionalities found in larger, more dedicated camera support systems.


    The post K&F Concept TC2335 Carbon Fiber Tripod Review appeared first on Digital Photography School. It was authored by Adam Welch.


    Digital Photography School

  • Fujifilm teases new Instax camera with LCD screen ahead of June 12 launch event

    Fujifilm has announced the upcoming launch of a new Instax camera model. Full details about the new instant camera won’t be released until June 12, but the company did tease one key feature in the below tweet on May 27: the inclusion of a small LCD. The new Instax model will be ‘perfect for the new age,’ Fujifilm’s tweet states.

    The ‘new era’ of Instax cameras will include multiple ‘very special features,’ Fujifilm teased in its tweet, one of which is the LCD. The new model will include the same instant color printing capability found on other Instax models, but it’s unclear what new features Fujifilm plans to include.

    The current Instax product line features more than a dozen models, including the relatively new Square SQ20 instant ‘hybrid’ digital camera, which features an LCD for previewing images before printing.

    Articles: Digital Photography Review (dpreview.com)

  • Image Resolution Explained – Seeing the Big Picture

    The post Image Resolution Explained – Seeing the Big Picture appeared first on Digital Photography School. It was authored by Herb Paynter.

    The very first thing you must understand about photography is that it is totally based on illusion; you choose to believe what you perceive. This concept didn’t originate with photography’s pixels and dots; it is the very basis for human sight. Your brain chooses to believe something to be true well beyond what your eyes can verify or recognize to be true. The very word “resolution” gives light to this concept. The resolving power of a lens is its ability to distinguish small elements of detail. This same issue is true concerning the human eye and its perception of images on a computer screen and the printed page. Each of these “interpretations” relies on a mechanism to carry out an illusion. The eye’s mechanism is rods and cones, cameras use photo receptors, computer screens use pixels, and printing machines use spots and halftone dots. The degree to which each device succeeds in their illusionary quest is dependent upon the resolution of the mechanism and the resolving power of the device.

    Each system requires two elements – a transmitter and a receiver. Just as a magic trick requires both a salesman (the magician) and a customer (the viewer), each “visual” process requires a good presenter and a willing observer. The common phrases, “seeing is believing,” and “perception is reality,” pretty much define the benchmark of success. Now let’s get image resolution explained and show you where it’s is most effectively used.

    Image resolution

    There comes a finite distance when viewing any image where your eye can no longer distinguish individual colors. Beyond that point, your brain must sell the idea that detail indeed exists beyond that point of distinction. The detail you see when viewing an object at close range continues to be perceived long after that object is too far away to verify that detail. There are limitations to the normal resolving power of the human eye with “normal” defined as 20-20 vision.

    In the image reproduction process, delivering an image with excess resolution becomes useless when the result of that extra resolution has no purpose. Thus, the gauge of all visual resolution must ultimately be framed by resolving capabilities of the human eye. Producing more image resolution than the eye can perceive doesn’t increase the detail or improve the definition, it just creates bigger files.

    While you feel more confident when you pass massive amounts of pixels on to your printer, your printer doesn’t appreciate the excess. It throws all those extra pixels away. More ain’t better; it’s just more.

    Dots, Pixels, Lines, and Spots

    Beware of the numbers game that is played by manufacturers in the imaging industry. There is ample misinformation and misused terminology floating around that causes significant confusion about imaging resolution. Allow me to clarify some very foggy air beginning with terminology.

    DPI (Dots per inch)

    The term DPI is probably the most misconstrued acronym in the digital imaging world as it is loosely cast about in digital imaging and applied to just about every device. DPI, or dots per inch, is a reference to printing device’s resolution and describes the dots and spots that each technology uses in various combinations to simulate “tones.” Dots are neither pixels nor halftone dots. We’d all be a bit better off not using this term as it has little practical application.

    PPI (pixels per inch)

    The basic structure of every digital image is the pixel. Pixels are the square blocks of tones and colors that you see when images are enlarged on computer screens (see the Eye illustration below). The measure of those pixels (typically in a linear inch) determines an image’s resolution and should always be addressed as PPI, or pixels per inch. This setting is affected by the Image Size dialog box in editing software. The higher the number of pixels in an inch, the higher the image resolution. Scanners, digital cameras, and paint programs all use the PPI terminology.

    Of all the resolution terms in the industry, this is one that deserves top billing. While the rest of the terms need to be recognized, rarely will they have to enter the conversation.

    When viewed in imaging software, these squares are referred to as pixels and should be defined in values of pixels per inch (PPI). This particular dialog defines the size of the “Eye” picture in this article. Internet images are defined by pixel count and concern the linear measurement of horizontal pixels in the image.

    LPI (lines per inch)

    LPI refers to the halftone dot structure used by laser printers and the offset printing process to simulate the continuous tones of photographic images. LPI refers to the number of “lines” of halftone dots used by various printing processes. “Lines” is a throwback reference to the days when actual lines were etched in glass plates to interpret photographic tones in early printing processes.

    This LPI number is specific to the printing industry. Lower numbers refer to larger, more visible halftone dots (newspapers) while higher numbers refer to much smaller and less visible dots (magazines and artwork). I’ll get into the numbers later.

    Spots and SPI (spots per inch)

    A spot is a rarely used term that refers to both inkjet and imagesetter processes. With inkjet, it is the measure of micro-droplets of ink sprayed during the inkjet printing process. SPI, or spots per inch is a User-Selectable issue concerning the resolution choices when using some inkjet printers. Higher SPI also affects the quality of the printing process by slowing the speed at which the paper is fed through the printer. The spot “marking” size of both plate and imagesetters determines the quality of the shape of halftone dots produced and only applies to high-end lithographers and service bureaus.

    Device real-world requirements for optimal resolution

    Now we’ll look at each device’s real-world requirements for optimal resolution. How much is too little and how much is too much? The answers require a bit of explanation because there are some variables involved in the projects and the printing devices. First I’ll clarify some misconceptions about digital camera files, then I’ll address three specific printing technologies and give you some concrete examples.

    Digital Cameras

    The most common reference to camera resolution relates to the camera’s image sensor. These sensors contain a grid of cells called photosites, each cell measuring the light value (in lumens) striking it during an exposure. The actual number of cells contained in an image sensor varies depending on the camera model. When the number of horizontal cells gets multiplied by the number of vertical cells on the sensor, the “size” of the sensor is defined. The Nikon D500 sensor measures 4,288 x 2,848, or 12,212,224 pixels, making it a 12.3 mega (million) pixel camera.

    The individual cells in the image sensor are covered by either a red, green, or blue filter called a Bayer array. Each cell records the filtered light, converting the combined values into individual pixel colors.

    These pixels can produce any number of different size pictures for various purposes. Each printing process requires a different number of pixels per inch (PPI) to deliver optimal quality prints at a given size. This is because the technology used for each type of printing is different. For example, high-quality inkjet printers spray liquid inks onto paper using very small nozzles (usually 1440 spots per inch).

    Laser printers

    Most laser printers are either 600 or 1200 dpi devices meaning that a solid line printed horizontally will be composed of either 600 or 1200 dots. Type is printed using all these dots while halftone images can be effectively reproduced from 220-300 pixel-per-inch (PPI) images.

    Inside these laser printers is a raster image processor (RIP) that generates halftone dots from square pixels. The value of each image pixel gets transposed into a halftone cell. The formula for exchanging this grid of square pixels into a diagonal pattern of variable-size dots goes way beyond explanation in this article, but it’s kind of like magic.

    Laser printers simulate gray tones using the halftoning process provided by the printer’s RIP.

    Inkjet printers

    Inkjet printers use totally different technology to translate color pixels into printed images. Tiny spray nozzles distribute ink to specific parts of the image to deliver their version of the imaging illusion. The resolution (PPI) required to deliver accurate inkjet images differs from laser printers. This is because they do not use the geometric mechanism of halftone cells but instead, spray microscopic amounts of each ink to precise locations as determined by the pixel values.

    Inkjet printers require significantly fewer pixels per inch (PPI) than laser printers to carry the illusion. Typically 150-200 PPI is quite sufficient.

    Lithographic printing

    Offset printing includes newspapers, magazines, and brochures. Each requires a slightly different lines-per-inch (LPI) pattern of dots. Newspapers are typically 85 LPI, magazines are 150 LPI, and high-end brochures and other collateral material require up to 200 LPI resolution.

    Each line screen value is produced by a different PPI formula. While all these types of printing can be produced from 300 PPI files, all that resolution is certainly not required and is technically overkill. Even those high-end brochures technically don’t require this much resolution, but the early-adopted myth of 2xLPI persists yet today. The actual requirement for all high-end printing is only 1.4xLPI. Any more resolution simply gets discarded by the platesetter’s RIP.

    In this calculation, newspapers (85LPI) need only 120 PPI, magazines require only 212 PPI, and even the best quality print is ideally produced with just 283 PPI.

    In case you’re thinking that this is splitting hairs and irrelevant, consider this… using the 1.4 rule totally meets the mathematical requirement and saves a whopping 50% of the file size in storage real estate and transfer time.

    I fully expect to hear some pushback about these numbers, but science and math don’t lie. Phobias about resolution are long entrenched, respected, and expected. However, in the end, it really doesn’t matter that much.

    No-nos

    There are two unforgivable sins in preparing your images for proper resolution. Low-res and up-res.

    Low-res

    The biggest sin of all is sending files to the printer/publisher with too little resolution.

    That is a certain formula for poor results and shows up in the form of soft detail and bitmapped edges caused by normal sharpening.

    Every form of print technology requires a minimum of pixels to produce fully-detailed and sharp images. So do not shortchange your project in this respect.

    Remember, size your images for the final appearance and assign the PPI at that final size. If you want to see an 8”x10” image appear in print, make sure you address the issue of PPI in the Image Size dialog and before you save the file.

    Monitor the Image Size dialog carefully when you make changes. Resample an image while watching the Image Size figure at the top of the dialog. Try to never let it increase. You can get away with a small increase but do so only when necessary.

    Up-res

    Make it a rule never to increase your image size as it is a sure-fire recipe for disaster. You can’t create detail; you can only destroy it. Whatever size file (pixel count) you begin with is the largest pixel count you should print unless you’re okay with soft images.

    Pixels are not rubber, and you cannot stretch them to a larger size without sacrificing the sharpness of the image. Your digital camera most likely provides you with ample original pixels to print most projects, try to stay within that original ratio.

    You can increase the image size, but you can’t increase its detail. Every time you enlarge an image, you distort the pixels. So if you want to print sharp images, don’t enlarge them!

    The major advantage to maintaining higher resolution files for an archive is that if an image ever needs to be cropped or enlarged, that extra resolution will undoubtedly come in handy.

    It remains standard operating procedure in the printing industry to send all files to the printer with 300 PPI resolution. Cloud services, backup systems, and storage media sales folks certainly want you to continue the 300 PPI trend and rent more parking space on their sites.

    Final thought

    Make it your goal to make the best of this visual illusion called photography. Your camera, your computer, and your printer provide all the tools you need to perform your magic with great success. Enjoy.


    The post Image Resolution Explained – Seeing the Big Picture appeared first on Digital Photography School. It was authored by Herb Paynter.


    Digital Photography School

  • Nvidia Studio will boost the performance of your creative apps

    Nvidia has launched a new software and hardware initiative at the Computex Taipei trade show. Nvidia Studio is targeted at video editors, photographers and other content creators and consists of a collection of APIs, SDKs and drivers for Nvidia RTX GPUs that have all been designed to increase performance in use with creative software from providers like Adobe, Epic, Autodesk, Unity and Blackmagic Design.

    App developers can make use of an AI-powered software that provides automation of some tasks, including image upscaling or video color matching.

    Acer, Asus, Dell, Gigabyte, HP, MSI and Razer will all be announcing 17 RTX Studio-branded laptops between each other at the trade show this week. Graphics options in the new models include Nividia’s RTX 2080, 2070, and 2060 GPUs as well as the Quadro 5000, 4000, and 3000 workstation models.

    Nvidia says that in testing with apps like Maya and RedCine-X Pro, an RTX Studio laptop with Intel Core i7 CPU and RTX 2080 Max-Q GPU was seven times faster than a top-end MacBook Pro with a Core i9 and AMD Radeon Pro Vega 20 GPU.

    The first RTX Studio laptops will be available in June, with pricing starting at $ 1,599.

    Articles: Digital Photography Review (dpreview.com)

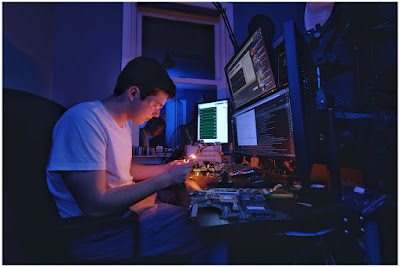
  • SLC-1L-08: Senior Photo

    This week, Ben, my youngest, graduates from high school. Which for any photographer dad also means senior photos. We obliged mom with a standard version, shot in the back yard with a soft box and underexposed foliage as a backdrop.

    But we also wanted to do something a little cooler, of the real Ben: at his desk, late at night, appropriately doing some kind of science/engineering.

    So this is what we came up with. Lit simply, the fill light was an on-camera flash. The key light was, well, a pencil.Read more »
    Strobist

  • How to Mix Lifestyle and Posed Photography Styles to Add Variety

    The post How to Mix Lifestyle and Posed Photography Styles to Add Variety appeared first on Digital Photography School. It was authored by Jackie Lamas.

    As photographers, we take time to hone in our craft and practice many hours getting it right. When it comes to photographing people, there are two main approaches in directing clients to get the photos you want. I’ll explain the difference between both, and how to apply the two during the same session to get the most variety in the final gallery that your clients will absolutely love!

    Mixing posed and lifestyle can add variety to your photos.

    What is lifestyle photography?

    Lifestyle photography is when you capture your clients a little more naturally than you would if you were posing them. It’s all about letting the session unfold naturally all while you photograph your couple, family, or individual being themselves.

    Lifestyle can mean going for a walk through a botanical garden with your clients.

    It’s also about showcasing the person in their daily life or routines too. For example, joining a family as they casually hang out at their home and bake together. Or joining a couple for coffee and a stroll through the park.

    Going for coffee while you photograph your clients can also be considered lifestyle.

    Lifestyle photography can be both natural or styled. Styled simply means curating the look so that even though the person is hanging out drinking coffee on their sofa, they are dressed and using items that make the photos have a cohesiveness.

    Using a styled home can also offer a great location for lifestyle photos of a couple hanging out in the living room.

    Much of what you see on Instagram can be considered lifestyle photography.

    What is posed photography?

    Posed photography is when you are directing your clients to sit, stand, and well, pose exactly how you would like them to. This gives you a more controlled and directive role in addition to being the photographer.

    Directing people to pose a certain way is posed photography.

    Posed photography can be really beautiful and usually lies in the editorial, fashion, or fine art styles of photography. However, posed photography can be used in every session where you want to control the final pose in your photo.

    How to mix both styles to get variety

    In a portrait session, it doesn’t matter if it’s family or just one person, mixing the two styles can really help add variety in the final images that you deliver to your client.

    Mixing styles

    When you’re starting the session, begin with posed photography because most clients are nervous at the beginning of a session. Getting them comfortable posing, and being more direct in how you want them to stand can help them to feel more comfortable in front of the camera.

    The photo on the left was lifestyle, and the right is posed. Same family, same session, two different styles that add variety to the final images.

    While you’re posing, show your client exactly how you want them to pose rather than merely instructing, which can get confusing.

    For example, instead of saying “put your left hand on your right elbow,” you would instead go over to where they are standing and show them how you want them to put the left hand on their right elbow.

    This is a quicker way to help your client visually see what you want them to do.

    After you’ve posed your client enough, and they seem a little more comfortable in front of the camera, go for the lifestyle approach.

    Tell your client to relax and walk around the area. If it’s a family, for example, ask them to walk and talk to each other while telling a funny joke. Make sure to keep your camera at the ready during these times. That way you can achieve photojournalistic style photos that make lifestyle so meaningful.

    With children, you can capture them playing with their toys and also get posed photos during the same session.

    As you go through the session, keep alternating between posed and lifestyle. You can also pose your clients, a couple, for example, so that they’re facing each other, take a few photos and then ask the couple to say one nice thing about the other.

    This is a great way to transition from posed to lifestyle. You will get authentic expressions from the couple because you are putting them in a particular pose then giving them something to do that will seem natural. It’s a perfect mix of the two styles at the same time.

    If you’re more comfortable with lifestyle and candid photography styles, don’t be afraid to stop your clients in mid-walk, hug, or whatever they are doing naturally to hold the pose. This is a transition from lifestyle to posed.

    Mixing the two styles offers your clients more variety as well as an overall great experience. They will feel more comfortable being in front of the camera because they were allowed to be themselves while you also stopped to make sure to get posed photos as well.

    Using both styles will give the session a more fluid flow and also allows your clients to have a good time during the session. This is especially important when photographing children. Letting them play and have a good time while mixing in posed photos will give them a fun experience.

    In conclusion

    lifestyle-and-posed-photography

    Mixing the two styles, lifestyle and posed photography, will add variety to your client’s photos and will also ensure that they have a great experience without feeling stiff or uncomfortable in front of the camera.


    The post How to Mix Lifestyle and Posed Photography Styles to Add Variety appeared first on Digital Photography School. It was authored by Jackie Lamas.


    Digital Photography School