Blog

  • How to Use Vibrant Colors in Photography with Great Success

    The post How to Use Vibrant Colors in Photography with Great Success appeared first on Digital Photography School. It was authored by Nisha Ramroop.

    How to Use Vibrant Colors in Photography with Great Success

    Your camera is capable of capturing intense, true color that is almost everywhere you look. So how hard could it be? Answer: It is actually quite easy to capture color. However, you need to practice a little more awareness when it comes to creating images with that extra “oomph.” Here are a few tips to help you capture vibrant colors in photography.

    1. Keep it simple/details

    As with other types of photography, simplicity is an art on its own. While details are can be essential too, sometimes scaling back on the amount of details is required. Thus, when working with vibrant colors in photography, your story may have more impact when you include only the key elements as opposed to having too much going on.

    How to Use Vibrant Colors in Photography with Great Success

    You can achieve simplicity in different ways. The first is by minimizing the number of colors in the frame. Yes, there are instances when many colors work well together in an image, but at other times it gets confusing. You need to direct your viewer’s eyes. Another way to keep it simple is to avoid too many details in your composition. It has the same effect as too many colors. When working with vibrant colors, simple works better.

    2. Experiment with color combinations

    Starting small is usually better with bolder colors. You can focus on one main color and build from there. When you start adding other colors in, determine if they work well together. Fortunately, you do not have to reinvent the color wheel and have tried-and-true color harmonies to use to your advantage.

    How to Use Vibrant Colors in Photography with Great Success

    Color harmony is a combination that is visually appealing to the eyes. Some of the options include complementary colors (those directly opposite each other on the wheel) and analogous color (those next to each other).

    Both of these harmonies exist in the natural world. A sunset of oranges and blues is an example of complementary colors. Whereas a green tree against the midday blue sky is more along the lines of analogous color. When you are working with color combinations, spend the time to make the final image pleasing to the eyes.

    How to Use Vibrant Colors in Photography with Great Success

    3. Make colors stand out/playoff

    Your scene may be full of color, vibrant and busy. If this is what you want to portray, then all is well. On the other hand, what if there is a subject in that chaos that you want to isolate? You can use color to make that happen. To do so, one of your options is to desaturate/tone down the colors that are not contributing to your subject’s story.

    How to Use Vibrant Colors in Photography with Great Success

    Another is putting a bright color against a dull one to help it to stand out more. Also, adjusting the hue and lightness of the colors next to your main color can help it pop.

    Here are a few easy ways for you to help your colors play off each other:

    White Balance

    Pay attention to your use of white balance when working with bold and strong colors. Your camera has several white balance options to deal with different lighting situations (Shade, Cloudy, Fluorescent, etc.). Each of these affects the overall color of your image. They either move your color to the warmer side (by adding yellow) or to the cooler side (by adding blue). Thus, white balance can enhance your colors or change the hue altogether.

    vibrant-colors-in-photography

    Note: If you do not want your colors to end up looking too blue or yellow, you have the option of manually adjusting your white balance color temperature.

    Saturation

    By default, Saturation is used to enhance the color intensity of every color in an image. However, you can use editing software and use Saturation selectively. When trying to make colors play off each other, you can increase the intensity of one color while desaturating other colors in the scene.

    vibrant-colors-in-photography

    Vibrance vs Saturation (the same level applied)

    Vibrancy

    When you change the Vibrance in an image, it is a little more specific than Saturation. Vibrance only adjusts the intensity of the duller colors in your image. When playing off colors, this tool can be very effective.

    How to Use Vibrant Colors in Photography with Great Success

    Conclusion

    When working with vibrant colors, be aware of your palette. Keep your compositions simple by minimizing the number of colors and details in your image. Work with the color wheel and learn about the various harmonies that exist. When you pay attention to all the colors in your image, you get a better sense of how they work together. You also understand the way each color affects and plays off the other. Most of all, have fun experimenting while you learn about color!

    Do you have other tips for using vibrant colors in photography? Share with us in the comments section!


    vibrant-colors-in-photography

    The post How to Use Vibrant Colors in Photography with Great Success appeared first on Digital Photography School. It was authored by Nisha Ramroop.


    Digital Photography School

  • Street Photographer Attacked on Social Media for Taking Photos in Public

    The post Street Photographer Attacked on Social Media for Taking Photos in Public appeared first on Digital Photography School. It was authored by Jaymes Dempsey.

    Image: Joshua Rosenthal’s Instagram feed.

    Joshua Rosenthal’s Instagram feed.

    Are you a street photographer?

    Have you considered what might go wrong in your line of work?

    Most street photographers don’t.

    But maybe they should.

    View this post on Instagram

    A post shared by Josh Rosenthal (@two_stops_ahead) on

    Joshua Rosenthal is your average street photographer. He goes out with his camera, photographs people in public places, and posts the photos on his website and Instagram. He does no harm, and nobody is bothered.

    Until this past week, when Rosenthal’s actions attracted a lot of attention – and not in a good way.

    Rosenthal journeyed to the Ventura County Fair in California. He walked around, taking photos of fairgoers. People noticed, became suspicious, and the police questioned Rosenthal. But doing photography in a public place is not a crime, and so nothing came of it.

    According to the police department:

    “The subject was contacted by police officers at the Fair on that date and has been contacted again today for questioning. No crime occurred during this incident.”

    Rosenthal probably thought that being questioned at the county fair was the end of things; after all, he hadn’t broken the law.

    View this post on Instagram

    A post shared by Josh Rosenthal (@two_stops_ahead) on


    So it was most likely a huge surprise when he awoke the next morning to find his name plastered all over social media alongside accusations of pedophilia and of predatory behavior.

    As it turned out, a number of fairgoers took videos and photos of Rosenthal at the fair, which depicted Rosenthal snapping images of a young girl. These videos and photos were promptly distributed on social media, capturing intense attention.

    One poster writes “Hey moms and dads, beware of this P.O.S. at the fair. He’s going around taking pictures of…little girls, in dresses.”

    Another poster compared Rosenthal’s actions to child traffickers, while a third wondered whether he is a “perv.”

    Rosenthal was questioned once again by the police but was not arrested. We can be confident that no legal action will be taken against Rosenthal.

    Rosenthal has plans, however. He will be reaching out to the ACLU, which deals with civil liberty cases. He explains, “This is more about the First Amendment and doxing than it is about me.” He also apologized to the parents of the girl he was seen photographing.

    For all the street photographers out there:

    How would you handle this scenario? And how do you handle taking photos of children?

    One way to prevent this kind of thing is to ask permission before photographing children. The parents might refuse, and that’s okay; there are plenty of people to photograph in the world!

    Another way to protect yourself is to avoid photographing children entirely. As Rosenthal found out, parents are often extremely uncomfortable with their children being photographed, and for good reason. While there are plenty of harmless photographers out there, dedicated street photographers aren’t the only people taking photos of children.

    What do you think? Do you have any tips for avoiding these difficult situations? Do you feel comfortable photographing children?

    Leave a comment below!

    The post Street Photographer Attacked on Social Media for Taking Photos in Public appeared first on Digital Photography School. It was authored by Jaymes Dempsey.


    Digital Photography School

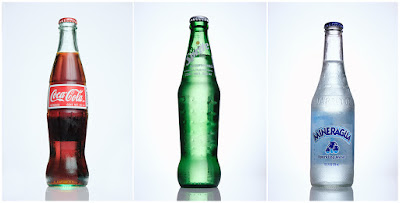
  • SLC-2L-08: Mexican Sodas | BTS 360

    You do something long enough, you'll eventually learn the little things you can do to help interesting stuff happen. One thing I have learned is this phrase:

    "I'm a photographer. What can I do to help you?"

    Just something as simple as that opens up all kinds of doors and possibilities. This week, it's how I ended up shooting Mexican sodas on a table-top studio in my basement.
    Read more »
    Strobist

  • Canon RF 24-240mm F4-6.3 IS sample gallery

    $ (document).ready(function() { SampleGalleryV2({“containerId”:”embeddedSampleGallery_6204946485″,”galleryId”:”6204946485″,”isEmbeddedWidget”:true,”selectedImageIndex”:0,”isMobile”:false}) });

    The Canon RF 24-240mm F4-6.3 IS is a do-everything lens for the RF system, designed to cover pretty much any situation from sweeping landscapes to capturing distant details. Is this new zoom an ideal travel lens for the EOS R and RF? Check out our sample gallery to judge for yourself.

    Please note that we’re converting these images in ACR 11.4 using a pre-release version of Adobe’s profile for the Canon RF 24-240mm F4-6.3 IS.

    View our gallery of samples from the Canon RF 24-240mm F4-6.3 IS

    Articles: Digital Photography Review (dpreview.com)

  • How to Simulate Long Exposure using Stacked Image Averaging

    The post How to Simulate Long Exposure using Stacked Image Averaging appeared first on Digital Photography School. It was authored by Rick Ohnsman.

    Silky water effects, streaked clouds, motion-smoothed with an ethereal look; long exposure photography seems to be in vogue as photographers discover the looks that can be created. There are multiple ways to achieve this. The most basic is to buy a standard neutral-density photography filter which cuts the light, allowing you to use long shutter speeds without overexposing your shot. You can achieve exposures minutes long, especially when using 10-stop ND filters like the Lee Big Stopper or even the 15-stop Super Stopper.

    I recently did an article on an alternative way to make long exposure photos, “Try this DIY Neutral Density Filter for Long Exposure Photos.” I encourage you to read the piece and learn how a piece of welding glass can be a budget substitute for more expensive photographic ND filters.

    simulate-long-exposure-stacked-image-averaging

    This is the same location I used for some of the other shots in this article but taken when the river was much higher and faster. The biggest difference is that I used DIY welding glass ND filter to achieve this shot. See my other article for this technique.

    This article teaches you a third method of making long-exposure images with no filter at all. Unlike the welding glass trick which pretty much requires your final image to be monochrome so as not to have to fight the heavy color cast, this works great in full color, with no filter at all, and no color cast present. It’s a great method to simulate long exposure.

    The technique uses a stack of multiple images of the same scene then processed with a Photoshop process called Image Averaging. It’s really quite simple and has some advantages over traditional methods with ND filters.

    Advantages over the traditional ND filter method

    When doing traditional long exposure photography with an ND filter you will be making long exposures.  (Duh!)  There are a few challenges with this:

    • If during the long exposure you bump the camera or things move in the shot you don’t want to be blurred, you will need to re-do the shot.
    • Long exposures can often be several minutes in length. Double the time if you also enable in-camera noise reduction. If it takes 2-minutes to expose and another 2-minutes for the noise reduction to work, you will only be making a shot every 4-minutes. This can really slow down your work, and if the light changes during that time, you could miss it.
    • With very dark ND filters, you won’t be able to see anything through the lens once the filter is in place. You will have to compose your shot, pre-focus, then mount the ND filter and make the image.
    • Determining exposure will take some calculation. You’ll check exposure without the filter then use a calculation tool to determine the new shutter speed the ND filter requires. Often this will need some tweaking after you see your shot and…yup, another re-do will be needed.
    • If back in editing you see the shots and wish you’d gone for longer or shorter shutter speeds to change the look, too bad. You’d have to go back and reshoot – if that is even possible.
    Image: In fairly bright sunlight, even with the ISO at 50 and aperture at f/22, 1/5th of a second wa...

    In fairly bright sunlight, even with the ISO at 50 and aperture at f/22, 1/5th of a second was as slow a shutter speed attainable while maintaining proper exposure. This was with no filter.

     The advantages of the Image Averaging method

    The advantages of using the image stacking method are essentially the opposite of those things just stated above:

    • You’ll be making multiple images rather than one long one. If one of the images in the group has a problem, you may be able to eliminate it and use the rest to still successfully create the effect.
    • You can see what you’re doing! Not shooting with a dark filter means you’ll still be able to see, compose, use auto-focus, auto-exposure, and even image stabilization if you shoot handheld.
    • No calculation! Without the addition of a dark filter, you eliminate this step.
    • Adjust the length of your “simulated slow shutter” later in post-production. Want more or less blur? You can change your mind later.
    • Are conditions too bright for a standard long exposure shot? Maybe you only own a 6-stop ND filter, and daytime conditions are too bright to let you get the length of exposure you’d like. You can combine both methods to simulate a longer exposure than possible with the ND filter alone.
    • Are people in the shot you’d like to remove? Because they are likely to move during the multiple shots, when the averaging process takes place, they will vanish!
    simulate-long-exposure-stacked-image-averaging

    Make people disappear! Notice on the inset the people walking in the river, but on the completed shot, 15 images, each 1/5th of a second = 4 seconds simulated. They are gone.

    Making the shots

    Setting up and shooting the images you need for your image-averaged creation is much the same as any photography. Here are the factors and steps to keep in mind:

    Composition still counts!

    Because you introduce a long exposure blurred effect does not mean that you will have automatically created a good photo. Still consider how to carefully compose your image. Take into consideration that moving objects in the shot will blur and look simplified with less detail. Good long exposure shots often emphasize the contrast between static, non-moving objects (buildings, rocks, trees, etc.), and moving objects like clouds and water. Include both in your shot.

    Shoot on a tripod

    I mentioned you could do this handheld and, well…maybe you could. However, even with this technique, you will still want to shoot at the slowest shutter speed possible. That way, you won’t have to make too many shots for combining. Once you get much slower than 1/30th of a second (and faster than that if if you’ve just had coffee), handholding your camera is probably going to ruin your shots.

    simulate-long-exposure-stacked-image-averaging

    All Images ISO 50, f/22 . Top left – No filter – 20 images each 1/5 second = simulated total = 4 seconds. Top right – No filter – 35 images each 1/5 second = simulated total = 7 seconds. Bottom – 6-Stop ND filter – 15 images each 20 seconds = simulated total = 5 minutes.

    How many shots?

    This technique simulates long exposure by combining multiple shots.  The simple formula is:

    (# Shots) x (Shutter Speed of each shot) = Total simulated shutter speed effect (in seconds)

    Let’s plug some numbers into that and see the result.  Set your camera for the lowest ISO possible.  I can get my Canon 6D down to ISO 50.  Some cameras will have ISO 100 as the lowest.  Use whatever you can.  Set your aperture to the smallest aperture possible.  Meter with those settings and see how long you can make each individual shot and have it properly exposed.  Say we were able to do this in the shade: 1/4 second, f/22, ISO 50.  To get a simulated shutter speed of one minute (60 seconds), we’d need to make 240 shots.

    240 shots x 1/4 second (.25) = 60 seconds

    That’s a little unwieldy, and stacking 240 shots in Photoshop may cause your computer to choke. So what to do? Perhaps you don’t have an ND filter in your bag, but you do have a circular polarizer. It will help reduce the light. You mount it and now find you’ve lost 2-stops. So your exposure can be 1 second, f/22, ISO 50. Plug that into the formula, and you get:

    60 shots  x 1 second = 60 seconds

    If you’re shooting in lower light conditions, you may be able to get a slower shutter speed to start with. That will mean you can take fewer shots.

    To make your job easier (and the computers as well), always try to get the slowest shutter speed you can for your shots. That will mean you can create the simulated long exposure with fewer shots.

    Say you did have a 6-stop ND filter in your kit. You mount that, and now your settings are 16 seconds, f/22, ISO 50. Now, to get that simulated 1-minute exposure, you’d just need about four shots. Why not make 10 while you’re at it and you can simulate a 2.6 minute (160 seconds) exposure?

    Had you done this traditionally, and had a 10-stop ND filter, you could take the unfiltered exposure down from 1/4 second, f/22, ISO 50 to 256 seconds (4.2 minutes), f/22, ISO 50. So, to get the same effect with a 6-stop ND filter as you could with a 10-stop by using image averaging, take 16 shots.

    16 shots x 16 seconds each = 256 seconds (4.2 minutes)

    simulate-long-exposure-stacked-image-averaging

    35 images each 1/6 second combine to simulate a 6-second exposure. Shooting into the sun, it would probably be impossible to make a 6-second exposure without a filter.

    Forget the math, make the shots!

    If all that math made your head hurt (it did mine), here’s the simple way to get what you need so Photoshop can do its magic:

    • Use a tripod.  You don’t want to do all this and get shaky shots.  That will waste all your work.
    • Do what’s necessary to shoot with the slowest shutter speed you can get with the equipment you have.  In the camera, that will usually mean setting the lowest ISO and smallest aperture.
    • If you have a polarizer or ND filter, use those to get the shutter speed even slower if you can.
    • Make lots of shots for each stacked image you will create.  Depending on how slow you were able to get your shutter speed, a few dozen isn’t too many.  You don’t have to use them all when you get into editing, but having more will allow a longer simulated effect.

    Putting it all together

    This recipe assumes you will be using Adobe Lightroom and Photoshop in combination. You don’t have to use Lightroom. You can get your individual images into a stack in Photoshop another way if you need to (though using LR is much easier). Using Photoshop, however, is mandatory. Also, to use the Smart Objects function described, you will need a version of Photoshop that is Version 14.2 or higher. Older versions of Photoshop won’t have this.

    There are ways to do this with older versions in a more manual process. If you have an older version, you will need to do a little online research to learn that technique. I used the latest version of Photoshop at this writing (Photoshop CC 20.0.4).

    Let’s look at this step-by-step process visually…

    simulate-long-exposure-stacked-image-averaging

    1. From Lightroom, select the sequence of images you will use.  Edit the first one in the sequence to your liking.  Then select all of them and use the Sync function so all have the same settings as the first.

    How to Simulate Long Exposure using Stacked Image Averaging

    2. With all selected, send the images from Lightroom to Photoshop by going to Photo->Edit In->Open as Layers in Photoshop. (Photoshop will open, and the images will appear as layers in a stack). If you have a lot of images to be opened and stacked, this can take a while. Let it work.

    How to Simulate Long Exposure using Stacked Image Averaging

    3. With all the layers selected, in the menu select Layer->Smart Object->Convert to Smart Object. This can take a while to do its work. Be patient.

    How to Simulate Long Exposure using Stacked Image Averaging

    4. With the Smart Object layer selected, from the menu select Layer->Smart Objects->Stack Mode->Mean. This can also take a bit to work.

    How to Simulate Long Exposure using Stacked Image Averaging

    Wait for it…wait for it…and…

    simulate-long-exposure-stacked-image-averaging

    Presto!  You will have a simulated long-exposure image made from your stack of shorter exposures.  20 images each at 3.2 seconds, f/22, ISO 50.  No filter used.  Simulated long exposure of 64 seconds.

    simulate-long-exposure-stacked-image-averaging

    The water in this section of the river was pretty calm anyway, but look at the before and after areas pointed out by the arrow where the original shots were 3.2 seconds vs the combined 20 shots x 3.2 seconds = a simulated 64 seconds.

    How to Simulate Long Exposure using Stacked Image Averaging

    5. To finish up, go to Layer->Flatten Image.  Then File->Save As and save the finished image where you like.  If you want to give the completed image some additional tweaking, you can do that with Photoshop or Lightroom as you would with any other image.

    Remember…

    That’s the magic!  Here are a few things to remember for best results:

    • Consider your composition.  Look for a scene where you will have a combination of static objects that won’t move during the sequence and those that will.  An image with both will be more compelling.
    • Use a tripod.  You can do this handheld if you must, but know that any camera movement will be translated as a blur in the final result.
    • Do what you can to get as long a shutter speed with each image in the sequence as possible.  Drop your ISO to the lowest setting, use a small aperture, and use polarizing filters or whatever ND filters you have.  Longer exposures for each shot mean fewer images are needed to create a simulated long exposure.
    • Overshoot.  You don’t need to use all the images in a sequence if you decide you don’t want as much blur. However, if you don’t shoot enough, you might later wish you had them.
    • As you work through the steps, some things can take a long time.  Be patient and let your computer work.  If the process crashes, it could be you don’t have enough computer resources and will have to settle for a smaller stack.
    simulate-long-exposure-stacked-image-averaging

    5 images, each 6 seconds = a simulated exposure of 30 seconds. No filter used.

    simulate-long-exposure-stacked-image-averaging

    10 images, each 1/4 second combine to give a 2.5-second simulated exposure. This can be a great technique to use for getting silky water effects when you don’t have an ND filter and only need a longer exposure of a few seconds.

    Final thoughts

    Is this a better method than using an actual ND filter? Like so many photographic things, the answer is probably…it depends. Maybe you don’t have a filter or have one with you. Perhaps you don’t need a really long exposure, but just one a little longer than you can get with a low ISO/small aperture combination such as when seeking blur on a waterfall. Maybe you need to vanish people and don’t want to make a single multi-minute shot for various reasons. Alternatively, perhaps you have an ND filter but need an even longer exposure than it can give you.

    There are lots of reasons to add this How to Simulate Long Exposure using Stacked Image Averaging Technique to your bag of tricks. Give it a try, and I’m sure you’ll have fun. Share your images with us in the comments!


    simulate-long-exposure-stacked-image-averaging

    The post How to Simulate Long Exposure using Stacked Image Averaging appeared first on Digital Photography School. It was authored by Rick Ohnsman.


    Digital Photography School

  • What You Can Learn From Entirely Different Photography Genres

    The post What You Can Learn From Entirely Different Photography Genres appeared first on Digital Photography School. It was authored by Mat Coker.

    If you spend any length of time within one photography genre, you come to the point when you wonder, what would take me to the next level?

    Deepening your creativity often means making connections between unlikely things.

    If you want to deepen your photography, one option is to take what you learn from one genre and apply it to another. Could you find something used in portrait photography and apply it to landscapes? How about taking an approach from birth photography and applying it to real estate photography?

    Let’s explore the idea of combining approaches from different photography genres.

    Street and landscape photography combined

    I had been out taking some landscape photos when I saw these canoes. A photo of the canoes on their own wasn’t working out for me. But when I saw this child come walking by it gave me an idea. I thought of all the street photos I had seen of people walking past interesting objects or backgrounds. For the fun of it, I adopted that concept here. I love the way the boots echo the yellow canoe.

    What Portraiture can teach us about Landscape or Nature Photography

    I’m a portrait photographer. What I love about portraiture is exploring the way people express their hidden selves through their body. You can see expression and gesture in feet, hands, and faces.

    If you love to photograph nature and landscapes, you can take this concept of gesture (something we normally look for in people or animals) and apply it to your nature photography.

    The more I focus on gesture in people, the more I see it in nature as well. Consider what Jay Maisel has to say in his book, Light, Gesture, and Color:

    “Gesture is the expression that is at the very heart of everything we shoot. It’s not just the determined look on a face; it’s not just the grace of a dancer or athlete. It is not only the brutalized visage of the bloodied boxer. Neither is it only limited to age, or youth, or people, or animals. It exists in a leaf, a tree, and a forest. It reveals the complicated veins of the leaf, the delta-like branches of the tree, and when seen from the air, the beautiful texture of the forest.”

    I believe something like gesture is what we’re after when playing with lines in a photo or even slow shutter speeds. Look at nature through the lens of gesture, and you’ll be more creative in your nature photography.

    Low angle photo of a tree suggesting gesture.

    When I looked up at this tree, it was the gesture of the branches that drew me in. It takes decades for those branches to get there. Though they’re holding perfectly still, there is the feeling of gesture because of their shape.

    Flower photo with gesture.

    I love to play with light. While photographing these flowers, a little lens flare struck my view. It’s very subtle, but on the right side of the photo, you can see a faint burst of warm light. It’s as if the flowers are reaching for the light.

    What Wedding Photography can teach us about Food Photography

    I’m not a food photographer, but if I photograph a wedding or event, I try to include a photograph of the dinner. Couples pay a lot for their meal, so why not add a photo? The problem is a stark white dinner plate full of food looks lifeless and uninspiring among all the other wedding moments. There was a disconnect between my candid event photography and my attempt at food photography.

    Weddings are about writing a new story; joining families and sharing life. But I discovered that there is just as much of a story in the food as there is in the rest of the wedding. When I was able to chat with a chef as she prepared food for the guests, I came to learn how much she loves her craft. There is as much heart in the preparation as there is in the sharing of the meal.

    So I began to photograph the meal just like I did the rest of the wedding. I took the heart of what I had been pursuing in all those candid wedding photos and applied it to photographing the food.

    What You Can Learn From Entirely Different Photography Genres

    What You Can Learn From Entirely Different Photography Genres

    What You Can Learn From Entirely Different Photography Genres

    What You Can Learn From Entirely Different Photography Genres

    What You Can Learn From Entirely Different Photography Genres

    What Birth Photography and Real Estate Photography can teach us about each other

    I can’t imagine two genres more opposed than birth photography and real estate photography.

    If I tell a friend that I photographed a house for a real estate agent, they don’t care. They assume it’s just something boring I do for money. But when my wife tells people she photographs births, their jaws hit the floor and a passionate discussion ensues.

    For most people, maybe photographers too, real estate photography is a boring necessity while birth photography is an exciting adventure. After all, one of those life experiences is about drama, emotion, and new beginnings, while the other is a series of appointments and paperwork until the ordeal is over.

    Yes, but which experience is which?

    Have you ever bought or sold a house? Then you know there is plenty of drama and emotion involved. Have you ever had a baby? Then you know there are plenty of appointments and paperwork. Both experiences – home-buying and having babies – are filled with the potential for adventure and emotion.

    Try taking the obvious emotional excitement of birth photography and applying it to real estate photography. When you force yourself to flip everything on its head, you might see something quite different.

    Many families have a negative birth experience. They’re treated like a commodity by their doctors and the hospital staff. A birth photographer knows that even if a laboring woman is given a bad experience by hospital staff, the photos still have to portray the unique beauty of the experience.

    Even though real estate photography may often feel like a commodity, it can be a beautiful part of the story. First-time homebuyers are on an amazing life journey. Perhaps there can be more spontaneity and emotion in real estate photography than we first think – even if it’s hard to represent in typical real estate photos.

    different-photography-genres-Birth photography

    My wife, Naomi, made these birth photos. I love to see the range of emotion and depth of personality in her photos. But they certainly make my real estate photos look dull.

    different-photography-genres

    different-photography-genres


    Real estate photography

    I know that my real estate photos are part of a larger story and every once in a while I have the chance to photograph that story. Sometimes that comes by being able to photograph the move-in day.

    What You Can Learn From Entirely Different Photography Genres


    What You Can Learn From Entirely Different Photography Genres

    What You Can Learn From Entirely Different Photography Genres

    What Street Photography can teach us about Newborn Photography

    If you’re tired of posing newborn photos, street photographers can be your guide. They are masters of spontaneity – taking whatever moments the situation gives to them. Street photographers are explorers of society. As a newborn photographer, you can be an explorer of human nature in newborns.

    Wait and see what that baby will do. Take what the newborn gives you rather than forcing your vision and poses on them. There is nothing wrong with posing, but it can be exciting to explore other moments that happen naturally.

    Newborn photography

    Do you know all those adorable photos of newborns wrapped in beautiful fabrics and placed in baskets? Well, this is the reality; a screaming newborn and bewildered older brother. Take the moments that come to you.

    Think beyond your genre of photography

    When you want to deepen your creativity as a photographer, begin with the principles of the genre of photography you’re working within. When you’re ready to go even deeper, go beyond the principles of your genre and consider what different photography genres might teach you.


    different-photography-genres

    The post What You Can Learn From Entirely Different Photography Genres appeared first on Digital Photography School. It was authored by Mat Coker.


    Digital Photography School

  • Walmart mistakenly prices DJI Inspire 2 and Spark drones starting at $17.99

    Daniel John posted this tip in the Chicago Drone Pilots Facebook Group early Friday morning.

    Early Friday morning, retail behemoth Walmart offered up deals that were so unbelievable, they seemed too good to be true.

    Eagle-eyed shoppers took advantage of the lowest prices they’ve ever seen assigned to the DJI Spark Fly More bundle, priced at $ 17.99, a DJI Mavic Pro Bundle for $ 24.99, a DJI Inspire 2 Premium Combo with Zenmuse x5 for $ 42.99, plus Sony and Leica cameras, which typically start between $ 1,000 – $ 5,000, for $ 24.99 – $ 42.99. Those who purchased these items from retailer Ecom Electronics, in the narrow window of time they were available through Walmart.com, will have ultimately scored an unbeatable deal if Walmart chooses to honor these prices.

    Savvy shoppers like Wayne Douglas discovered deals beyond the DJI Spark Fly More bundle.

    I first stumbled across this error in pricing on the Chicago Drone Pilots Facebook Group. Curious to see if it was legitimate, I purchased on DJI Spark Fly More Bundle for $ 17.99 through my PayPal account. As of this writing, Walmart has processed my payment and has not issued a refund. Ecom Electronics has confirmed my order will arrive between Wednesday, August 21st and Tuesday, August 27th.

    Talk about a hustle. Some people maxed out their orders with a quantity of 12 units.

    Other people got creative, typed ‘eCom Electronics’ into Walmart.com’s search bar, and came up with a Leica SL (Typ 601) Mirrorless Digital Camera for $ 22.99, a Panasonic Lumix DC-GH5 Mirrorless Micro Four Thirds Digital Camera Body for $ 22.99, and a Sony Alpha a7R Mirrorless Digital Camera for $ 42.99. Savvy shoppers pushed purchasing limits to the max and ordered up to 12 units of a deeply-discounted item. All of these low-priced offerings sold out quickly, returned to full price, and then were subsequently pulled from Walmart’s site altogether.

    As soon as the word got out, items sold out in a matter of minutes and returned to full price before disappearing from Walmart.com completely.

    For those concerned about a possible scam, Walmart has a favorable reputation for honoring their mistakes, if sentiments in the numerous posts I’ve seen across online forums are accurate. Ecom Electronics, on the other hand, has a Better Business Bureau Rating of ‘C.’ No matter how painful the mistake, the Walton family, owners of Walmart, likely won’t flinch as they are currently the wealthiest family in America with an amassed fortune surpassing $ 160 billion dollars.

    Articles: Digital Photography Review (dpreview.com)

  • Sony 35mm 1.8 FE Lens Review [video]

    The post Sony 35mm 1.8 FE Lens Review appeared first on Digital Photography School. It was authored by Caz Nowaczyk.

    In this video, Chris Turner reviews the Sony 35mm 1.8 FE lens.

    ?

    Sony 35mm 1.8 FE

    This is what Chris thinks of the lens:

    Build quality

    • While the build quality is quite good, it feels a step behind the 55mm 1.8 Zeiss lens. It’s about the same as the 85mm 1.8. It doesn’t feel high-end.
    • Has the function button on the lens which you can use to focus hold or eye focus. You can program it to a heap of different stuff.
    • It also has the AF/MF switch to change from auto to manual focus easily.
    • It is small – just slightly smaller than the 55mm 1.8 – with about the same thickness. It’s compact for travel unit.
    • Focus is speedy and performs flawlessly. It also works well in low-light and backlight situations. The video focus is also fast and accurate.
    • The lens isn’t weather sealed.

    Image quality

    • The Sony 35mm 1.8 takes high-quality images. While the 55mm 1.8 has some really weird flaring in certain situations, the flaring in the 35mm is well controlled with a nice glow. If you’re backlighting an image, it’s going to look really nice with this lens.
    • Chromatic aberration is definitely present. It’s not great in terms of aberration control. It’s quite bad at f/1.8
    • The lens is incredibly sharp. It is easily sharper than the 35mm 1.4 zeiss, especially wide open. If you stop it down, it just gets better and better. If you are putting something in the edge of the frame, it still is quite sharp.
    • The colors are very nice and have plenty of contrast.

    Overall, the 35mm 1.8 is an impressive lens.

    Chris says while the 35mm is a great lens, it won’t replace his favorite lens, the 24mm G-master.


    You may also like:

    • The Sony 100-400mm Lens Thoughts and Field Test
    • Sony Announces New Compact Camera With Amazing Features
    • Sony Announces Incredible 61-Megapixel Full-Frame Camera: The A7R IV
    • Sony FE 135mm F/1.8 GM Lens Review
    • Gear Review: Sony FE 85mm f/1.4 GM Lens
    • Camera Comparison – The Fujifilm X-H1 Versus the Sony a7R III


    The post Sony 35mm 1.8 FE Lens Review appeared first on Digital Photography School. It was authored by Caz Nowaczyk.


    Digital Photography School

  • DPReview TV: Sony RX100 VII review

    Sony’s RX100 VII has landed, but after seven(!) iterations you may be asking, “Is there anything left to add to this camera?” It turns out the answer is a resounding ‘yes’. Watch Chris and Jordan’s video review to learn what’s new and why it matters.
    What do you think of the RX100 VII? Tell us in the comments!

    Get new episodes of DPReview TV every week by subscribing to our YouTube channel!

    • Introduction
    • New sensor
    • High speed shooting
    • The zoom lens
    • Macro photography
    • Single burst shooting
    • Battery life
    • Rolling shutter
    • Real-time AF tracking
    • LCD screen and EVF
    • Video capabilities
    • Compared to smartphones
    • Compared to Canon G7 X III and G5 X II
    • Wrap-up

    Sample images from this week’s episode

    $ (document).ready(function() { SampleGalleryV2({“containerId”:”embeddedSampleGallery_5355715028″,”galleryId”:”5355715028″,”isEmbeddedWidget”:true,”selectedImageIndex”:0,”isMobile”:false}) });
    Articles: Digital Photography Review (dpreview.com)

  • 6 Important Considerations Before You Change Camera Brands

    The post 6 Important Considerations Before You Change Camera Brands appeared first on Digital Photography School. It was authored by Carl Spring.

    Important-Considerations-Before-You-Change-Camera-Brands

    I have finally started to change camera brands. I’ve been shooting Canon since my first ever SLR I got back when I was 16. I wanted to stay with Canon, but their current bodies do nothing for me. Also, the lens prices of the new R-mount system are insane. After spending a lot of time researching, as well as some hands-on time with the cameras I was considering (Sony, Panasonic & Fuji), I ended up moving towards Fuji.

    I’ve purchased a Fuji XT3 with the kit lens and a 35mm f2. It has been a decision that I made on several factors, and so far I am really enjoying the images I am getting out of the Fuji. I haven’t sold off my Canon gear yet (nor will I likely do so in the immediate future) but I can definitely see me moving a lot of my kit in Fuji’s direction.

    However, the move has thrown up a few surprises, which I wanted to share with you in this article. So without further ado, here are six things to consider before you change camera brands.

    1. Know why

    The question you must ask yourself is, what are you trying to achieve by moving camera brand? Changing brands is a long, sometimes painful experience that can be as frustrating as it is fun. It is also certainly going to be expensive. However, if you are considering a full-blown brand swap, there has never been a better time. The big two (Nikon & Canon) have changed mounts. This means, even staying with your current brand, you will eventually be changing your whole kit. So for many people, if you are going to move, the time is now.

    Why did I move towards Fuji? Three reasons; the weight, the size, and the video functions.

    I shoot weddings, and the appeal of lighter gear hanging off me all day is huge. Secondly, as I shoot in a documentary style, the size of the Fuji means the camera is not as intimidating as my 5DMkIV when in close situations. I have noticed in my son already that he is much more himself with the small Fuji camera, as opposed to my DSLR. This is what I see on paid shoots too. When shooting with the Fuji up close on a recent engagement shoot, the couple seemed to relax more. It is hard to put into words, but there is definitely something about the smaller form factor.

    Lastly; video. Canon is purposefully, it seems, not putting the video features into its DSLR’s that Sony, Fuji & Panasonic are. I want to shoot more video and am starting to offer it to clients. Fuji beats Canon hands down here and was the deciding factor.

    That’s not to say that other things such as Eye AF, a flip-out screen and 100% coverage with AF points are not things I want, they are, but they alone were not enough for me to make the switch.

    A king on a chess board with a young player in the bokeh

    You will find yourself shooting more to test your new gear out. Here I am testing the bokeh of the 35mm f2, whilst teaching my son to play chess. The smaller size means he acts more natural than when I point my DSLR at him.

    2. Be prepared to start again

    Unless you are willing to sell off all of your gear to fund your new purchase, you will no doubt (like me) dip your toe in the water first. As a professional, I simply cannot just go all-in on a new system. So it will be a switch over time. The lack of kit is in some ways quite refreshing. It is also making me think about what kit I will need as I begin to build up my new system. However, sometimes I do find myself reaching for my Canon as it has the lens option I want.

    A change of system will be expensive and, in the interim at least, you will probably have less gear than you previously had. Remember, it is more than cameras and lenses – you will need to change things like flashes and flash triggers as well.

    Little side note here. Pixapro (rebadged UK version of Godox) triggers for Fuji & Canon look identical. The method I’ve used to differentiate them is to color the little quality control sticker red on the Fuji trigger. A quick, simple way to overcome an annoying little problem.

    Changing brands and starting again can definitely have a positive impact. As you begin to build a new system, you will think more about what gear you don’t use as well as what you find yourself missing. This means you can save some money in the switching process and lighten the load of your gear bag at the same time.

    Important-Considerations-Before-You-Change-Camera-Brands

    This was my new kit for 3 weeks. No high-end primes, no myriad of lens options. Just a kit lens. Frustrating, but it did make me think about photography in a way I hadn’t in some time.

    3. Retraining the muscle memory

    There is nothing worse than the downright dread of coming to grips with a new menu system. Trying to remember which button is the one you mapped for changing autofocus is somewhat frustrating. The remapping of your brain to work with your new camera system is one of those things that is initially fun and exciting.

    However, that initial joy soon gives way to frustration. It is surprising how difficult it can be to move systems and retrain your brain to work with the new menu system. It gets easier quite quickly, but you will initially miss shots you would have got, simply because you forgot which button you needed to press.

    Important-Considerations-Before-You-Change-Camera-Brands

    This has been my workhorse for years. I can operate it in the dark without thinking. I will get there with the Fuji, but it will take time.

    4. The cost of switching

    It is easy to get carried away in thinking that if you sell off your gear, you will be able to switch systems without a huge outlay. Unfortunately, that isn’t usually the case. Moving camera system will come with a financial cost, and it will probably be more than you think. To move system and a new body and a set of lenses (24-70mm f2.8, 70-200mm f2.8, and a fast prime) you will be looking in the ballpark of £1000-£4000. You can reduce the costs of this by buying secondhand glass. However, with the new mirrorless systems by both Nikon & Canon, the price of secondhand glass is still incredibly high and hard to find.

    To give an example, I own the Canon 70-200mm f2.8 IS I lens. I could look to get around £700 for this secondhand at current value. To move to the new Sony G Master of the same focal length, I would need an extra £1700. To pick up a secondhand copy, I would still need £1000, and that is simply for one lens.

    When you look at the numbers like that you have to ask yourself, will a change of system for this function be worth £3000? Is eye autofocus, in-body stabilization, and 100% AF points coverage really worth that much? For you, it may be, but do not think there will not be a cost involved in getting the features you need.

    Many of you (like me) will be considering a move to a mirrorless-based system. Even changing to the same brand is now going to come with considerable costs as both Canon & Nikon have new lens mounts. I know that you can adapt existing glass for both these systems, but it will not work as well as the new glass designed specifically for the new mounts.

    In both cases, the lenses for these systems are commanding top prices. Over time, these will drop, and there will be a larger secondhand market. But at the moment, switching to a Canon or Nikon mirrorless system, complete with native lenses for the system, is no cheaper than a complete change of brand.

    I think the mirrorless camera revolution will see many people taking the plunge with different brands. Switching from a 5D Mk IV to an EOS-R is, in reality, the same kind of investment you will make moving to Sony or Nikon.

    Again, most brands now have good quality adapters to use glass from other systems, so it does help you take those baby steps. However, the native glass will always give the best performance. Unless you have a great relationship with your bank manager (and/or partner), you may need to transition slowly to cushion the financial impact.

    A cow in a field at sunset

    This was meant to be shot on my Fuji. However, the battery died and I had no spares. Luckily, my trusty Canon (and 4 spare batteries) to the rescue.

    5. Will the grass be greener?

    There is the honeymoon phase in any relationship. I am currently in it with my Fuji. No matter what the sensible part of your brain says, having new gear makes you get out and use it. The more photos you take, the more your photography improves. So, therefore, changing camera gear will make things better right? Well, maybe. If you changed for a specific reason and your new gear addresses it, then, yes, it may be better.

    What is more likely, though, is that after the honeymoon phase, your camera will get used no more than your current kit. Your photography will not improve simply because of your choice to change systems. You will again find things that you don’t like about your new system and things you miss about your old one. This is simply because there is no perfect camera.

    6. Could you spend money more wisely to advance your photography?

    The biggest reason to pause and think about changing systems is whether you could make a different investment that will improve your photography more than a change of brand. It is well documented that lenses are a wiser investment than a new camera body. I have seen countless photographers move towards a full-frame camera, rather than invest in lenses, which is definitely a mistake. Lenses hold their value, will instantly give you better results and will last you way longer than a new camera body.

    If you look at a minimum of £1000 to change camera brands, then think of what else you could invest that money in to improve your photography. Portrait photographers, that could buy you a great off-camera flash system with modifiers that will take your portraits to a new level. You could invest in new lenses for your current camera that helps you shoot better in low light, or give you more reach as a wildlife photographer.

    However, look beyond gear. What could £1000 worth of education do for your photography? How about spending £1000 on a trip to locations that you have always wanted to photograph? In many cases, changing your camera system is possibly the least likely thing to advance your photography.

    For most of us, we simply got caught in the hype and Facebook chatter about a new camera. We think it will be a magic bullet that makes us take more photos or better photos. But in reality, it won’t. You will have a shiny new toy that you love, until the Mark 2 comes out and you will convince yourself again that you need to upgrade.

    There are lots of legitimate reasons to change systems. There is also absolutely nothing wrong with switching to a new camera system simply because you want to. Just beware of the hype that it will make your photos better because it won’t.

    A tipi near a pond with a tree growing out of it.

    The Fuji will make me money. Will I make more money than if I had kept my Canon? No. My back, however, will thank me for the lighter weight.

    I’m not trying to convince you either way (you probably wouldn’t listen if I did). I am just giving you some things to think about if you are looking to move from your current camera system. Happy shopping.

    Have you made the switch to a new camera system or considering it? Share with us in the comments section below!


    Important-Considerations-Before-You-Change-Camera-Brands

    The post 6 Important Considerations Before You Change Camera Brands appeared first on Digital Photography School. It was authored by Carl Spring.


    Digital Photography School