Sony has announced function enhancing firmware updates for its DSLR-A900 and DSLR-A850 full-frame cameras. The latest versions for both cameras promise faster AF and broaden both exposure compensation range (to -/+5 from the current -/+3) and the exposure bracketing range (from up to -/+2EV to a maximum of -/+3EV). It also adds a new menu option allowing shutter release without an attached lens.
News: Digital Photography Review (dpreview.com)
Blog
-
Sony updates firmware for DSLR-A900 and DSLR-A850
-
It’s DIY Thursday
 Fancy yourself a bit of a … modder?
Well, we gots not one but two DIY tips today, courtesy intrepid readers. Hit the jump to learn both how to add a nipple (not my term, mind you) to your SB-800 and how to make a very cool speedlight-to-AlienBees adapter.
__________Can You See Me Now?
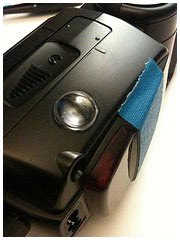 Reader Eric Au came up with the idea to add a cheap flashlight lens to his IR window on an SB-800 to increase the angle of acceptance from other flashes’ optical signals. It appears to turn the flat window into sort of an optical collector.
He was using it for CLS, but one would presume it would also increase the angular performance for people using the SB’s in SU-4 slave mode. More info on this cool mod in the Strobist Flickr group discussion thread.
One note — DealExtreme seems to now be out of the multi-packs of super-cheap flashlight lenses. But they are pretty good at getting in stock to fill back orders. Shipping is free and the lenses are like, .40 for 100.
DealExtreme takes a while, but they usually come through. Oh, and if this is your first time there, plan on a few hours of late-night browsing.
Little Lights, Big Mods
With the introduction of the new Einsteins, Paul Buff seems to be paying a lot more attention to the quality of his reflectors and other mods. He has moved beyond the old conical reflectors and has some very cool replacements at typically low prices.
The grids to fit them are likewise inexpensive. And that starts to give some interesting possibilities if you can mate them to speedlights.
Here’s the thing to remember: You need to change your speedlight output to the equivalent of a bare bulb with a Sto-Fen -type diffuser before the reflectors will properly do their thing.
Thus will lose you some power. But this adaptation is not about power, it’s about light shaping. It is about being able to make some very cool light sources for when you are working up close (or in low, easy-to-overcome ambient.)
You can shoot like this in your speedlight’s wireless TTL mode, too, if that’s your thing. (Not that there’s anything wrong with that…)
I love jamming a foam-wrapped, stofened SB-800 into a Profoto Magnum reflector and working in close. Just a very cool kind of light for close-in portraiture. (Example of a Magnum-keyed portrait here.)
So, without further ado, Tim Rogan’s neat little DIY hack to marry your AB mod and your speedlight”
Vid not showing? Click here.
On thing to note — this mod puts the flash a little further into the soft box than the regular AB or Einstein tube would be. No prob in a ‘box, but with a reflector you want to match the focal point of your flash head as closely to the position of an AB flash tube as possible. I would be looking to saw off some of the front of the male screw threads on the main black plastic piece to adjust that flash position.
Very cool idea tho, and you can see a variant on it courtesy Tim Johnson.
Or, Go High-End

If you are the type with more money than time, frequent Strobist Flickr group contributor Elvis Pahr is now making speedlight-to-softbox adapters that look darn-near Italian as far as the design goes. More info at EP-Designs.
__________So, anyone else marrying speedlights to big mods using nifty DIY hacks? Gimme a URL in the comments. I’d love to help spread the word to others.
Oh, and for anyone who is confused by the lead pic, that’d be Tim “Tool Time” Taylor, a staple of US TV in the ’90s. Click the pic for a much better explanation.
__________

-
Photography College
Should you or shouldn’t you go

When young photographers are starting out and beginning to learn the technical craft of photography, there seems to be a lot of confusion on whether or not photography college is the right choice. I get a ton of emails asking me whether or not I think it’s important to go to college and/or to get a degree in photography. And honestly it’s one of those questions only you can answer. Everybody is different and everyone learns in their own way. For some people, college is an important, integral part of their growing process and really want to participate in that kind of schooling process. Others are more self-motivated and learn better by doing. Experience is their best teacher and they flourish without the restraints of a school environment, all aspects of it including peer pressure and social mine fields. I can tell you about my experience and you can use that insight to help determine your own destiny but I, in no means whatsoever, would ever assume I know what’s best for you. So while I’m eager and happy to share my story, I suggest asking a lot of different people their opinion and do your research. One person’s perspective is not enough when you’re really on the fence about something this important and life changing.
I was 17 when I decided to become a professional fashion photographer. While I had the inspiration and the vision and the ideas, I had a very tough time mastering the technical aspect of photography. So in other words, I had the concepts, I just didn’t know how to execute them technically to see the results. And I was probably weakest in lighting. Composition and angles, I was pretty good at as well exposure and depth of field. I got that stuff fairly easily on my own by reading books and experimenting. But lighting!! That was a killer.
I put together a portfolio in high school and got accepted into Otis/Parsons in Los Angeles for my first year of college. I was really eager to learn how to light and then I was pretty much going to go out and conquer the world, or so I thought. I had a father that was willing to pay for Art College. If you don’t have financial help and you’re going to have to take out loans or work part time to put yourself through school, that’s something to consider. Because the work load is going to be tough and holding down a job that can support you is going to be even tougher. And student loans are a bitch to pay off. So that’s one thing to really take into consideration when considering photography college. In my family, education and college were very important. My father went to USC and he was very proud of his Alma Mater. So he was willing to pay for me to get a college education and a diploma. In saying this, let me assure you, that these things have never held importance to me. ( I told you, I was always the rebel kid). But I knew for myself, that the discipline of school and the fact that I HAD to show up and I HAD to participate was going to be the catalyst to me learning the craft. I am not a very disciplined person. I needed the pressure of keeping a GPA and I needed the stimulation and competition from my peers to improve and challenge myself to work harder and thus proving results by doing good work. So after my first year at Otis/Parsons, I got accepted into The Art Center College of Design. Now this was back in 1984 when the school was tough to get into and even tougher to stay in. It was not only very expensive, even back then, but it had a grueling work load. I mean, the school opened at 7 AM and closed its gates at 11PM, I think, and I honestly was in school that many hours, 6 days a week, during my first year there. I had no social life, I had to break up with a boyfriend about half way through my first term, I never saw or hung out with friends outside of my classmates, I was busy!! But I’ll tell you something: I learned. And I learned a lot. Especially about lighting.
 Art Center Campus
But I can also tell you, that first year of lighting classes were not about lighting beautiful models. I was lighting toasters and wine glasses and shiny metal objects and occasionally my classmates. I carried 7 classes my first term and we had an assignment due every week from every class. If the assignment was rejected on the critique wall then we had to re-do that assignment, plus get the new assignment in by the following week. It was daunting. We worked hard at Art Center back in those days. I’m not sure how difficult it is now. I’ve heard that they aren’t as tough in the admissions process. Back then, it took me 3 tries to get in. My work was deemed too “avant-garde” and they wanted me to take some night classes in lighting to get accepted. I did what it took to get in there because I knew that I lacked the technical skills to master my concepts and I would learn those skills at Art Center. I also have to say that back in those days, there were only a handful of good photography colleges to choose from. There was Brooks Institute, RISD (Rhode Island School of Design), Pratt and Parsons. Nowadays, with the digital explosion and everyone including half of their family wanting to be a photographer, there are photography colleges everywhere! I mean, I’m blown away at how many photography colleges and schools there are out there. I mean, how do you choose? Do you want a degree? Do you just want some basic classes to hone your skills? Do you need a degree? Is it important to actually go to school?

Okay, so here’s the low down. While Art Center is a very prestigious school and I’m grateful to my father for footing that extravagant bill (he spent around 0K and that was between 1984-1987). Yeah, a truckload of money. You got that right. But no one has ever asked me to produce that diploma that made my father so proud! I’ve been asked if I went to school, but no one has asked for proof of my diploma.
Did I become a better photographer because I went to school? Well, yes. I did.
Did Art Center prepare me for the “Real World” out here? No, it didn’t. Nothing does but cold, hard experience.
If I had it to do over again, would I go? My first question would be, who’s paying? If I had to pay that kind of money to put myself through photography school, I couldn’t go. In my early twenties, which is when I attended, I didn’t have that kind of money and with the workload, it would’ve been impossible to work and go to school.
So my short answer to anyone asking whether or not they should go to college is:
- Can you afford it?
- Can you live and eat while going to school?
- Are you going to be taking out massive loans to put yourself through college?
- My last question would be, How important is getting a diploma?
Like I said earlier, my father wanted me to get a diploma because education was important to him. But if you’re serious about becoming a professional photographer, having a diploma doesn’t amount to much. At the end of the day, your images in your portfolio are what get you the job, not your diploma.
If you need the discipline of school to learn, then school would be a good option. If you’re motivated to go out and experiment and learn on your own, you don’t need school. I would recommend to anyone who’s just starting out to assist a pro photographer and learn from them. You can pick up lighting set ups and learn technical skills right there on the job AND you’re earning money instead of paying someone to teach you. At the very least, intern for someone and work part time so you can learn from a pro and then your part time job can support you while you’re learning. Another great way to learn where you don’t have to spend the money for a degree is workshops. It’s a small investment and you can learn from the pros. It doesn’t have to necessarily be fashion oriented either. You can learn lighting and exposure through a lot of the weekend or even week-long workshops being offered world wide these days. DVD’s and tutorials are another great way to learn. Blogs, the internet, websites, there are literally thousands of them out there giving great tips and advice on lighting and technical knowledge.

It’s really up to you and your financial situation. My personal story is that I’m glad I was fortunate enough to have a father who paid for me to go to college. But I kept learning out of school and nothing beats learning through experience. And school ultimately did not prepare me for the real world of commercial/fashion photography. School can’t even begin to teach one how to deal with the politics and the marketing and the ins and outs of developing relationships with clients. That education is learned through the school of hard knocks. And I will say that I have met plenty of professional photographers who did not go to college. They are self-taught and have done absolutely great in their careers. So do your homework, research the schools you’re thinking of attending, figure out how much money it’s going to take to get through school and live at the same time and then make a sound decision based on all of the above to decide if college is indeed something you need or if you can learn through assisting, workshops, DVD’s and experience! And best of luck to all of you out there trying to make this important decision!
Fashion Photography Blog – A Resource for Fashion Photographers, Created by One. -
Miscellaneous Software – Keep the Screensaver from Running or the Computer from Hibernating
Prevent the screensaver or Windows power management from interrupting a video, download, or other long task with Don’t Sleep.
Have you ever had Windows turn off the monitor or display a screensaver while playing a video? Or maybe you are downloading a large file, and suddenly the computer goes to sleep before it finishes. Frustrating, isn’t it?
One option to solve this problem is to use the small utility “Don’t Sleep”. This software can prevent the screensaver from displaying or monitor from turning off, as well as system automatic stand-by, hibernation, shut-down, and logoff. The disabling can be turned off or on with ease, and can even run on a timer. …
Read more at MalekTips.
New Computer and Technology Help and Tips – MalekTips.Com -
Using Levels in Photoshop
Happy with our training? Donate! tinyurl.com Visit www.PhotoshopTalent.com for more tutorials, contests and more! Using Levels in Photoshop http
Skin Tricks: Fixing Shiny Skin and Blown Red Channel in Photoshop
Video Rating: 5 / 5 -
How To run Virtual Boy in Maximus Arcade
How To run Virtual Boy in Maximus Arcade Download Mednafen: forum.fobby.net mednafen-09x.cfg: vb.anaglyph.preset disabled vb.anaglyph.lcolor 0xff0000 vb.anaglyph.rcolor 0x000000 vb.disable_parallax 1 Configure Buttons: alt+shift+1 ShateredSoul at WordPress: maximizedemulation.wordpress.com ShateredSoul at youtube: www.youtube.com Free 3D glasses: www.3dglasses.com or here www.rainbowsymphony.com Tags: How To run Virtual Boy in Maximaus Arcade EMULATOR INSTALL RUN TUTORIAL DEMO HOW TO electronics technology howto gaming computers tips tricks software consoles Fullscreen dolphin Nintendo Wii Gamecube DS SEGA ATARI LYNX JAGUAR WONDERSWAN FRONTEND MAME CAB Colecovision Commodore 64 Magnavox Odyssey2 Turbo-Grafx 16 Gameboy Advance Dreamcast GENESIS SATURN Sega Master System GameGear Atari Lynx Handy
-
Lightroom’s Selected and Most Selected Images
One of confusing things when you’re getting started in Lightroom is understanding the concept of selected images and the most selected image in Lightroom.

Step 1
To see this at work, start in the Library module and press G to move to Grid view. Click on any image to select it and Shift + Click on another image. You’ll now have a sequence of images selected.
Notice that in both Grid view and on the Filmstrip the first image that you selected has a lighter border around it than all of the other selected images and notice that the unselected images have darker borders.
The image with the lightest border is the most selected image and it is the image that will be affected by changes that you make to various settings, in particular when you are working in Loupe view with multiple images selected.

Step 2
What you have selected in Lightroom and the view you are in impacts how changes are applied to an image.
In Grid view if you select the Quick Develop panel and choose a different white balance setting then all the selected images that are selected will be altered.

Step 3
However, if you are in Loupe view and if you make the same change only the most selected image will be altered and not all the selected images.
Grid and Loupe view work very differently and it’s important to understand, particularly in Loupe view, that when you have multiple images selected, there is one that is most selected.

Step 4
When you have all images in a folder or collection selected it can be difficult to see just how to deselect the images. To deselect a selection, click outside the thumbnail area of any of the selected images in an empty area of the cell it is in. This deselects the current selection so only the image that you just clicked will be selected.
Post from: Digital Photography School
-
System Information Software – Freeware to Display Windows Memory Usage in System Tray
Keep track of Windows memory usage via an icon in the System Tray area of the Taskbar with MemInfo.
MemInfo is a freeware Windows application that displays detailed memory usage in the System Tray area of the Taskbar. Memory used and a percentage bar is displayed as an icon; hovering over it displays more detailed usage information.
Configuration options include showing the page file or physical memory, showing actual value or percentage free, altering the refresh rate (useful for slower computers), and displaying a warning balloon for high memory usage. You can also change the font, text colors, and theme….
Read more at MalekTips.
New Computer and Technology Help and Tips – MalekTips.Com -
Nikkor Lens Tips – Mark Watson
Mark Watson is recognised as one of Australia’s foremost adventure sports photographers. The challenge to create emotion in his imagery is what drives Mark to push the boundaries of conventional photography and hence his work is regularly published in outdoor and sporting magazines worldwide. In this episode, Mark talks with us through a variety of Nikkor lenses. Hear from our Nikon Ambassador as he discusses the lens terminology, shows off some of his ‘favs’, and offers key tips on how you can improve your photography with the right lens choice. See more @ My Nikon Life: mynikonlife.com.au
Video Rating: 4 / 5 -
Nice Visual Art photos
Some cool visual art images:
Life Drawing class in the Foundation Visual Art & Design program at VFS
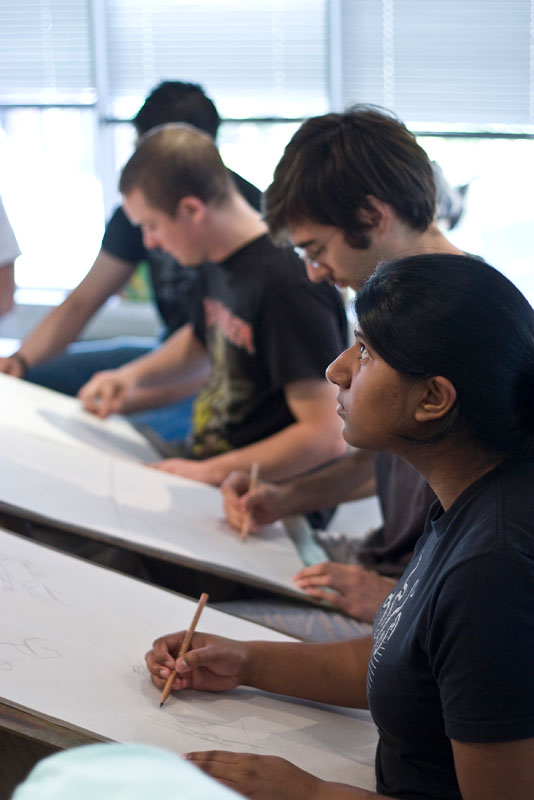
Image by vancouverfilmschool
Find out more about VFS’s one-year Foundation Visual Art & Design at vfs.com/foundationHigher Ground: A Century of the Visual Arts in East Tennessee

Image by Knoxville Museum of Art
Higher Ground: A Century of the Visual Arts in East Tennessee, is a new permanent installation of works from the Knoxville Museum of Art collection celebrating the art and artists of Knoxville and the surrounding region.The fascinating and complex story of our area’s rich artistic heritage and its connections to the larger currents of American art are largely unknown, and certainly underappreciated. Highlights of the new installation include important works by Catherine Wiley and Lloyd Branson, pioneering artists who introduced Knoxville audiences to Art Nouveau, Impressionism, and other international art movements of their day; Joseph and Beauford Delaney, two of America’s most significant African-American artists; and works from the 1950s and 1960s by the Knoxville Seven, a group of progressive artists connected to the University of Tennessee who transformed and energized the area’s artistic climate. Art from more recent decades includes mixed-media objects by visionary sculptor Bessie Harvey along with a selection of works by leading area artists whose creations represent the quality and diversity of art-making in the region today.
Life Drawing class in the Foundation Visual Art & Design program at VFS

Image by vancouverfilmschool
Find out more about VFS’s one-year Foundation Visual Art & Design at vfs.com/foundation

